EDNA & HARVEY: THE BREAKOUT
by Daedalic Entertainment
Walkthrough by MaGtRo February 2011
Gameplay: The main menu has
options, new game, load and quit selections.
Options menu has music, text on and sound on
selections.
During gameplay, the main menu is accessed by the
ESC key.
There are 9 slots for saved games. The saved games
can be overwritten.
Actions: The bar at the
bottom of the screen has the interaction selection text buttons at left and
inventory at right.
Select an interaction button and then left click on
the item on the screen you want it to apply to.
Left click is to do the action and right click is
the default action "look at". Use the right click to get information about the item.
Press the space bar to see all the active spots in
the screen.
Inventory: The inventory at
bottom right is opened when the cursor hovers over the inventory bag icon at
bottom right or when you click on the inventory picture.
Items can be combined in inventory by selecting an
item and clicking it over another item.
Tempomorphing:
Tempomorphing is when Edna and Harvey go to the past. During this process,
there is a character picture at bottom right of screen. Clicking on the
picture changes the active character playing on the screen.
Dialogues: Clues are
obtained by talking to other characters completely. The dialogue will end when
the last dialogue is selected. Use the period key or right click to skip over
a dialogue line.
See a ship sailing
through the sea of a nightmare. Edna roars.
Doctor Marcel enters
and checks on Edna.
ASYLUM
Get out of the tower.
Where is Edna?
Harvey:
Open inventory and talk to Harvey. Learn that they are in an asylum and
the rabbit is Harvey.
Edna has lost her
memory and that Harvey will help restore her memory and escape from the
asylum.
Look around the room.
Right click to look at the padded wall, the table and the locked door.
Right click the grate
and the guard talks to Edna. Talk to door. :)
Find a way out of
cell:
Guard:
Talk to grate to have a conversation with the guard again.
It is hot in here
because the AC is turned off. Learn about the ventilation shaft and AC behind
the padding.
Talk about skillfully
guarding the door. Learn about mini golf and praise the guard. Ask where
he got the Babbitt and Son golf club. Learn that his father is Geoffrey Francis
von Babbitt Senior.
Chair:
Right click the chair and the leg of the chair. Pick up leg of chair.
Use leg of chair on
the grate or on the table. Edna breaks the chair leg to get broken chair
leg.
Padded walls:
Use the broken chair leg on several pads on the wall. Edna rips the pads.
Take note of the
one at third from top left side of the back wall. See that the label of this
torn pad is different - torn up pad.
Air condition:
Right click the grate again.
Ask the guard to turn
on the AC. Talk about mini golf. Be nice to the guard. Then about mini golf
and being dizzy.
The guard turns on the
AC.
See padding fall from
the torn up pad. It is now labeled airy gap.
Use the broken chair
leg on the airy pad.
Grate:
See a grate. Walk to fan. See a ventilator.
Right click or pick up
a screw. Harvey says that Edna can pick up a screw before without a tool.
Use Harvey on a screw.
Harvey says that he has to be shown things that reminds Edna of the past and
he can tempomorph them to the past.
Use Harvey on a screw
again to tempomorph to the past.
Tempomorph to the
past and get a Harvey ability:
It is now 10 years in
the past and in a locked basement.
Edna was punished by
her father for a trick played on Alfred Marcel, the son of the doctor in
charge of the asylum.
Read the hint about
actions while in tempomorph. Harvey can collect item by drag drop to Edna or
to a square at bottom of screen.
As Harvey:
Click on Harvey icon at bottom right. Look around by right
clicking things in the basement.
Learn how Edna can
remove screws:
Walk upstairs to
locked door. Check - right click the handle and the screws.
Click-hold-drop the
screws in inventory.
Walk to out - go
downstairs to Edna. Click-drag the screws on Edna to tell Edna how to get out
of here.
Right click the
window. Take the rake and drop it on Edna.
As Edna:
Click on Edna icon at bottom right of screen. Pick up and then use
the rake with window.
As Harvey:
Walk to window. Look around outside and right click everything.
Walk to the back of
the house. See Mattis, Edna's father and Alfred, the doctor's son eating ice
cream.
Walk to newspaper on
the table. Right click and then place Article 2 in inventory. Learn how
the chestnut burglar escaped from prison using his nail. Read article 1 and 3
also. :)
Walk to back door and
inside the basement window.
Use Article 2 on Edna.
Now Edna knows how to remove the screws.
As Edna:
Get toenails in inventory.
Walk to locked door.
Use toenails with screws. Exit the basement automatically.
Edna would have liked
to explore her past but is automatically brought back to the cell.
Escape the cell:
Screws:
Walk to fan.
Open inventory and see
Harvey Ability 1. Click-use Harvey1 and get a toenail.
Use toenail on all 4
screws. The grate is removed and see the ventilation fan.
Turn off the fan:
Walk to cell.
Right click the grate
over the locked door.
Talk to the guard
again. Ask about mini golf and then his father. This time be nasty and select
whack it across your skull.
The guard turns off
the fan.
Fan:
Walk to fan. Use fan and Edna asks Harvey to help push the fan.
Dr. Marcel's office:
Chute:
Walk to chute.
Go left and hear Dr.
Marcel talking to Hulgor. Learn that the Doctor is afraid that Edna still
remembers something that Marcel is hiding and that Edna's father is a
convicted murderer.
Office:
Look at grate and see that Marcel and Hulgor are gone.
Use toenail with
grate. Walk to office. Look at everything.
Read the newspaper
clipping above the fireplace and learn that Mattis Konrad confessed killing a
boy. Edna was placed in the asylum.
Check the 3 photos on
the fireplace mantle and see 3 photos of a boy. One photo shows Edna.
Pick up the
encyclopedia left of the photos on the mantle.
Look at the diploma on
the wall and signature comment is made.
Pick up the polo
mallet left of the diploma and the ballpoint pen from the desk.
Hulgor:
Walk to door. Edna
goes out and back in immediately followed by Hulgor.
Talk to Hulgor. He
wants Edna back in her cell.
Use the polo mallet on
Hulgor. Watch.
Open the cabinet. Pick
up Hulgor and automatically place him inside the cabinet. Right click to close
the cabinet.
Walk to door.
Look around:
Utility room:
Walk to door across the hallway.
Right click the light
switch left of the door and look around.
Look at all the items
on the shelves. Talk to the brain. :)
Walk to the window and
right click to open it. Go through the window.
Antenna:
Go left to roof edge. See an antenna.
Look at and then use
the antennae. Edna turns it.
See a guard watching a
TV show loose his reception. He now watches the monitors.
Roof:
Walk ahead at left and around the roof edge.
Look down and see the
area around the asylum.
Right click - look at
the distance and see the forest, church and town.
Grate:
Check the grate right of the windows.
Use Harvey 1 in
inventory to get a toenail. Use the toenail with the grate.
Enter and go right to
the chute. See that this is the other end of the chute where Edna was. Now the
path is opened to the roof.
Babbitt, the
mini-golfer guard:
Enter Dr. Marcel's
office and then exit through door.
Go down the hallway
and see the mini golfer standing guard by Edna's cell.
Chase:
Walk around the corner. Babbitt chases Edna.
Walk to utility door
at right and enter. Try to go out the window. If slow, the Babbitt enters the
room. Watch the confrontation.
Immediately when able,
walk to exit through the opened window.
If not fast enough,
you are brought back to your cell. If so, go through the chute again and out
to Marcel's office. Go around the corner to be chased by the guard again.
Once on the roof edge,
learn that Babbitt is afraid of heights.
Go back around to the
grate. Enter through the opened grate and right to the chute.
Enter Dr. Marcel's
office and exit through door.
Plant:
Pick up the plant on the column left of the utility door. The plant drops to
the floor and is broken.
Use the column and
automatically Edna pushes it under the handle of the utility door.
Use the encyclopedia
from the office with the column to prop the handle. Now Babbitt is trapped.
Find the main exit.
Look around:
Walk to hallway and
around the corner and check Edna's cell at end of the hallway. It is locked.
Third level:
Walk to stairs at next. Look around.
Surveillance
room: Look at the viewing window and see the guard. If
you want you can go in and see-talk to the guard.
WC:
Walk the hallway around the corner. Enter the WC. Check the mirror,
soap, sink and towel dispenser. Exit.
Break room:
Enter the door at right. Look around.
There's a bubble gum
dispenser here. In the cabinet is a Chocolate Chunks Cornflakes box. It is
made up of industrial foam and sugar. It also has a surprise in the box.
Second level:
Go back to the stairs and walk down the stairs.
See a locked grill
door with rooms beyond. There's a locked door left of the grill door.
Shock therapy room: Enter the room at right with the electricity sign on
the door.
Look around and see
where electric shocks are given to patients.
Edna says she needs
someone who knows his way around these things.
Exit and go down the
stairs.
First level:
Look around.
See Bruce Broker with
a phone receiver and a door in the hallway. They are behind locked grill door.
Walk to down stairs.
Main level:
Go through the double doors at left.
Uh oh! Talk to the
guard behind the glass partition.
Another security guard
is called to take Edna back inside. It is his first time to handle an escaped patient, he brings Edna to the area of other patients.
Find the patients that have a ticket for the laundry lift.
First level laundry room
entrance:
Be at the recreation
room. Walk to the double doors at left. Enter the door with the sign - Staff only - at
left.
Look around. Try to
enter the laundry lift.
Talk to the Ticket
Inspector completely.
Learn about the
laundry lift as a system that goes around the building. The lift stops here (first level),
basement and the second floor.
Learn that #2 ticket
holder is the next one that can use the laundry lift. The ticket holders are
Mr. Frock who has a season ticket; Professor Nock who visits his Peruvian
amber mine and Aluman has the third ticket.
Talk to the ticket
inspector again. Learn about the nervous guy.
Exit and go through
the double doors again.
Recreation room:
Look around the rec
room.
Droggeljug:
Talk to the man guarding the padded tent.
He would not let Edna
enter the tent. Edna says to make him earn his respect.
Aluman:
Talk to the man by the window completely.
Aluman sees the aura
and chi of Edna. He wears aluminum.
Learn about King
Adrian who was hit by lightning and became psychic. He wins all games and has
a gold prize.
Learn the reason
for the coat hanger.
Telephone:
Go right of Aluman to the telephone area.
Check the phone and
see that it does not have a receiver. The cable is cut.
TV Room:
Go through the double
doors at right.
Bruce Broker:
Try to talk to the man holding the phone receiver. He is obsessed with his
stocks.
Professor Nock:
Enter the door at right.
Talk to Professor Nock.
Learn that he is interested in dinosaurs. He would not allow the channels to be
changed until he learns that the dinosaurs are extinct.
Use the TV and the
channel is moved to the stock channel. The show is about buying and selling stocks.
Talk to Professor Nock
again. Learn about his use of the laundry lift. He would not lend his laundry
lift ticket because he needs to get to his mine. His research is about dinosaur
breeding. He says that dinosaurs hatch from occlusions in amber.
Get the receiver:
After watching the stock channel on TV, go back out and talk to Bruce Broker
again.
Select Buy or Sell
dialogue repeatedly. When the choice of "Look Brucey! It's a boy" dialogue
appears - select it.
The phone call results in his loss of everything in the stock market. He gives the
receiver.
Get a dinosaur occlusion in amber.
Get Amber:
Phone area: Exit the area and be
back at the rec room.
Go to the phone at right of Aluman.
Use the phone receiver
on the fork or pay phone or cable.
Look at and then pick
up the coin from the coin chute.
Occupational therapy
room: Walk to rec room and
then through the double doors at left.
Enter the door at
right. Look around.
Beeman:
Talk to Beeman completely. Learn his reason for wearing the bee costume.
Learn also about his
earwax output triggered by hot beverage (like coffee) allergy.
Bar: Go through the door at
back wall. Look around.
Try to pick up the
spoon-shovel in a barrel.
Talk to the barkeep.
He would not give a drink until the other customer is taken care of.
Peter:
Talk to Peter. He is depressed and it is his birthday today.
Get coffee:
Go through the door at back. Be in a coffee room. Look around.
Pick up the cup
from the floor. Use the cup on the chute of the coffee machine.
Use the coin taken
from the phone with the coin slot. Take the coffee.
Walk to the door and
be in the bar. Exit at right.
Occupational therapy
room: Give the coffee to Beeman.
He gives back the cup
filled with earwax.
Take the pinking
shears from the table.
Get dinosaur for the amber:
Toilet: Exit through door at
right. Enter the door at front left and be in a toilet.
Right click the light
switch right of door.
Talk to Petra who
prepared a surprise party for Peter. Learn about the dangerous key master at
the second floor.
Take the bean dip
from the table.
Exit the toilet.
Bar:
Enter the door at
right to the occupational therapy room. Then go through the door to be at the
bar.
Use the bean dip on
Peter. He will rush out to go to the toilet.
Pick up the cocktail menu at right side of the bar. Right click the menu in inventory
and learn that there is only one selection in the menu - Stinkydrink.
Talk to the barkeep
and order stinkydrink. Get stinkydrink and a straw.
In inventory, combine
the stinkydrink and the straw to get Edna to drink it.
Check inventory and
see a fly that was in the drink.
In inventory, combine
the fly with earwax to get fly in earwax that resembles being covered
by tree resin.
Toilet: Exit the bar and the
occupational therapy room. Enter the toilet at left.
See Peter and Petra. Pick up chips
in front of the lovebirds.
Ride the laundry lift.
Get laundry lift ticket:
Professor Nock:
Go to TV room via rec room and through double door at right. Enter door at
right.
Use the fly in earwax
with Professor Nock - dino DNA.
He gives his laundry
lift ticket to Edna. The ticket is a coat hanger. Check inventory and see that the
coat hanger is labeled 3.
Aluman:
Exit the TV room and through the double doors.
Remember that the next
in line to ride the laundry lift is #2.
Use coat hanger 3 with
Aluman. Edna exchanges the coat hanger 3 with Aluman's coat hanger 2.
Ticket Inspector:
Go through the double doors at left. Enter the laundry room entrance (Staff
only) door at left.
Use coat hanger 2 on
ticket inspector. You may pass.
From now on, just click on the laundry lift to enter-use it.
Mr. Frock:
Walk to laundry lift.
Talk to Mr. Frock who
lives here in the lift. he has not seen the sun in a while that is why he's pale.
There are 3 exits of the lift; one is at the
laundry in the basement.
Check the second floor:
Second floor laundry lift exit:
Be at the second floor laundry lift exit. Look around.
Electricity meter:
Look at the electricity meter. With the lights off, see that the power usage
is in the acceptable range. Edna automatically turns on the light, looks at
the electricity meter and says someone leaves the light on all the time.
Turn off the light switch.
Exit the room.
See that Edna is in
the hallway with rooms behind the locked grill gate.
The laundry lift exit
is the far right door.
Toilet:
Enter the front right door. Turn on the light switch left of the door. See that there is a
hose on the left wall. Exit the room.
Solitary padded
cell: Enter the front left door and see a viewing window
into the solitary cell.
Look around. Play with
the alarm button. Turn on the light switch.
Key master:
Look at the viewing window and talk to the Key Master. He knows about a lot
of things about Edna.
His plans on how to
get out of the asylum are:
- Get to the other
side of the bars.
There is a way out via
the laundry lift system at the third exit at the basement. You need a
soft padding to drop down to the basement exit or you will break your bones.
- Get a copy of the
master key of the building which also opens his cell door.
Find the original
master key. Bladder the guard at the control room on the third floor has one.
Maybe he can be distracted.
Make a clay mold of
the master key. This asylum is built on a clay packed layer of earth.
Use gold for the copy
of the master key. Get Adrian's medal from the jigsaw contest. That might be
difficult because of his mind reading act.
- Get a vehicle.
Continue to talk to
the Key master again. He is dangerous (as Petra mentioned also).
Learn about the death
of Alfred, Dr. Marcel's son and an altar.
Get to the other side of the bars.
Get a soft padding:
Hoti and Moti:
Exit the solitary cell room. Walk to end of hallway.
Talk to Hoti and Moti, the Siamese twins
lying in bed. They are wearing only one sweater and are in in the only bed
that has a blanket.
We need that blanket
and we need the twins off the bed.
Use the pinking shears
on Hoti and Moti. They are not Siamese twins anymore.
Exit the room and
enter any of the other rooms. Come back to this room afterwards.
See that Hoti and Moti
are gone. Try to take the blanket but it is too bulky for Edna to carry.
Use the chips taken
from the surprise party toilet with the blanket. Now it's dirty and will need to be washed.
Get to the other
side of the bars via the third exit at the basement.
Go back to the far
room at right side of the hallway and be at the second floor stop of the laundry
lift system.
Walk to laundry lift.
See Mr. Frock again.
You hasten the trip by:
- talk
to Mr. Frock and click on the dialogue: Isn't the next stop due soon.
- wait
and Edna will say the next exit is approaching.
At the laundry room in
the basement, walk to down - click on the blanket on the floor close to the
stairs. Edna will jump off the laundry lift.
Climb the ladder and
go through the double doors. Now you are under the
free area of the building.
Get a copy of the master key of the building.
Find clay:
Furnace:
Go down the stairs and enter the furnace room left of Dr. Marcel's
caricature on the wall.
See the furnace with
blazing fire.
Cellar:
Walk down the ladder at right. See a hole in the ground surrounded by broken
spoons.
Talk to the hole. Meet
Almilio - Almighty Ruler - Almo who is digging a tunnel. He reached a layer of
hard clay and needs spoon.
The master key is held
by Bladder, a guard. Climb up and then exit
the furnace room.
Look for spoon:
Climb up and then exit
the furnace room. Walk the stairs up and then the stairs at far right.
Kitchen:
Enter the room at left across the other padlocked exit out of the building. Look around
the kitchen.
Walk to the menu board
at left and see that today is free choice day.
Look at the cutlery
cupboard at top left. Pick up the cutlery cupboard to get knife and a
fork.
Look at the pot
at left and the potholder on the wall to take them.
Dining room:
Walk to the door at left and be at dining room.
Look at the ketchup
and the mustard on the table to take them.
Find Dr. Marcel's
altar to his son:
Dr. Marcel's
office: Exit through double doors at right. Climb the stairs
to the topmost floor.
Go left to hallway and
enter the office at left.
Look at diploma on
wall and see Marcel's signature.
Check the locked
drawer under the diploma on the wall. Use the knife on the locked drawer.
Pick up the drawer to
get the old key inside the drawer.
Locked door at
second floor: Exit the office and go down to the area
with the locked grilled door 2 floors down.
Use the old key on the
locked door left of the grill door.
Look around the room.
Looked at the portrait of Alfred. Edna is saddened. Talk to the portrait of
Alfred.
Check the urn and then
talk to the urn. Check the pictures left of the portrait, Poozie the bear and
other toys.
Forge signatures:
Look at the homework ledger on top shelf of the glass case. See that Mattis
Konrad's name written by Edna. Harvey remembers the day that he taught Edna to
forge signature.
Tempomorph to the
past to get Harvey ability 2:
Use Harvey from
inventory on the homework ledger. Tempomorph to the past. Be in Mr. Hornbush
math class.
Get Edna in the
cabinet: Harvey has to do this by himself. Look around.
Take the note
from Edna's bag and use the note on Edna. Take the note again and place it on
the bottom frame.
Walk to hole in the
cabinet at left. See a letter in Hornbush's coat pocket.
Look outside the
window. Place all active spots on the bottom frames: playground,
merry go round, circus, ice cream stand, Ferris wheel,
sun and pond.
Use any of those items
with Edna. Alfred snitches on Edna. Hornbush says after the third distraction,
Edna will be placed in the cabinet.
Use 2 more items on
Edna until she is placed inside the cabinet.
Letter:
Walk to hole and use the letter from Hornbush's coat on Edna.
It's too dark here.
Take the hole on the cabinet and use it on Edna. Harvey reads that Dr. Marcel is
paying Hornbush to hold back Edna in class and not to let her out when the
weather is good.
Learn to forge
signature: Take Hornbush and place his picture at bottom
frame. Walk to hole.
Use Hornbush on Edna
to get her back in class.
Use note from Edna's
bag on Edna. Harvey tells Edna to forge his father's signature.
Now Edna can forge
signature just by looking at it.
Back at the altar
room; see that Harvey 2 ability forging signature is now in inventory.
Go back to the area
behind the bars:
There are 2 ways you
can go back to the area behind the bars or the patient area:
- Go back down to the
basement laundry lift stop via the hallway right of the kitchen or right of
the main stairs of the building.
Stand on the platform close to the double doors and lift bar. Use the coat hanger 2 on the laundry lift
system bar. (Recommended.)
- Exit the main double
doors left of the main stairs of the building and get caught by the guards.
Get a spoon:
Bar:
Exit the first floor laundry entrance and enter the door across the hall. Go to the bar through
the door at back wall.
Try to pick up the
spoon-shovel in the barrel. The barkeep stops Edna.
In inventory, use
Harvey 2 ability on the cocktail menu. The barkeeper's signature (pen
with x x x) is now in inventory.
Use the barkeeper's
signature with the cocktail menu. I selected to write x x x.
Order a drink from the
barkeeper. Ask for x x x or whatever you forged. The bar keep does not have the ingredients for that drink and goes down to his cellar behind the bar to get some.
Pick up the
spoon-shovel from the barrel.
Get clay:
Exit the bar and take
the laundry lift to the basement laundry (2 stops away).
Climb the ladder and
go down to the furnace room at left. Go down to the cellar via ladder.
Use the shovel on the
hole to give it to Almilio.
Climb up the ladder
and then go down again.
Pick up the small
pile of dirt-clay in front of the hole.
Distract Bladder
the guard:
Climb out of cellar
and then basement to the main floor of the building.
Go down the corridor. Climb the main stairs until the surveillance room (third level) where Bladder is sitting.
Enter the surveillance room. Check the trash can and the water cooler.
Talk to Bladder. Learn
that he drunk all the water from the cooler and is called Bladder for his
capacity.
Try to get Bladder to
go by selecting dialogues. It doesn't work.
Look at the monitors
and learn that staring at the monitors long enough can be hypnotic. After a while you will start seeing letters.
Monitors:
See that the lit monitors can form 2 letters. Try to see which
monitors should be lit or unlit to form W C.
Room lights:
The bar light should be on (small monitor at second from left column).
The
laundry lift room at second floor (top monitor second from left column) should
be off.
The TV room light (monitor middle at last column) should be off.
All the rest of the monitors should be
on.
Check those rooms that
need to have light switch adjusted.
When correctly done,
watch Bladder see the letters WC on the monitor and runs out. He could not hold it anymore.
Get a mold of the
master key:
Imprint: Exit the monitor room.
Go around the corner and enter the WC.
See the master
key under a stall. Try to take it and learn that it is attached to Bladder's belt.
Use the sink to get
water pouring. Use the clay from inventory with sink.
Use clay mass
with master key to get imprint.
Get gold for the copy of the master
key.
Get to see King
Adrian:
Break room:
Exit the WC. Enter the break room at right.
Use the cabinet above
the sink to open it. Pick up the chocolate chunk cornflakes box. The ingredients
are industrial foam and sugar; there's a surprise in the box.
Use the cornflakes in inventory to
open it. For fun - try using knife, scissors or broken chair leg to open the
box. Get a police badge as a surprise.
Mold: Go down to the
furnace room at the basement.
Open the grate using the potholder from the kitchen.
Use imprint in the heating furnace. Use potholder on
mold to take it out of the fire.
Get back to rec
room: Go to basement laundry and ride the laundry lift to where
the ticket master is located or go through the double doors at main floor.
Droggeljug:
Talk to the man guarding the padded tent.
He would not let Edna
enter the tent. Edna says to make him earn his respect.
Use the police badge
on Droggeljug. Edna is now an FBI sergeant.
King Adrian: Enter the
residence. Talk to King Adrian.
Play with him twice and lose twice. Learn from King
Adrian how he got his abilities (why must I always lose). He was struck by
lightning (as mentioned by Aluman in previous talk).
Exit the tent.
Aluman: Talk to Aluman
about beating King Adrian.
He has a plan to give electroshock therapy to Edna
so that she also gets psychic ability.
But before that, he needs a better coat hanger to be
able to use the laundry lift system.
Get a better coat hanger:
Since the better coat hanger is #1. Ride the lift
system.
See that Mr. Frock uses coat hanger #1. Use the ketchup taken from the kitchen with Mr.
Frock. Now he's not clean.
Ride the laundry lift system until the basement
laundry. Go down.
See Mr. Frock inside the washing machine. Pick up coat hanger #1 on the clothes bar.
Go back to rec room and use coat hanger #1 with
Aluman.
He says to meet him at the shock therapy room.
Get shocked:
Go to the basement exit of the laundry lift system
and walk up.
Go to main level and climb the stairs to the second
level (two flights of stairs) to the area with the locked grill door and door
to altar room.
Enter the room at right with electricity sign on the
door.
Automatically be on the chair, Edna and Harvey are
shocked!
King Adrian round 1:
Go to rec room and talk to Adrian in his tent. Play coin toss several times with him and win but he
wins back when it is his turn.
Exit the tent.
Look for a way to win:
Patient records: Ride the
laundry lift to the basement exit. Enter the door across the furnace room.
Take the form on top of the file cabinet by
the door. Look at form in inventory and see that it is therapy registration
form but is unsigned by the psychologist.
Use the file drawer. Pick up the drawer to get Edna
see that it is patient records.
See a list of the patients.
Select a patient and
learn what is in their record. Do this for all the patients.
Beeman: Pet is black pony
and comes first in physical education lesson.
Adrian: Pet is red cat and
comes second in physical education lesson.
Drogglejug: Pet is green dog and
comes third in physical education lesson.
Peter: Pet is blue goldfish
and comes next to last in physical education lesson.
Hoti: Pet is yellow rat and
comes last in physical education lesson.
Get the form signed: Exit
the basement and go upstairs to main level. Climb the stairs until the very
top floor and around the corner.
Enter Dr. Marcel's office at left. Look at the
diploma on the wall and see his signature.
Use Harvey 2 counterfeit signature on diploma. Edna
says she can now forge Marcel's signature. LOL!
Use the Marcel's signature pen with the form to get
signed form.
Therapy: Go down to main level. Enter the double doors left
of the message board at back left of the stairs and be at the kitchen.
Enter through the double doors at left. Read the
doorplate below the room A22 and see that it is the group therapy for game
designers.
Enter and be allowed to participate in the group
therapy of video designers after Edna shows the signed form.
Answers to give when questioned are:
You are Adrian, king of the recreation room.
I was always picked second during gym class.
Color of pet if it is a dog is green.
Listen to the analysis. Just let go. Edna (or
Adrian) is cured.
Cure King Adrian: Go back
to Adrian at the rec room.
Ask Adrian - Which place were you picked for a team
during physical education class?
Edna asks about his dog. Adrian asks you what color it
should be. Answer the color of his pet - red.
Adrian now feels understood and knows his problem.
He knows to relax now. Adrian is cured.
Try to play once more. Adrian loses. Edna is the
King and gets the gold medal.
Get gold key:
Make gold key: Ride the
laundry lift. Go to the furnace room at the basement.
In inventory combine the pot from the kitchen and
the medal to get medal in pot.
Use medal in pot with heating furnace. Use potholder
with pot to get steaming pot.
Use steaming pot with mold in inventory to get
steaming mold.
Get gold key: Go to any
sink (kitchen or toilets). Use the sink to run water.
Use the steaming mold with the sink with running
water to get cooled mold.
Use cooled mold to get gold master key.
Get a
vehicle.
Find a vehicle:
Outside: Go to the locked
door in the corridor across the kitchen coming from the basement.
Use the master key with the padlock. Exit and look
around.
Dr. Marcel: See Dr. Marcel comes
back in in his chauffeured sedan.
He asks why patient's lunch are not being served.
Babbitt reports that Edna escaped.
Pick up the trashcan lid and see the trash full of
master keys.
Van: Go to the garage. Look
at the window of the van. It is partly opened and the car door is locked.
Use a coat hanger on window. Use car door and Edna
says to get help.
See that the van is missing a wheel. Pick up the jumper cables and wrench
from the floor.
Sedan: Go to the sedan of
Dr. Marcel parked at side of the building.
Pick up the spare tire or use the polo mallet or the
broken chair leg or knife or fork on the sedan and the alarm goes off.
The driver arrives to check.
Find help:
Enter the building and go to the basement laundry
lift. Try to use the lift and see that it is turned off. Have to find another way to get around.
Key Master: While the driver is
out checking the car alarm, and go to the main stairs down the corridor. If he is back, set off the sedan's alarm again.
Climb up to the second floor. Use the master key on
the grate lock.
Enter the solitary room at left. Talk to Key Master
through the window.
Use the master key on the locked door. Talk to Key
master. He will meet Edna at the garage.
Distract the guard: Go down the
stairs and see that the driver is standing guard at bottom of the stairs.
Go up the stairs to the 3rd floor or where the
Surveillance-monitor room is located.
Go around the corner and enter the break room at
right.
Use the bubble gum dispenser and Edna chews a gum.
She spits it out and it hits the window.
Open-use the window and again use the bubble gum
dispenser. This time the spat bubble gum goes out the window and hits the sedan.
The car alarm goes off.
Exit the room and go down to the main level. The driver is gone.
Van: Go right of stairs and
out through the back door. Go to the garage.
Talk to the Key Master. The van needs a tire and an
expert that knows electricity that can work on the ignition problem.
Fix the tire:
Get tire: Go to Marcel's
sedan. Use the wrench on the spare tire to get the spare tire.
Go back and talk to the Key Master.
Find a car jack: Go back
inside through back door.
Enter the kitchen. The chef is busy and ignores
Edna.
Use the trolley by the door at left. Edna is under
the table of the other patients.
Note the arrangement of the patients: Beeman, Prof.
Nock, Adrian, Hoti-Moti and Peter-Petra.
Talk to Hoti and Moti. Today is free choice food
day.
Tell Hoti that there is already an escape plan and
need help with the tire of the van.
They will help if we distract the guards.
Make a distraction:
Beeman: See that Beeman's
foot is bare.
Use fork on foot and see that Beeman flips what he
is eating.
Walk to trolley and be back in the kitchen.
Menu: Walk to menu on the
board on the wall.
See the choice of food given to the patients.
Change the foods of the patients around to cause
disruption. Take a food and click it over another food label to interchange
them.
Beeman - potato for something heavy when he
flips his food.
Prof. Nock - roast chicken for something he
bends down to eat with his hands.
Distraction: Use the
trolley and be back under the table.
Use fork on foot and see that Beeman flips the
potato to hit Adrian because Prof. Nock is bent over eating chicken with his
hands. Food fight!!!!!
Install the tire: Edna
stands outside the kitchen door. Exit and go to the garage.
Talk to Hoti. Give the spare tire to Hoti. Hoti
and Moti install the spare tire.
Get expert on electricity:
We need Aluman to help as the expert in electricity.
He is not in the rec room the last time we were there and he is not at lunch.
Distract the driver: Go
back inside and go to the main hall down the corridor. See that the driver is
standing guard.
Go back out. Use the polo mallet or the broken chair
leg or fork or knife on the sedan and the alarm goes off.
The driver arrives to check. Go back inside and climb the stairs.
Find Aluman: Use the master
key on the lock on the first level.
Enter the TV room at right. See Aluman getting
energy from the TV pattern. Talk to Aluman.
Learn how to open the main gate. Aluman left to take
a look at the car in the garage.
Look close at TV and note the pattern of
fingerprints left by Aluman on the TV screen.
Distract the driver again:
Go back down to the stairs and see the driver back at his post.
Go back up to the break room at third floor and do
the bubble gum routine again on an open window.
The car alarm goes off. Go down the stairs and out
to the garage.
Energize Aluman: Aluman is not
here. He looked at the van, cried, left and is at the garden right now.
Walk to around the house. See Aluman sitting in
front of a Zen garden.
Talk to Aluman. The Zen garden charges Aluman with
cosmic energy but it is not flowing right now because the stones are not
attuned with Aluman.
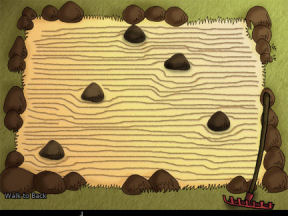
Arrange the stones to attune with Aluman:
Go right to the garden by the wall. Pick up the
rake. Go back to the Zen garden.
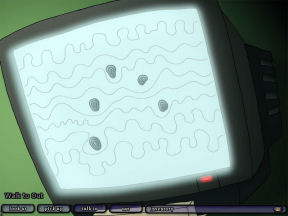
Walk to and look close at the Zen garden. Remember
the fingerprint pattern left on the TV screen.
Arrange the stones to be similar to the fingerprint
pattern.
Then use the rake on the Zen Garden to make the wavy
lines of the TV pattern.
Talk to Aluman again. Ask about the pattern that
I've raked. This is exactly what he needed. It vibrates with his chi.
Charge the battery: Go back
to the garage at left.
Talk to Aluman. Use the jumper cable on him. Aluman
charges the battery.
Open the main gate:
Walk around the house again and be at Zen garden. Go
to the watchtower by the gate.
Enter through the door with Keep Out sign. Look
around.
Open the locker at the landing. Leave it open.
Go upstairs and the guard hears Edna.
Immediately go down and walk in the locker to hide.
As soon as able, immediately climb upstairs and
press the green button on the panel.
Immediately use the pinking scissors to cut the cable
hanging underneath the panel.
OUTSIDE THE ASYLUM
Go home.
Edna is caught by the guard and thrown out of the
watchtower. The gate is still open.
The 2 guards hear the sound of a car running. They
approach the garage while Marcel's sedan goes through the open gate.
Where to? Edna wants to go home to clear her
father's name. Key Master turns out not to know how to drive and they
crashed.
Explore the area:
The car wreck-sedan is totaled and lying partway in a pool.
Hoti and Moti: Walk to sedan.
Talk to Hoti and Moti. Aluman had an epiphany. Key
Master is gone. There's a roadblock ahead. They decide to stay in the car wreck.
Moti made a card game that one needs to guess where the ace of
hearts is located. When you win you get an electric shock given by the car.
Trunk of car: Use the trunk
of the car. Pick up the trunk and get the towing rope.
Church: Walk up to the bank. Go right down the street.
See the church behind a wall and across the river.
This is the one seen from the rooftop of the asylum tower. We need to go
there.
Roadblock: See a van and Bladder the surveillance guard is doing his thing by the railing. Go back to the street.
Aluman: Walk to stairs on the
cliff side and across the road from the bank-car wreck.
See Aluman. Beside him is an antioxidant.
Talk to Aluman. Learn about his vision and knows how
to be converted to pure energy. He has to be hit by lightning.
He will give the antioxidant only when he gets hit by
lightning.
Walk down the stairs.
Riverside walk: Go down the bank-car wreck. Walk right to
Riverside walk.
See something pouring from the bridge above to the river. Guess what. See
the wall of the church at other side of the river from here.
We have to get to the other side. Go back to the pool. Walk up to the bank.
Remove Bladder from here:
Walk down street towards the van. See the church
behind the wall at other side of the river.
Bladder the guard is still going by the bridge railing. We have to remove him to get across the river below the bridge.
Van: Walk to the van. Walk to
the drivers cab and see a close-up of the dashboard.
Press the space bar to see all the active
areas.
Release-click the parking brake. Press the clutch
pedal and immediately click-change gear shift to neutral.
The van rolls away and Bladder runs to follow it.
Get to church:
Bridge railing: Use the towing
rope on the bridge railing.
Church gate: Go back down the
street and down to the bank-crash site.
Go right to riverside walk. See the towing rope
hanging from bridge railing.
Click on rope to walk across the river. Edna swings to
the other side.
Go right and check the gate of the church. The lock is
rusted tight.
Remove rust from church gate:
Play Moti's card game: Go
back across the river and back to the crash site.
Talk to Moti and play his card game.
Find where the ace of hearts is on the 5 cards he is
holding.
Click to select the card. Win 3 in a row and you will get
zapped.
When asked by Moti if you are sure of your card -
watch blonde Hoti's eyes and see it blink up and then down when you clicked on
the correct card. If his eyes stays the same, the card is wrong.
After you win, you get an electrical shock from the
car.
Get antioxidant from Aluman:
Go across the road and up the stairs.
Touch or use Aluman to give him a small buzz of
electricity.
Talk to him and tell him he was hit by lightning. Take the antioxidant.
Church gate: Go back down and
across the road to the bank-crash site.
Go right to the riverside walk and across the river.
Go right to the church gate. Use the antioxidant on
the gate. Go through gate.
Explore Church:
Outside: Look at the graves
at the cemetery by the gate.
The middle grave is Mattis Konrad's, Edna's father. :(
Go left and forward to the other bigger gate-church
door. Look through. The road leads to Edna's home behind the gate.
Enter the church using the door.
Inside: Look around. Check the
cross, altar and pulpit.
Reverend: Walk to door at
right of pulpit. Talk to the Reverend.
He recognizes Edna. He was about to tell what happened
to Mattis and why he has become a legend. He believes that Mattis is innocent.
The organ sounded outside. The priest left to check before he finished his
story.
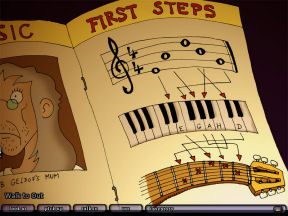
Look around the room. The priest likes music and
musical instruments.
Look at the book on the stand by the door. See musical
notes E G A H (B) and D that is labeled on a keyboard and the strings of a
guitar.
Guitar and amplifier: Pick up
the headphones from the floor and the amplifier-guitar by the
couch.
Edna automatically plugs the amplifier by the
pulpit. Turn on-click the guitar amp (see red light on amp).
Organ: Go to back of church.
See organ pipes on the choir area.
Climb the stairs. See the organ. Check the hatch on
the wall left of the organ. It is the opening to clean the pipes that extends
above.
There's a tape recorder right of the organ.
Find a way to get out while keeping the Key Master
in:
Key Master: Climb the ladder
at right wall to be on the top balcony.
Oh No! The Reverend was hanged by the Key Master. The
Key Master blames Edna for setting him free.
He locked both of them in the church. He gives Edna the puzzle of her exiting while keeping him inside.
Belfry: Climb the far ladder.
Look at distance and see lightning flash. Aluman is on
his way to becoming pure energy. Look at distance again. :D
See the bell. Use the polo mallet on the bell.
See that the Reverend swings. Key Master does not like
the noise.
Go down twice until the organ.
Organ: See a close up of the
keyboard of the organ.
Flip the red switch at top left. Press any of the keys
seen on the sheet in the Reverend's room - E G A H (B) or D.
The label of the keys are seen at bottom left of the
screen.
See that the organ is connected to the guitar by the pulpit. They play
the notes at the same time and it reverberates through the church.
Elevator music for the Key Master:
The Key Master wants Edna to stop making noise.
Check the tape recorder right of the organ. It plays
elevator music.
Open the hatch left of the organ. Place the headphone
on the open hatch.
Use the headphone and Edna automatically plugs the
other end to the tape recorder.
Look close at organ again. Press the first b key at
left area of the keyboard.
See the headphone shoot up to top balcony beside the Key
Master.
Play the Reverend's music: With the red switch at top left pressed down, press all of the keys seen on the sheet
in the Reverend's room - E G A H (B) and D. The label of the keys are seen at
bottom left of the screen.
The one rabbit band plays. The Key Master screams to stop it.
Bell: Go up the ladder and
see that now the Key Master is wearing the headphone.
Climb the far ladder to the belfry. Use the polo mallet on the bell. See the Reverend
swing again. A scream is heard.
Go down to the main church floor. See what happened to
the Key Master. Harvey has a faint recollection of something.
HOME
Find a way in:
Edna and Harvey are in the front door of Edna's home.
The door is locked.
Gnomes: Look at one of the
gnomes and Edna says that one of the gnomes has the key.
Use the polo mallet with the order gnome that is on
the pillar. Edna will smash all the other gnomes first. Automatically pick up
the key from the last destroyed order gnome.
Pick up clay shards of the destroyed gnome.
House key: Use the house key
on the door. It breaks inside the keyhole.
Go around to the back of the house. Look around at the
furniture.
Go to shed at foreground exit. Enter the shed. Look
around.
Pick up the spade from left wall and the
pliers from the table.
Exit the shed and go to porch. Go left to front of the
house.
Use pliers with door to get the broken house key.
Basement window: Go around to
the back of the house twice to be at the back door.
The door is also locked. Check the barrel with water left of
door.
Look at the thistles under the window. Use the spade
with the thistle to dig them out and expose the basement window.
Use the basement window. It is jammed. Use the polo
mallet on basement window to open it.
Enter through basement window.
Look around the house:
Lower level:
Basement: Look around at the
basement. Check the items on the shelves, wood and furnace.
Kitchen: Go up the stairs. Look
around at the kitchen.
Hallway: Check the dining room at right and look
around. Look at Mattis' coats hanging on wall left of stairs.
Top level: Climb the stairs.
Study: Check the study at left. See
that it is Mattis' bedroom and study.
See Edna's picture by Mattis' bed. Pick up the
lighter from the table. Exit this sad room.
Bathroom: Enter the bathroom. Check
the tub with water.
Schoolroom: Enter the schoolroom
where Mr. Hornbush gave private math lessons. Look around especially the
chalkboard. Edna still is scared of the closet.
Edna's bedroom: Walk up to
the attic area.
Look through the window and see red lights coming
towards here.
Check the bedroom door and see that it is locked.
Open Edna's bedroom:
Go down to the bathroom. Use clay shards with the tub
to get damp clay.
Use broken house key with damp clay to get clay
imprint.
Go down to the basement. Use the furnace to open it.
Use the lighter with furnace to get fire.
In inventory, use clay imprint with furnace.
Use potholder with furnace to get mold.
Use master key with pot. Use golden key in pot
with furnace.
Use potholder with furnace to get steaming pot.
Use steaming pot with mold to get steaming mold.
Climb through basement window (or go to bathroom tub).
Use steaming mold on barrel (or tub) to get cooled off mold.
Use or click cooled off mold to get repaired key.
Use repaired key with locked back door. Enter and go to
attic-Edna's bedroom.
Use repaired key with bedroom door. Enter.
find
out what happened.
Tempomorph to the past:
Edna looks around the bedroom. Harvey tempomorphs them to the past.
Mattis grounded Edna for playing a trick on Alfred.
Alfred stands watch outside the door. Look around the
bedroom.
Diary: Check the diary on the
table at left. Edna realizes that today is the third of August, the day of the
murder that Mattis is charged with. They have to help Mattis.
Open the window.
As Harvey: Change to Harvey.
Walk to window and be on the ledge.
Look at a woodpecker tap tapping on the roof.
Click-hold woodpecker and place him on the bottom frame.
Look through the window and see Alfred standing watch
by the door.
Go back inside Edna's room.
Use woodpecker with Edna. Edna says to knock on the
door to trick Alfred.
As Edna: Open the closet
door.
Use the door and Edna knocks on it. Immediately use
the opened cabinet and Edna hides inside. Edna calls for Harvey to go in also.
Use the closet to close the door.
Alfred opens the door and looks for Edna. Edna and
Harvey go out of the room and lock Alfred inside.
Look for Mattis:
Edna will look for Mattis at top floor while Harvey
looks for him at bottom floor. They have to stop the murder.
As Harvey: Harvey is scared
because he thinks Mattis might really be a psychotic killer.
Go to kitchen and Harvey sees a vision of Mattis being
a killer of children. Harvey calls Edna. Edna leaves after scolding Harvey.
Go down the basement-cellar and see another vision.
Edna is called again.
Go through basement window and see another Mattis
vision at the backyard.
Edna and Harvey checks the backyard. Edna says to call
it a day. Harvey says to keep on looking.
SAVE GAME HERE!!!
Go to back of house around the corner. See another
vision of Mattis and the Prince of Darkness.
Hear Mattis and Dr. Marcel discussing Edna.
Mattis muses about the possibility that Alfred and
Edna might marry.
Matttis asks about character adjustment to be done for
Edna.
Dr. Marcel is doing a research on reconditioning or
correction of character.
Decision:
Mattis sees Edna and reprimands her and tells her to go back to her
room.
At the attic, Edna reprimands Harvey. Harvey states
that he is but a figment of Edna's imagination.
Watch what Alfred does.
Watch what Harvey says.
Watch what Edna did.
Listen to Dr. Marcel.
Make a decision: Replay from saved game to do both decisions.
Do what Dr. Marcel says.
Do what Harvey says.
This document may not be
distributed without express written permission of the author and the content may
not be altered in any way.
For Questions or Comments
on this Walkthrough,
Please write to:
MaGtRo
Copyright © 2/2011
MaGtRo
 GameBoomers
Walkthroughs and Solutions
GameBoomers
Walkthroughs and Solutions