Edna & Harvey: Harvey's New Eyes
By rondomedia & Daedalic Entertainment
Walkthrough by MaGtRo October 2012
Gameplay: This is a third
person point and click game.
Select the language of the game: German, English
or Russian.
The main menu has Resume game, New game, Saved
games, Settings, Credits and Exit game.
The Settings option has music, sound and language
volume adjustments. There is a choice of window or fullscreen mode,
resolution, subtitle and open inventory with a click.
Save games page has empty frames that when clicked
on will show the saved game location and the time-date. Click on save
(or load or delete) at bottom of the frame. Saved games can be overwritten
or deleted. The scroll arrow is at right edge of the frame.
A tutorial is a choice at start of a new game.
The rabbit head cursor is sometimes split into 2
parts. The left side will do action shown by a small icon and processed by
left mouse click. The right side will do other actions such as look, talk...
and is processed by right mouse click.
ESC key will open the main menu page and skip the
intro screen. Left mouse click skips the dialogue.
Spacebar will show the hotspots (shown by red
eyes) and exits in the game screen.
The dialogue bar is seen at bottom right. Hover
the cursor over the picture of the dialogue choices to see the label or
description of the dialogue. The arrow at right will bring up previous
dialogue or the dialogue tree. Click on the X at right to end the dialogue.
The inventory bar is also at bottom right
(replaces the dialogue bar when not in use). Inventory items can be combined
by clicking one item over another.
When an item is taken from inventory, the cursor
shows that item.
Chapter 1 The Convent
Lilli is the most virtuous child in the whole world.
Lilli is in a convent school.
Mother Superior scolds Lilli for whistling while
she works.
Edna arrives and asks Lilli to join her on a
treasure hunt at the garden.
If selected, a tutorial shows the game
manipulation.
Take the rake and use the rake on the left
pile of leaves. You can do 2 piles of leaves if you want. This action exposes stone
slabs.
Use the rake on the stone slabs several times and
that action makes sounds.
Mother superior gets upset and gives Lilli 2 new
tasks: the garden is to be dug again and to rid the swing tree of termite
infestation.
Perform Mother Superior's tasks.
Check the 2 new tasks:
Backyard - Garden: There
is a ball of yarn already in inventory. Go right to the garden.
Check the compost barrel and tire swing. Note the
heart etched on the tree trunk.
Talk to Edna completely. Learn that the ground is
too hard for the treasure hunt and she needs a shovel. The shovel is in the
cellar.
Check the termites on the tree trunk.
Well: Go left back to the
school pond and left again to the well.
Talk to Freeman completely. Learn that the cellar
key is at the bottom of the well and that termites love sweet things.
Tell Freeman that the well is too dangerous.
Freeman says he will not fall down the well although he is a non-conformist.
Exit the well area and hear a kaplop sound.
Help Freeman:
Go back to the well. Hear Freeman call for help.
Beehive: Check the
beehive above the well. Use the rake on the beehive and it falls into the
well. Uh oh!
Garden hose: Take the
garden hose from ground and use it on the well. Lilli places the end over
the well.
Go back to the school pond. Check and move the
bush under the window. A pump is exposed.
Unhook the garden hose from the faucet on wall.
Take the garden hose and use it on the open pipe on top of pump.
Click to turn the pump on. Hear Mother Superior's
scolding again.
Freeman: Go back to the well at
left. See Freeman loaded with bee stings and honey. He is holding the cellar
key.
Talk to an irate Freeman.
Remove termite infestation from swing tree:
Look at the beehive floating on the well water.
Go back to school pond. Look through the cellar
window left of the faucet.
See the shovel, air hammer and can of food in the
cellar.
Take the brush from the shelf below Lilli.
Honey: Go back to the
well. Use the brush on the beehive covered with honey to get honey brush.
Go back to the school pond, then right to
backyard. Note that Lilli is dripping honey wherever she walks.
Remember that termites love sweet things.
Use the honey brush on the compost pile. See the
termites move to the compost pile.
Uh oh! The termites are now following the honey
trail. Hear Freeman yell.
Freeman: Go to the well
area. See that Freeman is now a pink goo being painted on by a gnome that
Lilli sees from time to time.
Check the termites on the bench.
Pick up the cellar key from the ground.
Dig the garden:
Cellar: Go to the school
pond. Use the cellar key on the padlock of cellar door.
Enter the cellar. Look around. Check and try to
take can of food. Lilli doesn't mess with Doris the lunch lady and her
stuff.
Take the air hammer and shovel.
Check the stove and see that it is black and empty.
Garden: Exit the cellar
and go right to the backyard.
Give the shovel to Edna. They - Lilli exposes an
aerial bomb.
Use the shovel on aerial bomb to open the bomb.
Edna takes out the bomb's fuse and clicked it. The bomb is now live.
They placed the ball of yarn inside the empty
aerial bomb's case.
Mother Superior's punishment:
Hear Mother Superior call Lilli.
Mother Superior Ignatz informs the gathered
students that as punishment; games outside are now forbidden, no more dessert and bedtime
is moved up one hour.
A renowned psychologist will come to examine the
students.
Office: Mother Superior
calls Lilli to her office.
After scolding Lilli, she orders her to feed Lumpy
the cat.
Look around and check the potted plant, receipt
holder on desk, hook and painting at right wall.
Take the cat food from the dumbwaiter at
left wall right of door.
Use the cat food on Lumpy's pet bowl. Mother
Superior screams that Lumpy needs special food. She gives Lilli a recipe
that has Lumpy's food and her dinner. The recipe is to be given to Doris at
the kitchen. Learn that it is Doctor Marcel that will come to examine the
students.
Stop Gerret from spying.
Meet some of the students:
Edna: Lilli informs Edna
that it is Dr. Marcel that is coming tonight.
Edna says Dr. Marcel has an old score to settle
with her and that she needs to leave the convent. She asks Lilli to keep
Gerret from spying on her.
Check the embroidery pillow and take the
marbles from the desk at left. Exit the room.
Suka and Shy: Talk to
Suka and Shy. The 2 girls are into Japanese Shibuya power rage.
Ask about the hairpin. Suka states only in
emergency and facing death will a Shibuya girl give up her hairpin.
Exit through door to be at main hall.
Gerret: See Gerret enter, look around
and goes to the chapel.
Bullies: The stairs is
blocked by 3 male students. Shawny blames Lilli for the punishment. Memphis
is upset about not being able to play outside. Shawny takes the recipe from
Lilli.
Find out what Gerret is up to:
Chapel: Gerret is not in
the chapel and there is no second exit.
Check, enter and then exit the confessional booth
at left.
Check the bracket on the confessional booth.
Check the cross and the stone slabs on the floor.
Frank: Talk to Frank.
Learn about his interest on the Templars and the church conspiracy.
He wants a tool to find the evidence. Talk to
Frank completely.
Give the air hammer taken from the cellar to
Frank. Frank wants to know where to drill but there is no one alive to know
about this.
Frank starts to drill on the stone slabs.
Gerret: Gerret exits the
confessional booth. He can't work with the noise and leaves the chapel.
Check the door of the confessional booth Gerret
exited from.
It is a surveillance room. Take the board
from the surveillance room.
Close the door.
Edna: Exit the chapel and
go back up the stairs. Enter the dormitory and enter Lilli's bedroom.
Talk to Edna. The plan is to lock Gerret inside
the confessional booth but he won't enter the booth because of the drilling
noise that Frank is making.
Frank will not stop unless he finds what he is
looking for.
Find information to get Frank his stone slab clue:
Exit the room and the dormitory.
Main hall: Check the
chandelier and see Edna's balloon stuck in the chandelier.
Check the Last Supper painting on the wall.
Convent hallway: Go right
to the convent hallway.
Check the school clock and the 2 gargoyles on the
roof. The gargoyle on the left has firecrackers and is hanging only by a
thin rope.
Capu: Talk to Capu.
Collection room: Enter
the left door to be in the collection room. Look around.
Check the musket and scout chest by the door. The
old man hanging by the window stops Lilli from checking the chest.
Take the guinea pig jar from the shelf.
Examine the shelf space with 3 empty pedestals.
Old man: Talk to the old
man completely. Learn that he has done so many things in history. He helped
the Templars build secrets crypts under the convent chapel.
His memory aid is the 3 E's: emotion he
experienced that time (happy, sad or angry), engagement (how he faced that
situation; with strength, heroic courage or sleepiness) and fruit eaten that
day.
His 3 E's on the shelf is gone. He cannot now
recall where the clues are for the secret crypts under the convent chapel.
Find and get the 3 E's:
Masks: Go right to the main hall. Climb left to the
stairway.
See and check the 3 masks on the wall: sad, happy
and angry. The masks are screwed to the wall.
The mask says that it only needs the right tool to
use to unscrew the masks.
Find the right tool to unscrew the masks:
Go back to the main hall at right and enter the dormitory.
Ask Suka about the school bullies, hairpin and
activism.
We need that hairpin. Remember what Suka said before: only in
emergency and facing death will a Shibuya girl give up her hairpin.
Get the hairpin: Go back
to the main hall and exit to the well.
See Shawny and the remains of Freeman. Go to the
garden via the school pond.
Take the fuse-detonator beside the aerial
bomb case. Go back to the convent and the 2 Shibuya power girls at the
dormitory.
Show the live fuse to the 2 girls. Suka inserts
her hairpin on the fuse detonator to get fuse with hairpin.
Look at the fuse with hairpin in inventory. Lilli
has to find a bomb proof place to dispose of the warhead.
Take care of the live detonator:
Exit the dormitory and the convent via the lower level door.
Go to the cellar and see Memphis.
Memphis: See Memphis
inside the stove. Talk to Memphis. He is afraid of the apocalypse. He describes the stove as bomb proof.
Place the fuse with hairpin inside the stove.
Lilli takes the hairpin from the fuse and closes the stove door.
3 masks: Go back to the
convent and up the stairs to the stairways at left.
Use the hairpin on the 3 masks to get: sad mask,
happy mask and angry mask.
Get 3 fruits:
Go back to the main hall at right. Go down the
stairs to the cafeteria at right.
Take banana, coconut and apple
from the buffet.
Get 3 engagement icons:
Mother Superior Ignatz:
Talk to Mother Superior who is drinking her calming tea. She mentions about
the banners on the wall. They show superiority, strength and self control.
The self control banner is missing. Mother Superior says to remind Birgit to
finish the self control embroidery.
Birgit: Go to the convent
hallway upstairs and then left to the schoolroom.
Check the cabinet and study the eagle model on the
school desk.
Talk to Birgit, Mother Superior's favorite
student.
Learn that animals show different
characteristics. The bear stands for strength, the deer for heroic valor and
the porcupine denote sleepiness.
Birgit wants Lilli to ask Mother Superior about
the motif for the missing banner.
Find a motif for the missing banner:
Go back to the cafeteria.
Talk to Doris at right. Doris calms her finger by opening canning jars.
Doris complains that her knife disappeared and the stove fire is out.
Give Doris the jar with guinea pig. Doris is now
calm. Lilli takes
the guinea pig and jar of alcohol.
Go back upstairs and then left to the stairway. Go
through and forward to Mother Superior's office. Take the note and receipt
holder from the desk.
Learn what the letter in the receipt holder
contains. Learn also that puma stands for valor and that Mother Superior
does not like the guinea pig.
In inventory combine the receipt holder and the
guinea pig to get a dissected guinea pig.
Get the missing banner:
Go back to Birgit at the classroom at the convent hallway.
Give the dissected guinea pig to Birgit. Lilli
takes the eagle motif off the desk and replaced it with the guinea pig.
Lilli exits the classroom. Go back to the
classroom again. Take the guinea pig banner from the easel by the window.
Place the missing banner up:
Go back to the cafeteria.
Use the guinea pig banner on the free space on the wall. Watch Mother Superior's reaction on seeing the
banner.
Get the 3 engagement icons:
Go back to the classroom. See Mother Superior scold Birgit.
Mother Superior takes the puma motif from the
cabinet. Birgit is furiously embroidering a new banner.
Go to the open cabinet and take the grizzly
bear motif, grained screen, deer model and porcupine
model.
Examine the grained screen and see that it is a
unicorn with 8 legs.
Arrange the memory aid of the old man:
Go to the Collection room. Talk to the old man again about the clues.
Click on the 4 clues on the dialogue bar.
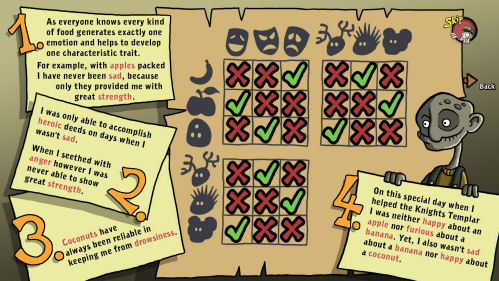
Clue 1: As everyone knows each different food creates one emotion and promotes one characteristic for
example: I was never sad if I packed a few apples because it helps me to be
very strong.
Clue 2: I could only do heroic
deeds on days I was not sad; on the other hand if I was angry, I cannot show
great strength,
Clue 3: Coconuts were always
good at preventing sleepiness.
Clue 4: On this one specific day
when I was helping the Templars, I was neither happy about an apple nor
angry about a banana but I also wasn't sad about a banana or happy about a
coconut.
End the dialogue.
See the notepad at top left of the screen. Click
on the notepad.
Use the notepad to enter the first 3 clues. Click
on a square and then select an X or a check mark.
Remember that the bear stands for strength,
the deer for heroic valor and the porcupine denote sleepiness.
Clue 1: place an X mark for apple square under
the sad mask and check mark for apple square under the bear (strength).
Clue 2: place an X mark on the deer square
under the sad mask and on the bear square under the angry mask.
Clue 3: place an X mark on coconut square
under the porcupine.
Place a check mark on the banana square under
the porcupine and coconut square under the deer. This fills up the top
right square.
Now fill the other squares based on top right
square data:
Clues 1 & 2: place an X mark on apple square
under angry mask. Place a check mark on apple and bear square under
happy mask.
Place check mark on deer square and coconut
square under angry mask.
Place check mark on porcupine square and
banana square under the sad mask.
This opens Clue 4.
Clue 4 verifies that the correct choices are:
angry mask, coconut fruit and deer model.
Move the cursor at side of screen. Use the back
arrow at either side of the screen.
Place under I - angry mask, under II - deer
model and under III - coconut fruit.
Talk to the old man again about the Templars. He
checks his memory aid. The old man recalls the event and gives an old
book where he wrote down the clues about the crypt and the symbols.

Find the Templar crypt:
Go back down to the chapel. Give the old book to
Frank.
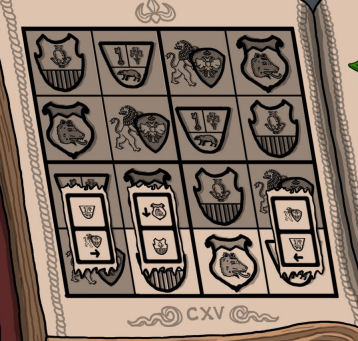
Fill the empty squares with coat of arms. No
repeat or duplicate coat of arms is to be seen in a row or column or
in a quadrant.
Click on an empty square and then select
the coat of arms to be placed there.
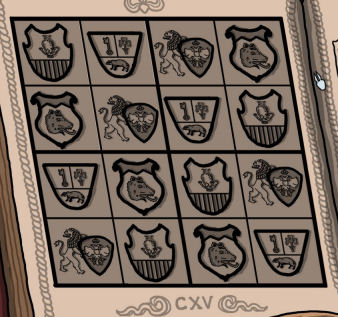
Now that the stone slabs are filled with coat
of arms; deduce from the clues at right page the placement of the 2 coat
of arms on the stone slabs on the left page.
Click-hold-drop the 2 coat of arms from right
page on the correct spot on the left page. Check the tutorial at top
left.
Top clue: The Wryneck Lion's coat of arms
cannot be placed right of the crypt. The Wryneck Lion coat of arms is
beneath the Clover Pig's coat of arms.
Place the Wryneck Lion's coat of
arms at bottom left so that the secret crypt will be to the right of it.
Middle clue: The Order of the Snake Tongue
Bears insisted that their coat of arms be somewhere above the crypt.
Place the coat of arms at second
from left at bottom row.
Bottom clue: The Order of the Clover Smith
Locksmith's coat of arms is right of the crypt and below the Wryneck
Lion's coat of arms.
Place the coat of arms at bottom
right row.
Franks is intensely happy about finding the
correct stone slab. Lilli enters the confessional booth to wait for Gerret.
Hear Frank's commentary about his discoveries. He found a Templar sword.
Hear a loud bang.
Take care of Gerret:
Gerret arrives and enters the side of the
confessional booth.
Lilli exits the booth. Take the Knight's sword
from the floor.
Use the board taken from the booth earlier on the
bracket of the confessional booth door thus locking Gerret inside.
Frank: See that the
chapel is full of that pink goo that was Frank. The goblin is there painting
the goo.
See that the wobbly cross has fallen down over the
stone slab where Frank was before.
Edna: Lilli reports to
Edna. Edna wants Lilli's help to cover her tracks.
Lilli has to:
Get rid of the balloon at main hall.
Remove the firecrackers on the school clock.
Remove the inscription (heart with Lilli and
Edna's name) on the swing tree.
Remove evidence of Edna's tracks.
Get rid of the balloon at main hall:
Chandelier: Exit room and
dormitory. Note that Shy is standing at the hallway without Suka.
Look at balloon on the chandelier by the stairs.
Go left up the stairway. Check the chandelier
attachment on the beam at the foreground.
Lilli can't remove it with her bare hands.
Clown: Talk to the clown
Funny Earnest. Learn that he applied as a child therapist but Mother
Superior already hired Dr. Marcel.
Learn that Dr. Marcel is a bitter evil man ever
since a little girl shoved him down the stairs (Edna & Harvey 1).
Get him to make a balloon. Select a wrench.
(You can have several balloons but he will pop the old balloon with his
cigarettes first before he makes a new one.)
Chandelier attachment: Go
back upstairs to the stairway.
Use the balloon wrench on the chandelier
attachment. Hear a scream.
Edna's balloon: Go down the main
hall. See the gnome and goo that was the clown.
Take Edna's balloon and the clown's
cigarettes.
Remove the firecrackers on the school clock:
Go upstairs to the convent hallway. Talk to Capu
standing by the maintenance door. He wants Lilli to deliver a love letter
to Shy.
Go back to the dormitory. Give the love letter to
Shy standing alone at the hallway.
Go back to the convent hallway. See Shy talking to
Capu at the balcony below the school clock.
Enter the maintenance door. Lilli has now popped
out of the right gargoyle's stomach.
Try to use the sword on the left gargoyle that has
Edna's firecrackers. Lilli can't reach it.
Use the sword on the school clock. The sword is
now held by the hands of the clock.
Go back to the hallway and then to the main hall
by the stairs.
Go back to the convent hallway and hear a dull
sound.
See that the left gargoyle has fallen down on the
balcony. The familiar pink goo and gnome are there.
Take the firecrackers.
Remove the inscription on the swing tree:
Classroom: Go left to the
classroom. Oh! See the pink goo that was Birgit hanging on the rafter.
Take the puma banner over the easel.
Go to the cafeteria and hang the puma banner on
the free space on the wall.
Mother Superior praises the banner. She wants to
give Birgit an award and celebration.
Lilli followed the Mother Superior to the
classroom. Mother Superior awards the hanging goo an award.
Take the scout's badge from Birgit's desk.
See a party cake left of the door. Lilli didn't
want to take the party cake.
Collection room: Go next
door to the collection room.
Try to take the musket and open the scout's chest.
The old man stops Lilli. Only certified boy scouts are allowed to touch the
musket and chest.
Show the old man your scout's badge. He was
impressed and allows Lilli to his things at the corner.
Take the musket and open the chest. Look
inside the chest. Take the scout's knife. Now who was missing a
knife?
Cafeteria: Go down to the
cafeteria and talk to Doris. She still complains that the recipe is not here
and the stove is not lit. She saw that Lilli is holding a knife.
She gives Lilli a chainsaw in exchange.
Garden: Exit the convent,
well area, school pond and go right to the garden.
See Suka swinging on the tire swing. Try to talk
to Suka.
Use the chainsaw on the dedication (heart with
Edna and Lilli's name) etched on the tree trunk.
The chainsaw does not have gas. Combine the
chainsaw and the bottle of alcohol (guinea pig container) to get a filled
chainsaw.
Now use the chainsaw on the dedication etched on
the tree trunk.
Lilli carves out the dedication - wood block
from the tree trunk.
Find Edna's diary.
Pigeon: Automatically be
talking to Edna. Edna wants Lilli to find her diary. It has her escape
plans and map to her hideout.
Exit the room and see a pigeon holding Edna's
diary. Look at it and then try to get the diary.
The pigeon flies to the rafters over
Mother Superior's office.
Mother Superior: Exit and
go up the stairway at left. Go forward the gallery and enter Mother
Superior's office.
The nun asks if Lilli has Lumpy's food.
Get the recipe:
Shawny: Exit the convent
and be at the well. See the sparrows and Shawny.
Talk to Shawny completely. Shawny doesn't believe
that Lilli can stand up to him; so choose the tough dialogue and get a
"sparrow" clue.
In inventory combine the marbles from Edna's room
and the musket from the Collection room.
Use the loaded musket on the sparrows. Hahahaha.
See an eagle carcass fall from the sky.
After seeing the eagle carcass, Shawny gets so
frightened. Try to talk to Shawny but he's too sacred.
Give the cigarettes from the clown to Shawny. That
might calm him down.
Shawny gives the recipe to Lilli. He smokes the whole pack of cigarettes
at the same time.
Pick up the burning cigarette from the
ground.
Get Doris to make the recipe:
Doris: Go back inside the
convent and then to Doris at the cafeteria.
Talk to Doris about food for the cat. Recipe is given to Doris but the stove is still out. The recipe calls for roast
duck for Lumpy and Doris wants the can food at the cellar for Mother
Superior.
Light the stove:
Exit the convent. See another gnome and purple goo that was Shawny.
Go to the school pond and then right to the
garden. See a gnome and the purple goo that was Suka.
Go back to the left and enter the cellar.
Take the pigeon flavored can of food from
the shelf.
Place the block of wood inside the stove. Use the
burning cigarette on the stove.
Go back to the cafeteria and talk to Doris to give
her the can of food. Get orders from Doris about the dumbwaiter and empty
plate.
Lumpy:
Go back up to Mother Superior's office. Mother
Superior leaves the office and order Lilli not to leave before all the work
is done.
Hear the coo of the pigeon somewhere.
Take the roast from the dumbwaiter and place it in
the bowl. Lumpy rejects it.
Give the roast to the potted plant. Place
the empty roast platter on the dumb waiter.
Doris sends up Mother Superior's food - cat
food pigeon flavored. Take the food from dumbwaiter and place Mother Superior's food on pet
bowl. Lumpy loves it.
Lumpy wants to climb the wall to get to his next
course - the cooing pigeon.
Use the grained screen from the classroom cabinet
on the hook beside the painting on the wall.
Lumpy climbs the wall and Lumpy stares at the
pigeon hungrily.
Pigeon:
In inventory, combine the balloon and the
firecracker. Use the burning cigarette on the firecrackers
on the balloon.
Click the lit firecrackers on the balloon on the
pigeon. It flies away with the firecrackers.
Mother Superior returns and releases Lilli. Mother
Superior asks the Lord for a sign. She sees the pigeon with Edna's diary;
balloon and firecrackers fly by and then "boom".
Dr. Markel:
Automatically be in the bedroom. Lilli reads the
note left by Edna for Lillifred. Edna will wait a bit at the swing tree
before she leaves.
Lilli exits the room but is called by Gerret. They
enter Gerret's surveillance room.
From there follow him to the chapel and main hall.
At the main hall, hear Dr. Markel and Mother
Superior. Exit to the garden.
At the Swing tree, take Edna's diary-map from the
burned pigeon. Lilli learns that Edna's hideout is a cave at Moor Lake.
Lilli gets caught. Dr. Markel zaps Lilli.
Using Harvey's eyes to hypnotize Lilli, Dr. Markel
has installed important behavioral block on Lilli. Woogie, woogie. Oogie.
Dr. Markel asks who is responsible for all the
chaos in this institution.
Circumvent installed behavioral blocks.
Mother Superior and tea:
To test the blocks and Lilli's complacency, Mother
Superior asks Lilli to serve the doctor and Mother Superior some tea.
Take note that there are Restrictions left of
inventory. It has all the "don'ts" imposed on Lilli.
Gerret: Go to the right
and try to take the teapot. Look at the painting to talk to Gerret.
Gerret wants Lilli to place the deadly nightshade-truth
serum on Mother Superior's tea to learn about their evil plans.
Learn that the embroidery is of an 8 legged
unicorn made by a child.
Tea: Take the teapot
and cup. Combine the cup with the teapot.
Use truth serum with the cup with tea. Use
truth serum tea in cup on Mother Superior but Lilli drops it.
Get more truth serum:
Exit the office.
Get deadly nightshade that is growing around the
post in front of the burning fireplace. Combine the deadly nightshade and the teapot.
Use the teapot with deadly nightshade on
the hook in the fireplace. Harvey block arrives and warns
Lilli.
Automatically get the ready teapot with deadly
nightshade.
Go back to the office. Take another cup.
Combine cup and teapot with deadly
nightshade.
Give truth serum tea to Mother Superior.
Mother Superior: Mother
Superior starts getting hysterical and tells about her childhood and unicorn
fascination.
Her hate of children stems from her getting a
tarantula instead of the unicorn she wanted. She accidentally killed Shaggie
when she placed a horn on Shaggie's forehead.
Get to Gerret's hideout:
Exit the office while the adults are busy. Check
the hallway right side of the fireplace. It is dark here.
Take the torch from the wall left of the
fireplace.
Use the torch on the fire and gets zapped. Harvey
block arrives to warn Lilli.
Go back inside and look at the painting for
advice.
Gerret says to get hypnotized by Harvey again.
When in a trance to look for the inner demons that prevents her doing things
and destroy them.
Look for and remove the make fire block:
Trance: Stare at stuffed
Harvey doll on the stool. This puts Lilli into a trance. Woogie!
Get away from that giant eye:
See Mother Superior's giant eye behind the desk. Lilli cannot exit the room.
Pull the cord by the desk. The dusty curtain blows
dust on the giant eye.
Take the club propped on right wall. Use the
club to beat the dusty curtain. This burns the giant eye and the eye closes. Exit the office.
Harvey fire block: See
Harvey snowman with a cylinder on its head. Try to take the cylinder. Harvey
snowman stops Lilli.
Harvey snowman is sitting on firewood. The other
giant eye of Mother Superior is by the back wall. There are ribs in front of
it.
Go back to the office and take the contact lens
propped on the left wall.
Exit and use the contact lens on the rib in front
of the other giant eye. This burns the hat-cylinder on top of Harvey
snowman. Harvey snowman asks to take off his hat.
Use the burning cylinder on the firewood under
Harvey snowman. This melts Harvey snowman. One block down.
Tutorial: This is the way
to cancel the restrictions - don'ts. You can now use one of the unblocked
restrictions when needed. Click on an unblocked restriction to use it. Use only one block - restraint at a time.
See that the playing with fire restriction is now
active.
Follow Edna's footsteps:
Go to Gerret: Exit the
office.
Open the restriction bar. Click on "make fire".
This releases Lilli's block.
Use the torch on the fireplace. Place the lit
torch on the bracket at right wall. Examine the dark corner. Hmm...
Turn the burning torch on the bracket and the
secret door opens.
Talk to Gerret Gardengore. Learn that he is a
policeman assigned to check Mother Superior. He is happy that he also got
Dr. Merkel. He investigates the abuse on children.
He says to follow Edna's footsteps.
Tree swing: Automatically be
at the garden. Take the ball of wool from the aerial bomb.
Remove the
contradicting adults block:
Try to go through the fence with hole left of the
compost barrel.
Lilli gets zapped. Harvey block arrives to stop
Lilli.
Trance: Give the ball of
wool to Harvey block. Lilli is now in a trance.
See the giant Harvey spider blocking the hole on
the fence.
Giant Mother Superior paces behind the fence.
There's a bubbling tar pit and pile of bones.
Take a bone-rib from the pile. Dip the rib
in the tar pit.
Use the sticky rib on Harvey spider. Mother
Superior starts growing big(ger). 2 down.
Follow Edna:
Open the restriction bar. Click on "contradicting
adults". This releases Lilli's block.
Go through the hole in the fence.
Chapter 2 Edna's Hideout.
Crossroad:
Meet Gerret at the crossroads. Eventually, he
leaves to check to see if he can find information about Edna.
Lilli checks the map but Harvey block arrives. He
reminds that Lilli must not hang around dangerous places.
The map falls on the ground. Try to pick up the
map that has developed unusual independence and it rolls away. Follow the map to
the village.
Get to the map:
Courtyard: Try to pick up
the map again and it rolls behind the police station.
The map rolls through a grilled window. Check the
bars of the window.
Bicycle: Check the
bicycle. Take the air pump of the bicycle.
Trash: Check the
pizza box in the trash bin. Take the chili peppers.
Police station: Go around
and enter the station.
Look around. Take the neon yellow pen and
valium from the counter. Take wine gums beside the fax
machine.
Look in the jail cell and see the map. Check the
alcohol test meter beside the cell.
Talk to the police officer and make a complaint
about Lilli. He can't arrest Lilli if she has drunk nothing.
Lilli can take a breath test using the meter by
the cell. Take a test and see that it is at the love range.
Exit the police station.
Bar: Go to the bar across
the road.
Look at and talk to the bartender. He gives a
cocktail album and tells Lilli that he is missing the ingredients for
the only alcoholic drink in the menu - the Volcano Berserker.
Take the collection jar on the counter and
the neon pink illuminated advertising on the window.
Check the flounder automat on the wall by the
door.
Find the ingredients for the Volcano Berserker:
Exit the bar and go right to the cemetery.
Miranya the Medium: Take
the green neon color from the carton beside Miranya.
Talk to Miranya. She is talking to Maxmixo the
bartender. The spirits are talking over each other. She wants earplugs.
Give her the wine gums. Learn that Maxmixo brought
the recipe for his Volcano Berserker with him when he crossed over. He wants
his legacy to continue.
Learn that the ingredients are: wine gum,
Artemisia and chili pepper.
Pick up the wine gums that Miranya rejected
as earplugs from the ground. Exit the cemetery.
Bar: Go back to the
bar. Use the cocktail album on the bartender.
Select - click on the drink we have all the ingredients - Neon
drink.
Take the neon drink, a non-alcoholic drink.
Bridge: Go to the
signpost and then go right to the bridge.
See Gerret and two men in white clothes. Lilli
hears that the men are Doctor Marcel's minion looking for Edna. Dr. Marcel
found Harvey and used him for hypnosis.
Check the feeding trough. The sign warns about saber toothed boars. The boars mark the territorial plant Artemisia. Lilli
doesn't know what Artemisia looks like.
Artemisia: Use the neon
drink on the feeding trough. Oops.
Unblock contradicting adult's restriction. Use the
neon drink on the feeding trough again.
Go to the signpost and hear the saber toothed boar
oinking. Go back to the bridge.
See a plant marked with neon by the boar. Take
Artemisia.
Bar: Go back to the village and
the bar. Use the cocktail album on bartender.
Select the Volcano Berserker. The bartender mixes
the drink.
Remove the drinking alcohol block:
Try to take the volcano berserker and Harvey block
arrives.
Use the ball of wool on Harvey block again. Woogie!
Western village saloon: Look
around. Don't drink the coffee or you will wake up from the trance. If so,
use the ball of wool on Harvey block again.
Take the jar of mayonnaise from the
counter. Check the mayo in inventory. It spoils easily in the sun.
See a box of Cuban cigars on one of the chair of
the poker players.
Try to join the poker game but Lilli does not have
any money. The cigars are for players only. Exit the bar
Courtyard: Go behind the
sheriff's station and see a quack doctor in a covered wagon.
Talk to the gnome quack doctor. He gives a free
Alcofix - taste 100 proof and works 100 proof to those that are sick. Lilli
should come back when she is sick.
Prairie: Go to the
prairie left of the saloon and cash cow.
See a vulture,
smoke signal and a sundial. Talk to the vulture. He is waiting!
Use the mayonnaise on the sundial. Click to turn
the sundial to get the full sun effect. The mayo becomes rancid mayonnaise. The jar swells and the
flies hover above it.
Click on mayo and Lilli eats the rancid mayo. She
now has spots on her stomach.
Quack doctor: Go back to
the courtyard and the quack doctor.
Talk to gnome again. Lilli shows her stomach
spots. The gnome gives her a handkerchief and Lilli blows her nose. The
handkerchief has red chunks.
She is given a free sample of Alcofix. Take the
bottle of medicine.
Look at the blue bottle of medicine in inventory.
It reminds her of someone. It also talked - do not touch alcohol. Ah - we
found another inner demon.
Saloon: Go back to the
saloon.
Place the bottle of medicine that reminds Lilli of
Harvey block on the champagne bucket.
The genie in the bottle comes out. He is very cold
and sneezes.
Give the Harvey genie the handkerchief. Now the
genie is infected.
The genie goes back to the bottle and drinks
Alcofix, the alcoholic medicine. The genie breaks his own rule - do not
drink alcoholic beverages.
Get drunk:
Back to the bar at the village, unblock drinking
alcohol restriction.
Take the volcano berserker from the counter. Lilli
drinks some of it and returns the rest on the counter.
The bartender also takes a swig. He starts
pounding on the counter.
Place the collection jar on fist print and the jar
breaks. Take the coins.
Police station: Use the
alcohol test - meter beside the cell. It shoots up to the top and Lilli is
placed in the drunk tank.
The hamster that caused the rolling of the map
comes out.
Lilli takes the map. Check the map in
inventory. LOL.
Remove the lying block:
Get released from jail:
Talk to the police officer and when asked if she promises not to get into
trouble again, select thumbs up.
Harvey block comes out. Use
the ball of wool on Harvey block again.
At the Western village sheriff's office, talk to
Justitia. Justitia says that Lies are evil. Lilli contradicts this
statement.
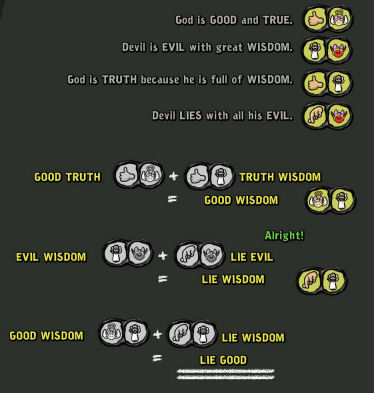
See a chart. In 3 steps, prove that lies are
not evil.
Take the drawing on top - God is GOOD and
TRUE. Place it on the enclosed curve at top equation (Good Truth).
Take the third statement drawing - God is
TRUTH because he is full of WISDOM. Place it on the enclosed curve at
top equation (Truth Wisdom).
This equation results in = Good Wisdom.
Take the second statement drawing -
Devil is EVIL with great WISDOM. Place it on the enclosed curve at next
equation (Evil Wisdom).
Take the fourth statement - Devil LIES with
all his EVIL. Place it on the enclosed curve at next equation
(Lie Evil).
This equation results in = Lie Wisdom.
Place the Good Wisdom drawing from first equation on
third equation.
Place the Lie Wisdom drawing from second equation on
third equation.
Good Wisdom + Lie Wisdom = Lie Good
Justitia stabs herself.
Unblock lying restriction. Talk to the police
officer again. Promise not to get in trouble again.
Lilli is released but is warned not to go outside
in the dark because it is dangerous out there.
Look for another inner demon:
Try to exit the police station and Harvey block
arrives. Use the ball of wool on Harvey block again. Woogie!
At the Western village sheriff's office, note the
coffee that will wake Lilli up from a trance and the wanted poster. Exit the
office.
Gold digger and cash cow:
Talk to the gold digger by saloon. Learn about his goldmine and wendigo.
Lilli thinks that the wendigo might be another behavioral block.
The path to mine is known only to the gold digger.
The wendigo might be an Indian devil.
The shaman will know about wendigos. The shaman's
smoke signals can be seen in the horizon.
Prairie: Go to the prairie and
see smoke signals at the horizon.
We need something to make smoke. Go back to the
village.
Saloon: Try to take a
cigar from the box on the chair by the poker players. They are only for
players.
Talk to the players. Lilli doesn't have money to
play with.
Bring coins to limbo:
Indian cemetery: Go right
of the saloon to be at the cemetery. See the totem pole and the potato heads
- goblins
around a campfire.
Miranya: Click on the
campfire and see Miranya the medium. Miranya asks if you have crossed over.
Select thumbs up. Learn that those that crossed
over should have coins placed on eyes to get the ferryman to take them. Also it
is difficult to bring worldly goods to limbo.
Village bar: Go to the Western
saloon. Drink the coffee to get out of trance and be at the village bar.
The bartender is still unable to breathe from the
volcano berserker drink.
Use the coin on the flounder automat by the door
to get flounder.
Inflate the flounder with the air pump to get
blowfish.
Use the cocktail album on bartender. Select the
Knock-out Poison Smile drink (Sunnycup narcotic). The bartender gives
the drink.
Take the drink and click it in inventory. Lilli
drinks a bit. Give it to the bartender and he croaks.
Place coins on bartender's eyes.
To go back to the Western village, try to exit to
bring Harvey block again. Use the ball of wool to go into a trance.
Western saloon: See that
the bartender is here now in limbo. Talk to bartender. Get the coins.
Find the shaman:
Poker game: Use the coins
on a poker dog to join the poker game.
Lilli loses. Take a cigar from the box.
Prairie: Go to the
prairie. Use the cigar on the
smoke signal in the horizon.
Lilli has a conversation with the shaman. The
shaman wants to find the totem pole.
See structures and the shaman at middle
entrance of the leftmost building.
The aim is to get the shaman to the totem at
rightmost screen.
At bottom of screen are the movements that the
shaman can do: up, down and enter tunnel.
You can go back to original position by
retracing what you have done before. There is a skip button at top
right.
The shaman starts at middle entrance at
leftmost structure 1. There are 6 structures from left to right.
At structure 1; go up and enter tunnel.
Be at structure 3; go down and enter tunnel.
Be at structure 5; go up and enter tunnel.
Be at structure 4; go up twice to be on top
and enter tunnel.
Be at structure 2; go down and enter tunnel.
Be at structure 6 and automatically the shaman
goes to the totem pole.

The shaman signals thx.
Cemetery - shaman: Go
back to the village and then to the Indian cemetery.
Find the large potato head - goblin. He looks like the one
at the wanted poster. Talk to the shaman.
Lilli asks about the wendigo. The wendigo stink
horrendously. The shaman places an order for the only weapon against a
wendigo. Also the shaman orders something by accident. He asks that Lilli
pick up the order from the quack doctor by giving her the prescription -
recipe.
Take the junk food that smelled like dead
animals at the foreground.
Remove the entering to dangerous places block:
Quack doctor: Go back to
the courtyard behind the sheriff's office.
Give the recipe to the quack doctor. Get a
deodorant as the recipe against wendigos.
Take the package for the shaman and see that it is
a hair removal cream.
Find the mine with the wendigo:
Go to the cash cow standing by the saloon.
Click on the saddlebag on the cow. Place the junk
food that smell like dead animals in the saddlebag.
Click on any exit and then go back. See that the
gold digger left to check on his mine.
Prairie: Go to the
prairie and see vultures hovering at the horizon.
Click on the vultures to be at the gold mine.
Wendigo: Talk to the
wendigo. He warns Lilli about dangerous places like the mine.
Try to use the deodorant on the stinky wendigo.
The wendigo stops Lilli because those sprays contain CFCs that makes an
ozone hole. Hmm...
Look at the sky - sun. It is very hot. Use the
deodorant on the sky - sun. This makes an ozone hole and the sun beats down
on the sunbathing wendigo.
The wendigo notices the ozone hole forming. He
places his suntan lotion on the table.
Replace the suntan lotion - sunscreen with the
hair removal cream.
The ozone hole forms and the wendigo applies the
cream. He gets burned - no place is safe. Another block is removed.
Find Edna:
Edna's hiding place: Be
in front of the cave by Moor Lake.
Unblock the entering dangerous places restriction.
Enter the cave.
Look around. Take the owl pipe-whistle from
the floor.
Look through the telescope and see the 2 minions
of Dr. Marcel.
Read the note on top of the crate. Edna went to
check the 2 minions of Dr. Marcel to see what they are up to.
Check the bridge: Exit
the cave and go to the bridge.
Overhear the attendants say that they got Edna but
the truck won't start.
Try to get Gerret's attention by using the owl
pipe.
A real owl lands on the tree at right. The owl
starts responding to Lilli's owl pipe.
The object of the puzzle is to respond
correctly to the owl until it flies away.
Use owl pipe on owl. Owl responds.
1. Hey - huuuh.
2. Stop that - u-huuu
See the pictures of #1 and #2 responses at
bottom of screen.
Select #2. Get answer #3 Sorry - uuuuuh.
Select #3. Get answer #4 Nevermind - uh.
Select #2. Get answered.
Select #4. Get answer #5 Hahahaha.
Select #5.
Select #2. Grrr. The owl flies away.
Use the owl pipe on Gerret again. The attendants
caught Lilli on their headlights. They got scared and run away when the
phantom appears behind Lilli.
Go to the truck and take the keyring from
the dashboard.
Asylum:
Go to the path -wall behind the truck.
Talk to Gerret. He tells that he saw Edna get
caught. He tells Lilli to wait here.
Lilli continues up the hill to the institution's back door.
Use the keyring on backdoor. But the hamster came
and snares the keyring.
The owl flies in. Use the owl pipe on the hamster.
The owl sees the hamster and flies away with it in its claws.
The keyring falls into the bushes. Look and use the
bushes. Lilli enters the dark bushes and falls down the
hole.
Chapter 3 The Asylum
Enter the asylum:
Pick up the keyring from the floor. Enter the boat and row left.
Step up to the jetty. Open the door with the keyring and see the Phantom.
Go back to the boat and row left until the
waterfall.
Row back to the jetty and immediately enter
through the open door. Automatically climb the ladder. Lilli gets held by the Phantom while on the ladder.
Click on the floating energy smartie (black circle
with an X) at bottom of screen.
Click on the ledge at top right.
Chimney access:
Furnace room:
Look around the furnace room. See 4 burning
furnaces that go to the top of the asylum.
Take the punch card from the control panel
at left.
Use the punch card on the slot of the furnace at
right.
Enter the now off furnace. Lilli climbs up.
Mr. Frock: Talk to Mr.
Frock (Edna & Harvey 1). He is now covered with soot; very different from
his former fastidious cleanliness.
He is very interested in a feather duster.
Maintenance room: Look
through the grill into the maintenance room above Mr. Frock.
Take the slice of cheese full of holes
above the microwave oven.
See can opener, feather duster, chair leg, pizza
flier, telephone, refrigerator and Dr. Marcel's credit card in the room.
Chimney: Continue to the
top and see Beeman (Edna & Harvey 1) on the edge of the roof.
See that moths fly around the lantern attached to
the chimney.
Climb back down to the basement furnace room.
Maintenance room access:
Maintenance room: Use the
slice of cheese on the punch guard slot of the furnace second from right.
The furnace is turned off.
Climb up to the maintenance room. Pull the
chair leg that closes the cover of the stove. The chair leg broke and it
now has a pointy end.
Harvey block warns Lilli about sharp objects.
Take the feather duster right of the
microwave and Dr. Marcel's credit card by the door.
Take and read the pizza flier from board.
Use the telephone and Lilli inadvertently orders a pizza with no toppings.
Check the can opener at left. Buzzz - sharp
object.
Check the refrigerator. Take bananas,
tomatoes, blueberries and broccoli. Exit the room.
Hallway: Surveillance
room is locked. Take the delivered pizza from floor.
Harvey doll: Try to pick up
Harvey doll from the floor. It moved. Try again.
The phantom got Lilli by the throat.
Pull Harvey doll's rope seen at bottom left.
Woogie!
Remove the use sharp objects block:
There's an army of goblins - potato heads below and a
dam at end of the valley.
See dragon Harvey block behind a locked gate and a
chicken on a pole. Take a feather from the chicken. The gate has a large padlock.
Use the feather on Harvey dragon's tail. Do
this twice and see that the tail curls under the spiked gate.
Click on the iron gate to make it fall down and
the thorn at the tail of the dragon pierces his claw.
Take the thorn off the dragon's claw. The dragon
thanks Lilli and then realizes that the thorn was a sharp object. The dragon
melts and the sharp object restriction is unblocked.
Phantom: Back to reality.
Lilli is still being choked by the phantom.
Unblock the sharp object restriction. Use the pointy chair leg on the phantom's head.
Check the other rooms:
Bathroom:
Enter the door on the left. Talk to the washing
maniac.
The washing maniac explains how to use the colored
sanitizers in the 4 urinals. The clothes have to match the color of the
sanitizers the first time you use it. Then you can use it as often as you
want with another color.
Check the 4 urinals with colored sanitizers.
Pick up silk scarf from the clothes line
and the bottle of starch below it.
Take the knitting needle on the pile of
clothes on the right. Exit the room.
Role playing round: Move
the cursor to bottom right of screen to see the exit and then go right to the role playing
round.
Take the red curtain by the window.
Unblock the make fire restriction. Take the
scented candle.
See the 4 patients: Adrian at left and Peter,
Petra and Drogglejug at right (Edna & Harvey 1).
Talk to Adrian at left and learn the color
blindness of the 4 patients.
To be allowed to play with them on the fantasy
role playing game in Hoth Motigor, Lilli must prove herself by bringing them
the pizza with the topping they want. Learn what each of them wants on their pizza.
Ask about the pillow on the head of Drogglejug.
Lilli picks up the thrown green pillow.
Learn that Dr. Marcel left in a helicopter and has
not been seen here again by the patients.
Maintenance room: Enter
the maintenance room again.
Unblock the use sharp object restriction. Use the
credit card on the can opener at left to get credit punch card.
Mr. Frock: Go through the
furnace. Climb the chimney furnace at right.
Give the feather duster to Mr. Frock. He cleans
himself and he is now white all over. He gives a white sheet.
Roof access:
Use the credit punch card on the second from left
punch card slot.
Climb the furnace to go to the roof.
Beeman: Talk to Beeman.
He wants to know the real reason and smell of freedom.
Unblock the make fire restriction. Give the
scented candle to Beeman.
Beeman answers himself and flies away to freedom.
Take the yellow scarf he left behind.
Lantern and moths: The moths are
searching for food. Use the silk scarf on the lantern-moths to get torn silk
scarf (full of holes).
In inventory combine the torn silk scarf and the
bottle of starch to get hard cleaning cloth.
Climb back down to basement furnace.
Surveillance room access:
Use the hard cleaning cloth full of holes on the
left punch card slot.
Enter and be at surveillance room.
Miranya: Check the
viewing room and see Miranya knitting. She is not allowed to talk to living
people.
Exit the room through door at right.
Enter the maintenance room.
Unblock the use sharp object restriction. Use the
white sheets from Mr. Frock on the can opener at left to get ghost
costume.
Go back to the surveillance room. Use the ghost costume on the viewing window.
Learn that Miranya is forced to knit Harvey dolls.
Select thumbs up when asked for help.
Miranya pushes out blue fabric through the flap of
the door. Take the blue fabric.
Prepare the pizza for the role playing round:
Access to the urinals with colored sanitizers:
Go back to the bathroom.
Place the red curtain from role playing round room
on the red urinal.
Place the green pillow from Drogglejug on the
green urinal.
Place the yellow scarf from Beeman on the yellow
urinal.
Place the blue fabric from Miranya on the blue
urinal.
Now we can use the urinals for other colors.
Role playing round players:
Each of the players has color blindness and has a
preference and dislike of food on their pizza.
There are 4 colors to be itemized for each
player: blue, yellow, red and green.
There are 4 toppings for the pizza for the
players: blueberries, banana, tomatoes and broccoli.
Adrian mixes red and yellow colors. He wants
tomatoes and no blueberries on his pizza. So he should have green
tomatoes.
Peter mixes red and green colors. He wants
blueberries and no bananas on his pizza. Red and green makes blue. So he should have yellow
blueberries.
Petra mixes yellow and green colors. She wants
broccoli and no tomatoes on her pizza. So she should have blue broccoli.
Drogglejug mixes green and blue colors. He
wants bananas and no broccoli on his pizza. So he should have red
bananas.
Dip the food items on the urinals to make:
green tomatoes, yellow blueberries, blue broccoli and red bananas.
Look close at the pizza in inventory. Place
green tomatoes, yellow blueberries, blue broccoli and red bananas on the
pizza.
The patient smile if the item placed is
correct.
Play the fantasy role playing game:
Go to the role playing round group. Give the pizza
to the players. After eating, they now invite Lilli to play.
In the world of Hoth Motigor, the group is in
Goblin Gorge. The goblin army is sounding the drums and have gathered in the
valley.
The dungeon master (Adrian) narrates now. The goblin army
has
dammed the pink river to flood the Valley of Unpleasant Memories.
The group consists of a hooded local guide, the
black magician Petrulla, the knight Sir Droggalot and the juggler Snippo.
The only restless one is the Amazon barbarian
warrior Lilligrim.
Right click results in information stated by the
dungeon master.
Snippo the juggler: Right
click and then talk to Snippo (Peter). Ask him to juggle no balls and he
promptly falls asleep.
Pick up the ball from the ground.
Petrulla the black magician:
Right click and then talk to Petrulla. Petrulla keeps watch on the
kettle. Agree to watch the kettle and Petrulla falls asleep.
Sir Droggalot: The knight
will watch the fire.
Lilligrim sees the mysterious traveler smile when
Lilli's anger is checked.
The traveler inserts pacifying comments during the
dialogue.
Yawn by selecting the Zs dialogue 3 times and the
knight falls asleep.
Take the wood logs by the knight.
Goblin Gorge: Go right to
check the Goblin Gorge.
Talk to the King of the Goblins. He said that he
will not sound the attack horn. He was advised by the mysterious traveler to
just put the feet up and drink tea.
Lilligrim becomes very angry.
Mysterious traveler: Back
at the campfire, right click the mysterious NPC and then talk to him.
Remove the getting angry block:
The goblin army will not move unless attacked and
the role playing round players are asleep and under the control of the mysterious
NPC.
Safety kettle: Right click to
check the safety kettle to discover a safety valve.
Place the ball on the kettle-safety valve to block
the outlet of steam.
Place the wood logs on the campfire. The kettle
releases steam and shoots up in the air.
Battle: The kettle lands
in the middle of the goblin army. The king calls: To arms. Sound the horn.
The mysterious NPC - Harvey demon loses control
because of the noise and calls to arms.
The goblin army is defeated. The dam cracks and breaks. The pink water is
released.
The Valley of Unpleasant Memories shows the remains of
Lilli's
classmates that have died because of Lilli.
Aaaaaaahhhhh. Lilli had seen the truth. She throws
up in the bathroom.
Open the locked gate:
Check the gate where the Harvey Doll is located.
See that it is locked. Edna is back there.
Peter: Go back to the
role playing round. Talk to Peter. Peter needs to award experience points
but Peter dithers.
Unblock the getting angry restriction. Click on
Peter and Lilli slaps him. Peter increases the lock picking points and gives
Lilli the character sheet.
Gate and Harvey: Go back
to the locked gate and click on Harvey doll. Woogie!
Valley gate: The iron gate is
locked.
Cross the log and go to the right. Take the
arrow from the cliff wall.
Go back to the iron gate. Use the arrow on the
lock. Click again to pick the lock. It gate is opened.
Back at the asylum, the gate is open. Lilli goes
through and brings Harvey doll with her.
Bring Alfred back:
Check Edna's cell - locked door at end of the
hall.
Take the portrait from the wall.
Check Dr. Marcel's locked door at left.
Storeroom: Enter the
storeroom at right. Look around.
Phantom: Look at the phantom and
note the keyring that might be for Edna's cell.
Talk to the phantom. He is Ruben, Dr. Marcel's
secret second son and Alfred's older brother. He wants to see his brother
Alfred one more time to say goodbye to him.
Make Alfred: Take the
bowling ball at bottom shelf by door.
Check the clothes rack at right. Use bowling ball
on top of the clothes rack.
Use the ghost costume over the bowling ball.
Open the lunch box at bottom shelf at right. Take
the honey pancakes.
Take the mirror from the door. Hang the
honey pancake on the hook that held the mirror.
Click on the termite farm at top shelf by door and
they are released. Go
through the door. The termites ate the pancake and through the door making a
hole.
Take the Do not disturb sign from office door.
Place the mirror on the hook on the office door. The moonshine is now
reflected through the hole on the storeroom door.
Enter the storeroom. Place Alfred's portrait on
the hook above the storeroom door hole.
Alfred's picture is reflected on the ghost costume
on the clothes rack. Ruben talks to Alfred's ghost.
Pick up the keyring dropped by Ruben while
he is choking Alfred's ghost.
Edna:
Exit the storeroom and go to Edna's locked cell.
Use Ruben's keyring on door.
See Edna and Gerret sewn on the padded wall.
Mother Superior under the influence of Dr. Marcel is sewing lots of Harvey
dolls.
Dr. Marcel locks Lilli in the cell also. Learn of
his diabolical plans for the Harvey dolls.
Talk to Edna and Mother Superior.
Harvey: Look around.
Unblock use sharp object restriction. Take the
needle left of Mother Superior.
Look at the trash can below Edna and Gerret. Take
Harvey's old eyes.
In inventory, combine the needle and the ball of
wool. Then combine the needle and wool with Harvey's old eyes to get Harvey
sewing kit.
Combine Harvey sewing kit with Harvey to get the
old Harvey back.
Harvey talks to Edna.
Remove the doing whatever you want block:
Save game here.
Give Harvey with old eyes to Mother Superior.
Woogie! Mother Superior and Lilli are in a trance.
See the fight between the Harvey devils and the
unblocked restriction Harveys.
Snowman was responsible for fire block.
Spider was responsible for contradicting
(listening)
block.
Genie was responsible for drinking alcohol
block.
Justitia is responsible for lying block.
Wendigo was responsible for entering dangerous
place (location) block.
Dragon was responsible for sharp object block.
Hooded mysterious NPC was responsible for the
getting angry (berserker) block.
Good luck! There is a skip button at top right and an escape
link at bottom right to get out of the game.
The doing whatever you want restriction is
unblocked.
|
Mother Superior vs. Lilli (Harvey
Devils vs. Harveys Formerly Known as Restrictions) by Becky
You will see a gameboard with the
devils/monsters from Lilli’s “visions”on the left and the unblocked
restriction Harveys on the right. Mother Superior is above the
devils and Lilli is above the Harveys. You will play as Lilli, and
you have the first move (always a good thing).
Go ahead and read the tutorial first by
clicking on the face on the upper left. It’s slightly helpful.
You can study each Harvey’s range of
“moves” by clicking on the Harvey icon on the bottom right menu, and
then reading the explanations by hovering the mouse over the moves
that show up in the bottom left menu. Once you have used a move, the
Harvey in the lower right menu (or, in the case of combination
moves, two Harveys) will have a red “can’t be used anymore” icon
over it/them – these Harvey’s cannot be used again until the next
round. The corresponding Harveys on the game board will also be
grayed out. Each round is over when you’ve used all the Harveys, and
then the red “can’t be used” icons disappear and the grey Harveys on
the gameboard regain their color.
Points are listed for each Harvey and for
each devil/opponent. If you find yourself behind in points and
realize that a loss is inevitable, you can choose to Escape and then
start over again from scratch.
WATCH OUT BELOW! SERIOUS STRATEGY
SPOILERS*
Combination and Magic Moves
In my experience, combinations and magic
moves are more useful than the straight “strike out” attacks. Use
the straight “strike out” attacks only when you don’t have anything
else useful left in terms of combinations or magic. The Harveys with
the best stuff in terms of attacking (IMHO) are the Alcohol Harvey,
Location-shooting Harvey and the Berserker.
Strangely, sometimes a straight “strike
out” attack wasn’t effective against a selected opponent, though it
was always effective against the opponents who happen to be each
Harvey’s direct counterpart (direct counterparts are listed below).
The only times that attacks didn’t work against direct counterparts
were fire or shooting attacks while the Spider and the Snowman were
protecting against those particular forms of attacks (more
information on the protection racket below).
Direct Counterparts
Listening Harvey – Spider
Fire Harvey – Snowman
Berserker (angry) Harvey -- NPC (monk
look-alike)
Lying Harvey – Justitia
Location-shooting Harvey – Wendigo
Sharp Harvey – Dragon
Alcohol Harvey -- Genie
Devils and Their Quirks
For the devils/opponents, the most
dangerous (in terms of attacking) from what I could tell were the
genie, the NPC (monk-looking thing), and the Wendigo. The snowman
and the spider were huge obstacles in a different way because they
could protect their allies from fire attacks (Snowman) and shooting
attacks (Spider). The Dragon and Justitia seemed less dangerous –
you can leave them to be defeated last.
Just about any fire or shooting attack
triggers protection for the opponents -- a shield shows up near the
Spider or the Snowman that describes the type of protection. While
they are in protection mode, fire attacks (if the Snowman is in
protection mode) and shooting attacks (if the Spider is in
protection mode) appear to be useless. Combo moves that include fire
(if the Snowman is protecting) or shooting (if the Spider is
protecting) also won’t work. Lowering the Spider and/or Snowman
points until they stop the protection feature is a top priority.
Hit them with your Best Shot (Despite
the Spider and Snowman)
I would suggest starting out with the
Berserker and Location-shooting combo or the Fire and Alcohol combo.
Each of these combo moves will damage 5 devils/opponents in one go.
When you select the 5 targets, make sure the Snowman and the Spider
are two of the targets on the first round, BEFORE they’ve put up
protection.
Once the Spider protection goes up, the
Location-shooting Harvey’s ability to cause significant damage is
reduced. Once the Snowman protection goes up, the Fire Harvey’s
ability to cause significant damage is reduced. So you’ll have to
maximize what the other Harveys can accomplish. For example, the
Sharp Harvey in magic (double damage) mode is good against the
Spider or the Snowman even after both protections are instituted, as
is the Berserker and Alcohol combo. Other Harveys in straight
“strike out” attack mode can wear down the Spider and the Snowman,
though more slowly than the other moves I just mentioned.
More Fun Moves
Berserker Magic – motivate a Harvey to act
again. This means that a Harvey that has a red “can’t be used” icon
can be selected in order to remove its red “can’t be used” icon,
allowing it another turn in that particular round. Who knew?
Location and Listening Combo – protects 3
allies. This protects 3 Harveys that you select, at least for a
while. I usually used this move in the second or third round. For
some reason, using it seems to increase some of the opponents’ point
totals. This protection move appears to protect only OTHER Harveys –
when I tried to use it on the Location-shooting Harvey himself (as
one of the three to be protected), it did not appear to work. (I
suppose the guy with the gun has to be radically unselfish.)
Alcohol Magic Healing – you can use this
move when a Harvey is approaching 0 points. You can also heal a
Harvey that has already reached 0 points, though this does seem to
trigger an increase in points for each of the remaining opponents.
Alcohol Harvey can even heal himself.
Berserker and Alcohol Combo -- Harvey acts
3 times – the red “can’t be used” icon doesn’t show up until after
the selected Harvey has attacked thrice.
Listening Magic Move -- protect 1 Harvey
with sound shield – this doesn’t do much. From what I could tell, it
works for only one move. Maybe it is useful if you have a Listening
Harvey move left near the end of a round and want to try to protect
a Harvey with a low point total.
Oddities
Lying Harvey and trust issues -- Lying
Harvey’s ability to make opponents betray other opponents and work
for you is so tricky it is almost useless (apparently, he can’t hide
his lyin’ eyes). Examples include the Listening and Lying combo
(opponent attacks allies and is blocked) and the Lying Magic move
(opponent fights for you). I never did get these to work well. If
you feel like experimenting with Lying Harvey’s moves using
different opponents, there are probably ways to get these moves to
work to your advantage. If you elect the lazy way, though, I suggest
staying away from these moves. Use Lying Harvey only in straight
“strike out” attacks.
At times, all the opponents suddenly had
little green images above them and gained points. I couldn’t figure
out how to generate that particular effect for the Harveys.
Apparently, Mother Superior doesn’t fight fair. I guess that’s what
it takes to be superior.
*I am absolutely certain that there are
strategy intricacies that I missed in the “Mother Superior vs.
Lilli” challenge. But the above should make it possible to
understand what’s going on enough to win. |
Doctor Marcel:
Save game here! You can replay the 3 ending choices.
Talk to Mother Superior. She is crying.
Give Harvey with old eyes to Mother Superior
again. Mother Superior gives the knife to Lilli.
Edna recalls her adventure at Edna & Harvey 1.
Lilli left to be behind Dr. Marcel while holding
the knife.
Use the knife on Dr. Marcel to get 3 choices:
Lay the knife down.
Stab Dr. Marcel.
Contradict. If this is selected, click on the
contradict icon 4 times.
THE END
This document may not be
distributed without express written permission of the author and the content may
not be altered in any way.
For Questions or Comments
on this Walkthrough,
Please write to:
MaGtRo
Copyright © 010/2012
MaGtRo
 GameBoomers
Walkthroughs and Solutions
GameBoomers
Walkthroughs and Solutions