
WALKTHROUGH OF THE FILMMAKER
by Hans Lamboo, Holland
The Filmmaker is a game in 4 main Chapters
I. The Shards
II. The Killings
III. The Movies
IV. End game
Unfortunately the game is technically instable. There's an error appearing every now and then, talking about a missing file, actually a part of active X needed for the scripting engine. This will occure mainly in the beginning, and when using the main menu. It's drag, but simply click it away and play on. Sometimes it makes your inventory disappear, most often while playing The Movies. The use of Flash is also making the game instable in the case of some puzzles.
Still, I liked the game very much. It has an original storyline and the way the movies fit in is really great.
CHAPTER I - THE SHARDS
Watch the introduction video. The game will bring you to the theater automatically. Go to the main entrance. Explore.
Only the doors left of the ticket booth are approachable.
The doors have all kind of little squares, which can be ticked. If you click one of the boxes on the door, it will show a number. The number indicates how many boxes away – either horizontal, vertical or diagonal – the box is you need to click to open the door.
Watch out: you only got two chances. After that, you’ll have to start again, by clicking another box…. Eventually you will click the right box and the door will open.
There's the ghost of Ferucil, a former film director. Listen to his introduction. He will tell you to find 6 shards of a crystal.
That's the first assignment.
Take the ticket from your inventory and put it in the slot.
Explore the theater.
1.1. Restrooms
There's a puzzle on the floor of the men's loo. Read the note (which gives no information at all).
It's a Tetris-like puzzle. The pieces can be turned around by clicking the little arrow icons.
There are two clues: inside the paper roll in next to the toilet in the men's room and on the wall of the ladies' toilet.
Copy both drawings.
Put the pieces of the clue from the men's room in the right upper corner and the other on the left side.
Put the pieces of the clue form the ladies' room on the other side.
Complete the puzzle with the pieces left.
The box will open up and you can take Shard # 1.
1.2. The Arcade Room
Explore.
There's a joystick on the floor next to one of the playing machines. You can't pick it up (yet!)
There's a little card hanging out the Fortune Telling Machine. There's a number on it: 174. Write that down, it will come in handy with the cash register puzzle later on.
There's a Crane Game, where you can try to catch a bear. Note one of the bears carries a little key.
You can't do anything more, because you don't have any money.
1.3. The Snack Bar
Get behind the counter, by walking to the curtains either on the left or right side of the snackbar, then make a sharp turn left or right (depends which way you approach the counter from).
On the left hand side there's a cash register.
If you could open it, perhaps there's some money to play the Arcade Machines.
On the right hand side of the cash register there's a note. Read it.
How can you solve this puzzle?
You have to use the numbers 1 to 9 each once.
Hm, in the middle there's a number of three digits.
Do I have a clue?
Yes, remember the card form the Fortune Telling Machine?
So put 174 in the middle.
After that you have the numbers 2,3,5,6,8 and 9 left.
Is it possible to make two sets of numbers that if multiplied has 174 as a result?
Yes, 58 times 3 and 29 times 6.
So the solution is 58 x 3 = 174 = 29 x 6.
Go to the cash register and type 583174296 on the keys.
The register will open. Take some coins out of the drawer.
Take Shard # 2.
Go down at the cash register.
There's some candy on the shelves under the counter.
Take a bag of candy (kind of M&M's).
On the right side of the counter there's a weighter.
Click down on it.
You'll see the weighter standing on the counter.
The cursor will suggest you have to put something next to the weighter on the counter.
The cursor will also suggest to put in something in the weighters scale.
Maybe the candy? But it doesn't work out, yet.
1.4. The Cinema
Walk through one of the curtains and go into the main room, the cinema, with seats for the audience and a silver screen.
While exploring, you will get scared by ghostly images.
Climb the podium and find the flyer on the desk. You can observe (i.c. read) stuff in your inventory by putting the magnifying glass over the item. Read the flyer.
There seems to be a hatch in the middle of the podium, but it can't be opened.
There's a corridor on both sides of the cinema room.
Each one has door the will take you back stage.
Take the right corridor.
1.5. Back stage
Find a pair of scissors on a small prop table and put them in your inventory.
Turn left. There's a large trunk. It has a number lock on it.
How do you open the lock?
Turn left again. There are some books & papers on a table.
Read the letters: is a puzzle.
Follow the instructions carefully.
It's not difficult, but you have to do it really exactly.
The outcome is 150.
Go back to the trunk and put 150 on the lock. It will open. Take Shard # 3.
Next to the trunk there's a door to the Men's Dressing Room.
1.5.1. The Men's Dressing Room
Explore the room. Read the paper.
On the middle table are two cases. Intriguing, but just decoration.
On the 3rd table is a cahier. Open it. It belongs to Eric Salvis. Take the key to the storage room.
Read the book and look at the pictures attached to the mirror.
Turn right twice and look behind the chamber screen. There are three heads each carrying a different wig.
Notice the yellow post-it memo? Write it down, it's a clue to the Work Schedule Puzzle.
On the left side you can see a vague drawing of a matrix of 5x5 squares. Some of the squares are green. Never mind.
The door behind the chamber screen can't be opened.
Leave the dressing room and turn right.
1.5.2. Manager's Office.
The door is locked.
No, the key you took from Eric's book in the Men’s Dressing Room doesn't fit.
Turn left to the next door.
1.5.3. Women's Dressing Room
Step into the room and explore.
On the first table is a necklace, which you can't take, and some letters. Read them.
On the middle table, well, there's lots of stuff on it. But nothing of interest.
You can't reach the third table, so leave it.
Turn to the rack with a number of dresses hanging on it. You can't do anything with it. Yet.
Leave the room and turn right.
1.5.4 The Catwalk
There's a ladder leading upward.
Climb it. You’ll find yourself on the catwalk, from where spotlights are operated.
Walk the catwalk and get down on the other side. You're back stage again.
1.5.5. The Cellar
Walk to the exit door. Don't open it; instead turn left twice.
You'll see there's a stairway leading to a cellar underneath the podium.
Step down the stairs.
Take the first door left.
It's locked.
But this time it's the storage room allright - from which you happen to have the key.
Use the key from your inventory on the door en step in the storage room.
Explore.
Find the torch and find the matchbox; take 'm both and step out of the room.
Walk the corridor in the left direction. There's a space with some barrels and crates.
It's right under the podium.
You can't take anything, not even the prop sword.
There's a ladder going up, right in the middle. Climb it.
You encounter another puzzle.
It needs to be solved in order to be able to open the hatch in the podium.
Therefore you need some nails or somethingto put in the little holes.
So try later.
Go back to the corridor and continue to walk it.
There's one more door, which is locked.
Click on the door and you'll get a warning not to try that again.
At the end of the corridor: walk up the stairs and take the exit door.
You're in one of the corridors aside the cinema now. Get back to the lobby.
1.6 The Balcony
In the lobby, walk the large stairs on the right hand side, so at the Arcade Room's side. There's a curtain at the landing.
Walk through it and you're on the balcony of the cinema.
Explore.
There's something on the floor between the seats.
It are a couple of two-coloured stereo glasses.
Take them.
Since there's nothing more to see here, leave the balcony and get back to the landing.
1.7. The Operator's Room
Halfway down the landing is a door marked "Employees Only".
Ignore that and enter.
You'll climb the stairs and get to the door of the Operator's Room.
This is an important spot in this game.
Explore.
Find the CD in the rack and note who owns this record with happy country music: Eric.
Look down at the operating table.
There's a screen in there. Read it.
It's the Work Schedule. Right: another puzzle.
You'll have to find out who worked when and operated which movie.
That's a true mindcracker.
There are some more clues scattered about the place.
Collect them and try to solve the puzzle later.
Left of the operating table is the projector.
Look at it. It seems to be out of order.
Behind the projector is a closet up the wall.
Note the poster of the movie "The Fuzzies". Someone wrote "WED" on it.
Yet another clue to the Work Schedule Puzzle.
Try to open the closet. It's locked.
Right of the closet is a soundmixer.
Take a look in the litterbox.
There's a note.
That will come handy while solving the Work Schedule puzzle!
In spite of all kinds of intriguing items, there's nothing more to do at the Operator's Room. So go back to the lobby.
Go back to the Arcade Room.
1.8. The Arcade Room 2
Go to the Crane machine.
Insert a coin from your inventory and try to catch the bear carrying the key.
You can push the little handle, hold it and release it.
Figure out the right way to grab Teddy.
Don't worry: the number of coins is endless.
Collect the key.
Remember where we still have a locked door?
The Manager's office, the middle door back stage.
You can play the game with the Fortune Teller Lady Esmeralda if you want, and get some more clues. Just for fun, you don't need to.
Get back to the Manager's Office Back Stage.
1.9. Manager's Office 2
Open the door with the key from your inventory and walk in the room.
Explore it.
Find several notes and read them.
The cinema seems to run very well, thanks to Mr Ferucile's great movies.
There's a clue about the weighter on the snackbar counter: you only need a special weight to operate it.
Note the books with puzzles in it.
Apparently the Manager (i.c. Mr Todd Wickermann) likes puzzles.
The book explains how a so called "logical puzzle" can be solved by deduction.
Hm, looks like the Work Schedule in the Operator's Room, doesn't it?
Close to the door, on the utter left side of the desk, is a multi-coloured cube.
Yet another puzzle.
This time it's not a really hard one.
Try to get the square pieces in the right order.
Follow the colours in the various pieces.
If you do it right, the cube opens up. Take Shard #4.
Next to the computer screen are are 4 redheaded pins.
Take them.
What for? To open up the hatch in the podium!
In the right corner of the office is a Money Poster.
Click on it and it reveals a wall safe.
It appears to need a kind of colour code to open it.
Since you haven't got a clue, forget it for now.
Take a look at the picture on the wall of the happy family.
Let me introduce them to you:
The older man in the middle is Mr Todd Wickermann.
The man is Eric, the woman is Melanie.
The girl is Heather and the boy is Jeremy.
They all work in the theater.
Leave the Manager's Room and go back to the lobby, to the Snackbar.
1.10 The Snack Bar 2
Get behind the counter.
Go to the weighter on the right side.
How can I put something in the weighter's scale?
Take the candy, the M&M's from your inventory.
Use the scissors on it, by dragging the scissors over the bag of candy.
There's a bunch of loose candy in your inventory now.
Try to put the candy in the weighter's scale.
That doesn't work.
What did the hint in the Manager's Office say?
You need a special amount to use the weighter.
Turn around.
See the pile of paper cups?
Take one.
Turn back to the weighter.
Put the paper cup next to the weighter on the counter.
Poor the candy into the paper cup.
Try to poor the candy form the cup into the scale.
That doesn't work.
Notice you still have candy left in your inventory after you put candy in the paper cup?
Take the left over of the candy and put it inthe weighter's scale.
A drawer opens.
Take Shard # 5.
Now you have to go back to the Operator's room and try to solve the Work Schedule Puzzle.
1.11. The Operator's Room 2
In the Manager's Office you could read all about solving this kind of puzzles.
There's a few things you know for sure.
That could be positive or negative.
So about some things you know what's right, or what's wrong.
Insert the positive items in the schedule as a dot.
Use the cross for the items you are sure they are a no - or are impossible.
Insert them in the schedule.
Read the hints aside the Work Schedule.
They tell you more about what's right and what's wrong.
Now, what do we know for sure?
Heather likes poems. Recall her letters?
Heather works on Monday's, her father ordered her to in a note she threw in the litterbox in the Operator's Room.
On Monday "Primal Atmosfear" is showing.
Jeremy likes videogames.
He works on Wednesday's.
On Wednesday's "The Fuzzies" are showing.
Eric likes music. Remember the CD in the Operator's Room?
Todd apparently likes puzzles, as shown by the books in his office.
That leaves Melanie to like to read books.
So far the evident knowledge about the 5 people.
Now try to combine it with the hints next to the schedule.
Write it down for yourself in a diagram.
Who works on Monday? Who On Tuesday? Who can't possibly work on Thursday? Who could?
Do the same thing for the movies.
You know "The Fuzzies" play on Wednesday, it was marked on the poster in the Operator's Room.
According to the hints, "Primal Atmosfear" is running Mondays.
So what have you got?
Heather > poems > Monday > Primal Atmosfear
Jeremy > videogames > Wednesday > The Fuzzies
On Thursdays it's neither "Aliens" nor "The Count" playing. (and of course also not "Primal" or "Fuzzies").
So it has to be "A Detective Story".
Fill it out in the scedule with a cross. Keep testing your answers to the hints.
This is the definite solution:
Monday > Primal Atmosfear > Heather > Poems
Tuesday > Aliens from Mars > Melanie > Books
Wednesday > The Fuzzies > Jeremy > Video games
Thursday > Detective Story > Eric > Music
Friday > The Count > Todd > Puzzles
The Operating Panel will open. Take Shard # 6 !
Now go back to the lobby.
1.12 The 6 Shards
Look at the ceiling of the lobby.
Fit the pieces in their shadow parts.
Now you have to put them together in the right way.
Note this is a 3-D puzzle.
It's not the spot that's the problem
It's the order in which you put the shards down.
How can you tell you did something right?
When you do, you'll hear a sound like "cloink".
1. you put down the large rectangle at the left side
2. you put down the little top
3. The smaller rectangle at the right
4. The large L shaped piece at the bottom left
5. The part with the two points
6. The small L-shaped piece next to the large one
Look at the video.
This is the end of Chapter I!
Chapter II - THE KILLINGS
2.1 The Operator's Room
Go upstairs and open the closet.
There are 5 film reels in it. Take them.
The reels are marked D, C, F, A and P.
What should that mean?
In the cinema 5 movies were shown.
So D stands for the Detective Story
C = the Count
F = the Fuzzies
A = Aliens form Mars
P = Primal Atmosfear.
Now you want to play the movies.
Turn to the projector from the exit door's side.
There is an action cursor on the projector. Click it.
A small door opens and reveals a little box.
It's empty. There's a little socket at the bottom.
Obviously a part is missing. What could it be?
2.2. Manager's Office back stage
Enter the Manager's Office.
Talk to Todd Wickerman's ghost voice.
This will take some (too much) time.
Note down the order the killings took place and where, and in which movie each person is appearing.
1. Eric on the catwalk > Detective Story
2. Melanie in the restroom > The Count
3. Heather on stage > The Fuzzies
4. Jeremy in the Arcade > Aliens form Mars
5. Todd in his office > Primal Atmosfear.
Todd will also give you a hint for the code for the wall safe. Note down 4,2,4,3,1.
Find the note on the desk.
It's a note from Ferucil to Todd.
What's the point?
Look carefully.
There are a lot of colors mentioned in it.
Could that be the clue? Yes it is.
Write the colors down in the order they appear in the letter.
1. Red
2. Blue
3. Black
4. Green
Now replace the numbers given by Todd with the colors:
Green - blue - green - black - red
Go to the wall safe behind the money-poster.
Press the coloured button in the above mentioned order.
The safe opens.
Read the message on the torn paper.
It's a hint about a loose brick in the cellar wall.
Take the money.
Take the little key.
Look in the litterbox down by the safe. Read the script pages.
Turn around. Watch the video.
Go down to the cellar under the stage.
2.3. The Cellar
Search the wall of the corridor for a loose brick.
You can't find it.
It's because it's not in the corridor.
Is there another place where bricks are?
Yes.
Go to the space below the podium.
Take the prop sword. (You can now, so why shouldn't you).
Climb the ladder to the trapdoor in the podium.
There's a loose brick on the left side.
Click on it and take the crystal from it.
Now turn to the hatch.
To open it, you have to solve a puzzle.
You need to put something in the right holes, so all lines will be lit.
Take the four redheaded pins from your inventory and put them in the right holes.
Which ones?
Try a bit. It's not too difficult.
Put a nail in the hole second from left in the top line
Put a nail in the left whole on the second line
Put a nail in the center hole
Put a nail in the right hole on the bottom line.
The hatch opens.
Go through it and climb up the stage.
Talk to Heather.
Climb the catwalk and talk to Eric.
Go to the lobby. Look at the video.
Go to the ladies'room and talk to Melanie.
Go to the Arcade Room and talk to Jeremy.
Don't forget to pick up Jeremy's joystick. You can now.
2.4 The Ticket Booth
Go to the door of the ticket booth.
That’s the door in between the entrance doors, opposite the snackbar.
It's closed.
Use the key you got from the safe in the Manager's Room.
Get into the booth.
On the floor is a small crank. Take it.
There's also a blue book. Look through it.
There's nothing more here.
2.5 Men's Dressing Room back stage
Go into the room.
Read the papers.
Take the comb from the table.
Go behind the chamber screen.
You could take a wig now.
But which one?
Get back later.
2.6 Women’s Dressing Room
There's one of Heather's letters. Read it.
There's also a necklace. Take it.
Take the pink perfume bottle on the middle table.
Turn to the rack with dresses.
You can take one now.
But which one?
Get back later.
2.7 The Operator's Room 2
Open the projector again and put the little crank in the socket.
It reveils a puzzle. A complicated one this time.
Electricity comes in at the bottom left side and has to come out on the top right side.
Phew!
Change pieces by clicking on them and they swap places.
To get all circuits set, put the schedule like this:
So now you're able to use the projector.
Turn to the projection window.
You are able to put a film reel on the empty reel arm now.
Take reel D and put it on the reel arm.
Turn to the projection window again.
Hm, something is missing.
Remember the 3-D glasses you've found on the balcony?
Take them from your inventory and click them on the projection window.
You’ll need them every time you want to watch a movie.
You can always pause a movie by clicking INTERMISSION. Then you'll go back to the operator’s room.
That’s the end of Chapter II.
CHAPTER III – THE MOVIES
3.1 A Detective Story
Watch the introduction
Explore the room of Dick Rome's secretary.
Note the letter right next to the typewriter. Read it.
Note there is some kind of Rohrschach test image on it.
Get into Dick's office.
The phone will ring. Pick it up.
Listen to Tiffany.
Explore the desk.
Play the radio, just for fun.
The left drawer of the desk can be opened.
Pick out the item.
Observe it.
If you click on the little buttons kind of Rohrschach-pictures emerge.
Everytime you press a button a different picture will be added or put out.
Hm. Do we have a clue?
Leave it for now.
Undernetah the clock is a safe.
Note the safe has only two buttons that can be pressed.
Left is a drawer case with a tape recorder on top.
There's one drawer that can be opened.
Take the letter from the file and read it.
There's one more letter here.
Read that one carefully.
Notice anything?
See something odd?
Read it again.
It's not in the message. It's in the words.
There's a lot of 'left' and 'right' mentioned in it.
Is that a clue?
Yes it is, to open the safe.
Write all the 'left' and 'right' down in the order they appear in the letter:
L RRR LL RRRR L
Go to the safe and press the buttons according to that.
It will open. Take the gun.
In the office there's a coat stand. It has a glove on it. Take it.
Go back to the secretary's room.
Pick up the paper right of the typewriter.
Look at the image on the bottom that looks like an ink spot.
Try to make a drawing of it.
Then go back to the left drawer of Dick's desk.
Open it and take out the item.
Press the buttons so you get an image that resembles the one on the note next to the typewriter.
Number the buttons clockwise starting at the top left 1 - 2 - 3 then go down to 4, then 5 - 6 - 7 and 8 at the left.
Press 1 - 4 - 5 - 7
The box will open. Take the tape that's inside.
What should you do with the tape?
Right, go to the tape recorder.
Put the reel on the left spot.
Go down.
Look for the 'start' button. Press it.
Listen to Dick's voice.
Write down his discription of Tiffany.
Auburn hair, red dress, heart-shaped necklace, perfume.
Hm, sounds familiar.
Go back to the coat stand.
Hey, it's to be moved around.
What could I do with it?
What would get Dick Rome into action?
Tiffany!
Take the coat stand outside Dick's office.
Then dress it up like Tiffany.
Go back to the dressing rooms backstage by using the INTERMISSION button.
Get the Auburn wig from the Men's Dressing Room and the red dress from the Women’s Dressing Room.
Go back to the Operator's Room and click on the projection window. Don't forget the 3-D glasses!
Put the red dress over the coat stand
Put the auburn wig on the coat stand.
Put the necklace around it.
Use the pink perfume on it.
Still there's something missing. What could it be?
What is Tiffany supposed to do?
Or better: what is Dick Rome alias Eric Salvis supposed to do? Die!
So give "Tiffany" the gun.
How can I attract Dick Rome's attention?
Use the secretary's phone. Tell Dick he's got a visitor called Tiffany.
Watch the end video.
You want to get out of the office, but you can't.
What about throwing something through the window?
Use the perfume bottle on the white cloud at the door.
See how Eric got killed.
Now you're back in the lobby of the theater.
Notice you still have the perfume and the necklace in your inventory.
3.2 The Count
Let's get back to the operator's room and watch another movie.
Put the reel marked C on the projector.
That’s The Count.
Don't forget to put on the 3-D glasses!
Watch the introduction.
Once in the castle, explore the hall.
Notice the signs, runes, on the walls.
Get in the door.
Turn left at the candle and turn right.
Here's a door marked II + III.
The door is locked.
Turn left, turn right, turn left.
There's another door.
Get in.
Click on the well in the middle.
Listen to the message.
Evil runes? What the heck?
Walk around the well and walk into the next room, a cave actually.
You see "Melanie" floating in some sort of magic power field.
Look for runes.
There's 2 on the walls, indicating left and right.
Note them down.
Look in the little cave at the left.
There's a stand with a crystal on it. Take it.
Leave this room.
Outside, turn right, step forward and turn left, step forward again and turn left.
There's the door marked II+III.
It's still locked.
Turn back right, step foward, turn right again.
There's a double door.
It's open! So get in.
This is the Puzzle Room.
Explore.
At the right you see a text, next to it is a book.
Read the book.
Note down the properties of good and bad runes.
If a rune contains a curve or a triangle, it's good.
If there's an even number of good properties in a rune, then it's evil.
If a rune contains a V with a vertical line through it in the center, the rune is evil if there are also any good properties in it.
If there are no good properties, the rune with a V and a line through it is always evil.
If there are 8 or more lines in a rune, it will be the opposite of what it normally would be.
This information comes in handy in solving a puzzle later on.
Turn left.
In front of you are 3 squares on the wall.
See anything special?
The left one has a sign I above it, the middle one is marked II and the right one III.
Hm. Where did I see that again?
On the locked door in the corridors, marked II+III.
Now turn around twice.
See the sign above the entry doors?
It's IV.
In case you shouldn't know what these signs mean, there's a poster on the wall that explains it. These are Roman numbers.
Turn back to the wall and step foward to the left square.
Now you can see it's composed of 36 tiles.
They all have the sign IV on it.
Now click on any tile.
Find out they all can change in I, II or III.
What could be the meaning?
Try to turn all tiles into II's.
It's not hard, but it takes some trial and error.
If you succeed, there's a snapping sound.
Step backward, and turn to the square marked II.
Now there's a puzzle in the square.
It contains 100 tiles.
Click one, and it turn into a cross.
Click the same tile again and it will turn into a question mark.
Click it once more, and it's empty again.
In case you don't know what to do: keep clicking tiles.
At a certain moment you'll hear a blasting sound and 15 tiles spread all over the square show skulls. Game over, start again.
In case you still don't know what to do, press the help button. It explains a lot.
And yes, your deepest fears come true: OMG, it's a freaking minesweeper game.
Blast! A bore and a drag, and not very original.
As you might remember from the minesweeper game, you have to click on all tiles NOT hiding a skull.
If you click a tile twice it will either reveal a skull, or a Roman number. The number will tell you how many skulls are next (horizontal, vertical and diagonal) to that tile.
Every time the game is over, there's a new game. At random. So it's no use taking notes.
This puzzle only takes time and a lot of patience. Besides is utterly boring!
Tip: try to find a couple of empty tiles first.
These are tiles that are not next to a skull tile, but at the edges of an empty area the tiles will tell you how many skull tiles are at it's borders.
Tip 2: use the cross and the question mark to help you identify the skull tiles.
Eventually, you will succeed. There's a snapping sound again.
Is puzzle number III revealed?
No, it isn't.
How did you reveal puzzle number II?
Right, by putting all tiles in puzzle number I to II's.
So go back to puzzle I en now set all tiles to number III.
A click will tell the puzzle emerged.
Now you can go to puzzle number III.
Inside a square are 4 T's.
Try some.
You can take each one out, put them aside.
And turn them.
If you take them all out, you'll see there's a smaller square inside the outline.
Goal of the puzzle is to fit in the 4 T's into the smaller square.
Never mind the writing on the wall "3 T's also fit the smaller square". That's a fake hint.
You really have to fit all 4 T's in the smaller, inner square.
This is a tricky one, a true mindcrusher.
You also have to be very precize, because if a T touches another one or the outline, it will jump out again.
Any ideas?
Did you notice you can also put the T's in an angle, a kind of skewed way?
There's the solution.
Put one T upside down, and put the long bar in the left upper corner, in such an angle that the point of the short bar just touches the outline.
Put another T on it's side and fit it in at the upper outline.
And so on.
The solution looks like this:
Now you'll hear a snapping sound again. You've solved puzzle II and puzzle III.
The snapping sounds apparantly opened something.
Something with II and III.
Right, the door in the corridor marked II+III.
Get out.
But help!
The exit door is locked.
How can you open things in the puzzle room?
Remember how puzzle I looked when you first saw it?
Remember the marking above the exit door? IV.
So put all tiles of puzzle I on IV.
The exit door opens.
You're ready and done with in the puzzle room!
Go back to the door marked II+III.
Guess what?
It's open.
Walk in.
It's a kind of crypt.
Right in front is a coffin. DON'T TOUCH IT.
You want to touch it anyway?
At your own responsability.
The lid opens and you can look inside the coffin.
There's The Count, actually a vampire!
The cursor changes into an action cursor.
What could you put on a vampire to kill him?
You have only one items in your inventory that can help you.
It’s the necklace.
But you'll need three more.
The first is garlic.
You’ll find that in The Fuzzies.
The second is a wooden pole, to put through his heart.
You'll find that in Primal Atmosfear.
The third is daylight.
If it takes too long, the vampire will open his eyes and gets you!
So only go back if you have all the needed items.
Walk around the coffin and go into the cave behind it.
There's a carving of runes - but not all of them are runes.
Remember the runes you've found on the wall of the other cave?
Still got the drawings?
One represents the sign for Right and the other for Left.
What else do you know about runes?
Remember the voice in the well?
What did it say?
"Press the evil runes".
How can you tell a good from an evil one?
Check the notes you made from the book in the puzzle room.
Replace them by the suitable runes you copied from the wall.
So replace Riii by the sign for right.
Do the same with the runes for Left.
Now judge the runes.
Which ones are evil?
Here’s the solution:
Press the rune that looks like a reversed 1.
Press Ri.
Press Riii
Press Liii.
Daylight will come into the room (that comes in handy when killing the vampire).
The stone reveals a new clue.
Riii Li Rii
Or: three times right, one time left, two times right.
What's the hint for?
You don't know yet.
Walk to the crypt's exit.
Note the trunk that's right next to the exit.
It's locked.
You can't do anything more here.
So click INTERMISSION.
You're back in the Operator's Room in the cinema.
Take The Count off the projector and put the next movie on it. That's F for Fuzzies.
3.3. THE FUZZIES
Watch the introduction.
You can't get passed the doorman.
He asks for a "shiny-shiny".
What could that mean?
Give him the grey stone you got from behind the brick below the stage in the cinema.
Go to the next Fuzzie, who is also asking for "shiny-shiny".
You have one gem left in your inventory, the blue one from the cave in The Count.
But he doesn't accept that one.
So find out which Fuzzie does.
If you've found the right Fuzzie, he’ll give you a riddle.
RIDDLE 1.
What's the beginning of eternity
The end of time and space
The beginning of each end
And the end of every race?
Does it make sense?
In a way.
Perhaps you don't have to understand the words.
Maybe you have to take it all literally.
So look at them.
What's the beginning of eternity?
Right, the letter e.
That's also the last letter of "time" and "space".
The first one of "end".
And the last one of "race".
That was easy.
Typ in e for an answer.
The Fuzzie will give you another stone, or "shiny-shiny".
Find out which Fuzzie likes this particular gem.
RIDDLE 2.
Two donkeys stand in straight line
One in front, the other behind
Behind the second one stands I
Somewhere in the middle I lie
A whole nation exists behind me
Find the answer and you'll be free.
Take this one literally as well.
Another word for donkey?
Right, ASS.
So write down ASS and put the other donkey behind it.
So now you've got ASS-ASS.
Behind that stands and I.
So now you've got ASS-ASS-I.
The next hint is a lie, so skip that one.
Now put "a whole nation" behind that.
ASS-ASS-I-NATION.
That's your answer to this riddle.
ASSASSINATION.
You'll get another gem and must find the next Fuzzie.
RIDDLE 3.
Five hundred begins it, five hundred ends it
Five in the middle is seen
First of all figures, the first of all letters
Take up their station between
Join all together and you will bring
Before you the name of an eminent king.
Take this one literally as well.
But what to do with "five hundred"?
We've seen Roman numbers before.
What's "five hundred" in Roman numbers?
You can go back to the puzzle room in The Count and read it on the poster.
The answer is D.
So you've got D at the beginning as well as the end.
That makes D-D.
In the middle there's a five. So a V.
Now you've got D-V-D. (kind of funny, huh?)
What's the first of all figures?
Of the Roman figures?
I.
What's the first letter of the alfabet?
A.
So put these two in between the D and the V, and the V and the D.
In some order.
D-A-V-I-D.
DAVID.
That's a king allright.
Take the gem and off to the next Fuzzie with the next riddle.
RIDDLE 4.
But you know nothing of gems.
The answer is in the spaceship in "Aliens From Mars".
1. Amethist
2. Emerald
3. Ruby
4. Pearl
5. Diamond
6. Tiger's Eye
7. Cubic Zirconium
8. Black Opal
Now take the first letter from # 1, the second from # 2, the third of # 3 etcetera.
You'll get the answer.
AMBROSIA.
Take the gem and off to the next Fuzzie with the next riddle.
RIDDLE 5.
I am the longest word there is
The greatest distance in biz
Yet use only six letters please
You don't need any more than these
Looking at content is the key
To finding the word that I be
Two snakes apart I will allude
And I'll always improve your mood.
That's not hard.
What's the longest distance you know?
Inch? Yard?
Not it's MILE.
You are to use 6 letters.
So you need two more.
What letter is a snake?
An S.
So you'll need two apart letters S.
S-MILE-S.
SMILES.
That will improve your mood!
Take the gem and off for the last riddle.
RIDDLE 6.
This is a really nasty one.
You have to find nine letter word, that remains an existing word after putting out one letter.
And one more letter. And one more. Until you have one letter left, which is still a word.
The answer is STARTLING.
Take the gem. There are no Fuzzies left.
So what to do with this last gem?
Find Heather.
She's crying.
Talk to her.
But that gets you nowhere.
Notice there are little plants in front of Heather?
Find the garlic and take it.
Hm. Garlic.
That might come in handy in killing a vampire!
Go to the exit. But you can't get out yet.
You have to do one more thing.
But what?
Look at the waterwell.
There's an action cursor.
Something has to be thrown into the well.
Try everything from your inventory.
But you haven't got it yet.
Click INTERMISSION.
You're back at the projector. Put on Aliens from Mars now, the reel marked A.
3.4 ALIENS FROM MARS
Watch the introduction.
Explore the spaceship.
There's not very much you can do.
Where you begin, go to the left.
There's an action cursor on the machine at the bottom of the screen.
Click it, look at it and remember it's location.
Turn around and step on the captain's platform.
Step forward.
There's a message in the communication device on the wall.
Click it.
Listen to the Martian.
The captain will order you to man the arm system.
Turn left.
There's an action cursor on the screen. Click it.
It's all about gems.
Click one and read the discriptions.
This comes in handy in solving the gem riddle in The Fuzzies!
Go back to where you stepped on the platform.
Now go straight ahead.
See the action cursor?
Click it and get closer to the arm system.
Click on 'Target' for exemple.
The captain will tell you what to do first.
‘Reroutethe power’.
Go back to the machine in the backroom (where you started).
Study the screen.
There's only one thing you can do.
It's a very small hot spot.
It's the word at the bottom right 'Reroute Power'.
Ain't that what the captain ordered you to do first?
Click it.
The machine will ask you for a power crystal.
Do you have it?
Yes, you've got an item that could be it.
You got it from a Fuzzie.
It's yellow and red.
Put the gem in the socket.
Click 'Reroute power' again. That's better!
But what's that?
Another puzzle.
Click 'HELP' and read it.
You can connect power sources A, B, C and D by clicking on the dark area in between the tiles. There's one big 'BUT: the connection lines are not to cross or touch each other.
Help!
It's a matter of trial and error.
You'll find out how to do it.
In case not, here's the solution:
(Note the line in the bottom left to E is missing. The only way I could take a picture. You have to put it in yourself.).
Go back to the weapon system on the platform in front of the big screen.
Now follow the instructions and fight the Martians!
You have to beat them all.
Eventually the captain will cheer - and disappear.
On his chair are some explosives.
Take them.
Over the chair is a white cloud.
Take some item that is connected to Jeremy to put into the white cloud.
Of course: it's his joystick.
You've finished Aliens from Mars.
You're back in the lobby. Only 3 films left!
3.5 THE FUZZIES 2
Go back to the Operator's Room and put on The Fuzzies again.
Remember, you're almost done whith this grumpy creatures.
There was only one thing left:
You've got to throw something in the well.
How about some sweet dynamite?
Put the explosives in the well. But they don't work.
In movies you always have to set fire to a fuse wire.
It's on the right.
Take the matches from your inventory and click on the fuse wire.
A big blast and all the Fuzzies are blown to Fuzzie Heaven.
Only the lit white cloud remains.
Put in something that is connected to Heather.
Right, the letter from your inventory.
You've finished The Fuzzies, too.
You're back in the lobby. Only two more films to go!
3.6 PRIMAL ATMOSFEAR
Go back to the Operator's Room and put on Primal Atmosfear, the reel marked P.
Watch the introduction.
This movie is very difficult to navigate through.
Pay good attention to the position of the arrow cursor.
It's very hard to discribe your steps exactly. So first give it a try yourself.
Nasty part is when you come onto a path where the monster gets you.
And there's nothing you can do about it. Yet!
You only have got a prop sword. But you have to know where the monster's soft spot is.
You don't know yet.
It's in a book in crypt of the vampire count.
But you've got to kill the Count first.
There's a lot of wood here, so you might find just the piece you need.
Eventually you will get to a little house, more of a shed.
Explore it. Listen to the radio. Read the book.
There's an action cursor on the bed - but there's nothing there.
What the heck, I try to give you the right steps to get there:
-forward
-left
-forward twice
-left
THIS IS AN IMPORTANT ONE. Here you can turn left or right, but also forward.
Notice you can click forward left as well as right of the tree.
Click the RIGHT forward cusor.
-forward
-right
-forward 4x
That's where the shed is.
Turn around so the shed is behind you.
-forward 3x
-left
-forward
Now that's where the monster is. So don't make another step forward, or it will get you.
-right
-forward
-left
-forward
-right
-forward
-left
-forward twice
-right
-forward 3x
You'll come to a fence with a head on it. It's poor Todd's.
Turn around so the fence is behind you.
-forward 3x
-left
-forward 3x
-left
-forward
There's a tree. In front of it is a piece of wood with a pointy side.
Take it.
This is a good place to save your game.
Now click INTERMISSION
3.7. THE COUNT 2
Change the filmreels, put on The Count again.
Go to the crypt (behind the door marked II+III)
Step forward to the coffin.
Click it. It will open.
Now don't start clicking about, or the Count will wake up and gets you.
Instead, give him something of Melanie first.
You still have here necklace in your inventory.
That doesn't work.
Because you have to rub it with garlic first.
Then put the necklace on the count's hands.
Then put the piece of wood from the tree in Primal Atmosfear and click on the vampire.
He'll die for sure.
He disappears.
On the bottom of the coffin is a key.
Take it.
Now where can we use the key?
In the trunk next to the exit of the cave.
Put the key in the keyhole.
Notice there are two arrow curors appearing, one to the left, one to the right.
Apparently you have to turn the key in a special way.
Hmmm. Remember the code from the rune stone?
Riii - Li – Rii.
Click the right cursor three times, then the left one once, and the right one twice.
Now click on the key.
The trunk opens.
There's a book in it.
Read it.
It tells you how to kill the monster from Primal Atmosfear.
Go back to the room where Melanie is floating.
She's in the known white cloud now.
Give her something to end this movie.
But what?
Give her Eric's comb.
That finishes The Count as well!
You're back in the lobby.
Only one film to go!
3.8. PRIMAL ATMOSFEAR 2
Go find the monster.
Kill it with your sword.
Then go back to Todd's head on the fence.
It's in the white cloud now.
To finished the movie, put something in the cloud that belonged to Todd.
Put the money in there.
You're back in the lobby. All movies finished!
3.9. FERUCIL
So now what?
There's only one room you haven't been able to enter so far in the game.
Because the door has been locked all the time.
The door produced a strange noise and showed a flashing light when you tried to open it.
It's back stage.
In the cellar.
Go to that room.
The door is unlocked now.
It's dark.
Step forward.
Use the torch from the inventory.
Explore the room.
It's where the heater is.
And also a burned corpse, probably Ferucil's.
Search it.
Next to the body is Ferucil's staff.
Take it.
You can use something on the door of the heater.
But what?
The staff might work.
But it lacks a sharp edge.
Don't go and search for it.
Remember how Ferucil uses the staff to cut people?
There's a sharp knife inside the staff.
Put the magnifying glass over the staff in your inventory.
There's an action cursor on the staff's head. Click it.
The knife will come out.
Now use the staff on the heater's door again.
There's something burning in there.
But you can't take it out, it's too hot.
Don't use your bare hands.
Put on the glove.
Get the film reel that was burning there.
It's marked H.
What could that be?
So off you go to the Operator's Room.
To play the Grand Finale.
But both stairs to the podium are blocked by rocks!
Fortunately you know about the trap door in the podium.
So use that to get out of the cellar.
That’s the end of Chapter III!
CHAPTER IV: THE END GAME
In the Operator's Room, put on the film marked H.
Watch the introduction. Now you know where H stands for: HELL!
Follow the road.
Go to the tower.
The doors are locked.
Turn right.
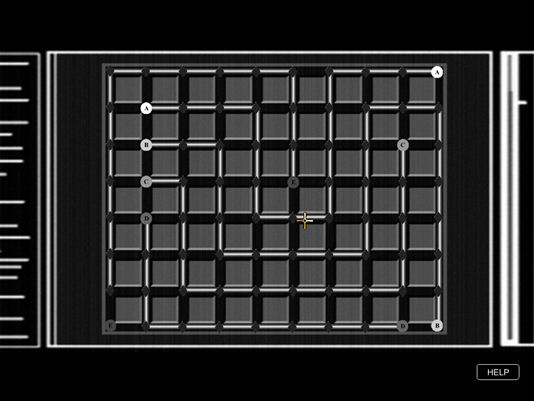
There's the lock: a puzzle.
How does it work?
Turn left.
Look upwards.
There's a clue:
TRAVERSE ALL PATHS
WITHOUT BACKTRACKING
Now turn right to the lock again.
That's not too difficult.
Go down one bit.
Then take the left side of the outer ring.
When it stops at the bottom, go up once.
Then take the left of the inner ring..
When it stops at the top, take the right half of the inner ring.
When it stops at the bottom, go straight up.
Take one more step up.
Then take the right side of the outer ring.
When it stops at the bottom, go one step downwards.
The doors will open.
4.1. THE MAZE
Now be careful, don't be hasty.
Look at the hall.
In front of you is a single door.
Look upwards.
There's a clue on the wall.
IN TIME ALL WILL BE REVEALED
WHEN YOU MOVE FORWARD.
Note the door is marked C.
At the left there are two doors, marked A and F,
at your right there are two doors marked D and P.
Hmm. Doesn't that remind you of something?
Right, those were the names of the black & white films.
Step into door C.
That looks familiar, doesn't it?
It's the set from The Count. But in full color this time.
Turn left (the only way).
Step forward, right, forward, left and forward again.
There's a drawing on the wall. It's a grid with red tiles.
Copy it.
Turn left and exit.
And you're back where you came from. In the hall.
Note the door in fornt of you is the door to the exit into into hell.
So step forward and turn around.
Turn left and take the door marked D.
Indeed, that's the set of The Detective Story.
Look at the desk. Another grid, with blue tiles. Copy it.

Turn right and exit. Back in the hall again!
This time, the door in front of you is door C.
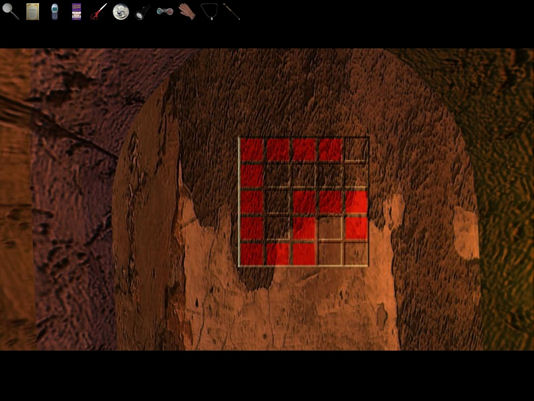
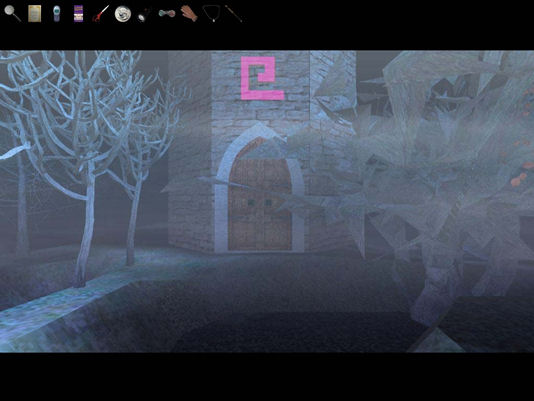
So turn left and take the door marked P.
That leads into Primal Atmosfear.
You can only go forward.
You'll see a tower. Above the door is another grid in pink. Copy it.
Go throught the door.
Back in the hall, take the door marked A.
Hey, you're back in space.
There's nothing you can do so walk to the wall in the back.
Click the screen, and you'll get another grid.
Turn right.
Press the button next to the door and exit.
Back in the hall!
Now take the only door left, the door marked F.
Hohohoho, back in Fuzzieland!
Walk to the door in the rear.
On the wall are two drawings.
One is a grid. Copy it.
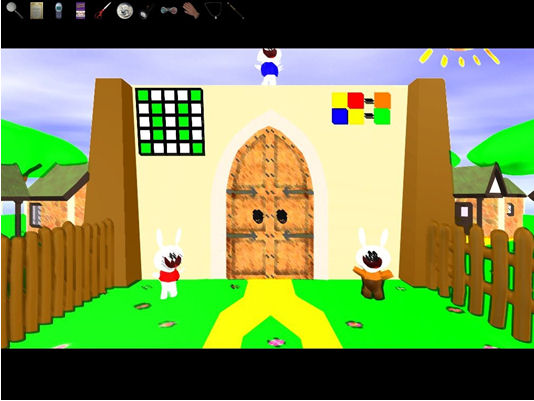
There's another hint.
Yellow + Red makes Orange (in case you didn't know).
Blue + yellow makes green.
Go throught the door. You're back in the hall.
Now what?
Whatever door you take, it takes you back to the hall.
There might be some kind of clue to get out of here.
Maybe it's in the order you pass through the different films.
Can you think of any?
Use the order in which the killings took place in the theater.
1. Eric = The Detective Story
2. Melanie = The Count
3. Heather = The Fuzzies
4. Jeremy = Aliens form Mars
5. Todd = Primal Atmosfear
Now walk through the doors in this order
D, C, F, A, P
Guess what?
You're in another hall!
4.2 THE MARBLE & THE GRIDS
On one wall is a kind of grid box.
The text on it reads
COLORS COMBINE TO FORM COLOR ANEW
And at the bottom
OVERLAPS NEGATE
On one wall is a closed door.
On the other wall is a toy with a rolling marble.
Press the red button.
The marble doesn't come very far, does it?
That's because it can't go down.
There's a couple of wooden bridges avoiding that.
The first one is slightly pink, the second one is orange.
The last one is green.
Now turn to the grid box.
There must be a connecting between the two.
Remember the first wooden bridge is pink.
Do you have something with a pink grid?
You sure do.
Take the copy you made of the pink grid.
Now press the tiles that should be pink.
Now press the button. You'll here a click.
Turn to the marble roller again.
The pink bridge is down now.
The next bridge is orange.
Go back to the grid box.
For orange you need two colors.
Right: red and green.
Take the yellow grid you copied.
Press the boxes that should be yellow.
Next take the red one.
Press the boxes that should be red.
Noting happens.
Beware: it reads 'Overlaps negate'.
So click away the tiles that are red as well as yellow.
You'll hear a click again.
The orange bridge is down too.
Now the green bridge.
If you put the green grid in the grid box and press the button, nothing happens.
If you put the blue and the yellow grid in the box (overlaps negate!!) nothing happens when you press the button.
Now what???
There's a nasty trick here.
You can't hardly figure this out by yourself.
You have to put all three colors in the grid.
So blue, yellow + the green one. Overlaps negate!!
Now press the button and the green bridge is also down.
Go to the marble roller and press the button.
The marble slowly rolls down.
You'll hear a click.
The exit door is open!
4.3. THE DEMON
Step outside the door.
Walk the path.
At the end of the path there will be a demon coming from below.
Climb the monster by following the arrow cursor.
Step into it's mouth.
You'll fall down into it's guts.
In front of.... yet another locked door.
4.4. THE SKULLS
Take a look around.
Anything to open the door with?
Hey, some of the skulls in the walls have red eyes.
And you can press them and they will go out.
If you've found all the skulls with red eyes and put them all out, you'll hear a sound.
No, it's not the door unlocking.
It's behind you.
Step out of the cave.
In front is a kind of golden statue.
You can't open it.
On top is a kind of strange diagram with a couple of colored skulls beneath it.
You don't know what to do yet.
So turn around.
In front of the cave's entrance is a heap of skulls.
If you press one, on a certain skull the eyes will light up and you'll hear a sound.
Press any other skull and you will hear a bleating sound, meaning 'game over'.
So what could that mean?
It's a matter of order.
Press any skull.
Note which skull's eyes light up.
Press that skull. The eyes will turn red again.
After that the eyes of another skull will light up.
Remember that order.
Now press the first skull and the second one.
The skulls will repeat that and add another skull lighting it's eyes.
Press the first skull again, then the second and the third one.
The skulls will repeat that order and add one new skull.
You’ll have to remember the order of skulls.
If you do it right, you win the game.
Beware: sometimes a skull has to be pressed twice!
Since this is a randow game, I can't give you any more hints.
It's a matter of trial and error - and of recalling the right order.
When you finished this game, you'll hear a click again.
So walk back into the cave.
Go to the door in the back.
No, it's not open.
But there's a skull hanging in front of it.
It needs something to be be put in it.
So turn around and walk out of the cave again.
Turn to the heap of skulls again.
Left next to it is an action cursor.
Click on it.
The rock will open, revealing a piece of paper.
Read it.
The paper contains a lot of hints and restrictions about the placements of some things.
Might be skulls.
Copy the paper.
Turn around and climb the golden statue again.
Look at the grid on the top.
There are 8 circles connected by lines.
Beneath that are 8 skulls with different colors.
Got the message?
Put the colored skulls in the right way in the grid.
OMG. This is truly HELL! It's a real mindcrusher. It almost drove me mad!
It took me months to solve it.
But I did.
Look at all the hints and restrictions.
You've got names, colors and positions.
It resembles the puzzle with the work schedule in the operator's room.
So start working on it.
Which name is what color?
Which skull should not be where?
Biro = rede
Irina = blue
Sari = green
Jenj = orange
Cryd = purple
Phera = yellow
Sephino = pink
Rarpine = white
Now make a list which colors should be next to each other - or not.
I can't give you any more clues.
So here's the solution:
|
|
PINK |
PURPLE |
|
|
BLUE |
|
|
YELLOW |
|
GREEN |
WHITE |
RED |
|
The door under the puzzle opens.
Inside is a little key.
Take it.
Climb down the statue and go into the cave again.
Go to the door in the back.
Take the key from the golden statue and put it in the skull in front of the door.
The door will open.
Step outside in the white light.
4.5. THE STORY OF FERUCIL
You're in a field.
Follow the arrows.
Find the cane.
The landscape will turn into a gloomy one.
Follow the arrows.
Meanwhile, listen to Ferucil's story.
Eventually you'll come to a wall with some graffiti on it.
SAVE YOUR GAME.
Do so.
4.6. THE KILLING OF FERUCIL
Step out and you're inside the theater again.
This time it's Ferucil on the podium.
You have to find a machine backstage.
With yet another puzzle.
Solve it, and a device will give you the magic gem that belongs on top of the staff.
With that you can finally kill Ferucil.
There are only a few minutes to spend.
So you have to be fast.
At first you won't manage to do what's needed.
Because you can't find your way to the machine.
Because you don't know how to solve the puzzle.
Because you don't know how to put the gem on the staff.
Because you don;t know how to get back in front of the podium
to kill Ferucil with his own cane.
Don't worry: there are endless tries possible.
As soon as Ferucil ended his little speech, the arrow cursor emerges.
Go forward.
Right.
Left.
Forward.
Left.
Forward twice.
Up the stairs.
Left.
Forward.
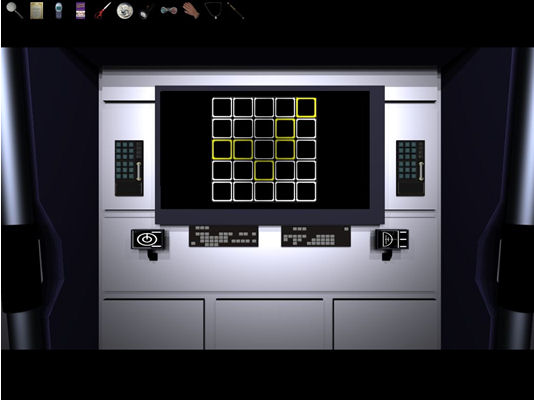
Turn left. There's the machine with the puzzle.
Get closer.
There are 4 black balls connected with red beams.
In the middle are 6 slightly red dots.
You have to set light to all dots.
By moving the black circles in such a way, that the beams hit all dots.
It's not hard.
After you succeeded, the machine will produce a gem.
Take it.
Put it on top of the staff in your inventory.
Now run back to the front of the podium and face Ferucil.
Throw the staff towards him.
He'll die.
Enjoy the tail bit of the game.
It’s kind of Happy Ending.
Is it?
- - - - - -
Best regards,
Hans Lamboo
Holland.
October 15, 2011.
This document was provided to GameBoomers.com and may not be distributed without express written permission of the author and the content may not be altered in any way.
![]() GameBoomers
Walkthroughs and Solutions
GameBoomers
Walkthroughs and Solutions