General Observations
It is difficult to characterize this game. The mark of Arxel Tribe and company is all over it. There are many individuals and the relationships between them is frequently far from clear, and occasionally seems to change. The story line contains very many nonsequiters in that there seems to be no point to what has happened, or if there is a point being made, it is obscure in the extreme. You want a conclusion, a reasonable wrap up, and it is not there; you are left hanging. There are required actions for which the indications are so vague as to defy deciphering or so cryptic as to resist any logic. There are things that occur without any explanation, such as Siamese twins suddenly becoming separate when it suits the action. There are puzzles that must be solved for which there is no clue, such as rearranging books by title against a sentence that appears nowhere.
There are dead ends and red herrings in abundance, though that is of course characteristic of Adventure games. Some might seem so, but are really not. For example, very early on in Episode 1 you will find a tooth that goes into inventory and is never accessed; however, if you do not have it, the climactic scene between the twins will not occur. There is a lot of this type of action throughout the game.
This is a linear game and you should proceed through it following the numbered episodes even though these do not occur in chronological sequence. This latter fact gives rise to some contradictions that will be addressed later. Be sure to read carefully pages 18-20 of the game book:
Under
the Options menu there are adjustments for “Dialog Volume” and “Volume”,
but no explanation for what these sliders do. Operations that seems obvious
do not work. One would hope that there would be a way to separately control
the background music from the speech of the characters, but with no adjustments
of either slider the speech volume changes from overloud to hard to hear.
After a while it would be a relief to do away with the background, particularly
the sappy saccharine lullaby that accompanies the menu screen. Perhaps
you can determine how these sliders actually operate to make these adjustments.
In any event, have the subtitles on.
Inventory action leaves something to be desired. There are occasions when you click on a hotspot, nothing seems to occur as a result, but if you check the inventory you will find you have acquired an item. At other times, an inventory item will appear and you must place it in inventory. An item must always first be in inventory before you can make use of it.
The character of Mephisto may grate a bit after a while, but perhaps this is by design, considering who he is in legend and religion. It is especially irritating after a while to hear his insulting remarks each time you load, save, or quit. He is an oily chap who is very full of himself and he does not mind letting you know it, since he is forever talking. He does not have a very pleasant face, and it never changes expression, only his lips move slightly. And, not that it matters, he waves his arms extravagantly. Well, most of the characters do when talking.
Walkthrough
As you play this game you are acting as Marcellus Faust, a previous employee at the Dreamland amusement park, trying to learn details of the lives of a few of the park’s denizens, mostly freaks. It is possible that this can be confusing at times because Marcellus shows up frequently in videos. Deal with it, there are many other situations that are more confounding.
Here is a suggestion that really should be taken to heart: view the introductory video more than once. (“Trailer” in the MOVIES menu.) It sets things up pretty well, which is particularly necessary in this game.
Episode 1 - November 1935
Episode 1 opens on a part of the Dreamland park where a boardwalk goes to a couple of carnival wagons and a tent. Mephisto is there giving a lecture-you will find he does a lot of that. Check the STARS menu for the cast. There is of course nothing in inventory. The only dwelling open is the wagon of the twins, Lily and Jody, so go there.
1. Enter the
wagon. It is not very elegant. Turn left to the sink from which you can
pick up a strainer. For some reason, as soon as you do this a brief video
of the twins picking up scattered coins appears. Perhaps this is to give
you a look at these two, or to indicate their avarice.
2. Turn around
and click on the ashpit door at the bottom of the stove. It will open to
show three small piles of ashes.
3. Get the ash
shovel hanging from the back of the stove.
4. Use the shovel
to pick up an ash pile.
5. Get the strainer
from inventory. It comes to rest in front of the stove.
6. Get the ash
filled shovel from inventory and click it on the strainer, dumping the
ashes. Yes, the ashes remain in the shovel while it is in inventory.
7. Click on
the strainer and drag it back and forth to sift the ashes. Do this thoroughly.
8. Again use
the shovel to pick up, and the sieve to sift the other two ash piles. In
one of the three you will find a tooth that goes into inventory, with a
video flash when you finish completely shaking the sieve.
9. You will
also find a burned key under one of the piles. Pick up the key.
10. Back off
from the stove and click on the blackboard. Note the numbers in the total
column. These are amounts of unspecified currency units owed to the twins.
11. Click on
the drawer in the box below the blackboard, which opens to show two books.
The green one is more evidence of avarice. On the cover of the gray book
you can make out the last part of Hannibal’s name. Open it to see that
he owes them 187 of this unspecified currency.
12. Walk toward
the bed. Below the bedpost is a shallow drawer containing a key that you
need. If you want to see what Hannibal looks like, there are two pictures
of him in the round frames.
13. Walk toward
the bathroom, then turn to the dresser and click twice on the lamp to get
a video of Hannibal and the twins. He is a slimeball with a thick Cockney
accent. One of the twins wants to marry him. Or maybe both do, it isn’t
clear.
14. Click on
the old Victrola to get a video of Mephisto stirring up the plot.
15. Go into
the bathroom and turn to the special commode for Siamese twins. Get the
knife from the commode’s water tank.
16. Walk to
the wardrobe next to the head of the bed and use the two keys to open it.
17. Drag the
red garment to the left to reveal a safe. Click on the safe to hear one
of the twins remark about “all our wealth”. This is your clue to add the
totals from the blackboard plus Hannibal’s debt to get the combination
of the safe.
18. As you can
see, the dial of the safe is at 0. The combination is entered in the standard
manner: turn the dial cw to the first number, then ccw past the first number
to the second one, then cw directly to the third number. The dial returns
to 0 and the safe opens.
19. Inside the
safe is a winning lottery ticket placed there by Mephisto. Pick it up and
you are treated to a video of Jody using the knife to do away with Lily
so the prize will not have to be shared. The twins somehow have become
separate, but there is no explanation of how this might have happened.
The disposal of Lily’s body is not clear, but the stove is involved. On
the other hand, Jody says that that Lily will be as close to Hannibal as
she ever dreamt of. Somehow Jody is left with Lily’s skull to dispose of,
and she takes it to the park’s Ghost Train. That is where the program now
transports you as well.
20. Walk to
and get into the waiting train car.
21. Click on
the tunnel entrance to begin the train ride. This is a sort of maze in
which, if you do nothing, you just continue to ride. However, a right pointing
hand will appear briefly in the blackness just before the track divides,
and if you press the left mouse button whenever you see the hand, the ride
will eventually end at a wooden barrier against which a skeleton is leaning.
22. From the
mouth of the skeleton you can get a contract from Mephisto guaranteeing
Jody great wealth if she will give up Hannibal. Back off, and you are transported
again, this time to a paddlewheel boat cruising on a park lake. (What has
happened to Jody, and to Lily' skull?) The boat stops at a dock leading
to a large ornate gazebo. Walk to the gazebo, where you will be seated
at a bench in it. Theo comes and talks to you about the gazebo arches and
looking at the sunset, then he leaves.
23. You are
standing again. Walk to the bench to sit in it and look down. The floor
of the gazebo is a compass rose; you should be facing South.
24. Turn until
you find on the gazebo floor in the shadow of one of the pillars a hard
to see small gold rectangle. Click on it to get close, then click again
to move it down. Back off and rumblings are heard.
25. Turn to
look directly east. There is a plaque in the pillar straight ahead. Click
on it to read about the redesigned park dedication in November 1920 in
Savannah, presumably Georgia.
26. Click on
the plaque to have it swing aside. Inside the pillar is a book. Pick it
up. It is Theodore More’s notebook.
27. With a final
short appearance by Mephisto, the episode ends, the menu screen appears,
and you are set to begin Episode 2.
You may click
on the left end of the banner at the top of the screen to go back to the
end of Episode 1 and you can then read Theodore’s Notebook at the bottom
of the screen. You may also review Jody’s pact with Mephisto, if you wish.
The lottery ticket appears as “evidence” - evidence of what?? Click on
the right end of the banner to return to Episode 2.
Episode 2 - December 1952
Episode 2 begins, of course, with philosophic remarks from Mephisto. The STARS menu will show only a small cast of characters, and the inventory has only the lottery ticket from the last episode. You will have an exterior view of a building shaped like a Quonset hut, which is, as you will in due time learn, the park quarters of Nathaniel Meister. You will also learn that the structure was built to Nathaniel’s specifications. You can see what must be a waterwheel on the left side of the building, and you can hear running water but the wheel is not turning.
1. Walk to the
building. You have to go around to the other side of it to find the entrance.
On that side at the end of the porch by the light there is an opening showing
a bucket of the now covered and unmoving waterwheel.
2. Go back to
the center of the building for the entrance. Enter and go up the stairs
at the left. You may as well know here at the start that there is a bathroom
at the top of the right stairway, and that it plays no part in the action.
There is a door behind and below these stairs that is locked for now.
3. Look at the
diploma and first picture at the top of the left stairway in order to learn
a little more about Nathaniel. The diploma is signed by no less a luminary
than John von Neumann. Those literate in computer history will be impressed
by this.
4. Walk forward
to the writing desk in the corner. Locked, of course. Note the headless
wooden statue by the left leg of the desk.
5. Turn left
to the bookshelves built into the wall. You can read the title cards on
the edges of the shelves, and you can also get and read a little bit of
a few of the books, if you wish.
6. The book
you want is the large leaning one in Kryptology and Coding section. Get
the key that is protruding from the top of the spine.
7. Now you can
open the writing desk and lower the writing surface. From beneath the right
edge of the blotter get the peculiar looking paper that the inventory calls
a geological survey map.
8. The center
drawer presents a somewhat strange contract between Nathaniel Meister and
Dreamland park architect and owner, Theodore More.
9. From the
other drawers you may get a magnifying glass, a sealing (signet) ring,
a paper knife, and the head missing from the wooden statue. In order to
get the lower right drawer to open all the way to reveal the head, the
lower left drawer must be open when you open the right one.
10. Back off
from the desk so it will close. Put the head on the statue and a door behind
it will open. Inside are a tape machine and three reels of tape.
11. Click on
the tape reels to put them in inventory. Retrieve tape 1 and put it on
the machine, then press the switch on the right to hear a recording that
does not seem to have much significance. When it is done, click on tape
1 to put it back in inventory. When you back off from the cabinet, the
three tapes return and the door closes.
12. Go to the
big desk and open the center drawer. Pick up the matches that you will
need in subsequent episodes. Don't bother with the pipe.
13. Now return
downstairs and enter Nathaniel’s bedroom through the door under the left
stairway.
14. Turn to
see the square drawing in the arched door. It very much resembles the geological
map that you found upstairs. Open the door and place the map from inventory
in the brick square.
15. Now when
you close the door you get a readable map of the English Channel and the
French coast. You also get a narrative about the WW II Normandy invasion
and Operation Fortitude. On the map Omaha Beach is identified by its longitude
and latitude, and the invasion date is indicated.
16. At the conclusion
of the story you get a quick glimpse of some numbered wheels being set,
and you are left looking at, among other things, a large world globe.
17. Walk over
to the globe and turn right so that you can see the equatorial ring on
the right side of the globe. Click on the ring and you will see the numbered
wheels. The top two rows have been set to the invasion date shown on the
map.
18. Go to the
four-doored wardrobe against the wall. Open the second door and locate
a picture postcard of Omaha Beach; turn it over to see the notation A=0.
19. Open the
third door and find a garment label that is too out of focus to read. Use
the magnifying glass to clear it up. The row of three numbered diagrams
on it are what is relevant: the steps to open a sealed document. (You would
hardly need instruction for this operation, but you have to read this label
for program progress.)
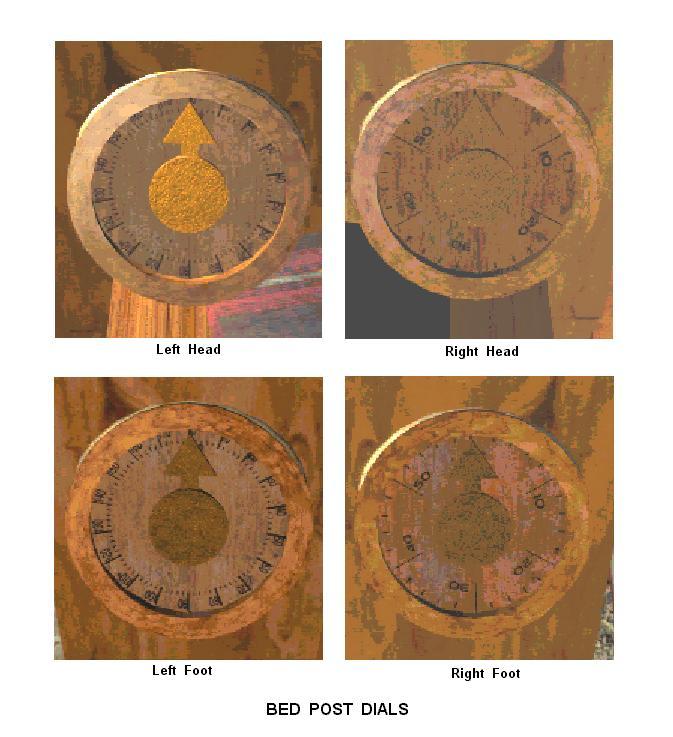
20. Click on
the four bedposts and you will find that each contains a dial and pointer;
the details of these dials, especially those on the right, are not all
that easy to distinguish, making this exercise unnecessarily difficult
since the dials must be set exactly, and the pointers do not line up precisely
with the dial numbers. You have to set the dials at the head of the bed
for the latitude of Omaha beach (degrees on the left post, minutes on the
right one) and the dials at the foot for the longitude. The dials on the
left posts have 18 major (numbered) divisions, so that makes 10 degrees
for each division; the dials on the right post have 6 major divisions,
so they are 10 minutes for each division.
21. When you
get the four dials set precisely correct the drawer in the side of the
bed will open. In it is a box or a book that is closed with a sealed clasp.
The sealing ring will take care of that.
22. After the
clasp springs up, click on the white spot where the seal was. The coding
wheel appears briefly, then goes into inventory.
23. Click on
the cover to raise it and reveal seven bicolored wheels. If you drag on
these wheels to turn them, you will discover there are in fact more colors,
and that they are the seven colors of the optical spectrum:
Red Orange Yellow Green Blue Indigo Violet
though the color
rendition is in some cases more pastel than primary. Drag the wheels so
that the spectrum is represented bottom to top on the edge of the opening
between the two triangles, and the inner cover rises so that you can pick
up and display the sealed document at the box bottom.
24. Insert the
paper knife under the seal and pull it down as shown in the garment label.
25. All that
for a practice document! Back off and everything closes except the drawer.
26. Get the
code wheel from inventory and drag the inner wheel around until A=0. Read
the numbers corresponding to the word Omaha.
27. Go again
to the numbered wheels on the globe equatorial ring and set the lower row
of wheels to this number. The globe opens.
28. Click on
the scarf inside for a statement of mysterious import. Presumably a lady
dear to the heart of Nathaniel was a member of the French Resistance group
of the Operation Fortitude narrative, and despite assurances of safety,
the group was eliminated after providing the false information.
29. Get the
envelope from the globe and use the paper knife to open it as before. It
is a letter dated seven years previously from Nathaniel to a British government
official refusing appointment to a government position and hinting at reasons
why. One can infer that the loss of the lady is prominent.
30. Back off
from the letter and there is a video in which Mephisto offers Nathaniel
vast wisdom and immortality in exchange for something not quite clear.
This must have happened sometime earlier, because it shows Mephisto scratching
the fabric of the armchair, and the scratches were there on the chair’s
arm when you first entered the building. Nathaniel refuses Mephisto’s offer,
and the video fades.
31. Part
2. It is eight years later in the study at the top of the stairs. Nathaniel
has gone but has left behind a series of clues that he anticipates you
will follow.
32. You still
have the key to the writing desk. Open it to find another tape, and some
sticks of wax in the upper left drawer.
33. Click on
the wooden statue to open the compartment in which is the tape machine.
Play the tape. It is about a treasure hunt using clues by analogies, the
reward being an assistant. The narrator claims to be Nathaniel, but sounds
more like Mephisto. Below the tape machine is a note about ashes.
34. Get the
Faust book from the lower left shelf in the bookcase for a little more
about the treasure hunt. (Be sure that the subtitling is on.)
35. As for ashes-well,
there is a fireplace in front of the large desk. When you go to it you
will find there are some tools immediately to the left of it, among which
is a shovel that you will need.
36. Click on
the bellows pointing into the fireplace. Ashes are blown away and a recess
in the back of the fireplace appears in which is a wooden tray.
37. Click on
the tray and it moves to the lower left of the screen to be your companion
for a while. The tray has 11 compartments, and the 3 wax sticks jump from
inventory into the front left ones. The other tray compartments have symbols
on the bottom. These compartments must be filled as you progress.
38. In the fireplace
compartment is a note wrapped around a handle. Click in this combination
to read the note, another clue, about the frog in the well. The handle
goes to inventory.
39. You must
have noticed the well as you rounded a corner of the house on the way in.
Leave the house now and go to it. Use the handle on the crank wheel to
bring up the bucket, on the handle of which is a metal frog with what looks
like a ring in its mouth. Click on this item and it goes into your ever
present treasure tray.
40. Look in
the bucket for another treasure clue. Pretty obscure; in fact, not much
of a one at all. Walk left along the boardwalk and go a couple of clicks
into the woods to look for a rock that you can overturn.
41. When you
find one there will be a rectangular outline in the turf beneath it. Use
the shovel to unearth a small chest in which there is a telescope and a
clue.
42. Pick up
the telescope (monocular) and read the clue. This one is more forthcoming.
Turn left a little and look up into the tree foliage for a hotspot. You
will find a hook affixed to a tree branch, and carved into another branch
is a symbol similar to one in the bottom of a treasure tray compartment.
43. Put the
telescope on the hook and look through it. In the distant rock face is
another of the same symbol. Walk to it.
44. From a crack
in the rock get a tray item and then another handle, again with a clue
wrapped around it. “movement” and “half in air, half in water” refers to
the waterwheel. “seven after black” are the operative words.
45. Go to the
waterwheel. On the left of it is an obvious place to put the handle. Click
below the installed handle and the waterwheel moves, click above it and
it stops.
46. Start the
wheel and watch closely for a bucket with a black edge. Counting that bucket
as 1, stop the wheel after 6 (not 7) more have passed. The bucket window
is now a hotspot.
47. Look in
and click on the tiny lever on the bottom of the bucket. A lid will rise
and you can get one more treasure tray item, also a key, and a clue, this
one again quite cryptic: “Iris’ rainbow”, “sailors”.
48. You should
have noticed a rainbow on a tapestry in Nathaniel’s bedroom when you were
near the globe. Go there now. You will doubtless be surprised to find that
while you were outside, the box in the drawer in the side of the bed has
been replaced somehow by a pyramid, which is in fact a mirror. Pick it
up.
49. In addition,
the invasion map in the arched door has been replaced by a picture of what
appears to be conquistadors, though one is carrying an oar, so they may
be the sailors of the clue.
50. Join these
two new items: put the pyramid mirror in the feathered fedora of the man
carrying the oar.
51. Focus your
attention on the apparatus on the wall above the bedlamp. The newly acquired
key will open the panel on the left, and the unit may be activated by clicking
on the red knob to move it from left to right.
52. In the wall
to the left of the globe is a bright stained glass window that heretofore
has been dark. Go to this window and press the red button in its center.
A laser beam emerges from it and bounces all around the room, glancing
off several reflectors and coming to rest on where else? The rainbow in
the tapestry: Iris’ rainbow. Crazy!
53. Click twice
on the place where the laser beam comes to rest to get yet one more treasure
tray item, and another clue appears in the mouth of an animal on the tapestry.
This one tells you in Latin to visit the center of the earth; in other
words, open the globe again.
54. Click on
the globe to open it and get a green treasure tray item and a clue about
a shoe. You saw a lot of shoes earlier in the wardrobe.
55. Open the
second door where one of the shoes is not neatly placed as are all the
others. Click on this shoe and then on its heel to get a final message:
meet in the kitchen. All but two of the treasure tray compartments are
filled.
56. The kitchen
entrance is below the never used right stairway in the hall. Go there and
enter the kitchen.
57. On the kitchen
wall to the left you can open the rightmost of the three cabinets to find
five packets of salt. Click on a packet of rock salt to put it in the treasure
tray.
58. Turn to
the counter, in the center of which is a peculiar appearing apparatus with
an ornate glass container suspended above it. Get a closeup of this apparatus
and it goes into action, somehow removing items from the treasure tray
and ultimately bringing a homunculus into the glass container. This is
the companion assistant you were promised. The treasure tray turns into
something that looks like a folded newspaper. You are transported to the
gate of Dreamland, with only the homunculus, matches, and the lottery ticket
remaining in inventory.
59. Above are
some lights, one of which is flickering. Get the homunculus from inventory
and click it on the flickering light. You will move to a map of Dreamland,
before which Theodore More is standing and telling why he created it in
1911. Click on the podium to pick up the map.
60. Fade to
Nathaniel’s study where Mephisto makes a brief appearance, and the episode
concludes. The menu screen appears, and you are set to begin Episode 3.
Use the banner
at the top of the screen to go back to Episode 2 so that you can read Theodore’s
Notebook at the bottom of the screen. However, all he has added is a copy
of Nathaniel’s letter to the British ministry. There are no pacts and the
folded newspaper has been added to the “evidence” mystery.
Episode 3 - February 1930
The episode opens-after Mephisto’s remarks-on a dock where you have just left the paddlewheel boat. Check the STARS menu; Kalinka and Giselle are listed, but they are not in this episode. Theo More is not listed, but he appears at the end. The inventory holds the homunculus, the matches from Nathaniel’s study desk, and the lottery ticket from Episode 1.
1. Walk up the
dock, turn left, move forward, left again, and down the steps to an underwater
apartment, presumably that of Frank Barnes. Turn right and move forward
where you will be facing a mirrored door to a closet in the corner of the
room.
2. Click twice
on the blue pad on the right side of the door to open it, then look at
what the man in the painting appears to be holding aloft in his right hand.
It is a wig. Pick it up.
3. Go to the
opposite corner of the room where there is a cabinet on which rests a small
red chest and a cup filled with pens, pencils, and the like. If you open
the cabinet you can see some items, but they are not accessible.
4. Open the
chest and read a short satirical newspaper clipping about Frank, or click
on it and a voice will read it to you. You learn that he is an artist.
5. Click on
the cup and a long thin item appears. Click twice on it, and the inventory
shows that you have picked up a compass needle and a thin pencil.
6. Turn around
and move toward the entrance steps where you can see other steps leading
downward. Go down these steps and regard the painting of the two nudes.
Use the thin pencil to touch the breast of the nude where it is being touched
by the other. The painting parts and you can enter Frank’s bedroom.
7. At the foot
of Frank’s bed is a large compass lacking a needle. Since you have one
in inventory you may as well install it. It points NW.
8. Move across
the bed in the direction the compass needle points, to the Don Quixote
type statue by the window. Click in it for a closeup. Get the wig from
inventory and put it on the statue.
9. Now you can
turn the crank at the statue’s base. The statue bows and orates. A drawer
opens in the base. Get the barely visible key from the drawer and back
off.
10. There is
a mermaid on the bedpost to the left. Click on the mermaid’s navel. The
navel flashes. Turn left to the next mermaid and repeat. Keep doing this
until the canopy above the bed drops.
11. Get off
the bed and click the key on the dropped canopy. This starts a video sequence
in which Marcellus opens a door in the canopy, then the scene shifts to
Frank drinking on the dock next to the paddlewheel boat. Mephisto appears
walking on the water and offers Frank a deal to make women fall at his
feet. Frank agrees. Mephisto says wait, you haven’t heard the price.
12. You too
will have to wait to learn what this price is, because at this point the
video fades.
13. Part
2. It is now October 1939, nine years later, and the scene is a duplicate
of the opening one on the dock.
14. Go up the
pier and down the steps to the apartment as before, and to the corner closet.
This time, instead of a wig you get a key.
15. Turn to
the right and take Frank’s 1st Prize from its frame on the wall.
16. Go again
to the cabinet in the room’s opposite corner. In the red chest, in addition
to the newspaper clipping there are now two letters, neither very flattering,
to say the least. Click on them for a lady with a very affected voice to
read them.
17. There is
nothing to get from the cup, but from the cabinet you can now pick up a
box of slides and a magnifying glass.
18. Beneath
the entrance steps is a viewing table. Spread the slides on it and use
the switch at lower left to turn on the light. The magnifying glass is
used to look at the slides.
19. Most of
the slides are inconsequential, but one shows a clock that could be the
one on the wall in this apartment.
20. Go to the
apartment clock and use the key from the bedroom to open the glass cover
over the face. Drag the hands to the same time as that seen in the slide.
Back off and the hands return to the previous setting. Faint bongs and
cuckoos may be heard.
21. Go downstairs
and use the thin pencil to get into the bedroom. There is now a hole in
the floor with a ladder leading down. Go down the ladder.
22. You end
up in what appears to be a darkroom, and a messy one at that. On the wall
is a row of prominent photos, each with a number. Click on 76. Take the
revealed light bulbs.
23. Walk toward
the camera and turn left to the sink. Click on the book. The edge of a
manuscript can be seen below the pages at the bottom. Click on it and Frank
will read it to you.
24. Go to the
projector device to the right of the camera. There is a bulb holder on
the top of the bellows. Click on it to open it, then put the red bulb in
it.
25. Click in
the flat projection area below the bellows and place Frank’s 1st Prize
on it. Turn on the light using the switch on the lower right and read Frank’s
contract with Mephisto.
26. Back off
from the contract to start a video in which Frank attempts to immolate
himself. Mephisto stops it, and you are transported to the Ghost Train
switching center.
27. Walk straight
ahead past the railcar and you will reach a gate into the central roundtable
mound. Click on the left side of the gate to open it.
28. Enter and
go to the massive machinery on the far wall. Turn left and open the small
door in the wall, behind which you will find a miniature set of the same
machinery.
29. Pull the
pendulum to left and release it. This starts the same action on the large
machinery, and for some reason the railcar goes to the top of the mound.
Theodore More appears and muses for a while about the park, then fades
away to be replaced by Mephisto in the darkroom rationalizing and making
excuses for himself. The episode ends, the menu screen appears, and you
are set to begin Episode 4.
Use the banner at the top of the screen to go back to Episode 3 so that you can read Theodore’s Notebook. He has added very little. Frank’s pact with Mephisto can be seen, and his manuscript has been added to the “evidence” mystery. Use the banner to return to Episode 4.
Episode 4 - June 1935
After Mephisto’s remarks, this episode opens on a dock overlooking a body of water with hills in the distance and the paddlewheel steamer at the dock. On the far shore you can see other parts of the Dreamland park. Your inventory again contains only the homunculus, matches, and the lottery ticket from Episode 1. Check out the STARS on the Carousel introduction menu. Hannibal is not listed but his presence is strong. The twins are listed, but they appear only in an optional very brief flashback.
1. Turn around
and walk to the ramp. You can’t go up, you need steps.
2. Get the homunculus,
then click it on the lever at the top of the ramp. Now you have the stairs.
3. Ascend the
stairs. Turn right and go to the center of the courtyard between the table
and the statue supporting a water globe.
4. Optional:
for some plot thickening, click on the potted plant on the table under
the umbrella.
5. Go up the
stairs to the right of the statue.
6. Open the
box on the floor to left of the door and take the peacock feathers, despite
what Kalinka says.
7. Note that
the window in the door is broken. If you wish to know why, click on it,
but it has little if any relevance.
8. Click on
the door to enter Kalinka’s home, where you will be looking at a stairway.
9. Turn and
walk to the left of the sewing machine.
10. Turn right
to face a work table. On the right end of this table are three horizontal
rolls of material on a stand: gray, black, and brown. Click on the brown
roll to cut off a piece, then do the same for the black roll.
11. Take the
brown piece of material-hard leather-from inventory and click it on the
black cutting machine in the center of the work table. Put the resulting
strong leather strap in inventory.
12. Take the
black piece of material-soft leather-from inventory and click it on the
pattern machine at left end of the work table. Put the resulting pieces
in inventory.
13. Take these
black pieces and click them on the cutting machine. Put the altered pieces
back in inventory.
14. Go to the
sewing machine. Under the stairs against the wall behind you is a chest
of drawers. Open one of the top drawers and get a respiration grill and
some shoelaces.
15. Turn to
the sewing machine. Click the black soft leather pieces on it, then the
respiration grill, then the shoelaces. Put the resulting mask in inventory.
16. Walk between
the sewing machine and the stairway. Ahead is a bathroom, the entrance
being through a pair of red curtains, one of which is pulled aside. As
soon as you enter confusion sets in.
17. You will
see a set of three brushes on the wall to your right, and you will find
a hotspot on the wall just to the right of the brushes. Click on this hotspot
and a mirror appears reflecting the wash basin stand. The drawer in the
stand in the mirror opens, but not the one in the actual stand. From this
open mirror drawer you can get first a roll of gauze, and second some tissue.
18. When you
turn to leave, you cannot exit between the curtains where you entered,
you must go through the curtain behind the tub. This bathroom experience
does not make much sense.
19. Go up the
stairs and through the bedroom to the room with a loom and a cradle. Click
on the loom for a statement from Kalinka to her lover (Frank) about wonderful
news. She tenders a key (by speaking); click on the shuttle that is lying
on the weaving to get the key, which is a silver moon in a folded cloth.
Unfold the cloth and click on the center of it to put the moon in inventory.
20. Go back
down the stairs and through the black figured curtain behind them and into
the kitchen. Look at the face of the large grandfather clock, then put
the silver moon in the moon opening. The clock door opens.
21. Go through
the passage to the greenhouse, where Mephisto gives Marcellus a lecture
on time travel. You seem to have acquired a tray similar to the treasure
clue tray in Episode 2.
22. Look at
the round table to the left of the door. In the center is a disk with 12
astrological symbols, surrounded by four trees with foliage indicative
of the four seasons. (Spring is in the lower left, with Summer, Autumn,
and Winter clockwise.)
23. Go back
through the door to the kitchen. In a cupboard below the distillation apparatus
on the counter you can pick up a sack of flour.
24. Now leave
the house and go to the Atlas statue holding the glass globe in the courtyard.
25. Look at
the wheel crank near the bottom on the left. you can’t turn it because
there is a nail jammed in the gears. Remove the nail, then click on the
crank to start the buckets filling the globe with water.
26. When that’s
done, click on the buckets to get the necklace that somehow got in one
of them.
27. Now click
on the statue for a closeup, then throw the switch on the top of the statue’s
head to drain some of the water.
28. Click the
sack of flour on the globe to get a glimpse of 4 of the 12 astrological
symbols that you saw on the greenhouse table. Click on the globe to get
a steady view so that you may make a note of them.
29. Go back
to the house and head for that goofy bathroom. Don’t go in, instead go
to the right through the glass doors, where there are six mannequins. You
can click on all of them for statements, but the only two of importance
are Hannibal and the twins in the room at the right. After looking at them,
click the peacock feathers on the twins and the strong leather strap on
Hannibal. Not a nice guy.
30. Now for
the time travel that was the subject of Mephisto’s lecture. Go back to
the greenhouse and the symbols on the round table. Click on the 4 that
you saw in the globe in the order they appeared. The table undergoes a
convulsion and returns to normal.
31. Click on
one of the trees around the symbols. Any one will work, but you may as
well start with Spring. Another convulsion. A short video may follow, maybe
not, depending upon the tree chosen. Go to the corner of the room where
there are pots with herbs growing supported by sticks. Get a leaf from
one of the plants, it will go to that tray that is following you around.
32. Repeat this
procedure for the other three trees on the table, then go to the kitchen
with your herb leaves in inventory. (If the forward cursor does not appear
on the door, click the Spring tree again.)
33. Get a closeup
of the still. Remove the cork from the spherical container on the left
and put in it the herb leaves that are now in inventory. Use the matches
to light the burner and process some of the herb leaves into the container
on the right. When the burner goes out you can place the processed leaves
(mixed herbs) in inventory.
34. To the right
of the still is a box that will open when you click on it. Put the mask
in the open box, then the gauze on top of the mask. Put the herbs on the
gauze, and finally the tissue on the herbs. Pick up the completed mask.
35. Return to
the six mannequins and place the mask on Frank in the left glass room.
He speaks about a ring.
36. Go back
upstairs to the room with the loom. A cloud with a miniature castle has
appeared over the candle. Use the matches to light the candle, and a little
blue angel rides the track out from and into the castle.
37. Put out
the candle when the angel is out of the castle and she will stop. Click
on the angel and a ring will appear in inventory.
38. Back off
from the cloud and the scene changes to the courtyard where Marcellus is
having coffee with Kalinka. That concludes shortly and Mephisto appears
for a speech, then he too fades away, and you are transported to a strange
large room that must be a transportation terminal. An elevator at the end
of the walkway is the only way out.
39. The elevator
takes you to a great library. Move ahead up a ramp, turn right and walk
to a ladder leaning against the bookshelves. When you climb to the top,
most of the books in the center shelf slide to the left, exposing five
that are sort of a light maroon in color.
40. Click on
these latter books and they will disappear. Continue moving to the left
and clicking on each book as long as the bright action cursor shows. Right
click to access the inventory; it should show that you have twelve books
there, and running the cursor along them will show the title of each. If
there are not twelve, go back to the books on the shelf for the missing
ones.
41. Now you
must put the books back, using the first word of the title to make the
sentence “I Theodore Lost Hope In 1917 And Signed A Contract With Mephisto”.
Start at the left and slide the books in when their image as cursor brightens.
42. When you
succeed in this effort-it is not difficult if you take your time and keep
checking as you go-the sentence is repeated with flashing lights, and then
on the library floor Theodore is seen telling Marcellus the circumstances
of this pact. Mephisto joins the conversation, tosses Marcellus a coin,
and has a few solo words. The episode ends, the menu screen appears, and
you are set to begin Episode 5.
Use the banner
at the top of the screen to go back to Episode 4 so that you can read Theodore’s
Notebook. He has added a lot about Kalinka and Frank, and Kalinka’s history.
Despite Theo’s pact with Mephisto, nothing appears under this heading.
Kalinka’s silver moon is the “evidence”.
Episode 5 - March 1932
The opening remarks by Mephisto are perhaps a little more offensive than usual. He is on the boardwalk where Episode 1 started. Inventory still contains only the homunculus, matches, and the lottery ticket. Check the STARS menu; a new character, Tod, is to be introduced. The tent is now open, so go into it.
1. This place
seems to have a little more class that the twins’ wagon, but perhaps somewhat
sleazy like its owner, Hannibal. Walk ahead toward the sink on the back
wall.
2. Next to the
sink is something that Hannibal has tried to make look like a grandfather
clock. The face is a roulette wheel that you should pick up. (For some
reason inventory calls it a cylinder.)
3. Turn to the
bench that has the roulette board on it and put the wheel in the tray on
the end.
4. Examine the
poster and read the roulette numbers that Hannibal has written and crossed
out. What you are supposed to come up with is:
19 Red 0 Blue
22 Black 7 Red 19 Red
5. Click on
the wheel for a closeup, then drag these numbers to the indicator, pressing
the yellow diamond on it after each number is positioned. The roulette
numbers board rises.
6. Step across
the board look into the recess under the raised section. Get the whip and
the film reel.
7. Optional:
you can look at the pictures on the wall to get insights to Hannibal’s
character.
8. Go toward
the entrance curtain, then turn right and move to the cabinet that is to
the left of the round bed. Open the top doors.
9. There are
four bottles on the right of the top shelf; the three larger ones have
colored tops. Click on these tops in the same order as the colors you used
on the roulette wheel. The front of the open cabinet drops to reveal another.
10. Get the
key, then click on any of the bottles to bring up a video of a drunken
Hannibal berating Tod, who is delivering booze. It concludes with Hannibal
dancing on the bed with rats at his feet.
11. Close the
cabinet doors and pick up the rat on the bed.
12. To the right
of the bed is a small table on which is a wire and a box from which protrudes
a shaft and cylinder. Drag the wire to the terminals on the top of the
box.
13. Put the
rat in the cylinder and click the whip on the rat to get it running.
14. Click on
Hannibal’s picture above the bed. It slides away to reveal yet another
cabinet.
15. Use the
key to open the cabinet and put the film reel on the projector that is
in it.
16. Turn on
the rat powered projector to see a film about how to control tigers. The
rules are not on the screen long enough to comprehend them, so this is
what they are:
Use the banner
at the top of the screen to go back to Episode 5 so that you can read Theodore’s
Notebook. He has added a lot about Hannibal, some of it conjecture, some
obscure, some both. Mephisto’s strange pact with Hannibal is available.
Hannibal’s whip is the “evidence”.
Episode 6 - June 1930
Be advised that Episode 6 is more strange than even the others, with action jumps and unexplained situations. It starts on the boardwalk of Episodes 1 and 5. Mephisto’s remarks are mercifully brief. Checking the STARS menu shows more characters than usual, with an extra character played by Mephisto. Starting inventory holds the standard set: homunculus, matches, and lottery ticket. You must have noticed the punching bag the other times you were here, now you can use it.
1. Click on the
bag and Marcellus will hit it. Do it again and he will fall down after
he kicks it. The homunculus laughs at him. Marcellus tells it to try.
2. Click the
homunculus on the bag and instead of hitting it to move the dial, it flies
up and moves the indicator arrow to the highest position. The door to the
unvisited wagon opens.
3. If you go
to the open door it will close. Send the homunculus to hold it open.
4. Enter the
wagon. It is plainly furnished and very neat. As soon as you are in, turn
right and click on the poster to learn something about Tod, including his
date of birth, which you will need.
5. Optional:
there is a 2-drawer cabinet below the poster. In it you will find a signet
ring, a St. Christopher medal, and a newspaper.
6. Go to the
bicycle and click on the rear axle, then on the handlebars. Marcellus will
ride it for a short period, then the bed will open.
7. Optional:
look at the items in the box that is revealed.
8. Click on
the box to have it move aside. Underneath is a trapdoor with a combination
lock.
9. The code
for the lock is Tod’s date of birth. Drag the dials so the numbers line
up on the lower edge between the marks. When the door opens, Marcellus
climbs down a ladder to Tod’s liquor operation in the space below.
10. Time to
make some booze. Go behind the large vat that has a ladder hooked over
its rim.
11. Click the
red button on the wall switch. This will lower the stack of firewood from
the upstairs woodbin and slide back the cover grating. Pick up a piece
of firewood. (You could bring a piece of wood from the woodbox upstairs
down with you and skip this step.)
12. Turn around
and get the pot on the floor next to the vat.
13. Walk to
the pyramid of casks. Click the pot on the spigot of the right center cask
to fill it with molasses.
14. Go to the
stove. While you are there, pick up an empty bottle from the box on the
floor next to the stove.
15. Open the
door in the top of the stove and pour in the molasses from the pot. Close
the door.
16. On the floor
next to some barrel staves at the foot of the entrance ladder there is
a pail containing black material. Though not visible in the pail, you can
get an old newspaper from it.
17. Open the
fire door of the stove and put in the newspaper and the piece of firewood.
Use a match from inventory to light the newspaper, then back off to close
the fire door.
18. Turn back
to the cask pyramid and take the tap from the left center one. Put this
tap into the center one on the bottom and it will swing back so that you
can crawl through.
19. Here is
where things start to get confusing. Click in the open cask to have Marcellus
crawl through. There is then a video in which he starts to do this, then
Mephisto shows up and kicks him, after which a short conversation follows,
then Marcellus is shown briefly talking to Theo in a different location,
after which you return to the game having made it through the cask.
20. The room
you are now in appears to be a dormitory. The impression is that Tod is
caring for a group of street urchins.
21. Go into
the bathroom and turn right. Open the medicine cabinet and click on the
bottle of red liquid to hear about another of Hannibal’s misdeeds.
22. Go back
to the dormitory and turn right to the telephone. Click on it for a conversation
with Mr. Nitty. A poker game is arranged.
23. Leave through
the cask tunnel. In the outer room Marcellus metamorphoses to Tod, evidently
to the latter’s surprise.
24. Go up the
ladder to Tod’s living quarters. Mephisto, as Mr. Nitty with hat and cigar,
is seated at the table by the door. He wants a drink.
25. Go to the
sink and click on the faucets for a closeup. Click on the left one to start
the booze flowing, then click the bottle on the stream of booze. Turn off
the faucet.
26. Go to the
table and pour a drink from the bottle into the glass on the table. The
poker game is set to be played.
27. After some
remarks from Mr. Nitty, your hand is shown. Discard the cards that you
don’t want, then click on the deck to fill your hand. Both hands are then
shown with a win or lose statement.
28. Back off
to begin another hand. You keep playing until you win enough hands, then
the poker game concludes with a concession speech from Nitty.
29. A video
is immediately shown of a confrontation between Tod and Hannibal in Giselle’s
place, with some of the other cast characters looking on. Tod overcomes
Hannibal, then Theo shows up for another history lesson. Mephisto makes
a very brief appearance, and the episode ends. The menu screen appears,
and you are set to begin Episode 7.
Use the banner
at the top of the screen to go back to Episode 6 so that you can read Theodore’s
Notebook. He has added a posthumous letter written by Tod. Despite the
pacts of this episode, nothing appears under this heading. Tod’s St. Christopher
medal is the “evidence”.
Episode 7 - December 1938
This episode opens at the entrance of Giselle’s exhibition place on a hill above the entrance to Dreamland. Inventory carries the standard three items; the STARS menu does not really list the total cast of characters. Enter Giselle’s showplace.
1. Of the four
posters in the room it is only necessary to look at Giselle’s to note her
weight, but look at the others anyway.
2. Enter the
alcove containing the bathtub.
3. Remove the
stopper from the bathtub drain and get the attached key.
4. Use the key
on the square below the scale dial, then drag the toothed wheel to set
the scale pointer to Giselle’s weight. The tub sinks to her living quarters.
5. Look around,
lots to see, among which is an elaborate track system on the ceiling, presumably
to help Giselle get around.
6. Click on
the teddy bear on the floor next to the bed below the doll. Put it in inventory.
7. Click on
the doll and get a key from the doll’s apron pocket. A conversation between
Mephisto and Giselle follows.
8. Pick up the
four cubes next to the doll.
9. Walk to the
refrigerator and use the key from the doll to open the lock by the door
handle. Open the refrigerator.
10. Open the
freezer compartment and click on the bright area next to the temperature
gage. The inventory will show that you now have some frozen paper.
11. Look at
the refrigerator door, where you will see four bottles on the upper shelf.
You are to place the four cubes on the shelf below the bottles, and the
labels must match.
12. When you
do this successfully you can then open the lid of the compartment above
the bottles and get the chain that is in it. Hang the chain from the ring
on the shaft above the refrigerator.
13. Move over
to the stove and get a closeup. Put the frozen paper in the pot that is
on the stove.
14. Turn on
the gas and use a match to light the stove. When the ice has melted, turn
the stove off.
15. Click on
the brown paper at the bottom of the pot. It is a note to Giselle from
Mephisto which he reads aloud. The spoon he mentions can be found under
the pillow on the bed; no use is ever made of it, but you must have or
you won’t get out of Frank’s studio, so pick it up.
16. When you
back off from the stove you get an arm waving altercation between Marcellus
and Mephisto. Marcellus now has wings.
17. Click on
the basket apparatus hanging from the ceiling track. You can see a crank
on the control unit. Click the teddy bear on this crank, then click on
the windup key that you can just see on the bear’s back.
18. You get
a brief video of Giselle traveling in the basket to the refrigerator, which
has been raised by the chain you attached.
19. Giselle
disappears and is replaced in the basket by the teddy bear. A tunnel is
revealed by the lifted refrigerator. Click twice on the tunnel and you
will see Marcellus transporting Giselle down the tunnel on a handcar. It
looks like Marcellus, but sounds like Frank.
20. The tunnel
is another simple maze. Go consistently to either left or right every time
the tunnel divides and you will come to Frank’s studio.
21. When you
enter the studio, go across to the open chest on the curved bench. Click
on it for remarks by Frank and Giselle, then open the drawer and take out
the pieces of a picture, which go to inventory.
22. Click on
the bench top hotspot to the left of the chest and put the picture pieces
there, then put them one by one back into inventory, where they are shown
numbered 1 to 6.
23. Now you
must reassemble them on the bench top to show the completed picture. Start
with number 1 in the upper left of your assembly space. When done, click
on the upper part to see the picture (it appears to be a double one) and
on the lower part for some words about the subject.
24. Walk across
the room to the large drawing to the left of the ladder, then click on
the second of the smaller drawings to the left of that. When the drawing
lifts, click on the turtle to get a newspaper clipping.
25. Back off
from the turtle to be transported outside to a Ferris wheel and a video
of Marcellus and Theo, and starring the Boss. You are brought down to a
walkway leading to the Ferris wheel.
26. Walk up
to the Ferris wheel and click on the ticket booth. On the right wall of
the booth is a rack of picture postcards; click on them and you will find
an assortment of seven in inventory.
27. Put these
cards on the ticket booth counter, then get a closeup of them. Put them
one by one back into inventory. As you do this you will see that the picture
on the card shows a scene from each of the seven game episodes.
28. Put the
cards back on the counter in the order of the game episodes. Matching the
black streak across them will help.
29. Assembling
the cards brings on a long concluding video. The final thing for you to
do is use a pencil that has appeared in inventory to sign a contract, and
the game comes to a thoroughly unsatisfactory ending.
The game goes to the credits and there is no way to access the bar at bottom of the menu page, so you won’t be able to get an entry for Giselle by Theodore in his notebook, nor see any of the many pacts.
Commentary
At the conclusion of this game, you are left with a myriad questions, too numerous to cover completely, concerning contradictions, inconclusive endings, and unanswered interpretations. A few of these follow; some are trivial, some are not. There have been plenty of areas for conjecture; for just one instance, Frank's contract with Mephistopheles allowed him one masterpiece--is it a painting on a vast area of Giselle's skin? And one more--does the very last scene show the collapse of Dreamland just after it has been sold?
It is hard to see any connection between Goethe’s Faust and Marcellus Faust; perhaps none is intended.
As you proceed through the game from Episode 1 to 7 you will note a date on the screen at the beginning of each. While game progression flows more or less smoothly from episode to episode, it does not do so timewise. Several contradictions are indicated, and in an attempt to understand what is happening in this story, the accompanying time progression event table has been prepared, based primarily on these episode beginning dates, and a couple of times (Episodes 2 and 3) within one. The characters listed come from the STARS menu preceding each episode; one could argue about the correctness of this column. Mephisto and Marcellus are in each, and Theo More in most.
|
|
|
|
|
|
|
|
|
|
|
|
|
|
|
|
|
|
|
Theo More |
|
|
|
|
|
|
(Episode 4) |
|
|
|
|
|
|
|
(Episode 3, Part 2) |
|
|
|
|
|
|
|
|
|
Why is the
lottery ticket, acquired in Episode 1, carried in inventory throughout
the game? It is never used...What could possibly be the relevance of the
old movie clips at the end of Episode 5?
If the interpretation of the final exposition of Episode 7 is understood correctly, it was part of the Boss's plan to have Marcellus run the park. So the first thing he does is sell it to a conglomerate.
After finishing the game, one is left with the impression that several people were given an amorphous plot line, a cast of characters, and sent off separately to come up with parts, which were then put together without much consultation. Perhaps the game suffers some in translation from the original European. There are too many discontinuities, not enough closure.
Upon the conclusion of this game and reflection on the several discussions and Mephisto's many expositions presented in the various episodes, one might have the idea the authors have been expressing some philosophical ideas on the human condition, a lá Goethe. Or not.