| |||||||||||
WALKTHROUGH BY MALCOLM SCHMIDT | |||||||||||
| |||||||||||
CLICK THE GRAPHIC ABOVE TO EMAIL ME | |||||||||||
| This walkthrough provides a complete solution to the adventure. As with all my walkthroughs, some of the straightforward content and actions are not always dealt with. Instead, I prefer to concentrate on the clues to be found, and logic required, for solving the puzzles. | |||||||||||
| Search each location thoroughly as some of the hotspots require careful pixel-hunting. Examine all items (particularly the numerous papers lying around) and exhaust all dialog topics with the various characters you meet. In addition to providing a background to the story they often contain clues and answers to puzzles or details of what you need to do. | |||||||||||
| To prevent 'spoilers' of later actions or puzzles most of the clues and hints are purposely only dealt with when they are required, and not when first encountered. | |||||||||||
There are a number of useful functions/shortcuts to use in the game: | |||||||||||
| |||||||||||
YOUR ADVENTURE BEGINS | |||||||||||
| After having been run over by a truck you become the latest recruit in a ghostcatching organization. Your boss sends you to an abandoned factory to find out what happened there. You arrive outside a Cable Car Station, and must find a way to get inside... | |||||||||||
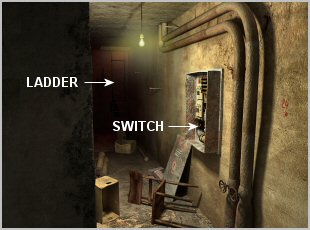
CABLE CAR STATION | |||||||||||
| Use your telekinesis ability to pick up the iron bar (on the ground in front of the door) and prise open the cellar cover to the right of the entrance. Climb through the hole to enter the Cellar. | |||||||||||
| |||||||||||
| Examine the switch in the fusebox to learn that it powers something other than the lights. Again use your telekinesis ability to flip the switch on. | |||||||||||
| Climb up the ladder to reach the Cable Car Station and go through the door to enter the Office. | |||||||||||
| Use your telekinesis ability to move the strange brick lying on the ground to reveal a diary. Read the entire diary very carefully as it contains a number of important clues. | |||||||||||
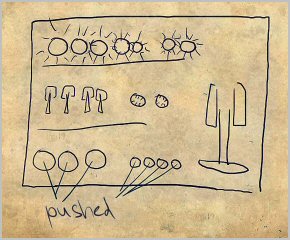
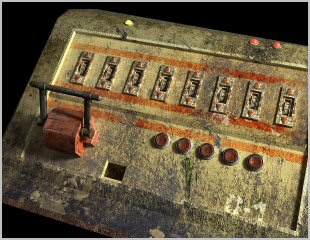
| Through the other door is a machine with a number of buttons and levers. Examine the drawing on the wall next to the machine to learn that it's a manual for operating the machine. | |||||||||||
| |||||||||||
| From the drawing you know that all the lights (top row) must be on, all the buttons must be pushed and all the levers (the four small ones in the centre and the large one on the right) have to be in the down position. In order to operate the machine, make sure that you have flipped the fusebox switch in the Cellar. The levers are manipulated with your telekinesis ability and the buttons are pushed by using the pencil on top of the machine. Experiment with the various levers and buttons to learn how they affect the machine and the row of lights at the top. | |||||||||||
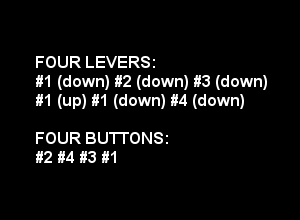
| LARGE LEVER ON THE RIGHT | |||||||||||
| Activates the machine, i.e. in the down position | |||||||||||
| THREE LARGE RED BUTTONS (BOTTOM LEFT) | |||||||||||
| Left button - activates the four small levers | |||||||||||
| Middle button - activates the four small buttons on the bottom right | |||||||||||
| Right button - power button | |||||||||||
| FOUR SMALL LEVERS ( #1 TO #4 FROM LEFT TO RIGHT) | |||||||||||
| Used to turn on the five lights on the left | |||||||||||
| #1 - turns on one light at a time (either up or down) | |||||||||||
| #2 - turns on two lights (down) and turns off one light (up) | |||||||||||
| #3 - turns on two lights (down) and turns off two lights (up) | |||||||||||
| #4 - turns on four lights (down) and turns off four lights (up) | |||||||||||
| FOUR SMALL BUTTONS ( #1 TO #4 FROM LEFT TO RIGHT) | |||||||||||
| Used to turn on the two lights on the right | |||||||||||
| #1 - affects both lights, i.e. turns them on if they are off, or turns them off if they are on | |||||||||||
| #2 - affects only the left light | |||||||||||
| #3 - affects only the right light | |||||||||||
| #4 - switches around the light turned on, only works when one light is on | |||||||||||
| You need to manipulate the levers and buttons so that all the lights are turned on, all the buttons are pushed and all the levers are in the down position. Begin with the large lever and the three large red buttons. Next, work out the correct sequence and combinations for the small levers and buttons. | |||||||||||
| |||||||||||
| If done correctly, power is restored to the cable car outside the office. Note the graphic of the cable car shown in the top left corner of your screen. | |||||||||||
| Exit from the Office and get into the cable car. Use telekinesis to lower the lever on the wall, then sit back and enjoy your ride to Sector Omega. | |||||||||||
SECTOR OMEGA | |||||||||||
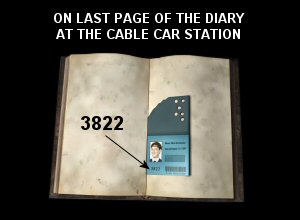
| The cable car takes you to the Garage at Sector Omega. On your arrival you develop a second skill that gives you the ability to push objects. | |||||||||||
| You need to use your newly acquired push ability to enter a valid employee code into the dial on the table. You should have seen an employee code somewhere. | |||||||||||
| |||||||||||
| Enter the correct code to open the metal grate. Although the door (behind the grate) is unlocked, it won't open as the handle is stuck. | |||||||||||
| Read the report on the table to learn about the fire that broke out in the factory. | |||||||||||
| Examine the pile of junk in the corner to hear strange sounds coming from behind it. Did you notice the acid dripping out of the large pipe in the centre? Pick up the asbestos sleeve (on top of the junk) and put it inside the pot on the table. Fill the reinforced pot with acid and then use it to melt the junk. You see 'something' escape from the locker behind the junk, making a hole in the door as it flees. | |||||||||||
| Go through the hole to a corridor that leads to Hall A and Hall B. By examining the two lines painted on the right wall you learn that the red line indicates Hall A and the blue one indicates Hall B. This is helpful in other locations as you will know which hall you are in. | |||||||||||
| You meet the first character when you discover Jacques Dirac, who has fallen down the large hole in the floor. Discuss all dialog topics with him until you get to: | |||||||||||
If you want, I'll pull you up | |||||||||||
| Select this topic to try rescue Jacques Dirac. Unfortunately you won't succeed and he dies. | |||||||||||
| From here follow the red line by going right to Hall A. Go through the door (straight ahead) on the far side to get to the Entrance Hall. Continue down the hall to where you see two doors on the opposite side. Go through the Cloak Room (Dressing Room) door to get to the lockers. | |||||||||||
| One of the lockers in the middle row has smoke coming out of it. Click on the smoke to talk to Scott Piper, the fireman inside the locker. Pay careful attention to what he tells you about Hansen and the fire. Note that you must have read the report in the Garage to activate the 'fire report' topic with him. | |||||||||||
| Continue through the Dressing Room to the Shower Area and talk to Larisa. After discussing all the dialog topics with her, again select: | |||||||||||
For example, the idea of looking at me hasn't crossed your mind? | |||||||||||
| After discussing this a second time with her a new dialog topic should be triggered: | |||||||||||
Larisa, listen to me. | |||||||||||
| Select this topic (and those that follow) to convince Larisa that she's a ghost and you also get more background to the story. Note that she's desperate for any information about Niels' disappearance. | |||||||||||
| Return to the Entrance Hall and go through the other door to the Lobby. Talk to Jacques Dirac, who wants you to repair the fan. You must talk to him twice to access all the dialog topics. Listen closely to what he says about the 'thief in the Dressing Room' as he provides a clue on how to solve a later puzzle. Note that you must have discussed the 'fire report' with Scott Piper to activate this topic. | |||||||||||
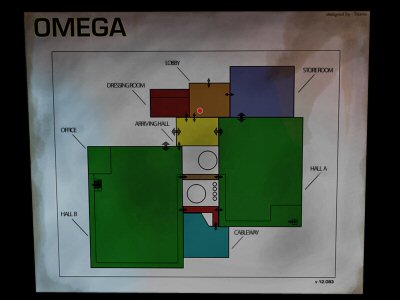
Study the plan on the wall which is a complete map of the factory. | |||||||||||
| |||||||||||
| Go to the left of Dirac's desk and try opening the door leading into the Store Room. This activates a new dialog topic with Dirac. Return to the other part of the Lobby (where you face Dirac) to discuss it with him. He agrees to let you enter the Store Room if you promise to get rid of the rats. | |||||||||||
STORE ROOM | |||||||||||
| There's a rat next to the box on the floor in the centre of the Store Room. Use telekinesis to pick up a paving stone and drop it on the rat to activate an arcade sequence. You need to kill all the rats by dropping the paving stone on all of them. Once you get the timing right it's not really difficult, but you can bypass the sequence by pressing the [Backspace] key. | |||||||||||
| The door leading down to the Cellar is at the far end of the Store Room. To open the door you must enter the correct code on the number dial. | |||||||||||
| |||||||||||
| At the bottom of the stairs is a fusebox. Use telekinesis to open the cover on it, then press both red buttons with your push ability. From the resultant shock you learn another new power - the ability to provide an electrical surge to objects. | |||||||||||
| The actual Cellar (to the right) is in darkness, so you cannot go there yet. | |||||||||||
| You should have found Niels' love letter to Larisa on the extreme right of the Store Room floor. She was desperate for information about him, so go back to the Shower Area and talk to her about: | |||||||||||
Tell me about Niels. | |||||||||||
| Discuss all the new dialog topics with her to get more background to the story and plot. | |||||||||||
LIGHT ABILITY | |||||||||||
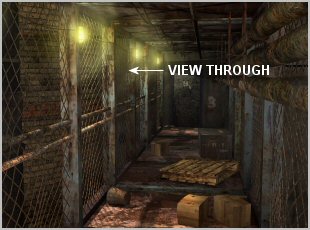
| Exit the Store Room and make your way back to Hall A. From the right hand side of Hall A climb the ladder at the far end to get onto the walkway above, then enter the Passage between Halls A and B. Examine the view through to see a whole lot of light bugs floating around. | |||||||||||
| |||||||||||
| You must collect all the light bugs and join them together by clicking them with the electrical surge. This needs to be done rapidly as they don't stay together for long. As with the rats, you can bypass the sequence by pressing the [Backspace] key. Note that if you haven't examined the view through previously, or if you didn't try entering the dark Cellar, the light bugs will already be joined together. | |||||||||||
| Once this is done you acquire the ability to create light in dark places. | |||||||||||
| In the cut scene that follows you get a first insight into your boss' true nature. | |||||||||||
| Did you look at the cabinet in the Garage after melting the junk? Although the cabinet was open, you couldn't see inside as it was too dark. Perhaps you could try out your newly acquired light skill on it. Return to the Garage and use the light on the darkness inside the cabinet to find a document. Read the document to learn about the monster and the ladybirds in the Cellar. | |||||||||||
| Return to the Cellar down the stairs at the far end of the Store Room and use the light ability on the darkness. You come face to face with the monster Hansen wrote about in the document you found inside the locker. To convince the monster not to eat you, select the following dialog topics: | |||||||||||
You can't eat me. | |||||||||||
I'm a ghost. | |||||||||||
Carefully observe this sheet. | |||||||||||
| Take note that you have promised to bring 'it' something to eat in exchange for your freedom. | |||||||||||
| The panel on the wall controls the supply of power to the entire factory. For now there's nothing you need to do with the power supply. | |||||||||||
HALL B | |||||||||||
| Return to the walkway above Hall A. On the opposite side, next to the ladder leading down to Hall A, is a strange machine. Click the machine to get to a room with a tube post device. Examine the hole in the tube post to see the monster you freed from the locker behind the junk in the Garage. Use the electrical surge ability on the monster to send it through the tube post. Anything the monster can do should be easy for a ghost in the sheet to also do, so follow it through the tube post to get to Hall B. | |||||||||||
HALL B RIGHT | |||||||||||
| |||||||||||
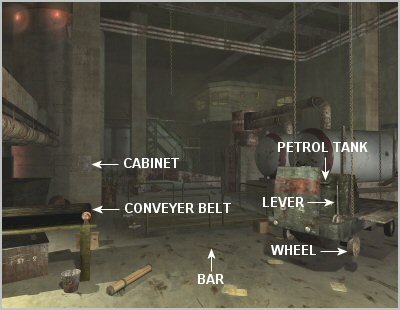
| You need to find a way to open the cabinet on the wall. Unfortunately the bar lying on the floor won't fit the hole in the cabinet, and you cannot sharpen it on the stationery wheel. What if you could start the little car and get the wheel to spin? | |||||||||||
| Go left to the other part of Hall B. | |||||||||||
HALL B LEFT | |||||||||||
| |||||||||||
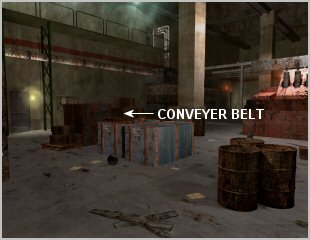
| The canister on the floor still has some petrol in it and perhaps it could be used to start the little car. As you cannot carry items from one location to another, you need to get it to the right side of Hall B on the conveyer belt. Use telekinesis to pick up the canister and place it on the conveyer belt. Take note that there are two conveyer belts, so you must place it on the top one that goes to the right. | |||||||||||
| The control panel at the far end of the hall is used to operate the conveyer belts. Oops! Did you get fooled by trying to use the green (stop) button to start the conveyer belt? Unfortunately the puzzle is a little more difficult than simply pressing the red button. | |||||||||||
| |||||||||||
| Return to the right side of Hall B, where you can remove the canister from the conveyer belt. Fill the petrol tank on the little car, then pull the lever to start it. Take note that the wheel on the car will now be spinning. Pick up the bar and sharpen it on the spinning wheel, then use it to open the cabinet. | |||||||||||
| Try pushing the lever in the cabinet (controller) only to find that it's not working. Note that the yellow light indicator on the controller is not lit. You now have a use for the panel on the wall in the Cellar. | |||||||||||
| Before going there, activate the exits (bottom centre of the screen) out of both sides of the hall. The exit on the left side opens the door in a corridor near the Garage, and the one on the right opens the door in the Entrance Hall. | |||||||||||
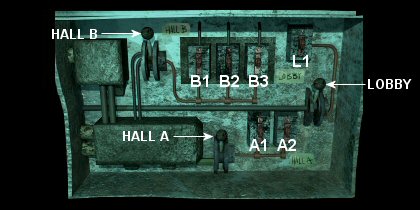
| Return to the Cellar and examine the panel on the wall closely. The levers for Hall A, Hall B and the Lobby are all off, i.e. in the up position. The buttons along all the circuits are also switched off. | |||||||||||
| |||||||||||
| Unfortunately, due to either a short or an overload, you can't switch everything on at the same time. You need to supply power to the cabinet (controller) inside Hall B, so begin by pushing the lever for Hall B down. You also cannot switch on all three buttons (B1, B2 and B3) at the same time and will have to try them one at a time. Switch on the first button, i.e. B1, then return to Hall B. | |||||||||||
| The yellow indicator light on the controller should be lit. Push the lever down to open an entrance to the control panels below. | |||||||||||
| There are two control panels in the area below. Examine the red control panel to see a lever (on the far right) that activates the fan in the Lobby. Take note that none of the yellow indicator lights are lit. Push the fan lever up to the 'on' position before going back to the Cellar. | |||||||||||
| You need to establish which button (B1, B2 or B3) on the wall panel in the Cellar must be switched on to activate the fan control. By using trial and error you learn that B3 must be switched on. To get the fan working you also need to push down the Lobby lever and switch on L1. Note that you cannot have both B1 and B3 switched on, so switch off B1 first. | |||||||||||
| Go to the Lobby to confirm that you've done everything correctly, then talk to Jacques Dirac about: | |||||||||||
I've repaired your fan. | |||||||||||
| In appreciation for repairing the fan he teaches you the draft ability. | |||||||||||
LOCKERS | |||||||||||
| Go to the Dressing Room and examine all the lockers carefully. Three of them can be opened with your push ability; the last locker on the right of the first row at the entrance, the last one on the right of the middle row and the fourth one from the right in the middle row. Open the last one on the right of the middle row, noting that you have to push it three times to open fully. Read the paper you find inside the locker as it contains vital clues to solving this puzzle. You also need to remember exactly what Scott Piper said about the fire and Jacques Dirac's comments about the thief in the Dressing Room. Also, read the 'Rules' on the back of the door noting that the third rule warns employees not to try open the locker by the showers. Although this locker (nearest the door) has a hotspot, there's nothing you can do with it yet. Clearly you need to find a way to open it! | |||||||||||
| |||||||||||
| Look inside the opened locker, then examine the little box and the flier underneath it. | |||||||||||
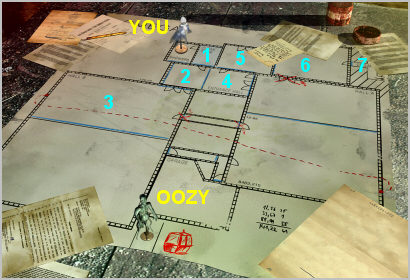
OOZY | |||||||||||
| When you've completed everything covered in the walkthrough to this point, you should see the cut scene in which your boss sends Oozy to kill you. If not, check the walkthrough carefully to see what you may have missed. | |||||||||||
| Immediately after the cut scene Larisa calls you, so go to the Shower Area and talk to her. This will trigger a board game in which you must get rid of Oozy. | |||||||||||
| |||||||||||
| You move the GITS figurine to an adjacent room by clicking on that room. You cannot always move to all adjacent rooms and those you can go to are coloured in light blue. After each move you make, Oozy makes a corresponding move. | |||||||||||
| The first thing to figure out is where you need Oozy to go to. Do you remember your promise to the monster in the Cellar? Oozy would make an extremely delicious meal, so the aim is to get him into the Cellar, marked '7' in the graphic. | |||||||||||
| You have to get Oozy to follow you, which he only does once he's closer to you. Note that you must always keep one room ahead of him to prevent him from killing you. | |||||||||||
To win the game move to the rooms (as numbered in the graphic above) in the following order: | |||||||||||
| |||||||||||
OFFICE | |||||||||||
| After he has feasted on Oozy, talk to the monstrosity and he repairs the broken stairs in Hall B. The Office is at the top of the stairs, but the door is locked. Note that there's a tube post on the wall. | |||||||||||
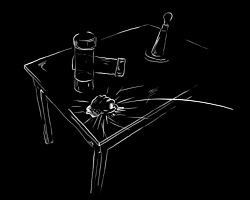
| There's a Dark Corner on the left of the ladder (leading up to the walkway) in the right side of Hall A. Go there and examine the hole in the pipe to see something stuck inside. Use the draft skill to blow it through the pipe. Watch the cut scene closely to see it land on a table that you should recognize. | |||||||||||
| |||||||||||
| Climb the ladder and go to the strange machine, i.e. the room with the tube post. The severed hand on the table has a grip around something. Use an electrical surge on the hand to loosen its grip and drop a key, Perhaps this is the key to the Office and you can use the tube post to get it there. | |||||||||||
| Take note that the small yellow light indicator on the tube post is not lit, so you need power in Hall A. | |||||||||||
| Go to the wall panel in the Cellar. As you enter the Cellar you finally get to meet the ladybirds! | |||||||||||
| After your conversation with the ladybirds, adjust the wall panel so that the lever for Hall A is pushed down and A2 is switched on. | |||||||||||
| |||||||||||
| Return to the tube post and check that the yellow indicator is lit. Pick up the key, put it into the open capsule and insert the capsule with the key into the tube post. Use your push ability to send it on its way, hopefully to the other tube post outside the Office. | |||||||||||
| You should now find the key on the floor outside the Office. Pick it up and open the lock on the door. | |||||||||||
| When inside the Office, note that the door is towards the top right of your screen and you can move deeper into the Office from the bottom of your screen. | |||||||||||
| Use telekinesis to pick up the floppy disk (on the cabinet on the right) and insert it into the computer at the far end of the Office. Use your push ability on the directional arrows to navigate the computer screen and select an option (surrounded by a green rectangle) with the 'Confirm' button. When you select the 'Administrator' option you're prompted for a password, which you don't yet have. In order to exit the computer, select and 'Confirm' the 'Log off' option. | |||||||||||
| Go deeper into the Office and examine the tape player on the table. The tape player is pretty normal and it works like all others. First, though, you must close the cover with your push skill. Next, rewind the tape to the beginning and push the 'play' button. After listening to the conversation between Kurt and Hansen you acquire the magical eavesdropping ability. | |||||||||||
| There's also a safe in this part of the Office. Examine the safe, noting that it has a numeric dial and handle. You can't open the safe yet, but additional dialog topics about the combination are triggered with the other characters in the game. | |||||||||||
KURT'S GHOST | |||||||||||
| Go to the Dressing Room and talk to Scott Piper about the combination to Kurt's safe. This triggers another dialog topic about where to find Kurt's ghost. Unfortunately he cannot help you with this. | |||||||||||
| Talk to Larisa (in the Shower Area) about the safe combination and finding Kurt's ghost to learn that Kurt 'liked to be in Hall B to oversee production'. | |||||||||||
| When you discuss these topics with Jacques Dirac (in the Lobby) he says that 'Kurt often stood on the catwalk'. | |||||||||||
| You now know that the most likely place to find Kurt's ghost is on the walkway above Hall B. To get there, climb the ladder in the right side of Hall A, then through the Passage (where you got your light ability) and through the door marked 'Hall B'. You won't find Kurt's ghost, but this is because you're there. Activate your eavesdropping ability and then leave the area. When you re-enter the area, wait a few seconds for the large eavesdropping icon to appear, then click on it. | |||||||||||
| After overhearing Kurt mumble the combination to his safe, return to the Office. Use the push ability on the dial and handle to open the safe. | |||||||||||
HANSEN | |||||||||||
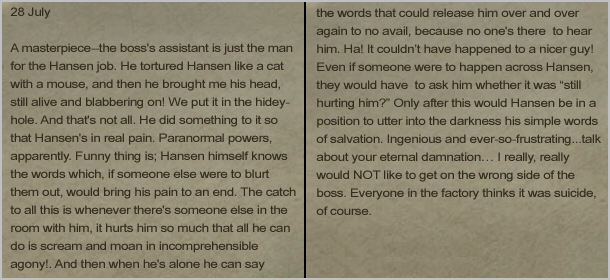
| Read the diary inside the safe very carefully as it contains a number of clues. | |||||||||||
| From the entry dated 28 July you learn that Hansen's head was put in Kurt's hidey-hole. The bottom shelf of the safe is a cleverly disguised button, so push it to reveal a secret door next to the safe. | |||||||||||
| Enter the secret door to find Hansen's head on a pillar. Although you won't get any lucid responses, discuss all the dialog topics with the head. | |||||||||||
| The entry dated 28 July provides the solution to releasing Hansen. He himself knows the words that would bring his pain to an end, but he can only say them when nobody else is in the room with him. | |||||||||||
| |||||||||||
| You have to activate the eavesdropping ability, leave and re-enter the room, then click the large icon when it appears to hear what the head said while nobody was present: | |||||||||||
... It doesn't hurt me at all! ... | |||||||||||
| Talk to the head again and select this dialog topic. Discuss all the topics to finally learn what Sector Omega is all about. Pay attention to the conversation as there's an important clue. | |||||||||||
| The head gives you the scary sound essence that must be used to contact Niels. You must create an improvised musical instrument and use the essence on it. Did you hear GITS say that a single bone was all that was left of Oozy? Perhaps the bone can be fashioned into a musical instrument! | |||||||||||
NIELS | |||||||||||
| Go to the Cellar, where you see the bone on the floor in front of where the monster sat. Think about what musical instrument you can make with it. Use the electrical surge to make some holes and it will resemble a flute. Next, use the scary sound essence on the bone to get the scary sound ability. Clicking this ability activates the flute that you use to call Niels and learn to communicate with him. | |||||||||||
| |||||||||||
| Once you're able to communicate with Niels, go through all the dialog topics. He tells you there has to be a reverse machine that negates the effect of the ghostcatcher. He gives a 8-digit combination for this machine which you must make a note of as it's randomly generated. In addition, you have to set up the rest of the machine and correctly calibrate the gas in the factory. | |||||||||||
REVERSE MACHINE | |||||||||||
| The machine Niels referred to is the one on the left in the control panels room in Hall B. Before this machine can be operated you need to provide power to it from the wall panel in the Cellar. Push the lever for hall B down and B2 must be switched on. | |||||||||||
| |||||||||||
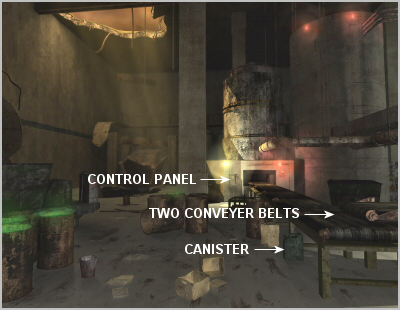
| Go to the control panels in Hall B and zoom in on the left one. The yellow indicator on the left should be lit. Adjust the eight counters (at the top) to the numeric code Niels gave you. Did you ever talk to Jacques Dirac from behind his desk? If so, you at long last know what he meant by: | |||||||||||
Enter the counter one by one and most importantly from the front. | |||||||||||
| The left red indicator at the top should light up when the counters are set correctly. | |||||||||||
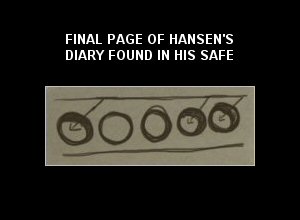
| Do the five red buttons look familiar? You should have seen a diagram of them somewhere. | |||||||||||
| |||||||||||
| Push down the buttons as indicated in the diagram and the red indicator on the right lights up. | |||||||||||
| If you push down the large lever on the left to start the machine, it switches off after a few seconds because the gas has not been correctly calibrated. | |||||||||||
| The red control panel (the one used to activate the fan) regulates the gas. However, before you can do anything with it, you need to know the correct ratio for the gas. Who is the most qualified person to provide you with this information? Obviously a fireman, so go to Scott Piper and talk to him about it. He tells you that the gas must be set in the ratio of 66:34. | |||||||||||
| The red control panel has numerous levers, buttons and dials that must be figured out. You should also have found various clues on how to regulate the gas. | |||||||||||
| |||||||||||
| When the gas ratio has been set correctly and the red control panel is activated (large lever pushed up) return to the left control panel. Now push down the large lever on the left to start the machine. | |||||||||||
| Watch the cut scene very closely. You should recognise the large red machine that's in the left part of Hall A. Also note that the conveyer belt is to the left of the machine. | |||||||||||
| |||||||||||
| Go to the left part of Hall A and look for the conveyer belt hotspot. Go there and examine the bucket on the conveyer belt, then click inside the bucket to activate the anti-ghost catcher. At the end of the cut scene take note that you've acquired the exorcism ability. | |||||||||||
EXORCISM | |||||||||||
| Go to each of the characters you met (Scott Piper, Larisa, Jacques Dirac and Hansen) and use the exorcism ability on them, then sit back and enjoy the ending! | |||||||||||
THE END | |||||||||||
| |||||||||||