 |
 |
 |
||
 |
 |
|||
HEAVEN, by Oldmariner
This game is in first person and is point and click 3d and is linear. It is religious in theme with many Christian Gospel references made by your guide. You cannot advance without completing each puzzle to open access to the next level. There is little conversation and your character does not speak. The story is simple, you died and went to heaven where you meet your grandmother. She serves as your guide as you work your way through the seven levels of heaven to the pearly gates. That’s it no mystery, no real story, no inventory, no conversation tree and no way to skip what little conversation there is. Saves are auto save on exit which overwrites the previous save. In the save folder you will find only save1 in the first game slot, save2 in the second game slot, etc. If you are playing in game1 slot your save title is not changed it is overwritten. There are five game slots but each one is for an independent game. In regard to inventory you cannot see what you are carrying. Though you do carry items you can carry only one item at a time. Since you can't see it, you have no idea what it looks like. For instance you take a symbol to open the gate and to set a station dial to match the symbol to it. It would have been nice to know what the thing looked like. All you have is a voice telling you that is right. So you do need that guide or you are lost. One aid you do have is the compass on the bottom of the screen. It points in the direction you need to walk. Since the scenes are so similar this aid is quite useful.
My warning
This game is a puzzle driven game with no conversation between characters. There is no story to pursue, no mystery. You simply pass from one level to another. If you were to tackle this game with no written guide it could take you several days or a few hours. The variable being how you relate to puzzles. There are only five to solve. But they are multi step puzzles using several ingredients with some not being obvious in the least. Many of them are sequence related with hidden clues as to the proper order. It is also unforgiving demanding each its specific place in the sequence. Figuring it out on your own could take considerable time, while using this guide will obviously shorten your quest. The format divides the guide into separate levels. Each consist of one puzzle to open the next level. Whatever, it is your game and your choice. Try it on your own and refer to this only when you are stuck may be a good approach.
OPENING
When you begin the opening scene is not the usual intro video. When you gain control turn around look at the back of the ship and see a terminal. Click on the terminal and your game options appear. You see five slots, select one, type in your name and click New Game. The game now begins, after a cut scene and opening credits you find yourself face to face with your guide. You close the game with the escape key which opens the initial screen when you first loaded the game. Escape again the game closes, during this process you will get a message the game was saved. Upon restarting that initial screen appears. Turn around click on the terminal, select your game and click Play Game and you return to the point you left off.
The Golden Street Level 1
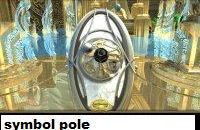
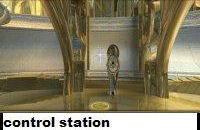
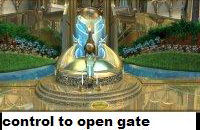
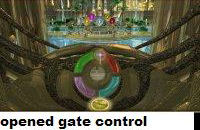
Begin on an island, you can look around but most of what you see won't mean a lot until later. You need to go through the speed gate and follow your compass several clicks until you meet your guide. This is your Gate Opening Puzzle You will see a cut scene where she demonstrates crossing the water on submerged bridges. She will tell you to raise the bridge by using the Sparkle pole. Click on it and when the bridge appears, cross. You will see your guide standing there, click on her and she will explain your task. The next item will not activate until she explains it to you. Go back to the speed gate click on your guide and she will activate the Symbol Pole. To the right of your guide is the pole, click on it once. Then follow the compass back to the bridge, cross the bridge. Your guide will be at the ramp, click on her. Then go up the ramp click on the Control Station until the voice says “I think that’s good” There are two ramps one on either side. It does not matter which one you choose except with the direction you turn at the bottom. Turn right go down the ramp. About midway between the two ramps along the walkway you will see the next control, click once then return to the Control Station. Opposite it is the Gate Control which is now open to operate. Click until she says “that’s better. You now have the first gate open and have to repeat this for five more gates. Each time opening a bridge, going back to the portal to get the symbol, etc. At one point you have to go back to the island to active a sparkle pole, she will tell you when you arrive at that bridge. The control you need is across the water and must be released on the island. Go back to the portal enter to reach the island. Once on the island you see a bridge, cross it to find the pole. Yes for each symbol you must click on the girl and listen to her, unfortunately you cannot click through speech. Once all the gates are open follow the compass to the next puzzle.
|
|
|
|
||
|
|
|
|||
The Spinning Lenses Level 2
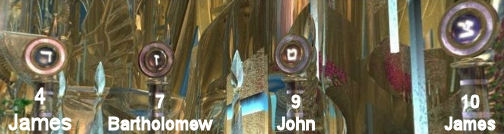
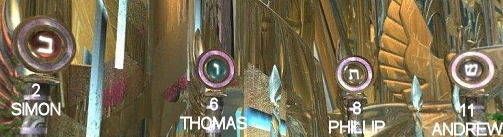
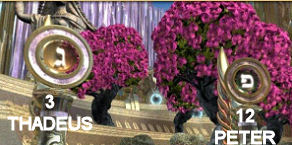
Welcome to the Apostle Puzzle as I call it. What you have to do is click on the Sparkle pole to the left. Another bridge will open, cross it. Go up and look at the twelve poles each with a unique symbol representing twelve Apostles. You need to click on each pole in the appropriate order. Go back to the island about nine clicks until you see a green patch. Turn left to see the portal. Once through the portal cross the bridge click on the girl. She gives you the telescope scan until the curser activates then click. Scan again and click when curser activates. This will give you a narrow view of the names of the Apostles. Next to each name is a symbol, some hard to define. Make a list of the names and copy the symbol next to each name. You will note the names are repeated. Start with Judas down to Peter. Notice James appears twice, (dirty trick) use the name both times. After Thad, and after John. Notice the symbols are different for each John. Go back to the poles. Please note you have more than twice as many clicks going back as you did on your way to the island. The portal dumped you in a different place. You need to match the symbol next to the name with the one most like it on the pole. They are not exact replicas which adds to the difficulty. If you don’t match the symbols correctly or do them in the correct order, start again. Here are pictures from screenshots of the poles. Activate the poles in order 1-12 as I have placed the order number and name in the photo.
|
|
|
 |
 |
|
|
|
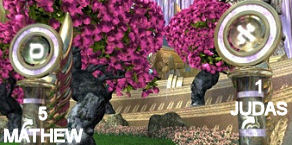
NAMES UNDER POLES ARE NUMBERED 1-12 THAT IS THE ORDER YOU MUST CLICK THEM.
PLEASE NOTE JAMES IS IN THE LIST TWICE. NOT AN ERROR. ALSO EACH JAMES HAS A DIFFERENT ICON. MUST BE IN RIGHT ORDER.
Listed in order
1 Judas
2 Simon
3 Thadeus
4 James version looking like a large 7
5 Mathew
6 Thomas looks like the small 7
7 Bartholomew
8 Phillip
9 John
10 James ( again odd design right side of picture 1 )
11 Andrew
12 Peter
The telescope view is rather small and not quite the same as in the larger screen shots.
The Crystal Forest Level 3
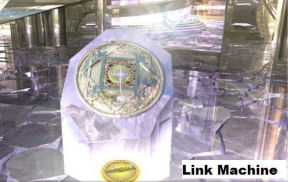
You are now in what the game calls the Crystal Forest. The Ball Puzzle What you need to do is pair three colored balls, green, yellow, red with three animals, Eagle, Horse, Lion. Needless to say the right animal with the right color. You are limited by the ability to carry one object at a time and the ball machine will not dispense a ball if you already have one. The object is to get a red ball with a picture of an Eagle give it to your guide when she is at the Eagle Transponder. She will active the machine in a cut scene. You then locate a linking machine and click it to rotate until she says “That’s Better.” You then go to the guide, she has moved but in the same large room. Click on her again, another cut scene. If you did it right you will see an eagle throw up a hoop and a catapult throw a ball into it and you will be congratulated. If wrong the ball will disintegrate and you start over. Repeat this for the Yellow Lion and the Green Horse. Easy huh? Nope.
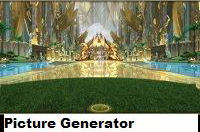
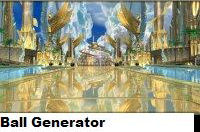
Here is how this works. Your guide will be standing at a portal and after receiving little help you go through the portal back to where you had come from. The main area you have been playing. Look for the Ball Generator. You will emerge from the portal onto the green patch between the two machines though the ball generator will not be visible from where you stand. Turn left for the ball generator. You need the ball before you can apply the picture. Walk around the ball generator looking toward it and down to see the color chooser. See close up picture there is one each of red, yellow or green on different side of the Ball Generator. You can only select one. When you click on it a ball of that color will be created. It is in your posession though there is noting to inform you that you actually have it. Return to the green area, cross and go to the picture machine. Click on your guide. She will place the ball on the color chooser for you.
 |
 |
 |
 |
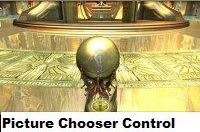
Click on the ball she placed on the picture chooser control. The included picture shows the control after she had placed a ball on it. She will tell you to make sure to select the correct picture and color. Your color choice has already been made. Click on the ball again when she says look closely you will see the machine begin to rotate. Click on the ball when the object you need, Eagle, Lion, or Horse passes in front. Make sure your curser is activated, sometimes you have to shift positions, sliding your mouse up or down on the ball. She will be saying "have a closer look at this." A cut scene will show your picture on the ball in front of you revealing which picture it has placed. It will be whatever was in front when you clicked. Hopefully you managed to click at the right time. It turns slow so there is no sudden hurry up action to take. Again nothing to alert you that you have the ball. Once you have the pictured ball go through the portal to find your guide at the Transponder, give it to her and watch cut scene. You now go to the small link machine click it until she says “that’s better.” Go back to the guide, she will have moved to a different location in the room click on her and watch cut scene. The ball should fly through the hoop and the Lord praised. One down two to go, repeat for the remaining animals.
![]()
The problems,
There is no way I am aware of to determine which transponder she will select before you get the ball. I could see no way to redirect her. It appears to be trial and error. Get a combination say Eagle/Red go back through the portal and your guide will be at a transponder. If she is not at the Eagle Transponder to match the combination you chose the ball will break up and you do it over. You cannot simply drop the ball to get another you have to go through the process even though you know it won’t work. FRUSTRATING. After several days of trying I could not determine any way to get her to go to the transponder you need. You will hear repeated throughout this quest to visit the island it may be helpful. What you learn there is the Eagle is matched to the red ball and the Horse to the green. I did not locate the lion on the island but yellow was the only color left. Process of elimination. No other control on the island appeared to interact with items in this puzzle. One must use brute force then get the combination you desire and stay with it until she is at the right transponder. The good news is once you get a ball through, she will not return to the completed transponder. So with the second the odds are two to one and for the third she should be at the correct one the first time. I regard this as a either a poorly constructed puzzle or I am thick and could not find the key to get her to change transponders. I could not predict which one she will be at before getting the ball. It would make a lot more sense if you could. After successfully getting three balls through, a cut scene will reveal your next level. But there is no indication of what is expected and you remain standing where you are. You have to look closely to discover the new bridge as you curser indicator is not as prominent. Once locating the bridge cross it to a new challenge.
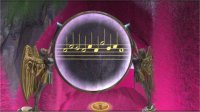
The Musical Trumpets Level 4
This puzzle is a bit less difficult that it appears at first. Don’t rush across the bridge look at the seven sets of trumpeters. You will notice each is in a group of three, each of the group plays the same note. Each with a varying length. At the end of the bridge you will see your guide standing at the base of a stairway. Click on her for the sage advice. Continue up the stairs before the tunnel on the left your will see a pink crystal that can be activated. It is not easy to pick out but your curser will signify it. There is another larger pink mass near it that gives you useful information. Go up to the highest level and note a black crystal on the left. Click on that it will sink into the ground. Turn around and go forward and down in one click. You will see a lever which plays the notes you select and opens the next level. Of course you now have to pick the correct 10 notes in the proper order. There are a few clues that make this fairly easy. Now that you have depressed the black crystal take a look at the tunnel wall. It gives you the proper notes to play, that is the length of the note. Here is the note solution
Go to the end of the bridge and step off. This seemed for me to reset the compass and on the return it guided you to the proper grouping you interact with. Turn around and follow the compass across the bridge slowly. Notice it points to the proper grouping you will pick one from each of the ten groups the compass leads you to. It is fortunate the groupings are set up the same as you look at the three figures. All the ones on the left, right and middle of the grouping play the same length they do in each groups. In other words all angels on the left play a note of the same length no manner witch group and so on. Therefore for the first four groups pick the middle trumpet. The next two pick the left the next one pick the middle then two lefts and finally the right. A review of the picture shown on the wall of the correct notes indicates their length. The key was which length angel played. The order is determined by the compass pointing you to them. I will leave you to follow your compass and will only highlight the note, not the order.
Middle,
Middle,
Middle,
Middle,
Left,
Left,
Middle,
Left,
Left,
Right,
After selecting ten notes, your guide should tell you that you have enough notes. On your way up the stairs to pull the lever at the top to play your notes depress the pink crystal before the tunnel. It will change the cave wall to reflect the choices you made. If you did it right the wall should match the screen print, if not you missed one but you will have to push the lever anyway for Barbie to tell you to do it over again. If it matches she will tell you when you look at the wall, if you depressed the pink crystal. If you got it right you will get a cut scene that transports you to the next area. BUT!
The Flight level 5
Now for the BUT. Your cut scene begins with grandma mounting a flying horse. She flies around in circles with you sitting behind her. You will notice you aren’t going anywhere. The curser will flash on one corner suggesting your cut scene has morphed into a mini puzzle. Yes the next time the curser flashes click and keep clicking. She will say something like the annoying “we must go this way”. Eventually she will turn landing onto another circle ending this level.
The Creation Room Level 6
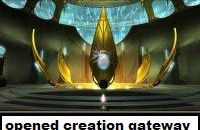
This is the final puzzle and not all that difficult but when you get your instructions you may think otherwise. Start walking until you go through a tunnel emptying into a room with a portal. You will see a portal that looks like this.
Click on it and you get an informational video explaining you need to open this gate by opening the Creation Gateway and activate the Petals.
 |
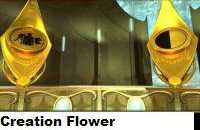 |
Turn around and in this room up a set of stairs is the Creational Gateway. Click on it, and it opens. Opened you will see six posts with a circular lens as in picture above. They are called Creation Flowers. What you will see is a clear lens without the picture. You add the picture. There are six green petal areas around the outside walkway. You have to click on a lens then go outside and find the appropriate petal then return and click the lens if correct the picture appears. When you have all six the next level is reached.
The solution is pretty much a gift. Look at the pic below you will see an ink blot type sketch of a man and animals inside the yellow triangle.
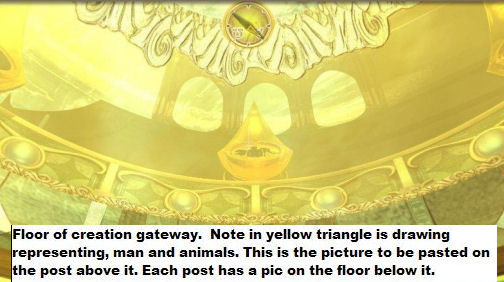
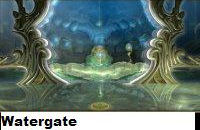
There is one of these drawings beneath each post as you turn about. Follow each post downward to see the sketch. I inverted the picture so you could see the man, ape and elephant. You simply activate a crystal remembering the drawing you need by clicking on. It will light up. Go find the right petal with that picture. But there is a bonus, go back to your landing area by walking around the loop outside and you will find your guide. Click on her, she will say, "You need my help, meet me" then walks away. Follow by walking back the way you came, either direction is fine as your are on a circular path. Follow it around until you hear her humming, turn and click on her. You will see a picture machine behind her and she is holding a pull rope. Click on her, she pulls the rope and you see the machine behind her turn revealing a picture. Keep clicking on her until you see the picture you want. She will give you no indication. Walk back to the Creation Gateway and click on the lighted lens your pic should appear and she will say you got it right. Look at the floor pick another picture and highlight the lens and do it again until you have all six. When you finish go through the Watergate and then the next portal facing you. Enter the final level
Pearly Gates Level 7
You are done. Once inside this final room look up toward the ceiling click on the light and watch the final cut scene.
I will hold the opinion some will like this and some won’t.
This document was provided to GameBoomers.com and may not be distributed without express written permission of the author and GameBoomers and the content may not be altered in any way.