HEAVEN'S HOPE
By Mosaic Mask Studio
Walkthrough by MaGtRo 2016
Gameplay:
This is a third person point and click game.
Main menu has new game, back to
game, load, save, options, credits and exit.
Options have settings for
resolution, fullscreen, speech languages (English or Deutsch), subtitle
languages, speech volume, effect volume and music volume.
Gameplay menu is accessed by the
gear icon at top left of screen or the ESC key.
Help given by Salome and Azael is
accessed by the question mark icon at top right of screen.
Inventory frame is at bottom of
screen.
Game actions:
Pressing the space bar shows all
the active spots in the screen.
A selected item can have a hand or
an eye icon. Hand is for taking or action while the eye icon describes the
item.
Double left click makes Talorel
move faster.
Right click hastens dialogues.
Items can be combined in inventory.
Saved games can be named.
Click on the owl exit sign to leave a screen.
Talorel crashes in a cornfield
and recalls what caused the crash.
Talorel is goaded by Umorel to do
a stunt flying maneuver - wing breaker that will bring him close to the
Heavenly Barrier. Talorel together with his wingmen, Salome and Azael is to
take a final exam to be an aviator. Near the Heavenly Barrier, he collides
with an unknown object and crash lands on Earth.
It is 19th century England.
ACT ONE
Get Halo:
Cornfield:
His halo is gone and his wings are
burned. Azael and Salome at top right give advice. Look around.
See the halo on top of the
farmhouse
across the road. Look and try to take the halo. Talorel learns about
maneuvering on earth, space and time.
Go through the path between trees
at right. Click on the exit sign. Talorel refuses to go and needs light.
Get rid of crow:
Look around - use the space bar.
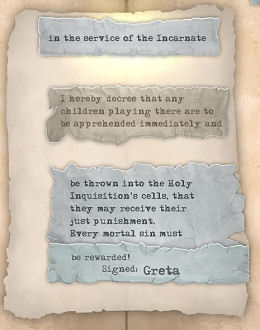
Read and then take the notice
issued
by Greta about the Inquisition.
Examine the basket and old rag on
the ground. Try to take the sweet smelling thing in the basket but the crow
stops Talorel.
Look at and talk to the crow.
After not able to talk to lower creatures, get another action choice - select the
grimace-make face icon (middle) to get Talorel scare the crow.
Get light: Look
at and take the honey bread from the basket.
Talorel accidentally steps on a
mouse. The mouse's spirit starts to separate from its body. Talorel grabs
and ties the spirit back to the body and takes the mouse.
Examine the light at the base of
the tree. Learn about insects. Use the honey bread on the fireflies to get
bread with fireflies. Use the bread with fireflies on owl exit sign to walk the path at
right.
Farm:
Look around. Examine the sign,
weather vane and the halo on the roof. Use the make face action on the owl.
Take pebble from the ground
by signpost.
Examine St. Peter's statue.
Examine the keys. Learn the relationship of Talorel and St. Peter.
Examine and take the rake to get
the rake's head.
Hit the halo:
There is a skip button after
several tries.
Use the pebble on the halo.
Adjust aim (target position) and the strength of the throw (bar).
Click - hold the target right
of the halo. Wait until the bar reaches 3/4 strength and then release.
The halo drops inside the
chimney.
Bill the farmer:
Knock on door. A rifle is pointed at Talorel. Answer the questions correctly
to get inside.
What are you talking about?
Greta's a witch!
I'm an angel!
Learn that Bill is a Yankee
from Tennessee.
Hide:
McCallum knocks on the door. Talorel must hide. Check the chimney.
Look at the chandelier. One of
the candles winks at Talorel. Use the chandelier and Talorel blows the candles
out. Climb on the chandelier.
McCallum enters and reprimands
Bill for not coming to the evening mass and praises Greta.
Talk to Bill completely. Learn
about the people of the village. Bloomford a scientist that can help Talorel to fly. Heaven's Hope is
the new name of the nearest settlement. Bill wants Talorel to change
clothes.
Look around at cheese, cabinet and
stew pot.
Halo:
Get the halo:
Examine the fireplace and the chimney flap.
Open the flap to see that the halo
is on top of the flue.
Place the notice on the fireplace.
Use the rake on the opened small
flap. The halo falls down.
Examine the halo and see that it
looks pale. Take the halo and the notice.
Recharge the halo:
The halo needs to be recharge with
heavenly energy which can only be done in heaven.
Maybe St. Peter can help. Exit the
farmhouse.
Put the halo on. Talk to St.
Peter.
Remember me? A thunder is heard.
No wonder they made you responsible for
the weather.
The sky grows dark. Calling you
the Fisher of Men is a real joke!
Lightning starts. You're like
that weathercock up there!
Lightning and thunder now. Talorel
needs more.
Combine the halo with the rake to
get halo with rake. Use halo with rake on Talorel.
Use the grimace-make face icon on
St Peter's statue. (Achievement - The Tease, grimace used 3 times).
Talorel is hit by lightning and
his halo is energized. (Achievement - The power of an angel).
Revive the mouse:
Go right to the cornfield.
(Achievement - The mouser).
In inventory, use the mouth-breath
icon on the dead mouse to get mouse with death experience.
(Achievement - The mouser).
Get clothes:
Look at the scarecrow. Try to take
the clothes. Breathe life on the scarecrow. Talk to the scarecrow completely.
The scarecrow wants his hat. Use
the mouse on the hat on the tree. The hat is back on the scarecrow.
Talk to the scarecrow again. They
exchanged clothes. (Achievement - An angel on earth).
Find a way to fly.
Learn about the village:
Go back to the farm. Talk to Bill.
He gives a map of Heaven's Hope. Learn about Bill's wife Stacey.
Get cheese from the
farmhouse.
Map: The
map is right of the inventory frame. It is a 'jump to' map. You can go back to
a
place you already visited.
Woods:
Take the road between the
locked barn and
house.
Tree:
Examine and talk to the tree. It must be asleep.
Look at the heart etched on a
root - S+B. Go down the path.
Meanwhile; a
dark shadow enters a billy goat.
Bridge:
Examine and talk to the narcissus - yellow flower before the bridge. It
seems to be asleep.
See 4 gargoyles on the bridge
posts. The left one is rather shaky.
Look at the river and the
sunlight
focused on the ground. Continue to town.
Outskirts of Heaven's Hope:
Arabian stall:
Talk to Kareem. Learn about his customer list. Look around the stall.
Ask about the items. Kareem gives
sneezing powder.
Learn about poison for rats and
insects; lavender rids of moths and garlic rids mosquitoes. The caffeine shampoo
is used to grow hair.
Heaven's Hope:
Enter town. Look around town
center. Examine the lampposts, angel statues (?Abdiel) and well.
Use the crank of the well and
Talorel raises the bucket.
Talk to Geoffrey the lamplighter.
Get matches from Geoffrey.
Lab:
Enter the door at left. Look
around. Examine the machine with handles, strange apparatus and cactus.
Prove that Talorel is an angel:
Talk to Bloomford the scientist. Angels are supposed
to be metaphysical, transcendent and absolute.
He can only accept tangible
evidence.
Prove that Talorel is metaphysical
(immortal): Take the poison (cyanide) left of door.
Prove that Talorel is transcendent
(contact and effect living things): Look at and talk to
the cactus right of Bloomford.
Prove that Talorel is absolute
(perform a miracle): Breathe on cactus. A flower blooms on
the cactus. (Achievement - Angel's breath, used 3 times).
Talk to Bloomford. Bloomford now
believes that Talorel is an angel. (Achievement - The nutty
professor).
Ikarus:
Talorel ask about help in flying back to heaven. See the flying machine.
Learn that Greta took the
blueprints and Bloomford cannot finish the machine.
They need to find a witness that
knows what happened to the blueprint. Learn about the inquisition.
Notebook: Bloomford gives a notebook so that Talorel can write down his notes. The notebook is located left of
the inventory bar. It lists the task needed to be done.
Look around in the backroom. Ask
Bloomford for the paint to get a paint bowl. Exit lab.
Look around town.
Mill Street:
Go to the side street right of the lab.
Notice:
Read the notice right of lamppost. Grimacing is prohibited.
EC antique shop:
Check the sign. Enter the EC shop. Look around at the items. Talk to Sir Edwin Cartwright the
third the shopkeeper.
See a familiar mask on the wall behind Sir Edwin.
Learn about the toupee loom and
Homunculator 3000 XL used to build a homunculus. The homunculator needs
angel's breath to work. Exit the shop.
ML silk tailor shop:
Check the sign. Enter the shop. Look around. Examine the large spider.
Take the bamboo rod from
floor.
Talk to the shopkeeper
Mai Lin. Learn
that the Chinese tarantula easily gets cold. When it sneezes; it sheds its
skin. Exit the store.
Beggar:
See a beggar with a sign. Read the
sign - red is quicker. Try to talk to the beggar. When you see the beggar
read the sign for different one-liners.
Church:
Enter the church. Look around. See
holy water basin, dirty picture of saints with H, Z and F symbols and consecrated
candles.
Talk to Bartholomew, the priest. The pictures are those of knights that once
have a chapel that is the foundation
of this church. The Knights established the Order of the Sword of St.
Michael. H stands for the high master, Z is senechal-zeneschall, and F is
for friar.
There is construction at
far right exit. Greta's hall is at far left exit.
Enter the confessional box.
Examine the window and then lattice. Exit the church.
Alleyway
- Tavern Lane:
Enter the side street right of the
church. Examine the 2 trashcans.
Last Supper:
Check the sign. Enter the pub.
Talk to Vladic the man with really
tall hat. He owns the only transport service in town.
Examine the beer bottle with a bow
under a bell jar. Try to take it. The beer is reserved.
See a red herring left of the bar.
Talk to
Josi the bartender. Learn all
about the drinks offered - all nonalcoholic. They are water, juice and
chamomile tea.
Chairs were confiscated for the
pyre. Exit the pub.
Cemetery:
Go right and see the cemetery.
Look around. See a bell attached to a rope that goes down and left under the
gate. The gate is padlocked.
Look at the headstones and the mausoleum. Talk to the cemetery caretaker who
mumbles in his sleep. He's waiting for someone to die.
See graveyard soil under the gate
but the rope attached to the bell alerts the caretaker.
Pyre:
Go back to town centre. Go right
and check the pyre.
Library:
Enter the library.
Read the Sumerian Literature
at middle part of the shelf left of door. Learn about Gozer the traveller.
Read the Homonuculus book,
Flagellation book, Legenda Aurea book about St. Peter and other martyrs and
the Physics book from shelf right of door.
Learn how to make a homonculus,
where and how to hit in flagellation, why St Peter was crucified upside
down. The physics book explains about materials and properties of their
combination: dry and cold produce earth; dry and warm produce fire, wet and
warm produce air and wet and cold produce water.
Take the Homonculus book.
The fifth element book at shelf close to librarian shows
and explains about the pentagram.
Look at the painting of the librarian with a head of hair
and 2 girls.
Talk to Magnus the librarian.
Find a witness to Greta's taking the blueprint.
Marla:
Talk to the little girl Marla sitting on a wall by the pyre. She saw Greta with the blueprint. She will trust Talorel
if he goes down to her level - do something illegal.
Exchange the honey bread with
fireflies for Marla's slingshot.
Do something illegal:
Go to Mill St. left of church.
Read the sign of the beggar.
It could be a recipe for pancakes.
Recall or reread the notice right
of lamppost. It is illegal to grimace. So then - grimace by clicking the make
face icon.
McCallum arrives and reprimands Talorel. He gives ticket1.
Witness: Go to
Marla and give her the ticket. Now Marla trusts Talorel.
Greta tore the blue print into 3
pieces. One flew away and landed at Kareem's. The second was taken by a rat
and the third is stuck at top of the pillory.
Check the notebook that shows the
drawing.
Obtain the blueprint pieces:
Pillory blueprint piece:
Look at the blueprint piece on top
of the pillory-pyre.
Talk to Geoffrey the lamplighter
to help pick up the piece. Geoffrey takes the piece and gives it to Talorel.
Go to the scientist and give him
the blueprint piece 1.
Look for blueprint piece at
Kareem's:
Go to outskirt of town. Talk to
Kareem about slip of paper. Learn about the 30 labels of his shampoo that he
did but had one left over.
Three shampoos
were sold this
morning. Kareem still would not tell on his shampoo customers.
Get the customer list: Try to pick up the list on the
table. The dark shadow passes by. Talorel warns Kareem about a goat.
Take the list
while Kareem is not looking. Look at the
list in inventory. The shampoos were sold to Bill, Magnus and Bartholomew.
Track the shampoos - Bill:
Bill: Go left
and back to farm or use the map to jump to farm. See Bill sneak out of his own barn.
Talk to Bill.
After a while, Bill admits that he
uses the shampoo on stew to make it tastes the way Stacy cooks it. He gives the
empty bottle. This is not the label.
Check the barn. It is locked.
Track the shampoos - Bartholomew:
Bartholomew:
Go to the church and talk to Batholomew.
He used the shampoo to get rid of
paper fleas. Magnus told him about it. Bartholomew used it on the hymnals
but it didn't work.
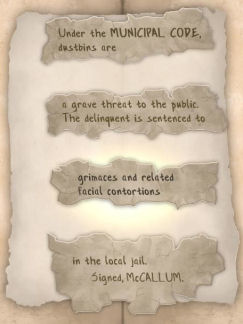
He threw the bottle at the dustbin
in alleyway-Tavern Lane.
Alleyway-Tavern Lane:
See the silk tailor and Vladic the transport man discuss about an item that
was not delivered.
Examine the notice above the
trash bins. Rummaging in dustbin is prohibited.
Rummage in left dustbin to get an
old silk robe. McCallum catches Talorel and issues warning ticket2.
When McCallum leaves, check the
right dustbin. Finally get the shampoo bottle. It is not the one with the
blueprint label.
Track the shampoos - Magnus:
Beggar: Go to the
center. See the beggar. Read the sign.
Magnus: Enter the library and talk
to Magnus. Magnus is not using it for the fleas. He refined the shampoo and
would not give the bottle to Talorel.
Seeing the portrait above Magnus and his bald head - he must
use it to try to grow hair; as advertised.
Make a toupee:
EC Antique store: Go to Mill St.
Enter the antique store. Talk to Sir Edwin about the toupee loom. It costs 5
pounds.
He will give the toupee free in exchange for Talorel's
scaring a rat that started to live here. It is in the mask at left.
Scare the rat: Make face on the rat by
the mask at left. It runs off with a piece of the blueprint.
Talorel follows it to the street. It went inside a hole on
the street by the lamppost.
Go back inside and talk to Sir Edwin. Take the
toupee
loom.
Silk tailor: Go next door and talk to the
silk tailor about the tarantula. It sheds it's skin when it sneezes.
Use the sneezing powder
given by Kareem on the tarantula. Take the spider fur.
Combine the spider fur and the toupee loom to get
toupee.
Magnus: Go back to the library.
Talk to Magnus to give him the toupee.
Get the bottle with the blueprint label.
Bloomford: Go to the lab. Talk to
Bloomford to give him the bottle with the blueprint.
Get the rat's blueprint:
Track the rat: Go to Mill St. See the beggar here. Read his sign.
Rat hole: Look and talk to the rat. It
doesn't want to come out after Talorel scared him.
Use the cheese on the rat nest. Talorel used the mouse on
the hole also. There was sound of fight. Uh oh!
Mouse comes back. Follow mouse to outskirt and then
wood. The backdoor of the rat nest is a hole at base of tree by the
gargoyle bridge.
Use the bowl of blue paint on the backdoor-hole of tree.
This way the rat will leave footprints.
Farm: Go to the farm at left. Enter the
farmhouse and use one of the empty bottles on the stewpot. It stinks. Ugh!
Goat at Gargoyle bridge: Go back to the
bridge in the woods.
See a scapegoat. Salome says that some sacrifices an animal
to carry their sins...
Use the left gargoyle. Talorel pushes it in water and
splashed the goat. The way is clear. (Achievement - Avoid the evil.)
Get the rat to come out: Go back to the
rat hole at Mill St. in town.
Use Bill's stinky beef stew on rat hole. The stew is so disgusting,
the rat left his nest through the backdoor.
Jump to Gargoyle bridge. See footprints coming out of the
tree. It stops midway the path.
Find out what happened to the rat: Talk to the narcissus.
Aren't you beautiful...
She want to be on stage and be admired. Take the
narcissus and plant it on the sunlight at bottom of steps.
Talk to the narcissus again. The rat was eaten by a bear.
Help the bear: Go left from the bridge to the woods. See a huge cranky
bear.
Talk to the bear. He has a stomachache from the rat lodged
in him somewhere.
Azael advises Talorel to go to Bloomford.
Greta: Jump to town center. Hear Greta preach at the church steps
about the perils of reading.
Talk to Bloomford. The mouse nixed the idea of
using it and Talorel in getting the rat from the bear. They decide to make a
homunculus.
Make a homunculus:
Get the Homunkulator 3000 XL: Enter the antique store at Mill St. Talk to Sir Edwin.
Sir Edwin wants the original ghost detector owned by
Bloomford in exchange for the homunculator.
Go back to the lab and talk to Bloomford. He said
the trade is okay.
Find the ghost the detector: Click
on the strange apparatus on the floor left of the machine with levers to get
a PKE meter.
Bloomford explains the control. Never cross the streams.
Go back to antique store. Talk to Sir Edward to give him the
ghost detector.
Take the homunkulator at right (looks like a bird cage).
Locate the ingredients needed to make a homunculus:
Read the manual. The ingredients are: nutrient solution - blood from a 3000
yr old vampire that has been dead 2000 yrs or grape juice; 2 concentrated
candles, matches, graveyard soil, appropriate name and breath of an angel.
Matches: If you haven't gotten it
yet; ask Geoffrey the lamplighter for some matches.
2 concentrated candles: Go to church.
Ask Bartholomew about the 2 candles.
The priest wants the 3 icons cleaned in exchange for the
candles. Use the mouse on each icon. Furball does not like it. (Achievement
- Mouse sympathizer).
H icon is William Cothelstone. Patron saint of beggars, vagabonds and salesman.
Z icon is Barnaby Garlick. Patron saint of horn of
plenty and quick snacks.
F icon is Harold of Limids. Patron saint of forced
laborers and false intrusions.
Talk to the priest and get 2 consecrated candles.
Graveyard soil: Go to the cemetery.
See
graveyard soil under the locked gate but is blocked by rope attached to a
bell. The bell makes noise every time you try to get the soil. Irving the
gravedigger gets upset.
Use the mouse on the bell. Furball covers the clapper and dampens the sound.
Get graveyard soil from under the gate.
Grapes: Go to Kareem's stall. Go
right behind Kareem to be at Giant's grave. See standing stones with strange
fluffy plants.
Continue to the right. See an old mill and keep out sign.
Take the grapes from ?tree?
Try to enter the mill but Talorel doesn't want to.
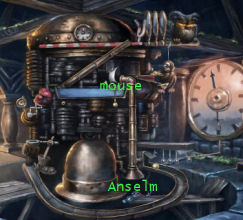
Name: Read the Homunculus book borrowed
from the library. Hahahahahah.
A homunculus made to be swallowed by a bear should be named
Anselm.
Make the homunculus: Go back
to Bloomford at the lab in town. Talk to Bloomford about the ingredients.
Now that we have all the ingredients, place the homunkulator
on the right side of the workbench at foreground.
- Squeeze the grapes on homunkulator.
- In inventory combine one candle and the graveyard soil.
See a blob inside the cage.
- Place the other candle on the homunculus to be's head.
- Light the candle on its head.
- Breathe on the homunculus and baptize it Anselm.
Oh he's a cutie! Talorel places Anselm on the floor.
Select Anselm's icon at right side of screen and then click on a place on the floor
to see him walk.
Click on Talorel's icon to make him the main character. Pick
up Anselm. (Achievement - The constructor).
Get Anselm inside the bear:
Go to the woods left of the gargoyle bridge. Talk to the
bear. The bear refuses to eat sweet little Anselm.
Make bear yawn: Read a book and the bear
gets sleepy and yawns.
Combine Anselm with Marla's slingshot and use
it on the
bear's mouth when he yawns.
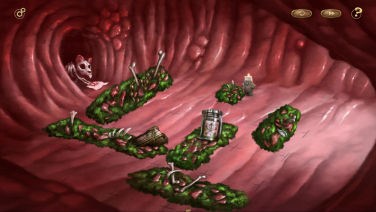
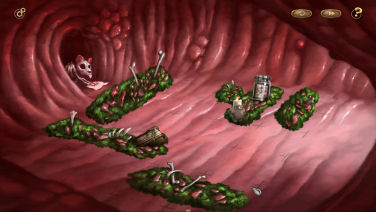
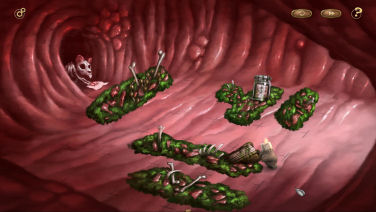
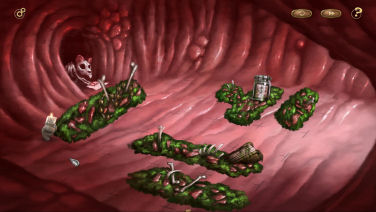
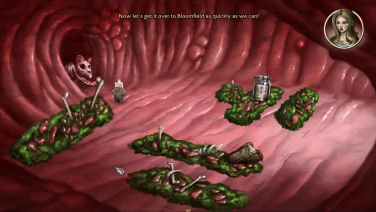
Move Anselm to paper: There is a skip
to this puzzle.
Anselm can pull and push.
To push: Click on one end of the yucky
stuff to get Anselm hold it. Then click on an empty square before the
stuff to push it to that square. Right click to release the yucky stuff.
To pull: Click on one end of the yucky
stuff to get Anselm to hold it. Then click on an empty square behind
Anselm to pull it. Right click to release the yucky stuff.
|
 |
 |
 |
|
Move the small yucky stuff located far right end first.
Move the smallest one to the middle area.
|
Pull the one with poison one square away from wall.
Go around and push those 2 to be on the wall beside
small one. |
Anselm should have a space to walk to the middle.
Pull the large one with book to first row to give space
to the one blocking the rat.
|
|
 |
 |
|
Then pull and then push that blocking one to left side.
Automatically get the blueprint. |
Trapped:
The gargoyle bridge is blocked by the goat. The dark shadow
floats beside the bridge. The goat rams Talorel.
Find a way out: Talorel wakes up in the
dark. Press the spacebar.
A hot spot is below Talorel's eyes. Get a fork or a skeleton
hand.
Press the space bar again and click on the hotspot a bit left of
the middle screen - and click several times to use the skeleton hand to dig.
Get light: Talorel drops into a
dark room. Examine the unlit torch at left wall.
Who has a lit candle? Use Anselm on the torch. Torches are
lit around the room.
See a mosaic floor. See a lever at left wall and 3 red
raised stone slab.
See a hotspot at middle of floor. Click on it and get
smashed. Use Anselm on the lever at left wall.
Open the door: Read the inscription on
top of the door. Only three of the same heart and the same step are
worthy of leaving.
- Use Anselm on one slab. Not enough. Add empty bean
stew bottle with Anselm. The slab is sinking into the ground
completely.
- Use mouse on another empty slab. Add the loom
with the mouse. The slab is sinking into the ground completely.
- Stand on last empty red slab. The slab is sinking
into the ground completely.
Door opens. The three exits. (Achievement -
Homunculist; used Anselm 3 times).
Bridge Hall of the Necropolis of the Order of the Sword of
St. Michael.
Look around. Read the inscription above the door.
Look at the light coming from the ceiling surrounded by the
ornate symbols: H, Z and F.
Check the large statue at left with a distorted face. Examine the
3 statues of knights at right wall.
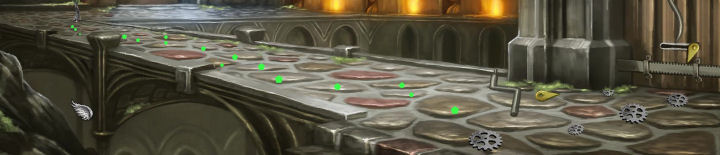
Walk the path:
See a stone door with parts of mechanism strewn on the
floor.
The path is made up of stone slabs. Walk the path and an
arrow is shot at Talorel.
Click on the stone slabs of the pathway - one stone at a
time to move Talorel slowly to the right.
Do not step on any red ones. Use the tip of the wing
cursor to select the stone slab.
Talorel goes back when a mistake is done.
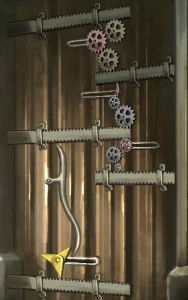
Fix the door:
There are gears and other parts on the floor in front of the
stone door. Place the parts back on the mechanism on the door to connect all the bars
together.
Check the arrangement by turning the lever.
|
- Insert the crank on the hole left of door.
- Place the 2 gold teardrop shaped parts with the
existing gold teardrop at bottom slider slot.
- Slide-click the connected gold part to the left part
of the slider slot.
- Get mouse to slide the top pinkish gear to the right
side of slider slot to connect the 3 gears at top.
- Place small size gear and middle size gear below
middle slot.
- Place middle size gear and teeny gear below lowest
slider slot.
- Slide pinkish gear on lowest slider slot to the left.
Turn the crank. Talorel leaves the hall.
|
 |
Charnelhouse:
Skulls abound. There are skulls on the wall that is the
entrance to the necropolis.
Read the inscription on the tombstone under the skulls on
the wall. The outcast who found death and the fires of angels for the
kingdom of Heaven on Earth. So these are outcasts from heaven.
Go right and Talorel exits into the church.
See that there is a new exit at right side of the
church in front of the exit sign where there is construction - charnelhouse.
Goat:
Exit the church. Meet the scapegoat. The goat gets upset at seeing Talorel.
The demon has buried Talorel in a sarcophagus but still he got out. The dark
shadow formed into a demon; leaves the scapegoat and the goat falls down dead.
The three angels
are deciding what to do with the dead goat when Vladic helps. Me, I
didn't see anything.
ACT TWO
Get items
for the flying machine:
Blueprint:
Go to the lab and talk to Bloomford to give him the last piece of the
blueprint. (Achievement - The comedy: act one).
Bloomford enters
the 3 things needed to finish the flying machine in the notebook. They need a balloon made
of silk, gas and burner.
Mai Lin would
know about the silk.
Bloomford had an
accident at the mill and released some gas. He gives a gasometer and
tells Talorel to find the gas in the mill and suck it from ceiling.
Bloomford had a
burner but Greta took it away. Do that last.
Greta:
Exit the lab and see Greta preaching against something or rather.
Kareem:
Talorel exits the town.
You might want
to return the costumer list now (can be done later or when he's not at his
stall).
Or do NOT return the list and be a thieving angel
at end of game. (Achievement - thieving angel).
Talk to Kareem
about the goat. Did you see that? Place the customer list on the
table by the teapot.
Get silk:
Ask Mai Lin:
Go to tailor shop - Silk store at Mill St.
Talk to Mail Lin
about the balloon. No silk because of prohibition. Bring silk and silk
thread and she will make one.
The spider lost
its fur. It is in the back room. Mai Lin opens the opium den.
The beggar
blows on Talorel. 3 other Talorels appear.
Remove
the other Talorels:
Talk to the
beggar. He spouts extreme philosophical rhetoric. One down.
Talk to one
of the other Talorel. A confused Talorel disappears. Two down.
Talk to the
last Talorel. Use the mouse on the last Talorel. It cannot climb on
Talorel. If it is a fake one, it
disappears.
Spider
and silk thread: Look at the naked spider in the
terrarium.
Go to town
center and ask Marla for the lamp (honey bread) back.
Go back to
silk store's back room.
Give the
bread with fireflies to the spider. Take the silk thread - web
made by the spider.
Parts of
silk balloon: Give the silk thread and silk robe
taken from dustbin to Mai Lin. We need more
silk cloth.
Get gas:
Enter the
mill: Go right behind Kareem and the right again to
the Mill.
Sign:
Read the notice on the sign. No one is allowed to enter the mill.
Try to enter
the mill. McCallum gives ticket3. (Achievement - Outlaw; get 3
tickets).
Take the
paper-pamphlet off the sign - no sign, no prohibition.
Enter the
mill now.
Ghost:
Talk to the ghost. She thinks Talorel is the demon as warned by an angel.
Leave the mill.
Follow the
Crow: See a crow fly back and forth. Follow the crow from
the mill to the woods. It flies behind
the tree.
Tree:
Talk to the tree about Poe, Shona's raven and ask for a way through.
Tree wants the
heart carving removed from his roots. Use the breath of life on the carving.
Talk to tree
again. Go through the opening to be at the clearing.
Shona the
witch: Look around.
Check the bird bath and the clothes hanging on the line.
Talk to Shona. Learn that St. Vincent is
the name of the town before Heaven's Hope.
Agnes Crowley
the mill ghost is Shona's several greats grandmother burned as a witch 230
years ago.
Shona gives a
family coat of arms - emblem to let Agnes know that the ghost can
trust Talorel.
Ask for the
dress hanging on the line.
Check the dream
catcher above Shona's moss covered bed. Ask Shona for the dream catcher.
Take it.
Exit the house
and take the silk dress.
Agnes the
ghost: Go back to the mill and talk to the ghost to
automatically give the emblem to Agnes.
A sacred goat
told her that Talorel is a demon. She absorbed the gas that is up at the
mill to make herself scary.
To release the
gas, Talorel should find her remains and give it decent burial. When she's
in peace, she can then release the gas.
She wants to be
buried at the cemetery. Her remains are where the Christians bury the dead
that doesn't meet their standards.
Find Agnes'
remains and bury it in the cemetery:
Get Agnes'
remains: Jump to Mill St. and enter the antique store.
Ask Sir
Edwin about the ghost detector. He gives the ghost detector
because it's broken. It only points at Talorel.
Remember where we
read the tombstone of the "outcasts". Jump to town center. Enter church
and exit to charnelhouse.
Turn on the
PKE meter. See Agnes' remains glow green on the wall. Take the
skull.
Enter the
cemetery: Be sure you have taken the dream catcher
from Shona already.
Jump to
Tavern Lane and then right to cemetery.
Irving: Look at Irving the
cemetery caretaker. He is a
restless sleeper. Talk to Irving.
Look for
Geoffrey. Talk to Geoffrey about Irving. Irving is a restless
sleeper.
Go to
the cemetery. Geoffrey places the dream catcher above Irving.
Padlock code: Look at Irving to hear the code to
the gate's padlock - 143256.
Use the
gate's padlock and Talorel opens the gate.
Cemetery: Look around at the tombstones, mausoleum
and coffin.
Take the
silk lining of the coffin.
Urn
musical chairs:
Read the
tombstones; open the tombs and get the urns.
Starting left to right by the tree.
Pick up
the grave flower and urns from the tombs.
Urn 1:
Peter Murphy, tradesman kind to wives. Talk to urn 1. He's the
exterminator here.
Urn 2:
Raymond Edwards. Talk to urn 2. Raymond owned an occult shop.
Urn 3:
Winston Leigh, plumber. Talk to urn 3. He worked here at the
cemetery.
Left to right on left side:
Urn 4:
Eugene Harold. Talk to urn 4. He collects mold spores and fungus.
Urn 5:
Jeanne Melanisse. Talk to urn 5.
Place urns
in different tombs to get space for Agnes' remains.
Urn 1, 4
doesn't want to be by the tree because of the roots.
Urn 2 wants
flowers.
Urn 5 doesn't want to be close to mausoleum.
Place
Urn 1 (Peter) at tomb 4 left of mausoleum.
Place
Urn 5 (Jeanne) on tomb 2 middle by tree.
Place
Urn 3 (Winston) on tomb 3 right by tree.
Place
flower in tomb 5 right at foreground. Place urn 2 (Raymond) in this
tomb.
Place
urn 4 (Eugene) together with urn 2 (Raymond) at right tomb
foreground. (Achievement - Rest in peace).
Automatically Talorel places Agnes in tomb 1. She's happy now.
Collect the gas:
Greta:
See Greta preach again at church steps.
Climb to the
top of mill: Go to mill. Examine the fallen beams. The beam
does not
look stable.
Use Anselm
on the beam. Make Anselm jump by clicking above him (close to flame).
Give the
gasometer to Anselm after he jumped.
Select
Anselm at right of screen. Walk Anselm on the beam - keeping at center.
When there
is a barrel rolling down - make him jump. If hit, he falls down close
by.
There is a
skip to this puzzle.
At top of the mill, use
the gasometer on the green gas. Go down or fall down.
Go back to
Bloomford and tell him that you collected the gas.
Get the silk
balloon:
Go to Mai Lin at
the tailor shop. Give her all the silk collected (dress, robe and coffin
lining). It is enough silk.
The silk balloon
will be delivered to Bloomford by Vladic.
Go back to
Bloomford and he says that the balloon has been delivered now. Now we need
the burner.
Get the
burner:
Greta took the
burner from Bloomford.
Greta:
Go to church and see that Greta is preaching against drinking alcohol.
Last Supper
Tavern: Go to tavern and talk to Josi.
Learn that she
gets her alcohol from Vladic's delivery and Bill has some too.
Get alcohol
from Bill: Jump to farm. Talk to Bill about alcohol.
The still is
broken.
Put the
pieces of the still back on the one at right.
Use 3 pieces
only - first, third and fifth from left.
Vladic will
deliver the alcohol to the pub. (Achievement - Sacrilege).
Kareem:
While Kareem is in church - you can return the customer's list if you want.
Enter Greta's
office: Check the tavern to see the place is full.
Go to town
centre and see Greta walking around.
Enter the church
and Greta's office at left.
Search the
office. Take the burner from the left drawer on the second from
bottom row of the middle cabinet behind the podium.
Possessed
Greta: Exit and be caught by Greta and McCallum.
While ranting,
Greta is possessed by the demon-dark shadow. (Achievement - Talking is
golden).
Talorel escapes.
Bloomford:
Go to the lab and talk to Bloomford about the burner. (Achievement - The
comedy: act two).
Bloomford goes
to the backroom. He gives new set of task. (Achievement - The flight of Icarus).
ACT THREE
Get the flying
machine in position:
The last task is
the get the flying machine in ideal position. The best launching site is the
steeple.
Talorel has
to convince Vladic to move the flying machine to Tavern Lane.
Greta-Demon and
McCallum catch Bloomford and Talorel. They are both placed in jail.
Escape jail:
Bloomford is upset and wants Talorel to get them out of here.
Look around and
check the active spots.
Sewer:
See a large pipe on the wall. It seems that Talorel does not have a
toilet like Bloomford.
Try to place
the mouse into the pipe. The mouse emphatically refuses!
Use Anselm
on the pipe. See Anselm in the sewer pipe.
Move left
and pick up a potato.
See a pile
of muck at end of sewer. Push the muck to the left to block the pipe -
like a dam.
Exit to
Bloomford's office-cell. Give the potato to Bloomford.
Take Anselm
and move him to Talorel's cell.
Firm
grasp of what to do: Change to Bloomford by
clicking on icon at right side of screen.
Check
inventory to find a lot of goodies.
Combine a
copper wire (out of 2) with potato to get potato with copper wire.
Combine the
other copper wire with screw to get copper wired screw.
Combine the
potato with copper wire with copper wired screw to get potato battery.
The battery is very low voltage.
Combine the
potato battery with the energizer to get potato battery+.
Use the
potato battery plus on the toilet right of Bloomford. The toilet is
electrified.
Water it
up: Change to Talorel.
See a dying
plant outside his cell. Use the breath of life on the plant. It revives
and reaches the hole at top of wall.
Use mouse on
hole at top of plant.
Take mouse
from inventory and use him on the hole on the ceiling of Talorel's
cell.
Take mouse
from inventory and use him on the hole on the wall of Bloomford's cell
right of toilet tank.
Use mouse on
the broken chain of the toilet tank to flush the toilet. The mouse hangs
on the chain.
Electrified water is on the floor.
McCallum:
Change to Bloomford.
Talk to
McCallum about the water. He comes in and gets electrified.
As
Bloomford, take the keys on the floor and use it on Talorel's
cell. (Achievement - Alcatraz).
Salome and
Azael thinks that Talorel has to get absolution because he hurt a human
being. If he can't be absolved; he might not be allowed back to heaven.
Decision
time: to lock or not lock McCallum up. They both work.
To lock
McCallum up; use the keys on the cell. To not lock McCallum up, leave
the cell open,
Leave
the police station.
Bring Greta
back to normal.
Vladic's
ultimatum: Go to the tavern and talk to Vladic. Vladic
wants Talorel to get Greta back to normal.
Exit the pub.
Salome and Azael want Talorel to be absolved of his sins first before he
does the other tasks.
Greta-demon:
Go to town center and see Greta preach again.
Greta is showing
signs of possession. The angels realize that Umorel is the one responsible for all of the problems.
Umorel is the one that pushed Talorel out of heaven. He is a demon now.
Go to
confession: Enter the church and talk to Bartholomew about
entering heaven.
Enter the
confessional. Open the wooden flap. Talk to Bartholomew. Talorel relates all
of his sins.
The mouse is not
a murder. Apologize to St. Peter. Exorcise Greta.
Talorel must
find a good location and have a ritual schedule Definitely!
Find location
for exorcism: Jump to Giant's grave. Look around at
everything, moss and standing stone.
It is a good
ritual place. Clear the green fluffy plant off the stone at top left and
at bottom right.
Do the
breath of life on any standing stone to see symbols and produce a protective
circle.
Find hints to
make ritual schedule: Jump to town centre. Take the
pamphlet3 left of the church door.
Talk to
Bartholomew in church. Learn why exorcism needs to be a ritual and how
symbols affect it.
How do we get
Greta to the ritual location?
McCallum or
another can bring Greta to the location.
Greta is crazy
pamphlet: In inventory combine 2 out of 3 pamphlets issued
by Greta. Get pamphlet snippet of all 3 pamphlets.
See parts of
the pamphlets. Put the snippets on the blank paper to make a strange order - fake
pamphlet by Greta.
McCallum is mad
ticket: In inventory combine 2 out of 3 tickets
issued by McCallum. Get ticket snippet of all 3 tickets.
See parts of
the tickets. Put the snippet to make a strange order - fake ticket
by McCallum.
If McCallum
is locked in jail - convince Bill to help with Greta:
Go to farmhouse
and talk to Bill about Greta.
Show that Greta
is possessed by giving the fake pamphlet to Bill.
Bill asks about
McCallum - He's gone mad! Show the proof - fake ticket.
Bill will help
if Greta is lured out of her office.
If McCallum
is not in jail - convince McCallum to help with Greta:
Go to jail and
talk to McCallum about Greta.
Convince
McCallum with the fake pamphlet.
McCallum will
help if Greta is lured out of her office.
Get heavenly
permission:
Library:
Go to the library and return the Homunculus book to Magnus.
Borrow and read
the Fifth Element book. Learn what is needed to do the ritual. Talorel needs
the proper authorization or permission to act in God's name on earth.
Church:
Talk to Bartholomew about hexagram. The priest says to have justification
and be empowered to do the ritual.
The only one
that has the power is the Pope; who has St. Peter's key. St Peter's keys
gives the right to act in God's name on earth.
Ask about who
can empower to do the exorcism. Talorel needs something that can separate
the possessed from the possessor.
Apologize to
St. Peter: Go to the farm. Talk to St. Peter's Statue.
Appease St.
Peter by taking back all the insult Talorel told him earlier.
I know
you didn't want to let Jesus down...
I know
about the inverted cross...
I know
that the whole thing with Jesus was just a slip...
Talorel - St
Peter forgave you. St Peter releases the keys. Take St. Peter's keys.
Find empowerment
tool:
Well:
Go to the well in front of the church. Use the crank to raise the
bucket. Take the mirror.
Open door
to the necropolis: Go to charnelhouse inside the church. See the slider slots with
skulls.
Move the
slider slot skulls in the position when the door is unlocked on the
other side earlier.
Top and
second slider slots to the left.
Third
and bottom slider slots to the right.
Use
mouse to move the top skull. The door opens.
Examine the
light at ceiling: Go to left side. Talorel gets shot
and runs to the other side.
Use the
mirror on the symbols surrounding the light by order of rank of the
knights - H, Z and then F.
The
symbols should light up if correctly done.
A gondola
drops down. Talorel goes up.
Look at the
statue of Archangel Michael holding his shining sword. Try to take the
sword, the perfect tool for exorcism. Yikes.
Take
the sword: Look at the source of the light
beam on the opposite wall. It is a crystal or prism.
In
inventory, use the pamphlet snippet to make paper balls.
Combine the paper balls with the bamboo rod taken from silk
store.
See
a very shaky target as cursor. Move the target slightly above
the top metal holder of the gondola.
Click-hold to get strength (move to max) of throw shown by the
bar.
Release to fire. You have to hit the crystal 4 times.
There is a skip to this puzzle.
Take the
sword. Replace it with the bamboo to prevent an earthquake. (Achievement -
Archangel).
Protective
circle:
Activate the
elements and the circle:
Exit the
bridgehall slowly as before. Use the crank and exit to church.
Get water: Use Bill's
shampoo bottle on the holy water basin to get holy water.
Get earth:
Go to cemetery. Take graveyard dirt from under the gate.
Go to the
Giant's grave.
Enter the
circle. Breath on the stone to show the symbols and activate the
protective circle.
Place
graveyard dirt on the bowl of the earth sign stone at bottom left.
Place the
holy water on the bowl under the water sign (inverted triangle) right of
the pentagram stone.
Use Anselm on the bowl of the fire symbol at bottom right. The stone is now permanently
activated.
Use mouse on
tube in front of air sign. The stone is now permanently activated.
The ritual
performance plan is complete. Go back to the priest and tell him the ritual
schedule is done.
Get Greta out of
her office:
Bell Tower:
Use the exit at far right exit by the pulpit. There is no construction
anymore. (Achievement - True explorer).
Bell
tower: Look around. Exit to outside and see a gargoyle with
sharp horns. It is stable.
Holy
bell: Go back inside. Click on bell. The sound of the bell will
drive Greta out of the church.
Go down and talk to the priest about the
ritual schedule. Talorel will tell the priest that ringing the holy bell will drive Greta out of her office.
Go back
to the holy bell at the bell tower. Examine the parts of the holy bell.
The aim is to get the metal ball from
bottom right to bottom left to hit the bell.
Turn the
clock 5 times. The ball at bottom right goes into the tube. Talorel will say if the
clock is set.
Place
Anselm under the funnel to heat the furnace.
Steam
drives the ball into the ship.
Use the
mouse on the ship to blow it to the left side.
The
boxing glove punches the ball to the tuning fork.
Make
faces 3 times to the owl.
The ball
moves left and drops down to the cup and rings the bell.
Hear Greta
rant and get taken to the ritual circle.
(Achievement -
True angel; didn't steal anything).
Exorcise Greta:
Go to the
Giant's grave. See Greta tied at center of the circle.
Perform the exorcism: Enter the
circle.
Activate the
circle by breathing life to any stone.
Place graveyard
dirt on the bowl of the earth sign stone at bottom left.
Place the holy
water on the bowl under the water sign (inverted triangle) right of the
pentagram stone.
Use Anselm on
the bowl in front of the fire symbol at bottom right.
Use mouse on
tube in front of air sign.
At each step, see the demon
slowly separate from Greta. Only yucky black threads keep it attached to
Greta.
Use sword to cut
the thread.
The demon goes
into Anselm. Mouse blows the light off and Anselm expires.
Umorel rants and
descends to fiery hell.
Greta wakes up
but loses her memory. (Achievement -
The exorcist).
Select any future for Greta:
Try - Cursed
Queen (as Marie Antoinette) that repents and help the people. (Achievement - MIB)
Save Anselm:
Look
at Anselm. Azael wants Talorel to help Anselm.
Use match on
Anselm. He's alive! Mouse embraces Anselm.
Lift off:
Talorel goes
to Tavern Lane and see Ikarus and Bloomford.
Tie the
mooring rope:
Use mouse on
rope on the ground. Then click the mouse cursor on the top part of the
wall. Mouse takes it to the bell tower.
Click mouse
cursor on the horn of the gargoyle. Mouse did a good job.
Inflate the balloon:
Bloomford
gives the gasometer. Talorel is
now on Ikarus.
Connect the
gasometer to the burner by clicking it to the burner - metal part with holes.
Use match on
the burner at center.
Place Anselm
on the bellows. (Achievement -
The comedy: act three).
Ikarus rises above the bell tower.
Farewell:
Heaven's Hope people see Talorel off.
Talorel
thanks the Heaven's Hope citizen. (Achievement -
I'll be back).
I'm back.
Talorel is in heaven.
This document may not be
distributed without express written permission of the author and the content may
not be altered in any way.
For Questions or Comments
on this Walkthrough,
Please write to:
MaGtRo
Copyright © 2016
MaGtRo
 GameBoomers
Walkthroughs and Solutions
GameBoomers
Walkthroughs and Solutions