In Memoriam Walkthrough v1.0
by Gamehound
January 2004
Table of Contents
Section A: Setting up an account
Section B: Story Background
Section C: Walkthrough
Part I: Test of the Initiate
Part II: AQUA / Water
Part III: TERRA / Earth
Part IV: AER / Air
Part V: IGNIS / Fire
Finale
Section D: Closing Comments & Possible Bugs
Section E: Copyright
Special Notes! - There is a navigational
toolbar that you will get sometime early in the game. There will be 2 added
tools later in the game. In Part II, you will get something called the
Analyser. In Part IV, you will get something called the Soundcracker tool.
Well, you don't need to wait till those parts to add them to your toolbars,
nor do you need to go to the websites (given later in the game) to
"download" them. You can simply open your navigational bar (with Internet,
Films, etc) then enter in the code SU2754 and get the Analyser (good for
Aphebis and Tetima puzzles although I hadn't used it with the Aphebis puzzle
myself). After, enter the code ST1732 and get the Soundcracker tool
(supposedly for Vari in Part IV, but I never used it). Also, make sure to
download
Patch v1.2 (mislabeled as v2.1 on the Ubi Soft website). You will need
this patch to complete the game, so I'd recommend downloading it before you
begin. There are a lot of bugs in the game, but if you follow this
walkthrough, there is only 1 major bug that requires the patch to continue
gameplay.
Section A: Setting up
an account
This is a particularly annoying feature of this game, but a necessary
one. In order to begin playing the game, you must set up an account. To do
so, you have to be sent a password through e-mail. So, in this section, I
will explain the procedure of setting up an account.
Creating your own account...
Rules:
1) Login must be a minimum of 4 characters.
2) You cannot use the same e-mail address to create new accounts.
3) If you use a space in your Login, your password will also have a space,
so I wouldn't.
4) The password you get is not case
sensitive even though it is sent to you in uppercase characters.
To create an account, you simply click on the "click here" link to the right
of user email management on the first screen. Next, pick a slot you want to
use (1 for the top slot, and 9 for the bottom slot). And I am guessing as to
the program using higher numbered slots if lower numbered slots are not
filled. So, you may have to use 1 then 2, etc. Click on the "create a new
user" link in the slot you wish to use. Make up a login name to use. Next,
enter in a valid email address. Choose a method for how you want to receive
e-mails (which you will use throughout the game)... either "via an email
program" or "online." Choose online if you use a web based e-mail service.
Next, click the register link. If successful, you will receive an e-mail
with your account information from SKL Network with a subject line reading
"Password." If, however, you try creating an account with the same e-mail
address, you will get an error message...
Coincidentally, if you click on the "create a new email address" link on the
error message, your web browser loads up, and takes you to Hotmail in the
United Kingdom ( http://www.msn.co.uk/Default.asp?Ath=f ).
Section B: Story
Background
This is a spoiler line where the information would not be provided until
later in the game, but if you want to understand what the puzzles of this
game comprise, I'd recommend reading e-mail 14. Also,
you can read through e-mail 11 for an analysis of the
killer who calls himself the Phoenix. And e-mails 19,
30 41 & 42 for a
further analyses of the Phoenix. And for the ultimate spoiler (to learn who
the Phoenix really hates), you can read through e-mail 63.
The following is taken from the ReadMe.wri file in your installation
directory...
"Our journalist, Jack Lorski, disappeared along with his friend,
Karen Gijman, whilst investigating a series of murders.
This CD-ROM is our only lead to finding them. We need your help.
PC/MAC CD-ROM
Warning
We hesitated for a long time before deciding to go public. However, since
our journalist, Jack Lorski, and his friend disappeared, events have
suddenly started gathering pace.
Arnaud Ivan, SKL Network’s CEO, received a CD-ROM and a video excerpt at his home address, which has made us take all of this very seriously.
An in-depth analysis of these elements finally convinced us that our
employee and his friend have been kidnapped. We believe this kidnapping
could be linked to the case of MP Kourievski.
We have since been contacted by someone who is obviously holding Jack and
Karen captive. It is more than likely that this same person also designed
and created the black CD-ROM currently in your possession.
This person calls himself "the Phoenix" and ends his messages with the words
"In Memoriam". The "Phoenix" has specifically asked us to go public with his
CD-ROM, which is all part of the challenge he refers to as his "Great Work".
After a great deal of discussion and thanks to the support of the families
involved and our partners, we decided to agree to the Phoenix’s demand.
Thank you for your invaluable help.
SKL Network - Editorial Board,
In solidarity with Jack Lorski and Karen Gijman
www.skl-network.com"
Section C:
Walkthrough
Notice! I
am terrible with keeping up with e-mails, and this game sends quite a few.
So, I placed the first 3 fairly close to when they were received. As of
receiving the 3rd e-mail up until my completing part two of the game, I have
not checked any of the e-mails. To my surprise, there were 13 of them. Ooof!
So, for convenience, I will place them in the walkthrough where I find them
to be most appropriate. Just note that receiving the e-mails while playing
may not coincide where I have placed them in this walkthrough.
* Click on the black warning screen to watch the 41+ second opening video.
* Click on the next 3 warning screens then change to CD #2 on the 4th
warning screen to proceed.
* Mouse over the white boxes in the red rectangle.
* Click on the red box to proceed.
* Mouse over the white button in the new, red rectangle.
* Click on the white button to continue.
* Mouse over the white circle in the new, red rectangle.
* Mouse over the next 3, gray boxes to proceed.
Phoenix: "If you want to reach the dizzy
heights, then give it to me."
* Click on the handle of the knife, drag it over to the open hand then place
the handle of the knife inside the open hand to proceed.
Phoenix: "So, you want some news about the
Polish guy, do you?
Well, since you've been good, you've earned yourself a
little
reward...
Shall I give you some bits from the log he filmed?
I'm sure you'd like that. Here we go, have a look..."
* Click on the screen to proceed.
* Watch the video shot by Jack Lorski of Karen Gijman then read the message
by the killer.
Phoenix: "To enter the lair of the Phoenix,
you've got to be an initiate...
The three tests are waiting for you..."
Part I: Test of the Initiate
* Mouse over the circle on the bottom, right-hand corner of the screen to
reveal a box.
* Click on the box.
Box Puzzle
-Note: In this "test," you will need to type in the word Corpus with your
keyboard, but the keys aren't what they are supposed to be. You will need to
find the correct key mappings to enter the word Corpus to proceed.
* Click on the letters P H E N I X to enter the
word Corpus, and to proceed.
-Note: Oops, it was late when I was writing this part. Maybe you had to type
the letters of P H E N I X in instead.
* Watch the video clip.
Sun Puzzle
Phoenix: "To pass this test, you've got to
enter a password.
You'll find the password on the Internet.
The door that will lead you to it is hidden on the
screen..."
* Click on the razor blade at the top of the screen then drag it all over
the screen to reveal information. The Internet, web address that you will
need to visit will be placed in the lower, right-hand corner of the screen (
http://www.xineph.com ).
* Click on the link (web address) in the game and be taken to ( http://www.xineph.com/22fgta2
).
-Note: Assuming the website is still up, you will see a 200 pixel by 200
pixel box (Macromedia Director animation) in the middle of the screen. The
object here is to navigate the animation (holding down left click and moving
the mouse in any direction) to locate the required password.
* (Assuming the website is still up,...) scroll to the bottom, right-hand
corner of the animation. Next, scroll up until the animation screen is split
in half, diagonally, with dark and light colors. The word "anima" will
appear in white lettering.
You can click here to see the solution.
* (Close your browser then...) enter the word anima into the box beneath
the human characters. Next, hit your Enter key to finish the puzzle.
Phoenix: "One last test and you'll be able to
open the Door of the Initiates..."
Moon Puzzle
Phoenix: "To pass this test, you've got to form
the password.
I've hidden it on the Internet.
Follow the path of the Sun and you'll find it..."
* Click on the screen and the letters will move around.
-Note: A yellow sun will be drawn for you.
* (Assuming the website is still up...) click on the yellow sun which takes
you to ( http://www.xineph.com/aze229d/ ).
-Note: You will find another 200 pixel by 200 pixel Macromedia Director
animation in the middle of the web page. Browse through the animation like
the other. Instead, the password is easily seen with large letters outlined
in white. The word is "spiritus."
* (Close your browser then...) enter the word spiritus into the white
circles on the screen.
-Note: To move the letters, you will need to push them with your mouse
cursor as if the letters, and your cursor, are like ends of magnets (+/+ or
-/-) being pushed closer together. Simply guide the proper letters where
they go in the circles to spell spiritus. You can either push, or if you are
careful, pull the letters into position. I find pulling to be easier to
guiding the letters where they need to go.
Phoenix: "Open it... You will find out the
truth..."
* Click on the
fire within the star on the screen then watch the cutscene.
-Note: Now will be a good time to check your e-mail because you have
received 3 new ones. The first is from the SKL Network with a subject line
of "Latest info." You can click here if you would like
to view it (assuming the e-mail is no longer valid where you wouldn't
receive it). The 2nd e-mail is from someone named Julie Massenet with a
subject line of "Your team member!" You can click here
if you would like to view it. The 3rd e-mail is from someone with the
username of Fe256 with a subject line of "Jack Lorski case." You can click
here if you would like to view it. You will see Internet
web addresses in each of the 3 e-mails. I am writing this walkthrough with
the intent that all web addresses will be dead after some period of time
(perhaps months or years after the game's release in 2003). You do not need
to see the content of the web pages to progress and complete the game, so I
will not make them available, in their entirety, for this walkthrough.
You can view the 4th e-mail sent by SKL Network with the
subject line "LATEST INFO" by clicking here.
Part II: AQUA
-Note: You will now see a moving, globular mass (blue) in the middle of the
screen. Within the mass, you will see 6, small circles (outlined in black)
floating around. Alphabetically, they are Aphebis, Bos, Soapphi, Syro,
Tetima and Ustichos. Once you click on one, you will be taken to a puzzle.
If you decide not to do the puzzle, you can click on the name of the given
puzzle (at the bottom of your screen) to be taken back to this screen. The
circle(s) you visit, but do not solve, will then have a "+" inside them to
notate that you have been to the puzzle, but have not solved it just yet.
This walkthrough will deal with the 6 puzzles alphabetically.
* Click on the Aphebis circle.
APHEBIS
Phoenix: "I promise you some of the Polish
guy's other films...
As you have passed my three little tests.
I'll give you a new clip.
You'll see it's a lot more interesting than the first
one..."
* Click on the screen to proceed.
* Watch the clip of [SPOILER - Click & Drag after the end of this box to the
/SPOILER box to view it.] the camera man being
executed[/SPOILER].
Phoenix: "You have just opened the first screen
of the Great Work.
To go back, you need only click on the name
at the bottom of the screen."
* Click on the screen to proceed.
Phoenix: "At the Origin of the Work, there's
this film made in 1975.
I'll give you a few shots. Put them in the right order and
Aphebis will open."
Okay folks, I blew it when writing this walkthrough. Because I neglected to
view the e-mails sent to me through playing the game, I was forced to solve
the Aphebis puzzle the hard way by watching it frame by frame. Instead,
there is a utility made by a participant in the case, Fe256, called the
Analyser. I mention this utility later in this walkthrough, but you can use
it now to help with this puzzle if you want to try and solve it on your own.
-Gamehound
-Note: You will see 13 screenshots at the bottom of the screen. To lessen
confusion, I will assign numbers (1-13) to the screenshots. The screenshot
with the girl in the orange bathing suit on the boat will be assigned #1.
Then, progressing to the right, the next screenshot will be assigned #2, and
so on, until all 13 screenshots have been assigned numbers. There were a
couple ways to view the video. One was to visit the following Internet web
address ( http://www.skl-network.com/gb/popup1.htm ) which I found browsing
through the Internet web address found in the last e-mail from the SKL
Network. The other way is to view the movie file in your installation
directory... X:\???\In Memoriam\Assets\apphebis.mov - I solved this puzzle
using the latter means.
Solution: The screenshots will need to be
placed in the gray bar above them, and in the proper order. Going with the
numbering system I described above, the following sequence is the correct
one... 1,3,7,12,5,8,9,4,2,13,6,11,10
You can click here to see the solution.
-Note: The easiest way, to lessen confusion, to solve this puzzle is to
remove the screens sequentially (first #1 then #2 then #3, etc) and place
them in the proper position on the gray bar. I found that trying to place
the screenshots in sequential position (left to right in the gray bar) had
me counting the screenshots over and over again to get the correct
screenshots.
* Click on the stop-watch-like button on the circle to play the movie and
complete this puzzle.
BOS
-Note: The following pieces of information were found ( http://www.volker-institut.com/Gesch.html
) doing a search on an Internet search engine (of which I used Google) for
Babureck Berthold Reinhart.
You can click here to see the information/solution shown on the website above.
* Drag the proper name to the proper member in the picture for all 6
members to complete the puzzle.
* Click on the rectangular animation to proceed.
* Click on the square animation to proceed.
* Click on the rectangular animation to proceed.
-Note: You will see a 7 by 10 grid of squares (70 in all) with a number 70
at the bottom, right-hand corner of the grid.
* Slowly mouse over every square in the grid to reveal a new picture.
-Note: As you mouse over each square, you will see the number in the bottom,
right-hand corner decrease by one until all 70 squares have been moused
over.
* Slowly mouse over all 70 squares again to reveal the picture needed to
solve this puzzle.
-Note: You will see 6 names floating around the base of the grid. You will
also see 6 numbered boxes where the names need\ to be placed next to.
Phoenix: "We're slowly making progress... but
you'll have to be quicker
next time... or else..."
* Click on the screen to proceed.
* Watch the video and learn that [SPOILER - Click & Drag after the end of
this box to the /SPOILER box to view it.] Karen is the
daughter of the murdered camera man from the 1975 video[/SPOILER].
SOAPPHI
-Note: You see an animation of Karen underwater.
* Click on the animation to get directional crosshairs shown.
* Scroll around the animation to see white-outlined numbers which read
19/75.
-Note: You will notice a value below the bottom, right-hand corner of the
animation.
* Move around the animation until the value below the animation reads 19/75.
You can view the 6th e-mail sent by Fe256 with the
subject line "Code for Soapphi" by clicking here. It
merely tells you the 19/75 coordinates to use and nothing else.
Phoenix: "It looks like you're managing quite
nicely, my Little Friend...
I can't say that your friend Karen went much on her bath,
but that will teach her to play detective... Apart from
that,
she's alright. Trust me..."
* Click on the screen to proceed.
-Note: You are taken back to the Soapphi puzzle. This time, however, you see
an illustration of a girl with a drawing/tattoo on her stomach.
* Click and drag the moving disks away from the girl's stomach.
* Click on the girls belly button until she giggles.
Phoenix: "Did you know this little girl was
drawn by Karen?
Not bad, eh? I swiped her portrait off the Internet...
All you've got to do is find out what the girl's first name
is..."
* Click on the screen to proceed.
-Note: You will see a five-letter named which needs to be filled in at the
bottom of the screen. * (Assuming the website is still up...) click on the
white rectangle to open your navigational bar. Next, click on the Internet
link to open your browser and take you to the SKL Network website. Click on
the Jack Lorski picture. Next, click on the Search link in the side menubar
to run a search on Google. Type in Karen Gijman (the one who drew the girl
you need to know the name of). Access Karen's website ( http://www.karen-gijman.com/
). Click on the enter link then click on the Gallery section to find Karen's
drawings. The name of the girl is Sanne.
* Mouse over the circles on the game screen to hear Karen say the letters
they represent.
-Note: I made an illustration of which circles have the letters you need
below...
You can click here to see the solution.
Phoenix: "Seeing as I keep my promises,
Soapphi is going to open."
* Click on the screen to proceed.
* Watch the video and learn that [SPOILER - Click & Drag after the end of
this box to the /SPOILER box to view it.] Volker was
the murdered camera man, and Karen's father[/SPOILER].
-Note: The video mentions the detective's first name who was in charge of
the investigation of Volker's disappearance. The detective's first name is
Vassili.
* Click on the Syro circle.
SYRO
*Click on the rectangular animation then click on the picture of the 2 men.
Phoenix: "Lead the target to its destination
and the password will appear."
-Note: In this game, you have to guide the orange object through the maze (4
in all) without touching the walls, running out of time, nor hitting the
moving stars. This mini-game is an obvious rip-off of the 1980 game by Taito
called Crazy Balloon. There are circles throughout the maze; these are your
safe havens. Your objective is to guide the orange object safely to the
hollow opening at the end of each maze.
* General strategies to follow for the maze game...
1) Do not leave a safe haven until the time bar resets.
2) Go to every safe haven.
3) Pull your object faster if time is running low.
-Note: With the 3rd strategy be careful. If you pull too far too fast, the
orange object will break from your control, and float off until you click on
it.
* Warnings about the maze game...
1) If you run out of time, you will have to restart from the last safe haven
you went to.
2) If you amass 4 crashes (into stars or walls), you will be reset to the
very beginning.
-Note: When you pass all 4 mazes, you will get the following message from
the Phoenix...
Phoenix: "Go on then, all you've got to do is
enter the password..."
-Note: The password, which is shown under the time bar, is the detective's
first and last name which is Vissili Tsirkas.
* Type the detective's name in the white box at the bottom, right-hand
corner of the screen. Click on the white box to submit the "password."
Phoenix: "Well done, my Little Friend! Do you
want another of Lorski's
films?"
* Click on the screen to proceed.
Phoenix: "I don't know if I should give it to
you..."
* Click on the screen to proceed.
-Note: No video! What a tease.
You can view the 11th e-mail sent by David Marcus with
the subject line "My initial analyses" by clicking here.
* Click on the Tetima circle.
TETIMA
-Note: If you mess up, the Phoenix will relay the following message...
Phoenix: "Hey! Ease up, my Little Friend! It's
no good getting all
wound up. Let's start again, but easy does it this time,
alright?"
* Click on the blue circle a series of times. Each new click will reveal a
new word, so let the blue circle settle until you click again. Continue
clicking until you arrive at the puzzle.
Phoenix: "Once received, three photos will lead
you to a Greek Island.
The letters in its name will open Tetima."
* Move the blue rock on the right side of the screen then allow the
undeveloped picture pieces to roll down the conveyor.
* Drag the silver tray (top-right corner of the screen) onto the screen to
completely see it.
* Drop the torn picture pieces into the tray of developer.
* Take the developed pictures out of the tray then move the tray back to its
original position.
* Assemble the 3 photos.
You can view the 5th e-mail sent by SKL Network with the
subject line "Important" by clicking here.
* (Assuming the website is still up...) visit ( http://www.fe256.net/ngcc1p/analyseur.html
) the link given to you in an e-mail from SKL Network. Once there, click and
download the Super-8 analyser. Again, you don't need to "download" from the
website to use this tool; just enter in the code below. After, you will see
the following message...
Well folks, as you can see I didn't use the Analyser tool for the Aphebis
puzzle. I solved it the hard way. So, if and when you read the 7th e-mail
below, you will understand why I placed it here instead of in the Aphebis
section. -Gamehound
You can view the 7th e-mail sent by Julie Massenet with
the subject line "You're a genius!" by clicking here.
You can view the 8th e-mail sent by Fe256 with the
subject line "RE: You're a genius!" by clicking here.
You can view the 9th e-mail sent by Fe256 with the
subject line "HD Super-8 film!" by clicking here.
* In the game, open your navigational bar then enter the code SU2754.
* Click on the Analyse link on your navigational bar.
* Play the video. Pause the video when you see the woman walk beside a wall
with writing on it.
-Note: If this option is unavailable to you for any reason, you can view the
video in your installation directory ( e.g. C:\Program Files\In
Memoriam\Assets\symi_BD.mov ).
* Click on the black square to analyse the image.
* Zoom in on the image until you can see the 3 words on the sign.
You can click here to see the information.
* View the rest of the video then close it with the X in top-right corner
of the analyser.
You can view the 12th e-mail sent by SKL Network with
the subject line "The 7 Sons of Helios" by clicking here.
* (Assuming the website is still up...) open your navigational bar then
select Internet. Click on the Jack Lorski image then on the Search menu on
the left to perform a search using Google search engine. Search for the word
epicharmou (which was the word not in Greek that was seen in the video
through the analyser). You will find a website ( http://www.rhodestravel.com/2Stadt.html
) which has 1 reference tp the word epicharmou (useless). So, this provided
no help. There is a link at the top of this webpage which reads
Begrüßungsseite (translation: Home). Click on that link which takes you to (
http://www.rhodestravel.com/index.html ) the home page where you can view
text in English, German or French. After choosing English, you can click
click on the "Rhodes - a brief history" link on the side and locate the
solution (Greek letters) that need to be entered to complete the Tetima
puzzle. Below is a picture of what is shown...
You can click here to see the solution.
* Write down the Greek letters next to Rhodes (in the above graphic) on a
piece of paper because you will have to enter them to complete the Tetima
puzzle.
-Note: Close your navigation bar if it is still open.
* Click on the Greek letter, one at a time, to complete the puzzle.
-Note: There are 31 letters in the Greek alphabet, so click through them
slowly to match what is seen in the graphic above.
* Watch the video.
You can view the 10th e-mail sent by Julie Massenet with
the subject line "Strange" by clicking here.
* Click on the Ustichos circle.
USTICHOS
* Click on the floating microfauna (ring) which will spawn a creature that
will eat up all the black stuff at the bottom of the screen. When the
creature comes back to the top of the screen, it will turn into a ring
microfauna like the first one. Continually create creatures from the rings
until all of the black stuff has been eaten up.
* Click on the circle that appears from under the black stuff.
Phoenix: "In Tetima, you'll know where he died.
This is where you'll find out
where he was born..."
* Click on the screen to proceed.
-Note: Well, there are those little ring microfauna again. Time to
replicate. Also, if you don't do anything, and the creatures die, the killer
will give you the following message...
Phoenix: "Go on, click on the enemies to
destroy them...
What are you waiting for?"
* Click on the ring microfauna to spawn creatures continuously.
-Note: This time, creatures that attack will try to kill the spawned
creatures, so after generating as many good creatures as you can, you will
see a 3rd time of microfauna come and attack your spawned creatures. Take a
break from generating good creatures and mouse click on the bad creatures
before they kill your good creatures. Once they are gone, go back to
generating more and more good creatures until the black stuff has been eaten
away.
* Type Solingen into the white box which is the name that was covered up by
the black stuff. Hit your Enter key to proceed.
Phoenix: "Nice one, my Little Friend. I'm proud
of you... Shall we continue?"
You can view the 13th e-mail sent by Julie Massenet with
the subject line "Translation of a German newspaper" by clicking
here.
-Note: You will notice a discrepancy in the 13th e-mail's spelling (soligen)
and the game's spelling of the solution (solingen). So, I do not know which
is correct, but you need to enter Solingen to pass the puzzle. -Gamehound
* Click on the screen to proceed.
* Watch the video.
Phoenix: "Bravo, my Little Friend, you have
passed the first initiation stage.
Harder ones await you.
Keep going... Jack and Karen need you..."
* Click on the screen to proceed.
-Note: 3 new circles, outlined in black, await. They are, alphabetically,
Chnouph, Ouphisit and Sothir. They will be covered in that order in this
walkthrough.
* Click on Chnouph.
CHNOUPH
-Note: This puzzle is very easy. You simply press on the oil can a few
times, and oil drops (of 3 different sizes) emerge. By placing your mouse
cursor over the drops, you can drag them around the screen, but be careful
not to let them go off of the paper. Make as many large oil drops as you can
(small and medium drops can combine to form large drops).
* Drag 10, large oil drops into the circle.
Phoenix: "The invincible Sun is by my side. Its
blood-red light warns me...
SOL INVICTUS: form it in the following screen and
Chnouph will open..."
* Click on the screen to proceed.
-Note: You will see a blue sun in the middle of the screen which will
release letters out of its mouth. There are yellow stars floating around as
well. If you touch letters (with your mouse cursor), they will remain by
your cursor until a star runs into them (which the sun will replace them if
this happens), or they will leave on their own if not dealt with in a
reasonably timely manner. As the Phoenix wrote, your task is to collect the
letters to spell SOL INVICTUS. When the letters attach, they form a chain.
The longer the chain, the more prone you are to having a star hit them and
break them up (making you start over).
Strategy: For this "game," it is best if you remain stationary as much as
possible. Let the letters come to you. You should only move when you are in
a star's path, but try to move as slowly as possible; the faster you move,
the larger your chain of letters spreads out (making them more prone to
being hit by the stars). Keep your eyes on the stars at all times, as well
as the letters you need. You will have to spell SOL INVICTUS without
gathering other letters, and in that exact order to complete this mini-game.
If you try collecting all letters randomly, you will not complete this
mini-game.
* Watch the video of Jack Lorski in Instanbul, and learn that he and Karen
cannot locate the book seller they were told about.
You can view the 14th e-mail sent by Julie Massenet with
the subject line "name of the modules (cont.)" by clicking
here.
* Click on the Ouphisit circle.
OUPHISIT
* Click on the animation 3 times to proceed.
Phoenix: "Your excursion continues in Istanbul.
Be patient - the next level will give you an inkling of what
it's
like in Hell... The combination to open Ouphisit can be
found on a web site. The three names will guide you."
* Click on the screen to begin the puzzle.
-Note: Mouse over each circle until the letters of each circle settle to
reveal the following 3 names: Maria Luiza Alves, Satô Mai and Victoria
Baring. Take note of the LUND _ _ _ _ _ _ code on the screen. That is what
you need to find on the Internet to complete this puzzle. Also, if you
double click on a circle, the killer will relay the following message...
Phoenix: "I'll give you a clue: Istanbul."
* Click on the animation to restart it if you double clicked on a circle.
* Open your navigation bar then click on the Internet link.
* (Assuming the website is still up...) click on the Jack Lorski image then
click on the Search link to run a search on Google for Maria Luiz Alves
which takes you to ( http://www.irbca.com/ ).
-Note: If the website is no longer available, I have included 4 screenshots
of the information needed (link below). You will see that Victori Baring is
Australian, so she has nothing to do with Istanbul (the Phoenix's clue in
the puzzle). Satô Mai is Japanese, so he isn't who we need to find
information on. Maria Luiz Alves is from Brazil, so she isn't who we need to
find information on either. A Ha! Wouldn't you know, there is only one
person from Istanbul on the website below...
You can click here to see the information from the website.
* Run a search on Google for Kasim Sari which will take you to the Kilic
Library ( http://www.kilic-library.com/ ).
-Note: If you recall the LUND _ _ _ _ _ _ code we needed to find, it is on
this webpage. Below is a graphic of what you see...
You can click here to see the solution.
* Enter the code in the game ( LUND 185053 ) by left clicking on the
individual values until the proper value for each digit shows.
-Note: Close your navigation bar before entering the code.
Phoenix: "As you've managed to overcome
Ouphisit, I'll give you another
film from your friend Jack..."
* Click on the screen to proceed.
* Watch the video of Jack and Karen meeting up with the book seller.
You can view the 15th e-mail sent by Julie Massenet with
the subject line "Sol Invictus" by clicking here.
* Click on the Sothir circle.
SOTHIR
Phoenix: "Converge their light above Agia
Sophia: it will let you
open the door."
* Click on the screen to start the puzzle.
-Note: You will see 5 circles floating around. Your goal is to get all 5
circles in the light when the light is directly above the words Agia Sophia
on the screen. Unfortunately, I took a screenshot after I had solved the
puzzle, but you can see where Agia Sophia is located (above the word SOTHIR
at the bottom, center of the screen).
You can click here to see the solution.
Phoenix: "Saint Sophia: when the 8 levhas
are in place,
Sothir will open..."
* Click on the screen to begin the puzzle.
-Note: You will see a map of a structure with 8 orange dots, and below that
are 8 objects. The only clue how to begin solving this puzzle was given by
the killer... Sophia & levhas.
* Open your navigation bar then click on the Internet link.
* (Assuming the website is still up...) click on the Jack Lorski image then
run a search (Google) for Sophia levhas which will show you a link to a
website (http://www.persofrance.com/mathet/jour2.html) which shows you
numerous thumbnailed graphics on the left-hand side. These are what you need
to solve the puzzle and open Sothir.
-Note: If you close your navigation bar then click on the screen to begin
the puzzle, the killer (if you wait long enough) will relay the following
message...
Phoenix: "As you look a bit lost, I'll give you
a clue: Abu Baker,
Umar, Othman, Ali"
The only logic needed to know here (of which I guessed correctly) is that
the orange dots on the right of the puzzle (beginning with the dot on the
bottom then going up) represents low numbers (of which, for the ease of
explanation, we will number the plates), and the orange dots on the left
(beginning with the dot on the top then going down) represent high numbers.
Confusing enough?
...Now we need the 5 images that were shown on the persofrance.com website. They were...
You can click here to see picture #1.
You can click here to see picture #2.
You can click here to see picture #3.
You can click here to see picture #4.
You can click here to see picture #5.
...Alright, now for the explanation. The row of 8 plates should be looked
at now. Number them, left to right, 1 through 8. Now look through the above
5 pictures of the plates and you will see the following pattern...
Picture 1 - Plate 2 (left) & Plate 3 (right)
Picture 2 - Plate 5 (left) & Plate 4 (right)
Picture 3 - Plate 6 (left) & Plate 7 (right)
Picture 4 - Plate 7 (left) & Plate 1 (right)
Picture 5 - Plate 1 (left) & Plate 8 (right)
...If you recall the map, and how the numbering is low on the left then
increase in value going clockwise, that is how you are to place the plates
onto the orange circles on the map. Also, you cannot place more than one of
the plates on the map, so disregard the 2 times both plates 7 & 1 are shown.
Reading left to right, and from picture 1 to picture 5 sequentially, you
will note the pattern of 2, 3, 5, 4, 6, 7, 1 & 8...
You can click here to see the solution.
...So, solve the puzzle if you haven't already.
Phoenix: "Well done, my Little Friend. You're
obviously a bit of a pro at this.
Here's a new reward..."
* Click on the screen to proceed.
* Watch the video of Jack and the book seller in Istanbul.
Phoenix: "You are from now on a member of the
first initiated.
With AQUA now defeated, TERRA awakens
with her first emotions from Hell."
You can view the 16th e-mail sent by Hans Berthold with
the subject line "Statement" by clicking here.
* Click on the screen to proceed.
Part III: TERRA
-Note: Wonderful, 3 new black-encircled bubbles. Alphabetically, they are
Epichnaus, Epitech and Tair. They will be covered alphabetically in this
walkthrough. Before we begin these new modules, let's check some e-mails
because quite a few have stockpiled since we last checked (wow, 13 of
them!). Please read the notice I relayed at the
beginning of Part C of this walkthrough to avoid confusion.
* Click on the Epichnaus circle.
EPICHNAUS
-Note: You will first see a flashing, white dot in the middle of the screen.
You can try clicking on it, but nothing happens until the box with
alternating road maps appears.
*Click on the box with the road maps.
-Note: You are taken to a screen with a spider on the far left with a path
to traverse. There are 3, white objects floating around the screen.
Strategy: The objective is to get the spider to the other end of the board.
To do this, you need to place of of the 3 white, floating objects exactly 1
title in front of it. The smallest floating object moves the spider 1 tile
(placed behind for backwards or placed in front for forwards). The floating
object that looks like a larger version of the smallest will move the spider
2 spaces. The 3rd floating object will move the spider 3 spaces. So, use
whichever of the floating objects you want (in whatever order you feel is
best) to move the spider across the board. Towards the end of the path, the
2nd to last tile may move (blocking you from reaching the end). If this
happens, move your spider back until it goes back into place then move back
forward. Try not to land on that piece when you get there though. Try moving
exactly to the end tile.
* Clear the 2nd board (same objective as before).
-Note: The 2nd board is a bit trickier than the first (and enough to drive
one bonkers). The left-hand, verticle row of tiles will move like a conveyor
belt once you get there. If you are fortunate to pass this portion of the
path, the tiles at the top rotate in pairs. Good luck!
* Click on the Epitech circle after you have passed the last puzzle.
EPITECH
Phoenix: "Fear is a thing of beauty. I saw it
in her eyes. Believe me. H.W
wasn't as pure as she claimed to be in her private diary."
* Click on the screen to proceed.
-Note: You will see an object of a circle with a sun inside. There are 4 red
dots, and 4 white dots around circle of the sun. Inside the sun is a white
plus (to move the object around the board).
Strategy: Pixel hunting at its worst! The object here is to get all 8 colors
of the dots to be red (none white) by moving the sun object around the board
until you find the right spot to do this.
You can click here to view the solution.
-Note: Now there is a box with objects in it (3 of which are red). Remove
the 3 red objects, and the white rope from the box then place them on the
bottom of the screen. Next, take all of the torn picture pieces out of the
box and place them at the top of the screen.
* Piece the 2 pictures together.
-Note: If you take too long, the Phoenix will relay the following message...
Phoenix: "The eight sunbeams light up to show
you the way..."
* Finish assembling the 2 pictures if you haven't already. Once you are
finished, click on the picture of the little girl to reveal an animation
which reads "Helena."
* Click on the picture of the older woman to reveal an animation which reads Whitford and gives a file number.
* Access the Internet (Google), and run a search for Helena Whitford. A search will reveal the following website ( http://www.helenawhitford.net/ ) which shows she was born on 9 July 1981.
* Enter the information on the card in the puzzle. First name, Helena.
Last Name, Whitford. Date of Birth, 09 07 1981 then hit your Enter key to
complete the puzzle.
You can click here
to see e-mail #18 with a subject line of 'Helena's diary' send by Julie
Massenet, and here to see e-mail #17 with a subject line
of 'Autopsy report' by Fe256 regarding the Whitford murder.
Phoenix: "Do you want to see another of the
Polish guy's films?"
* Click on the screen to proceed.
* Watch the video of Jack Lorski on a train in London, and learn that Karen
has gone back to Amsterdam.
* Click on the Tair circle.
TAIR
* Click on the animation 3 times to proceed.
Phoenix: "Places have a soul. Dressed all in
white, she walked ahead of
me, in this place steeped in history. Just like the others,
this place wasn't chosen at random, but with precision.
A specific point on a map."
* Click on the screen to proceed.
-Note: You will see two photographs. Move them off of the white paper that
is covered with dirt. The rectangular box beneath the white paper is what we
have to complete. By the looks of the N & W, it looks to be map coordinates.
All that is shown on the white paper is the word college and part of another
word beginning with the letters Ox. The last video we saw was of Jack Lorski
in London. Piece that information with college and Ox, and one can deduce
that the college in mention is The University of Oxford (a very famous
college near London).
* Search the Internet (Google) for the words 'Oxford England latitude' and
you will find that the coordinates are 51:45N 1:15W. So, click on the
separate values, one at a time in the puzzle, until you fill in the value
051N45 001W15 and solve the puzzle.
-Note: Other walkthroughs I have come across suggest you use 051N44 001W15.
Well, nowhere was I able to find on the Internet those coordinates. 051N45
001W15 will solve the puzzle (the actual coordinates of the university).
Phoenix: "It looks like you enjoy my little
games... I always reward those
that agree to play my game right to the end... Here's your
reward... It's always a pleasure to see this place a few
months after... Thanks Jack."
* Click on the screen to proceed.
* Watch the video of Jack Lorski at the university then at the pub talking
to the detective, and [SPOILER - Click & Drag after the end of this box to
the /SPOILER box to view it.] learn that Helena
Whitford was the murdered woman[/SPOILER].
-Note: More modules/puzzles to play through. Alphabetically, they are
Amphatab, Aron, Athoub, Broüs, Rhomenos & Soon. As usual, they will be
covered alphabetically in this walkthrough.
* Click on the Amphitab circle.
AMPHITAB
* Click on the animation twice to proceed.
Phoenix: "Second Sacrificial Victim.
Imploringly, he went down into the
church's cellar before dying with a sword in his hand.
The date on which this Holy Place was founded will open
Amphitab..."
* Click on the screen to proceed.
-Note: You will see 4 colored capsules (what the Phoenix will call lozenges
later) on the left, 3 treadmills in the center of the screen, and 4 pictures
on the right. One of the pictures reads Joos Amman Von Ravensburg.
* Search the Internet (Google) for the words Joos Amman Von Ravensburg and
find the following website ( http://www.italia-libero.com/ghidoni/in/pres.html
) which was found after selecting English and opening the book on the
website.
-Note: You will see a page, on the left, titled 'Hidden Treasures of Genoa's
Churches.' You can click on any of the 7 dots to reveal various information.
Of the 7 dots, only dot #2 has one of the 4 pictures we saw in the puzzle,
so the answer must be found there. On the right-hand page (after clicking on
the 2nd dot), you will see the number 658. That is the 3-digit number we
need to complete the puzzle.
Strategy: To complete this puzzle, you need to enter the number 658 by
using the various treadmills. An insect will come out and move the
treadmills
if you offer the right combination of capsules. Once the desired number is
achieved, click on the insect to scare it away. The treadmill on the left
requires that you feed the insect yellow & blue capsules (one at a time, and
only one of each). The middle treadmill requires that you feed the insect
(one at a time, and only one of each) green & blue capsules. The treadmill
on the right requires that you feed the insect (one at a time, and only one
of each) green & yellow capsules. Also, the red capsule will kill the
insect, so you don't want to use it.
* Solve the puzzle. 6 for the treadmill on the left. 5 for the middle
treadmill. 8 for the treadmill on the right.
Phoenix: "Yet again, it looks like you're
getting along nicely, my Little Friend...
You liked using the red lozenge, didn't you?"
* Click on the screen to proceed.
* Click on the Aron circle.
ARON
* Click on the animation 3 times to proceed.
-Note: You will see a small, white, rectangular box in the bottom,
right-hand corner of the screen where you will need to provide the solution
to complete this puzzle. There are a lot of white stars floating around the
screen. Towards the right is a vertically scrolling line of a single picture
(this picture will be key in solving this puzzle). At the bottom, left-hand
corner of the screen is a silver blade.
* Move the blade across the screen without hitting the stars.
-Note: If you hit a star, you will have to start over, and the word you must
uncover will change locations each time you get hit. To avoid getting hit,
you can release the blade (while anywhere on the screen), and the stars will
pass by you without causing you to restart the puzzle.
You can click here if you want to see the word you must uncover.
* Search the Internet (Google) for the word OESPG and find the following
website ( http://www.oespg.com/gb/ ).
* Click on the Principle & Organization link on the website to see a picture
of the founder and president, Father Malard.
-Note: His picture looks like the one scrolling in the puzzle. Because
Father Malard's first name wasn't mentioned, it is safe to assume that his
last name is the word we must use to solve this puzzle.
* Type in the word malard into the white box in the puzzle then hit your
Enter key to solve the puzzle.
* Watch the video of Jack Lorski driving in Italy. Learn that Karen meets up
with him once again.
* Click on the Athoub circle.
ATHOUB
Phoenix: "On the Sacred Journey, Sol was
obviously the first, followed
by Mars, Saturn and Apollo. Four planets
Their images will go into these four spaces."
* Click on the screen to proceed.
-Note: You see 4, empty boxes at the bottom of the screen. At the top of the
screen are disassembled puzzle pieces. To the right of the puzzle pieces is
a dish (circle) of solution.
You can click here to see e-mail #21
for information that will help you solve this puzzle.
Strategy: To solve this puzzle, I found it easiest to enlarge all of the
pieces to maximum size in the solution. To do so, drop the pieces into the
solution then click on the button. Piece the puzzles together with the
pieces enlarged (easier to see that way). After, you will need to resize the
pieces to fit into its respective box. To re-shrink pieces, place them back
into the solution then click on the button again to make it go the other
way. And if you go too small, you can re-enlarge it by pressing the button
again. Just recall the order of the pictures from the Phoenix's last
message... Sol (Sun), Mars, Saturn then Apollo. Also, the pieces will only
go to the box that will accept them.
You can click here to see the solution.
* Click on the Broüs circle.
BROÜS
* Click on the animation 3 times to proceed.
Phoenix: "First Sacrificial Victim. He died
without understanding, his eyes
fixed on the black sun. His father will give you his
surname.
His first name will open Broüs..."
* Click on the screen to proceed.
-Note: You will see a white, rectangular box at the bottom, right-hand
corner of the screen where you will need to enter the solution to this
puzzle. Above the box is a tray with a picture, a map and a photograph.
Removing the objects from the tray proves to be useless. No clues to look
up on the Internet (from the puzzle, nor from the words of the Phoenix). So,
the only option left is to check the e-mails.
You can
read e-mail #22 here for some help solving this puzzle
(an e-mail with a subject line 'Brous' and sent by Fe256). Click
here to read e-mail #23 (an e-mail with a subject line
'Information request' and sent by SKL Network), here to
read e-mail #24 (an e-mail with a subject line 'Omicide a Genova' and sent
by Marco Lerini), and here to read e-mail #25 (an e-mail
with a subject line 'Re: Brous' and sent by Fe256) for additional
information to help solve this puzzle.
* Move the white business card out from under the left-hand side of the
tray.
-Note: Now we have something to work with. Felice Maggioli is a re-occurring
name from the e-mails we received. To solve Broüs, you need the first name
of the sacrificial victim this puzzle pertains to.
* Search the Internet (Google) for the words Maggioli murder and find the
following website ( http://www.sabelli.net/in/archivo.html#archives3 ) where
the answer lies.
* Enter the solution into the puzzle (which is [SPOILER - Click & Drag
after the end of this box to the /SPOILER box to view it.]
Gianni[/SPOILER]).
* Click on the animation to proceed.
You can click here to read e-mail
#29 with a subject line of "Message from Felice Maggioli" from the SKL
Network which further provides his son's name.
You can click here to read e-mail
#28 with a subject line of "Nonna Fina" from Fe256.
-Note: E-mail #28 (above) adds useless information, but I will provide what
is shown on the website regardless. The website being referred to ( http://www.messini-yc.com/in/index.html
) was found by searching on the Internet (Google) for 'Maggioli yacht'.
Also, there wasn't any means of providing login information that I could find
on the website where e-mail #28 suggests that you can. Once there, you can
click on a link called "Check out the table of results for the Ultimo Bacoli
Cup" and see how Maggioli did in the race (useless information). He placed
first coincidentally.
Phoenix: "Watch closely my Little Friend.
You're going to learn a lot..."
* Click on the screen to proceed.
* Watch the video of Jack & Karen in Italy touring the monastery.
* Click on the Rhomenos circle.
RHOMENOS
* Click on the animation 3 times to proceed.
Phoenix: "Fourth Sacrificial Victim. He died,
drained of his blood.
Do you want to know why he was chosen?"
* Click on the screen to proceed.
Phoenix: "From one red point to another, six
steps are required before you
can get to him..."
* Click on the screen to proceed.
-Note: You see 6 clusters of 3, white circles, a solitary red circle at the
bottom of the screen, and a cluster of 2 white circles with 1 red circle on
the right-hand side of the screen.
Strategy: From what the Phoenix said, we have to create a path from the
solitude red circle to the other red circle with 6 steps before reaching it.
You can click here to see the solution.
-Note: Along the path, at different points, you are shown a name. That
name is [SPOILER - Click & Drag after the end of this box to the /SPOILER
box to view it.] Jose Cortado[/SPOILER].
Phoenix: "Two words on this engraving led to
his downfall...
He was out of luck - he naively showed them on the
Internet.
Find them and you'll know why he died."
-Note: You see boxes for 2 words. The 1st word contains 5 letters, and the
2nd word has 6 letters.
* Search the Internet (Google) for the two following words 'Cortado
engraving' to find the following website ( http://www.sainte-inquisition.net/gb/2paris.html
). There, you will see the picture that is also in the puzzle. At the
website, click on the enlarge hyperlink for the solution.
You can click here to see the solution.
* Enter in the 2 words found from the website by left clicking in each
box until the correct letter comes up.
* Click on the animation to proceed.
You can click here to read e-mail
#26 with a subject line of "More and more creepy!" from Julie Massenet which
provides more information for the previous puzzle.
* Click on the Soon circle.
SOON
-Note: Another mini-game. Sling the ball into the hole. The first time
through each of the 4 courses, you can take as many shots as you need. I
recommend taking at least 10 because you will have to re-do the same holes a
2nd time through. You are only allowed a maximum of 10 shots the second time
through. If you clear the hole in 5 shots then you will only be given a
maximum of 5 shots to clear it the 2nd time through. After you clear the
first hole (2nd round of the first hole), the word Napoli appears.
Phoenix: "Well done, my Little Friend... You
deserve a reward, and
yet I'm sure you're worthy of much more than that..."
* Click on the screen to proceed.
-Note: Time to play through the 2nd of 4 courses total. Same rules apply as
the previous course, but subsequent courses will get progressively more
difficult. Course 4 is very difficult. Good luck. After you clear course 2,
the word Genova appears.
Phoenix: "I'll leave you to it... Jack and
Karen are waiting for me..."
* Click on the screen to proceed.
-Note: After you clear course 3, the word Geneva appears.. After you clear
course 4, the word Toulouse apears.
Phoenix: "Oxford, Naples, Genoa, Geneva,
Toulouse...
As your friend Jack would say, 'The Oxford case was growing
at a worrying rate.' Just look at the glint in his eye..."
* Click on the screen to proceed.
* Watch the video Jack Lorski in Rome, Italy. Learn of identical murders
elsewhere in Europe.
You can click here to see e-mail #20
(with a subject line of 'Incredible!' from Marco Lerini).
Phoenix: "Your initiation continues. With TERRA
defeated, AER steps forward."
You can click here to see e-mail #19
(with a subject line of 'my latest analyses' from David Marcus) for an
additional analyses of the Phoenix.
* Click on the screen to proceed.
Part IV: AER
-Note: New modules/puzzles. Alphabetically, they are Chnoum, Isy and Sosommo.
* Click on the Chnoum Circle.
CHNOUM
-Note: You see an animation of rolling clouds in the middle of the screen,
and a white text box below it (to enter the solution).
* Click and drag the cursor across the screen to find six words in a foreign
language (Latin? Italian?).
-Note: The words will appear sequentially, but you will need to hold and
drag the clicks long enough for enough white line to be released to form
each of the words (just hold the click until no more white line is released
for each of the 6 words). Below are the words you will find...
* Search the Internet (Google) for the 6 words which are [SPOILER - Click & Drag after the end of this box to the /SPOILER box to view it.] est impuri separatio a substantia puriore[/SPOILER], and be taken to the following website [SPOILER - Click & Drag after the end of this box to the /SPOILER box to view it.] ( http://www.hermeticum.info/principles.html )[/SPOILER]. On this webpage, you find the one, missing word needed to complete the puzzle.
You can click here to see the missing word/solution.
-Note: If you wait too long to solve the puzzle, the Phoenix will relay
the following message...
Phoenix: "Write on the sky, to Her they will
guide..."
* Enter the missing word into the text box to complete the puzzle. The
missing word/solution is [SPOILER - Click & Drag after the end of this box
to the /SPOILER box to view it.] alchimia[/SPOILER].
Hit your Enter key after entering the word in to complete the puzzle.
* Watch the video of Karen and Jack in Tuscany, Italy. Learn that [SPOILER -
Click & Drag after the end of this box to the /SPOILER box to view it.]
the markings on all of the victims seem to be related
to astrology and, possibly, to a solar cult[/SPOILER]. Also learn
[SPOILER - Click & Drag after the end of this box to the /SPOILER box to
view it.] that all of the murder victims had only one
thing in common, religion[/SPOILER].
Phoenix: "It's amazing, isn't it? That will get
your brain cells working,
my Little Friend."
* Click on the screen to proceed.
You can
click here to see email #30 with a subject line of "my
latest analyses" from David Marcus. You can click here
to see e-mail #31 with a subject line of "Case round-up" from Julie Massenet.
You can click here to see e-mail #32 with a subject line
of "I'm watching you" from ----- Phoenix.
* Click on the Isy circle.
ISY
* Click on the animation twice to proceed.
Phoenix: "There are seven of them. One is
missing - enter the full
name and Isy will open"
* Click on the screen to proceed.
-Note: You will see the familiar white text box to enter the solution into.
In the middle of the screen are a lot of jumbled letters dancing around.
Also, there are larger letters, in gray circles, that shrink into and out of
view. Clicking on the larger letters adds those letters to the text box (to
solve the puzzle).
Strategy: When the orange circle moves around the screen, it will stop on 6
of the 7 "X" symbols in random order. Hold your cursor over 6 "X" symbols
when the orange circle is over them individually. Letters from the center
will move to each of the 6 visited "X" symbols to form chemical symbols. The
symbols shown are [SPOILER - Click & Drag after the end of this box to the
/SPOILER box to view it.] Ag (silver), Au (gold), Cu
(copper), Fe (iron), Pb (lead) and Sn (tin... also known as St for Stannum)[/SPOILER].
-Note: Your job is to find the 7th chemical symbol not visited in the
puzzle.
* Search the Internet (Google) for the words [SPOILER - Click & Drag after
the end of this box to the /SPOILER box to view it.]
metals au cu fe alchemy[/SPOILER] and be taken to a familiar website
[SPOILER - Click & Drag after the end of this box to the /SPOILER box to
view it.] ( http://www.hermeticum.info/laboratory.html
)[/SPOILER].
You can click here to see the missing element.
-Note: Great, now we know that the missing element is [SPOILER - Click &
Drag after the end of this box to the /SPOILER box to view it.]
Hg (mercury)[/SPOILER]. However, to enter the
solution into the puzzle, there are only certain letters you can use (A, B,
D, F, G, H, M, R, U, X and Y), so entering the word [SPOILER - Click & Drag
after the end of this box to the /SPOILER box to view it.]
mercury[/SPOILER] is not an option. You can try
entering in the chemical symbol for the missing element, [SPOILER - Click &
Drag after the end of this box to the /SPOILER box to view it.]
Hg[/SPOILER], but that doesn't solve the puzzle
either.
* Search the Internet (Google) for the following words: [SPOILER - Click &
Drag after the end of this box to the /SPOILER box to view it.]
seven mercury other languages[/SPOILER], and
find the following website... [SPOILER - Click & Drag after the end of this
box to the /SPOILER box to view it.] ( http://www.vanderkrogt.net/elements/elem/hg.html
)[/SPOILER].
You can click here to see the solution.
* Enter the solution into the puzzle by clicking on the correct gray
circles to spell the word [SPOILER - Click & Drag after the end of this box
to the /SPOILER box to view it.] hydrargyrum[/SPOILER].
Phoenix: "Nice one. We're making progress. Do
you still enjoy Jack's
films, my Little Friend? I don't know if I should give you
the next one...
it contains a clue that might lead you to me a bit too
quickly..."
* Click on the screen to proceed.
* Click on the Sosommo circle.
SOSOMMO
-Note: You see a box with a picture of a place and Karen in it. There is a
sign that is scratched out in the picture. Thre are 2 bulbs (one on each end
of the box), a hole in the middle, and a ball.
* Blow the ball into the hole (just once) to view the next piece of the
puzzle.
Phoenix: "A quick rest. The name of the
place where you'll find Karen
will open Sosommo."
* Click on the screen to proceed.
-Note: You have the option of playing the blow-the-ball-into-the-hole game
some more, but that will get you nowhere. I played it another 7 times before
realizing I was wasting my time. So I decided to review the information I
had already. Click on the picture in the above link, and note that it is a
mathematical expression. Couple this piece of information with e-mail #27
(provided in the link below), and we are on our way to solving this puzzle.
You can click here to read e-mail
#27 with a subject line of "Amphitab" by Fe256.
-Note: So, the mathematical expression we need to solve is [SPOILER - Click
& Drag after the end of this box to the /SPOILER box to view it.]
Inkdesign( (not found)-327 ) ==> Inkdesign(404-327)
==> Inkdesign77[/SPOILER].
* Search on the Internet (Google) for [SPOILER - Click & Drag after the end
of this box to the /SPOILER box to view it.]
Inkdesign77[/SPOILER], and be taken to the following website [SPOILER
- Click & Drag after the end of this box to the /SPOILER box to view it.]
( http://www.inkdesign77.com/gb/ )[/SPOILER]
then click on the Webcam link at the top of the webpage to find the picture
(and name of the place) where Karen was photographed in the puzzle.
You can click here to see the solution.
* Enter the words [SPOILER - Click & Drag after the end of this box to
the /SPOILER box to view it.] Lucciola Bella[/SPOILER]
into the text box then hit your Enter key to solve the puzzle.
* Watch the video of Jack and Karen, and learn that [SPOILER - Click & Drag
after the end of this box to the /SPOILER box to view it.]
Helena Whitford was a member of a secret society
called Manus Domini[/SPOILER].
-Note: More puzzles/modules. Alphabetically, they are Nephoemes, Pepisoth,
Phu, Spuchu, Vari and Zocha. They will be covered alphabetically in this
walkthrough.
* Click on the Nephoemes circle.
NEPHOEMES
-Note: You see 10 metal disks with letters on them. Below them is a circle
with a dot in the middle. To the right are 10, small boxes.
* Click on the circle with the dot in the middle to listen to Karen singing
a nursery rhyme of some sort.
Strategy: The object here is to match the 10 individual clips of the song
Karen is singing to be replayed as a whole the way Karen sung it. The song
itself doesn't change, but each time you leave the puzzle and return, the
order of the clips changes. Because of this, there is no possible way for me
to write a walkthrough for this (because it will be different for everyone).
Instead, I thought it would be best if I phonetically (written the way it
sounds) write out the correct order of Karen's song, so you can pick out the
individual pieces easier and in the correct order you need to play them for
your individual game.
You can click here to see the phonetic translation.
-Note: So, solve the puzzle by clicking on the disks, one at a time, to
see which match up to the phonetic translations I relayed. The proper order
must be relayed in order to complete this puzzle. Also, once all 10 clips
are placed, if any of the small boxes turn orange then you placed those
clips wrong. To successfully complete this puzzle, all of the small boxes
need to be white which represents no errors when placing the clips in the
proper order. Incidentally, after leaving and returning several times to the
puzzle, the order I needed to use was: 2 4 8 10 1 5 6 7 9 3 (going from left
to right).
Phoenix: "What about another little game?
You'll see, this one's a good
laugh. To open Nephoemes, you have to get the blade
through to cut the string on the other side. If you cause a
lesion
on the intestinal wall, you'll go back to the beginning."
* Click on the screen to proceed.
-Note: You see 17 small boxes below a moving intestine. At the far right is
the string that need to cut to pass this puzzle. The blade is at the far
left where the opening of the intestine is located.
Strategy: The easiest thing to do is to get the blade to the middle of the
intestine where it is the thickest. To get the blade there, wait until the
intestine (from the beginning to the middle) becomes one, straight path.
When it does this, move the blade quickly to the middle of the intestine on
one, fast motion. Next, you will see how the next part forms an arch, but it
also moves that arch diagonally to the top left. Immediately after it
returns from moving diagonally, move your blade through the rest of the
intestine, and out the other end to cut the string.
* Watch the video of Jack and Karen, and learn of Jack's feelings of Karen
and the uncertainty he feels of their future.
* Click on the Pepisoth circle.
PEPISOTH
Phoenix: "My Little Friend, we're coming to the
moment of Truth.
Philosophia Occulta.
Heinrich Cornelius Agrippa von Nettesheim.
He was his disciple, just as I am his..."
* Click on the screen to proceed.
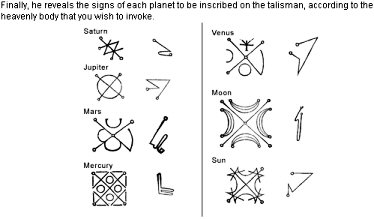
Phoenix: "On the talisman screen, three astral
images will open the
Pepisoth path. The first is the image of the Sun."
* Click on the screen to proceed.
-Note: You see 5 circles interconnected by a line. There are 2 other circles
highlighted white. There is nothing much we can do for now, so check your
e-mail.
You can click here
to see e-mail #38 with the subject line "Magic symbols (cont.)" from Julie
Massenet, and here to see e-mail #39 with the subject
line "Pepisoth" from Marco Lerini.
* Go to the website Julie Massenet gave you in e-mail #38 ( http://www.demagia.net/corne.html
).
You can click here to see the 7 astral images.
-Note: Okay, great, but the Phoenix said 3 astral images, and the first is the sun. So, if you click on the "Picatrix" link on the website Julie Massenet gave us, you will be shown which 3 astral images to use in the game.
Strategy: The 2 white circles are your starting and ending points.
Despite the "Picatrix" link showing the order of Sun, Jupiter then Venus,
the game plays the order of Sun, Venus then Jupiter (which is apparent in
the positioning of the white circles). It is best not to place the circles
on the starting and ending points until very last. When you place a circle
on a correct position, music plays. Having music play will make it harder to
find other correct positions. So, following the diagrams of the 3 astral
images, find the inner 3 points (between the starting and ending points).
Once you find a correct position (music will play), move it one space away
to get the music to stop playing. Once you have found all 3 middle points,
place the circles in their correct positions. There are 3 boards to play
through. I have included screenshots of the correct placements of all 3
boards below...
You can
click here to see the solution for board 1 (Sun),
here to see the solution for board 2 (Venus), and
here to see the solution for board 3 (Jupiter).
Phoenix: "6 enlightened letters will open
Pepisoth.
Use your keyboard, my Little Friend..."
* Click on the screen to proceed.
-Note: You see all 26 letters of the English alphabet moving around in the
middle of the screen. You will see letters at all 4 corners of the screen
which spell out NOLAIN. If you mess up, the Phoenix will relay the following
message...
Phoenix: "Steady on, my Little Friend, you're
going to break your keyboard."
Strategy: You can only use the 26 letters on your keyboard to "guide" the
correct letters to their positions in the corners of the screen. Sometimes
you can just hold down one letter to guide the letter you need where it
needs to go. Other times, you will have to use a combination of keys to push
the letter you need where it needs to go. The final piece of advice I can
offer is to leave the puzzle then go back into Pepisoth as many times as you
need (the game will never re-set back to the beginning) to get better
positions for letters you need to place because positions change each time
you leave and come back. This puzzle isn't difficult, but it is frustrating
(as many other mini-games are in this game). Good luck!
* Watch the video of Jack and Karen visiting the site in the mysterious
e-mail they received.
* Click on the Phu circle.
PHU
Phoenix: "Everything was planned from the
beginning. Everything.
In an abandoned barn near an old abbey, no one heard his
cries. The fire cleansed him.
In homage to my master, I left this talisman on the wall.
If you understand me, you'll know how to decode it."
* Click on the screen to proceed.
-Note: You see 2 text boxes (to enter the solution) on the screen. Above it
are symbols with the words In Memoriam.
You can click here to see the symbols.
You can click here to see e-mail #33 with the subject line "Magic symbols" from Julie Massenet.
-Note: We have seen those symbols before from a previous website we visited. That website is ( http://www.demagia.net/corne.html ).
You can click here to see the chart of symbols.
* Match the symbols with their numeral equivalents, and find them to be
[SPOILER - Click & Drag after the end of this box to the /SPOILER box to
view it.] 1548 - 1600[/SPOILER]. Enter these
values into the puzzle. Hit your Enter key to finish the puzzle after
entering in the correct information.
Phoenix: "You're getting closer to the goal, my
Little Friend. Watch
out though, you might get your wings burnt... To open Phu,
all you need to do is form the 13 letters of my other
name."
* Click on the screen to proceed.
-Note: You will see a dragonfly (also referred to as a butterfly in e-mail
#40). Beneath it are 13 dots.
* Click on the box with a question mark (top, right-hand corner of the
screen) for a clue.
Phoenix: "Setting out from Naples, I had to
flee across Europe."
* Click on the screen to proceed.
* Search the Internet (Google) for the following 'Naples 1548 1600' and be
taken to the following website ( http://www.bruno-giordano.net/ ).
-Note: The Phoenix wants a name with 13 letters. Giordano Bruno is letters.
Also, if you wait too long to to solve the puzzle, the Phoenix relays the
following message...
Phoenix: "In Pepisoth, you'll find out my
nickname."
Strategy: This puzzle is very simple (once you know the mechanics). You need
to spell out the name mentioned above. To do that, you must first press on
one of the dragonfly's 12 wings (or tail) then press on one of its antennae
to produce the correct letters you need. The left antenna produces letters
A-M. The right antenna produces letters N-Z. To choose which letter you
want, you click on a specific wing (or the tail) first then you click on a
proper antenna. Think of the dragonfly as a clock. The wing pointing to the
11 o'clock position is the beginning of the alphabet ("A" for the left
antenna, and "N" for the right antenna). Moving counterclockwise (one wing
or tail at a time), the letters go down the alphabet. Examples: To get the
letter "G," you would click on the tail (the 6 wings on the left would
produce, moving counterclockwise, A, B, C, D, E & F, so G would be the tail
and H would be the bottom wing on the right and so forth) then you would
click on the left antenna (because the left represents letters A-M); for the
letter "I," you would click on the wing 2nd from the bottom on the
right-hand side of the dragonfly then you would click on the left antenna;
for the letter "O," you would click on the wing 2nd from the top on the
left-hand side of the dragonfly then you would click on the right antenna
(because it will bring letters N-Z)... and so forth.
* Solve the rest of the puzzle by dragging the letters to their appropriate
positions along the 13 dots.
You can click here to see e-mail #
40 with the subject line "Phu" from Fe256,, here to see
e-mail #45 with the subject line "Message from Christina
Lombardelli" from SKL Network, and here to see e-mail #46
with the subject line "Case round-up" from Julie Massenet.
Phoenix: "Woe betide them! They don't know who
I am...
They chased me away everywhere. I every town, they
hurled abuse at me.
To silence me, they cut out my tongue!
To silence me, they burnt me at the stake!"
* Click on the screen to proceed.
Phoenix: "But today, the Phoenix has been
reborn from its ashes to take revenge.
I am Giordano the vagabond, the outcast, the heretic!
GIORDANO BRUNO IS ALIVE!
Four centuries after his agonising death, the time has come
for
vengeance!"
* Click on the screen to proceed.
* Watch the video of Jack and Karen being watched (by the Phoenix).
* Click on the Spuchu circle.
SPUCHU
* Click on the animation 3 times to proceed.
-Note: You see a lot of letters scattered across the middle of the screen.
* Move your mouse across the letters (from left to right) to form. in blue,
the following words strung together in one, large word...
solmarssaturnusapollovenustellusjuppitercupidominervalunamercurius.
Phoenix: "Sixth Chosen One. A bearded man
knocked to the ground by a
bolt of lightning. He is carrying a stick in his hand, and
a
boy is bringing him flowers as an offering: there is a
cithara
by his side. Spuchu will open if you find the name of the
sixth planet."
* Click on the screen to proceed.
-Note: The familiar white text box sits off to the side. Other than that,
there is just an animation to view (of which you cannot interact with).
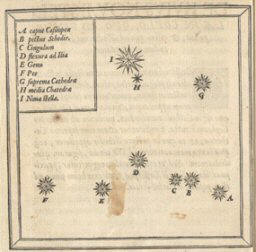
* Search the Internet (Google) for 'bearded lightning cithara' (keywords in
the Phoenix's last message), and find the following website ( http://www.demagia.net/bruno2.htm
).
* Enter the word [SPOILER - Click & Drag after the end of this box to the
/SPOILER box to view it.] asclepius[/SPOILER]
into the text box then hit your Enter key to complete the puzzle.
Phoenix: "What film can I give you? Another one
of Jack's or one of mine?
Decisions, decisions..."
* Click on the screen to proceed.
* Watch the video of Jack and Karen returning to the crime scene. Note that
the graphic we saw back in Phu was discovered by Karen at the crime scene
(In Memoriam, 1548-1600).
* Click on the Vari circle.
VARI
You can click here
to see e-mail #34 with the subject line "Sound tool for Vari" from Fe256,
and here to see e-mail #37 with the subject line "Vari"
from Marco Lerini.
* Go to Fe256's website ( http://www.fe256.net/ashpr58b/soundcracker.html ),
and download the sound tool (although you can just enter the code below
without "downloading" the tool).
-Note: I loaded the soundcracker tool, but I never used it once in the game.
* Open your navigational bar (in the game) then enter the code ST1732.
* Enter in the code 'umbra profunda sumus' (provided in e-mail #37 above)
into the text box then hit your Enter key to complete the puzzle.
Phoenix: "The Holy Path will appear when
silence prevails."
* Click on the screen to proceed.
-Note: You see the speaker with the 3 rings encircling it again. This time,
however, you can interact with it. You can move the 3 rings, and the 3 tabs
outside of the rings.
You can click here to see how to position the rings and tabs to complete the puzzle.
Phoenix: "To open Vari, list in order the
cities along the Holy Path.
The first one is Naples."
* Click on the screen to proceed.
-Note: You will hear a man's muffled voice listing the cities, in order, of
the Holy Path. They are Naples, Genova, Geneva, Toulouse, Oxford, Paris,
Marburg, Wittenburg, Prague, Frankfurt, Venice and Rome.
Strategy: Move the mouse over each star on the screen (associated with a
city). If you touch any other stars before touching the next, sequential
location, you will have to start over.
You can click here to see the locations of each city on the screen.
You can click here to see e-mail
#41 with the subject line "Giordano Bruno" from Julie Massenet.
* Watch the mini-animation/video.
* Click on the Zocha circle.
ZOCHA
Phoenix: "Each line and each column must add up
to 111."
* Click on the screen to proceed.
-Note: Place the correct numbers in the missing spaces. Use the numbers, in
blue, to see the existing totals of the columns or rows. The correct
positions are [SPOILER - Click & Drag after the end of this box to the
/SPOILER box to view it.] top row, 2nd box is 32 & 4th
box is 34. 2nd row, 1st box is 7 & 5th box is 8. 3rd row, 3rd box is 16 &
6th box is 14. 4th row, 1st box is 18 & 4th box is 21. 5th row, 5th box is
26. 6th row, 3rd box is 33 & 6th box is 31[/SPOILER].
Phoenix: "Just like Jack, you'll discover my
face at the end of the journey."
* Click on the screen to proceed.
-Note: Oh joy, another mini-game. The yellow bar above is your time line;
run out of time, and begin again. Until you have mastered the mechanics of
this game, the last board (#5) will seem impossible to beat. Learn the
techniques in the strategy below, and practice them. They, I believe, will
help you pass all 5 boards of this mini-game.
Strategy: There are 4, basic strategies I recommend employing to pass each
of the boards. 1. Gravity (hang objects from the top walls or they will fall
to the sides or to the bottom and crash into the walls). 2. Use multiple
strings to reduce crashing into the walls or other obstacles. 3. Keep lines
fastened to one corner of the object whenever possible (else, there will be
a lot of spinning out of control going on). 4. Keep lines as short as
possible to avoid elastic rebound (and crashing into walls or other
objects). Ultimately, you need to avoid hitting the walls and the skulls &
crossbones (poison symbols). You will need to guide your object to the white
goal for each of the 5 boards. Practice makes perfect, and you will need a
lot of practice for the later boards. For the first board, I found it
easiest to make the first line to the white circle to the right of the goal.
Cut your first line then let it zip over to the other end. After, make
another line in the direction that will pull the object to the goal then cut
the other line to let it go into the goal. I will leave the other 4 boards
for you to solve. Good luck! Also, if you mess up, the Phoenix will relay
the following message...
Phoenix: "You lose again! Try harder, my Little
Friend!"
* Watch the video of Jack and Karen driving in Paris.
Phoenix: "AER has been defeated. The flames of
IGNIS will accompany you
from now on in your final initiation stages.
The moment of truth approaches..."
* Click on the screen to proceed.
You can
click here to see e-mail #35 with the subject line "New
tool being developed" from Fe256, here to see e-mail #36
with the subject line "Origin of the names" from SKL Network, and
here to see e-mail #42 with the subject line "my latest
analyses" from David Marcus.
Part V: IGNIS
-Note: Weee, getting closer. 6 more modules to play through. Alphabetically,
they are Chnoumos, Chthisar, Ipi, Phatiti, Subos and Teuchmos. They will be
covered alphabetically in this walkthrough.
* Click on the Chnoumos circle.
CHNOUMOS
You can click here to see e-mail #43
with the subject line "Cassiopeia 1572" from Fe256.
-Note: You see a tray with 2 matchsticks, and 9 marbles. If you pull the
marbles back, release them then let them crash into a wall (or into other
marbles), you will see that all 9 marbles are each assigned a letter of
the English alphabet (A-H). Also note the small, black holes in the tray
(these are where the marbles need to be placed to solve this puzzle).
* Search the Internet (Google) for 'cassiopeia 1572 tycho' and find the
following website (
http://www.seds.org/~spider/spider/Vars/sn1572.html ).
You can click here to see the correct positions of each marble.
* Place the marbles in their correct positions to solve the puzzle.
* Watch the video of the Phoenix watching Jack and Karen.
Phoenix: "They were looking for me everywhere,
even though I was close.
by, right beneath their window. Ah, poor Jack!"
* Click on the screen to proceed.
You can click here to see e-mail
#48 with the subject line "Tycho Brahe" from Julie Massenet.
* Click on the Chthisar circle.
CHTHISAR
-Note: Just a dark screen is shown with a flame.
Strategy: The goal here is to move the flame through the dark to the top
where the lit white object is. The screen is full of holes. If you hit the
holes, the flame goes out and you have to start over. The path to take is to
start diagonally down toward the word Chthisar at the bottom of the screen.
Pass by the word (to the right) then start upward. Weave your way up to the
top of the screen then move left to get into the lit area.
Phoenix: "Minerva: I wrote the first part of
the message with her blood.
5 letters that will open Chthisar."
* Click on the screen to proceed.
-Note: There is an animation in the middle of the screen. Above the
animation is a white box moving from one side of the screen to another.
Below the animation is the familiar text box. The white box, at the top, is
the "play" button of the animation. You can click on it to pause the
animation, or you can play parts in slow motion.
You can click here to see the symbols you need to find in the animation.
-Note: We've seen those symbols before. Go to ( http://www.demagia.net/corne.html ) and see the following information...
You can click here to see the alphabetic-translation information you need to complete the puzzle.
* Enter the word [SPOILER - Click & Drag after the end of this box to the
/SPOILER box to view it.] nagha[/SPOILER] into
the text box then hit your Enter key to complete the puzzle.
* Watch the video of Jack and Karen in Prague.
Phoenix: "They walked past me in the streets of
Prague and they didn't even
realise. As for Minerva, she was waiting for me, deep in
prayer..."
* Click on the screen to proceed.
You can click here to see e-mail
#44 with the subject line "[none]" from ----- Phoenix.
* Click on the Ipi circle.
IPI
-Note: Piece the puzzle together. Be careful, every piece rotates in 4,
different directions (one at a time) when clicked upon.
You can click here to see the solution.
Phoenix: "6 planets destroyed and Ipi will
open."
* Click on the screen to proceed.
-Note: You see a disk that rotates 360 degrees in the middle of the screen.
The disk constantly shoots out a light beam. There are 4 reflective objects
which bend the beam. You can rotate the reflective objects.
Strategy: Move a reflective object to an anticipated position of the light
beam where the beam won't hit it for a while. Next, position another
reflective object in the angle you think the beam will bend from the first
reflective object. Finally, position another reflective object to bend the
beam a 3rd time, and aim the beam at a planet. You will need to bend the
beam at least 3 times in order to hit a planet. Once a planet is destroyed,
a white dot will float around as if something were released. Destroy all 6
planets.
* Watch the video of Jack and Karen being watched by the Phoenix.
Phoenix: "You saw how romantic it was!
From a distance, the Phoenix was watching his prey and
biding
his time."
* Click on the screen to proceed.
* Click on the Phatiti circle.
PHATITI
* Click on the animation 3 times to proceed.
Phoenix: "The accomplishment is getting closer.
Near a castle,
Minerva's blood was used to draw the Truth in the snow.
Light the Sun. Its light will lead you to the castle.
Four numbers inscribed on its tower will open Phatiti."
* Click on the screen to proceed.
-Note: You see the familiar text box, a sun in the middle, and a piece of
paper with writing on it including the year 1599.
* Click on the sun object numerous times until it ignites.
* Move the paper over the lit sun to reveal the missing letters of the
message [SPOILER - Click & Drag after the end of this box to the /SPOILER
box to view it.] Benatky 1599[/SPOILER].
* Search the Internet (Google) for [SPOILER - Click & Drag after the end of
this box to the /SPOILER box to view it.] Benatky
castle 1599[/SPOILER], and find the following website [SPOILER -
Click & Drag after the end of this box to the /SPOILER box to view it.]
( http://www.betaky-castle.net/an/historie.html )[/SPOILER].
You can click here to see the number needed to complete the puzzle.
* Enter the number [SPOILER - Click & Drag after the end of this box to
the /SPOILER box to view it.] 1864[/SPOILER]
into the text box then hit your Enter key to complete the puzzle.
Phoenix: "With the Ninth Step accomplished, I
knew he'd go there."
* Click on the screen to proceed.
* Watch the video of Jack finding another crime scene.
* Click on the Subos circle.
SUBOS
-Note: You see a doll off to the side, a background image of some sort, and
a matchbox.
* Place your cursor over the matchbox to open it then hold the left click
down. Move the lit matchstick over to the doll to burn it (and reveal a
skeleton).
* Position the skeleton like the one now shown on the matchbox.
-Note: Listen for the "clicks" when positioning the skeleton.
Phoenix: "Shall we continue?"
* Click on the screen to proceed.
Phoenix: "You need to kill to survive.
Kill the parasites before they eat you!
If all the plants get eaten, you lose!"
* Click on the screen to proceed.
-Note: You see 15 parasites on the screen (brown), and 5 plants (orange).
There is a time bar at the top of the screen. If you fail the game, the
Phoenix will relay the following message...
Phoenix: "You lose."
Strategy: Hold your left click down at all times then move the cursor over
to the parasites until they are all gone.
Phoenix: "It looks as though you like this
game. Right then, let's make it
a bit more difficult..."
* Click on the screen to proceed.
-Note: This time there are 17 parasites, and 7 plants to protect. The other
difference to note is that the parasites will return if knocked off of the
screen. If you lose, the Phoenix will relay the same 'you lose' message as
before.
Strategy: This time, guard 1 cluster of flowers, and leave the others to the
parasites. Let the parasites come to you until there is just 1 parasite
remaining then go after the parasite and kill it.
Phoenix: "One more and you'll have your
reward..."
* Click on the screen to proceed.
-Note: This time there are 17 parasites, and 11 plants to protect.
Strategy: I recommend trying to protect the 5 flowers in the top, left-hand
corner of the screen. Leave the other flowers for the parasites. If you lose
the cluster of 5 flowers, guard your remaining flower(s) until 1 parasite is
left then go after the parasite and kill it.
Phoenix: "At night, the castle is deserted. no
one heard her screams."
* Click on the screen to proceed.
* Click on the Teuchmos circle.
TEUCHMOS
* Click on the animation 3 times to proceed.
-Note: You see a lit matchstick.
Strategy: Keep the pilot lights lit by lighting them first (using the gas
dial). After, you will continuously reset the gas dial to on and re-light
individual flames that go low. Do this until all of the boxes at the top go
orange.
Phoenix: "He lived in this house in Prague a
few years after I'd been
there. A house: a street name, a number.
* Click on the screen to proceed.
* Find the message [SPOILER - Click & Drag after the end of this box to the
/SPOILER box to view it.] KNUDSTORP 1546[/SPOILER]
on a wall.
You can click here to see the message above.
-Note: IF you take too long, the Phoenix will relay the following message...
Phoenix: "According to some rumors, he died
from poisoning..."
-Note: If you wait even longer, the Phoenix will relay the following
message...
Phoenix: "If you can find his place of birth,
you'll find his name and maybe his address."
* Search the Internet (Google) for [SPOILER - Click & Drag after the end of
this box to the /SPOILER box to view it.] KNUDSTORP
1546[/SPOILER], and find the following webpage [SPOILER - Click &
Drag after the end of this box to the /SPOILER box to view it.]
( http://www.tychobrahe.net/ )[/SPOILER].
There, click on the "Stay in Prague" link at the top of the webpage.
You can click here to see the information.
* Scroll through the 2 in-game menus to find the address shown on the
website [SPOILER - Click & Drag after the end of this box to the /SPOILER
box to view it.] 1, Novy Svet[/SPOILER].
Phoenix: "Jack and Karen were looking for me in
Prague.
I was in Benatky to accomplish the Ninth Step of the
Initiation."
* Click on the screen to proceed.
* Watch the video of Jack and Karen learning of the Benatky castle murder.
You can click here to see the
message written in snow from the Phoenix (2nd part of the 'nahga' message
from earlier).
-Note: If you are following other walkthroughs on the Internet, you may
wonder why the Benatky-castle video appears here, in this walkthrough,
unlike the others on the Internet. I played the modules alphabetically (i.e.
I played the modules in a different order). The Benatky-castle video comes
after completing whatever your 6th (of 9) module is. For me, it was Teuchmos.
Also, 3 new modules to play through. Alphabetically, they are Choutaret,
Lachori and Sichet. They will be covered alphabetically in this walkthrough.
* Click on the Choutaret circle.
CHOUTARET
* Watch the video of Jack and Karen being watched by the Phoenix.
Phoenix: "Venice. As you know, that's where
they captured my master.
His suspicions aroused, the Phoenix didn't give them the
pleasure..."
* Click on the screen to proceed.
Phoenix: "At the root of it all is the Book
that Volker didn't have the time
to reveal to the whole world. They killed him, because he
was
getting ready to unleash the Truth! They killed him,
because
they were afraid of the words in the Book, just as they
were
afraid of my master's words"
* Click on the screen to proceed.
Phoenix: "Glory to he who discovered the Sacred
Book!
Minerva's message will lead you to it."
-Note: Time to decrypt the full message from before...
You can
click here to see the first half of the message (nagha),
here to see the 2nd half of the message (mmadi), and
here to decrypt the 2nd half of the message.
* Search the Internet (Google) for [SPOILER - Click & Drag after the end of
this box to the /SPOILER box to view it.] naghammadi[/SPOILER],
and find the following website [SPOILER - Click & Drag after the end of this
box to the /SPOILER box to view it.] ( http://www.nag-hammadi.com/
)[/SPOILER]. Click on the "1/ The minor history behind a major
discovery" link in the menu, and find the following information...
* Enter the name [SPOILER - Click & Drag after the end of this box to the
/SPOILER box to view it.] Mohammed Ali Samman[/SPOILER]
into the puzzle by clicking on each dot until the proper letter appears.
* Watch the video of Jack and Karen going to Venice.
You can click
here to see e-mail #50 with the subject line "Choutaret" from Fe256, and
here to see e-mail #47 with the subject line "Nag
Hammadi" from Julie Massenet.
* Click on the Lachori circle.
LACHORI
* Watch the video of Karen being followed by the Phoenix.
Phoenix: "Venice. Just like Jack and Karen,
here you are at the
end of the journey, my Little Friend. A bit more effort,
and you'll know what fate I've got in store for them..."
* Click on the screen to proceed.
Phoenix: "I just had to fit in a few games that
remind me of
my childhood. Are you ready?"
* Click on the screen to proceed.
Phoenix: "You'd be better off using the arrow
keys on your little
keyboard to move the Moon to the centre."
-Note: Something of a Pac-Man game. Eat the yellow objects to turn the
enemies green (to eat them). Guide your white moon to the circle on the
middle (entrance at the right of the object).
Phoenix: "The coat of arms will open Lachori."
* Click on the screen to proceed.
-Note: There are 5 picture slides, a family crest (shield), and a light in
the middle.
* Place all of the picture slides over the light (one on top of the other),
except the slide with the letter "N" on the left-hand side, to reveal the
name [SPOILER - Click & Drag after the end of this box to the /SPOILER box
to view it.] MOCE IGO[/SPOILER]. The letter "N"
will fit in the missing space.
* Search the Internet (Google) for [SPOILER - Click & Drag after the end of
this box to the /SPOILER box to view it.] Mocenigo
family[/SPOILER], and find the following website [SPOILER - Click &
Drag after the end of this box to the /SPOILER box to view it.]
( http://www.hotel-mocenigo.com/ )[/SPOILER].
There, find the light and dark pattern of the family crest (shield) which is
show below...
You can click here to see the crest.
-Note: Well, bad on the game developers. Without
Patch v1.2 (mislabeld as v2.1 on Ubi Soft's website), you cannot solve
this puzzle. So, download and install it.
* Click on the proper light & dark colors on the family crest (shield), in
the puzzle, to solve it.
You can click here to see the in-game crest.
* Watch the video of Jack and Karen, in Venice, staking out the Mocenigo
palace. On the 2nd night, Karen discovers a mysterious man.
* Click on the Sichet circle.
SICHET
* Watch the video of Karen being followed by the Phoenix.
Phoenix: "By playing with fire,
Jack and Karen ended up getting what they deserved, didn't
they?
Like two miserable
little lambs to the slaughter..."
-Note: You see an animation of Karen racing by (horizontally). Moving the
cursor to the top of the screen enlarges the image. Moving the cursor to the
bottom of the screen makes it smaller. Moving right makes the animation play
forward, and left makes the animation play backward.
Strategy: Pixel hunting time. The object here is to find the correct pixel
to move your mouse over on the the screen to play the animation at the
proper speed and size (large or small in size). For me, the point was
mid-screen just below the animation. That is all that I can say for this
puzzle. Good luck!
You can click here to see e-mail
#49 with the subject line "Help with Sichet" from Fe256.
-Note: Another arcade-style game (Space Invaders?). This is, by far, the
most annoying & difficult of all the arcade-style games within the game
itself.
Strategy: There is nothing much that I can say to lend advice with
successfully completing this game. Gratefully, there are 2 checkpoints
before the end of the game. If you successfully make it to either
checkpoint, you will begin each time from the checkpoint you reach instead
of from the beginning again. To fire and steer your ship, you use your left
mouse button. For steering, moving the mouse, like a compass rose, will
guide your ship. So, to move backwards, move the mouse below the ship
(south). To move to the top, move your cursor above the ship (north), etc.
You can also fire using your spacebar, but I found it easiest to solely use
the mouse for both steering and firing. Also, I found it best to stay at the
bottom of the screen when shooting at enemies. For piloting your ship
through tight spaces, sometimes it is advantageous to stay at the bottom of
the screen, and sometimes it is advantageous to move forward. Other than the
aforementioned, there is nothing else I can say to help you pass this
annoying mini-game. Just keep at it, and take breaks to get refreshed. Good
luck!
* Watch the video of Jack and Karen in their room then the Phoenix following
Karen. Learn that both Jack and Karen [SPOILER - Click & Drag after the end
of this box to the /SPOILER box to view it.] get
caught by the Phoenix individually[/SPOILER].
Phoenix: "Do you really want to continue?"
* Click on the screen to proceed.
* Watch the following animations go by (Sol, Mars, Saturnus, Apollo, Venus,
Esculapius, Tellus, Juppiter, Minerva, Cupido, Luna and Mercurius).
-Note: You are taken to a screen (no background music) with just a small,
flashing dot in the middle of the screen.
* Click on the dot in the middle of the screen.
Finale:
-Note: By clicking on the flashing dot in the last screen, you will be taken
to a website...
[SPOILER - Click & Drag between the single quotes to view it.] '(
http://www.xineph.com/fudulmar/Final_Game.php?glogin=YOUR_USERNAME&gmail=YOUR@EMAIL.COM>ry=1
)' [/SPOILER]
Phoenix: [SPOILER - Click & Drag between the
quotes to view the message.]
"My poor Little Friend, you've just
gone beyond the point of
no return! Jack and Karen are locked away in a secret
place.
It's all rigged to blow up via this web site, which acts as
a
remote trigger. By logging in, you've just sealed their
fate!" [/SPOILER]
* Click on the webpage to proceed.
Phoenix: [SPOILER - Click & Drag between the
quotes to view the message.]
"Nevertheless, I'll give you one last
chance to save their skins
by taking me on this time, face to face. If you win, the
count down stops. If you you lose, they die...
Are you ready?" [/SPOILER]
* Click on the webpage to proceed.
Phoenix: [SPOILER - Click & Drag between the
quotes to view the message.]
"A planet is shown."
[/SPOILER]
* Click on the webpage to proceed.
Phoenix: [SPOILER - Click & Drag between the
quotes to view the message.]
"We will take turns at placing the
symbols corresponding to
to the planet in the dark suns..." [/SPOILER]
* Click on the webpage to proceed.
Phoenix: [SPOILER - Click & Drag between the
quotes to view the message.]
"...while avoiding both enemies and
the planet's arms." [/SPOILER]
* Click on the webpage to proceed.
Phoenix: [SPOILER - Click & Drag between the
quotes to view the message.]
"When the planet is full, the player
that placed the most symbols
wins the planet. The first 6 planets wins the game. Ok?"
[/SPOILER]
* Click on the webpage to proceed.
Phoenix: [SPOILER - Click & Drag between the
quotes to view the message.]
"Sol is the first planet.
As I am feeling generous, I'll let you start..."
[/SPOILER]
* Click on the webpage to proceed.
-Note: The skull & crossbones (poison) symbols, and the moving tentacles are
the obstacles you need to avoid hitting. The object is to get the white
circles, with pictures inside, to 1 of the 5 circles next to the moving
tentacles. There are 2 wildcard pieces which appear periodically. The first
wildcard piece is a small, yellow circle with the picture of a moon. You can
use this piece in 1 of 2 ways. If it appears (which a sound will go off
before it does), and it is your turn, it is best to take it and click on it
to make it go away. If you don't, the Phoenix can use it against you. If it
is your turn, and the Phoenix just took his turn, you can use the moon
wildcard on the piece he just placed to knock it away and nullify his move.
Be careful, because he can use the moon wildcard to knock a piece of yours
away as well. The 2nd wildcard piece has the image of a sun on it. If used
before grabbing onto a white piece to place, it will give you invincibility
(i.e. you can touch any enemy or tentacle without losing a turn). Sol
Invictus... Invincible Sun.
Huge Spoiler: [SPOILER - Click & Drag between the brackets to view the
spoiler.]
[Sadly, there is no way to lose nor
beat this game. You can be
terrible at it, or very good. In either scenario, Géry
(Fe256 from
the e-mails) hacks into the Phoenix's website and stops the
game.] [/SPOILER]
[Gery]: [SPOILER - Click & Drag between the
quotes to view the message.]
"It's me, Géry. I've managed to get
onto the Phoenix's site.
I'll now try to locate the actual place that it's hooked up
to.
Try and stay online for as long as you can to buy me as
much time as possible.
CUL8R" [/SPOILER]
-Note: After some time spent playing the game with the Phoenix, Géry relays
the following message...
[Gery]: [SPOILER - Click & Drag between the
quotes to view the message.]
"Hang on - I've got one last little
tweak to do. You might see an
error message pop up. If it does, just click
continue. Géry" [/SPOILER]
-Note: If you are prompted by the error message above, select "Allow Future
Access by This Movie" under the Allow Access? question. After, click on the
Allow button. After some additional time is spent playing the game with the
Phoenix, Géry relays the following message...
[Gery]: [SPOILER - Click & Drag between the
quotes to view the message.]
"That's it, I've managed to pinpoint
the place where he's holding
Jack and Karen. I've disconnected the trigger. The game's
over.
We've won! Stay online - I'll send you an email."
[/SPOILER]
You can read the following e-mails to see how
the story concludes:
|
THE END
Special Note: Just for fun, I thought I'd go back and enter into the
webpage of the final game. Instead of what happens above, the following
takes place (after all of the above plays out)...
[Gery]: [SPOILER - Click & Drag between the
quotes to view the message.]
"Warning to those who have made it
this far:
I have succeeded in hacking the Phoenix's site and
establishing
Jack and Karen's whereabouts. The police are in position.
SKL will keep you informed as events unfold.
Fe256" [/SPOILER]
* Click on the webpage to proceed.
[Gery]: [SPOILER - Click & Drag between the
quotes to view the message.]
"Hang on - I've got one last little
tweak to do. You might see an
error message pop up. If it does, just click on Authorise
to
continue. Géry." [/SPOILER]
* Click on the webpage to proceed.
-Note: If you are prompted by the error message above, select "Allow Future Access by This Movie" under the Allow Access? question. After, click on the Allow button. After, the presentation ends here (unlike before). So, you can no longer replay the game you have been playing. All there is left to do is to wait for an e-mail from Jack and Karen, and one more from the Phoenix himself. Jack and Karen's e-mail comes 1 day after the last e-mail from David Marcus, and the Phoenix's e-mail comes 7 days after Jack and Karen's e-mail.
Section D: Closing
comments & Possible Bugs
To avoid problems with the game, download
Patch v1.2 (mislabled v2.1 on the Ubi Soft website). Following this
walkthrough, there is only 1 instance where it is needed, but after reading
other walkthrough/guides, for this game, on the Internet, I have noticed
there are other places where the patch is needed.
A possible problem worth mentioning is if the websites needed to play this
game ever go down, whoever owns the game will be left with useless CDs.
Using this walkthrough may not guarantee success at playing through the
game. One forseeable problem is with e-mails. The game, when certain levels
are reached, tells its server when to send e-mails to the player. If those
servers ever go down, there might be a problem with the game continuing.
Also, the end of the game requires that the player plays through a
multimedia presentation (presumably with the Phoenix) on a website. If that
site goes down, that is as far as you can go in the game. However, you can
read this walkthrough to see what happens if that ever becomes the case.
In closing, the greatest pleasure I received from this game was ending it.
It was frustrating, for the most part, exceedingly monotonous, and the
constant interruptions of having to check for clues online makes one feel
annoyed throughout the entire game. The ending of the game leaves room for a
sequel to In Memoriam; hopefully, however, that will never happen. The
ending of this game, after all of the hard work the player goes through to
see what happens at the end is inexcusable I feel. After all of the build-up
and torment (playing this game), it is as if the developers hand you a a
piece of garbage and say: "Here, this is for your efforts." The on-scene
locations, via video clips, were nice to watch although each were very
brief. The graphics were nice, and the story keeps the player interested
enough to want to see what happens at the end. Aside from the aforementioned
good points of the game, everything else is awful. I'd recommend reading
through my walkthrough (e-mails, messages from the Phoenix, spoilers, etc)
for an almost complete understanding of the game. Without playing the game,
and merely reading this walkthrough, you will just miss out on the
frustration and annoyances of the gameplay, and the several mini-videos
throughout. Ultimately, you aren't missing much in my opinion.
Section E: Copyright
Information
This document may not be used without the expressed, written
consent of the author. Linking to this walkthrough (hosted by the
Gameboomers.com website) from within your webpage is in direct violation of
this copyright. Please link to the Gameboomers.com main walkthroughs webpage
instead. Also, altering the information, in any way, is this document is
forbidden.
© Gamehound, 2004
E-mails sent throughout the game...
E-mail #1 - Subject: Latest info, From: SKL Network
Hello, First of all, thank you for your help. Here is the latest news in our possession. A profiler has been set to work building up a psychological portrait of the killer. He reckons that there is a strong chance that Jack and Karen are still alive. We have given him your details, so that he can send you the results of his initial analyses as soon as they are ready. In case you have not already noticed, a toolbar has been integrated into the Phoenix's program (it can be accessed via a button to the left of the screen). It will let you check your emails and log straight onto the Internet without having to exit the program. It will also enable you to view any of Jack's films that have already been opened, and in particular, allow you to save your progress when exiting the program. If you would like further information on these tools, please refer to our booklet. Last of all, please do not hesitate to check out all the latest case info on our site: www.skl-network.com/gb Good luck. SKL Network |
E-mail #2 - Subject: Your team member!, From: Julie Massenet
Hello, My name's Julie and I'm studying for a degree in history at the Sorbonne University in Paris. I got your address from the SKL Network agency, as they offered me the chance of teaming up with you on the Jack Lorksi case (they team up participants to increase their chances of getting this whole thing solved...) Well, the person that wrote the CD-ROM looks to be a bit of a bright spark! He also seems to have thing for esotericism, which is quite handy as it's one of my specialities! You'll see what I mean if you check out my web site on www.cathedrale-paris.net/gb, (don't pay any attention to the graphics - it's one of my computer mates that did the site for me and the graphics isn't really his thing ;-) See you later, Julie |
E-mail #3 - Subject: Jack Lorski case, From: Fe256
Hi, I came across your emails on the SKL agency's database. Don't ask me how. I also managed to get hold of the high-definition super-8 film from their site. You can download it from my site and check it out. www.fe256.net/ngcc1p/analyseur.html CUL8R Géry |
E-mail #4 - Subject: LATEST INFO, From: SKL Network
Hello, To make life easier for you when searching on the Internet, our agency has made some different tools available on its web site: a translator, a real-time optimised search engine based on the references gradually found by the participants, and a customisable wordpad so that you can jot down the results of your search efforts on the Internet, wherever you are. www.skl-network.com/gb Don't forget to read our emails regularly. All the best, SKL Network |
E-mail #5 - Subject: Important, From: SKL Network
Hello, One of the participants has managed to create a tool that will let you analyse the super-8 film. Viewing the film could play a decisive role in solving the Tetima and Aphebis puzzles. We would therefore strongly advise you to download this tool. It has been tested by our IT department. It's easy to install and will not harm your computer. Click on this link and follow the instructions: www.fe256.net/ngcc1p/analyseur.html SKL Network |
E-mail #6 - Subject: code for Soaphi, From: Fe256
To save you a bit of time in case you haven't already found it, here's the code to get into the Soapphi screen: 19/75. By going to this point, the screen opens. CUL8R G. |
E-mail #7 - Subject: You're a genius!, From: Julie Massenet
Hi Géry, I've just loaded your analyser: it's unbelievable - talk about a computer whiz kid! (either that, or you're the Phoenix himself! To be honest, I think I prefer the first possibility) If you're looking for a job, then no problem, as my uncle could do with someone like you in his company ;-) The analyser let me get to the end of the Aphebis screen. Thanks again. I think the 3 of us will make one hell of a team! Julie |
E-mail #8 - Subject: Re: You're a genius!, From: Fe256
Cheers Julie! Don't worry about the job. Having said that, if you invited me to Paris for the weekend, I'd definitely be up for it! CUL8R G. |
E-mail #9 - Subject: HD Super-8 film!, From: Fe256
If you haven't already done so, nip along to my site and download the super-8 film. It's gotta contain a whole bunch of clues that will help us find out where the photos were taken and solve the Tetima puzzle. www.fe256.net/ngcc1p/analyseur.html I'll contact SKL to patch things up with them and offer them my help. CUL8R Géry |
E-mail #10 - Subject: Strange, From: Julie Massenet
The wheel of the zodiac that appears when you successfully complete a test shows that the Phoenix is into astrology. However, the strange names of the different modules (Tetima, Soapphi, Ustichos, etc...) don't mean a thing to me. I'll have a look in my books on esotericism. Catch you later, Julie |
E-mail #11 - Subject: My initial analyses, From: David Marcus
Hello, My name is David Marcus. I am a psychologist specialised in criminology. I was appointed by the SKL Network agency as a profiler to help you understand the type of personality hiding behind the 'Phoenix'. I have selected a few observations, which are based on the initial information received by the agency. 1. The pseudonym chosen by the 'Phoenix' is an attempt to force people's admiration. We are dealing with someone who is extremely proud and very sure of himself. You will need to tread carefully when dealing with the sensitive nature that goes hand in hand with this type of narcissism. 2. His motives. The technical expertise and the graphical skills demonstrated by the Phoenix in designing his program could lead us to think that we are dealing with several individuals. Nevertheless, the rare information sent by Lorski before he disappeared could lead us to the opposite conclusion: that we are faced with just one man who is aware of his 'genius' and is looking for a sort of recognition through his 'work', which is a characteristic found in certain serial killers. By creating puzzles and then giving out clues in dribs and drabs, and by continually playing at concealing the information that he has agreed to give out, the Phoenix has shown himself to be manipulative and highly intelligent. No-one can be in any doubt about his intelligence, and he wants to make sure of that. His ability to devise ingenious and complicated devices means that we must take some precautions: this individual has proved to be calculating and is therefore dangerous. 3. The contents of the puzzles created by the Phoenix prove that he is familiar with several languages, including Latin, and that his mind is filled with esoteric references. He more than likely comes from a well-off family. He has a fixation for the past and uses his knowledge of religion and history to fuel his speculations. This all might seem somewhat confused, but do not be under any illusions: as is the case with a large number of serial killers, the Phoenix's acts are performed according to logical pattern hidden beneath an irrational appearance. What is the Truth that the Phoenix is looking to reveal to us? The way to track him down is obviously by discovering what it is, which is what Jack Lorski and his friend must have done. 4. Are Jack Lorski and Karen Gilman in great danger? If you consider that they have fallen into the hands of someone who has no hesitation in killing, then the answer is yes; if you believe the possibility that the Phoenix has done all of this just so that we will take a long-lasting interest in him, then the answer is no; even he does not appear to be clear on what his motives are. One way or another, he needs you. Be careful. David Marcus |
E-mail #12 - Subject: The 7 sons of Helios, From: SKL Network
Hello, One of the participants has just sent us the following information: "The introduction to Tetima gives a series of names: Ochiis, Cercages, Macalus, Actpas, Tenareus, Triomus, Candaphus. As I was convinced that it was an important clue, I took the last word and I swapped its third syllable with those from the other words, such as Candamus, Candareus, Candapas, etc... Then I typed the words on the Internet. None of the words resulted in anything, except for Candalus which sent me straight to a site that was all about the Heliades: Ochimus, Cercaphus, Macareus, Actis, Tenages, Triopas and Candalus! The Heliades were the 7 sons of Helios (the sun) and are associated with the island of Rhodes, which is the solution to the Tetima puzzle". We thought we would send out this information to everyone, in case it comes in handy later on. All the best, SKL Network. |
E-mail #13 - Subject: Translation of a German newspaper, From: Julie Massenet
I don't know if you've noticed, but there's a German newspaper article in the Ustichos screen that I've tried to translate (not all of it is legible). Aside from learning that Volker was born in Soligen, there are few more details on his disappearance: "Has Professor Volker been kidnapped? There is growing concern in academia where there is still no news of the researcher. He was invited to Rhodes 2 weeks ago to give a conference and has still not shown any signs of life (...) According to sources close to the investigation, the professor was alleged to have been seen for the last time on the Rhodes - Symi shuttle boat in the company of three men speaking Italian (...)." He would never have gone and left documents of great historical value in his bag, which was found at the hotel". Professor Volker was born in Solingen in 1930. His built his reputation by specialising in an ancient Egyptian language, which is still spoken today by Egyptian Christians. (...)". Maybe he wasn't in Rhodes by pure coincidence? Maybe this cursed book has got something to do with the templars who had settled on Rhodes? I'll see if I can unearth something... CUL8R Julie |
E-mail #14 - Subject: name of the modules (cont.), From: Julie Massenet
I found an old magic book containing the names that might match those on the CD-ROM. SOTHIS (Sothir), SITH (Ouphisith)... They're names of Greek decans, which confirms what I was thinking: the Phoenix makes references to astrology. As there are 3 decans for each sign of the zodiac (a decan represents the space travelled by the sun in 10 days), the program should therefore contain 36 modules (3 decans x 12 signs = 36). The first 9 modules seem to involve water; it's quite likely that the CD-ROM is structured around the 4 elements present in the tradition: Air, Earth, Water and Fire. Julie |
E-mail #15 - Subject: Sol Invictus, From: Julie Massenet
Hi, I've found some interesting info on Sol Invictus (I'm obviously not talking about the rappers and other rock groups that have pinched the name!). Here's a summary of what I found. "The Roman solar cult (the Greeks refer to it as Helios) originates from the Mithra cult, which came from Persia and incarnated the god of the Sun, the earth and the dead, and broke into the Roman Empire in the 2nd century AD. In the 3rd century, mithraism came in for competition from the fast-spreading Christianity in the army and the public services. It was officially introduced into Rome upon Aurelian's wish to reunite the religious conscience around a solar cult - the Sol Invictus or the invincible sun. Mithra was then compared to the Sun and imposed as a monotheistic religion, which was taken over for political purposes. Its principle was based on a link between the idea of the sun, the master of the world, and the concept of the invincible emperor, representing and incarnating the star on earth. Aurelian looked to use the religious concept as a moral base for establishing his power. He turned the solar religion into a State cult and made the sun the supreme god of the Empire, Sol dominus imperii romani. He proclaimed himself the representative and emanation of the solar divinity. He was god on earth, deus, master by birthright (Dominus natus), he to whom the eagle, the bird of the solar god, brought the light. Aurelian built a temple in Rome dedicated to the sun at the foot of the Quirinal, along the Via Flaminia (replaced in the 8th century by the S. Silvestro in Capite church). The emperor was represented with the radiate crown, the solar symbol. Coins bore the name of the emperor followed by DEUS and DOMINUS NATUS (god and born master)". Besides the reference to the solar cult that the old bookseller spoke about, some of the elements are a bit disturbing, such as the connection with Helios (Rhodes), the eagle (Phoenix)... Julie |
E-mail #16 - Subject: Statement, From: Hans Berthold
Hello, The SKL Network agency kindly gave me your email address. Since Jack Lorski disappeared, there have been some unfortunate rumours going around about our institute. We therefore thought it important to set the record straight. Our institute is named after Professor Volker, who created it in 1965. He loved what he did for a living and devoted his entire life to his archaeological research for a completely unselfish, non-profit making purpose. Certain rumours today have insinuated that Peter Volker might have been involved in trafficking ancient books before his tragic disappearance in 1975. Although he may have been in possession of a highly valuable book at the time, that does not make him a trafficker! A large number of archaeologists find themselves in possession of precious objects at some time or another in their lives. Even if a group of criminals did not hesitate to murder Peter Volker to get their hands on his object of research, that does not make him in any way their accomplice! For pity's sake, let us spare this innocent victim from being turned into an infamous trafficker! Some of us knew him well enough to bear witness to his integrity. We will not let his memory be tarnished and the institute he created harmed by the rumours arising from the fortuitous discovery of a film, and we shall take the strongest of action against those individuals at the origin of these unfounded rumours. We would also like to point out that the institute continues to uphold Peter Volker's mission and is not associated with any political or religious movement. It is a fully independent institute that continues to work in accordance with the mission for which Peter Volker created it: provide humanity with and promote awareness of ancient languages and ancient culture. Regards, Hans Berthold President of the Volker Institute ------------------------------------------------------------------------------ Volker Institute Friedrichstrasse 95 55127 Mainz www.volker-institut.com |
E-mail #17 - Subject: Autopsy report, From: Fe256
One of my mates has just come across the police report on Helena Whitford's murder on the Internetn! Here's a few etxracts: "We transported the body to the mortuary in Oxford, where we were met by the coroner, Dr Matthews, to whom we explained the circumstances surrounding the discovery of the body and the initial set of elements in our possession. The body was laid face-up in the autopsy room. A label attached to the ankle bore the following indications: Miss Helena Whitford, - N° OX-04708 - 1.67 m - 52 kg. The doctor proceeded to perform the autopsy at 10:20 am and provided us with his conclusions as follows: Cause of death: asphyxia by strangulation. Several lacerations to the base of the neck. Traces of burning after death to the forehead in the form of a symbol marked with a branding iron. Evidence of a struggle (contusions to the right shoulder and knees) Evidence of self-defence (broken fingernails) Blood, vitreous humour, urine, visceral, integument (nails and hair), anal, oral and vaginal samples were taken for examination purposes and kept in the mortuary for analysis". One last point which might be of interest: the girl was a virgin (I'll spare you the details!). There's an amazing piece in the other document: "Traces of sea water were found on the victim's hands and vitreous humour". Strange indeed... I'll trust you to make sure that the contents of this message remain confidential... CUL8R G. |
E-mail #18 - Subject: Helena's diary, From: Julie Massenet
Have you read Helena Whitford's diary? This girl was unbelievable! Talk about the irony of fate - it seems like she'd fallen in love with her killer (between you and me, it looks as though he turns on the charm to attract some of his victims!). I'm sure he uses the Internet to 'choose' his victims. We'll have to be careful! Julie |
E-mail #19 - Subject: my latest analyses, From: David Marcus
Hello, Since my last message, several new elements have been brought to my attention, which will allow us to better understand who we are up against. 1. He is bearing a message. Unlike a criminal who tries to cover all his traces and melt away into oblivion by keeping a low profile, the Phoenix has been loud and clear in saying that he bears a message. Decrypting and interpreting this main mystery appears to be the only way to defuse his fury. We need to grant the Phoenix the 'understanding' that he is seeking, at least from a tactical point of view. 2. A parallel can be drawn between the inscription 'Sol invictus' discovered in Oxford and the contents of the ancient book (the cult of Helios) and the planetary symbols to which the Phoenix draws our attention by using them on his CD-ROM. There is a logical sequence to his actions. Links and meanings are hidden behind the repetitions and resemblances. Discovering what these links are is the only way to find out what his motives are. 3. The white chasuble, the references to the sun and cruelty are elements that express strong subconscious preoccupations on the theme of guilt, punishment and redemption. We are not dealing with a serial killer who suddenly acts on sexual impulse. The Phoenix acts on recurring compulsions, which he broods over for long periods of time in the form of morbid speculations. The murders are committed according to his own set of rules and procedures, under pressure from a meticulous internal obligation, as if he were copying a predefined pattern (which one? 'A star whose enemies have not triumphed'?). He is probably prone to intrusive thoughts, a nightmare that keeps coming back, the fantasy of a mission which alone could help him to overcome a profound feeling of guilt. 4. He kills in cold blood. The mental universe that he forces us to explore with all its esoteric and mythological connotations appears to be devoid of any real humanity. People are cruelly eliminated without the slightest apparent emotion and probably without any remorse. The only things that appear to fascinate him are the ancient representations of symbols, which speak to him. He writes with his victims' blood. 5. Who will emerge victorious? The Phoenix has established a contract, which blackmails with suffering and in which a threat looms menacingly, but everything has been put on hold, during which we are invited to wander the twists and turns of his imagination in accordance with the directions he gives us. The ball is in your court. The Phoenix probably takes delight in the obstacles that you manage to overcome; the risk that he is running is huge, but it has not been left to chance. If the Phoenix acknowledged that he was suffering and underwent a course of psychotherapy, there would be a chance of curing him, but he has probably never consulted a specialist. Be careful, David Marcus |
E-mail #20 - Subject: Incredible!, From: Marco Lerini
Ciao, my friend Gery, he speak to me and give me your email adresse. Because I have house in Milano, he ask me to do some searches on Lorski case and omicides happened in Italy since a few months. It is incredibile, this serial killer bisness! My grandmother, she has in her cellar many papers. Her house is not far from mine. I see if I can no find something. Marco |
E-mail #21 - Subject: The plot thickens, From: Julie Massenet
In the film shot in London, the policeman refers to a feminine symbol drawn on the victim's forehead. I tend to think that it's the symbol of Venus, which would be more logical given the Phoenix's astrological references. Strangely enough, I've gone back over a passage on the Sol Invictus, which takes on a new meaning in light of the murder in Oxford. "Joining the sect was achieved by following a complicated, esoteric hierarchy. The initiation comprised 7 phases, corresponding to the number of hierarchical levels, each one of which associated with a planet. This organisation was based on a series of rites of passage represented by symbolic ordeals. Raven = Mercury Bride = Venus Lion = Jupiter Soldier = Mars Persian = Moon Messengers of Helios = Saturn Father = Sun Each dignitary was characterised by masks and insignia: ravens served drinks, the bride wore the bridal veil, the soldiers were attributed with two-edged swords and beggar's pouches. The lions burnt the incense ("Receives the lions burning the incense which consumes ourselves"). They wore the coat of purple and cleansed the mysts by fire, and they brought the gifts to Mithra's table. During their consecration, honey was poured onto their palms as a sign of incorruptibility and they were obviously branded by a hot iron. The Persians held the scythe and sometimes ears of wheat. The heliodromes, the messengers of the sun, were dressed in purple and often suffused with rays of sunshine. The pater, father of the ceremonies, presided over the meal and carried the ring and the crosier". Venus wearing a bridal veil... branding with a hot iron... The association with the planets... This could lead us to think that there will be 7 murders asociated with the 7 planets. We'll see. Either way, these coincidences give me the creeps... Julie |
E-mail #22 - Subject: Brous, From: Fe256
There's a business card in the Brous screen. It probably belongs to the victim's father. It might be lead worth following up... CUL8R G. |
E-mail #23 - Subject: Information request, From: SKL Network
Following the request from several people, we have officially contacted the Maccioni cemetery. We have been promised a swift answer, despite Felice Maggioli currently being in China. All the best, SKL Network. |
E-mail #24 - Subject: Omicide a Genova, From: Marco Lerini
Ciao, My grandmother, she is genius: I found an aticle that talks of the case (omicide in Genova). Here is the article that I try to translate (escuse for the mistakes!): Orrible omicide in Genova. A domenicano preist was found dead in church cellars. The police investigate in estremist circles. Macabre discovery yesterday in cellars of church Santa Maria di Castello in Genova. An electrician that was called for an electricity break in the convent next to the church, he find himself face to face with body of a man holding two edge sword in hand after he go down in cellar. After first chock passed, as his attacker no move, he thought he was model that someone arm to make bad joke. He look around and realise it was domenicano priest tied with some cord to back of prie dieu. He quickly call police. Investigation show it was brother Francesco, who hold function of libraian in convent. He had throat cut and the sword was inserted in his hand. A strange burning in form of magic sign was found on body. Also finded near body was latin writting probably written with blood of victim "Sol Invictus". Noone there know the cause of this orrible setup. The librarian was discreet man in high regard by all people that know him. "Noone could want him hurt!" exclaymed a parishonner that help to decorate abbey in tghe Christmas period. "That is the crime of a madman!". It seem also that police privilege this asumption without ruling off possibility of a ritual omicide perpetated by satanic sect. This priest was contacted by lady director of school for young girls subject to crisis of collectiv isteria. She ask him to calm girls by sprinking them with holly water. The priest was no exorcist and did no think able to affront evil forces, but he promise to speak about it with his superior. A presto, |
E-mail #25 - Subject: Re: Brous, From: Fe256
I've sent a email to Felice Maggioli to ask him for the first name of his deceased son, whilst explaining all about the Phoenix's CD-ROM... He's bound to think I'm a right nutcase, but you never know! Otherwise, I found in the archives of Italian papers on the Net some old aticle about the case, but it doesn't say anything about the first name. Another way of getting an answer is by hacking into the cementery's site, but it looks to be well protected: there's no way of getting in at the mo. CUL8R G. PS: the article translate by an automatic transltaor Misterioso omicidio a Napoli A man was murdered last night and his body thrown on the pavement of Benedetto Croce. The body was discovered at 6:15 am by the occupants of house 18. Bus driver, Massimo Palacci, 25, was on his way to the bus station to start his shift when he stumbled across the stranger's body. He called the police on his mobile phone and waited for the emergency services to arrive. The police were quickly on the scene and cordoned off the area to preserve any evidence that might be there. According to the rare witnesses that we managed to question, the victim was shot in head... Burn marks under the form of a circle were noticed on the victim's palms and forehead. The police were initially under the impression that it had been a gangland killing, but the least that can be said is that the police are bewildered by the initial elements which do not match the usual practices in the Camorra. Initially suspected of the crime, Massimo Palacci was held by the police for several hours until he was scagionato (cleared?) by the statement given by a woman with whom he had spent the night and whose identity he had not initially wished to reveal. |
E-mail #26 - Subject: More and more creepy!, From: Julie Massenet
Have you noticed the engravings that appear with each murder? I seem to think that the killer is following some sort of logical pattern, but which one? I can't get my head round it. Apollo doesn't tie in with my previous theory? What about if all this was the work of some group, like a sect? Maybe we ought to lok into Manus Domini (the hand of the Master)... I didn't sleep very well last night, so I think I'll go and get my head down for a bit. Take care, Julie |
E-mail #27 - Subject: Amphitab, From: Fe256
Not found' corresponds to error 404 on the Internet. CUL8R G. |
E-mail #28 - Subject: Nonna Fina, From: Fe256
In fact, I forgot to tell you how I managed to get past the security on the cemetery's site. By typing Felice Maggioli, I saw his name on some yacht club's site. If you type his name in the login and the name of his boat as the password, you can get in no prob! Child's play!! CUL8R G. |
E-mail #29 - Subject: Message from Felice Maggioli, From: SKL Network
Hello, Further to the request that we sent a few days ago, Mr Maggioli has only just sent us the following message: "Dear Sirs, As I have not had access to my emails over the last few days (due to my inbox being saturated), it was not until today that I became aware of your message. I did not fully understand the importance of my son's first name in finding his killer (the police have known for months... what has all this CD-ROM business got to do with it?). Nevertheless, after making a few enquiries with the local police, they confirmed that sending you this information might save innocent lives, in which case I am only to willing to give it you, praying that it might be of some help. My son's name was Gianni (Giovanni), God rest his soul. Although nothing can be done to bring him back, I hope that the killer will be caught as quickly as possible. Yours faithfully, Felice Maggioli." Sorry for the delay. All the best, SKL Network. |
E-mail #30 - Subject: my latest analysys, From: David Marcus
Hello, The situation appears to be developing at an alarming rate. The recent discoveries concerning the 'Phoenix' seem to confirm the worst case scenario in my previous assumptions. 1. The Phoenix is particularly formidable on account of his intelligence, and he seems to be motivated by ideas that are fed by an inexhaustible source of disturbing facts. Whilst waiting to have more information on his peregrinations, the Phoenix seems to me to be an individual without any roots, a vagabond on a European scale and incredibly solitary. He is sexually frustrated. He is insensitive, immoral, obstinate and unstable, which are the classic signs of a psychopathic personality. 2. One fact appears to be established: the Phoenix hunts for his future victims on the Internet. Several of them had a web site. He will certainly continue to use different pseudonyms. As can be seen with other criminals, the effectiveness of his ability to cover his traces reinforces the thrill of impunity: challenging the police and delusions of grandeur give rise to emphatic and provocative declarations. Sometimes, it results in a particularly careless conduct that could be interpreted as a subconscious desire to be caught. 3. The accumulation of clues taken from history, religion and mythological representations feeds the dominant psychological process in his mental functioning: intellectualisation. This mechanism allows him to repress the thought of the shameful impulses at work when he takes action. There is a denial of sensitivity. All the emotions and feelings are replaced by a strongly structured mental plan. Everything that should make his hand shake or increase his heartbeat, in other words make him doubt, has disappeared from the Phoenix's field of conscience, who is blinded by his ideals and illusions. 4. His feeling of being all-powerful, his megalomania, has swelled with each escape from being caught. In any case, he does not feel guilty. On the contrary, he considers himself the dispenser of justice! The feeling of guilt has therefore been completed rejected by his conscience and projected and attributed to others: his victims are the guilty ones. There are elements in the Phoenix's attitude and words which typically belong to the paranoid, especially the conviction of a plot, persecution and resentment: in this respect, the Inquisition ideally and mentally represents a summary of everything that can be imagined as traps, torture and concealment. 5. Without wishing to be paranoid, it is time to wonder whether all of this can be attributed to just one person. Since this case began, I have been amazed at what the Phoenix is capable of. The skills in both computing and art, which are developed in creating the CD, already appeared to be a rare occurrence; if you include all his movements, actions and knowledge, it seems reasonable to think that there might be a second person involved. The Phoenix could have easily subjugated someone in his circle of friends, led them into his convictions, dominated them and thereby taken advantage of the additional skills and expertise. 6. The hypothesis of the Phoenix heading up a sect indulging in satanic cults must logically also be taken into account. We could therefore tie all the different elements together by supposing that the pseudonym is the spokesman of a group of individuals acting in unison... To be honest, at this stage, the theory of a serial killer acting in isolation nevertheless appears to be the most probable, even if I am still confounded by his extraordinary abilities... Do not drop your guard, David Marcus |
E-mail #31 - Subject: Case round-up, From: Julie Massenet
Actually, have you received the latest analyses from the profiler? I though it was interesting and found that it fitted in nicely with own analysis of the case - here it is in full. 1/ Volker's murder. Contrary to what Hans Berthold of the Volker Institute said, I don't think that the theft of the cursed book was the motive for the murder. The super-8 film bears the hallmark of professionals, and they don't go round killing people just to steal. I reckon that Volker discovered something (related to an ancient book?) that he shouldn't have. 2/ The Phoenix's murders It looks as though the current murders have been painstakingly prepared and staged down to the most minute detail. The crime scenes have revealed the following characteristics: symbols of planets marked on the body, the inscription 'Sol Invictus', the whole setting inspired by ancient engravings (era?). Some victims and places appear to be closely related to religion (inquisition, secret societies, sects?) 3/ Link between the Volker case and the Phoenix This has got to be the key to the mystery. Before the murder in Oxford, Lorski was convinced that Volker's murder had something to do with some sort of dispute between traffickers. It was Helena Whitford's murder (and especially 'Sol Invictus' found near the body) that enabled him to draw a link between the Volker case and the current murderer. Even so, there's nothing to prove that the two cases are related. 4/ Coincidences It has to be said that there's a lot of strange coincidences: Volker was bumped off near Rhodes. Rhodes is linked to Helios, and Helios to the sun cult (Sol Invictus). In the Sol Invictus cult, you come across planetary references that can be found in the Phoenix's ritual and the CD-ROM (the 36 decans)... 5/ My interpretation Volker, guided by the 'cursed book', discovered the existence of a secret society associated with the cult of the Invincible Sun... This society decided to take him out of the picture - either to protect its existence or protect some secret reserved for initiates only (the cursed book might have contained a secret, which the sect didn't want revealed). If the Phoenix's victims belong to this secret society (which seems to be more and more likely), it remains to be seen what has caused the killer or killers to act 30 years later. I can't make head or tail or it. We'll probably know more in the next few hours. Take care, Julie |
E-mail #32 - Subject: I'm watching you, From: ----- Phoenix
I'm there, right near you. I'm watching you. You could almost feel my breath on your skin... See you later, my Little Friend. See you later, four The Phoenix |
E-mail #33 - Subject: Magic symbols, From: Julie Massenet
When you get on the Phu screen, there are esoteric symbols with the words 'In Memoriam'. I'm sure that I've already seen symbols like that in magic books. Julie |
E-mail #34 - Subject: Sound tool for Vari, From: Fe256
Sorted: you can download the sound tool from my site, which will help you to invert the voices on the Vari screen. http://www.fe256.net/ashpr58b/soundcracker.html CUL8R G. |
E-mail #35 - Subject: New tool being developed, From: Fe256
After having a quick look at level 6, I think we're gonna need a tool to tweak the sounds. I'll take care of it. CUL8R G. |
E-mail #36 - Subject: Origin of the names, From: SKL Network
Hello, One of the participants has sent us the following message, which might be important for what is to come. "After countless searching through different books on alchemy and astrology, I think I've found the origin of the names in the Phoenix's program. After establishing a connection with the names of Greek decans, I found their Egyptian equivalent: Tpi-Biu, Zont-Har, Biu, Si-Sesme, Sesme, etc... Egyptian gnostics considered the 36 decans of the astrological zodiac to be divine powers. The names on the CD-ROM would therefore correspond to Egyptian demons. Based on this assumption, my searches came up with the exact names on the CD-ROM in Hermes's Liber Sacer. The Phoenix's ritual therefore draws inspiration from alchemy. All that remains is to find the link between Hermes Trismegistus, the founder of alchemy, and Sol Invictus, the Phoenix's calling card." All the best, SKL Network. |
E-mail #37 - Subject: Vari, From: Marco Lerini
Ciao, Tahnks for the sound tool, Gery. I succeed in decrypting the first password: "umbra profunda sumus" I continue A presto, Marco |
E-mail #38 - Subject: Magic symbols (cont.), From: Julie Massenet
Brilliant! I found a site on the Internet that contains the symbols of the planets that the Phoenix talks about on the Pepisoth screen: www.demagia.net (Cornelius Agrippa at the bottom of the page) Julie |
E-mail #39 - Subject: Pepisoth, From: Marco Lerini
Ciao, For Pepisoth, I no know if you notice but the sounds change on certain points. Obviously an indication or it is maybe a trap. A presto, Marco |
E-mail #40 - Subject: Phu, From: Fe256
With the butterfly, you've got to click on a wing and then one of the antennas to generate the letters of the alphabet. CUL8R G. |
E-mail #41 - Subject: Giordano Bruno, From: Julie Massenet
Unbelievable! Why didn't I think of it sooner? By typing the names of the places where the Phoenix committed his murders on the Internet (Naples, Genoa, Geneva, Toulouse, Oxford, Paris), Giordano Bruno's itinerary popped up, and with it, part of the mystery. The Phoenix's ritual is therefore definitely related to Giordano Bruno and his description of the 12 planets (the pictures can be found on the site http://www.demagia.net): - 12 murders staged in 12 different ways to correspond exactly to the 12 planets described by Giordano (the images are on the site: http://www.demagia.net). - 12 victims apparently belonging to some mysterious, secret society dating back to the inquisition... - 12 places that go back over Giordano's itinerary some 4 centuries later (http://www.bruno-giordano.net) I can understand how Karen and Jack must have reacted at this revelation. They managed to suss out the Phoenix's itinerary, and after learning of new murders in Germany, they decided to head for Prague and put an end to the killing spree. One main thing still needs clearing up though: if the Phoenix is attempting to avenge Giordano Bruno, where does the Volker case fit into the picture? I sincerely hope that Jack and Karen won't be the next victims. Julie PS for Géry: I still live with my parents! |
E-mail #42 - Subject: my latest analyses, From: David Marcus
Hello, I was kidding myself that I wouldn't have any further involvement in this case. The latest developments merely add to my reluctance. Trying to understand someone first of all means that you must not judge them. In the case of the Phoenix, I emphasised right from the outset that it was dangerous to admire his intelligence. I warned you against the esthetic way that he staged his crimes. But I must acknowledge that I underestimated certain facts: 1. The inscription 'In Memoriam' found after the murder of the journalist gives us more than just a signature: it expresses the Phoenix's motivation, the banner by which he is persuaded to act. We knew that he was deeply into the past, and now we can see that he is violently bringing the past out into the present day. He is like the obedient and faithful soldier of El Cid, whose embalmed remains are riding out in front. 2. Giordano Bruno. What does this person represent? Giordano Bruno, who passed for the most learned scientist of his time and who read all the books published during his era, is the man that holds the absolute Knowledge. He is an unrivalled, overwhelming character, like a Father. But in the collective memory, Giordano Bruno is also the man that was condemned and burnt at the stake for his heretical ideas stemming from his overflowing imagination: consequently, at the same time he represents the danger of guilty ideas and the punishment of bad thoughts. This character is the focus o a large number of ambivalent fantasies. Between an overwhelming Superego and forbidden impulses breaking through into the Real World and without any acknowledgement of guilt and unable to find his bearings, the Phoenix, such as a bird reborn from its ashes, has escaped into the imaginary and the symbolism. He set out to look for anything that vaguely struck a chord in him, scorning what could have made him see common sense. Convinced of reaching the Truth, he misjudged himself. Madness is nothing more than an 'unconscious misfortune'. 3. Has the Phoenix become schizophrenic? We have already pointed out the Phoenix's taste for puzzles, the inordinate use of proper nouns, the systematic practice of codes and ancient languages and the fascination for myths and hermetic abstractions: we finally realise that the Phoenix has composed a personal symphony, an emanation of an imaginary world. His thoughts are dominated by syncretism and symbolics. The emotions hidden beneath a pseudo-cynical indifference give way to episodes of criminal impulses. Guided by the idea of exacting vengeance, by acting In Memoriam, the Phoenix seems to be going through a depersonalisation experience. 4. Watch out! The tension inside the Phoenix's psychological life has gone far beyond the threshold that most of us could bear. A brutal confrontation with an unexpected event could bring down the last barriers that intermittently hold him in check as part of his concern to communicate with you. Try to remain level-headed, David Marcus |
E-mail #43 - Subject: Cassiopeia 1572, From: Fe256
For the Chnoumos screen, Cassiopeia 1572 refers to a supernova in the Cassiopeia constellation discovered by the astronomer Tycho Brahe. The marbles supposedly represent the stars that need to be put in the right place. There must a diagram somewhere by Tycho Brahe that shows where they go. CUL8R G. |
E-mail #44 - Subject: [none], From: ----- Phoenix
I can see you, my Little Friend. Don't you believe me? I know you've just finished Chtisar, for example. I wouldn't bother calling the old bill - it's only a game. See you soon, four ... The Phoenix |
E-mail #45 - Subject: Message from Christina Lombardelli, From: SKL Network
Hello, Christina, Karen's Italian friend, requested that we send out this message on her behalf to all participants. "Hello everyone, My name's Christina. I'm Karen's Italian friend. I heard about this awful 'game' from a friend, and now I reluctantly see that I've been dragged into it. The purpose of this message is to thank you all for your support and let you know what the last news was that I received from Karen over the phone before she disappeared. She called me from Venice, whilst she was hot on the trail of the killer. She was convinced that she'd be able to help the police catch him. She gave me a quick rundown of his modus operandi, and in particular explained about his fascination for Giordano Bruno. Since then, I've done a bit of digging on Manus Domini. It's a sort of sect made up of Catholic extremists. Some of my friends think that it's an unofficial secret religious order that was created during the inquisition and which has survived through to the present day. After a bit of investigating, I managed to ascertain that at least 6 of the Phoenix's victims were more or less members of this organisation, including Antonio Foscarini, the journalist from Rome who was apparently investigating on behalf of the organisation. I don't know if this information will be of any use. Whatever the case, I hope we'll find Jack and Karen asap. Regards, Christina Lombardelli" |
E-mail #46 - Subject: Case round-up, From: Julie Massenet
Since Giordano Bruno's name turned up, I've found out a lot of stuff about him that I didn't know before, especially his thing for magic. One of my friends let me borrow the book by Yates called 'Giordano Bruno and the hermetic tradition', which is mentioned on one of the sites and which talks about this largely unknown aspect. The book is fascinating and reveals a whole load of disturbing facts about this character's hidden side. All that remained was to find the link between Hermes Trismegistus and Sol Invictus, which the Phoenix uses as a calling card at the murder scenes. I think I've found the answer in a famous book on magic called the Picatrix, which did the rounds during the Middle Ages and apparently inspired Lovecraft to write the Necronomicon. This old Arabic treatise, which was obviously written for the masses, goes on about the magic power of planets, stones, plants and animals. It credits Hermes Trismegistus as the inventor of these magic figures and above all the founder of Adocentyn, an ideal Egyptian city organised around a solar cult. Some people are even quick to associate Hermes himself with Akhenaton. Could the Picatrix be the infamous cursed book that the old bookseller was talking about? Did Volker have his hands on the original? I know it's all pie in the sky, but it's probably worth bearing in mind over the next few hours. Julie |
E-mail #47 - Subject: Nag Hammadi, From: Julie Massenet
After Jack and Karen, the Phoenix decided it was our turn to be put on the trail of Nag Hammadi (nagha mmadi). A load of stuff has already been written about the discovery of these ancient manuscripts in esoteric and religious circles. However, I came across a site devoted to this business and it could explain a lot of things: www.jim-leroy.net/gb Although there's no evidence to corroborate the facts given by the author, his theory is rather distubring and could explain what the Phoenix's motives are. Recap: After Jack published his article, the Phoenix started looking into the Volker case. He discovered the incredible journey of Nag Hammadi's cursed codex and managed to track down the people behind Volker's murder: the Manus Domini. In his fury, he decided to avenge Volker, who just like his 'master' Giordano, was the victim of religious fanatics. The Phoenix saw his vengeance of Volker as a way of allowing Giordano Bruno to be reincarnated in him (our friend the profiler could explain it better than me). That's when he put his symbolic ritual into action against this secret society, coldly killing 12 of its members that he'd obviously found on the Internet. All that ties in nicely. The one grey area that needs to be cleared up is what could be so special in the 14th codex that fanatics would kill someone (Volker) who'd decided to go public with its contents? Did Volker have the original version of the Picatrix as I've already suggested? According to my research on the matter, the Picatrix was written around 1000 AD, which makes it a lot later than when the Nag Hammadi manuscripts were reckoned to have been written. Where does that lead us? ? ? Might it have been a book on black magic that a group of superstitious fanatics wanted to destroy? Could it have been an unknown gospel whose contents would have clashed with the convictions of Catholic extremists? Maybe only the leaders of Manus domini know the answer. I'll carry on investigating. Julie |
E-mail #48 - Subject: Tycho Brahe, From: Julie Massenet
Tycho Brahe was one of Giordano's enemies. He didn't meet him in Prague, but in Wittenberg I think. Having read Giordano's biography, it appears that the Phoenix's victims have always been left in places related to Bruno's enemies. It was logical then that the Phoenix would leave new clues in front of the house where Tycho Brahe lived. Can anyone help me with Subos? Julie |
E-mail #49 - Subject: Help with Sichet, From: Fe256
To open Sichet, you need to play the video at the right speed. To speed the film up, move the pointer to the right, and to slow it down, move the pointer to the left. CUL8R G. |
E-mail #50 - Subject: Choutaret, From: Fe256
Have you figured out what message the Phoenix is speaking about? I've gotten Muhammed, but not the rest. CUL8R, G. |
E-mail #51 - Subject: Marco on the scene, From: Fe256
Nice one. The place where Jack and Karen are being held is an old abandoned factory in Cinisello Balsamo in the suburbs of Milan. Marco is on the scene and he'll keep us updated on his mobile. The police have been alerted. I just hope they won't get there too late. CUL8R Géry |
E-mail #52 - Subject: Cinisello, From: Marco Lerini
I just get here. I wait for police. I'm scared stiff - it's dark and crreepy. |
E-mail #53 - Subject: News???, From: Julie Massenet
Has anyone heard from Marco? I can hardly wait another minute. I wonder what the cops are up to? |
E-mail #54 - Subject: Police everywhere, From: Marco Lerini
it's good - the police arrive. There are police everywhere, even the ROS (Italian SWAT team). They try find esact place where J&K can be. Soon as I have news, I tell you |
E-mail #55 - Subject: imminent attack, From: Marco Lerini
The police are in position. They find esact place. Attack will start. |
E-mail #56 - Subject: I can't bear it any longer, From: Julie Massenet
I can't bear this any longer. Let's hope there aren't any snags |
E-mail #57 - Subject: What's going on?, From: Julie Massenet
What's going on? Has anyone got any news? |
E-mail #58 - Subject: Re: What's going on?, From: Fe256
No news. He's not answering his mobile. |
E-mail #59 - Subject: they are alive!, From: Marco Lerini
What a racket! The attack was short, but the police took time to find Karen in the undergound passages. Jack and Karen - they are alive! |
E-mail #60 - Subject: Re: What's going on?, From: Fe256
Sorted! I've just had Marco on the phone and he said the attack was well impressive. There were armed police everywhere all in balaclavas. They attacked and 20 mins later, Marco saw them bring Jack out, followed by Karen. They were a bit shook up. Marco has sent me some photos that I've put on my site: www.fe256.net/cinisello01 However, no trace of the Phoenix ! Jack and Karen haven't seen him for days. The main thing is that Jack and Karen got outta there in one piece. |
E-mail #61 - Subject: Re: What's going on?, From: Julie Massenet
The Phoenix almost caught us out, but WE WON! What a team, eh? Have you managed to get hold of the agency? Take care, Julie |
E-mail #62 - Subject: Jack and Karen have been found alive, From: SKL Network
Hello, Jack and Karen have been rescued. After being held inside an abandoned factory in a suburb of Milan, Italy, they were freed by police forces. They are in good shape and are resting up before being questioned by investigators. The Phoenix was not apprehended on the premises and, according to police, foresaw this outcome and escaped before the assault began. We thank you all for your participation, and wish to congratulate in particular the three participants who succeeded, through their intelligence and cool-headedness, in foiling this killer's plans. Kind regards, SKL Network. |
E-mail #63 - Subject: Latest info, From: David Marcus
Hello, Jack and Karen are safe and sound. We are all relieved at the outcome, which I must admit was not what I had expected. I managed to have a few words with them after they were freed. They have suffered and they will be mentally scarred by their long captivity. Having said that, they will make a full recovery in time. They gave me some information, which must remain confidential due to the ongoing investigation, but it confirms my convictions about the Phoenix's modus operandi. Fortunately, although striving for an irrational, lunatic goal, the Phoenix nevertheless followed a logic pattern: Jack and Karen were not members of Manus Domini, so the Phoenix did not have any reason to kill them. He was faithful to his logic right to the end. It is also possible that he looked on Karen as a sort of sister figure, given that she is also a victim of Manus Domini's criminal dealings. He therefore used them to share his conviction with us that there is a terrible plot against the truth - a sort of manipulation or censure at the highest levels against the broadcasting of certain details with the potential of challenging specific institutions, especially religious ones. Tomorrow, the police will publish a photo-fit of the killer, but there is every chance that the king of metamorphosis has already changed appearance as we speak. Don't change a thing - stay as you are, David Marcus |
E-mail #64 - Subject: Thanks, From: Jack Lorski
Hello, We heard from the SKL agency about the decisive role you played in setting us free. We would personally like to thank you for your help, which proved to be so precious. The Phoenix is in a class of his own - over the last few months, we've managed to see just how Machiavellian his intelligence is. The last few weeks have been particularly hard, as we've been locked up in the dark. Right up to the end, we thought the Phoenix would kill us as well. Looking back on it, we realise just how much he needed to keep us alive to achieve what he called his 'Work', but during our captivity, we always had the impression that our lives were hanging by a thread. We are going to try to return to normality and would like to thank you again for everything that you have done for us. Kind regards, Jack Lorski and Karen Gijman |
E-mail #65 - Subject: [none], From: ----- Phoenix
Everything was planned right from the beginning. Everything. Except for Jack's stubbornness. His dogged determination to following my trail initially drove me to distraction. But I didn't take long to realise that he and his girlfriend could help to achieve the Work, or at least play a part in making people aware of it. Because those two were not Chosen Ones. Everything was planned. Everything. I knew one day or another that someone would manage to decrypt the Work. If not you, it would have been someone else. I knew that they'd come and set them free one day or another. They came, but they didn't find me. When they went there to free them, I was already long gone. Far away. They won't find me. Ever. His Work achieved, the Phoenix spread his wings and flew towards to the sun. The black, invincible sun. |
Solutions & Other Information...


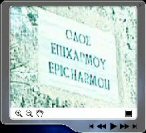


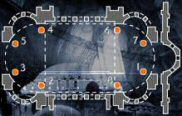

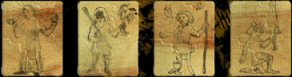
In solving a later puzzle in the game, I stumbled across a website ( http://www.demagia.net/bruno2.htm
) with information on the characters in this puzzle. I have included what
they read...
Sol The image of the sun (called the eye of the world, the lamp, the attentive guardian father, the sower and servant) is an eye that looks in all directions, observing and enabling us to see everywhere as if we all had one head, one eyeball, one whole eye; a noble, material image of God that can see the past, present and future all at the same time. All around him and in every direction, he radiates light, heat and the semblance of peace. |
Saturnus His skin is brown and he has a dangling beard, with long tuffs of hair covering his eyebrows. His skin is wrinkled, his eyes appear to be blazing, he is wild and to look at himself instills fear. (...) In his right hand, he is holding a stick, and in his left, olive and fig branches, as well as a vine shoot rich in grapes.
|
|
Apollo He appears to be a most charming shepherd, carrying a stick and a purse (...) he is a bright young man with a beaming face, pressing the blood of mutilated birds, and then mixing it and offering the drink of the divination.
|
Mars A stocky-looking man is rising to his feet, his feet bronzed and irascible, horrible to look at, judicious, severe, with a piercing look and fire in his eyes, smiling like a lion with his mouth wide open. (...) In his left hand, he is carrying an enormous sword that looks to be made of solid bronze with a rather stretched engraving of a dragon. |
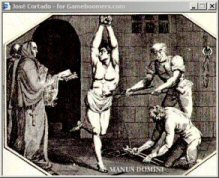


| Nephoemes (translated phonetically) for Gameboomers.com |
| 01) Fuh, Duh-nuh 02) Duh-nuh, Duh-nuh, Duh 03) *cry* Duh, Duh-nuh 04) Duh-nuh, Duh-nuh, Duh *gasp* 05) Looking for the 06) Sun. *sniffle* 07) *sniffle* Look for some 08) Fun. *sniffle* 09) Suk-uh, new-in 10) Me. |