The Inner World
By Studio Fizbin
Walkthrough by MaGtRo October 2013
Gameplay: This is a point and
click game.
Main menu has play, settings, credits and quit.
The German or English icons are for choice of language.
Settings has audio settings, screen settings and
game manual. Audio settings have volume adjustments for sound effects,
speech/movie and music. Screen settings have speech bubbles/subtitles and
fullscreen choices.
The ingame menu is accessed at top right of the
game screen or by pressing the ESC key. It has save game, continue,
settings, how to play, back to main and quit game.
? at top left is the puzzle help. It gives hints
to help move in the game.
Click- hold on screen or pressing the space
bar shows the hotspots.
Left click of an active item gives a choice of
look or use-talk action.
Inventory bar is at bottom of screen. Click an
inventory item to get selection of examining or using it.
To combine items, click-hold-drop an item over
another.
Dialogue choices are in cartoon-picture forms. If
a dialogue is exhausted, it will be grayed out.
Pressing the space bar also skips the intro or
cutscenes.
There is only one saved game file. It saves only
where you left off before closing the game or the spot where you click the
saved game link.
There is no load option. The game opens on the
autosave or where the last save was done - just like in casual games.
Asposia is a spherical world located in an enormous
hollow space surrounded by earth. It is ventilated by three big wind fountains.
Two of the wind fountains stopped and the wind gods, Basylians came. Air is
getting scarce.
The remaining working wind fountain is watched over by
Abbot Conroy. Abbot Conroy addresses the Asposians at the balcony of his palace.
He preaches austerity and obedience to appease the wind gods and hope that the
wind will return.
Waiting inside the palace is Robert. A naive
Asposian raised by Abbot Conroy. He's polishing Conroy's pendant. A bird
which he names Peck flies in. It shows interest in Conroy's pendant. When
Robert blows on the pendant, the silver fosfos changes color to white. The pendant is
important to Conroy because it reminds him of the most beautiful day in his
life as seen on the mural. The mural shows Conroy facing a Basylian and
protecting the Asposians that are standing behind him.
Robert is never allowed to the leave the tower.
Robert has a different nose than other Asposians. It has holes like a flute. Robert uses
a striped nose cover to look like other inhabitants.
Conroy enters the throne room, wears the pendant and asks Robert
to play for him. Robert uses his nose as a flute and plays Conroy's song.
The song has to have only one note and one beat.
The pigeon swallows the pendant from Conroy's
neck and dives in the garbage chute at right. Despite being told not to,
Robert follows the pigeon down the chute. Conroy calls the guard to get the
hedgehog.
Chapter 1 - The Quest for the Silver Fosfos
Obtain the Casual-Gamer achievement for using the
help system often.
Obtain the Mr. Wise Guy achievement for not using
the help system at all.
Obtain the Blabbermouth achievement by talking to
all the characters at least once.
Backyard:
Robert comes out of the garbage chute and tries to
catch the pigeon. It flies to a ledge that has a dead fish. A tutorial
follows.
Look around. Check the fosfos at top left. It
glows. Robert likes fosfos but Conroy hates them.
Check the old bottle on the ground below the
fosfos. Take the corked bottle of nodtarine juice. Check the pile of garbage at bottom left.
Garbage dealer: Click the
corked bottle of nodtarine juice on the garbage dealer. Learn that alcohol
is against the law. Obtain the Schnapps-Dealer achievement for showing
the nodtarine juice to the garbage dealer.
Talk to the garbage dealer completely. He's got
birdseeds. Not knowing the currency-money, Robert confuses the garbage
dealer. He will add a Conroy doll if Robert buys the birdseeds. Eventually,
Robert gets the Conroy doll and the birdseeds for free.
Items: Look at the wanted
poster of Laura. Check the wind turbine above the poster.
Check and take the windsock right of the
poster.
Check and take the crutch below the pigeon.
Check Conroy head at right.
Catch the bird:
Check the pigeon and dead fish. Try to catch the
bird. Try to use the crutch on bird or fish. They are too high.
Worm: Check the worm on
the ground and
try to catch it.
In inventory use the corked bottle of nodtarine juice to get
cork and nodtarine juice.
Pour the nodtarine juice on the worm hole. Pick up
the drunken worm.
Fish: In inventory
combine the crutch with the drunken worm to get slingshot.
Combine the slingshot with the cork from the
bottle to get loaded slingshot.
Use the loaded slingshot on pigeon first and then
use the loaded slingshot on the old fish.
The fish drops to ground. Robert keeps the cork
and frees the worm.
Windsock: Use the
windsock on the bird. The windsock is open at one end and didn't catch the
bird. Obtain the Pigeon-Tunnel achievement.
In inventory, check and then use the birdfeed. Find
out that the bag is empty but get a string.
Use the string with windsock to get net.
Bird: Use the net on the
bird. Laura arrives and takes Peck, her pigeon.
Robert checks the poster and learns Laura's name.
He has to get the pendant or Conroy will kill him.
Pick up the net. Try to pick up the fish
but it is greasy.
Garbage dealer: Talk to the
garbage dealer and learn that Laura is an outlaw and is the enemy of Conroy.
To keep the Basylians off his back the dealer
gives 20% of his earning to Conroy. There is a bounty on Laura's head.
Street with bars and Wind Fountain Square:
Go through the archway to be in the street with
bars. See the hedgehog come out of the garbage chute. Robert hears a familiar melody.
Asposian mother and baby:
Talk to the Asposian mother completely. She knows Laura, the one on the poster. The melody
is the lullaby her mother used to sing to her.
She will bring Robert to Laura if Robert gets her
baby girl named Conroy a strawbear yarn onesie.
Check the wanted poster, door and basement window
at right side of street.
Wind Fountain Square: Go
through the street to be at the fountain area.
Tailor: Check and talk to
the arms of the tailor behind bars. Learn about the tailor's life. Conroy
incarcerated him for his protection.
The tailor will make a onesie if he has: yarn, knitting
needles and knitting pattern. The strawbear yarn is what wind monks fashionables
robes are made of.
Guard: Go up the stairs.
Check the lunch box of the guard and the guard.
Talk to the guard and learn what he does. See that
he is afraid of Conroy.
Learn about the sin-o-mat. It is used to confess
sins to. The needle shows the weight of the sins confessed.
Go through the entrance behind the guard and be
upstairs. Check Conroyhead to get a flyer. Exit down.
Conroy's palace: Check
the view, wind fountain and palace.
Sin-o-mat: Check the
machine at right of the balcony.
Check the display and see the needle of the sin
gauge. It goes 0-100.
Check the sin-o-mat and then use it to confess.
Select the "no sin" dialogue. The output
compartment below opens to show a mint.
Exit (X) the dialogue and take the mint.
Use the mint to eat it. Obtain Fresh Breath achievement if you ate
a mint.
If you ate the mint - get another mint by doing
another "no sin" confession.
Obtain strawbear yarn:
Go back to the street with bars.
The Staggering Fosfos:
Check the bar sign above the entrance and the board left of door.
Enter the bar. Look around.
Talk to Ottilie the barmaid and owner of the
establishment. Ottilie gives a Lava streamer.
See the Wooloof and the wind monk at the slot
machine.
Wind Monk: Check the wind
monk. Talk to the wind monk of the Valleys. Laura left the right path. Learn what happened to
his valley wind fountain.
Check the swivel chair the monk is sitting on. It
is rusty.
Check the loose thread of his robe. Leave the bar.
Backstreet: Go right of the bar
to be at the garbage area.
Use the flyer taken from Conroyhead at the
fountain square on the old fish to get wrapped fish.
Strawbear yarn: Go back
to the Fosfos bar.
Use the wrapped fish on the swivel chair the wind
monk is sitting on. Now it is oiled.
Pull the loose thread of the robe to get
strawbear yarn.
Ottilie flirts with Maleus the wind monk.
Obtain the knitting pattern:
Bubble gum machine: Check
the bubble gum machine. Robert has a feeling that they are looking at him.
It needs coins to use.
Use the mint taken from the Sin-o-mat on the gum
machine. Get marbles. Leave the bar.
Detze the little boy:
Talk to the little boy. He has a treasure map of the Root forest. It looks
like a knitting pattern.
Detze freed the fosfos of the lighthouse. The Basylian treasure
he is hunting is made up
of their eyes in a chest.
Guard at fountain: Go
back to the guard at the wind fountain.
See a Basylian fly out of the wind fountain ad
attacks.
Check the poster at side of the guard house.
While standing left of the guard house, use the
Conroy puppet on the guard. Take the lunch box.
In inventory combine the marbles with the lunch
box.
Knitting pattern: Give
the lunchbox with marbles to Detze. Pick up the knitting pattern.
Get the knitting needles:
Petrified Asposian: Check the
destroyed house and petrified Asposian behind Detze.
Examine and take the petrified walking stick.
Ottilie: Go back inside the bar
and talk to Ottilie about Sin-o-mat.
She knows Conroy and Pandur personally. Maleus will
make three.
Ask about worst and new sins and Robert's sin.
Obtain the King of Sins achievement if
you thoroughly talked to Ottilie about sins.
Leave the bar. See that Ottilie is "on holiday".
Sin-o-mat: Go back to the
Sin-o-mat machine. Confess your sins to the machine.
Select Ottilie's sin dialogue. The machine
explodes.
Pick up the needle and a mint from
the output compartment.
Get a onesie:
Tailor: Go to the tailor
at wind fountain. Give the tailor
the needle, walking stick, yarn and pattern. Get a onesie. The tailor wants a companion - he's lonely.
Baby: Go back to the
Asposian mother and give her the onesie. The mother points Robert to go the Mechatre.
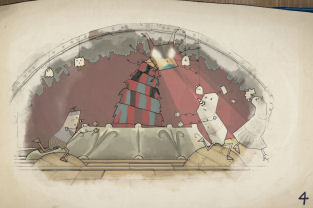
Mechatre:
See that this is an outdoor theatre. Watch the
story of Finus; a Conroy propaganda.
Stage: Robert notices
feathers on stage. Robert picks up pigeon feather.
Examine and try to open the trap door.
Open the trap door:
Screenplay:
Go back to the theatre. Look around the theatre-Mechatre.
Examine the screenplay above the control panel.
See 7 pages of the play script.
On page 7, see drawings that shows Conroy's thumb can be moved to
point up or down.
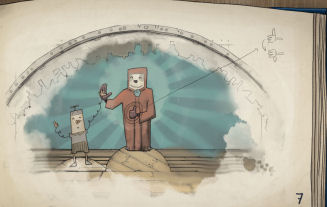
Control panel:
Examine the control panel and see the adjustments for the stage settings.
At bottom right is a wheel with pictures of parts
of the play: background, other characters, Conroy and the Basylian.
At middle bottom is a slider bar that changes the
features-actions of the one selected on the wheel.
Select a part of the play and move the slider to
each notch. See that the selected part changes.
Arrange the play characters:
Obtain the Trial and Error achievement if this puzzle is solved by trying
out things randomly (not sure when this will occur).
Cabinet: Open the door
below the control panel. See notation of a part of the play and number.
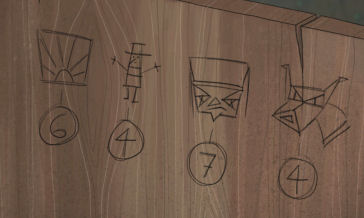
See that the background is #6, other characters is
#4, Conroy is #7 and the Basylian is #4.
Check the screenplay pages and see what is the
background on page 6, the positions of the other characters in page #4,
Conroy's position in #7 and the Basylian in page #4.
Use the control panel and move the slider to
show the selected screenplay positions-choices:
- other characters on #6 notch. Finus' parents
are petrified.
- background on #4 notch. The blue background
has sunrays.
- Conroy at #3 notch. Conroy has his thumbs
up.
- Basylian at #3 notch. The Basylian shoots
out beams from eyes.

Robert hears noises from the stage.
Stage: Go to the stage
and check the trap door. It doesn't open.
Turn Conroy's thumb to point down as shown by the
notation on page 7 of the screenplay. The trap door opens.
Fonk the hedgehog: See
Fonk the
hedgehog sniff Robert's trail. He destroys the control panel lever and
leaves.
Get the silver fosfos:
Robert lowers to the workshop under the stage.
Laura is upset about something she's working on.
Look around. See the silver fosfos on a
metal holder; Peck the pigeon is eating the old fish and Laura working at right wall.
Peck makes a noise whenever Robert moves out of
hiding.
Control desk: There's a
control desk at left wall.
Use the control desk's levers twice and see that
Conroy's hand-arm moves around and over the silver fosfos.
Use the net on Conroy's finger but it doesn't
work.
Glue: Check the burst
sack at left corner. It is Conrad's super glue: mix with solvent, shake and
glue.
Use the lava streamer given by Ottilie as solvent
on the burst sack-Conrad's super glue.
Combine the cork and the lava streamer with
miracle glue powder to seal the glass.
Use the corked up lava streamer with miracle glue
powder to shake it. It separates to miracle glue powder and cork.
Attach the net to Conroy's finger:
Use the control desk once to get Conroy image on stage.
Go on stage. Conroy figure is on its side. Use the glue on finger. Use the net
on sticky hand.
Go back down to the secret passage. Use the
control desk again. The net catches the silver fosfos.
Escape:
Laura catches Robert. She places the silver fosfos
back on the stand. The pendant was made by Laura's father. Laura wants to make it
glow. Robert blows on the fosfos and it glows. A movie is projected from the
fosfos.
See Laura's father try to warn Laura about Conroy.
Other Asposians with flute noses were turned to stone. Reminepo also mentions
saving the wind, the flute and root forest. Reminepo was taken away
by guards. A woman and a baby with flute noses are seen scared in the movie.
Robert realizes that Conroy lied to him about being the only one.
Conroy arrives and tries to take Laura. He orders
Robert to come to him. Laura and Robert escape in a rocket ship. The rocket
ship lands at the root forest.
Obtain the Chapter 1 - The quest for the Silver
Fosfos achievement for finishing the chapter.
Chapter 2 - The Secret Place in the Root Forest
Laura and Robert crashed in the Root Forest.
Robert tries to walk pass the bear traps. Laura leaves to find clues to the
location of her father.
Strange animal:
Gorf: The strange animal
eats the Conroy glove puppet. Try to talk to the strange animal.
Use the pigeon feather on Gorf the strange animal.
Pick up the Conroy glove puppet that was spat out by Gorf.
Now talk to Gorf completely. Learn that Gorf is a
very dangerous animal. Gorf has poisonous secretion; his tail can kill and
his claws and teeth are sharp.
The traps were set by a crazy old man-a wind monk.
The monk is protecting a secret place in the Root forest. Gorf can only move
in sturdy rocks because his claws sink in soft soil.
Get a nut:
Check the skid marks on the ground, swamp and the
signs on the tree at right.
Debris: Check the debris of the ship at bottom left. Take the funnel helmet.
Tree: Check the tree at
left and note the huge tree fruits hanging up the tree.
Use the funnel helmet to get Robert to wear it.
Use the tree and Robert kicks it. A nut falls from tree and breaks up.
Get the Brainteaser achievement when the
nut breaks after hitting the funnel helmet.
Thorny bush: There is a
thorny bush in front of the tree. Use the Conroy glove puppet on thorny bush
to get thorny branch.
Go to the traps and see if the thorny branch works
with the traps. No good.
Catch tumble mouse: See
that while Robert is by the trap; a white fuzzy tumble mouse comes out of
hiding and flies by the hollow in the trunk.
Use the thorny branch on the hollow of the tree
left of Gorf.
Go to the trap again or away from the thorn branch
to get the tumble mouse flying. It gets caught on the thorny bush. Take the
tumble mouse.
Get a nut: In inventory
combine the tumble mouse with the funnel helmet.
Use the padded funnel helmet. Use the tree
and Robert kicks it again. A nut falls down from the tree to the ground.
Disable the traps:
Go to traps and use the nut on the traps.
Obtain the Windfall Fruit achievement.
The nut is slippery and Robert can't throw it.
Use the nut with Gorf's claws. Gorf punches 3 holes
on the nut ala bowling ball.
Use the tree fruit with holes on the traps.
Trapped: Robert gets a
strike! Robert gets caught in a rope trap. Laura arrives. Robert is pulled
up the treetops upside down.
See a red robed wind monk. Pandur uses an ear
trumpet to hear. He hears Laura and shoots at her with his crossbow.
Play as Laura.
There's an empty small box in inventory.
Look around.
See the fired arrow on tree trunk. An empty
screaming ants nest is above Laura. There's a skeleton above that has a weird helmet
and neck pouch. A clothes line is strung across the trees above
Robert.
Robert: The rope that
holds Robert is inside a hook. Talk to Robert.
Pandur, the wind monk hears Laura and fires
another set of arrows. He also pulls on Robert's rope and the hook starts to
unravel the rope.
Talk to Robert again to see what happens. The wind
monk fires again and pulls the rope holding Robert. The hook falls off the
tree.
Go down to the forest floor and pick up the
hook.
Gorf: Talk to Gorf. Learn
that he has an itchy spot on top of his head. Learn that Pandur dropped his glasses
in the swamp. Pandur is deaf and nearly blind.
Use the hook on the dry spot on top of Gorf's
head. Get Gorf-Scratcher achievement by
using hook on dry spot.
Get Pandur's glasses:
After learning about the glasses in the swamp;
check the swamp between the trees at right.
Examine the spot in the swamp. Examine and take the
reed left of the tree that
goes to the tree house.
Use the reed on the spot in the swamp. That
doesn't work.
Obtain the Master of Stirring by stirring the
swamp with the reed.
In inventory combine the reed with the hook. Use
the reed with hook on spot in swamp to get glasses.
Pandur: Climb up to tree
house. Use the glasses on Pandur. After some dialogue,
Laura decides not to give the glasses.
Obtain the Suicide achievement.
Go back down to the forest.
Find clues about secret location.
Strange guys camp: Go
right into the forest. Talk to the strange guys. They are doing aerological
research. The fourth guy - Simon is lost.
Simon made the globe. Learn about Aerology. The
box measures the wind currents and they chart it on the Aerica Charta.
The box run out of fuel and has honey in it. It
shoots out paper airplane at specified positions.
The fuel is mud: made up of swamp water and sand.
There's a spot in the forest that might be a wind
fountain. The map is not complete - it needs more reading. Laura hopes that
the spot in the forest is where dad is.
Box: Check the tank,
machine and exhaust pipe of the box. See that the guy at right sits on a saddle.
Bring Simon back to camp:
The aerologists do not want to give Simon's globe
to Laura. They are still waiting for Simon.
Scream-ant: Try to exit
the camp and hear a scream. Examine the screaming spot on the rock left of
the sleeping aerologist.
Use Pandur's glasses on the screaming spot. See a
scream-ant. Use the empty small chili box on the scream-ant to get quietly
screaming pillbox.
Exit the camp and climb to tree house.
Release the scream-ant on the empty screaming ants
nest.
Pandur hears the scream and shoots at the tree.
Simon: Climb the arrows
that made steps.
Examine and take Simon's hat. Simon's skull
is taken.
Examine and take money bag to get pointer. See flies around the skeleton.
Globe: Go back down to
forest and go right to camp. Give skull to the aerologists to get globe.
Get fuel for the box:
Use globe in inventory to get 2 halves of the globe. The
globe has holes.
Go back up to the tree house and up to Simon's
skeleton.
Look at and take moss below Pandur. Go down
to forest floor.
Get swamp water:
Use moss on 2 halves of globe.
Use the 2 sealed halves of globe on swamp
behind Gorf to get swamp water.
Get sand: Use hook on the
skid marks made by the ship. See a sand stream.
Use the empty sealed half of globe on sand stream
to get sand.
Combine the 2 halves of globe to get mud.
Gorf: Try using mud on
Gorf's dry spot. Hmm...
Fuel the tank: Go back to
the camp at right.
Examine the tank opening and see it filled with
honey.
Use reed on tank opening. Laura drinks the honey.
Pour the mud in tank. The box is now fueled up.
Talk to aerologists again.
Get one wind current reading:
Use the machine and see that it points to 3
locations: Gorf, Pandur and into forest.
Get forest reading: Point
the machine to the right - into the forest.
Press-use the trigger button on the ground. See
the machine shoot out a paper airplane and comes back.
The aerologist reads the paper and updates the
wind map.
See also that Gorf eats the paper airplane and
Pandur shoots the paper airplane.
Get wind current reading by Pandur:
Tumble mouse: The tumble mouse
is stuck on the branch of tree. It is too high.
In inventory, combine the reed with hook. Combine
it with the pointer.
Use the reed with pointer and hook with tumble
mouse.
Pandur: Go to Pandur at
tree house. Use the tumble mouse on his ear trumpet.
Get reading: Go back to
camp.
Use the machine to turn it to face the monk-crazy
old man on the tree top.
Press the trigger button. The paper plane comes
back and the wind map is updated.
Get wind current reading by Gorf:
Go left to forest. Take the arrow that fell
when Pandur shot at the paper airplane earlier.
Gorf: Gorf eats the
airplanes that passes by him. Talk to Gorf about the paper airplanes. It is
Gorf's instinct that makes him eat anything flying around him.
Get flying things:
Remember that flies surrounds Simon's skeleton.
Go back to camp and check the exhaust pipe. There
is still honey in the pipe.
Use the arrow on exhaust pipe to get arrow with
honey.
Go back to Simon and the flies at tree house.
Use arrow with honey on flies above Simon to get
arrow with flies.
Gorf: Go down to Gorf.
Use arrow with flies on Gorf's dry spot. That
solves his itch and instinct to eat flying things.
Get reading: Go back to
camp.
Use the machine to turn it to face the strange
animal at edge of forest.
Press the trigger button. The paper plane comes
back and the wind map is updated.
Secret of the Root Forest:
Aerologist: The
wind map is compete. The aerologists are very excited to find a new wind
fountain. They left in a rush to tell Conroy.
Laura takes the wind map they left behind. Take the saddle.
Robert: Go back to Robert
at tree house.
Use the saddle on the clothes line. Laura uses the
saddle to get to Robert. She uses the tip of the arrow to cut Robert loose.
Obtain the Chapter 2 - The Secret Place in the
Root Forest achievement.
Chapter 3 -The Abandoned Dynasty
Robert and Laura walk to the secret place in the
Root Forest.
Play as Robert.
Move Gorfelina:
Look around. Check the sleeping fosfos, branch of
tree, bricks on wall, remains and stone at right.
The petrified remains is a possible Asposian. The
gate is locked.
Pick up the rope ladder and it breaks to get
ladder rungs. Take the petrified arm on the ground.
Gorfelina: See a Gorf
sitting on top of a remain - petrified torso. Talk to Gorfelina. Laura and
Gorfelina are not civil to each other. Ladies, please...
Get another stone for Gorfelina:
Check the stone at right. Try to move it. It's too heavy.
Use the stone arm on the stone. Robert tries.
Examine and talk to Laura. Learn more about her life. This place is
familiar to Robert.
Laura positions the arm to prop the stone at right.
Use the ladder rung on the spot under the rock.
Use the jacked up stone to take the stone arm.
Push the rock on rolls. The stone is now beside
Gorfelina.
Court Gorfelina: Convince
Gorfelina to move to the other stone. Flirt with Gorfelina until she moves.
Take the stone torso.
Open the Gate:
Petrified Asposian: Use
the stone torso on the remains facing the gate. Add the stone arm.
See that the Asposian is
playing his flute nose. He has his fingers on the first and last holes.
Using your keyboard numbers: hold down #1 and #4
keys at the same time.
Robert plays his flute nose. The fosfos awakens
and lights up. The gate opens.
Fosfos: See that the
awakened fosfos is surrounded by color moths. Laura says the color moths
color everything beside it.
Halls of Dynasty:
Laura recognizes a painting on the wall as done by
her father. It shows 3 rings one on top of each other; the largest on top
and the smallest at bottom. An arrow points to the lowest-smallest ring.
Steve: Meet the
receptionist. Steve says that it is a painting by Kavanosa Canosostri.
Robert eats the cookie given by Steve. He also
gives 2 passes to the inner courtyard.
Talk to Steve. Steve faces the mirror and Pete the
boss appears in the mirror.
Talk to Pete by presenting the questions to Steve
- his alter ego or split personality.
When dynasty is mentioned, Pete remembers a song.
Pete starts to sing but it upsets Steve. Steve throws a rolling pin.
Continue talking to Pete via Steve.
The tickets
given are only for the inner courtyard and not the ruins. The ruins can be
accessed only by use of golden passes. The family that used to live here has
golden passes.
Inner Courtyard:
Steve brings them to the inner courtyard. Look
around.
Check the rusty shield beside Steve; petrified
Asposians, nodtarine bed and jump rope.
Talk to Steve again. Learn about this place.
Go back to reception area.
Reception Area:
Pick up the rolling pin thrown by Steve.
Talk to Steve again. The ruins door is opened by the
golden key in front of Steve.
Pete will remember the rest of the song if he gets
fresh air and is out of here.
Look around. Check the oven, fire beetles and
ingredients behind Steve.
Get golden passes:
Inner courtyard again: Go
through door to inner courtyard.
Take a bunch of nodtarines and the jump
rope.
Take mushrooms that when placed in ears can
make one deaf.
Take the golden carpet in front of big
door. Check the big door.
Check the dynasty ruin outside the walls.
Reception area: Take the
golden tassel from the cordon metal stand by the door.
Gorfelina: Exit to
the gate. Give bunch of nodtarine to Gorfelina. She's allergic to flowers
but not to Robert. Obtain the Casanova
Casonostri achievement for trying to give flowers to Gorfelina.
Fosfos and color moths: If the
color moths are by the shrubs, see them release green powder.
Go close to (try to use) the fosfos and color
moths. They fly away to be on the tree at left. They then release
brown powder.
Note: Before you use the golden carpet - as
stated
below- do the Build the stairs to the top wall and Make a color moth
parts. You will then get brown passes.
Use the brown passes with Steve and learn that
the brown passes gain access to the royal toilet. The toilet is busted.
Get the Royal Toilet achievement. (Info
taken from Steam forum).
Go there and they move back to the right.
Use the golden carpet on the branch of the tree.
Try to use the color moths at right and they move
to the golden carpet. Now they release golden powder.
Build stairs to the top of wall:
While outside, check the brick left of gate.
While outside, use the rolling pin on the lowest
brick.
Go inside and see the 2 bricks.
While inside, use the rolling pin on the middle
and then bottom bricks. Now all of them are outside.
Go outside.
While outside, use the rolling pin on the top, the middle
and then bottom brick. Now all of them are inside.
Color moths: Try to use
the color moths so that they go to the golden carpet and release golden
powder.
Make a color moth: Go
back inside.
Look
close at the drawing of Laura's father. Take the 2 pins at middle
left.
In inventory combine the guest passes with the
tassel. Add the 2 pins to the handicraft. Hang the handicraft by combining
the jump rope with the handicraft.
Climb up the 3 bricks and then to the wall.
While standing at top of wall, use the handicraft
with the golden color moths by the tree. Get golden handicraft.
Use golden handicraft to get golden passes.
Dynasty Ruins:
Use the golden passes with Steve.
Inside the wind chapel, look around. Examine the
petrified male at central ring and the petrified female at bottom row.
Check the crystals at ends of middle row.
Check the small ring at ceiling. It looks like the
drawing done by Reminepo at reception room. It has fosfos drawn on it.
Talk to Pete: Check the
water basin. It is empty.
Use the bunch of nodtarines that has juice that is
as smooth as glass with the empty water basin.
Steve sees Pete in the juice reflection.
Talk to Pete via Steve. Pete grew up here contrary
to Robert's wrong palace. Learn about the rings at ceiling.
The petrified man is Ocarino Gustus II, head of
dynasty. Majoria, Ocarina's wife should have been beside him.
Pete sings the song but forgot the middle notes.
Pete needs fresh air to remember.
Get Pete to fresh air:
The crystal breaks. Pick up crystal shards.
Distract Steve: Talk to Laura
to distract Steve. Laura can't do it after a few words with Steve.
Give mushrooms taken from inner courtyard to
Laura. She uses them on her ears and tells Steve to ramble on.
Clean the shield: Exit to
inner courtyard and check the rusty shield.
Go to to reception area. Take the grater
right of mirror.
Try to use the grater on the shield in inner
courtyard. That didn't work out.
Go to Gorfelina outside the gate. Use the grater
to scratch her and get corrosive grater.
Use the corrosive grater on the shield at inner
courtyard.
Pick up the rust flakes on the ground.
Talk to Pete: Go back
inside the ruin and tell Laura to stop now. Exit the chapel.
At reception area, talk to Steve about courtyard
guided tour. They go to inner courtyard.
Steve sees Pete on the shiny shield. Talk to Pete
via Steve.
Learn that the inner courtyard was for the people
waiting to get an audience with Ocarino Gustus II. Pete says that it is his
fault that the attack happened. He allowed someone in. The door is the only
entrance to wind chapel but not the only exit.
Hear the song. Pick up the stone dust that
fell when the wall crumbled.
Pete says to go to the wind chapel.
Wind Chapel: Talk to Pete
via Steve. Ask for the song again.
Pete sings the song. Now all the fosfos on the
lowest ring at ceiling lights up.
Look close at the fosfos and see that there are 4
dots-holes under each one and the leg(s)of the fosfos covers some of them.
Make key to wind chapel:
Distract Steve again: Give the
mushrooms to Laura again so that she can distract Steve.
Make dough: Go back to
reception.
Take the baking
book at bottom left of screen.
In inventory, read the baking book to learn the
recipe for soft cookies: sugar, nodtarine juice, flour and chocolate flakes.
Use the crystal shards for sugar, bunch of
nodtarines, rust flakes for chocolates and stone dust for flour on the
mixing bowl right of the mirror.
Use the crank of the mixer. Take the mixing
bowl with dough.
Bake a key: Check the
case on the counter and see that it has the key shape.
Use the mixing bowl on the case. Use the dough
filled key case on the oven.
Heat the oven: Read the
poster above the oven. You have to insult the fire beetles to raise
temperature.
Talk to the fire beetles under the oven. Select
insults as dialogue. Robert quotes the words Conroy yelled at him.
Robert praises the fire beetles to get them to
cool down.
Key to Wind Chapel: Use
the Conroy puppet glove on hot oven.
Get baked key and burned Conroy puppet
glove.
Wind chapel: Go to wind chapel
and tell Laura to stop.
Laura: Talk to Laura.
Robert says that this place seems familiar to him.
Wind chapel:
Go back to the reception room to take Steve out of
here.
Go to inner courtyard. Use the baked key on the
big door. Enter the chapel.
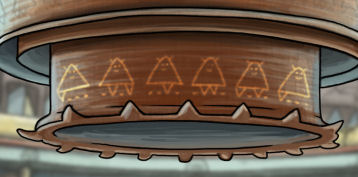
Flute nose music: Look
close at the fosfos at the ceiling.
See that there are 4 dots-holes under each fosfos and
the leg(s) of the fosfos covers some of them.
Click on the flute at bottom right to show the
flute with the 4 holes at bottom of screen.
Using your keyboard numbers: press the hole(s)
that is covered by the legs of the fosfos; reading it from left to right.
Press holes (left to right): 1 --- 2 and 4 together
--- 3 --- 2 and 3 together --- 1 and 3 together and 1.
If done correctly, all fosfos glows. Laura asks
Robert to play it again. Robert stands on the dais across Ocarino Gustus
II.
The rings at the ceiling goes down. Laura gets a
sack of marbles from the lowest ring.
Obtain the Chapter 3-The Abandoned Dynasty
Completed achievement.
Chapter 4 - The Secret of the Basylians
Hangar:
The floor gives in and they fall down the hole to
land in a large factory.
They see Basylians. After a while, Robert realizes
that the Basylians are machines.
Laura says that only her father can build such
machines - so she leaves to look for him.
Laura throws a note to Robert. Read the
note in inventory. It says "Hey! Look over there!"
Look around. Check the flag and windup box. Look
at the coffee pot and coffee filter.
Passageway:
Try to follow Laura. Go to the passageway at right
end of the walkway.
Parakeet: See a parakeet
in a cage and 3 soldiers marching on footprints on the floor.
The parakeet whistles to signal them to start
marching to the other corner.
Talk to the parakeet. Learn what Conroy plans for
the Basylians that are being made. Conroy wants to conquer Asposia.
Examine the guards. They just follow the
footprints. Hmm...
Alarm bell: Check the
alarm bell beside Robert. Try to take the alarm bell and get a hammer.
Get tools:
Mechanical Basylian: Go back to
the hangar at left. Check the mechanical Basylian.
Guard Mechanic: Examine the
guard reading nearsightedly at a schematic.
Check the round construction piece, clear varnish
bucket and Allen wrench around the guard.
Talk to the guard. Robert asks the guard for
permission to take the tools. The guard says no because Robert is obviously
not a mechanic. Learn about Conroy's new flag.
Use the hammer on the guard's knee. The guard
kicks the round construction piece and it knocks off the exclamation point of
the sign under the tunnel.
Take the exclamation mark. Hmm... That
looks familiar.
Be a mechanic:
Dead guard pictures: Check the
row of pictures on the wall.
See that the pictures are of guards that passed away. They have black bands.
Below the pictures are rhyming epitaph on the
monument-plaque.
The left picture is of a mechanic guard, middle is
a standing guard and right is a marching guard.
The mechanic guard's picture is loose. Take the
picture-poster.
Guard: Go back to the
guard. Use the poster on the guard.
The guard asks for the mechanic guard's code.
Select any number, color and number.
Get ID code: Go back to the
row of pictures.
The standing guard and marching guard has an ID
code at last line of the monument. The mechanic guard's ID code is blurred.
Read the epitaph and note that the last word of
each line rhymes with the code.
The standing guard's last word on first line is
boar which rhymes with 4; middle is fight which rhymes with white and last
line is hen which rhymes with 10.
The marching guard's last word on first line is
alive which rhymes with 5, middle is crack which rhymes with black and last
line is spine which rhymes with 9.
Going by that pattern; the mechanic guard's
epitaph: mate - eight 8; fellow - yellow and pen - 10. The mechanic guard's
code is 8 yellow 10.
Guard: Use the picture on
the guard again. Select 8, then yellow and lastly 10.
Take the clear varnish and the Allen
wrench.
Go pass the parakeet and soldiers:
Get flag: Use the Allen
wrench on the wind up box below the flag. The flag is lowered. Take the
flag.
Make footprint: Check the
coffee pot and coffee filter. There is coffee powder on the filter.
Use the clear varnish on the coffee filter. Pick up the coffee pot with black varnish.
Combine the coffee pot and the exclamation mark to
get exclamation covered in black varnish.
Parakeet: Go through the
passageway and be behind the parakeet again.
Talk to the parakeet. Use the flag on the cage.
Robert covers the cage with the flag. The parakeet goes to sleep.
Soldiers: Remember that
the parakeet whistles to get the guards marching.
Use the flute by clicking the flute at bottom
right of the inventory bar. Click on any number 1-4 of your keyboard.
Move the guards to empty the corner where the
birdcage is located.
Check the broken bridge at edge of the walkway.
Use the exclamation covered in black varnish on
the broken bridge. Robert makes a new set of footprints for the guards.
Use the flute again to get the guards marching.
Watch as they march over the broken bridge to the abyss.
Go pass the soldier guarding the High Tech Lab:
Go to the entrance at other side of the platform.
See a guard standing by the stairs and the High Tech lab.
The guard wants to arrest Robert because he looks
like the one on the wanted poster.
Try to use the dead mechanic's poster over the
wanted poster. The guard stops Robert.
Give Laura's note with "Hey! Look over there!"
written on it to the guard.
Guard looks around and when he's distracted - use
the mechanic's poster over the wanted poster.
The mechanic's face looks like the guard. The
guard arrests himself and leaves.
Reminepo:
Enter the High Tech Lab. See Reminepo and Laura.
Reminepo is suspended in a glass case and telepathically moving the arms to
make Basylian parts.
Reminepo is aware of what happens outside. The
arms embraces Laura.
When he stops making parts - see a weird guy trying to swat a fly below the
lab. The weird guy swats the red button and gives an electric shock to
Reminepo.
Talk to Reminepo twice. Every time a repeat of the
hugging scene occurs; electric shocks happen.
Obtain the Chief of BBQ achievement by giving Dr.
Reminepo many electric shocks.
Look around. See the mechanical arms at right
conveyor belt and the assembly line at left. Reminepo controls the arms. Check the blueprints on the wall.
Take the hand-replacement fist on the left
box by the assembly line.
Lift: Check the lift at
right wall. The lift button is missing. There's only a hole.
Weird guy: Look through
the grate on the floor at right.
See the weird guy under the lab. Check the lift
and lift button on right wall. Go back to lab. Exit the lab at left.
Palace:
Climb the stairs. Exit through the throne. Robert
looks around and the opening on the throne closes.
Robert hears a sound coming from the painting.
Look around.
Medicine cabinet: Check
the medicine cabinet. Get fish oil and knock out drops.
There are more Basylians flying outside. One looks
through the window and shoots a petrifying beam.
Painting: Examine the
painting. Robert heard clicking sounds from the painting when the throne
exit started to close. He needs a clue.
Throne: Sit on the throne
and a spring pops out. Robert takes the spring.
Model: Examine the model
at bottom center of screen. It is Conroy's view of his Asposia.
Take the model Basylian by the right model.
Fonk: Check Fonk the
hedgehog, Robert's nightmare. Pick up one of the hedgehog's quill
from the floor.
Give Conroy's puppet to Fonk. Fonk attacks it. Pick up
the puppet.
Use knock out drops on Conroy's puppet. Give the
puppet with knock out drops to Fonk. That didn't stop the hedgehog.
Obtain the Hedgehog-Anesthesia achievement for
trying to knock out Fonk. Pick up the
puppet.
Piece of Art: Go left and
check the piece of art left of the models. Use the piece of art and it opens
to show Conroy's secret stash of powdered sugar.
Check the powdered sugar. Try to take some but
Robert doesn't want to use his bare hands. Use Conroy puppet with powdered sugar.
Give the Conroy puppet with sugar to Fonk. Ah - the
hedgehog becomes ultra-active.
Diamond: On the way out
the balcony, Fonk breaks one of the chandelier. Pick up the diamond.
Get out of throne room:
Robert needs a clue to find the sound on the
painting.
Use the Basylian model with the powdered sugar.
Use the dusty Basylian model on the
painting behind the throne.
Robert dusts the whole painting. See fingerprints
on Conroy's chest.
There's notch where the fingerprints are located.
Use the notch; it's too small.
Use the hedgehog quill on the notch. The throne
opens. Go through to be at the hangar.
Release Reminepo:
Take care of weird guy:
Go back to the lab.
In inventory combine the replacement fist with the
spring from the throne to get fist with spring.
Use the fist in spring with the lift. Robert
places it inside the empty lift.
Check the weird guy through the grate again.
Use the fish oil on the lift button. The fly lands
on the fish oil covered button. Weird guy swats; lift door opens.
The fist with spring misses the weird guy but
stops under his nose.
Do it again: Take the fist
with spring from lift.
Add knock out drops to fist with spring to get
primed fist with spring.
Use primed fist with spring on the lift. Robert
places it inside the empty lift.
Check the weird guy through the grate again.
Use the fish oil on the lift button. The fly lands
on the fish oil covered button. Weird guy swats; lift door opens.
The weird guy
is knocked out now.
Reminepo: Reminepo
can move freely now.
After embracing Laura, the mechanical arm removes
the blueprint and points to a diamond. Reminepo wants a diamond.
Give the diamond to Reminepo. Reminepo makes a
cutter and releases himself.
Laura is his little tumble mouse. Reminepo
interrogates Robert about his intentions.
Dynasty: Upon realizing that
Robert has a flute nose; Reminepo tells the story of what happened to the
dynasty.
Learn that the dynasty is made up of Asposians
with instruments noses. They make music to create the wind.
The wind monks were Maleus, Pandur and Conroy.
Ocarino and his wife Majoria; the leaders of the
dynasty rejected Conroy's bid to revive the death penalty. Majoria carried baby
Ocarino-Robert.
Conroy threatened to harm Laura so Reminepo helped
him build his wind gods - Basylians.
Conroy attacked the dynasty and petrified them.
Majoria did not escape with the baby.
Robert was spared because he is needed to make
some wind. That is why he makes music for Conroy.
A whole orchestra is needed to make enough wind
for the world.
The marbles are anti-petrifying and should be used to
unpetrify the whole orchestra.
Obtain the
Chapter 4 - The Secret of the Basylians achievement.
Chapter 5 - Asposia's Last Hope
Hangar:
Reminepo works to install the depetrifying marbles on a Basylian.
Robert's true name is Ocarino Gustus III; the heir
to the throne. Laura
cannot believe it.
Conroy appears and turns Reminepo and Laura to
stone. Before Laura is turned to stone; she pushes Robert into the Basylian
with depetrifying marbles.
Robert flies all over Asponia and crash lands at
the inner courtyard of the dynasty ruins.
Get the Basylian out of the ground:
Inner courtyard: Examine the
Basylian. The motorhood is the only part of the head of the Basylian that is
accessible. We need the depetrifying eyes of the Basylian.
Check the brake parachute. Take the shiny shield from the ground.
Wind chapel: Go to the wind
chapel. Look around. Examine the petrified dynasty.
See and take Peck, Laura's pigeon with the
old fish.
Pick up the sleeping fosfos.
Reception: Go to the
reception area. See Steve.
Pick up the sleeping fosfos.
Gate:
Go outside. See Gorfelina.
Pick up the sleeping fosfos.
Basylian: Go back to the
inner courtyard.
Use the 3 sleeping fosfos on the brake parachute
of the Basylian.
Wake the fosfos by playing the flute. Click on the
flute at right end of inventory bar. Press on any number from 1-4 of your
keyboard.
Robert plays the flute. The parachute is raised
and the Basylian head is out of the ground.
Focus the depetrifying beam to the wind chapel:
Place the shiny shield on the flower bed full of
wilted nodtarines. Press the red release button at back of the Basylian. The
beam hits the wall.
Turn the shield a little again. Press the red
release button at back of the Basylian. The beam hits the door of the wind
chapel.
Turn the shield a little to face right. Press the
red release button at back of the Basylian. The beam hits the Basylian. The
motorhood opens and exposes the brain. Robert takes the round Basylian
brain.
Turn the shield a little back to middle position
that will hit the door of the wind chapel.
Align the beam to center of wind chapel:
Go inside the wind chapel to see what happened in
there.
Examine the Basylian beam hole at protruding
wall-pillar at right. So the shot missed.
There's a decoration above the hole. There is a
hook at center of the bottom ring of the tube suspended at ceiling.
Steve-Pete: Go back to
reception room. Talk to Steve and Pete.
Try to take the mirror. Steve-Pete start to argue.
Talk to Steve-Pete about the mirror.
Realize that Steve became mad because of his guilt
in letting Conroy inside the dynasty 15 years ago.
Steve hits the mirror and breaks it. Steve is
knocked out.
Try to pick up the mirror shards. The shards are
too sharp.
Take gumballs from the counter.
Gorfelina: Go outside and
talk to Gorfelina. She worries that she has bad breath. Give gumballs to Gorfelina for her bad breath.
Use the round Basylian brain on the bubble blown
by Gorfelina. Get sticky Basylian brain.
Mirror: Go back inside to
reception.
Use the sticky Basylian brain with the mirror
shards on the counter.
Robert rolls the sticky Basylian brain on the
shards to get mirror ball.
Wind chapel: Go back to
the chapel.
Hang the mirror ball on the hook under the lowest
ring of the tubes at center.
Conroy:
Hear a crash. Conroy enters the chapel. He is
holding a petrifying gun on Robert. Conroy tells Robert his plans.
Throw the fish or Peck at Conroy. Conroy shoots
Robert and gets himself thrown backwards through the roof.
Petrified Robert breaks out of the stone
encasement.
Basylian beam: Go to
inner courtyard. See Conroy's Basylian crashed on left wall.
Check if the shield is in middle position to focus
at wind chapel.
Use the old fish on the red release button of the
Basylian at right.
Go back to wind chapel.
Conroy enters again. It's a rerun of the previous
encounter.
Throw Peck at Conroy. Peck flies outside and goes
to the old fish on top of the red release button.
Peck pecks on the fish and presses the button. The
Basylian shoots a depetrifying beam that enters the wind chapel.
It hits Conroy.
Obtain the Just a Scratch achievement for using the depetrifying laser on
Conroy. It didn't work.
Basylian beam part 2: Go
to inner courtyard. Take the orange petrifying eyes off Conroy's Basylian.
Take the blue depetrifying eyes from Robert's
Basylian at right.
Use the orange petrifying eyes on the eye socket
of Robert's Basylian.
Take Peck off the old fish that is on the release
button.
Go back inside the wind chapel and have a repeat
of the scene with Conroy.
Throw Peck at Conroy again. This time see what happens. Ahhhh!!
Depetrify the orchestra:
Take the fosfos pendant from Conroy's
remains.
Use the fosfos pendant on the hook-decoration
above the Basylian beam hole at right pillar.
Go outside and remove the petrifying eyes from
Robert's Basylian.
Place the depetrifying eyes back on the eye socket
of Robert's Basylian.
Take Peck and old fish off the release button.
Use the release button.
Obtain Chapter 5 - Asposia's Last Hope
achievement.
Wind is back at Asposia!
This document may not be
distributed without express written permission of the author and the content may
not be altered in any way.
For Questions or Comments
on this Walkthrough,
Please write to:
MaGtRo
Copyright © October 2013
MaGtRo
 GameBoomers
Walkthroughs and Solutions
GameBoomers
Walkthroughs and Solutions