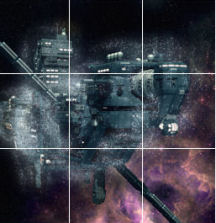
J.U.L.I.A.
by
Cardboard Box Entertainment
Walkthrough by
MaGtRo March 2012
Gameplay:
This is a third person point and click game.
When the game is
opened, the game setting frame is seen. Here the display (display device,
colors, antialiasing) and sound device can be adjusted.
The main menu has new
game, save game, load game, options and exit.
The options have the
music volume, voiceover volume and graphic detail level adjustments. Ingame
narration can be toggled on or off.
There are icon
boxes at top
of the game screen: planet, materials, MOBOT, upgrade repair, solar system and
main menu.
Explanation of the
puzzle is obtained by clicking on the "question mark" box.
To prevent issues at the Native quiz in Salia 4,
please set your font size to 100% (not over).
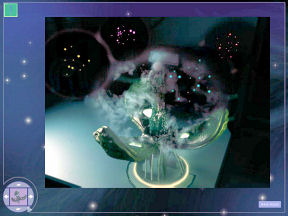
2430 AD, Somewhere in space: A spaceship orbiting
a planet passes through a meteor storm. Meteor hits and damages the spaceship. Parts
fly off.
The ship's intelligent
unit is reactivated from standby mode. It starts a checklist of the ship's system
function. Severe malfunction detected. Emergency crew is woken.
A cryostasis chamber
is opened. Rachel Manners is greeted by the ship's computer.
Enter manual
overdrive. Press OK.
This is the
MizukaCX1220. They are at NGC 9725 system orbiting an unknown planet.
Rachel, an
astrobiologist is the only crew. She has to repair the ship.
The computer is named
J.U.L.I.A. JULIA explains about the space ship. MOBOT 24001.21 (mobile
robot) is used for
planetary exploration.
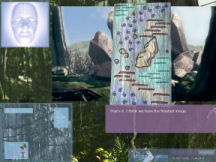
JULIA explains the interface.
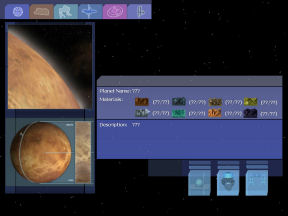
Planet view:
There are 3 activity (icons seen at bottom right) that can be done on this screen - scan, material
harvest and travel to surface.
After scanning the
planet's surface; material harvesting and repair is the priority.
Materials view:
All the raw materials needed for the ship's repair and function are listed.
The amount in storage that the ship has is on the right side. Right now they
are all zero.
MOBOT:
The huge robot is model 24001.21 and was developed secretly. It is used for
planetary exploration.
Upgrade repair:
Repair is the first priority and needs raw material. If an upgrade is for
a part; a blueprint is needed first.
Solar System view:
Since travel is not possible and information is not available yet; solar
system view is not available.
Repair the ship:
Dark orange planet's Planet view:
Click on the planet
icon at top left of screen.
See 3-D icons-boxes at
bottom right: scan, harvest and planetary exploration.
Scan:
Press scan box to
learn about the planet and know the materials available to harvest.
The planet is Salia 6.
See a pictorial list of materials that is available to harvest on the surface
of Salia 6.
Read the description
of the planet. Salia 6 is a rocky world.
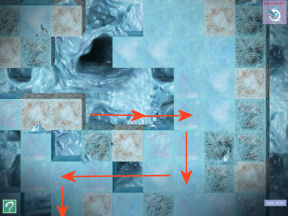
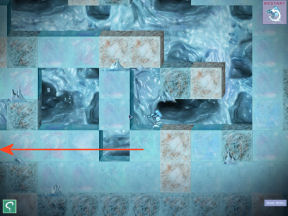
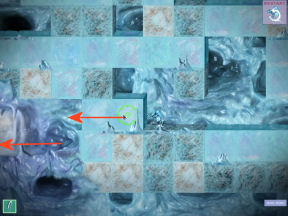
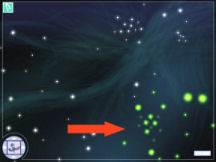
Material harvest:
Press the harvest box
to see a map of the planet. The pictured harvester will take the materials and
store it in the ship.
Explanation of the puzzle is
obtained by clicking on the question mark box at bottom left.
Slowly move your
cursor over the map to track down the materials. Watch bottom graph closely.
As soon as it matches one of the material graphs on the top of the screen; left
click to harvest.
Note that the cursor
turns bright green and the sound peaks when the cursor-harvester is at the
correct spot.
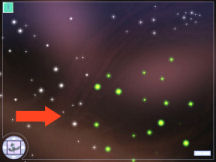
Verify the
similarity of the graph below
with one of the material graphs at top of the map.
If correctly selected, the icon of the material replaces the
cursor on the map.
There are only 7 materials harvested in this planet.
Automatically when
correctly done, the screen goes back to the planet view.
The solution is random. The picture below is just one possible solution.
Materials view:
After
harvesting is finished, click on Materials at top left and see the amount of materials
available.
No arghinium was
harvested or is present on Salia. Click on that icon and learn that arghinium is an
unlimited power source but still not tamed.
Upgrade repair:
Now that we have
materials, it is time to repair the ship. Click on the upgrade repair box at
top of the screen.
See the view of the
spaceship. It is model J-XNG 2145.
The pink colored parts
are the damaged area of the ship: core engine, communication module, shields
generator and oxygen supply.
Move the cursor to one
damaged area and see the materials needed to repair that area and the amount
that is available in storage.
Click-select an area
to start the repair.
See the probe go
through the area. The materials used to repair are seen at bottom right.
When damage is
located, the screen shows a red frame and the material needed to repair it
flashes at bottom right.
Click-hold-place the
flashing material on the red frame. If repaired, the frame will say checked.
If a damaged area is
missed in the first pass-through as shown by that area still highlighted in
the schematics, go through that area again. Only the damaged area will be
seen.
When all the damages
are fixed, the area on the schematics is not highlighted anymore and JULIA
will say the repair has been successfully completed.
Select another area to
fix until all highlighted areas are repaired.
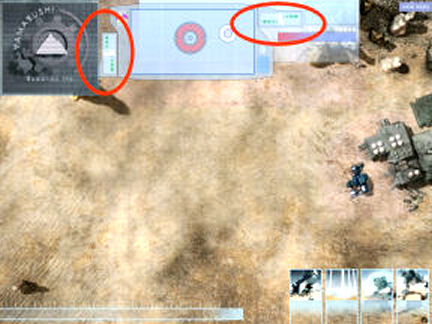
Entering Salia
6
JULIA recommends sending MOBOT down for exploration.
MOBOT:
Go to planet view.
Click on land-right box at bottom right.
See MOBOT (made by
Yamabushi Robotics Inc) go down to the planet surface.
MOBOT states that there
is intense radiation. It is a result of an explosion at the time
of the start of the exploration 500 years ago.
A structure is seen in
the map. JULIA activates MOBOT's exploration mode.
Click on the right
exploration box at bottom right.
Abandoned research
station:
Note:
Main menu button is at bottom right of screen.
MOBOT is now in front
of the research station.
Enter the station:
MOBOT comments that the radiation is intense and any human will live only for
2 days in this exposure. Inside see a dead woman in the hallway.
Search the dead
woman's items: She was Cynthia Petals ID 280311112. She
was shot at point blank range.
Proceed inside the
station: MOBOT has detected virulent organic life forms.
Analysis of the DNA shows virii from the human bodies radiation mutated. See bodies of the crew
on the floor.
Examine corpses:
They were all shot by some firearm.
Approach the
computer: The computer is not powered. Rachel says that
all these stations should be solar powered. The panel should be next to the
building.
Bring power back to
station:
Exit to corridor.
Exit to station entrance.
Examine the station
surroundings: See a hovercraft, junk, tombstone and a dead
body holding a small device.
Examine the
tombstone: It is now illegible.
Search the dead
body: The body is beyond recognition.
Examine the small
device: It is a small primitive radiation detection
device.
Approach
hovercraft: It is beyond repair.
Examine the junk
pile. Search for solar panels: MOBOT uncovers the junk
beside the tombstone and exposes the solar panels. The power is back on.
Return to station
entrance. Enter the station. Proceed inside the station.
Find out what
happened at the station:
Approach the
computer: The computer wants user ID or swipe the
security card now.
Log on as Cynthia
Petals - 2803112. The account password is
protected.
JULIA uploads a
bypass.
Select
a letter by
pressing a key on your computer's keyboard.
If
a letter is
found in the password, it will show on the Password text at top line. Play like Wheel of Fortune. :D
The password is
randomly generated.
Access public space.
It is empty.
Access private
messages: Read all the e-mails sent to Cynthia. Andrew Lark
seems to not like Cynthia. Other members of the expeditions are Li Wu and Bart Krylov.
Andrew mentioned
something about a floor tile. There are no personal
logs. Log out.
Pry open the
leftmost floor tile: MOBOT gets a computer access card from
the floor tile.
Approach the
computer. Swipe the computer
access card: It is the access card of the expedition
leader Andrew Lark.
Access public space. Access private
messages.
Access personal log:
Read and learn that something happened in Salia 4. Slow illness of the team
members starts with Sath. Bath found normal readings on his scan. Andrew does
not like Cynthia and blames her. They lost contact with the probe. Andrew
shoots the members that are ill. He finally realized that they were exposed to
insane levels of lethal radiation. Barth made the Geiger counter. 18/2335 - I will end
the madness tonight.
Access classified
data: A blueprint of a solar system scanner is obtained. It
will allow the spaceship to move away from here. Log out.
Leave computer. Exit
to Corridor. Exit to station entrance. Leave the station.
Click on the left
departure box at bottom right to get MOBOT back to the spaceship.
SPACESHIP:
Fix the spaceship's
solar system scanner.
Click on Upgrade
repair at top of the screen.
See the upgrade of the
Solar System Panel. The materials needed are on the left.
Click on the materials
panel to start the upgrade.
See the tiles on
middle
left and the schematic on top left.
Left click to select
a part-tile from the left frame. Right click to rotate a part-tile.
Select a tile and
place it on the square of the panel at right until the flow with similar
input and output as the schematics is obtained.
The goal is to
connect the tiles with similar input and output as the blueprint. Double check that all the pipes are connected.
Click construct
to see the progress of the placement of the puzzle or
when you think the tiles are correctly placed. It seems you have
completed the upgrade.
The picture below
is just one possible solution.
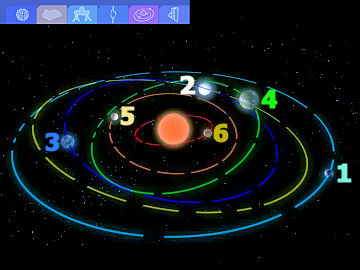
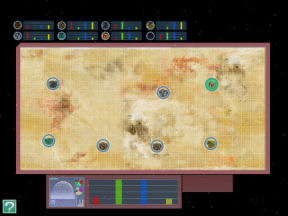
Solar system:
Now that the solar
panel is fixed, click on the solar system frame at top of the page. Let's
travel.
See that Salia 6
(dark orange planet with red orbit) where
we are now is the innermost planet.
Click on the next
planet (light orange planet with an orange orbit) to travel there.
JULIA's memory
blocks: Julia asks Rachel to help recover her memory loss.
The memories are in
blocks. Restore the memory by assembling memory clusters.
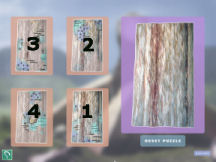
See 5 memory clusters.
Each cluster is made up of mixed picture squares from same or another
cluster(s).
The object of the
puzzle is to assemble the correct picture in each cluster.
Each square can be
interchanged in a cluster by left click on one and left click on the other
square you want interchanged.
To get a square (picture) from another cluster, right click the square on the worked
on cluster (big one at top right) where the picture from
the other cluster is situated and the square will cycle through all the pictures (situated on that 3x3) of the other clusters. Stop when you get the picture square needed.
If the location of
that square in the cluster you are working on is already correct for that
cluster, it is best that you move the correct square to another location in that worked-on
cluster before right click cycling.
It is also best to
complete one cluster first to remove that set of pictures from the cycling.
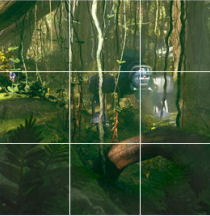
The easiest and distinct picture to work on first is the green forest scene.
Compile all the green
pictures from the other cluster and then rearrange them to form the complete
picture.
The cluster background
square turns green when correctly done. The squares cannot be moved anymore
after the whole picture is assembled.
Light orange planet's Planet view:
Click on the planet
icon at top left of screen. See 3-D icons-boxes at
bottom right: scan, harvest and planetary exploration.
Scan:
Press scan box to
learn about the planet and know the materials available to harvest. There are
5.
The planet is Salia 5.
See a pictorial list of materials that is available to harvest on the surface
of Salia 5.
Read the description
of the planet. Salia 5 is a desert world.
Material harvest:
Press the harvest box
to see a map of the planet.
Explanation of the puzzle is
obtained by clicking on the question mark box at bottom left.
Slowly move your
cursor over the map to track down the materials. Watch bottom graph closely.
As soon as it matches one of the material graphs on the top of the screen; left
click to harvest.
Note that the cursor
turns bright green and the sound peaks when the cursor-harvester is at the
correct spot.
Verify the graph below
with the material graphs at top of the map. Move the cursor slowly to get the
graph as close as possible to the known graph on top of map.
Left click to select
the correct spot. If correctly selected, the icon of the material replaces the
cursor on the map.
There are only 5 materials harvested in this planet.
Automatically when
correctly done, the screen goes back to the planet view.
The solution is random. The picture below is just one possible solution.
Entering Salia 5
MOBOT:
Go to planet view.
Click on land-right box at bottom right. See MOBOT go down to the planet surface.
JULIA and MOBOT look for the research station. Click on the right exploration box at bottom right.
Abandoned research
station:
MOBOT is now in front
of the research station.
Enter the station:
There are dark stains on the corridor walls.
Examine the stains: They are
human blood.
Rummage through the debris:
There are gnawed human bones. MOBOT takes a gas mixture canister from
the debris.
Examine door mechanism:
See laser wires that can be pulled from the top yellow nodes and be connected to
the bottom nodes. Exit the puzzle.
There are too many possibilities. Look for a hint
that might help.
Exit outside.
Explore the area behind the station:
Remains of machines are seen.
Examine
remains of machinery: MOBOT found traces of a Yamabushi
pen; an indestructible pen that writes on paper or stone. The writing is found in
a Yamabushi indestructible paper. The paper was torn into pieces. Find and
collect the pieces of paper.
Assemble the torn papers: Left click to take a paper;
right click to rotate it.
Place the paper in the frame. If correctly placed, the paper will lock in
place.
Return to the station entrance. Enter the station.
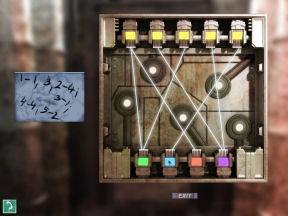
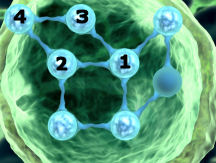
Examine the door mechanism: The torn paper clue is seen
on the left.
Click on a yellow node on top and a laser wire is
attached to the cursor.
Click on the bottom node that you want the laser
wire attached to.
Right click an attached laser wire to erase it or
exit to reset the whole puzzle.
The aim of the puzzle is to attach the correct
laser wires based on the torn paper clue.
|
Using the clue from the torn paper, connect (left to
right):
1 from top to 1 (green) at bottom
1 from top to 3 (orange) at bottom (Thanks, Rushes!)
2 from top to 4 (purple) at bottom
3 from top to 1 (green) at bottom
4 from top to 4 (purple) at bottom
5 from top to 2 (blue) at bottom.
The door is opened. |
 |
Enter the laser door: MOBOT
detects high concentration of nitrogen in the air which makes the place
highly explosive. He is ordered to deactivate his electrical system and go to
solar backup.
The room has a lab and WC doors at north wall. A notice
board with a corpse below it is seen.
Examine corpse: The
examination of the body showed that he suffocated. He is still holding an
oxygen canister and a data pad. MOBOT takes the oxygen container.
Examine the data pad: It
shows the air replenishment instructions.
The proper gas ratio is 78% nitrogen, 21% oxygen
and 1% other gas mixture.
Then the vent system should run on full power for
5 minutes.
Reduce the power to 6 ensuring that the atmosphere
is compliant with earth conditions.
Look through the
window: MOBOT sees something in the ground and takes it.
It is a nitrogen container.
Learn that JULIA, unlike MOBOT has an emotional AI.
Examine the notice board:
MOBOT sees traces of an air replenishment schematic.
Rachel says that air replenishment is what is needed
here. The canisters are usually mounted on an outside
wall.
Exit to entrance. Exit outside.
Explore the area behind the station:
A metal case mounted to the wall is seen.
Examine metal case:
See the gas containers.
MOBOT automatically inserts the oxygen container
taken from the corpse, gas mixture container from the hallway and nitrogen
container from the sand.
Using the
information found in the data pad:
Adjust proper ratio: The
nitrogen control is broken and automatically rises to 26%. Adjust the oxygen
and mixture appropriately. You can get the game calculate the ratio for you
or do it yourself.
Using the arrows, adjust oxygen to 7.0 and the
mixture to 0.33.
Vent system to run for 5 minutes:
Fill the station with the correct proportion of the gases by pressing the up
arrow at right side to the maximum. Rachel will say she nailed the first
part and it's ready to go.
Reduce the power to 6:
Using the down arrow, lower the bars at right to 6 lines. That's it! I
did it.

Return to station entrance. Enter the station. Enter
the laser door.
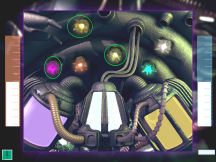
Enter server room: It has a
keycard lock.
Enter laboratory: Clues are needed
to find the correct combination.
Enter sleeping quarters: The
sleeping quarters is welded shut.
JULIA recommends tracking the expedition to look for a
blowtorch.
Exit to entrance, laser door and to outside.
Leave exploration mode. Click on departure box
at bottom right to go back to the ship.
SPACESHIP:
Solar system:
Click on the solar system frame at top of the page.
Let's travel.
See that
the next planet is green with a green orbit. Click it to go there.
Green planet's Planet view:
Click on the planet icon at top left of screen.
Scan: Press scan box to
learn about the planet and know the materials available to harvest.
The planet is Salia
4.
See a pictorial list of the 7 materials that is available to harvest on the surface
of Salia 4.
Salia 4 is a huge arboreal planet; filled with vegetation and
life forms. The planet is dying.
Material harvest:
Press the harvest box
to see a map of the planet.
Slowly move your
cursor over the map to track down the materials. Watch bottom graph closely.
As soon as it matches one of the material graphs on the top of the screen left
click to harvest.
There are only 7 materials harvested in this planet.
The solution is random. The picture below is just one possible solution.
Entering Salia
4
MOBOT:
Go to planet view.
Click on land-right box at bottom right. See MOBOT go down to the planet surface.
JULIA activates the visual map.
Visual map:
Click on the right exploration box at bottom right.
See the map.
JULIA relates the disaster that happened the last
time she was here. The exploration team fired at the inhabitants. Andrew Lark
led the team.
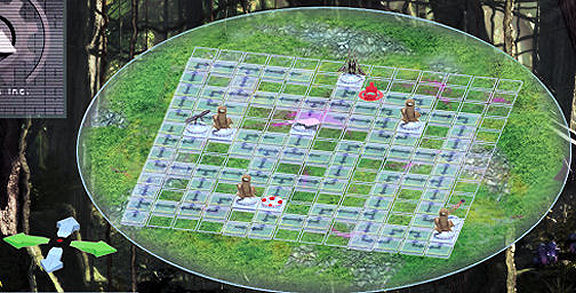
Explore the forest:
Click on the arrows at bottom left of the map or use the
keyboard arrows to move MOBOT on the map grid. Find points of interest
at certain places.
Be sure to map-visit all points of
interest. Once the points of interests are visited, they will then be jump to
points. Click on them and be there with no traveling.
MOBOT: MOBOT is the rotating red
circle.
Point of entry is the red and white structure
at middle bottom of screen.
4 Mystical places: There
are 4 mystical spaces as shown by brown structures on the map above. Visit all of
them at: bottom middle, bottom right, middle left and top right areas.
Purple lake: Check the purple
lake at middle of the map. The lake is filled with highly corrosive substance.
Laser gun altar: At middle left
of the map beside a mystical place, visit the altar raised by the inhabitants. The altar has a laser
gun. It is etched R_n _lmo_d which stands for Ron Almond, a member of the
exploration team. (Location can be interchanged with the machete altar).
Machete altar: At bottom
right of the map behind a mystical place, visit the altar that has a machete used by the team to clear
the jungle. (Location can be interchanged with the laser gun altar).
Inhabitant: At top right of
the map. MOBOT meets a native.
The inhabitant writes on the ground showing that it
is sentient and has a written language.
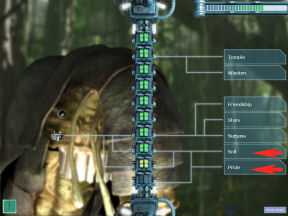
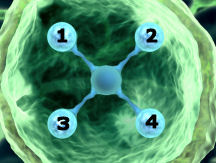
Learning the language:
See the learning core at the center.
On the left of the learning core is a native language symbol. On the
right are possible translations of the symbols.
Select-click the translation that has exactly the
same number and formation of lines connected to the central core. For example: if the
symbol on the left has one line connected to the core; immediately click on
the translation-word(s) on the right that has one line coming out of the
module.
Note one symbol can have 2 or more meanings-words
at right. So click on all words at right also.
The symbols flash fast, so immediately click the
possible translation-word(s).
If correct choice, the core at the center will
flash green from top to bottom.
The aim is to get the comprehension meter-bar at
top right to go to the right end for complete comprehension of the language.
The example below shows that the symbol on the
left has 3 connections-lines to the core; 2 symbols and branched similarly to
the marked words at right. Click immediately on the 2 marked words and see
the core flash green and the bar at top right increases.
Do the selection until the bar at top right reaches
the end. Then full comprehension is reached by MOBOT.
MOBOT talks to the native. He tells the native that
they want to learn the way of the ancients.
The native says if so, MOBOT has
to completely explore the forest and then meet him in his home at the edge of
the forest. The home is at top middle of the map grid.
Talk to the native:
Inhabitant's home: If you have
seen all 4 mystical places, the 2 altars (laser gun and machete) and the
purple lake; proceed to top of the map. Talk to the native again.
3 important places for the natives: The native
questions MOBOT. Select the correct answers from the dialogue list.
Stone formation with machete. The native
believes it is here to test their faith.
Lake filled with corrosive liquid. The lake
is the symbol of the native's doom. It was formerly filled with holy essence
of life. The masters punished them and filled it with the purple substance
that drains the life out of them.
Laser gun left here by the crew. The native
believes that the laser gun was left by the masters to remind them of their
inferiority. The gun returned a lot of the natives to ancient Xir.
The native will now answer the questions.
The beings from the stars: They made 2
special places (altars) to keep what the masters left. The leader of the tribe
saw the space people descend from the sky but did not meet them like the other
natives. The native greeters were killed-punished by the masters (exploration
team). The leader survived the massacre because he hid. That is how they
learned of what happened.
The native asks if this time, the masters will teach
them and make his branch-family proud. He is the watcher of the skies.
The punishments: There were
3 punishments done to the natives.
The artifacts were part of the last and third
punishment (exploration team).
Previously, another set of masters that are
different from the last told them to repent their ways or die. They
changed the essence of life to the purple liquid which kills.
The first punishment was when the ancient lords
came. They were proud then and thought to rule the universe. The lords
destroyed cities and everything they invented. They were then trapped on this
planet. Rachel surmised that they were more advanced then. Ith the great
prophet traveled to the place in the mist.
High above the third place of existence lives one of the ancient gods.
The essence: The natives depended on the essence
which the masters made to kill. The prophecy states that a wanderer from
the sky will restore the essence. The team copies the symbol of essence.
Ith: Ith was the last of the ancients. He was taken
by the Ancient Lords. He battled Xir, the Lord of the Sand. He succeeded. Ith
was given a flying bird and traveled to the place in the mist. He came back
and was killed in treachery at Gaethir. Ith spent a lot of time alone erecting
structures; which they now know as preparing them for the pilgrimage of
enlightenment.
Pilgrimage of Enlightenment: There are 4 empty
parchments left by Ith. Ith told the leaders that the pilgrimage is
ready. Since the parchments are common to them, they ignored it and
subsequently forgotten. After the last punishment, they resurrected the story
of Ith.
The
natives did the journey of Ith as a rite of passage. They are handed the
parchments and left alone. They traveled to sites that Ith visited and meditated
on it. Whoever understands it will be the leader. Many tried yet none succeeded.
The team will try. The native is pleased and gave them the 4 parchments
hoping that they will come back with answers.
Prophecy:
When Ith returned from the sky, he brought the prophecy. It is foretold that
new masters will descend from the sky in their shiny bird and bring the
essence of life. They will bring back happiness, joy and wipe the tears.
The masters came and they were punished. Then they (the team) came. They will
worship them and the circle is complete.
Lake:
The essence once lived in the lake.
Artifact: Take leave of the native. He tells them
something that is important. In each of the 3 places of
worship there is a hidden place where they can find something of importance.
Go and bring back joy to us.
Pilgrimage of
Enlightenment:
It is time to travel
to the sites visited and structures erected by Ith. MOBOT has the 4 blank
parchments.
Go
to one of the mystical places. Click on a brown structure in the map and jump
to there.
Mystical place and parchment: Use the map scroll here.
Julia tells MOBOT to use the blank parchment on the ray of light.
A part of a map appears in the scroll.
Jump to the rest of the mystical places and do the
same until 4 parts
of map are obtained.
Superimpose the maps: See the 4 maps on the left.
Click on a map and it will appear at the big parchment
at right.
Click-select in correct order-layer so that all parts of the map are seen.
Get a map of the place in the mist.
Artifact:
Travel to the 3
places of worship: laser gun altar, machete altar and purple lake.
In each place of worship, MOBOT does a scan and takes a piece of an omega
disc.
Go back to the
spaceship:
Jump to the point of
arrival at the red and white icon at bottom middle of the map.
Click on exploration box and then departure box.
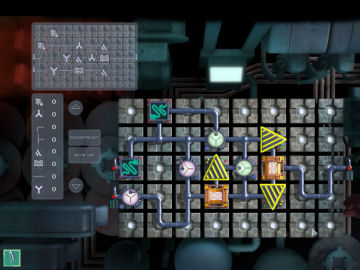
SPACESHIP:
Construct the omega discs:
JULIA states to
reconstruct the parts of the omega discs. See a blueprint that has scrambled squares.
Click one and then click on another to swap their positions.
Get the blueprint of a blowtorch upgrade for MOBOT.
Blowtorch upgrade
for MOBOT:
Click on Upgrade
repair at top of the screen. See the
blowtorch upgrade for MOBOT. The materials needed are on the left.
Click on materials
panel to start the upgrade.
See the
parts-tiles on the
left and the schematic on top left.
Select a
part-tile and
place it on the square of the panel at right until the flow with similar
input and output as the schematics is obtained.
Left click takes the tile and right click turns
it.
Click construct
when you think the tiles are correctly placed. If there is an error JULIA
will say so. Double check that all the pipes are connected.
If correct, JULIA will say - It seems you have
completed the upgrade.
The picture below
is just one possible solution.
Entering Salia
5
MOBOT:
Now that MOBOT has a blowtorch, let us go back to
Salia 5. Go to solar system view and click on Salia 5 planet.
Go to planet view.
Click on land-right box at bottom right. See MOBOT go down to the planet surface.
Click on the right exploration
box at bottom right.
Research station:
Enter the station. Enter the laser door.
Enter the sleeping quarters: MOBOT
uses his blowtorch upgrade.
Examine corpse: The
corpse was doing an entry on his data pad when he run out of oxygen.
Read data pad: Sergey
Antolnikov wrote on his data pad that after Salia 4, only the stable
scientists are sent to this planet. He heard strange sounds and asked
the probe about them. The probe states that there are no signs of life.
James went berserk after screaming that something
tried to eat him alive out in the desert. James tried to burn the data discs.
Sergey changed the computer room code to 8123.
The probe still said that nothing is seen even after he
heard the sound again. The next day, Sergey saw it. They lost contact with the
probe.
Lin was bit into two. They cannot change the oxygen
canister outside because it is waiting. Eventually the remaining 3 died.
Sergey locked Garth in the laboratory. Garth has his administrative keycard.
Enter laboratory: Using the
computer room code from the data pad, press 8123.
Examine corpse: MOBOT takes
the access card next to the body.
Exit to central room. Enter server room: MOBOT uses
the access keycard. See that the computers are burned as stated by Sergey in
his datapad.
Exit to central room. MOBOT accesses the
omega disc before leaving the server room. He gets an underwater upgrade-blueprint.
Exit to the entrance. Exit outside. Leave
exploration mode.
Go back to the spaceship by clicking on the
departure box at bottom right.
SPACESHIP:
Underwater upgrade:
Click on Upgrade
repair at top of screen. See MOBOT's underwater upgrade.
Click on materials. JULIA says there are not enough materials.
Solar system:
Let's go to the next
planet. Click on solar system box.
Click on the blue
planet with blue orbit.
Blue planet's Planet view:
Click on the planet icon at top left of screen.
Scan: Press scan box to
learn about the planet and know the materials available to harvest.
JULIA hears a distress signal coming from the depths
of the ocean. They need a means to go underwater.
The planet is Salia
3.
Salia 3 is an oceanic world. Only a small part of the planet
has visible land.
Material harvest:
Press the harvest box
to see a map of the planet.
Slowly move your
cursor over the map to track down the materials. Watch bottom graph closely.
As soon as it matches one of the material graphs on the top of the screen left
click to harvest.
There are only 5 materials harvested in this planet.
The solution is random. The pictures below are just 2 possible solutions.

Underwater upgrade:
Click on Upgrade repair again at top of screen to
see if we have enough materials.
Click on the
materials. JULIA still says we do not have enough materials.
Solar system:
Let's go to the next
planet. Click on solar system box.
Click on the white
planet with gold orbit.
White planet's Planet view:
Click on the planet icon at top left of screen.
Scan: Press scan box to
learn about the planet and know the materials available to harvest.
The planet is Salia
2.
Salia 2 is a mist world.
Material harvest:
Press the harvest box
to see a map of the planet.
Slowly move your
cursor over the map to track down the materials. Watch bottom graph closely.
As soon as it matches one of the material graphs on the top of the screen left
click to harvest.
There are only 5 materials harvested in this planet.
The solution is random. The pictures below are just 2 possible solutions.
Entering Salia
2
MOBOT:
Go to planet view.
Click on land-right box at bottom right. See MOBOT go down to the planet surface.
The planet is filled with stone pillars. The atmosphere has the same
composition as Salia 4.
Ith was transported here - the planet of the mist. They might find the temple of eternal flow.
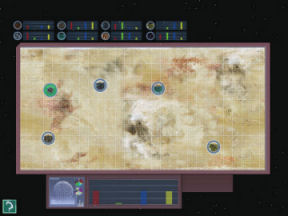
Manual comparison of the map and the planet surface:
Rachel will do a manual comparison of Ith's map with the planet surface.
JULIA combines a large map with Ith's map.
JULIA says to find the large rock with 5 small rocks on the left that
are seen
on Ith's map on the view of the planet's surface. The planet surface view is
large so scroll right-left/top-down to see all of it.
Click on those rocks and JULIA will isolate it.
Click on the right exploration box at bottom right.
The top view of
the stone pillars is seen. The view initially seen is at top left of the overhead view.
Use the arrows at
top left inset to move. Click on Ith's map inside the inset to see it large at
top right.
Look for the rocks
JULIA wants. Click on the rocks to select it. You can click 6 times before
the select circles are reset.
Scroll by clicking
on the arrows itself. If not directly on the arrows, you might select a
place in the map under the inset.
Scroll to the
right edge and then down.
Once the map is at
the bottom right corner of the large area, see the large rock and 5 small
rocks to the left.
Click on the large
rock and the 5 small rocks.
Ancient master:
See
MOBOT land on the rock. MOBOT meets one of the ancient masters. There is a small
structure-shack on the rock.
The ancient master
takes over MOBOT. He speaks through MOBOT and converses with the team.
JULIA remarks that
the ancient masters are observers with no ambitions. Rachel remembers that Ith
came here to seek advice about the alien lords.
The ancient tells
them to ask their questions.
Ask about
himself: They are Guardians; hidden, watching and
learning. They do not influence other beings. They have been on endless solar
systems even Earth.
JULIA deduced that
they are from another universe.
They left messages
long ago waiting to be discovered. Those that have evolved enough will
understand the message. Evolution cannot be forced. The advanced beings have
discovered and seek them for advice.
Ask about other
visitors: The visitors that want to be their
emissaries have failed. After accessing MOBOT's memory, the ancient replies -
yes. The other wants to manipulate and dominate; it is stronger than their
agreement with the ancients. They influenced developing civilization. They
failed and the ancients made them leave this system.
Ask about fate of
the expedition: Rachel explains that she wants to help
because of what the expedition did. The ancient became silent when questioned
about whether he-they influenced what happened to the expedition. It would not
explain what happened to the expedition but stated that they did not have
anything to do with it.
Ask about the
essence: The failed race gave the inhabitants (of Salia 4) a
trial that is unfair. One of them defeated this trial.
Upon learning that
the team wants to help the people of Salia 4, he states that he will help. The
ancient tells the team to do the ritual undergone by Ith. They have to slay
Xir in the land of endless sand (Salia 5). They can call Xir by emitting low
frequency sounds. They can get help from the depths. Then come back to him and he will explain.
Ask about Ith:
Ith was brought there by the failed race to impress Ith. Then the failed lords
told Ith to undergo the ritual and that it was ordered by the ancients. This
was a lie. Ith killed the lords and returned to the ancient. They tried to warn
him but he didn't listen. He went back to his world and was slain.
The ancients do not
get involve in internal conflicts.
Farewell.
Leave exploration mode. Go back to the spaceship by clicking on the
departure box at bottom right.
SPACESHIP:
Solar system:
Let's go to the next
planet. Click on solar system box.
Click on the last
small gray
planet with light blue orbit.
Gray
planet's Planet view:
Click on the planet icon at top left of screen.
Scan: Press scan box to
learn about the planet and know the materials available to harvest.
The planet is Salia
1.
Salia 1 is an icy frozen world.
Material harvest: Press the harvest box
to see a map of the planet.
Slowly move your
cursor over the map to track down the materials. Watch bottom graph closely.
As soon as it matches one of the material graphs on the top of the screen left
click to harvest.
There are only 5 materials harvested in this planet.
The solution is random. The picture below is just one possible solution.
Underwater upgrade:
Click on Upgrade repair again at top of screen to
see if we have enough materials after harvesting at Salia 3, 2 and 1.
Click on the materials. See the
parts-tiles on the
left and the schematic on top left.
Select a
part-tile and
place it on the square of the panel at right until the flow with similar
input and output as the schematics is obtained.
Left click takes the tile and right click turns
it.
Click construct
when you think the tiles are correctly placed. If there is an error JULIA
will say so. Double check that all the pipes are connected.
If correct, JULIA will say - It seems you have
completed the upgrade.
The picture below
is just one possible solution.
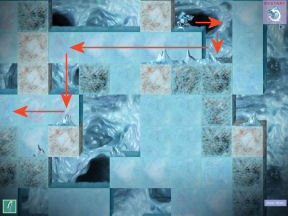
Entering Salia
1
MOBOT:
Go to planet view.
Click on land-right box at bottom right. See MOBOT go down to the planet surface.
It is snowing. Rachel ponders on her being alone.
The snow's form is consistent to a higher
temperature. MOBOT thinks there's a source of heat.
JULIA locates the research station. Click on the right exploration
box at bottom right.
Research station:
Try entering the station: MOBOT
tries to open the door with his blowtorch. It is not possible.
Leave the station.
Leave exploration mode. Go back to the spaceship by clicking on the
departure box at bottom right.
Entering Salia
3
MOBOT:
Now that MOBOT has an underwater upgrade, let us go back to Salia
3. Go to solar system view and click on Salia 3 planet.
Go to planet view.
Click on land-right box at bottom right. See MOBOT go down to the planet surface. See that the planet is completely covered with water.
MOBOT activates his underwater extension. They will search for the source of the distress
signal coming from the depths of the ocean.
Distress signal:
Click on the right exploration
box at bottom right. Descend.
The ocean is salt water. It might damage MOBOT
circuits after prolong exposure.
JULIA says the distress signal is coming from a
crater. MOBOT goes to the crater and turns his light source
on.
Underwater sonar search:
JULIA activates MOBOT's underwater sonar.
The faster the sonar flash (seen at top left of
screen), the closer MOBOT is to the distress signal.
Each screen is labeled with a Greek letter. Do a
systematic search by checking each screen and watching the flashing sonar at
top left.
From sector alpha - go right to sector beta -
go right to sector theta - go down to sector kappa (the flashes are much
faster now).
Move the light source-cursor a little to the left and
down from the middle and see a submarine on the ocean floor. Click on submarine.

Rachel questions JULIA. It is the exploration team's
submarine and JULIA should know about it. JULIA replies about her memory loss.
The narrator states that the submarine was destroyed
by high speed impact on the crater wall. But why were they traveling at such
speed and who sent the signal?
Submarine:
Enter submarine: A hole
allows entry to the command center.
Examine room: Rachel asks
about the stand alone terminals. It is a network terminal that stores
classified information. It is shielded and thus prevents being hacked.
Attempt to recover data from terminal:
See sets of numbers.
Garbled message deciphering:
Rachel remarks about the punctuation marks. Julia states that each letter is
replaced by 2 numbers.
To substitute a letter for a number, click on that
letter and then the number. The message will show the letter substitution.
If a mistake is done, replace it with another
letter or click on that letter in the upper row.
Look for a 1-letter word shown by 2 numbers alone.
It should be either I or A.
Then work on 3 letter words like 'the' shown by 6
numbers.


Rachel gets very
angry.
MOBOT finds a
blueprint of the weapon that was to be used. MOBOT will collect the weapons
parts.
Proceed deeper into
the submarine. It is unsafe. Exit submarine.
Extract weapon
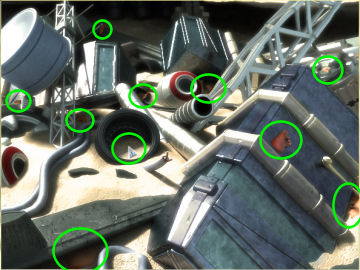
parts: See the outside hull of the submarine.
Collect the parts of
the weapon. Click on parts and/or places where the parts might have fallen on
or stored in.
Remove the metal in
front of the submarine to get 2 ring parts.
Click inside the
large hole on the wall. MOBOT lights that area.
Click on parts
stored at bottom left. Click above that area to get 3 wide roller-tubes.
Click on bottom
right to collect 4 slim rollers-tubes.
Click on the side of
the chimney-like structure on top of the sub to open a door. Click inside to
get a part with wires.
Click on top of the
chimney-like structure on top of the sub to remove it and take tubes.
Click on the crab to
get it to swim away. Click inside the hole underneath to get 4 rods.
JULIA will say if
all parts are taken based on the blueprint.
Ascend.
Leave exploration mode. Go back to the spaceship by clicking on the
departure box at bottom right.
SPACESHIP:
Weapon:
Rachel remembers what the ancient stated - they will
get help from the depths. The weapon must be it.
It is strong enough to fight Xir at Salia 2.
Build the weapon:
See parts on the left frame Scroll-click the arrows
to scroll through the different parts collected.
Select or feature a part. Click on the spinning arrow to turn a part.
Click the attach button to place the parts in specific
order on the outline of the weapon at right.
 |
|
 |
|
 |
|
 |
|
 |
|
 |
|
 |
|
 |
| 1 |
|
2 |
|
3 |
|
4 |
|
5 |
|
6 |
|
7 |
|
8 |
| Attach 3 parts |
|
Turn and attach |
|
Turn and attach |
|
Attach 4 parts |
|
Turn and attach |
|
Turn and attach |
|
Turn and attach 4 rods |
|
Attach |
That's it! I did it.
Solar system:
Let's get Xir. Click on solar system box. Click on
Salia 5.
SALIA 5 & XIR
Click on Land
for MOBOT to go down to the surface.
Fight Xir:
See an overhead view. Xir will show up on the left and MOBOT is on the right of the
screen.
At top of the screen is a target with sliders on the left and on the right.
Use the sliders to maintain the target at the center.
JULIA will concentrate the energy of the weapon as shown by the bar at bottom
left.
At bottom right are 4 frames that have defense actions when Xir attacks in a
certain way (shown by the picture). To neutralize that attack, click on the
defense frame that has a circling arrow.
Maintain the target at the center and press the defense frame - okay, got it.
If anything goes wrong I'll run away... Oh no, I'm stuck in the sand...
Help me.
The game can be saved during the fight.
After getting MOBOT's head torn off 3 times; a puzzle skip is offered by the kind
and understanding developers.
MOBOT:
MOBOT is asked to
analyze the dead Xir. MOBOT does not respond. JULIA and Rachel wait. Oh No!!!!
JULIA asks that her
VPR modules be unplugged. MOBOT is part of her and that part of her is gone.
Those are her feeling modules; her probe modules will still be operational.
She doesn't want to feel anymore.
They wait some
more.
MOBOT wakes up. JULIA
did a maintenance check and MOBOT is fully operational again. The blast
disabled his electronics.
Xir is an artificial
construction. MOBOT takes the control unit of the machine.
SPACESHIP
Solar system:
Go back to the
spaceship. Let's go to the hermit.
Click on solar system box. Click on Salia
2, the white planet.
ENTERING SALIA 2
Ancient master:
Go down to the
planet. Explore to go to the Temple of Eternal Flow.
Rachel asks
questions of the ancient master.
Xir is a weapon. It
is a show of power to be able to control such a monster. Xir's brain will be used later if
that is
the choice.
The ancient master
states that this is the last time they will see him. He will now create a Temple
of Eternal Flow. This will make them understand the secret of the essence.
The team has to pass
2 tests to demonstrate their knowledge first.
Tests:
The shack transforms
to an ornate grand building.
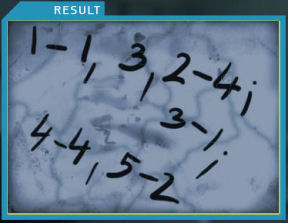
Glyph Gate:
Reconstruct the full message by clicking on the correct glyphs. The glyph has
to be selected in exact order in the message.
Click on a glyph to
find out the meaning and help form the message.
Then click the glyphs in order to form the message.
To Enter The
Sacred Place Of Eternal Flow You Have To Meet The Following Requirements Be
Humble Patient Knowledgeable Only Then The Entrance Will Be
Allowed to Those
who Seek The Eternal Flow
Check if the clicked glyphs that get lit up are in sequence. The door opens.
Note: As soon as you make a mistake, the puzzle
starts over meaning that you can anytime do the correct sequence regardless
of what you did before. So you can click random glyph and then do the full
text anytime and the game will recognize it. (Thanks, Jan.)

Order of the
Planets: See the planets on the left side of the frame.
The pictures on the right are prominent features of those planets.
The aim is to
arrange the planets in order from the sun.
Under those planets,
the prominent feature or snapshot view of those planets are to be placed. The door opens.

TEMPLE OF
ETERNAL FLOW
MOBOT enters the
large chamber. His extension closely examines the chamber.
JULIA detects a
space anomaly. The liquid flowing
from the chamber is ordinary water.
The team decides to
find pure water. Go back to the spaceship.
SPACESHIP
Solar system:
Go back to the
spaceship. Let's go look for water.
Click on solar system box. Click on Salia
1, the last gray planet.
ENTERING SALIA 1
Land to the surface.
MOBOT analyses the
surface. It is frozen water. JULIA states to cut the ice and then transport it
using the cryocoffins.
It is unstable
ground. When MOBOT uses his blowtorch, the ice floor cracks and he falls
through ice floor.
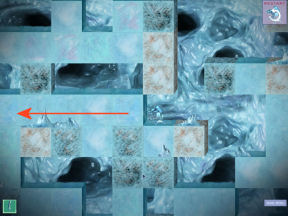
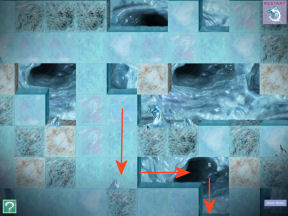
Find the exit:
See MOBOT at top
right of the screen. The exit is at bottom left: two screens down and two
screens left.
Solid ice blocks
with black specks cannot be drilled.
MOBOT should not
fall more than one level or be under a single clear drillable block of ice. He
will be killed.
The reset button is
at top right of the screen.
Exit to the left.
ENTERING
UNKNOWN LOCATION
MOBOT enters an
underground lake. There is an opening on the ceiling that lets light inside
the grotto.
MOBOT analyses the
cave and finds out that
the temperature is -94 degrees F. The lake is pure water and is 50
degrees. The stones around and in the lake might be responsible for the
temperature of the water.
MOBOT sees a corpse.
Examine the dead
body: The corpse is a human male. MOBOT extracts 2% of
the info in the datapad.
Examine the
datapad: Learn that this is the first planet that was
explored. The man questioned the strange condition of the snow. Learn about his
seeing the man who ordered that Rachel be cryojailed and her innocence.
Examine the lake:
The lake is the water source they are looking for.
Transport the
water into the probe. Salia 4 is waiting.
SPACESHIP
Solar system:
Go back to the
spaceship. Click on solar system box. Click on Salia
4, the green planet.
ENTERING SALIA 4
Land to the surface.
Explore to get the map grid.
Native:
Jump to the native's
place at top of the map.
Deliver the water.
You have brought us essence. You are the ones spoken in the prophecy.
He gives the
artifact they were guarding. It is a holographic star map. You can't bring
it back. It has to move on; same manner as the essence.
I'll return
later. Jump to point of entry at bottom middle of the map. Explore and
then depart.
SPACESHIP
Constellation:
Go back to the
spaceship.
The holographic star map shows 4 rotating
constellations.
The stars are all crowded together so JULIA adjusted
the star map to show 3 layers of stars. The up-down arrow will change the
levels.
The right-left arrows scroll the map.
Passing the cursor over the star map highlights a
constellation. Click the chosen constellation and hear a sound. Then look for
the rest.
If a wrong choice is done, click the constellation again to unhighlight that
constellation. If an error is made after clicking on 4 constellations, the
puzzle resets.
Click on the star map icon at the center to see the
4 revolving constellations. Use it as reference.
Locate the 4 constellations.
The star map shows the
4 constellations project beams of light that intersect. The intersect point
shows an uncharted planet.
ENTERING UNKNOWN LOCATION
The team travels to the uncharted planet in the
solar system.
MOBOT lands in the planet. It is an artificial
planet with no inhabitants.
Go east: At the center of
the plaza is a middle sized obelisk.
Examine the obelisk: The
structure's material is too complex to analyze. Rachel thinks that it is not
just a piece of art since it is strategically placed.
Examine surroundings: The
inhabitants left in a hurry. The structures are decomposing.
Explore the area to the north:
See a gigantic pillar with a weak purple light.
Examine the pillar: The
pillar has a switch.
Operate the switch: Push
and pull do not work.
Proceed to huge building:
There is a gigantic building at northeast. It looks like the rest of the
structures support this building. There is a pile of biomechanical devises at
southwest. Examine the door: It is sealed shut.
Explore the broken biomechanical devices. Examine
the devices.
One of the devices is still operational:
There's a little light flashing on it. Examine the active device:
MOBOT extracts the energy cell powering the device.
Return to the main building. Get back to the tower.
Return to the central plaza.
Explore the area to the east:
See a moving platform. Examine the platform:
MOBOT sees a square indent on the platform. The energy cell is inserted and
MOBOT moves to another pillar.
Examine the pillar:
There's a switch with a different orientation. Rotate the switch:
The pillar lights up and is turned on. A humming sound is
heard.
Go back down. Return to the central plaza. Explore the area
to the north.
Rotate the switch: The
pillar is activated.
Return to the central plaza. Closely examine the
lighted obelisk.
Switch off the security device:
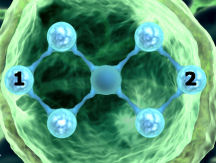
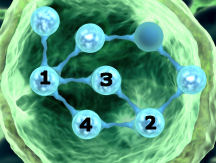
See 5 cells. Click to open a cell.
Inside each cell is a set of connected balls. Some
of the balls are lit.
When a ball is clicked, the adjacent balls are
toggled off or on.
The aim of the puzzle is to turn off the lights of
the balls to deactivate the mechanism.
 |
|
 |
|
 |
| Click the balls
in numerical order as shown by the pictures. |
 |
|
 |
|
 |
The process was too
easy for the team. It seems that it is not a protection device.
Explore the area
to the north. Proceed to the huge building. See that the building's door
is now open.
Enter the
building: Rachel screams. Inside are a lot of
deactivated Xir.
Deeper in the
headquarters is a sealed door with an inactive Xir.
Examine sealed
door: It cannot be opened.
Examine Xir:
Rachel remembers what the ancient master said - The brain is the key.
MOBOT is
hesitant to place the brain in the inactive Xir. MOBOT is told to run as fast
as you can.
Control room:
Examine the
laboratory: The device looks like an organic computer
with translucent containers attached to it.
The left container
is filled with the purple liquid similar to the lake in Salia 4. The right container
looks like a neutralizer.
The middle container
is a mixture of the left and right containers.
The aim is to have
both left and right bars-gauges fill at midpoint.
Check each color and see that they fill or empty the
bars-gauges.
From right to left:
White adds 9 to the
left bar.
Blue adds 1 to the
right bar.
Yellow adds 1 to the
left bar.
Red adds 0.5 to the
right bar.
Pink adds 0.5 to the
left bar.
Orange (top left)
adds 4 to the left bar.
Click on (top left)
orange once, yellow (middle) once and pink (leftmost) once.
Look closer at
the holovision: Watch events in the past.
See the reason the
submarine at Salia 3 crashed. Learn the report that there is no life in Salia 5.
Andrew Lark was told that Salia 6's living condition is ideal.
Rachel confronts
JULIA.
MOBOT finds out that
this machine has recorded their entry into system from the beginning. He can
scan and calculate the route to return to earth.
Return to probe.
Save game here!
Salia 4
JULIA learns that the chemical formula from the
artificial plant's lab is a reversal process for the water pollution in Salia 4.
Rachel has to decide.
Julia found a stash of arghinium at the artificial
planet. It is enough to either manufacture the chemical that will neutralize
the lake or travel back home.
Save entire planet or go back home.
Rachel discusses
the pro and cons of the decision. The possibilities...
Choose wisely!
Left is Earth
and right is Salia 4.
This document may not be
distributed without express written permission of the author and the content may
not be altered in any way.
For
Questions or Comments on this Walkthrough,
Please write to:
MaGtRo
Copyright © 03/2012
MaGtRo
 GameBoomers
Walkthroughs and Solutions
GameBoomers
Walkthroughs and Solutions