J.U.L.I.A. Among the Stars
by
CBE Softwares
Walkthrough by
MaGtRo September 2014
Build 370283 9-2-14
Build 368793 8-31-14
Build 367562 8-28-14
Gameplay:
The main menu has
continue, new
game, save game, load game, options and exit.
The options have the
audio (music, SFX and voiceover volume controls) and video adjustments (high
quality, calibrate gamma and windowed selections).
During a puzzle, at top right of the game screen is a question mark
icon that gives puzzle instructions. Right of that is the link to the main menu.
The green button at top right in exploration
window shows the hotspots in the screen. After an informational hotspot has
been activated, it will not be shown anymore.
Above that are the links to the messages and main
menu.
Press the ESC key to pause the game and toggle to
go back to the game.
Ingame
narration can be toggled on or off.
The saved game in Win7 is located in:
C:\Users\computer's name\AppData\Roaming\JULIAAtS
folder.
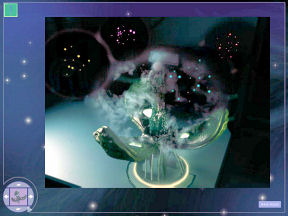
A spaceship orbiting
a planet passes through a meteor storm. Meteors hit and damage the spaceship.
The ship's intelligent
unit - Julia wakes up Rachel Manners.
A cryostasis chamber
is opened. Rachel Manners is greeted by the ship's computer.
The IU - Julia updates Rachel on the ship's damage.
Rachel
has to reduce hazardous condition for her to survive.
Rachel, an
astrobiologist is the only crew; the rest are planetside.
Julia explains that Rachel is on
interstellar probe J-XZN-12586. They are orbiting an unknown planet in the
Solar system of NGC 9725.
Julia's memory block has been damaged. After the
repairs, Rachel needs to send Mobot down for crew extraction.
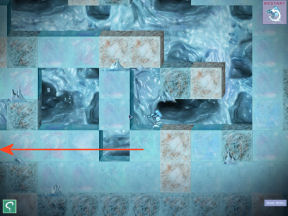
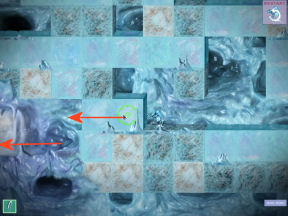
Repair the ship:

See an overview of the ship's damaged areas. They
are in red.
Select an area-room and see the closeup view at
bottom right of the panel.
The top panel has electricity circuit breaker
controls, water mist controls and air flow-ventilation system.
- Assess the damage in the selected room.
- Repair electric hazard first, then fire and lastly clear the room's
ventilation as needed. If not done in this sequence, additional hazards
will occur. For example, if the air flow is triggered before electricity
is turned off, fire will occur.
- If there is loose electricity, turn it off
using one of the circuit breaker buttons.
- If there is fire, turn on the water mist
button. The power to the water mist panel might be any one of the 4
buttons on the circuit breaker.
- If there is smoke or poisonous fumes in the room, turn on the
air flow panel. The power to the air flow panel might be any one of the
4 buttons on the circuit breaker.
The room's color turns blue if all the hazards
are repaired or removed.
Room 1: Damage - loose
electricity, fire and poisonous fumes.
Turn off electricity using the bottom button
of the circuit breaker.
Turn on the watermist system using the second
from top circuit breaker button.
Press the on button of the water mist.
Turn on the airflow system.
Room 2: Damage - loose
electricity..
Turn off electricity using the bottom button
of the circuit breaker.
Room 3: Damage - fire
and poisonous fumes.
Room 4: Damage - loose
electricity, fire and poisonous fumes.
Room 5: Damage - fire.
Room 6: Damage - loose
electricity.
Room 7: Damage - fire.
Room 8: Damage
- loose electricity.
Room 9: Damage - loose electricity.
Room 10: Damage
- loose electricity and fire.
Room 11: Damage - fire and
poisonous fumes.
Room 12: Damage - poisonous
fumes.
Room 13: Damage - loose
electricity, fire and poisonous fumes.
Room 14: Damage - loose
electricity and fire.
Julia switches the probe to system default.
Main panel:

See the main panel.
At top left are 6 icons: Solar system, probe,
workbench, Mobot, messages and main menu.
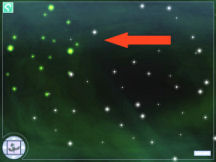
Solar system: See the
planet Xenophon. The solar system is seen when the Solar system tab is
selected. One Xenophon day is equals to 3.7 Earth days.
Probe: See the probe
overview. Click on a component to see a closeup at right. A component check
seen at top of the closeup shows that it is working properly.
Workbench: This is where
upgrades are made.
Mobot: See the mobile
robot - Mobot C-2A4 58123. It is used for planetary exploration.
Messages: This panel
shows Mission data, current goals and history. At right end is the Mind
o'Matic.
XENOPHON
Objective: Light in the darkness.
Landing on Xenophon:
Julia says to switch on the planet view and
commence landing.
Select the solar system planet tab. See the planet
Xenophon in orbital view. There is one landable zone.
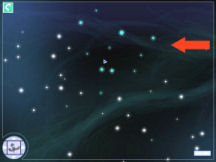
Dispatch
Mobot: Click on the planet at right view.
See Mobot icon attached to the cursor. Click Mobot on the planet.
Mobot is dispatched to
the planet.
Mobot states that there
is intense radiation. It is a result of an explosion at the time
of the start of the exploration 500 years ago.
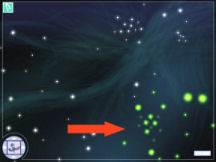
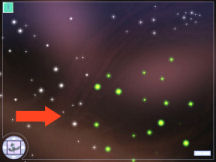
Julia scans the planet. A structure is seen in the
map. Julia activates Mobot's exploration mode. See the status at right of
the panel. Click the red arrow to land.

Bring power back to
station:

Mobot is now in front of the research station.
Enter the station: Mobot
sends his mobile unit inside the station. It is dark inside.
Rachel states that the stations are powered by solar
system panels. They need to restore the power to the station.
Exit the station.
Examine the station
entrance: See reflectors at right end of the station.
See the storage unit and ladder on the side of the
station.
Examine the crates on the ground under the
station.
Examine the satellite on the roof. It is the communication between the
station and the probe.
Examine the external storage unit under the entrance to
station.
Examine the left side of station:
Go left to the end of the station. Examine the landscape.
Examine the metal plate. Mobot states that the
inscription has faded. Rachel comments that it looks like a tombstone.
Examine the shuttle. It should be perched on top of the
station. Mobot doesn't think it was moved be due to seismic activity.
Examine the front side of the station:
Go back to the right and be at entrance. Go to the front side of the
station.
Examine the sky and learn Julia's thoughts about
constellations.
Examine the catwalks and reflectors on the ground.
Examine the sockets plugged to the side of the
station.
Examine the elevator. Rachel says it is used to
directly send in samples into lab for containment. Mobot says it is still
sealed.
Calibrate the solar panels:
Examine the 3 buried objects. Mobot states they
were once solar panels. Uncover the dust heaps to expose the 3 solar
panels. Automatically, Mobot assembles the 3 solar panels.
Read the instructions (question mark) at top right of screen.
Click the solar panels to adjust the positions.
The solar panel becomes reflective when in correct position. See that light
is on inside the station.

Objective:
Gain station entrance.
Abandoned research
station:
Return to station entrance. Enter the station.
Pressure - Decontamination chamber:
Look around.
Examine the sprinkler, screen and controls left of
door and the handles on the ceilings.
Examine the decontamination pool and waste
disposal on the floor.
Examine the door and the ID lock left of it.
Examine the piece of cloth on the floor. Mobot
says it is a part of uniform and it has dried blood. A dried blood sample
is obtained.
Examine the metal plate. Look under the metal
plate to get the ID card of Alexander Hinkley.
Use the ID car of Alexander Hinkley on ID card
lock of door.
Enter through the other door.

Objective: Locate Survivors.
Main Hall:
Human body: See a human body
propped on the wall at left. Learn from Julia that it has been 60 Earth years since the
crew went down here. Xenophon rotates 3.7 days compared to one Earth day.
Examine the male body. Search the body and get the
ID card of Andrew Lark. Obtain sample.
Examine and gather the laser gun evidence by the
body.
Examine Andrew Lark's datapad from floor by the
body. It needs a password. Click on icon at top right. A nanoSD memory card
can be inserted on the datapad.
Look around: Examine the
malfunctioning station status screen above the body.
Examine the chair. Mobot postulated that there was
a fight or someone left the room in haste.
Examine the storage box at middle of the
floor.
Examine the work desk, chair and crates.
Check the crate at bottom right of the screen.
Examine Scott White's datapad on top of the crate. A nanoSD memory card
can be inserted on the datapad.
Objective: Gather evidence
Computer terminal (Yambushi station):
Examine the computer terminal above the crates beside the work desk.
Select Command Chief Master Sergeant Alexander
Hinkley's card.
Personal ID #: 2889638/88765. His department is aviation.
Check the messages by clicking the envelope
icon at bottom of screen.
- Read the Crew message about rules violations
and an emergency meeting.
- Read the message exchange with Pavel
Cernohous. They talk about Lark blaming it all on Cynthia.
Pavel works in the lab.
Learn that Alexander's datapad password is
xander756. That datapad has his notes.
- Read the message exchange with Li Zheng. She
is not feeling well.
Check the media file and see pictures.
Click on back arrow at bottom right of screen.
Select Major Andrew Lark's card.
Personal ID# 556871/35489. His department is military.
Check the messages by clicking the envelope
icon at bottom of screen.
- Read the message exchange with Barth Krylov.
Lark prepares a trap for Cynthia. Krylov doesn't want to be part of the
trap and tells Lark about info in his datapad.
- Read the message exchange with Cynthia
Cleveland. Cynthia is mad.
Check the media file and see pictures. Log out
by pressing the power button at bottom right.
Lab door at right: The
lab door at right
is locked and the keypad needs a password.
Living room door by body: The door ID lock
mechanism
is destroyed beyond repair and Mobot can't open it.
Sleeping quarter's door at left: Open the looked
door behind the body. Use any ID card to enter.
Objective: What happened to the crew?
Sleeping Quarters:
Women's sleeping quarters:
Examine the door. It is destroyed. It looks like it was shot at by a laser
gun.
Storage space: Examine
the storage space at end of the hallway. The mechanism is
malfunctioning and cannot be opened.
Men's sleeping quarters: Access keylock and use any
male ID card.
Body on bed: The 34 year old
male was shot in the head while sleeping. Obtain body sample - evidence.
Examine the bed (top and bottom bunks) and the display beside the body.
Pavel Cernohous' datapad:
Examine Pavel's datapad above the display.
It was last accessed 2133/19/38. Read the
entries. Check the number of pages per entry so that you can read them
all.
Learn about Pavel's nightmare about a purple
lake and acid.
Pavel was sick with headaches, has nausea and rash. Li's hair fell off in patches before she died.
Alexander got sick the day after Li died. Lark
blamed Cynthia for the poisoning. Pavel mentioned a jungle fiasco.
Pavel's locker code is 978125.
Learn that Alexander died. Alexander changed
his password by increment of 1.
Learn that Lark took care of Cynthia. Scott
got
sick. Barth destroyed the hovercraft which was their only way back to the
probe.
Bottom bunk at left: Examine the
display and broken entertainment display.
Examine the top bunk.
Floor: Examine the nutrient
packs, cup and junk on the floor. Examine Pavel's shoes on the floor.
Alexander's datapad: Examine
Alexander Hinkley's datapad on the floor. It needs password and can use a NanoSD memory card.
Enter xander756 and then confirm. Access denied.
Hmm...
Remember the entry in Pavel's datapad -
Alexander's password was changed incrementally by 1.
Alexander's password stated in his messages
is: xander756
Enter xander757. Confirm.
Alexander started his log on 2133/19/23, their
first Xenophon briefing.
The planet Ambrosia that caused Pavel's nightmares
is mentioned.
Someone sabotaged the communication data
channels to the probe - Julia.
Learn that Barth changed the passcode to the
lab to 014563.
Lockers: Examine the lockers at
back wall. 2 of the lockers need password.
Use Pavel's locker code - 978125 on the bottom
locked locker. Get Pavel's ID card.
Ventilation system: Check the
ventilation system on the ceiling above the lockers.
Objective: Enter the laboratory.
Main hall:
Go back to the main hall.
Use the computer terminal (Yamabushi station):
Use Pavel Cernohous' ID card on the
computer terminal.
Personal ID#: 996357/19466. He is a civilian
and works in research.
Check his messages.
- Read the message exchange with Scott White.
Learn that Barth Krylov destroyed the
hovercraft.
Barth's datapad's password starts with his
full name and some long number.
- Pavel insinuated to Barth that the symptoms
match Thallium poisoning.
- Pavel refused an invitation from Cynthia
Cleveland.
Check the media file and see pictures. Log out
by pressing the power button at bottom right.
Laboratory:
Enter the passcode seen in Alexander's datapad on
the door at right - 014563.
Enter the lab. Look around.
Examine the containment unit at right corner.
Examine the glovebox-hood that was never used.
Examine the strange device on the table at right.
It is a make shift Geiger counter from parts taken off the hovercraft. Learn
that there is a radiation counter in the system.
Examine the datapad on the floor. It is Barth
Krylov's datapad.
Examine the scrap pad under the left table.
Examine the datapad on the left table. There is a nanoSD card inserted on the datapad.
The nanocard is removed from
Cynthia Cleveland's datapad.
Examine the broken device part on the floor at
left.
Blueboard: Examine the blueboard
at left corner of room. Touch the blueboard to turn it on.
There is a computer monitor right of the blueboard.
Analyze evidence:

Analytic station: Look
close at the analytic station at corner seen at middle of screen. The analysis hood is left
and the analysis table is at the corner.
See the instructions for using the analyzer.
- See the sample at right. Drag the sample to be
analyzed on to the green square at left.
- Press the perform analysis button at bottom.
- The sample is analyzed and the type of analysis
is seen at bottom. Select the results. Bioanalysis is a DNA icon. Data
analysis is a binary icon.
- Past analyzed samples can be reviews by clicking
on the tab on right frame.
Cloth sample (from decontamination chamber):
The sample contains degraded dried human blood.
The blood came from an outside source and not from
the person wearing the cloth sample.
Go back to object list by pressing the button at
bottom of frame.
Body sample (from dead body at main hall): Bioanalysis shows that the skull is badly fractured and laser gunshot as
caused of death. Mutated human virii is present in the body.
The data analysis confirms that the body is Andrew
Lark.
Go back to object list by pressing the button at
bottom of frame.
Laser gun (held by Andrew Lark):
Fingerprints seen are mostly Andrew Lark's with traces from Scott White.
The laser gun was fired exactly nine times.
Go back to object list by pressing the button at
bottom of frame.
Body sample (from men's sleeping quarters):
Sample shows that the body was shot in the head with high probability while
sleeping.
DNA comparison confirms that the body is that of
Pavel Cernohous.
NanoSD card (taken from Cynthia Cleveland's datapad): Bart Krylov's fingerprints with traces of Andrew
Lark's are detected in the card.
The card contains a password analysis program. The
program will not work on datapads with strong protection.
Click on back arrow at bottom right of screen.
Objective: Spies among us.
Cynthia Cleveland:
Hack Cynthia Cleveland's data pad:
Examine Cynthia's datapad on the left table.
Click on the NanoSD icon at top right of the
datapad. Insert the NanoSD card by clicking on the icon at bottom left.
Click on a letter-key. If it turns green, it
will show up on the lines for password above.
There is a limit of letters to enter before
Access denied comes up.
Deduce the password depending on the green
letters obtained. Play like Wheel of Fortune.
The password is wildflower.
Cynthia Cleveland's datapad:
Cynthia is a civilian and involved in research. Personal ID# - 983474/11589.
Read her daily record.
Learn about Lark's failure on the planet Ambrosia.
Cynthia will investigate if Lark knows something more.
She wanted to get Lark's ID card. Li died.
Cynthia borrowed Scott's card. She hid a camera in
the ventilation system of the men's dorm.
Alex died and she suspected that Barth is involved in his
death (like Li's).
Barth Krylov:
Hack Barth Krylov's datapad:
Examine the datapad on the floor of the lab.
Remember that Pavel mentioned on his log that
Barth's datapad password is made up his name and long numbers.
We need the numbers only.
Click on the NanoSD icon at top right of the
datapad. Insert the NanoSD card by clicking on the icon at bottom left.
Click on a number key. If it turns green, it
will show up on the lines on top.
There is a limit of entries before Access
denied comes up.
Learn that the numbers are 64257.
Enter BarthKrylov64257. Confirm.
Barth Krylov's datapad:
Barth is a civilian and assigned in research. Personal ID number -
155970/25489.
Read Barth's logs. Learn what he thinks of
Xenophon, Julia and Cynthia.
Only Lark and Barth know about the data channels
lost contact with the probe.
Learn that their planetary check ruled out
radiation poisoning.
Barth suspects Cynthia.
Alex and Barth tried to look for what is jamming
the data channels. He thinks the decryption unit has been sabotaged.
Barth mentioned a previous incident in Zenobia and
Lark's experience.
Andy Lark ordered Barth to make the hacking
program.
Andy and Barth took care of Cynthia when she
followed them outside - the trap.
After hacking Cynthia's datapad, Barth thinks he
made a horrible mistake. Cynthia might be innocent.
Barth started making a Geiger counter from the
hovercraft parts.
Learn that Andrew Lark's datapad password is
an9768221k.
Barth learns that the radiation is 11 Gy.
Examine Andrew Lark's datapad:
Exit the lab and check Lark's datapad beside his
body.
Andrew Lark's datapad:
Enter the password taken from Barth's datapad
- an9768221k. Confirm.
Read the log. Lark admits that he screwed up in Ambrosia.
Follow his thoughts about the loss of communication and Cynthia.
Lark deduced that "someone tampered with Julia".
Hmm...
Andrew Lark found out that "She" planned this from the
beginning. Ah...
He sent Scott to patrol the perimeter while he
took care of Pavel.
Scott White's datapad:
Hack Scott White's datapad:
Examine the datapad on the crate at bottom right
of screen.
Click on the NanoSD icon at top right of the
datapad. Insert the NanoSD card by clicking on the icon at bottom left.
Click on a letter-key. If it turns green, it
will show up on the lines at top.
There is a limit of letters to enter before
Access denied comes up.
Deduce the password depending on the green
letters obtained. Play like Wheel of Fortune.
The password is invinciblescott.
Scott White's datapad: He is a
lieutenant in the military. Personal ID# - 235688/35168.
Read Scott's logs.
Learn that Lark's Ambrosia fiasco caused 1 cryo-jailed (Rachel), 1 MIA, 12 dead and 7 left.
Learn that he became close to Cynthia and was still not aware about the lost contact with the probe.
Cynthia's camera:
Go to the men's sleeping quarters.
Look up at the ventilation cover above the
lockers. Remove cover.
See a camera. Obtain camera data. Get the
memory card.
Go to analytic station at the lab.
Analyze the memory card from the camera.
Biological analysis confirms that the fingerprints
are those of Cynthia Cleveland.
Data analysis shows a video of a hand entering a
passcode on the top locker.
The code is 549237.
Andrew Lark's locker:
Go back to the men's sleeping quarters.
Open the top locker with the 549237 passcode.
Search locker. Get the station's master card.
Computer terminal:
Use the terminal either in the main room or at the
lab.
Select Master card. Personal ID#: 993399.00008.
Department is Headquarters.
Blueprint: Look at the media gallery - camera icon at bottom
of screen.
The last photo is that of a blueprint for a solar
scanner. Julia says that if they build it they can leave this system.
Exit the terminal.
Mind'o'Matic (optional puzzle):
Open messages. Open the mind'o'matic at top right.
See an event tree chart. Place the tags at its
proper place and time to see the story progression at Xenophon.
Use the logs of the crew as clues.
Place the unused tags at Invalid clues frame at
right. A reset button is present.

Leave the station.
Click on the
departure box right of the green box at top right of screen. Mobot flies back to the
probe.
SPACESHIP
Objective: Build scanner and get out of this place!
See the main menu. Click on Workbench tab at top of the frame.
See the
blueprint of the
Solar system scanner. The scanner allows the probe to discover all the
celestial bodies in the solar system.
Launch upgrade interface. Read the
instruction. Click the continue button at top right to see the next
page.
After learning the instruction, see the main
work panel.
The aim is to construct the circuit by copying
the blueprint's pattern on the panel at right.
Place the components and connect them.
When done, click on the construct button at
bottom right.

Objective: Explore the solar system.
Select the solar system tab at top of the frame. Open the solar system view.
See the probe at Xenophon - orange planet with a
ring of meteors in orange orbit.
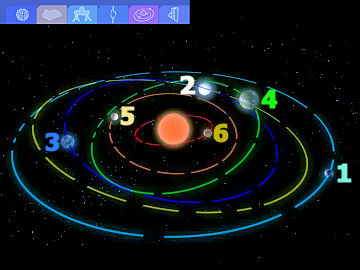
Study the planets in the solar system orbiting the
sun Salia:
Click on the planet to get information.
Phaidros: Study the
innermost orange planet in the red orbit.
Zenobia: Study the blue
planet in the blue orbit. It has gas vapors around the planet.
Ambrosia: Study the white
planet in the green orbit. The planet is green on its equator
Hermes: Study the large
white planet with 3 moons in the purple orbit. It is a gas giant.
Xenophon: This is the
planet we just came from.
Elpis: The outermost large
blue-white planet in the light blue orbit. It is a gas giant with a big
moon.
Solar system:
Now that the solar
panel is fixed, click on the solar system frame at top of the page. Let's
travel.
Let's check the innermost planet Phaidros. Click
on the planet in orbital view and the probe will fly there.
JULIA's memory
blocks:

On the way, Julia asks Rachel to help recover her memory.
Memory recovery module:
The memories are in
blocks. Restore the memory by assembling memory clusters.
See 5 memory clusters.
Each memory cluster to be assembled is made up of picture squares from same or another cluster(s).
The object of the
puzzle is to assemble the correct picture in each cluster.
Within a cluster, each square can be interchanged by left click on one and left click on the other
square you want interchanged.
To get a square (picture) from another cluster, right click the square on the worked
on cluster (big one at right) where the picture from
the other cluster is situated and the square will cycle through all the pictures (situated on that 3x3) of the other clusters. Stop when you get the picture square needed.
If the location of
that square in the cluster you are working on is already correct for that
cluster, it is best that you move the correct square to another location in that worked-on
cluster before right click cycling.
It is also best to
complete one cluster first to remove that set of pictures from the cycling.
The easiest and distinct picture to work on first is the green forest scene.
Compile all the green
pictures from the other cluster and then rearrange them to form the complete
picture.
The cluster background
square turns green when correctly done. The squares cannot be moved anymore
after the whole picture is assembled.
Portable Analytic Station:
While processing her memory, Julia finds a
blueprint of a portable analytic station that would allow Mobot to directly
analyze gathered samples while in exploration mode.
Click on Workbench tab at top of the main frame.
See the
blueprint of the
Portable Analytic scanner.
Launch upgrade interface. Read the
instruction by clicking the question mark at top right of the screen.
After learning the instruction, study the main
work panel.
The aim is to construct the circuit by copying
the blueprint's pattern at top left on to the panel at right.
Place the components and connect them.
When done, click on the construct button at
bottom right.

PHAIDROS
Phaidros data:
Let's check the innermost planet Phaidros. Open
the solar system tab.
Click
on the first planet from the sun in the red orbit.
Click on the planet in orbital view and the probe
flies to Phaidros.
Click on planet again in celestial body view and
it will be scanned.
Objective: Scout the station.
Abandoned research
station:
Note: Mobot's new analyzer is
now beside the messages at top right of the screen.
Send Mobot down to the surface of Phaidros by
clicking the planet.
See an abandoned damaged research station that
sits on a sand dune.
Examine the broken platform in the sand. They have
been thrown far from the station.
Examine the sand. Mobot takes samples of the
sand.
Examine the station. It has been damaged by
impacts. Mobot is hesitant to find what caused it.
Examine the storage bin. Something large pounded
on it.
Examine the station door. It is also damaged.
Restore power:
Rachel wants the power restored. That might get
the door opened.
Go behind the station at right.
Examine the broken parts in the sand. Looks like
something has been attacking the station.
Examine the cable. Mobot takes a sample of
the object on it.
Examine the socket of the station.
Examine the cable again and plug it to the
station. Nothing.
Examine the metal bar in the sand. Rachel tells Mobot to take the metal bar.
Solar panels: Clean the 2 solar panels. After cleaning the
panels, they got power.
Examine the compartment with question marks. It
contains air cleaning units.
Enter the station:
Go to the station's entrance. See that one side of
the double doors is opening-closing.
Try to enter through the door. Mobot does not want
to be squished by the door. Rachel says to insert the metal bar taken from
the side of the station.
Enter the station.
Pressure chamber:
Examine the deformed railing at right. It is
mechanical damage. Something pounded on it.
Examine the sticky substance on right wall. Mobot
takes a sample.
Examine the station shell - right wall. The damage
came from inside the station.
Examine the deformed cleaning unit at left.
Examine the opening under the deformed cleaning
unit. It is a Yamabushi indestructible paper - torn into pieces. Mobot will
make a digital reproduction of it.
Scan the papers.
Examine the organic substance on left wall. Mobot
takes a sample.
Examine the broken control panel left of door.
Examine the door. Mobot cannot open it without a
schematic.
Examine the socket left of door. Like the control
panel, someone was desperately trying to open the door.
Analyze the samples:
Open Mobot's new analyzer by clicking on the
colored circle icons at top right of screen.
Sand: Chemical analysis
shows silicon dioxide quartz with some unknown minerals.
Sticky substance from right wall of pressure
chamber: The substance doesn't resemble any know material.
Bionalysis showed complex structure that cannot be
analyzed by the limited analytic station.
Organic substance from left wall of pressure
chamber: The substance is highly corrosive. Further
analysis with current technology is impossible.
Scanned papers: Click on
"enter enhanced analysis". Put together the torn papers to get a readable
note.
Read the instructions at top right. Left click to
move the tile; hold right button to rotate it.
Move the pieces to top square; turn the paper
as needed. If in position, the paper cannot be moved again.


Open the locked door:
Take the multitool from the floor in front
of the closed door.
Plug multitool into the socket left of door.
Click - drag to connect top and bottom nodes.
Click on the connection line to remove it.
Using the clue from the torn paper (1-1, 3; 2-4;
3-1; 4-4; 5-2), connect (left to
right):
1 from top to 1 at bottom.
1 from top to 3 at bottom.
2 from top to 4 at bottom.
3 from top to 1 at bottom.
4 from top to 4 at bottom.
5 from top to 2 at bottom. The door is opened.
Spacesuit room:
MOBOT
detects high concentration of nitrogen in the air which makes the place
highly explosive. He is ordered to deactivate his electrical system and go to
solar panel backup.
Examine the laser gun left of door. Gather
evidence.
Examine container and then take the backup air
generating unit. It is heavy and can be picked up later.
Examine visor on the floor right of the spacesuit.
Examine the spacesuits. All breathing units have
been removed from the spacesuits.
Examine the spacesuit scanner right of door.
Main hall:
Go through door to the main hall.
Examine the main pipe and crowbar at center of
room.
Examine the holo unit on back wall. Examine the empty storage unit left of the holo
unit.
Examine the worktable at right.
The door at right that goes to the living room and the
door at left that goes to the hospital need ID cards.
Examine the antenna construction sketches on wall
above the desk.
There is a station computer above the desk.
Examine the datapad on the desk at left. It is
Roger Callan's datapad. Examine the Rubik's cube on the desk.
Hack Roger Callan's datapad:
Click on the NanoSD icon at top right of the
datapad. Insert the NanoSD card by clicking on the icon at bottom left.
The password is protected by strong cryptography
and cannot be hacked.
Objective: Clean the air.
Sleeping quarters:
Enter through the dormitory door at back wall
above the rungs.
Examine the empty compartment at top part of left
wall.
Male sleeping quarters:
Examine the damaged men's quarters door at right. There was an explosion.
Examine the fallen grate. It was blown out by the
explosion in the other room.
Examine the maintenance shaft. Someone tried to
manipulate the air supply.
Female
sleeping quarters: Enter the room at left.
Examine the oxygen tank on the lower bunk.
Take the ID card beside the tank - Marita
Robinson's.
Examine the diagram right corner. The air pipes
that are accessible are marked.
Examine the shoes and broken scrap pad on the
floor at right.
Examine the blueprint on how to remove the tanks
from spacesuits.
Examine the vent on the ceiling at left and
lockers below it.
Examine the closed locker. It needs a code.
Examine the cosmetics on the floor.
Examine the ventilation cover that supports the
possibility of
explosion in the station.
Marita's data:
Computer terminal:
Go back to main room. Use the computer terminal
above the desk at left.
Use Marita Robinson's ID card. Civilian
attached to medical department. Personal ID: 111255/12387.
Read the message exchange with Stephan Prinz.
Stephan has a theory about something he saw.
Marita's locker code is 987654.
Read the message exchange with Roger Callan.
Roger is feeling very odd.
Read the message exchange with Benjamin
Walter.
Look at the media gallery.
Marita's locker: Go back
to the female dormitory and the lockers.
Enter the code taken from the messages: 987654.
Take Marita Robinson's datapad in the locker.
Hack Marita Robinson's datapad:
Click on the NanoSD icon at top right of the
datapad. Insert the NanoSD card by clicking on the icon at bottom left.
Click on a letter-key. If it turns green, it
will show up on the lines at top.
There is a limit of letters to enter before
Access denied comes up.
Deduce the password depending on the green
letters obtained. Play like Wheel of Fortune.
The password is magtastic.
Read the log that was started on 2132-4-16.
Marita presumed this place is ideal for the
crew to calm down after Ambrosia and Zenobia.
Roger heard sounds in the night.
They lost connection with the probe and Marita
suspects Lark. (It's weird writing this.)
The crew showed her green jelly. Benjamin
can't restore the communications and might need a walkthrough.
There is a thing outside that destroyed the
internal air generators.
Stephan was badly injured. The thing doesn't
want to eat them.
Stephan's datapad code is freed91023. It has
plans for external air unit.
Hospital:
Go to the locked door at left wall of the main
hall. Use Marita's ID card on access slot.
Examine the mutilated skeleton on the table.
Examine tools on the floor.
Examine the datapad on the floor. It is Stephan
Prinz' datapad.
Stephan Prinz' datapad:
Use the code taken from Marita's log - freed91023. Confirm.
Stephan is civilian and in research. Personal
ID# 667234/78553. Read Stephan's log.
Learn that after Ambrosia, Lark split the
crew. Lark sent the 5 stable crew here while the others are recovering
on the probe.
Stephan heard a noise but the probe's inquiry
was negative.
The probe - Julia insists that the readings
are negative.
Roger rushed in screaming something tried to
eat him.
Benjamin found out that the sound returns at
the same time every day. Benjamin made a program which detects sharp
amplitude changes.
The crew was woken up by heavy pounding. They
found greenish substance around the station. Communication with the
probe was lost.
The air generator broke and they have to take
turns changing the external air unit. RTL NOG is mentioned.
The thing got Marita while she was changing
containers of the external air unit.
The air generator correct levels are: 20.9%
and 1.1%. The fans have to be cranked up to maximum and then lower them
immediately to midpoint to expel the bad air inside.
The last entry was when it was Stephan's turn
to change the external air unit.
Examine the medicine cabinet at left wall. There
is a computer terminal left of the cabinet.
Examine the x-rays. Parts are missing. They look
like they were chewed on.
Open the door under the medical worktable.
Examine the container. Take the container.
The surgical room door is broken beyond repair. Look through the surgical room window.
Living room hallway:
Use Marita's ID card on the locked door at
right wall of the main hall.
Examine the ladder that accesses the shuttle on
the roof of the station. It is blocked.
Examine and then acquire the air unit container
on the floor.
Examine the documents - electrical wiring
schematics on the floor.
Examine the tools and the wirings that was cut.
Examine service -toilet door. It needs a password.
Living room:
Enter the room at left.
Examine the body on the floor. The hands are
clenched. Mobot got an ID card that is different. It is a maintenance
card. Obtain sample.
Examine food tray on table.
Examine the datapad of Benjamin Walter's on the
table.
Try to hack Benjamin Walter's datapad. It
is protected by strong cryptography.
Examine the central air and electrical circuits
diagram on left wall under the station computer.
Maintenance data: Use the maintenance card on the computer. It
came from a person at engineering department.
Check the media gallery. See schematics of
machine parts.
A blueprint to enhance Mobot's auditory
capabilities is found.
Check the Station controls folder.
Links are lost for station maintenance,
validation sequence, station-orbit communication and station
transportation.
The air unit control link reads that incorrect
air composition is detected. It refers to chapter 17 of the manual -
replacing air containers.
Examine the broken window at the back wall. It was
broken from outside.
Examine the hanging cables' electircity conduits
on the ceiling.
Look through large window.
Learn that JULIA, unlike MOBOT has an emotional AI
unit.
Collect the container:
Go to hallway and feel a rumble that shakes the
station. Mobot did not detect anything around.
Go to Spacesuit room. Take the container
from the floor.
Analyze the samples:
Open Mobot's new analyzer by clicking on the
colored circle icons at top right of screen.
Laser gun from spacesuit room: Bionalysis shows that the prevailing prints are from Stephan Prinz.
The laser gun has
never been fired.
Container from hospital:
Chemical analysis shows that it has chemicals used to synthesize oxygen.
Container from living room hallway:
Chemical analysis shows that it has chemicals used to synthesize lesser
gases in breathable air.
Body sample from man on floor of living room:
Biological analysis shows that the man died of heart attack after seeing
something outside.
Data analysis identifies the man as Benjamin
Walter.
Container from spacesuit room:
Chemical analysis shows that it has chemicals used to synthesize oxygen.
Change the air units:
Air containers: Go
outside and then to the side of the station. Look close the compartment at
base of station.
Remove all 3 containers.
Remember the cryptic note Stephan wrote on his
datapad: RTL NOG - right to left - nitrogen, oxygen, gas mixture.
Insert from left to right: gas mixture, oxygen and
nitrogen containers.
Adjust the gas ratio: Go back
inside the station.
Go to the computer terminal at main hall. Use the
maintenance card.
Select the station controls folder.
See the air unit control adjustments at right.
The nitrogen tank's link is lost.
Remember what Stephan wrote - The air
generator correct levels are: 20.9% and 1.1%. The fans have to be
cranked up to maximum and then lower them to midpoint to
expel the bad air inside.
Gas levels: Adjust oxygen to
22.4 first; then adjust gas mixture to 1.1. Then lower the oxygen to
20.9% (nitrogen is at 78%).
Expel bad air: Using the
controls at right of the panel, turn on fan.
Then use the up arrow to raise the level to
the very top. Rachel says to wait.
Then move the level using the down arrow to
midway. The machine will show that it is operating correctly.


Return to spaceship:
We need something to open the men's quarters. We
will come back here later.
Click on Mobot's button right of the green button
at top right to return to the spaceship.
SPACESHIP
Upgrade Mobot's audio:
Open the workbench tab at top of main control
frame.
See the blueprint for an audio kit extension. It
will improve Mobot's signal recording and processing abilities.
Launch upgrade interface.

AMBROSIA
Ambrosia data:
Let's check the third planet Ambrosia. Open the
solar system tab.
Click
on the third planet from the sun in the green orbit.
Click on the planet in orbital view and the probe
flies to Ambrosia.
Click on planet again in celestial body view and
it will be scanned.
The scan showed that the planet has extra
terrestrial life. The green belt on the equator is vegetation. There is a
purple spot on the surface that looks artificial. There are 27 hours in a
day.
Objective: Explore the jungle.
Click on the planet with Mobot cursor to fly down
to the planet.
Mobot is disoriented by the flora around him. There
are obvious signs of habitations.
Julia will activate a visual map once Mobot starts
exploring. They will search for signs of the exploration team that was
here before.

Landing site (M-5): Examine
the vegetation. Mobot notes that there is acid in the rain.
Examine the tree. It doesn't create branches. The
leaves are clustered on the trunk.
Exit to jungle.
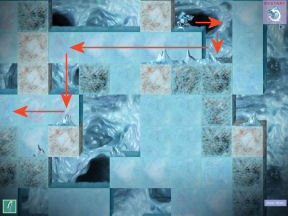
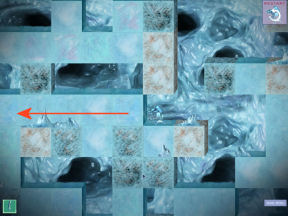
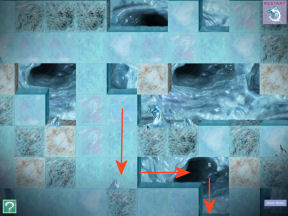
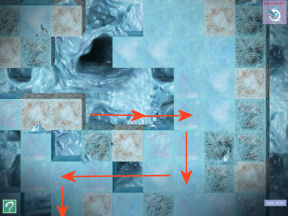
Visual map: See the visual
map.
Click on the arrows at top left of the grid or use the
keyboard arrows to move Mobot on the map grid. Find points of interest
at certain places.
Be sure to map-visit all points of interest. Once
the points of interests are visited, they will then be jump to points. Click
on them to fast travel. The important sites are shown by yellow picture
square.
Current position - Mobot is seen in rotating red
circle.
Julia relates the disaster that happened the last
time the team was here. The exploration team fired at the inhabitants on
sight. They didn't even greet them. Andrew Lark
led the team.
Explore: Click on cursor
or use keyboard arrows to move around.
Observe the surroundings on the screen at right.
Obelisk at lower right of the map
(L-13):
See a place that must have been made by sentient
beings. There is an obelisk with a hole and swirling light inside the hole.
Examine tree at left. It looks dead. Mobot takes a
sample.
Examine the insect on the vine at top of screen.
It looks like a firefly. Mobot catches the insect.
Examine the dense vegetation.
Examine the obelisk. It is not naturally formed.
Someone built it.
Examine the swirling hole at top of obelisk. It
has a strong electromagnetic energy field. Mobot is not sensitive enough to
analyze it.
Go back to the jungle and continue exploring. See
that the obelisk is marked in the map.
Analyze samples: Open
Mobot's analyzer by clicking on the colored circles at top right.
Insect - Bionalysis shows similarity with
Coleoptera - beetles. The chemical analysis shows that the glow is caused by
a phosphorous compound excreted by the insect.
Dead tree sample - Bioanalysis shows that the tree
is consumed by insectoids.
First contact (I-12):

At bottom right of the map (I-12), Mobot is
followed by an apelike creature that travels through the tree canopy - from one tree to another.
Mobot sees the creature. The creature makes
sounds. Mobot greets the creature. The creature starts drawing mysterious symbols.
Analyze written language:
The aim is to get the bar- translation progress to
the right 100%. Then Mobot learns the language.
See circles at center that has a sound wave line
that dissect them.
If one or more of them are lighted - that is the
sound-word made by the Ambrosian.
At the bottom of those circles are the Ambrosian
meaning of those sound(s) said by the Ambrosian.
At the top are the possible translations of the
sound(s).
Select the possible translation of the sounds by:
- Select-click the translation that has exactly the
same number of lines as the lit circles. If there are 3 lit circles with 3
lines, look
for a translation above with 3 lines connected to the center.

- Select-click the translation that has the same formation of lines connected to the
lighted circle. If there are 2 lit circles connected by 2 lines at top, look
for 2 lines that are formed similarly as the lines at the bottom part
connected to the lighted circles.

- If the Ambrosian inflections at bottom has more
than one possible meanings, select and click on all possible translations at
top part.

- If choice is correct, the circles at the center will
flash green from left to right.
Do the selection until the bar at top right reaches
the end. Then full comprehension is reached by MOBOT.
The Ambrosian shows signs of surrendering. Julia
recommends not telling about knowing the first team's visit.
The Ambrosian wants to know if they are being
punished again.
Mobot talks to the Ambrosian. He tells the
Ambrosian that
they want to learn the way of the ancients.
It will meet with Mobot in his
settlement at end of jungle. It will teach Mobot about the ancients after he has finished his
explorations.
Laser gun altar (K-13):
Continue exploring the jungle.
Explore at bottom right and see a place above the
first obelisk square.
Examine the glowing flowers. The light forms that
covered the flowers produced the glow. Mobot takes a sample.
Examine the snail shaped plants. Mobot gets a
sample of the curled part of the plant.
Examine the vines above. Rachel thinks those are
sidewalks where the Ambrosians walk on.
Examine the fantastique shape. There are 2 of
those statues at either side of the structure.
Examine the inside statue.
Examine the painting on the structure. It is a
depiction of a laser gun.
Examine the spherical part at top of the
structure. It has a funnel and has a contraption at the back of the head.
Approach contraption and see symbols in a panel.
There are scratches at top of the symbols. Examine
scratches. Recover inscriptions. Read inscriptions. Flow with me to
understand your past. We will do this later.
Analyze samples: Open
Mobot's analyzer by clicking on the colored circles at top right.
Flower sample - Bioanalysis shows that insects
feed on the plants and their excreta serves as nutrients for the plants.
Curled plant - Bioanalysis shows that it is an
annual plant that commits suicide by tearing itself apart to spread its
seeds.
Article of power: Exit the area.
The Ambrosian comes back and said that the laser gun is an artifact of power that
brought many of them to ancient Xir.
Obelisk at bottom center of map
(K-5):
Examine the obelisk and the swirling hole with
energy.
Machete altar at middle left of the map (F-2):
Examine peculiar tree. It seems to grow from the
spherical object at bottom which in turn is part of the vines. Get tree
sample.
Examine the gorge behind the altar.
Examine the statue. Looks like one of the
exploration team.
Examine the painting. It is a machete.
Examine the spherical head. It also has a funnel
and a contraption at the back.
Examine the funnel and approach the contraption.
Contraption: It also has the
scratch marks. Examine the scratch marks. Recover the inscription. We will
do this later.
Analyze sample: The tree sample shows that vines
compete with other vines and kills the rest to survive.
Article of faith: Exit the area
and the Ambrosian says that the altar is for the article of faith; the
machete. It is here to test their faith.
Purple lake at center of map (E-6):
See the purple
lake at middle of the map.
Examine the dead vegetation.
Examine the lake. The lake is filled with highly corrosive substance.
Exit the area and the Ambrosian returns. It says
that the lake is their doom.
It was once filled with the essence of life. Julia
says that it is not us that did this.
Obelisk at top right of the map (D-10):
Examine the bonding plants. Julia says that the
plants is part of the other plants. Take sample.
Examine obelisk and swirling hole.
Analyze sample: The bonding plant sample shows
that the plant share one common root with other plants and may cover
kilometers of Ambrosia's surface.
Shoreline of purple lake at top middle of map (D-6):
Examine the dead vegetation.
Obelisk at middle left edge of map (F-3).
Examine enormous tree that is 1 km tall. It looks
like the tree swallowed the obelisk. Take sample.
Examine obelisk and swirling hole.
Analyze sample: The tree sample shows genetic
mutation that brought the enormous size and longevity of the tree.
Objective: Ambrosian reunion.
Go to the Ambrosian (A-7):
Ambrosian's settlement:
If you have
seen all 4 mystical places, the 2 altars (laser gun and machete) and the
purple lake; proceed to top of the map - to the settlement.
Examine the purple plant. The berries might be food
of the Ambrosians. Take sample.
Examine cocoons. The cocoons are where the Ambrosians
live in.
Examine hanging blossoms. Take sample.
Examine walkway used to travel in the jungle.
Take sample.
Examine opened cocoon. The cocoon can be pulled up
to the top of the trees and sealed.
Analyze samples:
Fruit - It serves as food for the life forms but
poisonous to humans. It has level of cyanide based compounds.
Hanging blossom plants - The plant is
carnivorous. It attracts insects and traps them.
Vine walkway - The vine has been treated with
chemicals to reinforce its strength.
Talk to the Ambrosian:
Ambrosian: Examine the
Ambrosian. Talk to
the Ambrosian. See the communicatron. Select a topic and get
information.
Environment:
Secret of the 2 altars: They
are pillar of memories built by an old branch. It was told to them by
stories and legends.
To the humans it has only been a couple of
years. The Ambrosians have forgotten.
It is said that one who obtains them restores
faith in a better future.
Dead lake: Essence of
our doom. Our punishments... If you understand our punishment; he
can reveal an important part of their history.
Strange obelisks: The
stone of enlightenment. They were created by Ith as part of their
pilgrimage of enlightenment.
History:
Ask for a history lesson. They were taught the way
of modesty. They were once the rulers of the bhialth- Salia solar system. The
built a settlement far from here. The Masters arrived and taught them in
the form of 3 punishments.
First punishment: The
first punishment was when the ancient lords came. They were proud then
and thought to rule the universe. The lords destroyed cities and
everything they invented. They were then trapped on this planet.
Second punishment:
Another set of masters that are different from the last told them to
repent their ways or die. A
flash of light changed the sacred essence of life to essence of doom. Ith
the prophet performed a sacred rite and was taken by the masters to the
place in the mist.
Third punishment: Ith
returned to them and they were happy. His death divided the tribe into
many branches.
The leader of the branch saw the masters descend from the
sky but did not meet them properly like the other greeters. The masters
were offended and punished them. The leader survived the massacre
because he hid. That is how they learned of what happened.
The Ambrosian is now the watcher of the skies - greeter.
He hopes that they
give their branch a new meaning. The Ambrosian showed hope for the
future. The only hope is the ancient prophecy.
Mythology:
Ith: Ith traveled to
a
place of the mist; high above third plane of existence where live the
ancient gods. Ith learned how to calm the lords. He returned and during
his time of solitude erected structures which they now know as preparing them for the pilgrimage of
enlightenment.
Pilgrimage of enlightenment:
There are 4 empty parchments left by Ith. Ith told the leaders that the pilgrimage is
ready. Since the parchments are common to them, they ignored it and
subsequently forgot. After the last punishment, they resurrected the story
of Ith.
The
Ambrosians did the journey of Ith as a rite of passage. They are handed the
parchments and left alone. They traveled to sites that Ith visited and meditated
on it. Whoever understands it will be the leader. Many tried yet none succeeded.
The team will try. The Ambrosian is pleased and gave them the 4 parchments
hoping that they will come back with answers.
The prophecy: When Ith
returned from the sky, he brought the prophecy. It is foretold that a
wanderer from the sky will come and restore the essence of life;
reverting the punishment. Somewhere in the bhialth lies a place where
the essence can be discovered.
The Ambrosian draws a symbol. Mobot copies the
symbol.
Artifact from altar: Mobot says that they will get the artifacts
and give it to them. The Ambrosian is in awe.
The contraption will come alive when the
essence of punishment (corrosive purple liquid) is poured on it. He
gives Mobot a purplish container so that he can handle the essence of
punishment. If Mobot gets the artifacts, he will give them the artifact
of wisdom (another item left by the ancients).
Analyze items:
Empty scrolls - Chemical analysis of the scrolls
shows that they are like old photographic films.
Empty container - Chemical analysis shows that the
material doesn't react to any available substance and potent acids.
Spectral analysis shows that the material is
practically indestructible.
Objective: Retrieving
artifacts.
Pilgrimage of
Enlightenment:
It is time to travel
to the sites visited and structures erected by Ith. MOBOT has the 4 blank
parchments.
Go
to one of the obelisks. Click on a structure with the swirling energy in the map and jump
there.
Rachel recommends to expose the scroll on the swirl.
LOL - Julia.
Obelisks
and parchment: Expose the pergamen to the
swirl. The swirl makes a visual pattern on the scroll.
Jump to the rest of the mystical places and do the
same until 4 parts
of map are obtained.
Analyze the visual pattern:
Markings on the scroll. Enter
enhanced analysis.
See the 4 maps on the left. Click on a map and it will appear
on the big parchment
at right.
Click on sample 04 - bottom right, then sample 01 -
top left, sample 03 - bottom left and last sample 02 - top right.
Markings are seen but still not understood.

Artifact:
Purple lake: Jump to the purple
lake. Fill container with acid.
Laser gun altar (K-13): Jump to
laser gun altar.
- Pour in purple liquid.
- Approach the contraption.
Read the inscription that was cleaned by Mobot
- Flow with me to understand your past.
Lower the bars that would allow the flow of
liquid from one inscribed symbol to the next which follows the inscription
above. The lowered bars are seen as green lines in the picture below.
Raise the plug left of the first inscribed
symbol.
Press the lever right of the inscription to
start the flow of the acid.
The acid flows from one symbol to another
following the inscription. A sound is heard.
Take the laser gun from the head of the
altar.

Machete altar (F-2):
- Pour in purple liquid.
- Approach the contraption.
Read the inscription. Avoid me to learn of
the future.
Lower the bars that would allow the flow of
liquid from right to left and NOT pass through any of the symbols in the
inscriptions.
Check each row and look for symbols that
matches those on the inscription. Lower the bars only on those that are
NOT on the inscription.
All the other symbols that are NOT in the
inscription must have the acid pass through them.
Raise the plug at right of the first symbol not found above.
Press the lever left of the inscription to
start the flow of the acid.
The acid flows from one symbol to another. A
sound is heard.
Take the machete from the head of the
altar.

Give the artifact: Go back to
the settlement (A-7). Talk to the Ambrosian.
Select mythology. Deliver the gun and the machete.
These will give them hope for the future.
The Ambrosian gives the black box to Mobot. It is an
Omega disk.
Analyze the omega disk: Enter
enhanced analysis.
Blueprint recovery:
Rearrange the tiles to complete a picture of the blueprint.
It is a blueprint for a blowtorch for Mobot

Go back to the
spaceship:
Jump to the point of
arrival at the red and white icon at bottom middle of the map.
Click on Mobot icon at top right of screen.
SPACESHIP
Upgrade Mobot's audio:
Open the workbench tab at top of main control
frame.
See the blueprint for a blowtorch - laser cutter.
Launch upgrade interface.

PHAIDROS
Now that MOBOT has a blowtorch, let us go back to
Phaidros.
Go to solar system view and click on Phaidros, the first planet from
the sun in the red orbit.
Land in Phaidros.
Research station:
Enter the station through to the dormitory door at back
wall above the rungs
Enter the men's sleeping quarters: Torch
through the damaged door of the men's sleeping quarters. MOBOT's portable
unit
uses his blowtorch upgrade.
Examine the debris. It seems the explosion was
caused by an electrical surge.
Examine corpse:
Examine the corpse. Mobot gets an ID card - Roger Callan. Get a body
sample.
Analyze the body sample:
Biological analysis shows fractures of skull and bones as a result of
explosion.
The data analysis shows that the corpse is Roger
Callan.
Roger's data:
Go to the computer terminal at the main hall.
Use Roger Callan's ID card on the terminal.
Roger is a civilian and assigned to research. Personal ID 358774/32874.
Read his messages.
Benjamin Walters does not believe that Roger saw
something.
Learn Roger's datapad's passcode: his name and
313012.
Roger asked Stephan about the green stuff.
Look at his media gallery.
Examine Roger's datapad on the desk.
Enter Roger313012. Confirm.
Read his log that started on 2132-4-14.
Roger comments on what happened in Ambrosia and
the natives.
Roger thinks the sound calls him.
Learn that Benjamin Walter's code starts with
e79a12zwu. The last letter must be a number.
2 days later on the 25th, Roger got in Benjamin's
datapad. Benjamin is trying to track the sound. Roger suspects Andrew or
Julia. He will build his own device to intercept communications.
The entry on the 27th states that Roger will fight
the large thing.
Roger killed her and offered her to the thing in
the sand.
Roger lost his mind.
Benjamin's datapad:
Go to the living quarters through the door at
right. Go to the mess hall at left.
Examine Benjamin's datapad on the table.
Benjamin is a civilian engineer. Personal ID#: 665782/15774.
Enter e79a12zwu6. Confirm.
Read the log that Benjamin started on
2132-4-14.
Benjamin started setting the server room up.
He hear and is tracking the sinister sound.
On the 22nd, Benjamin started having
communication problems with the probe.
The sound comes at same time everyday and that
something is circling the station. It comes close at 5 PT everyday.
On the 26th, the thing pounded the station and
left the green goo.
Learn that the server room code is 795597.
On the 37th, he noted that Stephan died today
and Marita is missing.
His last entry was on the 41st. He lost hope.
Service room:
Go to the hall and examine the door at right.
Enter the code taken from Benjamin's datapad -
795597.
Examine the UPS units at right wall.
Examine the data nodes at back wall.
Search for important data on the terminal at
center of room.
Mobot tries to hide the underwater upgrade.
SPACESHIP
Underwater upgrade:
Open the workbench tab at top of main control
frame.
See the blueprint for an underwater upgrade.
Launch upgrade interface.

ZENOBIA
Zenobia data:
Let's check the planet Xenobia. Open
the solar system tab.
Click on the blue
planet with blue orbit.
Click on the planet in orbital view and the probe
flies to Zenobia. Gas vapors of unknown origin formed a ring around the
planet.
Click on planet again in celestial body view and
it will be scanned. One day is 18 hours.
Barth Krylov at Xenophon mentioned an incident
here.
Zenobia's surface:
Click on surface to get Mobot down to the planet.
Cliff: Examine the ocean
and the sky.
Examine the corals. Get sample.
Examine plants. The plants are the ones
responsible
for the gas vapors in the ring around Zenobia. Get sample.
Examine opaque crystals. It might be due to
precipitation from ocean.
Analyzer: Analyze the
samples.
Plants - The plant is actually millions of
swarming small insectlike creatures. They produce the gas similar to
Zenobia's ring.
Coral sample - The corals
are formed by colonies of invertebrates from the ocean.
Peak:
Go left. Mobot hears an intermittent sound. To locate it, the sound
frequency needs to be isolated.
See a the sound frequency input.
The bar shows the wave lengths of the sound.
Move the bar on the line below and isolate the
sound at center line without the long and short wavelengths.
The sound is isolated at around 390 mhz
(350-399). Wait a little bit to see if the sound is isolated

Mobot wants a better location to go underwater.
Examine the vista.
Objective: Find the mysterious signal source.
Beach: Go back down to
the cliff at right. Go to the beach at right.
Freeze! See a creature on the rocks. Rachel wants Mobot to bring it back to the probe.
Mobot says it will die. Julia argues that it might
be sentient and questions Rachel's ease in killing a creature.
Click on creature and make a choice:
- bring the creature to probe.
- throw the creature into ocean.
- leave it be.
Underwater: Click on the ocean
to go underwater. Mobot dives down.
Expedition submarine: Rachel questions
Julia. It is the exploration team's
submarine and JULIA should know about it. Julia replies about her memory loss.
The narrator states the submarine was destroyed by
high speed impact on the crater wall. But why were they traveling at such
speed and who sent the signal? No one could have survived the impact.
Objective: Explore the submarine.
Outside the submarine:
Look around. Examine the mushrooms. Get a
sample.
Examine the cliff and the wrecked submarine.
Enter the submarine.
Storage room:
It is dark in here. Mobot's IR license expired due to
programming error. Mobot did a backup.
Look around. Examine scuba gear on floor.
Examine torn piece of metal on floor.
Examine various crates.
Examine weeds on pipes with red rings. Acquire
sample.
Stairs going down at bottom right of screen is
blocked.
Analyze samples:
Mushrooms - Bionalysis shows that it is similar to
Earth mushrooms and the glow is caused by luciferase.
Weed sample - Bionalysis shows that it is made up
of small invertebrates.
Front room:
Move lever left of the door at right side of the
screen. Enter.
Lifeform: See a lifeform feeding on a corpse.
Examine the lifeform. The corpse has a datapad on
him.
Julia says to shine a light on the lifeform to
remove it from the corpse. It zaps Mobot and tries to attack! Retreat!
Find how to control the lifeform:
Mobot is back at the storage room.
Using his audio enhancement, check what pulse and
frequency affects the lifeform.
Move the pulse halfway the bar. The lifeform reacts but no
response.
Move the frequency bar 2/3rds of the way. The
lifeform goes
away.

Check the back room:
Look left at the lever left of door (extreme left
of screen) behind the large crate.
Move lever. Enter the back room. Look around.
There are more crates here.
At top right of screen is an exit to further down
the corridor. It is an unstable environment.
Cabinet: Move the light
to bottom left and see a lever that holds a cabinet close.
Move lever. Examine and acquire metal rod from
cabinet.
Get rid of lifeform:
Attempt #1: Exit to
storage room.
Front room: Go to front
room to the lifeform. See that the lifeform is blocking the way to the
ladder.
Lure the lifeform.
Storage room: It watches Mobot standing now
at the storage room.
Use light to attract the lifeform twice. It's feeding on the weeds.
Use sound to repel life form. It doesn't react.
Retreat to outside.
Attempt #2:
Remove weeds: Go back
inside.
Remove weeds on the pipes with red rings.
Remove weeds from the gray tubes under the red
tubes.
Lure the lifeform again.
Use light to attract the lifeform twice. If more
than twice, Mobot gets zapped.
Retreat and Mobot says that the door behind him is
closed. Escape to the outside.
Attempt #3:
Back room door: Move the lever of the back room door.
When it opens, click on lever again to insert
metal rod. This keeps the door ajar. Now we have a place for Mobot.
Lure the lifeform again.
Use light to attract the lifeform twice.
Retreat to back room. It follows Mobot.
Lure the lifeform again. Use light to attract the
lifeform once. The door closes behind the lifeform.
Now both of them are trapped in the backroom.
Use sound to repel the lifeform. It goes into
cabinet with metal rods and Mobot closes the door.
Corpse:
Exit to storage. Go back to the corpse at front
room.
Examine the corpse. The chest is ripped apart by
the lifeform.
Acquire sample and datapad.
Go up the ladder but the trapdoor is sealed. Oh.
Analyze:
Corpse sample - The corpse's calcium in the bones was eaten by
the life form.
Objective: Decypher datapad message.
Datapad: Enter enhanced
analysis.
Decrypt the message in the datapad.
Rachel remarks about the punctuation marks. Julia
states that each letter is replaced by 2 numbers.
See a set of numbers. Each letter is made up
of 2 numbers.
The bottom row has the letters.
The dark orange numbers on middle row are the numbers
that should be matched with the letters below.
Click on a letter at bottom and then click on
a dark orange number at middle row that is a possible match.
The top light orange numbers will change to
the letter selected. The message will show the letter substitution.
If a mistake is done, replace it with another
letter or click on that letter in the upper row.
Look for a 1-letter word shown by 2 numbers alone.
It should be either I or A.
Then work on 3 letter words like 'the' shown by 6
numbers.

Learn that the expedition was going to wipe out
the inhabitants of the forest planet - Ambrosia. Rachel gets very
angry.
There is a high powered weapon here. Julia
obtained the blueprints for its construction.
Objective: Locate the high powered
weapon parts.
Front room: Inspect crate. Get
parts.
Storage room: Inspect crate in
front of entrance to front room. Get parts.
Inspect the crates at bottom right corner of
screen. Get parts.
Inspect crate blocking the back room door. Get
parts.
Back room: Inspect small crate
at bottom right of screen. Get parts.
Inspect the large crate left of the small crate.
Get parts.
Try and open the cabinet with metal rods. LOL.
Rachel will say if
all parts are taken.
Construct the weapon:
Open the analyser. Enter enhanced analysis.
See parts on the left frame Scroll-click the arrows
to scroll through the different parts collected.
Select or feature a part. Click on the spinning arrow to turn a part.
Click the attach button to place the parts in specific
order on the outline of the weapon at right.
 |
|
 |
|
 |
|
 |
|
 |
|
 |
|
 |
|
 |
| 1 |
|
2 |
|
3 |
|
4 |
|
5 |
|
6 |
|
7 |
|
8 |
| Attach 3 parts |
|
Turn and attach |
|
Turn and attach |
|
Attach 4 parts |
|
Turn and attach |
|
Turn and attach |
|
Turn and attach 4 rods |
|
Attach |

Return to probe: Go back
to the ship.
HERMES
Hermes data:
Let's check the planet Hermes. Open
the solar system tab.
Click on the large white gas giant planet with 3
moons in the purple orbit.
Click on the planet in orbital view and the probe
flies to Hermes.
Click on planet again in celestial body view and
it will be scanned.
Hermes has 3 moons: alpha, beta and gamma.
Scan the 3 moons.
- Alpha is the second largest moon and the
farthest from the gas giant. It has rock formations and shrouded in mist. It
is connected to Hermes by a gas tidal bridge. Possible landing site.
- Beta is the largest moon and the surface is
riddled with molten lava. Unsuitable for landing.
- Gamma is the smallest moon and closest to
Hermes. It is unsuitable for landing due to security regulations.
Landing site:
Land: Send Mobot down to
Hermes alpha. See that the moon is filled with stone pillars.
Julia says that has the same atmosphere as Earth
but thinner.
Rachel remember the map from the obelisks and noted
that Ith was transported here - the planet of the mist.
Find the place located in the map:
Julia adjusts the map viewing. Locate the
structures seen in the map.
Click on the map.
The overhead view of
the stone pillars is seen.
Look for the rocks
seen on the target location inset at bottom left. Click on the rocks to select it.
A closeup of the selected rock formations is
seen.
Draw a rectangle around the possible map rock
formation and Julia will isolate it.
- Click at bottom middle area of the map.
- See the matching rock formations to the
target location.
- Place the selected 7 rock formations inside
a rectangle by click-hold-move the cursor around the rocks.


Find life forms
- Once located, Julia activates a life
scanner.
- Move the cursor around the 7 rock
formations. See that only the bottom left rock formation shows an
active green scan.
- Move the rotating green circle until the
label turns green also.
- Click to land.

Objective: Explore the misty world of pillars:
Examine the rocky platform and the pillar at
center.
Examine the large boulder at left.
See another area. Examine rock shelter at left.
Unknown crystalline substance:
An unknown substance - crystalline is seen on the ground.
Mobot says it is made of peculiar substance and
emits a vapor.
Acquire a sample. Rachel tells Mobot to
leave.
Mobot walks away and the crystalline substance
rises and follows Mobot. Face to face.
Examine the crystalline being. The being examines Mobot and... teleported.
Mobot greets the being. The being hijacked
Mobot's circuitry. The ancient master
takes over Mobot. He speaks through Mobot and converses with the team.
Converse with the being using the commuicatron:
What - who are you? They are Guardians;
hidden, watching and learning. They do not influence other beings but they
can seek them. They have been hidden on endless solar systems even Earth.
They are from all universe. They became eternal travelers that share
knowledge throughout the universe.
It refer to the guardians as plural beings.
Hiding place: They left messages
long ago waiting to be discovered. Those that have evolved enough will
understand the message. Evolution cannot be forced. The advanced beings have
discovered and seek them for advice. Yet you are not ready for the answers.
History: They
observe and record. To explain more, the being scans Mobot's memory. The
being says that they have the understanding of the system and its life.
Observe the monument behind the creature. He will
tell more when they are more knowledgeable.
Analyzer: Analyze the
crystalline sample from the being.
Data analyzer, Biological analysis, Chemical
analysis and spectral analysis result in gobbledygook.
Objective: Learning history.
Fly to rock formation behind the crystal entity.
Entrance to monument: See a door
that opens with photoelectric cell.
Examine the broken handrails. Mobot doesn't have
imagination upgrade installed. LOL.
Examine the stairway.
Enter through door.
Museum of Rachel's memory: Mobot's visual feed is interfered with and Rachel' sees the museum she
visited when she was a child.
The seats are from her memory when she was a child
before her parents were killed.
Three punishments:
Go to display panel. Press the red button right of
the panel.
The instructions from the panel relates what
happened to the Ambrosians.
They originally came from Xenophon as a thriving
community but became a threat to another sentient group. They were punished.
|
Arrange the picture tags to relate the story
of the Ambrosians and their 3 punishments.
Read the instructions at top right - question
mark.
- Xenophone as the original planet.
- The Ambrosians once lived in a thriving
world.
- The Ancients destroyed their planet with a
huge explosion.
- Place Ambrosia planet.
- A few Ambrosians were moved to a new world.
- The Ancients poisoned the lake.
- Many Ambrosians died because of the poison.
- Your probe arrived into orbit.
- The expedition team opened fire on the
Ambrosians.
Learn about the Ambrosian exodus and
punishments. The display panel recedes. |
 |
Story of Ith:
Enter the door on the left. See another display
panel.
Look close. Press the red button right of panel.
See the Story of Ith.
|
Arrange the picture tags to relate the Story
of Ith.
Read the instructions at top right - question
mark.
- On Ambrosia a ritual to summon the Ancients
was performed.
- Ith was abducted by the Ancients.
- Ith was brought to the place in a mist.
- Ith was attacked by Xir.
- Ith hurt and enraged Xir.
- Ith escaped in a spaceship of the Ancients.
- Ith returned to Ambrosia.
- Ith erected four obelisks on Ambrosia.
- Ith was slain by the Ambrosians.
The narrator explains Ith's story. The display
panel recedes. |
 |
Ancient Scripture:
Go back to the main room. Enter the door at right.
See another display panel and a door at the back.
Display panel: Look
close. Press the red button right of panel.
See an ancient scripture. The narrator states
that the language is a vital part of the history.
The language originated from Xenophon.
Translate the ancient scripture by selecting a
word at left and it will show its position in the scripture.
Reconstruct the full message by clicking on the
correct glyphs. The glyph has to be selected in exact order in the message.
Click on a glyph to
find out the meaning and help form the message.
Then click the glyphs in order to form the message.
The panel will say if the sequence is
incorrect. Push button to erase and then push again to restart the
puzzle.
Repeated text are not placed on the panel but
should be entered by clicking on them in correct sequence.
|
To Enter The
Place Of Eternal Flow You Have To Meet The Following Requirements
Be
Humble Patient Knowledgeable
Only Then The Entrance Will Be Allowed to Those
who Seek The Eternal Flow |
 |
Wall: Open the door at
back wall and see a wall. Mobot says that the wall is not completely
reconstructed.
The narrator explains it shows that they still do
not have complete knowledge of this system.
Temple of Eternal flow:
Main room: Go back to
main room. The narrator says that he will open another room for them to
check.
The back wall opens to an entryway.
Mobot is hesitant to enter that mysterious
hallway.
MOBOT enters the
large chamber. His extension closely examines the chamber.
JULIA detects a
space anomaly. The liquid flowing
from the chamber is ordinary water.
The team decides to
find pure water. Go back to the spaceship.
Temple of Eternal flow: See a
chamber.
The glyph is the one that the Ambrosian
There is still one planet to check and other
planets need answers.
Ask about other
visitors: The visitors that want to be their
emissaries have failed. After accessing MOBOT's memory, the ancient replies -
yes. The other wants to manipulate and dominate; it is stronger than their
agreement with the ancients. They influenced developing civilization. They
failed and the ancients made them leave this system.
Ask about fate of
the expedition: Rachel explains that she wants to help
because of what the expedition did. The ancient became silent when questioned
about whether he-they influenced what happened to the expedition. It would not
explain what happened to the expedition but stated that they did not have
anything to do with it.
Ask about the
essence: The failed race gave the inhabitants (of Salia 4) a
trial that is unfair. One of them defeated this trial.
Upon learning that
the team wants to help the people of Salia 4, he states that he will help. The
ancient tells the team to do the ritual undergone by Ith. They have to slay
Xir in the land of endless sand (Salia 5). They can call Xir by emitting low
frequency sounds. They can get help from the depths. Then come back to him and he will explain.
Ask about Ith:
Ith was brought there by the failed race to impress Ith. Then the failed lords
told Ith to undergo the ritual and that it was ordered by the ancients. This
was a lie. Ith killed the lords and returned to the ancient. They tried to warn
him but he didn't listen. He went back to his world and was slain.
The ancients do not
get involve in internal conflicts.
SPACESHIP
Zenobia data:
Let's check the planet Xenobia. Open
the solar system tab.
Click on the blue
planet with blue orbit.
Click on the planet in orbital view and the probe
flies to Zenobia. Gas vapors of unknown origin formed a ring around the
planet.
Click on planet again in celestial body view and
it will be scanned. One day is 18 hours.
Barth Krylov at Xenophon mentioned an incident
here.
Entering Salia
1
MOBOT:
Go to planet view.
Click on land-right box at bottom right. See MOBOT go down to the planet surface.
It is snowing. Rachel ponders on her being alone.
The snow's form is consistent to a higher
temperature. MOBOT thinks there's a source of heat.
JULIA locates the research station. Click on the right exploration
box at bottom right.
Research station:
Try entering the station: MOBOT
tries to open the door with his blowtorch. It is not possible.
Leave the station.
Leave exploration mode. Go back to the spaceship by clicking on the
departure box at bottom right.
Entering Salia
3
SPACESHIP:
Weapon:
Rachel remembers what the ancient stated - they will
get help from the depths. The weapon must be it.
It is strong enough to fight Xir at Salia 2.
Solar system:
Let's get Xir. Click on solar system box. Click on
Salia 5.
SALIA 5 & XIR
Click on Land
for MOBOT to go down to the surface.
Fight Xir:
See an overhead view. Xir will show up on the left and MOBOT is on the right of the
screen.
At top of the screen is a target with sliders on the left and on the right.
Use the sliders to maintain the target at the center.
JULIA will concentrate the energy of the weapon as shown by the bar at bottom
left.
At bottom right are 4 frames that have defense actions when Xir attacks in a
certain way (shown by the picture). To neutralize that attack, click on the
defense frame that has a circling arrow.
Maintain the target at the center and press the defense frame - okay, got it.
If anything goes wrong I'll run away... Oh no, I'm stuck in the sand...
Help me.
The game can be saved during the fight.
After getting MOBOT's head torn off 3 times; a puzzle skip is offered by the kind
and understanding developers.
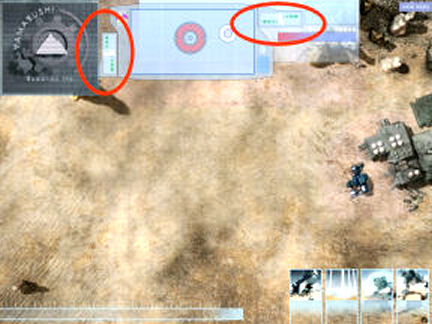
MOBOT:
MOBOT is asked to
analyze the dead Xir. MOBOT does not respond. JULIA and Rachel wait. Oh No!!!!
JULIA asks that her
VPR modules be unplugged. MOBOT is part of her and that part of her is gone.
Those are her feeling modules; her probe modules will still be operational.
She doesn't want to feel anymore.
They wait some
more.
MOBOT wakes up. JULIA
did a maintenance check and MOBOT is fully operational again. The blast
disabled his electronics.
Xir is an artificial
construction. MOBOT takes the control unit of the machine.
SPACESHIP
Solar system:
Go back to the
spaceship. Let's go to the hermit.
Click on solar system box. Click on Salia
2, the white planet.
ENTERING SALIA 2
Ancient master:
Go down to the
planet. Explore to go to the Temple of Eternal Flow.
Rachel asks
questions of the ancient master.
Xir is a weapon. It
is a show of power to be able to control such a monster. Xir's brain will be used later if
that is
the choice.
The ancient master
states that this is the last time they will see him. He will now create a Temple
of Eternal Flow. This will make them understand the secret of the essence.
The team has to pass
2 tests to demonstrate their knowledge first.
Order of the
Planets: See the planets on the left side of the frame.
The pictures on the right are prominent features of those planets.
The aim is to
arrange the planets in order from the sun.
Under those planets,
the prominent feature or snapshot view of those planets are to be placed. The door opens.

SPACESHIP
Solar system:
Go back to the
spaceship. Let's go look for water.
Click on solar system box. Click on Salia
1, the last gray planet.
ENTERING SALIA 1
Land to the surface.
MOBOT analyses the
surface. It is frozen water. JULIA states to cut the ice and then transport it
using the cryocoffins.
It is unstable
ground. When MOBOT uses his blowtorch, the ice floor cracks and he falls
through ice floor.
Find the exit:
See MOBOT at top
right of the screen. The exit is at bottom left: two screens down and two
screens left.
Solid ice blocks
with black specks cannot be drilled.
MOBOT should not
fall more than one level or be under a single clear drillable block of ice. He
will be killed.
The reset button is
at top right of the screen.
Exit to the left.
ENTERING
UNKNOWN LOCATION
MOBOT enters an
underground lake. There is an opening on the ceiling that lets light inside
the grotto.
MOBOT analyses the
cave and finds out that
the temperature is -94 degrees F. The lake is pure water and is 50
degrees. The stones around and in the lake might be responsible for the
temperature of the water.
MOBOT sees a corpse.
Examine the dead
body: The corpse is a human male. MOBOT extracts 2% of
the info in the datapad.
Examine the
datapad: Learn that this is the first planet that was
explored. The man questioned the strange condition of the snow. Learn about his
seeing the man who ordered that Rachel be cryojailed and her innocence.
Examine the lake:
The lake is the water source they are looking for.
Transport the
water into the probe. Salia 4 is waiting.
SPACESHIP
Solar system:
Go back to the
spaceship. Click on solar system box. Click on Salia
4, the green planet.
ENTERING SALIA 4
Land to the surface.
Explore to get the map grid.
Native:
Jump to the native's
place at top of the map.
Deliver the water.
You have brought us essence. You are the ones spoken in the prophecy.
He gives the
artifact they were guarding. It is a holographic star map. You can't bring
it back. It has to move on; same manner as the essence.
I'll return
later. Jump to point of entry at bottom middle of the map. Explore and
then depart.
SPACESHIP
Constellation:
Go back to the
spaceship.
The holographic star map shows 4 rotating
constellations.
The stars are all crowded together so JULIA adjusted
the star map to show 3 layers of stars. The up-down arrow will change the
levels.
The right-left arrows scroll the map.
Passing the cursor over the star map highlights a
constellation. Click the chosen constellation and hear a sound. Then look for
the rest.
If a wrong choice is done, click the constellation again to unhighlight that
constellation. If an error is made after clicking on 4 constellations, the
puzzle resets.
Click on the star map icon at the center to see the
4 revolving constellations. Use it as reference.
Locate the 4 constellations.
The star map shows the
4 constellations project beams of light that intersect. The intersect point
shows an uncharted planet.
ENTERING UNKNOWN LOCATION
The team travels to the uncharted planet in the
solar system.
MOBOT lands in the planet. It is an artificial
planet with no inhabitants.
Go east: At the center of
the plaza is a middle sized obelisk.
Examine the obelisk: The
structure's material is too complex to analyze. Rachel thinks that it is not
just a piece of art since it is strategically placed.
Examine surroundings: The
inhabitants left in a hurry. The structures are decomposing.
Explore the area to the north:
See a gigantic pillar with a weak purple light.
Examine the pillar: The
pillar has a switch.
Operate the switch: Push
and pull do not work.
Proceed to huge building:
There is a gigantic building at northeast. It looks like the rest of the
structures support this building. There is a pile of biomechanical devises at
southwest. Examine the door: It is sealed shut.
Explore the broken biomechanical devices. Examine
the devices.
One of the devices is still operational:
There's a little light flashing on it. Examine the active device:
MOBOT extracts the energy cell powering the device.
Return to the main building. Get back to the tower.
Return to the central plaza.
Explore the area to the east:
See a moving platform. Examine the platform:
MOBOT sees a square indent on the platform. The energy cell is inserted and
MOBOT moves to another pillar.
Examine the pillar:
There's a switch with a different orientation. Rotate the switch:
The pillar lights up and is turned on. A humming sound is
heard.
Go back down. Return to the central plaza. Explore the area
to the north.
Rotate the switch: The
pillar is activated.
Return to the central plaza. Closely examine the
lighted obelisk.
Switch off the security device:
See 5 cells. Click to open a cell.
Inside each cell is a set of connected balls. Some
of the balls are lit.
When a ball is clicked, the adjacent balls are
toggled off or on.
The aim of the puzzle is to turn off the lights of
the balls to deactivate the mechanism.
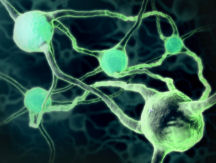 |
|
 |
|
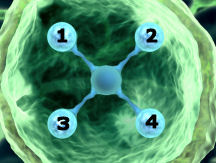 |
| Click the balls
in numerical order as shown by the pictures. |
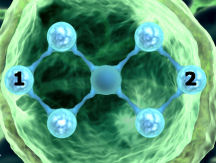 |
|
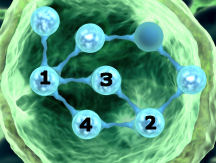 |
|
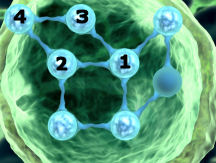 |
The process was too
easy for the team. It seems that it is not a protection device.
Explore the area
to the north. Proceed to the huge building. See that the building's door
is now open.
Enter the
building: Rachel screams. Inside are a lot of
deactivated Xir.
Deeper in the
headquarters is a sealed door with an inactive Xir.
Examine sealed
door: It cannot be opened.
Examine Xir:
Rachel remembers what the ancient master said - The brain is the key.
MOBOT is
hesitant to place the brain in the inactive Xir. MOBOT is told to run as fast
as you can.
Control room:
Examine the
laboratory: The device looks like an organic computer
with translucent containers attached to it.
The left container
is filled with the purple liquid similar to the lake in Salia 4. The right container
looks like a neutralizer.
The middle container
is a mixture of the left and right containers.
The aim is to have
both left and right bars-gauges fill at midpoint.
Check each color and see that they fill or empty the
bars-gauges.
From right to left:
White adds 9 to the
left bar.
Blue adds 1 to the
right bar.
Yellow adds 1 to the
left bar.
Red adds 0.5 to the
right bar.
Pink adds 0.5 to the
left bar.
Orange (top left)
adds 4 to the left bar.
Click on (top left)
orange once, yellow (middle) once and pink (leftmost) once.
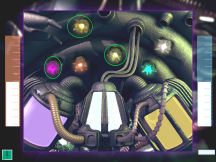
Look closer at
the holovision: Watch events in the past.
See the reason the
submarine at Salia 3 crashed. Learn the report that there is no life in Salia 5.
Andrew Lark was told that Salia 6's living condition is ideal.
Rachel confronts
JULIA.
MOBOT finds out that
this machine has recorded their entry into system from the beginning. He can
scan and calculate the route to return to earth.
Return to probe.
Save game here!
Salia 4
JULIA learns that the chemical formula from the
artificial plant's lab is a reversal process for the water pollution in Salia 4.
Rachel has to decide.
Julia found a stash of arghinium at the artificial
planet. It is enough to either manufacture the chemical that will neutralize
the lake or travel back home.
Save entire planet or go back home.
Rachel discusses
the pro and cons of the decision. The possibilities...
Choose wisely!
Left is Earth
and right is Salia 4.
This document may not be
distributed without express written permission of the author and the content may
not be altered in any way.
For
Questions or Comments on this Walkthrough,
Please write to:
MaGtRo
Copyright © 03/2012
MaGtRo
 GameBoomers
Walkthroughs and Solutions
GameBoomers
Walkthroughs and Solutions