JEKYLL AND HYDE 2010
Game Developers: Pixelcage/bitComposer
Walkthrough by robbo
January 2011
Extract from Coltrane's diary:
When Lord Grayshire disappeared, I hoped that this would put an end to the horror, and for a while, it did.
Dr. Jekyll bought the establishment and our trust in each other grew quickly.
It did not escape my notice that he felt very drawn to Miss Cunningham and she soon reciprocated his attentions. All seemed to be well.
However, Dr. Jekyll was incredibly ambitious. When a peculiar disease began to spread in London, he became totally focused on conquering it. Of course, I energetically supported him in every way possible,
but I did not foresee that a small mishap would lead him to discover the secrets surrounding Lord Grayshire.
Th is was the beginning of a melee of events, which would not only lead to Dr. Jekyll having to become familiar with his darker side, but that would ultimately determine the destiny of our world… “
Main Menu
Continue - loads the last saved game.
New Game
Chapter - you can replay a chosen chapter
In Settings, you can change screen res, anti-aliasing, texture quality, shadow def, display effects
Sound - Volume and Speech/Subtitles
Game Options - Hotspots - set to display with key press/always on/off.
Instructions/Tutorials On/Off
Mouse controls
Credits
Exit
Press Esc to pause the game and get these choices >> Continue, Chapter, Settings, Main Menu, Quit
To use or pick an object up you can either use the "E" or "Enter" key, the "A" button on the controller, or click on the "Hand" icon (action button).
To examine something press "Q" or the "Back" button on the keyboard, "X" on the controller or click on the "Magnifying glass" icon with your mouse.
Objects can be selected and combined in the inventory using the "Ctrl" key on the keyboard, the "Y" key on the controller or by clicking on the "PLUS" icon with the mouse.
Press the action key or use the mouse to click on the XXX icon, when Hyde is standing in front of an object that he is able to move. Push or pull the object to the desired position and then press the action button again or Cancel (Space) to release the object
Particular objects and abilities will be automatically made available via the Quickslots (bottom left-hand edge of the screen). Use these by pressing 1, 2, 3 or 4 on the keyboard, by using the digital D-Pad on the controller starting on the left, then top, right or bottom,
or by clicking on one of the icons with the mouse.
The inventory can be opened by pressing the "I" key on the keyboard or by using the "left shoulder button" on the controller. Alternatively click on the inventory icon on the bottom left-hand side of the screen with the mouse.
It can also be opened and closed with the # key. The inventory can only be used by Jekyll.
If you ever get stuck playing the game, then you can get the Hotspots to appear by selecting "TAB" or "H". These show areas which are important to gameplay and which Jekyll or Hyde can interact with.
Move Jekyll using either the "arrow" buttons (cursor) or the "W-A-S-D" keys on the keyboard. Hold the shift key down to walk slowly.
If you are using a controller, then Jekyll can be moved using the LEFT analog stick. The "right shoulder button" will make him walk slowly.
When mouse controls are activated (see Menu), press the LEFT mouse key to make Jekyll walk in the direction of the mouse cursor. The distance between Jekyll and the cursor determines the speed that he moves at.
Press the "space" key, "B" on your controller, or the RIGHT mouse button to make Jekyll jump or climb up a waist-high obstacle. This key can also be used to cancel Jekyll's commentaries and the cut-scenes.
Press the Control (Ctrl) key on keyboard or the "Y" button on your controller to get Jekyll or Hyde to crouch down.
To crouch using the mouse, use your mouse software to assign (if available) "Ctrl" to a free mouse button.
If you press and hold the key whilst moving Jekyll or Hyde, it will make him crawl forwards on all fours.
In contrast to Jekyll, Hyde can jump higher and further, as well as climb up to higher rocky outcrops. Hyde can reach more distant rocky outcrops by jumping at them. He will automatically grab hold of them and climb up.
KEYBOARD SUMMARY:
E / Enter: Use, push and pull
Q / Backspace: Examine
WASD and Cursor keys: Controls your character
Shift : Walk
Caps Lock / Numpad 0 / Ins: Look around (press and hold)
Space: Jump, climb, and cancel
Ctrl: Crouch and crawl (press and hold), Combine (Inventory)
I / #: Open/close inventory ( Jekyll only)
Tab / H: Display Hotspots/Help (press and hold)
1, 2, 3, 4: Use Quickslots
Esc / Pause: Main Menu
If you want to have a break from the game without losing your position, a useful trick is to use the Alt-Tab key press to swap to the Windows desktop, then just click on J&H to return to the game.
The game starts with a short cut sequence. When the 'hand' icon appears, press Enter and you'll see Jekyll change into Hyde and another cut scene.
Jekyll starts off with these items in his Inventory (hereintoforeinafter called the 'Inv' to save typing!): Bottle of green powder, a hanky, a vial of paraffin and his Portable Lab.
PART 1 UNBELIEVABLE DISCOVERY
Go up the lab stairs, examine the door (the quick way is to press 'Q' on the keyboard. You can also use this to examine items in the Inv) then when the 'hand' icon appears, press the Enter key, (its quicker and more accurate than using the mouse.)
Look at the well and use the Spacebar or the right mouse button to jump up onto it. Then just step forward to fall down it! At the bottom of the well, retrieve the (empty) BOTTLE, turn around and go up-screen to the water.
The 'magnifying glass' icon should appear so open the Inv (press 'I'), and select the empty bottle and use it on the water to fill it. Now he's ready to use his Lab for the first time.
Note there are just two ingredients for this potion. You have to click on the up and down arrows on the ingredient labels to increase/decrease the amounts. Click on the Water label and count 10 units of water, and 6 for the Hyde potion.
Click 'Start Reaction' to test the potion. The green rising bubbles indicate that the amount is correct. The new potion goes into Inv.
Close Inv ('I') and go right, climb the rock, jump down, right, climb rock, up-screen, climb rock, climb up to the flat area and go left to the wall. Press '1' to take the newly made potion and change into Hyde.
He automatically knocks a hole in the wall. Jekyll is amazed!
Go through and get the STICK. Now there's a cut scene with Coltrane - his servant - who passes a ladder down and throws him a box of MATCHES, but sadly, no cup of tea!
The Inv is open, so use the arrow keys to select the vial of paraffin. Press Ctrl (you should see the background of the picture change to the + sign), select the hanky and press Ctrl again = paraffin-on-hanky.
Use Ctrl again on the paraffin-on-hanky, then on the stick get a soaked-hanky-on-a-stick.
Press Ctrl on the soaked-hanky-on-a-stick, then select the matches and Ctrl gives you a lit TORCH.
Go right, use Ctrl key to crawl through the gap and enter the sewers (auto SAVE here). These references in red are the save positions >> DISC. 2
So, for example, if you wanted to replay this part of the game, you would load the 2nd part in the 'Unbelievable Discovery' section.
Go up the stairs (note the altar), enter the tunnels and go right. Just after the water, note there's a side tunnel - call it 'Tunnel A' - leading up-screen. When you reach a big rock and a big stalagmite, take the left fork (up-screen).
Just after the bridge, note the tunnel with a green-coloured border. Keep going right. At the leap, press '1' so Hyde can jump it and jump down to the bottom of the chasm.
See the rock, use Hyde to push/pull it so its under the ladder and use it to climb up. (SAVE) DISC. 3
Yuk, a corpse! At the table, get the DIARY and PAGES, go into the Inv and read them. Get the ROPE, tie to stalagmite, go down and get WING 1. Climb back up, go to the chasm and use Hyde to climb back up to the main tunnel.
Go to the green-bordered cave, look at the back wall and get PLATE.
Go back to the tunnel and left to the main tunnel, keep left and enter Tunnel A. Under the bridge is a group of rocks. Go down to them, use Hyde to pull the front rock out of the way and get WING 2. Go up and right.
There's a new part of tunnel here - I found it difficult to locate at first and used right arrow key and space to jump into it. Follow the tunnel - beware of falling rocks!..
...to a room with a Pegasus statue. Place the 2 wings on the statue and enter the new area. (SAVE) DISC. 4
There are walkways to jump across (be Hyde). Rough directions are left, down-screen to bottom, bottom-right screen, and right.
"Unbelievable. A temple complex under London!" (SAVE) DISC. 5
PART 2 CONVOLUTED PATHS
See an altar with the Tome. Use the plate on it. This activates some levers. Use Enter to activate a sliding block puzzle of Pegasus. A random puzzle, but the ones I've seen only have about two columns or 2 rows to sort – not too difficult.
Then there's a cut scene in which the Tome is imbued with power from above. After the cut scene, take the TOME and the wall opens – enter.
Another cut scene, and we get a hint that someone is following and watching us. He discusses the Tome with Coltrane and is deposited back in the sewers. (SAVE) PATHS 1
Put the Tome on the altar at the top of the stairs and a new door opens. Take the Tome and enter the corridors. Get PAGE and read it, go through broken wall. See a skeleton, get KEY off it. Go up the steps and follow the tunnel to the rail tracks.
Take the 'up-screen' tunnel and get/read the PAGE. Go back to the main tunnel and go right, across the bridge. Follow the rail tracks and use the key on the keyhole and enter the new area:
"A workshop? Tools and building plans?"
Get the DISH on the desk. See some shelves in the top right corner, get BOTTLE OF MILD ACID. See a skeleton and get the KEY. Flip the switch on the wall and go through.
Go through the opening, top of screen, see the keyhole and use the key.
Enter the living area: get MAP on wall; Read NOTES on desk; Take small PACKAGE and examine it; (Greek letters on it and a strange object inside - the object appears in the Inv, examine it and parts fold out)
Get HERCULES ROOT and use the portable lab. (2 portions Hyde to 8 Hercules). It will help him increase body strength for short periods of time.
Return to the main cavern >> "What ? Someone was there, weren't they?".
Go back through the rail tunnel and over the bridge (SAVE). PATHS 2
There's a tunnel behind the big wooden thing, Go up-screen to a rocky walkway. Take the potion, jump down and look at the rock pillar, press '1', push the stone and cross over.
Jump the gap up to the next level, keep going (careful with the angles) and finally climb up and down to a bridge. See and get the ROPE. Tie the rope to the stalagmite.
Go along the top tunnel and follow the tracks. Note in passing there's a tunnel leading off to his right - 'Tunnel B'.
Where the track forks, see some tables, get the HAMMER. (Note the small tunnel to right of tables - 'Tunnel C').
Follow the right-hand track (the other is a dead-end anyway), see an overturned truck, and behind it see and get DRY TAR.
Go further right and get & read PAGE. Go back and go along Tunnel B to the complex passages and down the stairs. (SAVE) PATHS 3
Go down the steps, left, and down. See a grille and behind it is a 'golden glow'. Turn around, go to the end of the passage. Turn Left, Right, L, R, L, R, 2nd L, jump x 2, down stairs.
See a pedestal in the room. Flip the switch on the wall - deadly spears rise (obviously they would kill you!). Go to the pedestal, be Hyde, push it under the spears to block them, and crawl under.
Get HORN 1. The door shuts behind you. Go up the stairs and forward. See and read a NOTE (important trigger here).
Get the SPEAR, flick the switch on the wall and go back to the grille area and left up the stairs then right up the stairs.
There's a PAGE at the bottom of the stairs somewhere around here. Enter the mines again and go down and right to follow the track again. (SAVE) PATHS 4
Enter Tunnel C. See a stalagmite at the end, hit it with the hammer = (encrusted) KEY. Combine bottle of acid with bowl and key to get CLEAN KEY.
Use the key to open the grille, take the left tunnel and get STRAW, POT and WOOD.
Put the wood and straw in the fireplace, light the fire, add pot and tar and use the spear to get STICKY SPEAR.
"Now it will stick better than Coltrane's homemade marmalade!"
Go back to the 'golden glow grille' in the complex, and use the spear to get HORN 2.
Go upstairs to the 2nd floor and see a corridor with gaps in the floor. Insert the mechanism you found earlier into the console at right. See the swinging axes and trapdoors in the floor.
This isn't too hard, just run fast at angles from one 'safe trapdoor' to the next. If you land on any other, you plunge to your death!
Not sure if the safe ones are random but the symbols on the stones match the letters on the package in Inv.
These are the blocks that worked for me:
3rd from the left on the first row, then 2nd on the second row, then 4th, 3rd, 1st, and 2nd.
So, for example, on your first run: stand on the 3rd block, wait for the axe to clear the way and dash at an angle to the second block in the next row. Then to the 4th block on the next row and so on.
MINOTAUR'S LAIR
At the end of the corridor is the Minotaur's lair. Don't be scared! Walk along his arms – be careful though, you might fall off - to place the horns (covers) on the ends of the creature's own horns.
See the mouth opening, and enter it. Here's another axe jump/trap, jump and avoid, go forward. (SAVE) PATHS 5
AMAZING!
You enter a large hall with 3 consoles, one of which has a diagram of corridors showing obstructions, and levers to manipulate them. Note the open door opposite, which leads to the first labyrinth.
The map represents a real location you have to get through.
Only the one console will work at the moment. Moving the levers opens and closes barriers, but some levers not only open one barrier, they may close others, so you have to go back and re-open it.
MAZE 1
If you number the top levers 1 to 3 and the side levers 4 to 6, then levers 2 and 4 open/close the top left barrier, levers 4/3 for the top right one, 5/2 for the L-shaped object in the middle, which is actually a cage device which swings across,
blocking one route and opening the other route. Levers 1/5 control the far left barrier and 6/2 the bottom, nearest one. The goal is to reach the room at the top of the map.
One solution for the switches is 4, 2, 5, 1 and 6.
Make a note of the directions to take to get you through the maze. Maze 1 is
fairly simple, and there's only one route through to the target room. Press
Space to exit the map.
Now enter the actual labyrinth and make your way to the room. When you come to the blade traps, be Hyde of course, and press '1' to give some extra oomph and jump/crawl past them. I think he can get away with 1 'hit',
so I just jump over the lower blade and walk through the upper one. He complains, but just ignore him!
When you get through Maze 1, collect SNAKE 1 and make your way back to the hall. Completing this opens the cover on the maze 2 console.
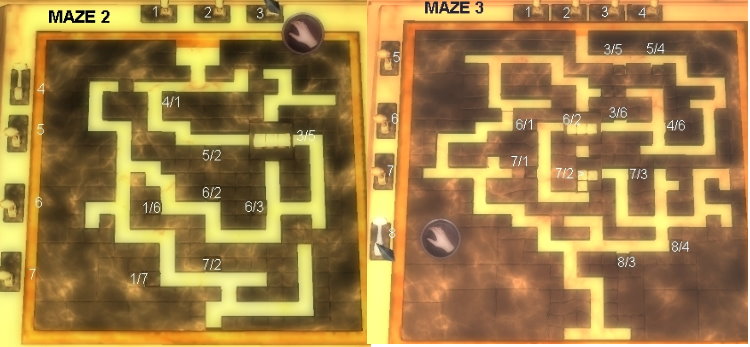
MAZE 2
See there's an extra switch down the side, so they are numbered 5 to 7.
Press switches 5 3 6 7 1 4. There are no real dangers in this maze, just a couple of chasms for you to fall into! Collect SNAKE 2 and return to the hall. (SAVE) PATHS 6
MAZE 3
Switches 5 3 6 7 1 4. There are jets of flame to avoid here. Be Hyde and just wait for the ones which shoot across the passage to stop, then step forward. There's a couple which shoot along the passage - here you just have to move quickly to avoid.
Reach the sculpture at the other end and place the 2 snakes. You don't have to go back through the maze because a ramp extends in front of you – so go forward... (SAVE) PATHS 7
...to an altar. Place the book and a door opens - go through it and across a walkway. Be Hyde. Note a machine (there are 5 of them) which tries to grab him, and 'power towers'.
Crouch down next to the tower, wait for the machine to grab hold of the tower (if it misses, just adjust Hyde's position until it hits the tower), press '1' to give him strength, crawl away from the tower (keep Ctrl pressed down) and stand up
(release Ctrl), and turn around. When you see the 'hand' icon, press Enter once and Hyde should destroy the machine. Do this for the others.
After each hit, a barrier is withdrawn and he can advance a bit further round the walkway until eventually Jekyll can approach another ramp which appears and cross it, to get the PAGE.
Go back out to the previous altar and use the page on the book. There's a cut scene where something is happening to the Tome.
“The Tome, it has become stronger. What power! As if coming from another world!”
Take the Tome and enter the new door. There's another cut scene with Coltrane and the book.
Next, he is back in the mines and wants to explore the tunnels. (SAVE) MINES 1
PART 3 THE MINES OF CHRONOS
Follow the bottom rail left to an open area (there are boards on the floor).
Get the CROWBAR off the table, and PARAFFIN off the shelf. Go back to the main area and see a wagon with a usable lamp on it. Get the (empty) LAMP. Combine paraffin and lamp and matches.
Follow the bottom track to the right of the wagon, where there's a wooden fenced entrance, to the furnace area.
WORKING IN THE FOUNDRY
The rail is damaged and Jekyll/Hyde must make a new one. Attach the lamp to the wagon. Flick the switch on the back right wall to move the mould towards the furnace.
In the far corner is a shelf. Get more PARAFFIN, go to the furnace and use the paraffin on it. Light the furnace. Behind the big rock to the left of the furnace is a handle for the bellows. Jekyll can't turn it, so be Hyde and turn it.
Go up the stairs to the top of the furnace and turn the handle to pour the molten metal into the mould.
Flick the switch again to move the mould back where it was, and turn the valve on the water tower to cool the rail. Hyde replaces the old rail. (SAVE) MINES 2
Use the wagon for a ride through the mines, and press Enter/Control as required. You might find that sometimes Jekyll doesn't respond quickly enough to your key presses, so when you see the hand, try tapping the key several times
(no need to bash it!) to make sure the action is 'registered'.
At the end, he plunges down and becomes Hyde. Jump right, and again, then down onto a ledge, press '1' and push the pillar. Climb up into a tunnel, where Hyde torments Jekyll. Follow the tracks left. (SAVE) MINES 3
At the back of this area, see a control panel. Flick the switch and go through the lit entrance.
Go left to get a PAGE and see some fast-moving spikes. You can't tackle these yet, so go back and right to a living area.
Get PHIAL of Heliasbud powder and RECIPE, use the lab (the portions are 9, 2 and 9 to make a potion which increases life force and endurance).
Get SATURN and examine it in the Inv to get 2 Saturn RINGS.
Read papers on the desk, get PAGE, get TORCH off pillar and light it.
Get CASKET and exit the cave to the tunnel at bottom left.
Take the side tunnel at the top and smell gas. Use Hyde to jump down left, across the chasm (approx where the vegetation is) and up to a tunnel towards the top right of the screen (there are some large rocks that look like steps up).
You'll have to use the number keys here for Hyde to survive. Tricky!
Jump down, see a skeleton and get a RECIPE. Go right as far as you can and get MUSHROOMS – the fungus from which Ambrosia can be made.
Use the lab - portions 3, 1, 10 and 8 - to make a potion which gives power, vitality and greatly sharpened senses.
Go back to the tunnel, back across the chasm (phew!) and back to the lit entrance.
Now you can get past the spikes, as the potion has the effect of slowing them down. There are 3 groups with gaps in between them. Try this: take 7 steps forward, press your number keys, then 4 steps should get you
through the first lot – wait until they're open of course - then just repeat until you reach safety.
Enter a large hall (SAVE) MINES 4
There are areas you can reach to the left and right, and forward is a plinth with a bust on it; “Snakes on the head, that is Medusa”, plus a blocked opening behind it.
Turn right and go into the top room and at the back wall, place the Saturn Rings in the alcoves to get a GOLDEN DAGGER. (Be careful, it's very sharp!)
Go out and directly across to the other hall. See the giant statue of Zeus. He seems to have a headache, mmm... wonder if that's a clue to finding the next object!
Go left to the 'Hephaestus' hall. Hephaestus was blacksmith to the Olympian Gods. See his furnace with it's chute for molten metal. Look at the furnace and switch it on – wow, it's a fully automatic gas furnace!
At the box on the right, get some CLAY. Use the clay on the barrel to get WET CLAY. Go up the stairs opposite the statue and go left. Be Hyde to jump across and behind Zeus. Jump onto the chair arm then the chair back,
“Henry, we need that head”. Press '1', and knock his head off! Go down to the floor and drag the head into the other hall.
See the giant hammer, and place the head where you think the hammer will strike – it's approx. at the intersection of the statue's fingers and the far corner of the rail. Flick the switch on the back wall to activate the hammer and break the head open.
Get the OBJECT from its centre. As Hyde, reset the hammer with the other wall switch as it's needed to climb on.
Go up the stairs and to the right, jump across to a corridor, see a rostrum with an oval opening. Place the object there and enter Athena's temple. (SAVE) MINES 5
THE TEMPLE OF ATHENA
“That's Athena, mighty goddess of wisdom and the art of war. Did Perseus not use Athena's shield to conquer Medusa?”
You can't get it yet. See the patterns on each left and right wall. Click on the left circle of dots. Start at the top and go clockwise to change each 'blob'.
Do the same with the right-wall blobs and on the 4th, Athena will loosen her grip and give up her shield. Get the SHIELD and examine it = SERPENT.
Go back to the main hall (what was that mighty rumble? – it was the hammer falling by itself, or did it?), down right, and down to the floor. (SAVE) MINES 6
Combine the casket + clay + serpent to get a MOULD so you can make another serpent.
Put the mould under the chute on the furnace. Put the dagger in the furnace and watch your creation take shape = new (hot) SNAKE in a box. Get it and use on the barrel = (cool) SNAKE.
Go out of here to the main room and to the Medusa head, place the snakes there and go through to a new area. Go behind the altar at the far side... (SAVE) MINES 7
...and place the Tome to get your next challenge. You'll see a round 'pond' surrounded by what look like car-factory robots and there's a Medusa-creature floating around in the water.
The creature will, of course, attack you and try to kill you. The idea is to use Athena's shield to reflect the rays from the creature back to the creature to weaken it.
As Hyde, use the shield, go to one of the gaps in the fence. Hopefully the creature will approach you and shoot, and when the rays bounce back and hit it, it will be temporarily weakened. Be close enough for the hand icon to appear, then press
Enter to kick the creature away across the water. It should end up under one of the 'robots'. Run round the other side and while it's incapacitated, flick the robot's lever and it will poke the creature with it's knife/spear/sharp thing.
Remember to get the shield back in hand for the next attack. Wait for it to recover and attack again. Keep doing this until the creature is dead.
You may find, like I did on several occasions, that the creature is too fast for you (or I was too slow!) and it repeatedly starts to turn those robots around so that you can't reach the lever. See connected to each robot, and set back from them,
is a handle which you can turn to turn the robot right way round. But I found this so slow and frustrating that I gave up and started the level again by loading from the saved game, which is 'MINES 7'.
When the creature is defeated, go to the central island, get the PAGE and put it on the altar and see the Tome absorb even more energy.
There's a cut scene with Ann. (SAVE) RIVER 1
PART 4 BURNING RIVER
In the next part, he is on a broken bridge over some lava. Walk along the top edge of the bridge to see a stone he can use to walk across and jump down to a walkway. Be Hyde to jump across and climb right and finally jump down to another walkway.
Go up-screen to see a big door held closed with claws. Use the console to make an L-shaped bridge swing across. Jump over to the bridge and follow the walkway left.
See another console and note a closed opening to the left of it - you will eventually return here through that door.
Use the console and cross the bridge, mind the gap near the other end! Go past another console and up the steps. (SAVE) RIVER 2
Go down into a cave, light the torch and follow the tunnel. The next part of the game is to collect 5 gems hidden in rooms which set different types of challenges and hazards.
FIRE MAZE
Look out for the first side-tunnel at the top of the screen and follow it to the Fire Maze room.
This consists of several mesh screens laid out in the form of a maze, with fire shooting up through the floor. The method is to enter the maze in about the middle, go right towards the right-hand wall, then round a screen, then left roughly through the
centre to the left wall, then to the back of the room then right to the hall containing the ruby-RED GEM. Press the number keys to help him endure the heat, and stop and wait for fire jets to finish before proceeding.
When you get the gem, you'll see one of the big claws on the door release its grip.
You have to go back through the maze to escape back to the main tunnel. (SAVE) RIVER 3
FIREBALLS
Go right to a chasm. Jump onto a small suspended rock and over to the other part of the tunnel.
Very close to here is another side tunnel leading to the Fireball corridors. Be Hyde and dodge fire balls shooting along and above the corridors. Use protection and crawl, and when you have to jump a gap in the floor, use slow-motion to slow the fireballs down and give him time to stand and jump. Go down the side corridor and see some stairs up. Be careful as there's fireballs coming at you higher up and from behind. Remember to crawl at the top near the danger area. Follow the corridor round and get the YELLOW GEM.
Make your way back to the main tunnel. (SAVE) RIVER 4
DRAGON WALL
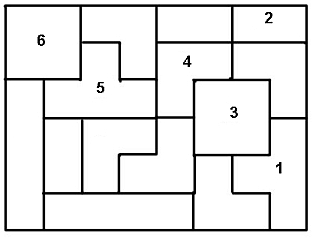
Go right and up-screen – just before the lava river - to the Dragon Wall room. Here there's a block puzzle to solve.
“Let me, see what needs to be done here”
Click on the blocks to press them in. Some blocks make other blocks move out again.
Clue: there are 6 blocks to press in and the aim is to create a safe path from the right of the wall across to the stairs at the left of the room.
(If you get stuck, see the diagram at the end of this walkthrough – just press the numbers in sequence)
When successful, you will be released from the puzzle and you can become Hyde to climb up the wall of fire-breathing dragons. Use slow motion again. I climbed up the second column. Jump left onto the staircase and up to the gem room to get another ruby-RED GEM.
Go back to the last console, the one you haven't used yet (up steps and down) and use it to activate another bridge. Go back up the steps and go left - mind the gaps - to a new tunnel.
KILLER BLADES
Go first left to the revolving blades room.
Tricky. If you use '3' to slow the motion down and look at the right hand area, there's a certain time when you can see a clear path through. You have to make a dash for it. It took me lots of goes to do this. Any contact with a blade kills him.
Once through, jump across the pillars, avoiding the blades of
course, and get the BLUE GEM then go back to the main tunnel.
PILLAR JUMPS
Go right to a large cavern where there's a beam of light projected onto the far wall.
Use a blue gem on the projector. The door will close and some pillars will appear between you and the far wall. Jump across, bearing left to get another BLUE GEM. Go back to the projector and take back the blue gem.
At the end of all this, you should have the 5 gems – 2 blue, 2 red and 1 yellow, and the locks on the big door will all be released.
Return through the tunnel to the bridge (SAVE) RIVER 5
CUT SCENE
AS Jekyll steps onto the bridge, it swings around and he is trapped. Rufus is standing on a distant bridge demanding that Jekyll hands over the Tome for the benefit of the Children of Kronos. Of course, our hero refuses and Rufus goes on his way - for now.
Look at the large gap between the bridge and land, and Jekyll decides he can't tackle it.
So be Hyde and jump! Then jump down to the right, press '1' and '2 and leap across. Keep going down then crawl right through a tunnel to what looks like a generator room - "A heating system?".
Go to the table in the centre and read the notes about an elixir. Ambrosia fungus and Hercules Root.
Go down screen to get a conveniently-placed Hylecereus Draco plant. Use the Lab, and the proportions are 3, 10, 3, 1 and 9 to make a potion to protect from fire and heat for short periods. Now go up the stairs top right to a rocky area flowing with lava.
Jump down and follow the rock path around to the edge of the lava. You can see moving blocks and guess what? You have to jump on these to get to your next location!
Be Hyde and jump on a block. It's about to slide down a lava waterfall, so take your potion to ensure you survive through to the other side. When you emerge, jump onto the bit of land jutting out otherwise you'll get knocked off.
Jump back onto another block and after a short ride, jump off back onto land. Climb up to a new area of the complex. Look at the broken lift if you like. Go up-screen, up the stairs and right, flick the switch on the wall.
Go through the opening and you're back to the place I pointed out earlier, near the console. (SAVE) RIVER 6
Use the console and go right to cross the L-shaped bridge. Go up-screen and through the now-open big doors. (SAVE) RIVER 7
See the altar, so it's Tome time again! Go forward to your next challenge. A large circular arena - go towards the far side.
"What sort of devilry is at play here?"
Doors lock and a dragon-creature rises from the centre of the arena. Note the coloured beams coming from its body. Go around and follow each beam to where it hits the wall. Place gems in the holes in the wall.
Blue at the top, then Red, then Yellow and in the bottom hole put 2 gems, one red and one blue to make a purple beam. Now the creature will be activated. The idea is to drain the thing of power by letting it fire at you and absorbing the rays.
Use all your protection. You can run around a bit to let your protection build up. You should see the coloured lights on its head going out as it loses power. Well, that's the theory! Not always so easy, but stick with it.
When its defeated, get the last page and add it to the Tome. (SAVE) FINAL 1
PART 5 THE FINAL HOUR
There's a cut scene with Rufus (“despicable cur!”) and Ann ("Henry, it's a trap!").
Go forward to the door and examine it/open it. You are in a warehouse. Go up the stairs on your left and you can see the target area, a walkway above one of the rooms with a ladder leading up. If you look around, you'll see various large boxes,
ideal for climbing up, I would think!
The idea here is to create jump points in both rooms so Hyde can get across to that ladder. He can only jump the height of one box so we'll have to create a sort of step affair for him to climb up. This is how I did it, (if you can see a better way then let me know):
Go to the right hand room and look left. There's a stack of 3 boxes. Nice, but too high to reach yet.
Look right and there's a single box which might be handy.
Directly in front, see a stack of two boxes. They conveniently have handles on them. Go to the boxes, look at them, then be Hyde and drag/push these boxes towards the room's entrance gate - not too close, so you can get out of the room.
Try to place them roughly in the middle between the single box and the other stack.
Now go through to the other room and see the stacks of boxes in there. Do the same, drag the movable ones to about halfway between the two stacks.
Now go back to the first room and climb onto the single box in the far corner. Leap across to the middle stack then onto the other stack, then onto the walkway between the 2 rooms. I found it best to jump at an angle because Hyde tends to overshoot
the target and you have to start again.
Now jump onto the nearest boxes in room 2, then across to the middle and across to the boxes/railing and over to the ladder. Up the ladder to a new area. (SAVE) FINAL 2
Go forward and look at the central console. "3 identical symbols with 4 holes". Go right and look at the panel on the wall. Get two 'parts' and go back to the centre, open Inv and place the parts there. Turn the circles until the white lines match the
pattern in the panel you looked at. Go forward to the next panel and do exactly the same. Go left and look at the cog wheel on the floor - too heavy to lift. Be Hyde and get the cog. Go near the wall, press '3' to help him concentrate and keep pressing
Enter until he places the cog on it's axle. This activates the third panel. Repeat the process on the console. Now go left and left again, up the stairs and up the ladder (SAVE) FINAL 3
Go forward to the wall panel and place the bits from the Inv. A lot of big machinery starts up. Go left and down-screen, up the stairs. Jump on the moving platform, crouch down under the beam, stand and jump onto the walkway then onto the
revolving platform. Jump off onto the gantry, go round to another machine with several platforms going the wrong way. I managed this one eventually by making small adjustments to his direction after each jump. As long as you stay slightly ahead of
the movement, you should be able to reach the back of the machine, where there's a walkway to jump on. Next, a platform on a revolving wheel, careful you don't stand too far away and plunge down.
Then jump off the other side onto another walkway then up a ladder to a new level. (SAVE) FINAL 4
Jekyll is searching for a 'collector' in the tower - I think he means an altar-type place for the book to go – and is searching the levels to find it.
Here there are massive weights suspended by chains. Be Hyde and jump onto them and across to the other side. There's a control panel here with levers to adjust the positions of the pendulums. Pull levers 4,2 and 5.
Be Hyde, and jump on higher weights to get to a ramp and ladder in the corner to a new area top of tower (SAVE) FINAL 5
HELL'S BELLS
Jump onto the big cog, duck under the beam and jump onto the walkway on the other side. Follow it round and take the first left. Here there's a rotating cog. Jump to its centre or run over it to the chest on the other side.
Place the Tome and go back over the cog and turn left up-screen. Jump onto the moving platform, duck, jump onto the horizontal cog, climb up onto the walkway (see the gap in the railing).
Go left, follow it round to a ladder and new area (SAVE) FINAL 6
GOOD HEAVENS
Here is a room with diagrams of constellations on each wall. In the centre of the room there are controls, one for each diagram. There are four rotating drums, with a marker on each which represents the position of each of the bright stars in the diagram.
The aim is to move the drums up or down to match the positions of the stars relative to each other. Only one is available to start with so use the up and down pointers to adjust the drums. When you have completed the first one, the next becomes available,
and so on. You'll see that its not quite straightforward in that some pointers control adjacent drums.
Number 1 is THE TWINS:
Letter the drums A, B, C & D.
Click on the 'D' up-arrow so the notch on D is at the top.
Click on the 'C' down-arrow so it's notch is at the bottom.
Click on the 'B' up-arrow twice.
Click on the 'A' down-arrow twice.
Number 2: LEO
Click the down arrows so that all the notches are in a line at the bottom. Now
click 'B' up twice, then 'D' down once, B up 1, B down 1, B up 1, B down 1.
Number 3: SAGITTARIUS:
Start with all notches down. C up 2, C down 1, then repeat: D up 1 and C down 1
until solved.
Number 4: HERCULES:
Start all down. A up 1, B down 1, A up 1, B down 1, C up 1, A up 1, A down 1.
When you've done all four...
...Jekyll becomes Hyde at a new location. (SAVE) END 1
PART 6 THE END OF THE WORLD
Hyde stands on one side of a lava chasm, where molten lava flows below. Leap across the chasm but beware – large chunks of lava break off and slide away. Use the number keys to keep up his strength and resistance.
Eventually he arrives at a rocky outcrop. Leap the gap towards the clock parts strewn around the new area.
Now you're going to have to do a lot of leaping, jumping, and running, across rocks and lava (some of it moving or crumbling) to reach your goal, which is London's Tower Bridge. Along the way there are several save-points.
You could call them temporary saves as they are not saved to your hard drive, they are used in case your character gets killed and you can go back to that place. Anyway, you'll have seen them all through the game so far. Where they occur, I've put '(save)'.
Jump the chasm and go left, jump across the pillars to a rocky platform. There are 5 jumps up to another platform (save). Jump down and across more (crumbling) pillars to yet another platform (save).
Now go forward across the rocky slabs and follow a path round the (rising) lava lake and up to a plateau.
“Huh, quick, away from here!”, so go forward 3 blocks (SAVE) END 2
Now don't leap forwards, jump down onto the slab to the left, then forwards. You'll get a short cut scene with a view of the bridge. Forward again (save) then jump 11 pillars onto a flat area then onto a sort of jetty (save), where you can see
floating pillars (probably lava?). The aim is to reach a similar jetty on the other side of the lake, but its much higher than this one, so start by jumping onto the lowest passing pillar and from there jump onto successively higher ones.
I think there are 8 in all, then...
...jump off when you can on the other side. (SAVE) END 3
Go forward, jump down, go right, jump 7 pillars, climb up to a platform, turn right. (save).
Do 7 jumps, go left, jump down (save), towards the pillars. Make 4 jumps to the flat area, go right, 2 jumps, flat area, left, 5 jumps to flat area, climb up twice, go forward and right slightly then up, ahead, left, up and then up 5 big 'steps' to a broken wall.
In about the middle you can see some big stone slabs. Climb 3 then turn left, bit tricky to position, but climb up left, then up more slabs to the top (save). Go left, and be Jekyll.
There's a weird cut scene with some kids locked up behind bars -
“Wait, I'll get you out of there immediately.”
STEAM POWER
Now Jekyll is at the bridge control panel. It's operated by steam apparently, and you have to adjust the controls to make the bridge open. Play around with the valves to open the bridge.
Number the valves 1 to 4 along the top and 5 to 8 on the bottom. Press 6, 1 and 4. Go across (SAVE) END 4
See deadly discharges on the bridge. Be Hyde and dodge the lightning and holes to the other side.
Now a portcullis slams down and Hyde is trapped with a killer drone thing. Run into a corner and when the drone attacks you, dash out of the way so it short-circuits on the water. Repeat in each corner until it's dead - “Bull's Eye!” -
then a gate will open and let you out. As Jekyll, you enter the lord's residence. “So this is where his spiteful lordship resides” (SAVE) END 5
See a model of 5 planets. There are 5 rings which control their positions relative to each other and the universe – so it seems quite complex. Note that Jekyll tells us the model is 'heliocentric' (the astronomical model in which the Earth and
planets revolve around a stationary Sun at the centre of the solar system, but I don't know what difference it makes!). Use the arrow keys to switch circles. The outer one rotates all 5 planets together. Use combinations of the others to make
planets go further from and closer to each other. I got the purple Saturn and the blue Earth in their right places and played around with the others until they finally clicked in place.
The smallest planet, a purply colour, seems to go on the yellow beam. The others are green and orange. When you've got it right, a secret door opens. Go through towards the bridge.
The scene changes to the inside of one of the bridge towers. The lord has you trapped in the middle of some Tesla machines.
Lord: “Thanks to your good self, the Tome has become more powerful than we would ever to have dared imagine.”
About the children : “You see, Doctor, the almighty Kronos always demands the presence of innocent souls at his rituals, so that he can feast upon them”
Of course, Jekyll is horrified that he has unwittingly aided this dastardly lot!
The lord leaves and Jekyll changes into Hyde. Jump into the centre of the machine to wreck it.
Back as Jekyll, “*Groan* What happened?! My head!...ah...my things...everything destroyed...”
Leave this place and go out onto the bridge. (SAVE) END 6
Now there's a cut scene with the lord, Rufus, Ann and Jekyll. Ann is hanging off the side of the bridge (she must be a strong girl!) and in mortal danger. Lord tells Jekyll he must choose the world or Ann -
(but there's no actual choice in the game that I can see, it just continues as described below).
Automatically be Hyde. Rufus is further along the bridge using his powers to try to kill you. There are circles of giant rocks flying around in front of you. Make your way through the rocks, avoiding the holes in the bridge,
and when you are getting close to Rufus, get ready with the Enter key. Use the number keys first to give him strength, and when you see the hand icon, bash the Enter key like mad to reflect the energy back to Rufus and knock him
backwards down a hole.
“My son, my son, you have killed my son!”
“You will live to regret that, you paltry quack!”
The scene changes again. There are rocks circling above the bridge; Hyde is standing on one and can see the lord in the distance. Walk/jump right until you come to a group of rocks alongside the route, up-screen, and jump on it.
This takes you closer to the lord, so watch out, he's going to attack!
There are some smaller rocks flying past you, so when one is in front of you, press Enter to throw it at the lord (you should see the hand icon). Now he is going to shoot his evil energy at you.
Again, use the strength keys and get ready with the Enter key. Bash the Enter key to absorb the blow.
OK, you beat him once. You have to do this twice more (I think – I had to anyway).
Finally you finish him off and he floats away into the skies...
There's a final cut scene - the Tome is on an altar and a bright light is beating down on it. It's destroying the book, which shoots off the altar onto the floor.
THE END
This document was provided to GameBoomers.com and may not be distributed without express written permission of the author and GameBoomers and the content may not be altered in any way.