Legacy of Time
The Journeyman Project 3
Comments & Walkthrough
By
Soren Andersen
General Remarks
This game is the third in the Journeyman series, and like the others, a central theme is that in the 24th century in which it is set, time travel—at least into the past—has been accomplished, but it is a closely guarded secret lest some unscrupulous person go back in time and by changing something that has happened could then alter subsequent history; such a deed would cause a change from that point in time onward, and history as known would no longer be true. There would be a temporal distortion of a size that could be a from ripple to a huge wave, depending upon the severity of the historical change. The Temporal Security Agency (TSA) has been established to guard the secret of time travel, to detect temporal distortions, and to thwart any miscreant who attempts to alter history.
You do not have to have played the previous two games in order to undertake this one, but if you have you will enjoy a much greater understanding of the background action against which this game is played. The introduction on page 5 of the instruction booklet from the CD jewel case provides a concise summary of this background, and pages 21–25 presents a timeline of relevant events from 2112 to 2329, the present day, and introduces the principal characters; reading this information carefully will be of invaluable assistance in following the story.
It gives nothing away to relate that the game opens with a preliminary cinematic sequence in which the villainess of game 2, who was swept away in a time stream along with artificial intelligence Arthur in the course of foiling her plot, comes out of this stream in just at the time and place to witness the destruction of Atlantis (and somehow also El Dorado and Shangri-La, three of Adventure game favorite locations). The scene then shifts to the spaceship Oracle in which our hero Gage Blackwood, TSA Agent 5, is on patrol with Cyrollan allies of the Symbiotry; they see an attack on and destruction of frontier outpost Helm by anther space ship. The Cyrollan commander recognizes the attacker: "They have returned", he says. Fade-out.
That's the prelude. Now the game shows you a main screen that offers you choices. A New Game choice shows another movie sequence that gives more background, sets the scene for upcoming action, and introduces you to the newly developed Chameleon Jumpsuit. After putting it on and trying it out a little, you are ready to go and finally interact with the game. Incidentally, after a cinematic sequence has been shown, it becomes available for replay using the game's menu bar.
In part 1 of the game you go to the three destroyed locations to learn about their ruin. In part 2 you return to each of them before their destruction to search for three artifacts, one in each place, that can be used in the fight against the attackers. You cannot simply go to each in turn and complete the mission there because certain items you need in one scenario are found in another; however, you can go back and forth as often as you wish, and when you return to one you will be in the same place as you left. After the first mandatory jump to the destroyed Atlantis, you can go to the sites in whatever order you desire; the walkthrough that follows uses one of the more efficient sequences. Unlike the other games, you cannot die in this one and you can't get stuck, but you should nevertheless save often. Getting used to the ability to change guises might be a problem at first, and the plot at times seems hard to follow. The Buddhist beliefs are particularly obscure.
So much for introductory remarks, use them to find your way through the game. It is to be hoped that you will not need the walkthrough that follows, because using the lightbulb function with Arthur provides increasingly explicit help, and the spacebar gives indications on which way to go, so you should need the walkthrough only when you get really stuck.
Soren
Andersen, June 98
Walkthrough – Part 1
Now that you have read all the introductory materials and watched closely the beginning movie sequences, you click on the bar at the top of the screen and you are transported back in time to
Atlantis destroyed -- BC 1262 October 6
From the sights around you and the slight rocking motion, you can deduce that you have landed on something floating in the wrecked harbor of Atlantis.
1. Turn and face the shore, then go up to the base of what is left of the windmill.
2. Agent 3's jumpsuit appears. Click on it, the helmet opens, and you meet Arthur, who then joins you in your chameleon jumpsuit, and you will see him from now on in the lower right of the screen.
3. Agent 3's image appears with a story of terrible things she has seen and tells you to look for three timecodes she has established to mark the location of these events. Arthur then talks for a while.
4. Continue past the windmill and down the stone steps.
5. Jump across the water on the stones and go to the end of the jetty.
6. Look down and pick up the rope ladder.
7. Go back to the windmill and go inside.
8. Click the rope ladder on the end of the broken stairway leading up to the top of the windmill. This gets you up onto the stairs.
9. Go up the stairs and through the trapdoor to the upper room, then climb the ladder to the roof.
10. Look around; on the floor you will find the timecode Agent 3 left. Click on the timecode and watch a replay of the spacecraft destroying the Atlantean temple and harbor.
11. When the cursor appears as a pointing hand, click on the bar at the top of the screen and transport to the Andean Mountains (could go to the Himalayan Mountains if you wish).
El Dorado destroyed -- AD 0524 April 15
You land at this location in the bottom of a dry well, where is a large basket, some rocks, and a rope from the top. You cannot climb the rope.
1. One lone rock covers a drain. Next to it is a stone lever. Remove the rock, lift the lever, and the well fills with water. Ride the basket to the top.
2. Climb out of the well.
3. Look around and find a disk with a handle near the edge. Take this disk crank.
4. Go up the path to the two palm trees, then go past them a couple of clicks to the top of the path where you can see a wall with a doorway opening.
5. Turn to the left to another path leading upward. Go up the path to some ruined farm buildings. Take the basket on the left.
6. Return down the path and go through the doorway in the wall.
7. On the left is a mechanism of sorts, with a beam arrangement. Put the disk crank on the right end of the beam.
8. Turn the crank and pull down a balloon.
9. Place the basket below the balloon. It will become attached and you will climb in. The balloon will rise.
10. Many ropes are hanging. Turn to the right to find one that has a sort of handle.
11. Optional. Click the cursor on the rope right above the basket edge. You will get a closeup showing a hook on the end of the rope.
12. Click on the handle in the rope; the rope will swing and hook a basket on another balloon, pull it toward you, and you will jump to it.
13. Find the timecode on the side of the basket. Click on it and another destruction sequence movie shows. When the cursor appears as a pointing hand, click it on the bar at the top of the screen and go to the Himalayan Mountains.
Shangri-La destroyed -- AD 1219 April 15
Arrival is on a snowbank next to a severely damaged gatehouse across a ravine from a destroyed monastery. Arthur says the destruction is from an avalanche.
1. Turn right and go down the snowbank toward a dead soldier lying in the snow.
2. Pick up the wooden staff next to the soldier, and to the right, the spoked windlass wheel.
3. Return to your landing spot, then down into the gatehouse, and ahead out to the former bridge. Get a good view of the destroyed monastery. If you try to climb down the wrecked bridge, you will find the end too far from the ground and you will have to climb up again.
4. Once more go back up to the location where you arrived. Reenter the gatehouse, going to the right where the bridge mechanism is located.
5. Put the windlass wheel on the gate mechanism, then turn it, which will extend the collapsed hanging bridge.
6. Return to bridge. With the bridge extended you can now climb down and jump to the bottom of the ravine.
7. Turn left and walk to the monastery building with many windows.
8. Find the loose window that you can pry open with the staff you found by the dead soldier.
9. Go through the window and to the Buddha statue with the blue robe and hair.
10. Using the Buddha, climb to me upper part of the monastery.
11. Look around to find the timecode drawn in the snow.
12. Click on the code. This time the movie sequence is of aliens searching the ruins.
Having the 3 timecodes, Arthur computes Agent 3's location and that is where you go, to find her with a dying Eliot Sinclair, the exiled time travel genius from the previous games. You take her back to the TSA, where there is a long cinematic sequence including Jhessela, the Cyrollan ambassador, in which it develops that a long vanished race, the Sosiqui, has left behind something called a "legacy" that is needed to defeat the brutal Quo'Thalas, who are now attacking earth. You have to listen carefully to Jhessela to learn about this age-old enemy who was thought to have been thoroughly crushed and routed in ancient battles, but now have come back to obtain the legacy for themselves. One part of this legacy is in temples at each of the destroyed sites; as it turns out, this fact is why they were devastated. You are now ready for Part 2, in which you go back to the three destroyed sites on one day before their destruction to look for the three parts (artifacts) of the all-important legacy.
Walkthrough – Part 2
Mediterranean Sea -- Atlantis (BC 1262 Oct 5)
As it happens, you arrive on the roof of the not yet ruined windmill where you left in Part 1. Look around and examine the harbor for orientation.
1. Find trapdoor and go down.
2. Pick up 2 gears.
3. Move around the central mechanism and fit gears into floor by the windlass.
4. Move the windlass five times until torn sale goes by.
5. Step outside and then move windlass once more.
6. Go along top of the wall to the end.
7. Jump down to the crane boom.
8. Move along the boom to just past the center post.
9. Jump down to the spar at top of sail.
10. Move along the spar to the mast.
11. Climb down the mast.
12. Pick up the silk scarf from the deck.
13. Move forward to ship’s rail.
14. Pick up gaff from the deck.
15. Jump from the boat to the dock.
16. Go to right along edge of the dock and turn corner.
17. Capture the guise of the beggar; assume guise.
18. Talk to the beggar.
19. Return to the boat.
20. Go to the front of the vessel and find the boat's captain in chains.
21. Capture the guise of the captain, talk to him, beg for and get coins, leave.
22. Jump back to the dock, assume the guise of the captain.
23. Make your way through a group of large jars the to back of dock, turn left, go forward and then go down the stairs to the ferryman who is playing a recorder.
24. Capture the guise of the ferryman, then talk to him.
25. Since the artifact is supposed to be in the temple, ask to go there, pay him for passage, listen to him as he takes you there.
26. When you get to the temple dock, go right, turn around, and capture the guise of the temple guard.
27. Talk to the guard, who refuses to let you in but tells you who can get in and what is needed to do so.
28. Return to the ferry; from what the guard has said, ask to go to the oil vendor or the potter (it's the same dock). Listen to the ferryman as you go.
29. When you get to this dock, go right, turn left and go into the building to the potter's shop. Assume the guise of guard (or ferryman) and talk to potter, get information on the festival.
30. Before leaving, go to the right and approach the vessel with a windlass on the top. Turn the windlass and extrude some clay, which falls off. Pick up the lump of clay.
31. Leave the potter's shop, go back to the dock, then go around the corner to the left to the shop of the olive oil vendor. Different guises elicit responses when talking to her, so if you go in and out of her shop, changing guises when outside, you will get a lot of information and a couple hints. Be sure and capture her guise.
32. Examine the jars on the left; get closeup of the largest one and examine the seal on the jar.
33. Press lump of clay on the jar to get an impression of the seal.
34. Leave the shop and go back to the dock.
The temple guard has told you that you need a gold medallion to enter. You have the foundation for this: the clay lump with an impression. Arthur suggests that El Dorado is well known for its use of gold and has lots of it. Click on the bar at the top of the screen and go there ....When you come back to Atlantis at this location, you will have some gold leaf.
35. Assume the guise of the oil vender, and return to the potter's shop.
36. Offer to watch pots in the kiln. Potter accepts offer and leaves.
37. Go to the kiln on left and open the doors.
38. Go forward and place the clay lump on the circular platform in kiln.
39. Place gold leaf on the clay.
40. Turn around, move away from the kiln, and close the doors.
41. Turn the spoked wheel on the right.
42. Open the kiln and get the clay lump which is now a gold medallion.
43. Approach the table opposite the kiln doors and get the pitcher and bowl.
44. Leave the potter's shop and go to the entrance of the oil vendor's shop.
45.At the edge of the dock is a vat of olive oil. Fill the bowl with oil.
46. Return to the ferry and ask the ferryman to take you to the temple.
47. Show the medallion to the guard, who will open the gates, and the ferry proceeds to the temple.
48. From the temple dock advance to the temple center and fill pitcher with healing water from the large vessel.
49. Proceed to the right and use the gaff to close the gate in central shaft and thus cut off the flow of water to the lower temple.
50. Return to the ferry and ask to go to the windmill.
51. At the windmill, go to the top of the stairs and assume the guise of the boat captain.
52. Enter the windmill and open the chest in the entranceway.
53. Examine the parchment diagram and return it to the chest.
54. Enter the windmill, capture the guise of the miller, and talk to him.
55. Leave the windmill and go back to the ferry, ask to be taken to the dock.
56. Go to the boat, assume the guise of the beggar. Board the boat.
57. Talk to the captain, tell him it "looks like nasty weather". Listen to the captain, then leave.
58. Return to the dock and assume the guise of the captain.
59. Talk to the beggar, tell him "It may even rain". He then tells you of escape plans.
60. Return to the ferry and ask to go to the windmill.
61. Talk to the miller, tell him it "Looks like a long winter". Get more escape plans and details of the temple.
62. Say goodbye and the miller leaves.
63. Take the ferry back to the dock. Go to the beggar's location--he is gone, but his begging bowl is on the dock. Take it.
64. Take the ferry back to the windmill.
65. Enter windmill and pick up rope lying on the floor. Attach it to the windmill shaft.
66. Advance to wooden crank disk and turn it; this pulls on the rope and opens a trapdoor in the windmill floor.
67. Enter the trapdoor and go through the secret passage to the inner temple. Change to the guise of the beggar.
68. Climb the ladder steps on the wall.
69. Go left and get Arthur's reading of the murals.
70. Capture the guise of the templar Soros and listen to his lament. Talk to him. He will give you a disk and leave.
71. Get a closeup of the clock mechanism and put the disk between the large gear and the crank on the right.
72. Click once on the crank. Stuff turns and a roaring noise is heard.
73. Go back the way you came and up 3 flights of stairs to the upper temple.
74. Use the gaff to open the water gate that you had previously closed.
75. A fountain of water shoots up from the bottom of the shaft and the pyramidal artifact appears in it. Take the artifact, and you will be transported back to the TSA.
In the movie sequence that now plays, Blackwood brings the artifact to a group that includes Commissioner Baldwin, Chief Engineer Dalton, and Ambassador Jhessela. The latter authenticates the artifact as being part of the legacy, but says she cannot make out any of the mysterious markings. Nor can Dalton; Blackwood suggests that Agent 3 be brought in since she is an expert on ancient languages. Baldwin at first refuses, then reluctantly agrees. Blackwood sets off to retrieve more of the legacy.
Himalayan Mountains -- Shangri-La (AD 1219 April 14)
Here you must locate six almost identical statues of Buddha, each robed in a different color and representing different philosophical realms, and present each with a gift. In return you will get a colored stone, the set of which is returned to a second group of Buddha statues in order to earn your final steps to the artifact that is part of the legacy. You arrive at this location on stone steps leading up to a gatehouse across a deep ravine from a Tibetan monastery.
1. Proceed along path away from gatehouse toward a human figure crouched face down in attitude of prayer in the path beyond a footbridge crossing the ravine to the monastery. Fortunately he does not look up to see your jumpsuit, so you can capture the guise of this pilgrim.
2. Turn around and cross ravine on footbridge to lower wall of monastery.
3. Observe the colorful symbols and inscription on bank; get Arthur's translation. Note the symbol meanings, and also that which is "the cause of all suffering".
4. Go to the right toward the yaks and examine the Green Buddha, have Arthur translate the symbols on the base.
5. Return along the path past the footbridge to the grate in the wall. If you get a closeup of the grate you will see a handle beyond it that you may pull with the gaff; this will open the grate and allow you entry to the steam tunnels under the monastery, but you have not yet found a map of these tunnels nor learned anything about them.
6. Instead, continue along the pathway around the corner and up the stairs to the greenhouse.
7. Assume the guise of the pilgrim and enter the greenhouse.
8. Capture the guise of the gardener monk Amul, then talk to him. Learn about the steam tunnels, the wishing tree, and the Pretas.
9. Go into the greenhouse and around to the right to examine the Yellow Buddha. Have Arthur read the inscription on the base of the statue.
10. Go to the opposite side of the greenhouse and climb the ladder to the platform.
11. Take the knife and the steam tunnel map.
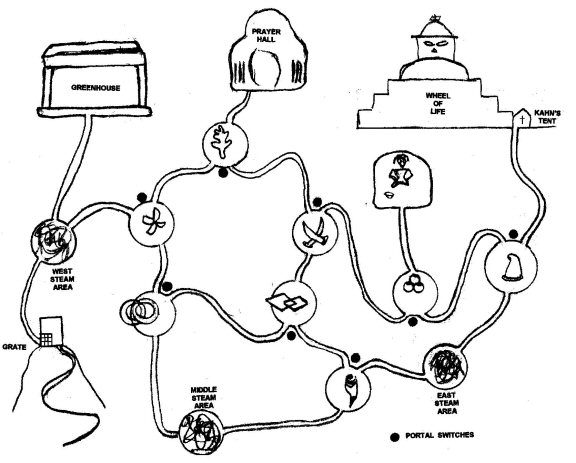
(A somewhat augmented sketch of this steam tunnel map is attached.)
12. Go back down the ladder and proceed around the wishing tree until you see a grate in the floor.
13. Open the grate and descend.
14. Pour the pitcher of healing water that you got in Atlantis on the roots of the wishing tree. They will be invigorated.
15. Return to the platform in the greenhouse and take the fruit from the wishing tree.
16. Return to the Yellow Buddha and place the fruit in the bowl that the statue is holding in its right hand.
17. A spherical yellow stone appears in the statue's left hand. Take the stone.
18. Talk to the gardener again if you wish.
19. Return to the floor grating and descend once more.
20. Just to the left of the roots of the wishing tree is an entrance to the steam tunnels. Go through it.
Refer now to the map of the steam tunnels. You are presently below the building shown on the left in the map, the one containing the large green tree. (The greenhouse and the wishing tree.)
Note: when the cursor shows as a hand, the map may be moved vertically to display more of its area.
The map shows three fiery steam areas that you will recognize when you come to them. There are 8 junction chambers, each identified by the indicated symbols on the chamber ceilings; each chamber has a gate that may be moved back and forth to one of two positions when you are in the chamber. There is a special chamber, identified by a skeleton, that is the location of the Black Buddha statue. There are four entrances/exits to the tunnel system. You can successfully complete the program tasks only if you first use either the entrance from the greenhouse or from the grate of Step 5 above. The Prayer Hall access is used the second time you go through the tunnel system. You cannot get past the Kahn at the access on the top right side of the map.
21. Go through the tunnel to the west steam area. Go into the steam area and past it one step. Then turn slowly to the left to find the access to the tunnel maze; do not confuse this tunnel with the return tunnel to the wishing tree root chamber.
22. Proceed into the tunnel maze until you get to the chamber with the ornate cross on the ceiling. From now on your position in the maze will be marked on the map, as will be the position of the gate in each chamber that you visit.
23. Continue to the chamber with two interlocking circles on the ceiling.
24. Continue through the middle steam area to the chamber with the seashell on the ceiling.
25. Click on the upright handle to move the gate to the left.
26. Go past the east steam area to the chamber with the image of a single thick horn on the ceiling (this also resembles a sort of dunce cap).
27. Continue on to the underground room resembling the one below the greenhouse but without the tree roots. You can hear Kahn muttering prayers.
28. Climb the ladder rungs in the wall up to Kahn's tent.
29. When the grate opens, turn immediately to the left and take Kahn's sword, than quickly return back down the ladder before Kahn discovers you and knocks you back down. That does not matter, however, as long as you have the sword. If you don't, try again.
30. Return to the chamber with the horn (dunce cap) image on the ceiling. In preparation for your return visit to the steam tunnels, move the circular wooden gate from left to right, closing the tunnel to Kahn's tent.
31. Continue your return past the east steam area to the seashell chamber.
32. Move the gate to the right so you can go to the chamber with two interlocking diamond shapes on the ceiling.
33. Keep going to the next chamber; this one has a set of crossed horns, or tusks, in the ceiling.
34. Move the gate to the left so that you can go to the chamber with three eyeballs on the ceiling
35. Go through this chamber to the one with a skeleton mural on the wall.
36. Approach the mural and have Arthur translate the writing below it.
37. Turn left and approach the Black Buddha. Have Arthur interpret the inscription on the base.
38. Turn left again. Take the bowl which the program says is a butter boiler. If Arthur is in his chatty mode, you will learn that the Buddha is made of butter.
39. Return to the three eyes chamber, then the two horns chamber. In this one, return the gate to the right.
40. Return through the two diamonds chamber to the seashell chamber, where you must move the gate to the left, again in preparation for your second visit to the tunnels. Then go through the middle steam area, the two circles chamber, the cross chamber, and then to the west steam area.
41. Now you must go to another part of the lamasery. The best way is to continue straight through the steam area whence you will come to the room with the wall grate. Click on the upright handle, the grate will open, and you will exit to the path where you were near the beginning approach to the monastery.
42. Continue to the footbridge, cross it, and go up the steps to the entrance to the gatehouse.
43. Enter the gatehouse and go to the main bridge to the lamasery. The bridge has not been opened and therefore you cannot cross, but you will get a superb panorama of Shangri-La for orientation and reference.
44. Turn around and go back into the gatehouse to the Buddha mural, then turn left and go up the stairs.
45. At the top of the stairs, capture the guise of the guard, then talk to him. Give him the silk scarf when he asks for it. Say goodbye and return to the bridge.
46. When the bridge opens, cross it and move straight ahead to enter the monastery Prayer Hall.
47. The high lama may be found at the right of the Buddha statue. Capture his guise, talk to him as much as possible, then leave and go to the center of the Prayer Hall.
48. Approach the Blue Buddha and get the translation of the inscription on the base of the statue.
49. Put the begging bowl that you got in Atlantis in the open left hand of the Buddha, then retrieve the blue spherical stone from his right hand.
50. Leave the Prayer Hall. Go down the short flight of steps at the entrance, turn left, and go down two longer flights.
51. Turn left again and observe Kahn's tent; approach the tent, and once more turn left. Approach the Red Buddha, get translation of script at the base.
52. Put sword in the outstretched right fist of the statue, retrieve the red spherical stone that appears in the statue's left hand.
53. Change to the guise of the lama and enter the tent. Talk to Kahn, learn of the wheel of life, Sidda, and his secret.
54. Leave Kahn, go across the plaza to the set of doors that lead to the Wheel of Life temple. Go through doors and approach the White Buddha (actually, he is gray). Get translation of inscription on base of statue.
55. The Buddha has his right hand to his ear as though listening for something, and is facing a set of eight inscribed prayer wheels. Arthur can translate the inscriptions, and if you cause a wheel to turn, a deep voice repeats it.
56. The upper right wheel does not operate until you oil it with either olive oil in the bowl from Atlantis or butter from the Black Buddha shrine.
57. The offering to the White Buddha is to have the prayer wheels repeat the sacred mantra: Om Ma Ni Pad Me Hum. Click wheels 7, 2, 1, 4, 5, 3 in that order.
58. Take the white spherical stone from the left hand of the Buddha.
59. Go through the doors beyond and into the Wheel of Life temple.
60. Turn right and approach the tapestry on the wall.
61. Get a closeup of the tapestry; it shows the six realms of the wheel of life, with the colored Buddhas in each one carrying a symbolic item; Arthur can translate for you:
The white Buddha is carrying a lute
The red Buddha is carrying a fiery sword
The green Buddha is carrying a book
The black Buddha is carrying fire
The yellow Buddha is carrying a fruit
The blue Buddha is carrying a bowl
The association with the statues you have found is evident; you have yet to take care of the green and black Buddhas. Arthur advises you to revisit the lama.
62. Assume the guise of Kahn. Return to the Prayer Hall and the lama.
63. Talk to the lama, learn more of the Sidda and his secret. When you ask about the Realms, you must do so six times, and each time ask about a different realm. In particular, when you ask about the animal realm, the lama in turn will ask you a question about the cause of suffering (see item 3), to which you answer "Ignorance", and you will receive from him the Book of Knowledge.
64. Leave the lama, go all the way across the Prayer Hall to the far wall, turn right, and move to the grate in the floor.
65. Open the grate and once more go into the steam tunnels. The mission this time is to set the gates so that two of the steam areas have unimpeded access to the skeleton mural chamber; the Black Buddha, being made of butter, will then melt from the heat of the steam.
66. Go through the chamber with the tree symbol on the ceiling to the two horns chamber, and here move the gate to the left.
67. Go to the 3 eyes chamber and roll the gate to the right.
68. Go through the single horn (dunce cap) chamber, the east steam area, the seashell chamber, the middle steam area, to the two circles chamber.
69. Move the gate from right to left. Arthur announces, "You did it, Gage!".
70. Go back through the tunnel maze to the Black Buddha chamber. The Buddha has melted from the heat of two connected steam areas, and on top of the melt is the black stone. Take the stone.
71. Return any way you wish to the exit grate leading to the path to the Green Buddha.
72. Go to the Green Buddha and slide the Book of Knowledge through the hole in the statue's base. Take the green spherical stone that appears in the left hand of the statue.
73. You now have all six stones. Cross the footbridge, go up the steps, and through the gatehouse to the main bridge, which will open for you. Proceed to the location of the White Buddha and the prayer wheels, and on into the Wheel of Life temple.
74. When you look at the floor of the temple, you will note that it is a duplicate of the tapestry.
75. Go down the stairs to the temple floor. Go half way around the central pillar (the spacebar will help) until you can approach the White Buddha inside the pillar.
76. Place the white stone in the Buddha's right hand. The floor will rise as a set of steps; Arthur can translate the characters on the bottom riser.
77. Go up the steps and place the red stone in the right hand of the Red Buddha. Another set of steps will rise.
78. Repeat the preceding two steps for the green, black, yellow, and blue stones and Buddhas.
79. When you climb the stairs to the top of the pillar, a large lotus spins and opens.
80. Step upward on the lotus petals. Examine the two murals and listen to Arthur.
81. Grasp the spinning, shining lotus on the wall and place it in your inventory.
82. Get a closeup of the pink circle between the two large eyes. Turns out to be a lens showing the pilgrim you first encountered praying on the path below the gatehouse. Arthur announces that the pilgrim is the Sidda who has finally returned as predicted. You must now go and talk to him.
83. Step down on the lotus petals and down the stairs to the bottom of the column, then out of the temple. Go to the main bridge and ring the bell on the gatepost. The bridge will open.
84. Cross the bridge and approach the pilgrim.
85. Talk to the pilgrim, then give him the lotus. When he says you must become your true self, change to your jumpsuit guise.
86. He will change the lotus to the artifact you have been seeking and it enters your inventory. You will be transported back to the TSA headquarters for a transition movie sequence.
In this sequence Daughton and Agent 3 report that they have made some progress in deciphering the first artifact. There is a violent reaction when the second artifact is placed near the first. The news about the attacking Quo'Thala is worse. Blackwood sets off to search for the third artifact in El Dorado.
Andes Mountains – El Dorado (AD 0524 Jan 28)
You land in the El Dorado scenario on the path by the trees above the well in which you arrived previously after the city was destroyed.
1. Turn around and go down the path to the well.
2. Capture guise of farm boy asleep behind shrubbery by the well; assume guise.
3. Use "balloon" to cross deep river valley to landing below temple.
4. Ascend stairs to temple entrance, then go up temple steps and enter temple.
5. Examine two pictogram murals and have Arthur explain them.
6. Move forward to look down shaft in center of room. You will get a closeup of a Couatl serpent glyph at the bottom.
7. Optional: Capture guise of muralist scribe; talk to him if you wish.
8. Get gold leaf from wicker basket.
9. Return down steps to temple entrance.
Presumably you have come here from Atlantis to get the gold leaf that you now have, so now click on the bar at the top of the screen to return there; when you next return to El Dorado (having been to Shangri-La) you will be here at the temple entrance.
10. Turn right and walk to the wall.
11. Turn right again and follow the path beside the temple all the way back until stopped by a soldier who will not let you proceed further to see the shaman.
12. Talk to soldier, then say goodbye and take one step back down the path the way you came.
13. Turn left and search for a passage through foliage in order to get behind the soldier.
14. Move through the foliage where you will find a rope tethering the soldier's balloon. Cut the rope with the knife from the Shangri-La greenhouse.
15. The soldier grabs the rope hanging from the escaping balloon. Go through the opening in the wall where the soldier has left his post.
16. Turn right and continue your interrupted walk along the passage and through the archway.
17. Turn right to confront a guard. Talk to guard, who tells you to get lost.
18. Shaman appears, says he wants to talk to the boy and sends the guard packing.
19. Capture guise of the shaman.
20. Shaman tells story of the Legacy and its division into three pieces (artifacts), one of which is hidden near the temple.
21. He also queries you about the talisman, and asks if you have it. Answer either yes or no.
22. Say goodbye and return to the temple entrance.
23. Go down to the balloon landing, enter the balloon basket, and cross to the other side.
24. Assume the guise of the shaman and go up the path to the farm. Go behind the building to find the farmer, the boy Acheo's father.
25. Talk to the farmer, learn that the boy keeps the talisman with him at all times.
26. Say goodbye and go down to the well where the boy is sleeping behind the shrubbery.
27. Talk to the boy, learn of his dream. Get the talisman from him.
28. Return to the balloon, cross the valley to the temple landing, and resume the guise of the boy.
29. Go back to the shaman's quarters where the guard is still keeping people out.
30. Turn away from the guard, proceed along the passage to a clearing with a balloon on the ground on the far side.
31. Get into the balloon basket. Strike the talisman on the triangular piece of flint in order to light the balloon burner. Balloon will rise and give a spectacular panorama of the area and the boy's dream.
32. Find a view of the temple and zoom in on it. Note the arrow shaped opening on the temple roof surrounded by four faces. Note details of the faces and their position on the sides of the arrow. Zoom out.
33. Zoom in on the sculpture just beyond the temple. It is a similar shaped arrow, with the legendary two bird brothers fighting over it.
34. Zoom out and click on the flame to turn the burner off. You will descend to the ground where you took off.
35. Return along the passageways and path to the temple entrance. Continue ahead to the other side of the temple and find your way along the path through the shrubbery to the arrow shaped object that you saw from the balloon. It is a pool full of water.
36. At the entrance to the pool is a short pedestal with an arrow shaped depression. Put the talisman in the depression. The pool drains noisily.
37. Go down the steps into the drained pool to find 4 sets of 6 stone faces on 2 of the pool walls.
38. Get closeup of first set of faces on the left.
39. Recall the faces seen from the balloon on the temple roof (Step 35). The set at which you are looking is below one that looks like the second face from right in the set. Click on that face. It is momentarily depressed and the eyes turn red.
40. Zoom out and advance to the next set on the same wall. Zoom in and again click on the second head from the right. Eyes turn red.
41. Zoom out and turn right to the opposite set of heads. Zoom in and click on third head from the left.
42. Zoom out and go to the last set, the one on the left of the pool entrance stairs (as you face them). Zoom in and press the first face on the left. Scraping stone is heard and a passageway opens in the center of the steps
43. Enter the passageway. Your progress will the stopped by flames.
44. Return to the pool, go up the steps, and remove the talisman from the pedestal. Water returns, but instead of filling the pool, it flows into the passageway and extinguishers the fire.
45. Return to the passageway and proceed along it until you are in a room that is under the temple where you saw the Couatl serpent image when you looked down the shaft (Step 6). There are more wall paintings that Arthur can interpret.
46. Click on the tongue of the image and the pyramidal artifact rises into the air.
47. Grasp the artifact and put it in your inventory. Arthur sends you back to the TSA for another transitional movie.
When you return the situation is critical. The attackers are well within the solar system. The fact that all three parts of the legacy are together radiates enough energy that the TSA location can be detected by both the Cyrollans and the enemy Quo'Thala, and the latter let loose radiation bolts on it. Now you have to perform the final task: reassemble the legacy.
Conclusion
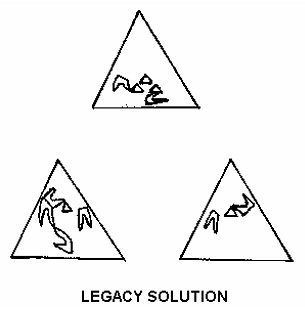
When the three pyramidal artifacts that make up the Sosiqui legacy are placed together in a triangle on the table that has been used to examine each one as Blackwood has returned them, an image is projected from the face of each to the center of the triangle, this image being a combination of the markings on the artifact faces, and is supposed to be that of one found on an ancient Sosiqi relic found long ago by the Cyrollans; it appears in the upper left of the screen. Arthur explains that if any two of the projected images overlap, the parts cancel; if the third face has the same projection, it appears again.
There are two ways to change the image fragments on an artifact: you can spin the entire unit by clicking on a base corner, or rotate the face by clicking on the apex of a pyramid. When you achieve the right combination, things get very bright, then a long, somewhat hokey final cinematic brings the game to a close.
Arthur can give guidance getting the correct selection of artifact faces. Shown below is one solution to the legacy.