Walkthrough for Normal Mode
written by Mr. Bill
Game Originally Developed (1996) and Published by Topware
Interactive
Revised and Updated (2001) by ZUXXEZ
Entertainment
and Published by JoWooD
Productions
Introduction
The Story:
This game is a new version of one of our old favorite detective yarns, Jack Orlando, but now all spruced up and upgraded so you can fully appreciate it on the newer computers. Jack is an irascible and irreverent has-been private eye, once competent and respected but recently no better than any other common drunk. And now, as perhaps the final chapter in his miserable life, he has been framed for a murder that he didn't commit and has only 48 hours to prove his innocence.
The story is a classic, as is the setting: the period immediately following the repeal of Prohibition in America. The city is reminiscent of the Chicago underworld of that era and both the characters and the dialogues are right on target. It is during the middle of the Depression years and you are moving through the seedy and desperate world of the gangsters and common thugs, the whores and the derelicts, where anger and loss of control are always just under the surface and life is cheap. And they don't mince their words when they talk to each other: the attitude is combative and the words are the language of the gutter.
Please Note: The Manual is on the CD. Hit the F1 Key to access Jack's Inventory. Right Click to access the other Action Icons such as the Fist (for hit), Magnifier (for look) or Gun (for hit or shoot).
About This Walkthrough:
We would advise you to not use this walkthrough until you are totally stuck, but heed the warning below first. There are a number of places to visit, people to talk to and items to pick up, but we will limit them to only what is necessary to get you successfully through the game. Those conversations that provide vital information in the game can, in a few cases, only provide this information if a particular order in the discussion is followed, and that sequence will be given in parentheses. Just remember that an adventurer should generally pick up anything and everything that is not nailed down, and in this game you will also need take a couple of things that are either nailed or bolted down. As a result you will pick up a lot of red herrings (useless inventory items: Jack's coat will be loaded with them), but that's OK. Also remember that adventurers should talk to everyone until they have exhausted all possibilities in the conversations.
A Word of Warning:
Jack can die in Normal Mode, so not only save often but also save often under different names. Due to the many changes that were made, this new version of Jack Orlando contains a potential dead end that traps nearly everyone. Therefore it is very important to save often under different names so that you can go back to an earlier save if necessary. It is especially important to save just before meeting with a man by the name of August Bellinger (and do not save over it), so that you can go back to that save if you find yourself at the dead end.
Act I: Crime Scene and Jack's Neighborhood
The Crime Scene (Alley)
As our game begins, we find Jack unconscious and lying next to a dead man. As Jack begins to wake up with a throbbing headache he hears a woman yelling and the police siren. Next thing he knows the cops put him in cuffs and consider him their prime suspect for the murder of a Major Pete Reynolds. Any conversation will do here since the cops are going to arrest Jack and take him to the police station anyway.
Police Station
Jack is then pushed into a cell that is also occupied by a man named Bernardo. Come to find out they know each other because Bernardo used to be one of Jack's informants back when Jack was somebody. Talk at length with Bernardo and then use Jack's Fist on him (Right Click to access the Fist Icon). Now he will tell Jack that Don Scaletti is the boss of organized crime and is connected to the murder of Major Reynolds. Pick up the spoon that is lying on the table. Then a cop will come and take Jack to Inspector Tom Rogers. Any order of conversation with Tom (Jack's old friend) will end up with Jack being given 48 hours to clear his name. The police then take Jack back to his apartment building.
Inside Jack's Apartment Building
Jack's key is under the carpet, take it. Use the key to unlock the door to Jack's Apartment (F1 Key gives access to Jack's Inventory). The neighbor Alice opens her door and starts talking to Jack. Any order of conversation will do here, but have Jack talk nicely to her. After talking to Alice, enter Jack's apartment. Go to and enter the doorway on the far left where Jack will clean up a bit (notice he doesn't change clothes). Take the wallet that is sitting on the couch near the doorway. Move to the right and take the duster seen to the left of the bookcase. Open the drawer on the bottom left of the bookcase and take the key from it. Now go to a cabinet with two drawers over at the far right and use the key to open the left drawer. Jack will take his Colt Revolver from the drawer. The gun will not go into Jack's inventory, instead it becomes an action icon and can be accessed with a Right Click. Leave Jack's apartment and enter Alice's apartment. Talk to her and give her the duster when she asks for it. Give her the spoon when she asks for it. She will leave to start cleaning and then Jack can take the boxing gloves that are hanging on the wall. Now leave Alice's Apartment. Take the broom that is leaning against the wall in the hall and then leave the Apartment Building.
Neighborhood Around Jack's Apartment Building
Now go to the alley where the crime took place (second alley to the right). Have Jack pick up the newspaper (Important!) by the trashcans and also pick up the cigar butt. Have him look at the cigar butt and he will say that it is a Davidoff cigar (not a commonly smoked cigar). Also have Jack notice the bloodstains. Jack suddenly remembers that on the night of the crime, before he passed out, he saw the killer climb up the ladder. Have Jack look at the ladder and then use the broom on the ladder and he will say that he could break Alice's broom and doesn't want her to be upset with him.
Now leave this alley and head back toward Jack's apartment building. Enter the alley on the left that is closest to Jack's apartment. At the end of this alley, Jack sees a crank lying on a car and thinks that it might be strong enough to bring down the ladder in the other alley. So Jack talks to the old woman in the window in order to find out who owns the car. Use the conversation of (5,1). She will tell Jack that the car belongs to Biff and that he hates people touching his things. She also tells Jack that she will tell Biff if he tries to take the crank. OK, let's try to take the crank. The old lady starts yelling loudly for Biff. When Biff comes use the conversation of (5,2,1). Biff will threaten Jack and then leave. Whew! Biff is big and mean, isn't he?
Leave the alley and cross the street that runs past Jack's Apartment Building. Go left down the street that is to the right of the shoeshine boy. Notice the horseshoe under the horse. Talk to the owner of the horse. Jack finds out that the horse kicks people that get too close. Have Jack use the broom to get the horseshoe. Have Jack combine the horseshoe with the boxing gloves. This glove will now have a much better punch, won't it? Look out Biff, Jack is now ready for you. So now let's go back to the alley and take the crank from the car. When Biff comes use the conversation of (5,1) and Jack will floor Biff with one big punch. Leave this alley and head back to the crime scene. Now use the crank on the ladder and Jack will pull it down and climb up onto the roof. Jack sees a box of matches. Take the box of matches and look at it. It has Night O'Granis written on it. Isn't that a nightclub downtown? Climb back down the ladder and Jack will run into Tom Rogers, the Inspector, who is looking over the crime scene again. Tom returns Jack's car keys to him. Jack heads back to his car, but unfortunately on the way he runs into Biff again who is really upset now and beats Jack up. Jack finally wakes up, and slowly makes his way to his car. He'd been out for quite some time, it's dark now. Use Jack's car keys on the car and Jack will get into the car and drive off. All Jack knows at this point is that a guy named Don Scaletti is the boss of organized crime and is somehow linked to the murder of Major Reynolds, and that the killer had a box of matches from the Night O'Granis. Let's head on downtown.
Act II: Downtown
In Front of the Cotton Club
Jack will arrive and park in front of the Cotton Club. Go right to the crossroads and then go left around the corner. There is a suspicious looking guy standing by the front door of the Cotton Club wearing a green overcoat. Talk to him at length and then use the Fist on him. Suddenly he's not so tough anymore and will tell you that there is a Casino in the back of the restaurant across from the Night O'Granis, and that you need an invitation in order to get in.
Charlie's Shop
Go left around the corner; continue left down by the Hotel. Then go to the other side of the street to visit Charlie's Shop that can be found to the right of the Chinese Laundry. Talk to Charles (1,2,2,2,3,2,1). He will give Jack five dollars. Take a newspaper (Today's News. Note: Jack should now have $10 ($5 from his wallet that was lying on the couch in his apartment and $5 from Charles).
Paradise Hotel
Go across the street, then right to the hotel and enter. Talk to the bellboy next to the elevator. Give him the newspaper that you found at the crime scene: it's the rolled up newspaper in your inventory. (Note: if you didn't pick up the newspaper, you can click on Jack's car in front of the Cotton Club and go back to get it now.) The bellboy will tell you that a new Chinese laundry has opened. This triggers the appearance of the Chinaman in front of the Chinese Laundry. Go right to the main hotel desk. Take the cigarettes (Lucky Strikes) which are lying on the floor in front of the desk.
Exit the hotel and talk to the hotel doorman. Give him the package of cigarettes and he will tell you that he likes taking a drink in the 'Small Talk' Bar after a day of hard work. His mentioning the Small Talk Bar will now let you enter it.
Cross the street and then go right 2 times. The Small Talk Bar is located in the alley to Jack's left.
Small Talk Bar
Enter the bar and go to the piano player. A vase is sitting on the floor next to the piano. Pick up the vase. Now who could use a vase? Maybe the Flower Lady by the Cotton Club.
Leave the bar and go left 3 times, then cross the street. Give the vase to the Flower Lady in front of the Cotton Club. She will give you a Chinese Manuscript.
Now go left and then cross the street. Enter the alley to the left of the Chinese Laundry and take the fan lying on the ground. Go back to the main street and speak with the Chinaman in front of the laundry. Give him the fan and he tells you about the man in front of the Night O'Granis club. The man will let you into the Night O'Granis and provide some information if you give him money. Give the Chinese Manuscript to the Chinaman and he will give you the Book of Wisdom. Hmmmmm... Jack could use a little more wisdom about now.
Go right 3 times, then cross the street to the Night O'Granis.
Night O'Granis
Outside the Night O'Granis talk to the taxi driver until he tells you that Frank will repair cars for whiskey (2,3) and then again until he tells you where Frank is located (3,1,1). Talk to the girl. Talk to the bouncer at the door (1,1,2) until he mentions something about money. Give him $5 and he will tell you that the girl inside knows something that will help you. He will also let go inside. Note: There is also a back way into the club (in case you only have one $5 bill) - Walk to the right in the direction of the Cotton Club and enter the first alley to the left. Go right and climb the ladder. Enter the back entrance and then open the second door on the right, the one with the star on it. Go right to enter the club. Now you can give the girl inside the only $5 bill you have.
Talk to the girl at the bar until she's ready to give you information for money. Give her five dollars and she will tell you that the man who smokes Davidoff cigars is August Bellinger, who is staying at the Paradise Hotel. Leave the club and go to the right four times to arrive at the Hotel again. Note: There is always $5 lying on the pavement in front of the hotel if you should need extra money. However these bills will not be there if you have not already used up both the $5 from Jack's wallet that was lying on the couch in his apartment, and the $5 from Charles.
Paradise Hotel (2nd visit)
Enter the hotel. Talk to the clerk at the main desk to the right (2,2). He will tell you Bellinger stays in room 101. Go to the right and look at the door where the cleaning lady has left her keys. Take the key and then go back to the elevator. Talk to the bellboy (1) and he tells you that Room 101 is right across from the elevator upstairs. Click on the elevator button, enter it, and use the elevator to go upstairs. Save your game here! Use the key to go into Bellinger's room and act quickly inside his room, otherwise Bellinger will arrive and shoot you. Look at the briefcase under the bed and then quickly look at the notebook on the nightstand. Bellinger has an appointment at the Night O'Granis at 20:15 hrs (8:15 PM) with Mr. Smith (to which you will go instead and use your Today's News as your identification). Quickly use the window to exit.
In the Alley behind the Paradise Hotel
Talk to the vagrant Jerry Cooper in the alley (3,1). He will tell you that you can get cheap whiskey at the old distillery (the red brick building), but that you have to go at night. If you have tried to enter the green door to the left of the old whiskey distillery before having had this conversation with Jerry, you found the door locked. Now you will find it open. Go back out to the street (down the alley to the right of Jerry).
Condemned House
Use the Fist Icon on the wooden planks across the door of the green condemned house. Enter the condemned house and then enter the room on the right. Take the baseball bat. Exit the room and then enter the second room on the left nearest you. Argue with the sleepy vagrant. Ouch! Jack can sure swing a mean bat! Take the rope next to him on the floor. Leave the room and enter the Catacombs that are down the stairway directly across the hall.
Catacombs
Use the Night O'Granis matches to light the torch that is hanging on the wall behind Jack. Go up the stairs to the next room. You are now in a room with a fountain. Go to the next room. Push the stone under the torch to activate the stairs. Go to the next room (you are now in an abbey hallway). Cross the room to the right and push the stone under the torch on the left side of the doorway opposite the throne. A door will partially open inside the next room.
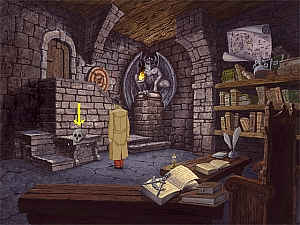
Go to the next room. It is a library with a secret door to the right of the Sphinx that is only partially open. Look at the bookshelf to the right of the secret door. Put the Book of Wisdom on that bookshelf. The secret door will now open completely.
Enter the secret room and the door will close behind you. Take the casino chip (Important!). Also take the skull and then Place the skull on one of the stones to the left of the stairway (under yellow arrow in picture below). Exit the room and then leave the Catacombs by continuing through all the doorways to the right. You will exit on the street next to a hooker. Now go to the Night O'Granis club to meet with Mr. Smith. Go right 2 times, then cross the street.
Night O'Granis (2nd visit)
Enter the Night O'Granis (can enter by the back way if necessary). Save your game here! Notice the man sitting at the table by himself. This must be Mr. Smith. Show him the Today's News newspaper. At this point Mr. Smith suggests that you go somewhere more private. He takes you out into the alley behind the Night O'Granis. I don't think you can trust him. Quickly hit him with the gun as soon as he turns his back to Jack. He had a gun in that briefcase, not money. That was close! Now use the rope on Mr. Smith. Jack can't let him go back to Scaletti and tell him what happened because Jack has to go see Scaletti himself.
Go back into the Night O'Granis. Inside enter the door with the star, then continue right into the club's main room. That must be Bellinger sitting at the table waiting for Mr. Smith. SAVE YOUR GAME HERE and don't save over this one! Jack is now Mr. Smith, so show Bellinger the Todays News newspaper. When you talk to him, the two of you agree to go to a safer place (a place with no cops). So the two of you head for the Cotton Club. Unfortunately Bellinger is shot and killed on the way. Soon the police arrive and apparently don't believe anything you say (he's downright sarcastic). So when the cop tells Jack to stay there so that the inspector can have a word with him, leave and walk to the left a couple of times. If you save your game here you can stay like the cop told you to do and see what happens. It's not a pretty picture.
Note: If Jack also dies with Bellinger, then Jack forgot to take his gun from the drawer back in his apartment. He cannot defend himself. You will have to restore to an earlier save and then get into Jack's car and go back to his apartment to get his gun. If you don't have his notebook then get it too.
Go to the crossroads by the Cotton Club, then go right and continue down this street past the Old Whiskey Distillery (red brick building), past a drunk and a truck, to Frank's Garage.
Frank's Garage
Instead of going into Frank's Garage head over to your right where you see what appears to be a big fancy car under a canvas tarp. Take the tarp off the car and look at it. Beautiful isn't it! What is this on the seat? Take the Casino Admission Ticket. Now Jack can enter the Casino and hopefully find Don Scaletti.
Now enter the garage and talk to Frank and tell him that you hope his fixing your car won't be too expensive (1,2,1). Pick up the Monkey Wrench (Important!) that is lying on a tire beside your car.
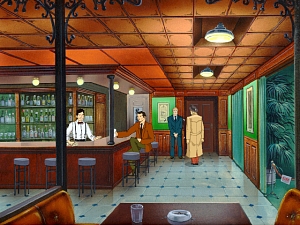
Now go back to the red brick building (Old Whiskey Distillery) and turn right. Continue to the right 3 more times to the Restaurant that is across from the Night O'Granis. Enter the restaurant (the Casino is in the back of this restaurant).
Show your Casino Ticket to the guard standing to the left of the door at the back of the restaurant's bar (see picture below). You can now enter the Casino.
Casino
Once inside talk to the girl over on the right three different times (3,1 then 3,2 then 3,3). Finally after the third discussion she summons the guard to come over. He will take Jack's gun and then take him to Scaletti's office. As you talk with Scaletti (1,3,1), the guard mentions something about a meeting at a Pier. Also during the conversation Jack says something about the killing of August Bellinger and Scaletti's daughter suddenly get very upset and runs out of the office. Since Scaletti has to rush off to the meeting (fortunately for Jack), He has the guard locks Jack up until they get back. Suddenly Scaletti's daughter shows up and gives Jack a crowbar. Apparently she and Bellinger were going to get married. She doesn't seem to like papa very much right now and decides to help Jack. Pick up the crowbar and use it on the door to Jack's cell. Go up the stairs and enter the first door on the right, which is Scaletti's office. Take Jack's Colt Revolver that is lying on the left side of Scaletti's desk, and then be sure to also take the papers (Important!) from the middle of the desk.
Leave Scaletti's office and exit the building by way of the door down at the end of the hall. Uh Oh! there is another guard on the balcony right over Jack's head. Look at the valve to Jack's right (left side of the door). Turn the valve. After the guard falls you can take the bullets he drops on the ground. Go to the gate and try to go through it. Darn it has a padlock on it. Shoot the padlock and then exit into the street. Go left 4 times, then left again to go around the corner and open the second (green) door into the alley of the old whiskey distillery.
Old Whiskey Distillery
Look around and notice something lying on a crate. Look at it. Let's look inside the distillery. Talk to the guy inside. You spot a bottle of whiskey and try to take it but the guy won't let you have it and tells you to get lost. Maybe we can do something outside to get this guy out of the way. We need that bottle of whiskey to pay Frank for the work on the car. Go back into the alley and take the crank off the crate. Now use the crank on the truck. Truck started pretty easily, didn't it? Looks like they think that the driver is here so let's go back into the distillery again. I don't see that guy so let's take the bottle and quickly leave. Exit the green door and then go left 2 times to return back to Frank's Garage to get your car.
Frank's Garage (2nd visit)
Go inside the garage and give Frank the bottle of whiskey. Now you can go outside and take your car. Since Scaletti's guard mentioned a pier, Jack better head on over to the Harbor.
Act III: Harbor
Bloody Shark
Go into the alley behind Jack and look at the gate. Pick up the coin. Go right 2 times and enter the alley to the left of the Golden Fish. Talk to the drunk until he says he's getting tired (3,1,2,1). Continue down the alley to the dog. Look at the object to the left of the dog and try to take it. Exit the alley and then go left 2 times in order to cross the street, then go left again and enter the Bloody Shark. Talk to the sailor until he says he wants a beer. Talk to the bartender and give him the coin to get a drink. Give the beer to the sailor and take his sausage. Exit the Bloody Shark, go right 2 times and enter the alley again. At the end of the alley, feed the sausage to the dog and pick up the metal cutter. Exit the alley, then go left 3 times to the other alley and use the metal cutter on the lock of the West Harbor gate. Try to enter the harbor, but you find that the door is stuck. Go back to the alley with the drunk and pick up the can of grease across from him. Return to the stuck gate and use the can of grease on the gate hinges on the right. Enter the gate, but then exit again. You need a drink, so go back to the alley where you saw the drunk and steal his bottle of rum.
West Harbor
Now enter the harbor gate again. Save your game here! Watch out, there's a guard. As soon as you see him appear behind the boxes straight ahead, follow him (go left 2 times). You will see the door to the warehouse.
Go left again to where you see a crane. Take the second passage (far left) between the crates and go down the row of crates to the right. Go down the small passage between the crates to the right. Save your game here! Click on the pavement toward the green crates where you see the cursor in the picture below.
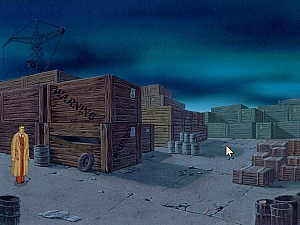
Three bad guys (thugs) will appear. After the dialogue (1,1), quickly use the gun on them. Pick up the crowbar that one of them drops and use it on the loose plank on the crate to your left. Pick up the plank and go left.
Go down the row of crates and to the left and use the plank on the boat. Inside the boat, try to take the anchor. Use the monkey wrench from Frank's garage on it and take the anchor.
Exit the boat and go left, then go right at the bottom of the screen, then go left 2 times to a fisherman. Talk to the fisherman and then try to take his rope. Talk to him again and then give him the bottle of rum. Now you can take the rope.
Go right once to the area near the warehouse. Save your game here! Then go right and as soon as you get the cursor back, right click and use the Hand Icon on the door of the Warehouse. Again as soon as you get the cursor back, right click and select the arrow cursor and then go inside.
Note: If you keep getting killed when loading your last saved game, then load the save again and walk back to the fisherman, and then walk back to the area near the warehouse, and save again. Now try the procedure given in the paragraph above for getting into the warehouse. But if Jack still keeps getting killed, load the last saved game again and move Jack a little closer to the warehouse, but don't use the arrow that would take Jack to the right. Now save again. Once again try getting the door of the warehouse open using the procedure given above. One of these saves should allow you to get into the warehouse. If not, write Mr. Bill for a saved game where Jack is safely inside the warehouse.
Once in the warehouse pick up the hammer, climb up the ladder and then go to the right. Listen to the conversation, then pull the lever of the ventilator in the middle of the screen. Go right and climb the ladder. Hit the guard on the roof with the gun. Now combine the anchor with the rope and use the anchor (with the rope) on the edge of the roof. Have Jack climb down the rope and onto the top of the truck below.
Act IV: Military Base
Warehouses
Look at the warehouse door and notice that there is a padlock on it. Look at the toolbox under the truck. Take the axe and go over to the door and use it on the padlock. Head to your left and look at an item that is lying on the pavement at the bottom of the screen. It is a piece of the wire, take it and return to the warehouse. Place the wire in the vise on the workbench and make a key out of it. Go back outside to the area where you found the wire and use the key to open the brown door of the warehouse ahead of you. Inside you will see a uniform, take it and then leave. Uh Oh! You're locked out, and all of your clothes are still in there (Including all of Jack's inventory items).
Go right 2 times to the cafeteria (building 6) and pick up the soup ladle that is lying on the sidewalk next to the building. Go inside (up the stairs) and talk to the cook about what's for lunch (the soup). Give the ladle to the cook. He gives you a key to the dressing room. Exit the building and go left 2 times to return to the uniform supply warehouse and use the key to go inside. Go right and pick up your possessions. Pick up the dog tags lying on the crate to the left.
Exit the building and go right and then cross the street. Talk to the soldier guarding the gate (3,3,2). He will tell you that Major Stewart signed for the three trucks that had left the base the night before. Go left 3 times to the main building.
Main Building
Talk to the guard at the door. You need a pass. Go right 4 times to the Officer's Canteen. Enter and give the dogtags to the soldier sitting at the table. He gives you a pass. Exit and go left 4 times to return to the main building. Enter the building.
Enter the first door to your left. Talk to the soldier (2,1,1). Connect the telephone to the switchboard, then try to call Tom Rogers. Jack has forgotten Tom's phone number. Look up Tom's phone number in the phone book on the bookshelf to the right and then call him (4,2). Leave the room and then enter the door at the end of the hall. Talk to Major Stewart (2,1,1). Exit the way you came in and then enter the last door on your left. Talk to the women (4,1,2) and then go back to Major Stewart's office. Enter the door on the left and talk with the Colonel (2,2,1,3). Tom Rogers and Major Stewart will enter and threaten Jack and the Colonel. Fortunately though, two MP's arrive just in time to disarm and arrest Tom and the Major. Enjoy the happy ending!
Congratulations, you have completed the game!
You deserve a Cigar!
A Davidoff Cigar, of course!

Visit Mr. Bill's Adventureland for help with other games!
For comments, corrections or suggestions for this walkthrough, send email to mrbill@acd.net
This walkthrough may NOT be distributed without the written permission of Mr. Bill.
Portions Copyright © 2001 ZUXXEZ Entertainment AG
Updated February 16, 2004
Mr. Bill's
Adventureland
Copyright © October 2001
http://www.mrbillsadventureland.com
All Rights Reserved