Jack the Ripper
by Galilea
Walkthrough by MaGtRo
February, 2004
GamePlay:
This is a point and click game. The main menu has the new game, resume game,
load, save options and quit. The Options menu consists of shadows, antialiasing,
extra characters, subtitles, lock cursor (bar for the speed of the cursor) and
back to menu.
To bypass a conversation, press P.
Exhaust all conversation dialogues.
Right click on the scene opens up the
Inventory menu consisting of map, inventory slots and Palmer's notebook. During
gameplay, various items will be obtained that has location labels.
Click-hold-drop the label on the pushpins that appears on the map. Click on the
labeled pushpins to go to that location. The notebook holds all items that are
used as reference. Click on X at top right of screen or right click to exit the
screen. Press ESC to go to main menu.
To save, click on save and then click
on an empty frame. It will automatically return you to the action screen you
left when done. Picture of the saved game can only be seen when saves are done
on main action screen and not on the map. There are 16 save slots.
Some of the characters appear in
different places in a particular time slot and might be found in places
that is different form what is stated below.
New
York 1901
Click the eye icon on
the view of New York and see a newspaper about the latest Jack the Ripper
murder.
November 16, Day 1
-Daytime
New York Daily Office:
In front of desk hear a
voice asking 'Has anyone around here seen Jack Palmer?' Click and
then look at desk and see that you are James Palmer, a reporter for New
York Today. Turn around and look at the newspaper on the wall - it is dated
November 26, 1901. Turn around and go to the door with a white sign at the far right
side of the room.
Enter the room of R. Bur, the boss. Bur asks if
you have seen the Daily's headlines. Take the Daily Illustrated Nov 16
newspaper on the desk. Read about the murder of Lizzy Berly at the Low Side District. Note
the notebook comes up at top right of screen that means the newspaper is in inventory.
Exhaust all dialogue from the notebook at top left. Your mission - Bur wants a
daily report on the Jack the Ripper story.
Go outside and talk to Paul, the man
standing by the center table. He wants to be informed. Turn around and look at the
picture above the desk - baseball players. Exit
the office and go down the stairs or right click to access the map.
Map in Inventory - Right click to
look at inventory and map. The notebook has the Daily Illustrated newspaper.
Picture shows the location when the cursor hovers the labeled pushpin
sites.
The map has a pushpin tacked on James Palmer's calling cards to get back to the main
New York Today office and a pushpin on Whitehall St.
The inventory slot has the Nov. 16 Daily Illustrated newspaper
with police office label on it and coins (currency). Click-hold-drop the
newspaper with police office label on the pushpin on Whitehall St. Click on the
new site available - police station.
Police Station:
Talk to Jeff, the Sergeant behind the
counter. Turn left and go through the double doors.
Enter the first right door
and talk to Carter, Police Chief. Read the preliminary report. Carter wants you
to report only the facts - nothing but the facts. Take the police report
from the desk. Read the report of the patrolman. Nov. 16, 1901, note that the
right forefinger of Lizzie was severed and missing from the crime scene at the
arcade leading to the distillery back court. She was employed at the Blue Velvet
Brothel.
Right click and place the Blue Velvet
and Crime scene Nov 15 tag on the 2 new pushpins on the map. Click on Crime 15
Nov tack.
Crime 15 Nov:
Look up, note that there are several
windows looking down on this area. Click on the wad of paper on the ground under
the Lithographers sign. It is the sketch crime scene 2 showing 2 policemen
with the body.
Go forward to archway, pan left and
see a limping man (left leg shorter) walk away through the archway. Rats come
out of the bloody area on the ground. Note the Olympic Theatre poster.
Go back where you started and up the
fire escape. Pick up another sketch crime scene 2 from floor of the
second level of a man in top hat and
cane with knife in hand running away from the crime scene. Click or hover on the raven on the railing and see a flash scene.
Look up and click on next upper floor. Look around and study the place. Open map
and click on Blue Velvet location.
Blue Velvet:
Alley - As soon as you arrive,
pan left to the double doors. Check the right door's poster of Miss
Abigail, The Irish Nightingale at Red Chapel, 20 Kingston St. Go forward down
the alley, turn right and up the railed step. Knock on Blue Velvet door twice
before you are allowed in.
Brothel - See the giant bouncer on
the left, go down the hallway and down the steps to talk to the woman behind the counter.
The madam tells you to talk to Lizzie's friend, the singer at Red Chapel.
Turn
left and take a Red Chapel flyer from the table by the wall and curtained
opening. In
inventory, a Red Chapel tag is now available to be placed on a new pushpin on
the map. You can either go out and explore further down the alley or click the
map to go to Red Chapel.
Red Chapel:
Talk to the Jason, he's the limping
tramp
we saw at the crime scene. He knows Lizzie from the shelter. Note the mention of
an illustrator.
Theatre Pub - Go forward and right
to enter the lobby of Red Chapel. Look at the poster for Nov 19 kinetoscope
(cinema) showing and then knock on the door - nobody answers.
Go back outside, turn left and
enter the alley behind the mailbox. Go forward 2xs and climb the backstage door
steps. Knocking on door doesn't work, so ring the bell. After learning that you
are a reporter, the manager allows you talk to Abigail.
Backstage - Go forward to
either the right hallway or the stage area. Go forward and see Abigail crying.
Talk to Abigail and find out that Lizzie was wearing a blue dress and carrying a
hat box. She will ask around about the illustrator-witness. Turn around and look
at the letter by the flower arrangement in red vase. On the way out, the manager
says it's time to rehearse.
Outside on the main street, look
around and see that you can climb the fire escape to look around. Go down and go
to the far corner and see Laundry Wang. Look close at the calendar on the laundry door. It looks
like 1901 is the year of the pig.
New York Daily Office:
Talk to Paul and he states his wallet
with the World Series opener ticket was stolen. He will talk to Patrick, the
newspaper hawker to find out about the illustrator.
Go to your desk and start typing
today's news - Jack is back!
Day 1 Nighttime
Red Chapel:
Look around the area and see Laundry Wang is lit. Go to the alley to the right and then left through the
gate. See a Chinese bouncer guarding a door. Nothing to do here yet.
Theatre Pub - Go back and enter
the Red Chapel main door to the left of the foyer. See the audience, bar and
entertainers.
Go through the red curtain right of the stage. Talk to
Abby
standing by stage right, she has something to tell you but it's time for her
show. The manager wants a good review of his new show before he will allow time
to talk with Abi. James will talk to the entertainment columnist.
Exit, go around through the front
door of the theatre and find out that the bar area is blocked by the manager
again.
Blue Velvet:
Alley - Go forward and eavesdrop on 2 men at
the booth at end of the alley. The man has heavyweight championship fight
tickets for sale.
Brothel - Knock and go see
madam who doesn't want to talk to you. Go to the back room beyond madam. Climb
up the stairs and talk to Gilda.
Exit the brothel and look at the sky.
If you have talked to all the characters above, the day will end.
November 17, Day 2 Daytime
New York Daily Office:
Talk to Bur in his office. Talk to
Paul. He will write the cabaret review if you find World Series tickets for him.
Patrick has given the newspaper with the first murder write up and it is on your desk.
Go to your desk and take the
newspaper dated November 1, 1901. Read the note left by Patrick tacked to
the newspaper and about the first murder. The victim is Carrie Blum found near
Trinity Church. In inventory, tag the new pushpin with Crime 31 Oct label. Click
on new site.
Crime 31 Oct: Go forward, turn left and hover the
cursor over the raven sitting on top of the water pump. See another flash scene.
Look at the shanties.
Blue Velvet:
Alley - Talk to Patrick, the newspaper boy. Patson, the bookmaker has a storage space beyond the porch.
Back of building - Go forward to the alley, turn left,
forward and turn left. Pick up the iron bar on the ground by the broken
wheels. Turn left and go down the railed steps. Click several times on the door
of #36. Nobody answers the door. Turn left and pick up wire from
the ledge. Use either the wire or the iron bar on the door and Patrick comes to
ask if you ever learned how to know - his knock has a rhythm. Knock on the door
and automatically use Patrick's rhythm.
Patson's place - Door opens. Talk to Patson. Go
forward and down the steps. Look around in both rooms. Hear Patson come down.
Talk to him and find out that he wants 12 dollars for the tickets. Okay, let's
try the one armed bandit.
Go to the other side of the room and
look close at The Star slot machine. Get some coins from inventory. There's
$4 dollars in inventory and one dollar to play the machine. Insert coins on slot
and then pull the lever. Play as much as you want. I stopped at $32. :) The
money is automatically placed in inventory. To exit, click on ornate design on
the sides of the suits.
Click coins on Patson to buy the
tickets. Take the World Series tickets from bar.
New York Daily Office: Give the tickets to Paul. Take Paul
Island's calling card from the table.
Red Chapel:
Backstage - Go to the alley and ring
the bell. If no one answers, go to the front lobby door and knock on that door
and then comeback to the backstage door. Then once again, knock and then ring
bell. Give the calling card to the manager. He lets you in to talk to Abi.
Go to the stage and see Abi
rehearsing. Talk to her about everything. Silk is the name of the illustrator.
Police Station:
Talk to Police Chief Carter standing
by the counter. Pick up the Autopsy report by Dr. Ralph Llewen from the
counter. The left kidney and right forefinger are missing. Take note of the man
behind the counter wearing a top hat and talking on the phone - Dr. Llewen?
Hmmm... Verrrry Interesting.
New York Daily Office: Talk to Bur. He will call in Silk for
an appointment. Go to your desk and type today's
news - Deep in the Low Side District.
Day 2 Nighttime
New York Daily Office: Look at the note at Bur's door about
Silkner's appointment tomorrow morning.
Blue Velvet:
Alley - Talk to Jason, the
limping man. Lizzie's hat box was for delivering laundry. Pan left and see a
man in blue with a hatbox beside him doing something on the door.
Brothel - Knock and enter.
Madam talks. See a Chinese man in blue walk in with a hatbox.
Alley - Exit and go back out
to the double door with posters at the start of this alley. Look close at white
card posted on the door by the Chinese man. Take the delivery boy (girl) wanted
advertisement for Laundry Wang. It has the dragon symbol on it.
Red Chapel:
Theatre - Go to the table
beside the curtain right side of the stage. Talk to Paul. He loves the show.
Listen to Abigail sing.
Laundry Wang - Go to the alley
right of Laundry Wang, open the gate at left. Go the entrance to the laundry.
Look down at the bottom part of the green-red door and see that the red design
has the left part of the yin yang symbol missing.
Door puzzle - Pan left,
click on panel and see 2 wheels with the animals found in the Chinese calendar
years.
Let's see, the advertisement has
the dragon symbol on it. The center of the wheels has the yin yang
symbol.
Turn the left wheel to have the
dragon symbol on top.
Turn the right wheel to get the
other half of the yin yang symbol that will match the one missing on the red
design of the main green-red door. Hear a click.

Go back to the green-red door and
enter. Talk to the tattooed bald headed man. Ouch!
November 18, Day 3 - Daytime
New York Daily Office:
Bur's Office - Knock on door
and then eavesdrop. It seems Silk has a soft spot for serial killers. Enter
and Hmmm... He's wearing a top hat. Talk to Silk. Learn about discreet
deliveries. Hear that you have a package.
Your desk - Go to your desk
and open the package. Read the letter 1 from Jack the Ripper thanking you
for the attention he is getting.
Dear Palmer,
Your daily
chronicles have capture my interest!
I'm delighted to
hit New York Today's first page:.
Granting me such
a close attention needs a reward and here is a small present for you
Happy
Thanksgiving!
ha ha !
Jack the Ripper
Take care of the
little sample of my art ...
until i return
to work again!
Open the other package-present and
see that it has Lizzie's finger. You faint.
November 19, Day 4 - Daytime
New York Daily Office: Talk to Bur. Go to your desk and read Paul's letter. He
will be back at noon and the police took the package.
Police Station:
Talk to Jeff the Sergeant and
then to Carter who is in his office. The hat box contains traces of Opium and the
Chinese laundry was raided. The police found a hidden opium den. Carter
officially closed the case blaming the opium gang for Lizzie's murder.
Red Chapel:
Laundry Wang - See a 'For Rent' sign
on the door.
Backstage door - Ring the bell and
the manager lets you in. Go forward and turn left to go through the red curtain.
Turn left and see Abigail and Paul. Talk to them and Paul advises to go see the Pinkerten Private Eye agency. Take the
Pinkerten agency advertisement from top
of the newspaper. In inventory, place the label on the new pushpin.
Pinkerten Agency:
Press the buzzer. Talk to the
Pinkerten man. He wants you to talk to the experts and the archives are open for usage. (I
found I had to do this in sequence - the forensic expert first and then the
archives. This allows me to type the day's story later).
Forensic Expert - Turn right
and press the buzzer on the counter. Talk to the Forensic Expert. Hear the other
man leave the room. Open inventory and then the notebook. Look and click on the
autopsy report. The report will be on the cursor and then give it to the
Forensic Expert - 'tomorrow, we'll hear it talking.'
Archives - Go to the room at
the other side of the hallway
Press Files - Click on the 1888 folder on the first table facing the entryway. Pull out the
red folder about Jack the Ripper. Turn the pages by placing the cursor at bottom
right of the page and then click. Read about the White Chapel murders. Note the
different cities around the world where similar cases are reported.
Criminal Files
- At the back wall, the cabinet right of the book case and left of table is locked.
Cases - Go to the
bookcase at the back wall of the room and look close at the 'W' shelf. Read
about the White Chapel Case. Automatically take the Freeman loan index
card.
Turn around and go to the cabinet at
right corner of the room beside the luminous board which is under the Manhattan Railway wallboard. Look at
the layout of the archive on the wallboard.
Detective files - Click on second
left drawer of the cabinet on the right. Read the notes about who the suspects
are on the White Chapel Case. Read and take the red script page - London
Ripper letter. Take Jack the Ripper's Criminal Index Card.
Luminous board
-
Letter Matching Puzzle -
Look close at the luminous board.
Open inventory and then the notebook.
Look and take Jack the Ripper letter
1.
Click letter 1 on the luminous
board.
Open the inventory again and
look-take London Ripper letter.
Click it on the Jack the Ripper
letter on the luminous board.
Drag the letter around so that the
word Dear matches on both letters. This will automatically move the
second page of the London Letter closer.
Now, drag this second page over the
signature - Jack the Ripper.
You know the puzzle is done when
music comes up and the backup icon shows up.
Take the letters back to be placed in
inventory.
New York Daily Office: Go to your desk and type in today's
story - The Opium Hoax.
Day 4 - Nighttime
Blue Velvet:
Alley - Talk to Jason, the
limping man who appears as soon as you arrive here. He wants money to get a safe
place to sleep. Give him some coins. Talk to Jason and learn about the Carry,
the first victim and shelter.
Brothel - Enter and talk to
the madam briefly. Go up and talk to Gilda. Find out more about the shelter.
Red Chapel:
Theatre Pub - Watch the movie (Kinetoscope).
Exit the pub, then look up at the moon and the day ends.
November 20, Day 5 - Daytime
New York Daily Office: Talk to Bur in his office.
Pinkerten Agency: Press the buzzer on the Forensic
Expert counter. Doctor or veterinarian... (So far only Llewen is the one we
know). Take and read the Forensic report.
Red Chapel: Talk to Patrick, the newsboy. Where
to find Jason, the limping tramp?
Blue Velvet: Go forward and talk to Jason
and the other man. Learn
about a man at the shelter named Tumbletwo. The shelter is at the hospital and
you're given a ticket. In inventory, place the hospital label on the new
pushpin.
Hospital:
Go to the right side aisle and
through the swing door. Go forward and left. Talk to the woman mopping the
floor. Doctor Tumbletwo left for a convention and will be back tomorrow night. Turn
left and down the stairs.
Basement - After the stairs,
turn left and look close at wall cabinet. It is locked. Turn around, forward and
left to the other hallway. Look at another closed door on the right. Let's wait
then.
New York Daily Office: Talk to Bur and he wants today's
story. Talk to Paul about all your findings. So, go to your desk and type a
story - Missing Organs.
Day 5 - Nighttime
Red Chapel:
Theatre Pub- Listen to Abigail
sing a lively Irish tune.
Hospital:
Go through the swing door on the
right - don't worry the watchman will not wake up. Turn right, forward and
look at table. Take the medical grip. Go down to the basement.
Morgue - Basement - Go to the wall
cabinet and use the medical grip on the lock. Take the mortuary and
Dr. Tumbletoo keys.
Go to the mortuary door down the
hall. Use the mortuary key on door. Oh my heart.... Watch a man in top hat run
out.
Go to white door at the other side of
the room. Turn left and see a weigh scale. Look at the counterweight of the
white door
pulley and see it is 55 lbs. SAVE GAME HERE.
Timed puzzle - Object of the
puzzle is to get the other door open on the other side of the cold room using
an exact weight to hang as counterweight. If your caught inside the cold room,
you will freeze. Note: In case of emergency in the cold room, an out cursor
can be found on top of the door you came in on.
Pull the hanging rope on the right
to slide up the door.
Go in the cold room, go forward to
the other door and see it is missing a counterweight to open the door.
Go back towards the other door, turn
right by door and take the carcass.
Go back out through the slowly
sliding door.
Place the carcass on the weigh pan.
Read the scale to see it is 100 lbs.
Pick up the carcass and place it on
the empty table at far end of room.
Go to the exit door, turn right and
take a butcher knife.
Go back to the carcass and use the
butcher knife on it.
Pick up right half of the carcass. Weigh
the carcass to see it is 55 lbs. (The left half is 45 lbs.)
Pick carcass up, immediately enter
the cold room and go to
the other door. If the door closes, just pull the hanging rope again.
Hang the carcass on hook and then
pull lever.
Exit and day ends.
November 21, Day 6 - Daytime
New York Daily Office: Talk to Paul and tell him about your
night escapades.
Hospital:
Go through the swing door and then
right to hallway. Use Tumbletwo's keys on the room at far right.
Dr. Tumbletwo's Office - Check
the picture on the wall of Tumbletwo and Mc Allister.
Stand in front of Tumbletwo's
diploma. Press the woodblock on the right frame of the wall and see a keyhole.
Go behind the desk and look at his
Daily Planner. Read the note.
Look close at the inkstand and take
the drawer key. Use the drawer key on top left drawer and read about his
Doctorate Thesis on Xenotransplantation (transplantation between species).
Return the key to the inkstand.
Pinkerten Agency:
Go to the Archives and talk to the
archivist typing. She gives the Criminal Files cabinet key.
Use the key
on the cabinet to the left. Open the cabinet and look under T. Hmm... Read and
take Francis Tumbletwo's criminal record card.
Look under J. Read Jack the Ripper's
other criminal index card.
Blue Velvet:
Talk to Patrick and he directs you
to Patson about keys. Go to Patson's hidey hole.
Patson's place - Knock and go
down the steps. Talk to Patson about master skeleton key. Her name is 'bring me
home afterwards'. Hehehe. Take pass key from counter.
Hospital: The orderly is standing by
Tumbletwo's office. We'll come back later.
Red Chapel:
Backstage - Ring bell and
finally see Abigail instead of the manager. Talk to Abigail and she will give
you a gun.
New York Daily Office: Talk to Paul. Go to your desk and
write today's story - The Shelter of Horror.
Day 6 - Nighttime
Hospital:
Go to Tumbletwo's office. Use the
office key and enter. Click on panel hiding the secret keyhole. Use passkey on
keyhole.
Secret laboratory - Enter the
secret door. Look down and click on lamp on floor to get light. Go down. Turn
right at foot of steps. Look at books on bookcase.
Go left and see a covered bloody body
on the bed. Note the different organs on the table.
Go back to the steps and go to the
other side. Go forward and click the cloth covering an organ connected to a
blood transfusion. Look at the paper on the table.
Turn around, forward to and open the
body slab door.
See the Doctor and his assistants
talking. Chief Carter calls to say another murder happened and he will bring it
to the morgue.
November 22, Day 7 - Daytime
New York Daily Office: Talk to Bur in his office. Pick up
the newspaper - Daily Illustrated Nov 22 on the work table Paul usually
uses at the center of the main office.
Police Station: The Chief
ain't back yet, Palmer.
Red Chapel:
Backstage - Go to Abigail on
stage. Give her the gun back. She got the gun from her father, an Irish Patriot.
He willed her several things.
Police Station:
Go to Chief Carter's Office and talk
to him. Take and read the police report 3. Same policeman found the
victim. Heart removed and 1 hour and half time between Violetta Warren was last
seen to the time the body was discovered. Carter said that it takes 40 minutes
to get from the murder site to the morgue. Label the new site in inventory and
then let's go there.
Crime 21 Nov:
Look at the Raven sitting on the
overpass. Pick up the new sketch crime scene 3 from the ground. Look
around. I can only exit using the map.
Red Chapel:
Go to Patrick and he gives you a
letter 2 from Jack the Ripper.
What wouldn't
I do to grab a lady's heart?
ha
ha!
Jack the
Ripper
Talk to Patrick. The letter was left
in pile of paper at the plant.
New York Daily Office: Bur tells you it's time to write your
story. Talk to Paul. Write today's story - Bloody Letters.
Day 7 - Nighttime
Hospital:
Talk to the drunken watchman at
the reception desk. Tumbletwo has reported his office key missing. He will talk
about who was in the morgue the other night if you take care of the key problem.
Tumbletwo's office - Look at
his daily planner and see the write-up of Paul about Abigail. Uh Oh!
Red Chapel:
Theatre Pub - Enter and talk to
the manager sitting at right side of the stage. Tumbletwo and a giant fellow
just left. Listen to Abigail.
Blue Velvet:
Talk to the bouncer and find out that
Tumbletwo is here for Gilda.
Enter the left curtained area by the bar. Give Tumbletwo the office key. He is checking on Gilda.
Hospital:
Talk to the watchman. He got a
call from Tumbletwo about his key. The painter was at the morgue drawing dead people
- Silk or Silkner is his name.
Go anywhere and look up at the sky.
Click and the day ends. Or you can go to Blue Velvet and talk to Patson about
the pass key and the day ends automatically.
November 23, Day 8
- Daytime
New York Daily Office: Talk to Paul. Go to your desk and
take the Moulin Rouge poster.
Red Chapel:
Backstage - Enter and talk to
Abby. She has an audition with an impresario. Silk is also a painter.
Pinkerten Agency:
Look in Criminal Files to see if
there anything under S. Nope.
Talk to Miss Robinson and she
recommends sending a telegram overseas to see if they might find something
useful.
Telegram - go to desk in front
of the main door.
The machine needs just Contact and
Subject.
Study the Morse code on the paper
on the right.
Use the back arrow if mistake in
entering code is done.
Click on paper to insert it.
Press the dot . or the dash - for
London: 39 12 or other country codes.
...-- (press right arrow to
separate the codes)
----. right arrow .---- right arrow ..--- right arrow
Click on handle to enter the typed
in Contact.
Whirl sound is heard and see
contact: 39 12.
Press the dot . or the dash - for Silkner.
... right arrow .. right arrow .-..
right arrow -.- right arrow -. right arrow . right arrow .-. right arrow
Click on handle to enter the typed
in Subject.
Whirl sound is heard and see
Subject: SILKNER
If correctly done, a ta di da dum
is heard.
Red Chapel: Talk to Patrick and get a message
from Patson.
Blue Velvet:
Patson's place - Give Patson
the pass key. Give Patson the Moulin Rouge poster. Now, you're even.
New York Daily Office: Bur tells you it's time to write your
chronicle. Go to your desk and write today's story - Terror on Low Side.
Day 8 - Nighttime
Blue Velvet:
Alley - Talk to Jason. Learn
about the big guy working odd jobs for the illustrator.
Brothel - Talk to Gilda
upstairs. Red Sally poses for Silkner. Gilda should tell Patrick when to see
you. Sally and Gilda will see you tomorrow.
You can go to the theatre at Red
Chapel, listen to Abby sing and then leave the theatre to get the day's end.
November 24, Day 9
- Daytime
Pinkerten Agency: Go to Miss Robinson at the Archives.
Pick up and read the telegram about Silkner.
Red Chapel:
Talk to Patrick. Red Sally is waiting
at the alley of the Laundry. Go to the laundry alley.
Laundry alley - Talk to Sally.
Silk leaves his key for his studio at intersection of Liberty and William. He's
mostly gone at night. In inventory, the new location is automatically placed.
Backstage - Abby is not there.
Madame is auditioning.
Silk's Workshop:
You can look up on left of door window to see
who is inside the studio or go back in the alley behind the building, climb up
the fire escape and look inside.
Inside the building, go to the left door and move the
knocker to find-get the workshop key. Use key on lock.
Enter and look at the blue book on
the bed. Saison En Enfer (Season in Hell). Check out the 2 tables, the painting
facing the wall by the bed and the bloody mannequin in bed.
Turn left, click on window by the bookcase to
see the giant man arrive and knock on the door. Turn right and pick up the
empty bottle on top shelf of the bookcase.
Go back to next room and look at the
pail on the floor. Use empty bottle on pail to get blood bottle.
Exit the workshop and place workshop
key back under the knocker.
Pinkerten Agency:
Forensic - Press the buzzer
and give the blood bottle to the Forensic Expert. Tomorrow, they'll be talking.
New York Daily Office: Talk to Paul. Bur tells you to write
your chronicle. Go to your desk and pound the keys - A Season in Hell.
Day 9 - Nighttime
You can listen to Abby sing at Red
Chapel Theatre.
Silk's Workshop:
Look at the window before the door
and see the shades are pulled. Go to the back and climb the fire escape. See
Silk painting a bloody body. Hear the giant assistant come in and say another
murder. Go down and look in the map for the new location- Crime 24 Nov.
Crime 24 Nov:
See Jeff and the Chief
looking down at the body. The raven on top of the boulder brings another
flash scene. Look at Silk, who is busy sketching. He talks to you. You ask 'Who is it?'
Click on covered body and the policeman pulls the sheet and you recognize Red
Sally. Move cursor off the body and the Chief says he wants to talk to you tomorrow.
November 25, Day 10
- Daytime
New York Daily Office: Talk to Bur. Paul is not around. Turn
around and pick up the Daily Illustrated Nov 25 newspaper from the
worktable at the center of the room.
Police Station: Jeff tells you to come back later.
Pinkerten Agency: Press the buzzer at Forensic and find
out Silkner's blood was cow's blood.
Crime Scenes:
Go to Crime 31 Oct and see flowers by
the crime scene area, close to the pump.
Go to Crime 15 Nov and see flowers by
the crime scene under the archway.
Go to Crime 21 Nov and see flowers by
the crime scene under the overpass.
Go to Crime 24 Nov and see no flowers
here.
Red Chapel:
Backstage - Abi is on the way to your
office.
New York Daily Office:
Go to your desk and see Paul and
Abby. You have another letter. Take and read the latest letter 3 from Jack
the Ripper.
Painters
capture soul. I steal bodies.
A final touch
to my work on season greetings!
ha ha
Jack the
Ripper
Talk to Abby and Paul. Let's check
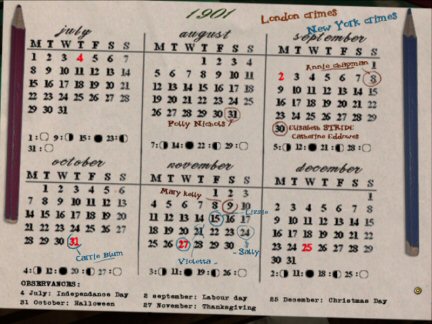
the dates. Look at the calendar.
Calendar puzzle - Write the
dates for London Crimes in red pencil and the New York Crimes in blue pencil.
Look at the Whitechapel Crimes
Index card to see the dates are: August 31, September 8, 30, 30 and November 9
in 1888.
Look in your map to see that the
New York crimes are: October 31, November 15, 21 and 24 in 1901.
Then in puzzle use the red pencil
for the London crimes.
If you finish and can't get
the blue pen - go back to a saved game and mark the dates continuously and the
cursor will turn neutral. This will enable you to pick up the blue pencil to
mark the New York crimes.
The dates do not match up. Wait for
a while until Palmer says - The holiday season.
Mark the red 27 in November -
Thanksgiving or as Paul said the World Series.
He sure to try on Thanks giving -
tomorrow night.
The phone rings. Chief Crater is
waiting for you.
Police Station:
Talk to Jeff and he will say the
Chief will be you in a few minutes. Then go to double door. Before entering the
double door, turn left and see Silk. Talk to Silk. Silk agrees with your theory
and advises you to check around the pubs.
Go back to Jeff and now he says, the
Chief is waiting for you.
Go through the double door to
Carter's Office. Talk to Carter. Palmer just got scolded! Ouch!
Pinkerten Agency:
Talk to Miss Robinson and she will
give the phone book to check the pub locations.
Pub puzzle - Look close and read the List of
Pubs. Select the Low Side District.
Look at the map on left side and
mark each one with a thumb tack.
Click - drag a tack and situate the
cursor on the street name. When the tack changes color, release the tack
When correctly done, the yellow
tacks of the crime scenes appear. You can refer to the graphic below at map
puzzle next day.
New York Daily Office: Bur wants today's chronicle. Go to
Palmer's desk and type a story - Killer Still At Large!
Day 10 - Nighttime
Red Chapel:
Theatre - Talk to
the manager.
Blue Velvet:
Paxton is not on his
usual bookie place.
Brothel - Talk to
madam. Go through curtain on right and talk to Gilda. The ninth victim, the
ninth commandment.
--- Use the map and come
back to Blue Velvet.
Hear a limping sound.
Talk to Jason. Day ends.
November 26, Day 11
- Daytime
New York Daily Office:
Talk to Paul. The killer
must have a trick to silence the victims. Go visit the crime scenes again for
inspiration.
Crime Scenes: All the flowers are
still there except for the Nov 24 crime scene. All the crime scenes are noisy
due to the train passing by.
Red Chapel:
Backstage - Talk to Abby. She gives
you the gun again. Pick up the gun from the low table.
Crime Scene 24 Nov: Talk to the giant -
Silkner's assistant. The sound of the train passing by upsets him. He is the one that places
the flowers.
Pinkerton Agency:
Talk to Miss Robinson.
She says to take all the map of the city and maybe we can find a clue.
Pick up the map
drawer key. Go to the luminous board. Look down and use the map drawer key
on drawer. Take all the maps.
Map Puzzle -
Look close at luminous
board.
Open inventory and select tacked New York map from notebook.
Click on map and it
will be the cursor. Click it on luminous board.
In inventory while at
close up of the luminous board, look at any of the other maps, ex: NY sewers
map, NY elevated rail(sub)way map or the NY electrical supply.
Click on one of the
maps. It will be seen as hanging from the cursor.
Click it over the NY
map with tacks. Move it around to match the Tacked map.
When the elevated
rail(sub)way map from inventory is placed correctly over the tacked NY map, hear a tum de
da dum music and you will not be able to separate the 2
maps.
The yellow tacked
places (crime scenes) match the subway route.
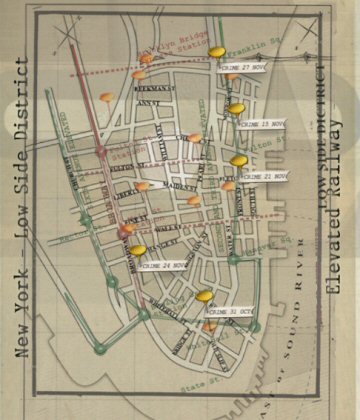
Talk to Miss Robinson
and tell her it is the elevated railway system. Get a new location on the map.
Crime scene 27 Nov:
See a lady of the day
(night) in green standing by the lamp post. Turn right and enter the gate and
look around. Climb the stairs through the door and look around. On the outside
balcony at second floor of this building, see a building with windows across the
rail track. Go back down and out of the gate.
Cross the rail track and
climb the metal ladder. Look out the window and now see the green dressed woman
embracing a man inside the gate enclosure across the rail track.
You can go there and be
a third wheel but will be shooed away later.
Police Station: Talk to Jeff about the
killer's next location to strike. Arrrgh! He makes fun of you.
New York Daily Office:
Talk to Paul. Talk to
Bur and ask for the camera. Turn right and take the pieces of the camera
from the box.
Go out of the office to
the stairs landing - where Paul had the camera before.
Camera puzzle -
Place the tripod on
hot spot on the floor.
Place the darkroom on
top of the tripod.
Place plate in
darkroom.
Place flash support on
floor.
Place magnesium powder
on flash support.
Take the setup again
after that practice.
Go to your desk and
write today's story - Closer than ever!
Day 11 - Nighttime
Crime 27 Nov:
Go across the rail track,
climb up the metal steps
and set the camera up on the floor in front of the window.
Place the tripod first,
then darkroom and then plate. You will see an eye cursor. Place the flash
support on floor right of the tripod. Place magnesium on the flash support. Face
the camera straight on (centered) when you click the eye icon to look through
the camera. If you are at an angle, the focus of the camera might be off centered and difficult to
control.
Look (eye cursor)
through the camera (darkroom) and move click-drag the crosshair to the balcony
on the right. See the green dressed woman and a man wearing a top hat about to
attack her with a knife.
Immediately click the
bulb on top right when Jack appears on the circle of the crosshair.
Leave the camera and do
not take another picture or glitch will happen.
Go
across to the woman. Talk to Fausta and Palmer will bring her to the Blue Velvet
for safety.
You write another story
- Checkmate! Day ends when you look at the sky.
November 27, Day
12 - Daytime
New York Daily Office:
Turn right to the
big newspaper board by the steps. Talk to Bur and Paul. Bur wants an exclusive
interview with the victim and the photo developed fast.
Pinkerten Agency: Talk and then give the
plate to the Pinkerten man in bowler hat. He will develop it as fast as he
could.
Police station: Jeff is apologetic and
Carter (won't be seen if you go to the police station later) in his office gives
you his congratulations.
Blue Velvet:
Brothel - Talk to
the giant bouncer. Talk to madam. The bar is now open! Enter the left curtain
and talk to Fausta sitting on the couch. My savior!
Red Chapel: Patrick (can be found at
Blue Velvet if you go there earlier) thinks what you've done is astounding.
Pinkerten agency: The Pinkerten man made
several copies and one for the archives. Take and look at the Jack the
Ripper picture from the counter.
New York Daily Office:
Give the photo to Bur.
Palmer thinks it's unusable. Paul is at the 'Bright' Chapel preparing for a
party. Write today's story.
Day 12 - Nighttime
Blue Velvet: Talk to Paxton. Nice
compliment, I think. The Brothel has 'exceptional closing' sign. Are they all at
the 'party'?
Red Chapel:
Theatre Pub - Go through the curtain
right of stage. Talk to the manager. Abby left with a package looking for you.
Go to the dressing room
and read the letter on the dressing room table.
There were three ravens sat on a tree.
Down a down, hey down, hey down.
They were as black as black might be. With a down
The one of them said to his mate,
Where shall we our supper take?
With a down, derry, derry, derry down, down
Jack the Ripper
The manager reads the
letter of Jack the Ripper and tells the audience (partygoers?) to look for her. Once you hear
the audience leave, the cursor becomes active again.
Police station: Talk to Jeff about Abby
missing.
New York Daily Office:
Paul is also waiting if she comes here.
Blue Velvet:
Tell Jason (can be found
at Red Chapel also) about Abby. He saw her an hour ago.
Brothel - Talk to
the giant bouncer.
Check all the Crime
scenes.
Second visit to Crime
21 Nov or Crime 15 Nov:
If you don't see Abby -
click this location again in the map.
Go forward and talk to
Abby. Abigail says she was to meet you here.
Look in the red box.
Checkmate. ha ha! Jack the Ripper
See a flash scene.
Hear a girl scream. Go
forward.
At the alley, go forward
and look down on the left and see another girl on the ground. She looks like
Fausta?
Turn around. Jack the
Ripper runs away.
Immediately, follow him
and end up at the dock. From the ship, a raven
flies overhead.
The End
Abby is a success in
Broadway (42 Broadway New Year's Eve).
Jack laughs at the
January 1, 1902 newspaper showing Abby and Palmer giving her flowers.
Nevermore!
This
document may not be distributed without express written permission of the
author and the content may not be altered in any way.
For
Questions or Comments on this Walkthrough,
Please write to:
MaGtRo
Copyright © 2/2004
MaGtRo
 GameBoomers
Walkthroughs and Solution
GameBoomers
Walkthroughs and Solution