JOLLY ROVER
by Brawsome
Walkthrough by MaGtRo November 2010
Gameplay: The Main Menu has
Set Sail (new game), Loot (awards), Options, Help and Quit. Later in gameplay,
Continue and Log will be added.
Options have sound volume, music volume, voice
volume and walk speed adjustments. Full screen, mute sound and subtitles
selections are also found. Developer commentary is unlocked after finishing
the game.
Help has information about gameplay features.
Left mouse click does actions and descriptions of
objects.
The inventory panel is at bottom of screen.
Dialogues can be skipped by left mouse click.
The game is automatically saved after moving to a new
screen.
The in game menu is on a drop down paper at top
middle of the game
screen.
Click the space bar and hold it to see all the
active spots in the screen.
Collect crackers and flag pieces for bonus
information seen in the log book.
See Gaius James Rover on his own ship see an
approaching
pirate ship.
Howell's
ship
Converse with Captain Howell:
Captain Howell talks to Gaius James Rover in the
brig. The brig has all the loot taken from Rover's ship especially the rum ordered by
Governor DeSilver. Captain Howell does not think that Rover has the qualities
of a pirate.
Select any dialogue. Pirates have to have a hat - fancy like.
Search Brig:
Press and hold the space bar. Check all the
hotspots.
Get a flag piece behind the cannon at left. It is
entered in the log at in game menu at top of the page.
Get a piece of eight from behind the treasure
chest.
After checking all 10 hotspots (including door and
lamp), Rover embraces Beatrice's painting and exits to the next room.
Fool Pirate:
The unexpected entrance of Rover knocks Davey the
pirate unconscious under the kegs.
Rover picks up Davey's fancy hat and places it on
his head. Melvin comes down the stairs to ask what the noise is about.
Answer "I have no idea" when asked about places.
The parrot calls Rover and he will help if released.
Free Strange Parrot:
Pick up the red stuff-scarf from floor,
crackers from top of barrel and keys from wall by stairs.
Use the keys on the parrot's cage and see it is
rusty.
Rusty key: Use the keys on the
brig door. Enter brig and take the lamp. Go back to cage.
Use the scarf with whale oil lamp to get oily
scarf. Use oily scarf with rusty lock of the parrot cage.
Use the keys on the lock to get a parrot.
Juan Leon - Parrot: Use the
parrot on Rover throughout the game to get helpful hints. If you don't use the
parrot during gameplay, you might get an award.
Use the parrot on Rover now and get a vague hint. If
you want a clearer hint, give Juan Leon a cracker.
Answer Melvin: Now that you
got information from the parrot, answer Melvin.
Where? Port... Sickle...
How long in the brig? 10... days...
Let us do? Swabbin' the decks... in silk
dresses...
Escape ship:
Go up to lower deck. Look around and check the
hatch.
Open the hatch: Talk to Melvin
and ask for something up the deck.
He goes up the stairs and knocks a secret code on the hatch:
knock, knock, 3 rapid knocks. Timing is needed.
Knock on the hatch the same way Melvin did. If you
missed the knock, talk to Melvin again.
Talk to Bobby and ask to switch places. He wants
Pete to relieve him.
Find Pete: Go right to the
sleeping quarters and see a sleeping Pete. Click on him and he asks for rum.
Get Rum:
Go left and then left again to the galley.
Check the bottles in the galley and see that they
are all empty. Check the cook and see that he is embracing a bottle of rum.
Look around. Get dried fish and peppercorn
from the sink area. Open the left cupboard and get crackers.
Window: Check the left
window and see that the hinges are rusty. Use the oily scarf with window. Open
the window.
Bird bait: Use the dried
fish with hook hanging in front of window. See a bird try to get the fish.
The "chef" wakes up and closes the window. He spills rum on the floor.
Use peppercorn with the spilled rum on the floor. Then open the window to let the bird in.
Watch what happens. Take the rum.
Get Pete hammered:
Go to and look around the sleeping quarters. Check the pirate
boots to get a piece of eight.
Use bottle of rum with Pete.
Go back up to the hatch and knock on the door with
the secret code.
Talk to Bobby. Tell him Pete is drunk. Rover
relieves Bobby.
Groggy Island
Captain Howell gets Rover to row him to Groggy
Island and talk to the Governor.
Rover informs the Governor DeSilver that the rum
was stolen. Rover is to pay 5 pieces of eight each month until he can return
the 50 pieces of gold that was given as deposit.
Join a crew:
Captain DeSilver mentioned to look for ship captains
at the Stumble Inn.
Talk to the guard. Go left from the fort.
Stumble Inn: Check the
right barrel in front of Stumble Inn to get crackers.
Check the left barrels to get piece of eight.
Check the poster left of the inn's entrance. It is a
wanted poster for Captain Silvereye.
Enter the inn and talk to Captain Howell sitting
with Hector and Bobby. Learn that DeSilver is semi-retired and that Captain
Silvereye is DeSilver's brother.
The new chef has to prove himself by fixing his
favorite dish - Salamagundi.
Melvin: Talk to Melvin
standing by right post to learn more about Captain Silvereye.
Davey: Talk to the pup left
of Melvin about hat. Tell Davey that you will give him a new hat. Get piece
of eight.
Check the bucket o crackers to get crackers.
This is a good source of crackers.
Make Salamagundi:
Pug pirate: Talk to Pugugly
Toydog - Puggy, the proprietor of the inn.
Insane pirate: Talk to the
insane pirate. Get some crackers.
Kitchen: Go to kitchen and see
that the chef is napping. Look around.
Get crackers from the stove. Check the mop bucket by cauldron to get piece of
eight.
Try to talk to the chef and see that he's holding a
ham.
Check the bookcase to read Ron Cooper's Cooking for
Pirates book. The page with the Salamagundi recipe is torn out.
Find Ron Cooper:
Exit the kitchen and talk to Puggy about Ron Cooper.
Exit the inn. Go left and look around as you go.
Turtle Beach: Go to Turtle
Beach.
Look around Turtle Beach. See a sand mound. Click to
get 2 eggs from sand mound. Click on it again to get piece of flag.
Ron's shack: Go to cliff
shack. The path is at left side of screen.
Check the mango tree. Read the sign and check the
skull and cannons.
Talk to Ron Cooper, the edgy pirate. He refuses to
let you near him.
Thwart Ron's defenses:
Go back to the beach. Take the fishing net
that is now on the beach.
Use the fishing net with the palm trees. See a
coconut fall down and bounce out from the net.
Use the tad tight hammock. Rover jumps up to the
shack.
Ron wants Rover to try his new book - Ron Cooper's
Voodoo book for Pirates. Ron gives the book and the cheat sheet.
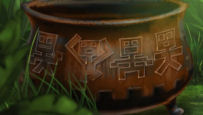
He wants Rover to do the scare beast spell on the
birds on the roof.
Learn the Scare the Beasts Spell:
Examine the book and cheat sheet in inventory by
clicking the book on Rover.
Learn that the spell needs something the animal eats or recently eaten.
Do voodoo stuff from cheat sheet.
Use the food with animal.
Find bird food: Check the birds and Rover says they are the same
birds as in the galley. Remember what that bird liked.
Exit the shack area. Check the cannon and get a
flag piece.
Go to the beach and check the palm trees to get a
piece of eight. Take the hammock-fishing net.
Go back to town at right.
Scruffy: Talk to Scruffy
at the now opened fish store.
Try to buy fish but the price is too high. Scruffy
lost his net. Trade the net from the beach with a fish-pickled herring.
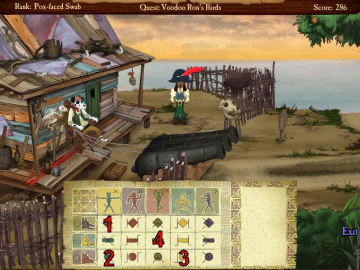
Voodoo Ron's birds:
Go back to Ron's shack.
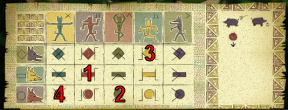
Review the symbols seen in the voodoo book.
Use the cheat sheet with Rover. See the cheat sheet
diagram. Click on the symbols seen in the book.
While Rover is tingling red, use the pickled herring
with the birds. Repeat if necessary.
Make Salamagundi:
Eyeball Recipe:
Talk to Ron about the spell. Ron gives the recipe.
Use recipe on Rover. See the ingredients needed for
Salamagundi: fresh fruit or vegetable, hard boiled eggs, 2 kinds of fresh or
pickle meat, wine and spices.
Spices: Talk to Ron about
spices needed. Ron gives the spices.
Get fresh fruit: Go right and
see a monkey perform a voodoo spell and gets a fresh mango.
If you missed the spell, exit the area and then
comeback to see the monkey doing the spell.
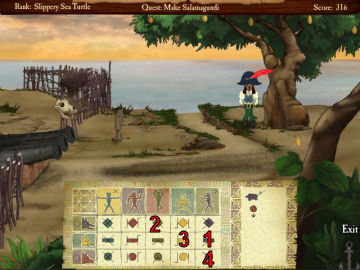
Go near the mango tree. Knock-click on the tree.
Use cheat sheet on Rover. Select the symbols of the
spell that the monkey performed.
Pick up the mango.
Hard boiled eggs: If you
haven't taken it yet, go to the beach and dig the sand mound to get 2 eggs.
Go right to town and enter the inn.
Go to the kitchen and use the 2 turtle eggs with the
cauldron. Automatically get 2 hard boiled eggs.
Pickled meat: The fish in
inventory is a pickled herring.
Fresh meat: See that the
chef is holding ham while sleeping.
Use peppercorn with the mortar and pestle on the
table to get pepper.
Use pepper with chef. Take the released ham.
Wine: Who drinks fancy wine
here at Groggy Island? Go to the fort at right side of town.
Enter fort: Talk to Rufus
the guard about seeing the governor.
You choose to bribe him and enter the fort if you
like or practice voodoo. See that the palm tree behind Rufus has a coconut.
Click to knock on palm tree.
Use the cheat sheet
on Rover and select the drop fruit icon at right to automatically do the
spell. And that is why we don't stand under coconut trees.
Enter fort and see that the governor is not here.
Look around.
Cabinet: Check the candle
left of door. Hear a click.
Check the cabinet at back wall. Get flag piece and
piece of eight.
Check the map on the wall.
Wine: Get wine from
wine rack beside the cabinet.
Hide: Hear someone
coming. Hide!
Enter the cupboard left of wine rack. See Governor
DeSilver talk to a witch doctor who owns his soul.
The witch doctor wants someone young. A need for a blood relative
is mentioned. He wants young Jolly Rover.
Open the cabinet again after the governor leaves
to get a piece of eight.
Exit the fort and go back to town.
Mix the ingredients:
Go back to the inn's kitchen and use the wine with
the mixing bowl on the table. The cork is stuck.
Open the wine bottle: Go back
to the shack. Use the wine with the skull on the fence.
Go back to the inn's kitchen.
Use ham, boiled eggs, pickled herring, spices, mango
and uncorked wine with the mixing bowl to get Salamagundi. Aaaaaaand we're
done.
See the reaction of Captain Howell after eating the
Salamagundi. They got Rover drunk.
Cannibal Island
Rover dreams of his father the famous clown.
Explore the beach:
Rover wakes up on a beach. Read the note from
Captain Howell. Get crackers.
Read the sign. Check the hanging skeleton with blue hat to get
piece of eight.
Check the conch and see that it still has the crab
in there.
Check the mound. Get piece of eight from the
box in mound.
Take the skull on the sand at right.
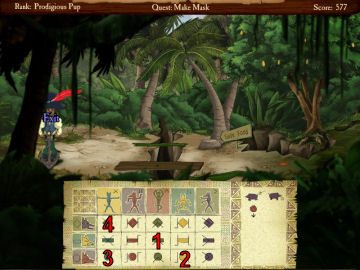
Explore the jungle:
Enter the jungle. See a pig run towards a mango on a
barrel and springs a trap.
Take the crackers and mango on top of
barrel.
Spring the ground trap: Go
right to next screen. See leaves on the ground and a pig munching on
mango.
Lure the beast spell:
Use the voodoo book on Rover and study the Scare
the Beast spell.
Since you want the pig to come to Rover in order
to check the leaves on the ground; reverse the Scare the Beast spell.
Use the voodoo cheat sheet on Rover.
Select the symbols of the Scare the Beast spell BUT
in reverse order.
While Rover is tingling red, use the mango with
the pig. The pig falls in the trap.
Cross the hole: Go back to
the left and take the barrel.
Go left to the beach and take the sign.
Go back to the right until the hole on the ground.
Use the sign with the hole. Walk across the gap.
Look down the hole to see what the pig is doing.
Take the rum hanging on the palm tree and the
crackers on the stump.
See a half eater mango that is full of pig slobber
on the ground.
Another trap: Go right to
next screen and see another pig. This time the pig is on this side of the
trap.
Do the Scare the Beast spell on the pig. Pig passes
safely over the trap.
Go right and try to take the crackers from the tree
shelf.
After passing the trap, the trap is sprung and rings
bells.
Watch as 2 women wearing masks talk about pirates
are to be killed here. Antonio was safe because he got to the Captain
first.
When the ladies leave, take the crackers from the
tree shelf and the flag piece from the sprung murderous trap.
Make a mask:
Rover's plan is to have a mask similar to what the
ladies wore.
Stockade:
Go right and see a stockade. Check the cauldron to get crackers. Get
charcoal from under the cauldron.
Doing the drop fruit spell on the palm tree doesn't
work.
Check the net twice to get piece of eight.
Check the bars on the window of the fort. See that
it is a storeroom and get crackers.
Waterfall: Go left to the
waterfall. Look around.
Check the bird feeder on top of a wheel. Take
dried corn. The feathers are too small for a mask.
Get tropical bird feathers:
See tropical birds on the cliff right of the waterfalls. Rover wants to
catch one of those birds.
Check the plant at bottom left and get piece of
eight.
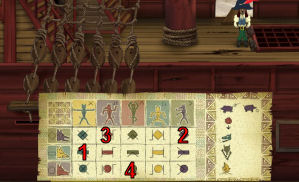
Cauldron: Check the plant
on top left beside the water. See a cauldron with 4 depictions that make a
spell.
Use the cheat sheet on Rover and select the
symbols found on the cauldron. The position of the body is on top. The face
expression on the left. The mouth shape of the cauldron depiction is
associated with the geometric shapes on the head column of the chart.
His belt buckle heats up. He writes it down on the
voodoo book.
The cauldron boils. Use the mango and rum on the
hot cauldron.
Get mango jam from the cauldron.
Use mango jam on the bird feeder. Go right to the
stockade.
Go back to the bird feeder at the waterfall. Take
the sticky bird feathers from the bird feeder.
Make a mask: Use the charcoal
with the barrel to make barrel with a face.
Use sticky feathers with barrel with a face to make
tribal mask.
Use tribal mask with Rover.
Enter Stockade:
Go right to the stockade.
See the 2 ladies do the code knock on the gate of
the stockade: knock, knock, 3 rapid knocks and 2 rapid knocks. If you missed
the knock, exit the screen and then go back again.
Go right again to the gate of the stockade. Do the
secret knock: knock, knock, 3 rapid knocks and 2 rapid knocks.
The guard asks your name - Julie Rover. Answer the
next question - Captain Butcher sent me out to make a mask.
Watch as Captain Clara Silvereye defies Captain Butcher. Julie Rover
tells the ladies about a ship west of here.
Rover identifies himself to Clara and follows her.
Meanwhile - Governor DeSilver talks to an informant
about Captain Silvereye sighting.
Maze:
Clara enters a cave. Below the cliff is her father's ship.
Rover loses Clara. Select any exit until you come
back out at the mouth of the cave.
Check the ghost sign twice and get a piece of eight.
Click on Rover and he says he needs a compass or something.
Talk to Clara and find out that her father is
Captain Silvereye. Clara thinks the Voices of the Dead spell sounds promising.
Read the ingredients needed for the Voices o' the
Dead spell in the voodoo book: conch, rum and gunpowder.
Collect ingredients:
Rum: We already have rum in
inventory.
Gunpowder: Go
back to the stockade at right.
Pass by the stockade and get stopped by Howell
imprisoned in
the stockade with Captain Butcher.
Captain Howell will give Rover gunpowder in exchange
for getting them out of the cell. Howell also states a plan on how to get the
keys from the guard.
Lure the guard: Howell
said to make a noise.
Place the dried corn in the cauldron.
Use the cheat sheet on Rover and select the heat
iron spell. This action pops the popcorn.
Rufus the guard comes out and checks the noise.
Talk to Rufus.
Knock the guard:
Howell said to knock the guard out.
Use the drop fruit spell on the palm tree with
coconut above Rufus.
Click on tree. Use cheat sheet on Rover. Select the drop fruit spell.
Rover automatically takes the keys and gives it to
Howell.
Released Howell gives Rover the gunpowder.
Conch: Go forward to the
jungle until the beach.
If you have not taken the skull from the sand at
right, do so.
Use the skull with the conch at left. Take the
discarded conch.
Check the jug beside the box on the sand to get
crackers.
Click on sea-horizon twice to get piece of pirate
flag.
Return to Clara: Go back to
the stockade. Check the bars of the stockade and get piece of pirate flag.
Go left to the waterfalls. Take the dried corn
on the bird feeder and also get crackers.
Go back to the right and up to the caverns.
Navigate the caverns:
Prepare the Voices of the Dead spell:
In inventory use the conch with the rum.
Use gunpowder with the stump at left of the
clearing.
Place the conch on the stump.
Use the voodoo cheat sheet with Rover. Select the
symbols of the spell.
Get a magic conch.
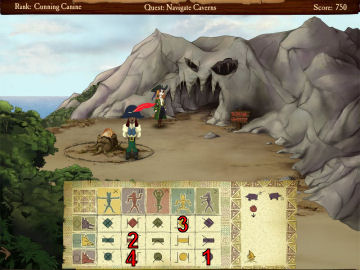
Caverns: Enter the cave.
Use the magic conch on the exits. If you hear a
voice, use that exit.
Keep on using the magic conch and select the exit
that sings another phrase of the song.
Yo - ho ho - ho a - pirates life - for me.
The Red Herring
Crew Red Herring:
Look around and check the hatch with the rusty
hinges.
Cabin: Go left to the cabin
and look around.
Check the jar on the desk by the door to get a
piece of eight. Click on jar again to take the empty jar.
Check the locked chest and map. Check the locked
cupboard at left.
Check the pillow on the bed and get a small key. Open the wardrobe at right to get crackers.
Use the small key on the cupboard. It opens. Rover
checks the coat inside to get piece of eight and a large key.
Use the large key with the chest by the window. Get
a piece of eight and a cutlass.
Use large key on the chest under the map. It fits
but not turn. In inventory combine the large key and the small key to get
super key.
Use super key with the chest under the map. Get a
strange wooden plate - compass 1 and old book - Silvereye's journal.
Use Silvereye journal on Rover. Read the Captain's
log. Learn that they captured the Santa Maria and its treasure. Splinters
wants to hide it in the other cove on Shipwreck Island. He noted a holey
compass. They took refuge from the maelstrom at Cannonball Island.
See that the last page about the Tree House has
directions.
Raise the dead spell: Study the
voodoo book.
Learn that you need blood of living relative, rum,
gun powder and fresh water.
There are rum and gunpowder in inventory already.
Fresh water: Exit the ship. Go
to lagoon and then to caverns.
Go to the stockade and left to waterfalls.
Use the empty jar on the waterfalls to get jar
with ingredients.
Use jar with ingredients with rum and gunpowder.
Go back to Clara; via caverns and Red Herring.
Use the jar with ingredients on Clara to get her
blood.
Use the completed jar with ingredients on the hatch.
Use the cheat sheet with Rover. Select the symbols
of the Raise the Dead spell.
Captain Silvereye brings the ship home. Clara runs
after her father's ghost.
Shipwreck Island
Find Clara:
Red Herring:
Check the barrels outside the ship to get
crackers.
Take rope from the ground, block and
crank of the crane.
Lookout Point: Go left to
the cove and right to Lookout Point.
Take piece of eight from one of the
cannonballs and crackers from the crate.
Take the barrel of gunpowder for later usage
inside the tree trunk.
Check the 2 fencing trees.
Forest: Go right to the
forest.
Take the block from the ground right of the
craved tree.
Take crackers from the face at left and the
top face.
Continue to the right and find Clara. Her father
passed through the blocked entrance.
Clear blockage:
Barrel of gunpowder: Click
the barrel of gunpowder on the rocks of the blockage. Rover goes back to get
the barrel.
Rover is stopped by the tree with 3 faces.
Raise the barrel of gunpowder:
Use the block with rope in inventory. Use the block and rope on the
other block to make block and tackle.
Use the block and tackle on the vines wrapped on
the branch at right side of the tree.
Use the barrel of gunpowder in inventory on the
block and tackle. Rover rolls the barrel closer to the block and tackle.
Go left to the Lookout Point. Look around. Take
flag piece inside the tree.
Go back to the tree at right. Use the cutlass on
the vine hanging from the branch at left.
Use the vine on the barrel of gunpowder. Rover
wraps the vine on the barrel and hooks it to the block and tackle.
Click on the block and tackle and Rover raises the
barrel. Job well done.
Go to the blockage at right. Use the barrel of
gunpowder on the blockage and Rover goes back to roll the barrel of gunpowder
to here.
Light the
gunpowder:
Stick a metal on the gunpowder by using the
cutlass on the barrel.
Use the cheat sheet
on Rover and select the heat the iron spell. Boom!
Unlock the tree house:
See Clara at the
cemetery. Clara tries the wheel on the tree house but forgot the combination.
She comments that
father has a code to remember the combination. It uses birthdays.
Find the code:
Read the last page of Silvereye's journal.
Tree house: North,
Clara starboard, Alexander port, Mary starboard, north.
Read the journal and
learn that Clara's birthday is in May.
Captain Silvereye's birthday is August 24.
Talk to Clara. Learn
about the combination for the wheel. The wheel is turned using the number
associated with the month. Port is left and starboard is right. Ask her when
is her birthday - May 25th.
Go to the graves at
the cemetery at left. Read the gravestone. Mary, Clara's mother and
Alexander's wife was born
June 6th.
Use the wheel:
Click on the wheel. Using the clues based on the code in the journal and
the birthdays; turn the wheel.
North (arrow points
up)
5 clicks to the right-clockwise
8 clicks to the
left-anti clockwise
6 clicks to the
right-clockwise
North 3 clicks anticlockwise (arrow points up).
A boat elevator
drops down from the tree top.
Find the treasure:
Tree house:
After Clara goes to sleep, search the tree house for clues.
Check the fruit bowl
by the boat and see that it is made up of wood and stuck to the bowl. The bowl
is nailed to the table. Compare the painting above it to the fruit bowl.
Something is missing.
Take the small jug
with 3 teardrops drawn on it from the hutch.
Open the top drawer of
the hutch to get a piece of eight.
Open the bottom
drawers of the hutch to get crackers. Open it again to get more
crackers.
Take a piece of
eight from the wardrobe by the bed.
Take the piece of
pirate flag from under the rug.
Use the super key on
the chest at the foot of the bed. Take a piece of eight and wooden
banana.
Place the wooden banana on the fruit bowl. The
painting swings open. Take compass #3.
Forest floor by tree house:
Go down to forest floor using the boat elevator.
Check the face of the right tree to get crackers.
Well:
Take the large jug with 5 droplets drawn on it beside the well.
Check the well. It is
missing a handle. Use the crank on the
well to get compass 2.
Use the crank again to
get piece of eight from the bucket.
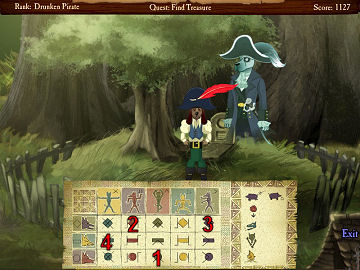
Grave: See Captain Silvereye by
his wife's grave. He asks to rest.
Use the reverse Raise the Dead spell.
Captain Silvereye gives a flag piece and states that
Gaius' father is very proud.
Forest: Go to the forest
right of the boat elevator.
Compass and stumps: This is a
random puzzle.
Look close at stump(s) in the forest. See brown
circles on the stumps.
The aim of the puzzle is to show all the brown
circles through holes of a compass that is placed over it.
Only the holes with brown circles are to be seen
and the other holes of the compass if there are any should be covered by
another compass. Combination of compasses can cover the holes of the
compasses under it.
The arrow will point to the next direction to go
to. Gaius will say if done correctly.
He will mark the checked stump with the correct
direction. Move the cursor on the stump and the cursor will change to a
directional arrow. I've matched all the holes!
Forest 1: The starting
area in the forest has 2 stumps.
Look close at
both stumps in first area with stumps. See circles on the stumps.
Check which stump shows the circles through any
one of
the compasses.
Place a compass on the stump. Turn it to see if
all the brown circles show through and match the compass.
If there are extra holes, use another compass to
cover the holes with no brown circles.
Mix, match and turn compasses to get the correct
solution.
Go forward to where the arrow points.
Do this to all the stumps until the totem area.

Totem: See a totem with 4
compasses on its side and an ugly mug on top.
Place compass 1 on bottom plate; compass 2 on
second from bottom plate and compass 3 from second from top plate.
The top compass is already on the top plate. Take
the ugly mug from the top of the totem.
Take all 4 compasses from the plates of the
totem.
Take piece of eight from the top plate now
that compass 4 is removed from it.
Tree carvings: Check the
tree carvings.
Pull the arm of the tree carving on the left. The
mouth opens. Take cracker from its mouth.
Click on the bag hanging on top of the
contemplative tree carving on the right. The nailed bag is too high.
Use the heat iron spell. The bag slides down. It
is a flag piece.
Forest again: Go left to go back
to the forest.
See that this is the start of the forest area
that has 2 stumps.
Use the compass on the other stump. A new direction
is pointed at and is the start of another compass-stump trek through the forest.
Use the compass(es) on the stumps until the cove is
reached.
Cove:
Figure out capstan: Look
around.
Check the hole below the tree craving on the right.
Get crackers.
Check the capstan and see that the plank of wood
through it won't budge.
There are holes on top of the capstan. Use the ugly mug on the top of the capstan. A
perfect fit.
Look at the ugly mug on the capstan. It has a single
droplet etched on its side.
Check the broken jug on the ground by the right
tree. It has a single droplet on it.
That's what it needs - to have a single drop poured
into it.
Use the small jug (3 droplets) with the waterfall.
In inventory, use the filled small jug with the large jug (5 droplets).
Use the small jug with the waterfall again and use
the filled small jug with the large jug in inventory again. One droplet is
left in the small jug and the large jug is filled with 5 droplets.
Use the small jug with one droplet on the mug. The water stayed in the mug.
Turn the capstan and the rock at left moved to show
an opening.
Check the capstan again and get piece of eight.
Enter the cave. See Silvereye's treasure and the
Santa Maria.
Enter DeSilver. DeSilver explains what he has done. DeSilver gives a pirate farewell to Rover.
Gaius' father wakes him up.
Leave Island:
Rover wakes up in a small island. Check the barrel and get crackers.
Take the noose and boot on the sand. Use the boot on Rover twice to get piece of eight.
Call a ride: Use the cheat sheet
on Rover. Select the Lure a Beast spell.
While tingling red, throw the boot to the sea.
Use the noose on the turtle.
Leave island: Rover throws
the end of the rope over the barrel.
Use cheat sheet on Rover. Select the Scare Beast
spell.
Click on the barrel while tingling red.
Groggy Island
Momma turtle leaves Rover where she laid her eggs.
Wedding: Go up to the shack.
Read the note tacked on the
sign. Ron went to the wedding.
Go to town. Check the sign on the fish store.
Enter the inn and talk to Puggy. Learn about the
wedding. Captains Howell and Butcher are getting married. Rover is supposed to
be the best man.
Get crackers from the bucket o' crackers.
Fort: Go right to the fort
and see Rufus wearing a pot on his head.
You can either bribe him with 8 pieces of eight or
incapacitate him.
Use the heat iron spell. The pot on Rufus' head gets
hot and he throws it off.
Click on palm tree above Rufus. Use the drop fruit
spell. There goes Rufus again.
Save Clara:
DeSilver: DeSilver is not
in his office.
Use the bowl of wooden fruit on the book shelf with
a ship in a bottle. Get 3 wooden balls and see a lever.
Use the lever and see a secret passage.
Enter the passage and see DeSilver and witch doctor.
Clara is in a basket above the bubbling pool. Clara
must agree to the exchange of souls.
Use wooden fruit with DeSilver.
Take the cutlass from the ground. Take crackers from the cauldron. Take the
bags and the canvas on the ground.
Take crackers from the bookshelf. Check the altar.
Escape: Use the crane to
bring Clara back to land.
The volcano is erupting. The exit is blocked by
rocks. Take a rock from the landslide at the entrance.
Talk to Clara.
Use canvas bag with the steam vent and see it float
away.
Use the sail canvas on the basket. Rover ties the
sail canvas on the basket.
Plug the other vent with the rock. The other vent
fills the canvas sail with steam.
Take the rock plugging the other vent.
Jump in the basket that is not steaming anymore.
Use the cutlass on the basket to cut off the
weights.
Clara and Rover float into the sunset.
This document may not be
distributed without express written permission of the author and the content may
not be altered in any way.
For
Questions or Comments on this Walkthrough,
Please write to:
MaGtRo
Copyright © 11/2010
MaGtRo
 GameBoomers
Walkthroughs and Solutions
GameBoomers
Walkthroughs and Solutions