THE JOURNEY DOWN
By SkyGoblin
Walkthrough by MaGtRo
Gameplay: This is a third
person point and click game.
The main menu has continue, new game, load game,
settings and exit.
The settings have selections and adjustments for
fullscreen, sound volume, music volume and subtitles.
Behind the Scenes is added when the game is
finished.
The in-game menu is accessed by ESC key or placing
the cursor at top of the page. The drop down menu has load game folder, save
game disk, settings gear and exit cross.
The inventory is at bottom of the screen. To use an
item; click-hold the selected item out of the inventory bar. And then move to
the labeled active item or person you want it to work on and release the
cursor.
There are 3 saved game slots and an autosave.
In Win7, the saved game folder is located at
C:\Users\computer name\AppData\Roaming\SkyGoblin\TheJourneyDown(1 or 2)
folder.
Chapter One
May 2012
Central St. Armando:
Two goons enter the Agibo University. Outside a
closed office, they call out to a professor. Forcing their way in; they
realize that the office is empty. They see a paper lead on the table about Gas and
Charter.
They inform the boss who demands they find his book
and Bozi. He orders the goons to kill them.
Gas and Charter:
Power goes out at a gas station. Bwana talks to Kito
and learns that their electricity has been cut off because of nonpayment of
4000 dollars to Armando Power Co. They have no power to pump their gas.
They decide to open the power box and meddle with the insides.
Power box: Click on the power box
to get Bwana to open it.
Click on the 4
brackets; the thingies holding the hatch in place that has a warning sign on
it.
Click on box to remove
the hatch.
See a switch connected
to all sort of dangerous things.
Pull the switch and
see what happens. The whole city of St. Armando's power goes out.
Bwana immediately
fixes things and the gas station has power.
Book:
Office: Lina from the
University asks about a book. Bwana says there are a lot of old books at the
attic left by Kaonandodo.
At the Charter office,
Bwana remembers that they used the rungs of the ladder as firewood. He needs
time to think of how to get the attic.
Look around.
Check the green
folders on the table full of candles.
Check the cash
register and Bwana is reminded that Johnsson Electric was bought by Armando
Power Co.
Fix the ladder: Check the pilot
certificate on the wall given by Kaonandodo before he disappeared.
Go to the cupboard
under the window and open it. Bwana gets breadsticks and after tasting
it realizes they are stale.
Move the cursor to
bottom of screen. Use the breadsticks on the ladder. Click-hold the breadsticks
and release them on the ladder. The breadsticks work well as rungs. Climb up.
Look for the book: At the attic, Bwana
reminisces that Kaonandodo, their father left them when they were kids.
Lina asks Bwana to help
her look for a book with swirly signs on the cover.
Check the bookshelf
right of the fireplace. It has plants books.
Check the dresser below
and Bwana gets a good blue shirt out of other moth eaten clothes.
Take the paintbrush
from the fireplace. Check the candles at foreground.
Check the picture on the
side table. It's a picture of a young Bwana being taught how to fly a plane by
his father Kaonandodo.
Check the bed. Bwana
finds the book - Journal of Journey Down. Lina explains that it is a book on how
to reach Underland. Any book relating to the Underland is illegal. Lina has been
searching for books mentioning Underland. She thinks that something is fishy
about Armando Electric Co. and she thinks it has a connection to the Underland.
Telephone:
At the Charter office
below, Lina wants to inform the university about her find but realizes the phone
is not working.
Bwana says he needs to
reset the number after the power went down but he forgot the number.
Check the green
folders on the table full of candles. Learn the phone number of the office: 99
- 450.
Open the phone box
again and try to change the numbers. They won't move.
- Turn the dials below
to the matching color of the wires they are attached to - left red, middle
orange and right green. The power light lits up.
- Turn the numbers to
enter 450. Ahh that's it.
Lina calls the
professor and learns about the office search. Lina says she knows where to
hide.
Lina asks Bwana if the
plane flies. Sure!
Airplane and
surrounding area:
Lina, Bwana and
brother Kito are inside the airplane. After assuring Lina and convincing Kito
about getting rid of the debt; he informs Lina that they need to do some touch
ups on the plane.
Learn that the plane
needs a couple of engines, propeller and something to steer with.
Lina and Underland:
Enter the plane and talk to Lina. Learn about enemies, Prof. Steeplehead
Moorehead, blank records and Armando Electric.
Hatch:
Look around.
Check the hatch left
of Lina. Take the wrench.
Check the hole where
the steering wheel is supposed to go.
Outside:
Go right and look around.
Check the winch for
the anchor above Bwana.
Check the pictures and
blueprints on the left wall. Learn that Kito is a good mechanic.
Take the net
where Kito sleeps. Exit the plane.
Pier:
Go left and down under the Gas sign left of the plane.
See a mouse, oil
faucet and a float in the water.
See Mama Makena's
diner. She cooks the best muddyuggler stew in Armando. Go back up.
Propeller:
Office:
Enter the Charter office.
Check the overhead
fan. Bwana wants to bring it down to use as a propeller.
Check the fridge at
left. Get cheese.
Check the picture on
the wall and the portrait behind the office counter. Learn Capt Kaonandodo
adopted Bwana and Kito from the streets. Click on picture again. We miss
you. Where did you go?
Mama Makena's Diner:
Exit the office and go
down at right of screen.
Paint can:
See a white paint can on the steps.
Use the paint brush on
the paint can to get brush with white paint.
Go right to Mama
Makena's Diner.
Sophisticated
Sailors: Talk to the sailors. They are from MS Corollo.
The stew is spicy. The sailor gives the
chili. They are going to Port Artue.
Rufus:
Check the dog. He would not let Bwana enter the door to the diner.
Mama Makena:
Talk to Mama Makena.
Get the propeller
down:
Matoke:
Talk to Matoke who is fishing. Learn about his fear of rats and his fishing
pole. He won't let Bwana
borrow his pole.
Get the fishing pole:
Go back to the pier left of the airplane. See the rat that might
scare Matoke.
Use the cheese on
Matoke's float that is on the water. See the rat jump on the float.
Go back to Matoke at the
diner. Talk to Matoke. He reels in the rat.
Bwana unratifies the pole
by getting the fishing rod. The rat runs off with the hook.
Get a hook:
Go left of the diner and up the steps to the street. Read the charter sign at
left.
Check the garbage bin at
bottom left to get hook.
In inventory click-hold
the fishing rod and release it over the hook to get fishing rod with hook.
S. Kingsport station:
Check the elevator and the card terminal at right.
Learn that an ARA or
maintenance card is needed to use the elevator to the train stop above.
Read the graffiti left
of the elevator. People open your eyes.
M.S. Corollo:
There is a road at center that goes to the ship.
See the sailors' ship.
Someone is welding above. The dockmaster is by the ship.
Go right and see a box
of salt, forklift and a pelican on a nest.
Get the propeller:
Go back to the Charter office.
Use the fishing rod on
the overhead fan. Bwana brings it down but one blade breaks off.
Fix the propeller:
M.S. Corollo:
Exit the office. Go to the street at right screen and then to the M. S. Corollo left
of the elevator at the station.
Talk to the dockmaster.
The new deckhand should know the password.
Learn the password:
Go back to the sophisticated sailors at Mama Makena's.
Talk to the sailors
about the password. They don't believe Bwana is the new sailor because he doesn't have the proper
clothes.
Go left. In inventory
combine the paint brush with white paint and the blue moth eaten shirt to get
shirt with stripes.
Go back to the sailors
and use the shirt with stripes on them. Get the password: Fear the hungries.
Enter the ship:
Go back to the dockmaster at the ship. Talk to him again about the password.
Bwana shows his shirt.
He is given a mop.
Talk to dockmaster again
to learn about misty Port Artue and Underland.
Enter the ship.
See a yacht left of the ship that might have engines that Bwana can borrow.
Welder:
Go right and talk to the welder. It's a Miss and she's busy. See that she is welding
the nut of the canisters.
Fix the propeller:
Go left and use the gas canister. This increases the gas. Hear the welder
scream.
Go right; see that the
welder is temporarily blinded.
Immediately use the
wrench on the nut of a canister.
Use the propeller on the
nut of the canister so that it is next in line to be welded.
If the welder recovers
before you have placed the broken propeller; do the gas canister again. Bwana enjoys doing it.
The welder gives the
propeller back to Bwana.
Airplane:
Exit the ship and go back to the plane. Give the propeller to
Kito.
Steering wheel:
Get rid of Rufus from
diner door: Remember that Rufus the dog would not let
Bwana enter the diner.
Go to the M.S. Corollo.
Left of the ship see a buoy on the water.
Use the fishing rod on
the buoy. Bwana reels in a crab
trap.
Use the net taken by the plane on the cage to get a crab.
Go to Rufus at Mama's
diner. Use the crab on Rufus. Rufus runs away.
Get a steering wheel:
Enter the diner. Talk to Mama.
Click on the ship's
wheel on the wall beside Mama. Get a steering wheel.
Get a rod to hold the
wheel: Go back to the plane.
Use the steering wheel
on the hole of the dashboard of the plane. See that the wheel needs something to hold it.
Go to the ship. Go right
of the ship to see the pelican sitting on its nest.
The bird would not let
Bwana check the lever of the forklift.
Go to the pier left of
the plane. Use the fishing rod on water to get muddyuggler.
Go back to the pelican.
Give it the muddyuggler - ugh! It just gobbled it.
Fish for another
muddyuggler at the pier left of the plane.
In inventory combine the
chili taken from the sailors with the muddyuggler.
Give it to the pelican.
Uh Oh!
Check the nest. There's
something shiny up there.
Use the lever to lower
the forklift. It is rusty.
Use the wrench on the
lever of the forklift. Take the metal rod from the nest.
Install the steering
wheel: Go back to the plane. Enter the cockpit.
Use metal rod on hole.
Use the steering wheel from Mama Makena on the metal rod.
ENGINES:
Yacht:
Enter the yacht:
Go back and enter the ship. See the yacht at left.
Use the switch right of
the ladder to adjust the crane above.
Start clicking the
switches and Bwana says that it doesn't make any sense. I HATE PUZZLES!
Bwana solves the puzzle
his way. Hahahahahah.
Climb the ladder. Learn
that Bwana has fear of heights.
Bwana drops down on the yacht and the crane's hook follows.
Help the chef:
Bwana enters the yacht. Talk to the concierge.
Enter the door at right
and see Sabo the chef crying. Try to talk to him. Yikes!
Go back to the kitchen.
Talk to Sabo. Learn that he is making a muddyuggler stew and he can't do it
right.
Exit the yacht. Go
to Mama Makena and ask her about her stew. Her secret is her magic spice that is added
at the end of cooking.
Collect Mama Makena's
secret recipe ingredients:
Mama Makena runs out of
her secret recipe and asks Bwana to collect the ingredients.
She gives the
recipe and the spice container. To review the ingredients, right
click the recipe: salt, lemon, chilies, extra virgin oil, ginger and chervil.
Chilies:
Combine the chilies taken from the sailors with the spice container.
Extra virgin oil:
Go back to the pier left of the plane. Use the spice container
on the oil tap.
Lemon:
Enter the Charter office. Check the blue cup on
the counter to get lemon added in with the mix.
Chervil:
Go up the ladder and check the books on the bookshelf. Bwana finds chervil and
adds it to the mix.
Salt:
Go to the ship. Go right of the ship where the pelican and the forklift is located.
Get salt from the box
left of the forklift. Bwana adds it to the mix.
Ginger:
Enter the ship and climb the ladder to go to the yacht.
Enter the kitchen. Go
through the freezer at far right exit.
The door freezes at top
to lock Bwana inside the walk-in freezer.
Check the 4 cabinets of
the wall freezer. See frozen bread, exotic food and ginger.
Bwana gets ginger.
Combine ginger with spice container. The spice mix is finished.
Exit the freezer:
Examine the panel left of the freezers. Play with the switches.
The left red button is
the power switch. The middle and right switches directs the flow of the radiator
by the door.
The knob on top adjusts
the temperature. Use the knob and Bwana
sets it to hot.
The power button doesn't
stay down.
Pick up the gum
from the floor. Use the gum on the left
power button to hold it down.
See that the middle
button blows hot air from the bottom radiator. Turn the middle button off.
Press the right button
to get the top radiator to blow the ice off the top of the door.
Exit the freezer. Use the spice container
on the stew pot. Tingling sensation. It's delicious.
Canapés:
Get toast for canapés:
Sabo checks his toast for canapés and sees them burnt.
Enter the freezer again.
Open the top left freezer to get frozen bread.
Use the frozen bread on
the bottom radiator by the door.
Go to the control panel
at left. Turn off the right
switch and turn on the middle switch.
Take the toast.
The top is frozen again. At the panel, turn off
the middle button and turn on the right button.
Exit the freezer and
give the toast to Sabo.
VIP Lounge:
Enter the VIP lounge:
Exit the kitchen and talk to the concierge. He would not let Bwana enter the VIP
lounge.
Go back to the kitchen
and take the canapés made by Sabo from the counter.
Go back to the concierge
and show him the canapés.
A guest comes out and
wants the canapés. He gets Bwana inside the lounge. Nobody likes me.
VIP Guest- hungry
man: The VIP guest's favorite is the black canapés; he
definitely doesn't like the white ones served the last time.
The guest eats all the
canapés. Look around.
Get more canapés from
the kitchen. In inventory use the brush with white paint on the black canapés.
Do it in the freezer.
Go back to the lounge.
The hungry man stops Bwana and declines the white canapés.
Engine room:
Enter the engine
room: Go right to be outside. The man asks for canapés.
Enter the door at bottom
of the stairs. Bwana says to the man that stops him that it's captain's orders.
That was the captain!
Bwana uses the mop to bar the door.
Find another way out:
Check the engines.
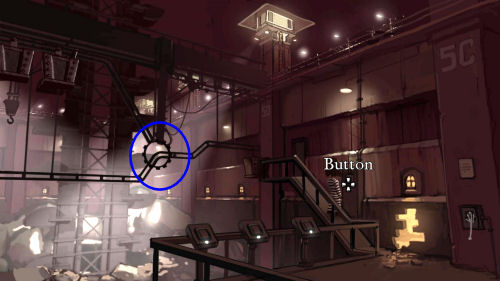
Press the button right
of the door. It controls the hatch in the ceiling.
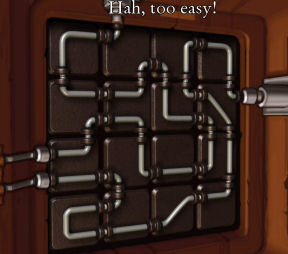
Activate the button: Check the switchboard right of the button.
See the power switch
puzzle. Arrange the wires on the plates so that outside wires are all connected.
Click a plate to rotate
it. Hah! Too easy.
Deliver the engine: Press the button right
of door to open the ceiling hatch.
Remember the crane that
dropped down with Bwana earlier - that is convenient to get the engines.
Bwana delivers the engine to Kito. They're beautiful!
Meanwhile: See the boss
orders the shutdown of a whole district that has hospitals. The 2 goons
report about the gas station owned by Kaonandodo at Kingsport Bay. The boss
orders them to get me that book and leave no witnesses.
Anchor:
Raise the anchor:
Winch handle:
Go inside the plane and then to the right.
Pull the winch left of the entrance.
The winch is all crooked and can't raise the anchor.
Bwana takes the crooked winch
handle.
Go above and Bwana tells Kito about
the winch.
Get a maintenance card:
There's no place to straighten the
winch around here. Let's check above ground.
Station: Go
to the train station elevator outside on the street.
Check the elevator and the card
terminal. We need a maintenance card.
Maintenance card:
Go inside the ship. Check the welder at right.
See her access card on the railing.
She is tired. Check the mug she is holding. She is out of coffee.
Get coffee: Go to
Mama Makena's diner. Enter through the door to be inside the diner.
Check the coffee maker. It's empty.
She will make more if the customer asks for it.
Exit and talk to the coffee drinker
sitting at the counter. The customer likes strong coffee; nothing worse than
diluted coffee.
Note where he places his cup and check the
pipe dripping water.
Move the pipe to the right. Ah -
the drip is pointing another way from the cup.
Use the wrench on the pipe to turn it
over the cup of strong coffee. That diluted his coffee.
The customer wants more coffee. Mama
Makena makes more of her volcanic rock coffee.
Enter the diner door and click on
coffee. Bwana takes the whole pot of coffee.
Go back to the welder at the ship.
Use the coffee on her mug.
Click on the access card on
the railing and the welder lets him borrow the card.
Find a way to straighten the winch
handle:
Card terminal:
Go to the station's elevator at the street.
Use the access card on the card
terminal. It wants a passcode.
I think I'm in for a puzzle.
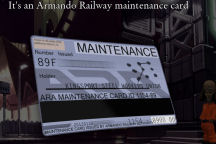
Check - right click the access card in inventory.
See the diagram at top right of the
card. There is a line that passes through 4 dots.
The dots are reminiscent of the
number pad of the card terminal.
Use the card on the terminal again.
Press buttons: 3 2 5 7. Access granted.
Vendor:
Enter the elevator. Press the up button.
Talk to the vendor at the newsstand. The train doesn't stop here anymore.
Learn about how Kaonandodo adopted Bwana and Kito. Learn that Armando Co. owns the
railway also.
Read the tabloid and learn about the
discovery of renewable energy source from the Underland mined by Armando Mining
Co. Hmmm...
Train railways:
See a train pass by. Check the track.
Use the crooked winch handle on the
track. Bwana says that might work but he will not stand on the track.
Go under the rail track:
Since Bwana doesn't want to be on the rail track - let's go under the rail
track.
Enter the elevator. Press the down
button.
As soon as you see a panel through
the elevator glass wall - press the red X stop button.
Adjust the 4 bolts on each corner to
match the slots-lines. If access to some bolts is not possible; press the
up-down button and then stop to gain access to the screws.
Once all 4 screws are aligned with
the slots, take the plate off by clicking on it.
Go through the sabotaged window now.
See Bwana under the rail track.
Use the winch handle on the rail
track. It's straight as an arrow man!
Go down. Go down the elevator and
back to the plane.
Raise anchor:
Enter the plane
and to the right to be outside.
Use the winch handle on the winch.
Use the winch. Good job Bwana.
We are going over the edge. Let's get outta
here! They're chasing us. We're taking off. You can stop screaming now. Bwana
Air. Gas? Right, Kito?
We might have a
problem here.
Ahhhhhhhhhhhhhhhh!
Be sure to check the
Behind the Scenes.
Chapter Two
August 2014
An eel trawler is amidst the mist. They are
stranded and without food. They caught something in the net. It is an
airplane. They reel the airplane in. Bwana, Kito and Lina meet the sailors.
Learn from Joe that the lighthouse is out of order
and that they rely on it to get their bearing in navigation.
THE MIST.
Figure out what direction the ship is going:
Joe: Talk to Joe. Joe is
on watch to look for Port Artue. Learn that they are moored to the buoy.
They are on M.S. Biko an eel trawler. There are
only mist, Bwana does not hear water. One morning, the lighthouse was just
gone from view.
Lina: Talk to Lina. Bwana's
father's book helps a lot in learning about Underland. They have to reach Underland.
Airplane: Go down on the
right side of the trawler. Walk the net to the upside down airplane.
Kito is seasick. Talk to Kito to hear a synopsis of
Chapter 1.
Borrow the screwdriver from the toolbox.
Take the duct tape from the safety belt of pilot's chair.
Use the screwdriver to take the compass
from the instrument panel.
Joe: Give (click-hold-move item
in inventory) the compass to Joe. They are at NNE.
Now they need map to know where they are. The
captain is no help.
Search the cabin:
Look around: Check (right
click) the buoy in the mist.
Check the sign of the name of the ship.
Check the wires on the wall right of the steps.
Bwana gets zapped and see that the wires are loose.
Cabin: Enter the cabin.
Press the button on wall. It is not working.
Fix the wires: Go back outside
and fix the wires. Use the duct tape from the plane on the loose wires.
Cabin: Enter the cabin.
Press the button on the wall.
Gimbo: Gimbo is happy to
have lights. Talk to Gimbo and learn that the captain spliced the wires
to conserve energy. He is afraid of pirates and large eels.
Sisulus are bloodthirsty pirates. The hungries are
giant eel that can swallow ships. The hungries do not come close when there
are lights.
Port Artue is the only city in St. Armando and is
usually fog covered.
Take the loose spring on the ceiling of the
bottom bunk.
See the sink at left. It is the only source for
anything to drink. Learn about eel rinse that the captain drinks.
Search the bridge:
Bridge: Climb the steps
and Bwana looks through the porthole.
See the Captain passed out drunk holding a bottle of
eel rinse. There is a key hanging above a drawer.
Open the door: The
porthole is held by 2 screws and the door is locked.
Use the screwdriver on the porthole.
Use the spring on the key hanging above the
drawer.
Use key on door. Enter the bridge,
Look around: Check the captain. Check the drawer.
Navigation Book: Get a
book title Lost? A Mister's Guide to Navigation. Read the book. (Use
the book as reference throughout this chapter).
Learn about the founding of Port Artue, the
lighthouse and the catch.
Learn that eel's silth is the main ingredient of
eel rinse. The McFerrin Distillery is the processing plant.
Learn the uses of mistlobster, barnacles and
mistweed.
See the size of the mistrawlers. They have huge
hull. Upbound vessels need ballast tanks for bouyancy control to navigate
mist and water.
Small eels are caught using nets while large eels
require multiple harpoons.
To navigate without the use of the lighthouse, a
barometer (depth), compass (bearing) and chart (location) are needed.
See a chart of marker descriptions, a map of the
mist and how to do celestial navigation.
The Path Star is the only celestial reference in
the mist. Using the star's location compared to the Celestial Navotorium,
the longitude and latitude can be used using the Age index.
Learn about the dangers of the mist: the hungries,
cliffs and piracy. The Outer Cross has cliffs which makes navigation
impossible. It is also the place where pirates hide and do raids.
Go back to Port Artue:
Give the navigation book to Joe. He now knows they
are at Northern Rubble. He steers them home.
See the introduction to the game.
PORT ARTUE PRISON.
While standing at downtown, Chief Barlow of the
Police confiscates Kaonandodo's book from Lina. He arrests the 2 men and
places them in the cell while he interrogates Lina.
Cell:
Talk to Kito. Bwana hits his bunk.
Check the window, ball and chain, chain on the
bunk, grate, skeleton and door. Kito and Bwana are chained to the bed.
Remove Bwana's chains:
Talk to Kito a total of 3 times to break his bunk
bed. Kito hangs upside down on his chains.
Bwana's chains break.
Find a way out:
Take the ball and chain by door.
Check the grate to know that it connects this cell
to the sewer below.
Check the window and Bwana can see outside.
Use the ball and chain on window. Bwana hangs the
ball and chain on window.
Use the ball and chain and Bwana hits the wall. Do
this 3 times until a hole on the wall is made.
Look around: Exit and
look around.
Check the plaque at right. It says workplace
security system requires 2 operators at all times.
Check the lever and see that the buckets move.
Bwana needs to prop this lever.
See that there are 3 buttons on the platform and
one on the wall by ramp.
Check the empty cart at end of the ramp.
Check the cart on the beam at left. It has a
pickaxe.
There's another mining cart at top left. The guard
tower must not be manned.
Check the locked door at top of the ramp.
Get the axe:
Go back inside the cell. Right click the skeleton
to get its hand.
Use the skeleton hand on the lever below the
plaque. This activates the buttons.
The buttons move the 3 mining carts around.
The button on the wall by ramp turns the center
gear that determines the direction the carts go.
The 3 buttons on the platform move the carts
through the chains.
- Push the button on the wall to turn the middle
gear to get the cart with axe to go up.
- Push left button on platform to move cart with
axe to the top.
- Push button on wall twice to position the gear
to go to the bottom rail.
- Push right button to move cart by ramp to bottom
left.
- Push button on wall twice to turn the middle
gear from top to right.
- Push middle button on platform to move the cart
with axe to the ramp.
Take the axe from cart.
Get out of jail:
Release Kito: Go back
inside the cell and use the axe on Kito's chains.
Get out of jail: Use the axe on
grate. Enter grate.
Bwana climbs the tree on prison wall and Kito
stands on ledge.
Kito will check the airplane while Bwana looks for
Lina.
DOWNTOWN:
Get new clothes:
Arnie's alley: Check the
dumpster and get a can of lobster.
Check the poster on left wall. It says - Down with
Moroboro.
Check Arnie's bar, the stick on the archway and
the pigeon.
Woman by window: Exit the
alley. A woman opens the window across the road and drops her matches.
Bwana picks up the matches and lights her
cigarette. The woman learns either Bwana has an airplane or he's from St.
Armando.
Newspaper rack: Check the
newspaper rack by window. Read the headline about lighthouse sabotage.
Use the axe on rack and then get newspapers.
Look around: Check the
phone booth beside Lonnie's Used Mattress place and see a telephone
directory.
Go left and see Cinema Rex across the street and a
fancy place with a maître d at right.
Continue to the end of the road. See the M.S. Biko, the
trawler they came in on.
Dark Alley: Enter the
dark alley at the corner.
See and talk to Moe and Vince. They are freezing
waiting for goods to come to port.
They have good leather clothes and they want to
sell a crate of them.
Take nachos from the crate by Moe.
Talk to Moe and Vince again. No shipment comes in
after the lighthouse stopped.
They really need heat.
Learn about union membership hats and the
political structure of Port Artue.
Make heat:
Place newspapers from rack on the empty drum between the 2 dockworkers.
Use the matches to get fire.
Talk to them again about clothes. They give Bwana
permission to get leather clothes from the small crate.
Bwana comes out looking sharp.
Check the lighthouse:
Exit the alley. Go left down the road to the
lighthouse at far end.
Enter and talk to Morten. Learn that the Sisulus,
the pirates on an airship arrived and smashed the lantern and destroyed
things down here.
Morten needs the blueprint to fix the gears.
Learn about the use of the lighthouse. The misting
depends on the lighthouse. The Pango Kubwa is where the locks are located
and goes up and down
to Saint Armando. The ships are the only way out right now. The trains are off
limits to public.
Take the boltcutter below the doohickey.
Check the doohickey, the teapot with eelbladder
brew on the fireplace and the anchor above the fireplace.
Learn about and take the model ship above
the fireplace. It is the model of the Mistraker, the ghost ship.
Lantern: Climb the stairs to the
top of the lighthouse.
Check the smashed lantern.
Radio: Check the radio. See that
it is broadcasting at frequency - 969. You can change the music by pressing
the lit button to remove the record that is playing.
Press any of the lit button to place a new record.
The arrows at right changes the frequencies.
Reel: Check the rusty
reel and the pulley that is used to bring things up to the top of the
lighthouse.
Morten: Go down and talk
to Morten again.
Learn about the clock tower that is out of
commission. The bells have not tolled for years.
Learn about the mayor.
Get a lantern for the lighthouse:
Club Temba: Go back
to downtown. Check the facade in between the steps leading to a maître d. It
is a giant stone elephant head.
Climb the steps to the maître d guarding Club Temba.
Talk to the man. Learn about the telephone and
lights.
Wire box: Check the wire box
right of the steps.
Use the axe to open the wire box. There are thick
power cables in there.
Use the boltcutter on the wires in the box. The flood lights go off.
Talk to the maître d again about the lights. He
hasn't heard anything about any repair.
Phone booth: Check the matchbox thrown
by the lady across the street from the alley. The phone number for Club Temba is 634 000.
Go right and enter the phone booth. Dial 634 000.
Say "this is management speaking".
Lamp: Go back to Club
Temba and the man.
Bwana takes the lamp.
Arnie's Bar:
Crew of Biko: Go back to the
alley by the phone booth. Enter Arnie's bar.
Talk to the crew of Biko completely. Learn that
Lina has been seen clinging to Chief Barlow.
Learn about Club Temba, Arnie's and misters. Gimbo
doesn't want to go back to misting.
Learn about the Pango Kubwa locks again.
Navigation book: Try to take the Navigation
book (that has the lighthouse blueprint) from the table.
Gimbo doesn't want to give it because it has a picture
of a lobster in it. He's still hungry.
Almanac: Check the almanac on
the wall. It has beautiful pictures of St. Armando. The bartender gives it
to Bwana.
Bar stool and drain: Check the
bar stool and the drain on the floor. The drain is used for eel rinse waste.
Bartender and radio: See that
the radio is tuned to the record that you played at the lighthouse
transmitter-radio.
Talk to the bartender. Learn that he pours the
drinks for Club Temba's VIP lounge and sends it up with the food shaft
behind the bar.
Learn about Barlow and mistfumes. Learn about the
public band on the radio.
Exit the bar. If you haven't yet taken the can of
lobster from the dumpster - do so now.
Fix the lighthouse:
Lantern: Go back to the
lighthouse. Go to the top of the lighthouse.
Replace the broken lantern with the lamp from Club
Temba. The light is back on.
Go back down. Morten still needs the blueprint to
get the lantern spinning.
Make lobster soup: Use
the can of lobster from dumpster on the teapot with eel brew.
Automatically get lobster soup in the
can.
Get the navigation book: Go back to Arnie's
bar.
Give the lobster soup to Gimbo. Take the
navigation book.
Go back to the lighthouse and give the navigation
book to Morten.
He fixes the gears. Old faithful is spinning
again.
Get to Lina:
VIP lounge: Go back to
Arnie's bar. Hear the crew of Biko decide to go back out to the mist. They
finally convinced Gimbo to go with them.
Remember what you learned from the bartender
earlier about the elevator shaft.
Climb the food shaft behind the empty bar.
See Barlow talk about Kaonandodo's book. He
discourages Lina to learn more about Underland.
Barlow is stopped from killing Bwana when Lina
tells Barlow that he is Kaonandodo's son.
Bwana is taken by the maître d-bouncer. Bwana recalls Kaonandodo's words about Underland -
learn the truth.
Bwana exits from the dumpster. Check the backdoor
of Club Temba up the steps.
Get info about Kaonandodo:
Ask around town about Kaonandodo:
Talk to the sailor outside the bar.
Enter the bar and talk to the bartender, Check the
2 sleepy sailors.
Take the empty bottle of eel rinse from floor.
Talk to the bartender again to learn about the
pirates Sisulus and Outer Cross.
Andiswa-Andi : Exit the
alley and meet the lady on the window again.
Enter the building and learn that this is the
Mayor's Office. Andiswa is the mayor's secretary. She dreams to leaving here
and going to the St. Armando.
Map: Check the map on the wall.
Click on an icon and Andi comments about that location.
The train works only going up. See the McErrin
Distillery. All that is distilled is sent to St. Armando.
See the cemetery and hospital. Learn about the
Industrial Zone and the Enola.
Enola butterfly therapy is like getting the
effects within 2 minutes from the booze misters drink without passing
out.
See a box of cigar below the map, a fire
extinguisher on the left of door and the smoke detector right of the window.
Check the stairs going up to the mayor's office.
Exit and check the fancy car.
Morten: Go back to the
lighthouse and talk to Morten about Kaonandodo.
Learn that Kaonandodo worked for Barlow and they
were involved in shady business. They led an expedition to the Underland and
one of the few that returned.
The last time Morten saw Kaonandodo is when he
flew off in the mist.
The expedition left on Kaonandodo's pontoon plane.
When it returned from the Underland it showed the hard times it went through
and barely made it back.
The next day, Barlow was made Chief of Police and
the expedition report was classified.
Get the Expedition Police report:
Mayor's Office: Go to
Andi at the Mayor's office again. Talk to Andi again. She's obsessed with
St. Armando.
Give the Almanac from Arnie's bar to Andi.
Use the terminal and get Andi's permission.
Type in using your keyboard - Expedition.
See that the report is written by Leroy McIgbo,
the former Chief of Police. It states corruption is involved in the
expedition. The report is classified.
Andi says that classified reports are moved from
here to the archive.
Ask around about McIgbo:
Talk to Morten at the lighthouse about McIgbo.
Go to the alley and then bar. Ask the bartender
about expedition and McIgbo. Learn that he is a decent cop and loved by the
little people.
Phone booth: Enter the
phone booth at entrance to the alley.
Look through the phone directory and check the
number of Mrs. McIgbo under M.
Mrs. McIgbo: Dial 510
842.
Learn that McIgbo disappeared 10 years ago. The
police and Armando power company cleared his papers from his office. The
power company has an office at Charnel Road here at Port Artue.
Get to Charnel Road:
Fancy car: Check the
fancy car in front of Lonnie's Used Mattress building.
Taxi: Go left to
the Cinema Rex across Club Temba.
Ride Reynolds the taxicab driver complains about
Mack that sold him a tire that went flat. Talk to Reynolds.
Check the ticket booth of Cinema Rex.
Harbor: Go forward to the
end of the road until the harbor. See that Biko the trawler is gone.
See another boat with a rubber boat. There's a
crane across the street from the boat and adjacent to the train station.
Check the rubber boat. Bwana deflates the rubber
boat. Take the rubber boat.
Train station: Check the
locked door across the boat.
It is the entrance to the train station that
connects Port Artue to St. Armando. Unauthorized entry is forbidden.
Get a tire: Go back to
the fancy car parked by the phone booth.
Use the rubber boat on the fancy car. Bwana places
it under the car.
Enter the mayor's office at right.
Try to take the fire extinguisher left of door. It
is locked in place. Andi says it can be taken only in case of emergencies.
Use the match on the smoke alarm right of the
window. The smoke alarm is triggered and the clamps of the fire extinguisher
opens.
Take the fire extinguisher. Exit the
building.
Use the fire extinguisher on the rubber boat under
the fancy car.
Click on the fancy car to get a tire-wheel.
Go back to Reynolds at Cinema Rex. Give him the
wheel.
INDUSTRIAL PARK.
Enter the Power Company building:
Reynolds gives Bwana a free ride. They leave downtown and a big truck follows them.
Bwana is dropped off in front of factories at the Industrial Park. The big truck
parks in between the factories.
Armando Power Company office:
Check the locked door of the building at right.
Check the window above the door. Bwana wants to
reach that window.
Check the window across the alley on the other
building.
Tow truck: Check the tow
truck parked at left. It towed a police car.
Check the tow truck and see a control panel that
needs a key.
Make a steel girder:
Steel mill: Check the
gate with a padlock.
Use the boltcutters on the gate. Enter the compound.
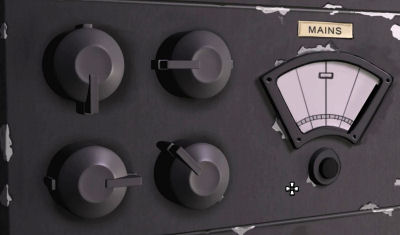
Get power to the building:
The building is dark. The control panel by Bwana is turned off.
Check the power box on the platform.
See a close-up the power panel. Turn the 4
dials until the meter is at extreme right.
Turn all the dials to the position that gives
maximum movement (before going back to the left) of the meter needle.
Turn top left dial to 6 o'clock position.
Turn top right dial to 9 o'clock position.
Turn bottom left to 3 o'clock position.
Turn bottom right dial to 10 o'clock position.
Press the button under the meter.
Control panel: Go down to
the control panel and see what happens when Bwana presses the button.The process is to melt stuff.
Check the smelter and turn the handwheel at its
side. There is not enough iron to make a girder. Bwana wants to make his own
girder.
Key box: Check the key
box left
of entrance and take the keys.
Get more iron: Go back to
tow truck. Use the keys on the tow truck. The rusty police car is released.
Go back to the steel mill. Activate the control
panel and see the crane pick up the police car and places it on the smelter.
The police car is melted. Use the handwheel of the
smelter. A steel girder is born.
Girder: Activate the control panel again. Go out and see
it pick up the newly made steel girder but it gets stuck between the 2 buildings.
Go back to the steel mill and climb the steps at
right of the control panel.
Meanwhile at the Train station: See the
arrival of the boss of the Armando Power Company and his troops at the train
station.
Chief Barlow wants them out of his town. The
bigwig reprimands Barlow for losing the girl and the prisoners. He threatens
Barlow that he might meet the same fate as McIgbo. He wants the book.
Search for the the missing police report:
Bwana enters the office window and confronts Lina. Lina
explains the reason why she is with Barlow.
The book is in the safe at Club Temba. They start
to search for the missing police report.
Check the bookshelf by window. Check each of the drawers at right.
Learn that the power company was once a mining
company and they want to mine at Underland.
Barlow and Kaonandodo are the first ones to return
from Underland. They are not believed because they showed no proof. There is
supposed to be an old book with sketches and drawings - the Journal of the
Journey down. Supposedly there is a strange new power source at Underland.
Barlow gave interviews but Kaonandodo refused to talk.
See the report of the setting up of the power company
expedition. The company hired Barlow as guide. They couldn't buy Kaonandodo,
so they jailed him. He disappeared afterwards. Bwana says that Kaonandodo
adopted him and Kito at St. Armando. It is after that time that Bwana wants
to know.
Open the safe: Lina find
something in the computer. The drawers move and a safe on the wall is
exposed.
Bwana uses the axe on the safe and removes the
keypad cover.
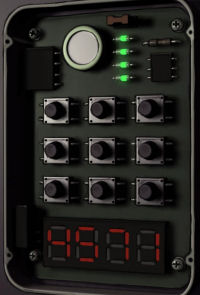
Keypad: See 9 buttons. The
buttons corresponds to numbers 1-9 starting at top left to bottom right.
There are 4 bulbs at top that lights up when 4
buttons are pushed.
Red color means wrong number; orange color
means correct number but wrong place and green color means correct
number at correct place.
To deduce the 4 correct numbers: press one
button 4 times and see if one of the lights turns green. Do this to all
buttons.
You will then get 4 numbers that gives green
light.
Play with the sequencing of those 4 numbers to
open the safe.
Press 4 5 7 1. The police report is in the safe.
Police report: Bwana and
Lina are in the taxi coming back from the power company office.
Lina reads the police report that states that
Barlow took over the police chief position after the power company killed
McIgbo for writing about the corruption.
Madame Sisulu: The large
truck forced the taxi off the bridge. The taxi is caught in a clamp by a
large plane and brought into a large airship.
Madame Sisulu the pirate chief wants the book.
Lina tells her that it is in the safe at Club Temba. Madame Sisulu's people
will break in the club to get the book.
DOWNTOWN:
Bwana and Lina are released by the pirates in the
large truck in front of Lonnie's Used Mattress. They were freed because Madame Sisulu
still need their help.
The two see that Club Temba is fenced in and
guarded.
Bwana shows Lina the back door to the club. Lina
will try to open the back door while Bwana looks for Kito and the airplane.
Find movie tickets:
Arnie's bar: Enter the
bar. Talk to bartender.
Talk to the sad sailor. He has a crush on Andiswa.
He hasn't really talk to her. Bwana recommends to take Andi to the cinema.
The video that the sad sailor has is about a
romantic action movie.
Suspicious man and the pirate's truck:
Go to the street and talk to the suspicious man and the man in the truck
parked outside Lonnie's Used Mattress store.
Andi at Mayor's office:
Go and talk to Andi.
Cinema Rex: Go to the
cinema. Talk to the couple outside the cinema.
Talk to the ticketman.
Check the popcorn machine. There's no popcorn
because the shipments were taken by the pirates.
Get cigars:
Dockworkers: Go to the
alley beside the harbor. Talk to Vince and Moe.
They will give corn to Bwana in exchange for booze
and cigars.
Get cigars: Go to Andi at
the mayor's office.
Click on the cigar box. Andi gives permission to
get Senor Muerte cigars.
Get booze:
Pigeon: Go to the alley
by Arnie's bar.
Click the nachos (gives 50% health to fat
efficiency) taken from the dockworkers on the pigeon.
The bird gobbles it up and flies back to the
stick. It gain so much weight that the stick didn't hold its new body.
Take the plunger.
Arnie's bar: Go to
Arnie's bar. Look at the drain on the floor. The bartender dumps eel rinse
down the drain as hazardous waste.
Use the plunger on drain. Use the empty bottle
taken from the bar earlier on the drain (while the plunger is on the drain).
Take the plunger back.
Check the bottle in inventory. The bottle is only
half filled.
Lighthouse: Check the teapot in
the fireplace.
Use the bottle half filled with with eel rinse on
the teapot to get eel rinse. The bottle is now filled to the brim.
Get corn:
Corn: Go back to the
dockworkers at the alley off the harbor.
Give Vince the cigars and the eel rinse to Moe.
Click on the crate in front of the barrel with
fire. Get dried corn.
Get movie tickets: Go to Cinema
Rex.
Give the corn to the cashier. Use the corn on the
popcorn machine.
Take the 2 movie tickets.
Sad sailor: Go back to
Arnie's bar and give the 2 movie tickets to the sad sailor.
The sailor gives his "action-romantic" movie -
video cassette - The Stud in the Mud.
Get the troops out of the train station:
Train station: Go to the
train station by harbor.
See the Power Company troops stationed in there.
Hear them take orders on the radio at a certain frequency.
Find the frequency: Go to
Arnie's bar. Remember that the bartender said that there is a public band
that he listens to police calls.
Check the radio. Move the dial until you find the
public band - 99.4. Aha!
Radio at lighthouse: Go
to the lighthouse. Climb to the top. Study the radio.
Remove the playing record. Change the frequency using
the arrows to 99.4.
Change record and play the third from left record.
It is Lonnie's Used Mattress commercial recording. Remember that Merton says
that he makes some money running the commercials. I got them. They are
here on Main St. at Loco Lonnie's Used Mattress. Go over here now. Gather
them while they are still here. What are you waiting for. Go get them now...
It's a bargain.
See the troop leader at train station take his
order from the mattress commercial. The squadron moves out.
Find Kito:
Go to the train station and enter.
Check the crate from Rosa's flower shop in St.
Armando. LOL.
Go to the back wall. See the elevator and the
platform.
Check the junk pile and get an oil can.
Look down from the platform.
Kito: Talk to Kito who is fixing
the airplane. He wants the airplane to be hoisted out of here.
Crane: Use the elevator
and be at top of the tower with the crane.
It is pitch dark. Bwana needs to get some light up
here.
Get light focused on the crane:
Go to the lighthouse. Try to open the doohickey by
Merton.
Merton stops Bwana. Find a way to distract Merton.
Talk to Merton. Merton wants excitement while he
check the window for distressed vessels.
Learn about the power company.
Distract Merton: Go up to the
lantern.
Check the rusty reel and the pulley beside it.
Use the oil can from train station on the rusty
reel.
Attach the Mistraker model ship, Morten's favorite
ship on the pulley.
Use the reel to lower the pulley. Hear Merton yell
- Golly Gunwhales.
Go down and see Merton look at the model ship
hanging outside the window. LOL.
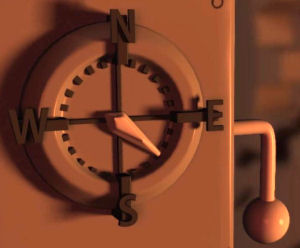
Adjust the lantern: Open the
doohickey.
Pull the lever to stop the turn of the lantern.
Play with it until it focuses on the crane at the
train station. Go to
the crane via elevator until Bwana comments about the light.
The doohickey should point third spot below E.
Airplane: Bwana
automatically pulls the airplane out of the train station and places it on the water at harbor.
Kito will fill it with gasoline and they are okay.
Bwana will go to Lina and get the book from the safe.
Get to the VIP Lounge:
Lonnie's Used Mattress:
Check the truck which is now surrounded with police tape.
Read the headline of the newspaper in the
newspaper rack.
Lina: Go to Lina at back
door of Club Temba by Arnie's bar.
Enter the open back door. Talk to Lina. Lina opens
the elevator.
Take care of the camera:
Read the plaque on the wall.
Keypad of security door: Look
close at the keypad on the door. See 3 numbers with smudges.
Use the numbers that
has the dirtiest to lightest smudge. Press 8 5 1. Got it!
Take care of the camera:
See a guard watching the monitors. In front of the guard with headphone is a tremendously large red button to
sound the alert.
Check the monitors. Read the note on the wall by door.
Check the video storage on the wall by door.
Use the por... action romance video cassette on
video storage.
Bwana automatically selects a footage for the hallway camera,
record and then press play.
Get the Journal to Journey down:
Exit the security room.
Check the door and learn that there are guards by
the door.
Open window: Bwana can't get the
window open.
Use the plunger on window. Go through the window.
See Bwana walk the ledge, pass the boss and
by the wall of the facade - elephant.
Get to safe: See a triangle on
the brick wall.
Click on the brick wall until there is a big
hole.
Enter and take the book on the pressure
plate. An alarm is set off.
Bwana jumps out and runs to the harbor.
Escape:
At the harbor, Lina is held by a soldier. He wants
the book.
A contrite Barlow arrives, runs over the soldier
and helps them escape. He is shot by the troops.
Kito, Lina and Bwana crashlanded at a beach.
Madame Sisulu orders her pirates to come back to
base. They will go to Underland.
HATARI REEF.
Bwana wakes up at the beach. Talk to Lina who is
trying to open the big gate.
Learn that the giant eels - hungries lives here at
Hatari Reef.
Check the colorful birds on the tree.
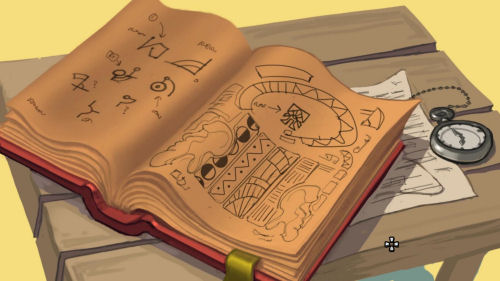
Book: Check Kaonandodo's
book on
the table. See and study Kaonandodo's doodlings.
Check the clock-watch and see that it is 10 AM.
Figure on gate: Check the figure
on the gate. It looks a bit like the drawing in the book.
Tent: Check the tent and
get a machete.
Kito: Talk to Kito. The
plane is destroyed. The pontoons are the only ones he can salvage. He is
making a raft of it.
Kito saved the cacti Kaonandodo gave to Bwana. Bwana
says he will look for perfect place to plant them.
Check the plane wreck.
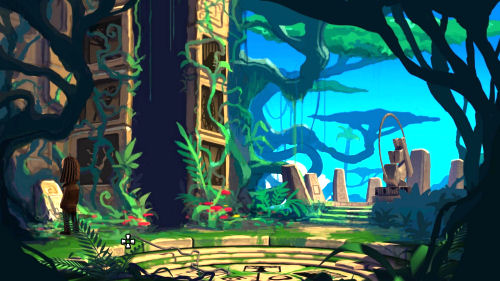
Explore the jungle:
Check the runes on pillar at jungle behind Kito.
Kito and
Bwana think they will find Kaonandodo here. Talk to Kito again. Kito and
Bwana feel like this place is home.
Use the machete on the plants of the jungle. See
steps-path.
Open the pillar: Climb
the steps and check a stone head.
See the entrance of the pillar is closed. The
pattern on the entrance is familiar.
Remember Kaonandodo's doodles. Turn the 4 planks
to the pattern seen on the book.
Runes and observatory:
See symbols on the pillars planking the entrance.
A stone with a button that can be pushed is at
left.
Observatory: There is an
observatory on a podium overlooking the water. It is surrounded by stones
with runes. At the observatory base are symbols similar to the symbols on
the pillars planking the entrance. The observatory turns around when the
button on stone at left is pushed.
Spinning runes: At the
foreground is a spinning rune structure. At the center are 3 runes: swirl,
moon and star. There are matching runes on the 3 outer wheel surrounding the
central runes.
Surrounding the center are stationary symbols
similar to the symbols seen under the rotating observatory and the pillars
by the entrance.
Activate the runes:
Observatory: Go to
the observatory podium, press the button on the left stone to
turn the observatory.
The observatory will point to a symbol at the
base.
Look-click the observatory and see what is seen.
Turn the observatory until you see the moon in the
sky. Click on moon.
Note the symbol at the base pointed at by the
observatory when the moon is seen in the sky. In this case - looks like lightning.
Spinning runes: Go to the
spinning runes at foreground.
Press the moon rune at center until the moon rune
of outer wheel lands above the symbol that the observatory pointed at when it
focused on the moon - looks like
lightning.
Press the button at left stone and see what
happens - nothing happened.
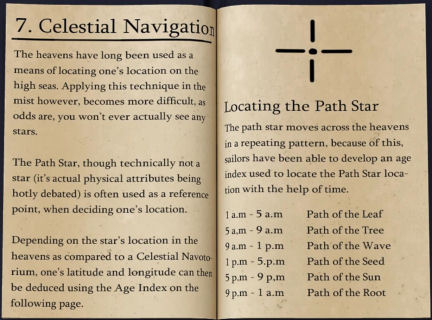
Lost - Navigation book:
(Thanks, Theo.) Read the navigation book in inventory.
Go to Celestial Navigation and Locating the Path
Star. Note that the path star rune is the one in the center of the spinning
runes.
Remember that the watch-clock beside the book by
the gate shows that it is 10 AM (when Bwana woke up.)
The chart below the Path Star states 9 am - 1 pm -
Path of the Wave.
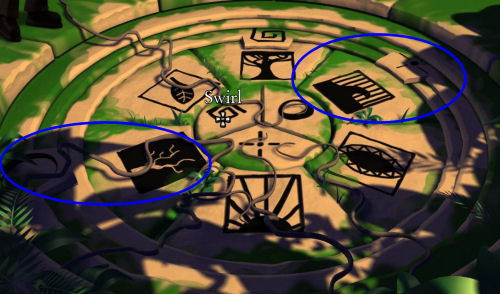
Spinning runes: Go to the
spinning runes at foreground.
Press the star rune at center until the star rune
of outer wheel lands on the symbol that looks like waves (with bars).
Activate the symbols:
Press the button at left stone and see what happens. A symbol on the pillars
planking the entrance is depressed.
Look at the spinning runes. The depressed symbol
is the same symbol adjacent to where the swirl rune is parked.
Press the central swirl rune to move the outer
swirl rune to the next symbol. Press the button on left stone. Another
symbol on the pillar is depressed.
Do this until all 6 symbols on the pillar are
depressed.
Idol:
A pedestal rises from the center of the spinning runes. Take the ancient
ceramic idol at center. It looks familiar.
Open the giant gate:
Go down to the giant gate. Try to talk to Lina.
She is busy.
See the figure on the gate similar to that shown
in the book is the same as the idol.
Use the idol on the figure on the gate.
The gate opens. Water flows in from the ocean.
Uh oh! The gate starts to close. Kito starts the
raft and the three ride through the gate before it closes.
The Underland is real!
Watch the Behind the Scenes. We are saddened by
the passing of Simon D'souza.
Watch the concept arts of the final chapter of
Journey Down - Chapter Three.
This document may not be distributed without express written permission of the author and the content may not be altered in any way.
For Questions or Comments on this Walkthrough,
Please write to: MaGtRo
Copyright © 08/2014 MaGtRo
 GameBoomers Walkthroughs and Solutions