Walkthrough by Tally Ho
| This game is Alt-Tab friendly. This means
you can switch back and forth between the walkthrough and the game
itself; there is no need to print it on paper. Saves ink and paper.
Inventory is very friendly also; you can open or close it at any time with the right mouse-button. Items that have no further use vanish, keeping things nice and tidy. There's no harm in leaving your inventory open, except that sometimes it is in the way, when you need to exit to the bottom of the screen. Any time Ariane is walking, if you click a second time on her destination, she will run. Saves time. |
The game begins as Ariane asks her pilot to land in the crater of an extinct volcano. Moments after landing, a rockslide destroys the chopper and seals off the only means of escape by foot. The pilot's whereabouts is unknown; is he hurt or is he okay? In order to look inside the helicopter, pick up the broken rotor blade and use it to pry the door. Inside the cabin of the helicopter, find the following items:
- Bag
- Rope
- Knife
- Computer
- There are several items you cannot take;
- A notebook on the floor,
- Binoculars,
- Fire Extinguisher, and
- the Yellow Flashlight
Unpack the Bag. It contained a Screwdriver, Gloves, a Lighter, and an Empty Flask. Use the screwdriver to take down the First-Aid Kit. Unpack it, and find the Cleaning Fluid, an Adhesive Plaster, Bandages, and some Aspirin. Finally, use the Knife to cut loose the Broken Wires. Exit the helicopter (by clicking on the symbol at the upper-left.)
Turn on the computer by selecting
the "Use" option above it in inventory.
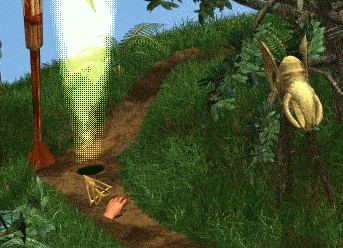
Explore to the east, and find the crack in the rock wall, blocked by a large
stone. Use the Rotor Blade to move the stone.
Try to exit, and you will need to notify your friends at home of your
predicament. Open the computer, click on the @ tab at the top to access e-mail,
and select the SOS document in the left-hand menu. Click on the
green 'Send' arrow at the bottom to send the message. Now you could leave, but
it's 'too dark' in there. "Use" the lighter to light it, then carry it with you
into the cave. Ooops! You fall down some kind of hole, and wake up on the Beach.
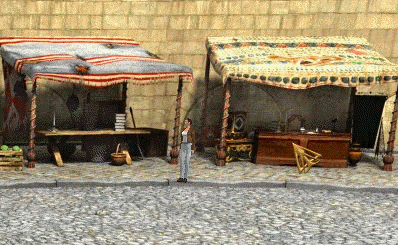
Meet Adam, one of the inhabitants of this strange territory known as the First Camp. Talk to him about everything, and he tells you you are beneath the Snaeffel Volcano, and the only town nearby is called Askiam. You will need to help him by finding and polishing a Crystal.
After he departs, look right at your feet and pick up the Bone Tip. Then fill the empty Flask with water, just this side of the little bridge. (The hot-spot will remain active at the water's edge; ignore it.) Follow Adam to the entrance of the Coal Mine. Take the Giant Shell, on the ground just left of the entrance. Step into the Mine. See the blue object, sitting in a crate to Ariane's right? Take it (Seals in a strange metal.) Then, just below that place, look on another crate, and find the Old Chisel.
Cross the bridge, and gather some more items:
Screen-bottom, is an old boat skeleton. Look for the Cloth on the right end of the boat.
Screen-left is a piece of Fossilized Wood.
Screen-center are two headstones. Look at them close-up
The grave on the left is Yvan Platonov (1831-1872) and you will see a computer-icon. Click, and read about him in the computer. Ariane notices the difference: Ivan's name is spelled differently, and he died in a different year (1864.) To look at the other grave, do this: Use the Cleaning Solution on the cloth, creating a Wet Rag. Now use the Wet Rag to clean the stone. Click the computer on it, open the computer and read about him. Well, his name is the same, but he also died in 1864 according to the computer, but in 1874 on the stone. What's happening here - the historical data in the computer doesn't match the actual graves?
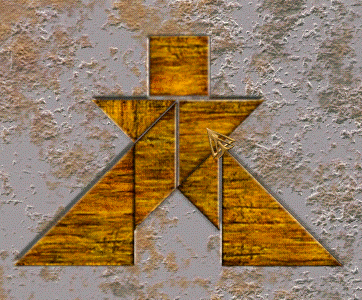
Click on the path above the headstones, and enter the Crystal Cave. Isn't that convenient? There is a ladder, and a special yellow crystal in the ceiling just above it. Ignore that broken rung, and climb up the ladder. Uhh, It's stuck. Open your inventory, and combine the Old Chisel with the Fossilized Wood to create a better Chisel. Uhh, still doesn't work. Put on ("Use") the Glove, and voilà! One Crystal is yours. Go down the ladder, and find the polishing machine near the entrance.
Put the rough crystal in the clip at the right, and operate the bellows at the far left. "What can I use to polish it?" Leave the crystal in the clip, and exit the cave. Just to the right of the cave entrance is a pile of stones, where you can now pick up some sand. (You couldn't get it before, and you can't get it if you bring the crystal with you either.) Go to the polishing machine, place the sand in the center vessel, and operate the bellows. It takes five pumps, and the crystal is finished. You're all done here; go back to the coal mine.
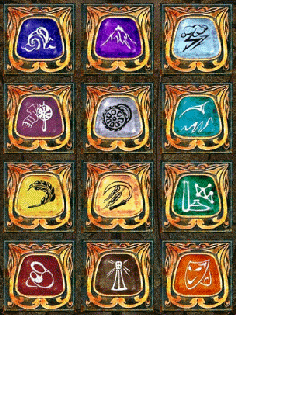
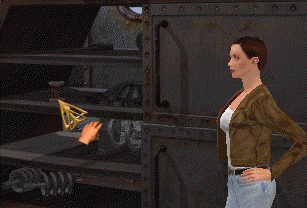
It's dark, and the generator needs to be repaired before you can proceed further into the mine. Find the control panel at the left of the cave. See? Broken wires. I knew it all along. Those wires from the helicopter look like just the ticket. Put on a glove first, and insert the wires. Then put on a glove again, and tape up the wires with the Adhesive Plaster. Wow! It worked. The equipment is repaired, and the lights are on. You go Girl! Go into the rear chamber of the mine, and walk up to the round door. You need to figure out where the twelve seals go.
The Occident is the
opposite of the Orient
Our story begins as the sun rises
Nature and technology go their separate ways
First the one whence we come
Then the one that feeds us
Followed by the one we mine
Comes the time of transformation
And of famed energy
Finally those who guide us
Hint:You need to group the symbols into 6 Nature and 6 Technology symbols. Nature on the left half of the circle, and technology on the right. The symbols that relate to each other must be opposite each other in the circle. E.G. From whence we came - the Nature symbol (mother) is top left and technology symbol (sea - science regards us as having evolved from there) is bottom right. etc. |
![]()
Exit the coal Mine, and you're in a totally different environment. By the way, if you ever think you need to go back to the Mine or the First Camp, the way remains open for now. Go once to the left, and the computer gives you some information about the giant mushrooms. Actually, the computer doesn't know much, does it? We seem to be dealing with something not of the known world. While you are right there, harvest the small mushrooms on the ground, using the Knife.
Go further into the forest. Wow! There's a house on top of one of the mushrooms. Go there, and climb the spiral stairs. Talk to Lieutenant Lenkoff about everything. Help his friend ease the pain with the pills. Exit the platform, and proceed further into the forest, until you come to the start of a rickety-looking bridge. Before the bridge, is a stump of an old mushroom. Look at it close-up, and use the knife to take some pieces. (The hot-spot will remain active here; ignore it.) Return to the Lookout-post, and talk with the soldier again. Offer him the "Splint." Then ask about "Healing." Finally ask about the "Horn." (He calls it a Conch.) The first time you step to the east of the platform, the computer springs to life. There's a note from Ariane's sister, but no acknowledgment of the SOS. Let's hope it went through.
To fix the Conch: Open the inventory, and "Use" the lighter to light it. Then pick up the lighter and use it on the Tip of Bone to convert it to "Hardened Cranium." Then use that item on the Giant Shell to convert it to the "Prepared Shell." Now the Prepared Shell will work as the mouthpiece of the Horn. Now you must traipse all the way back to the Crystal Cave, and take the Bellows. (Click on the far left-hand end to take it.) Go back to the giant horn, and put the bellows in place. Inform the soldier that it is repaired. He blows the horn, and his companion is rescued.
Look at the table. You can pick up four items: the Vines, a Cleaver, Black Powder, and a Map. Exit the lookout post, and cross that rickety-looking bridge where you found the splint pieces.
As you step onto the bridge, your computer notifies you of incoming e-mail. Your SOS has been received, but they won't be coming around for at least two more days. Continue across the bridge, and discover Adam's residence. As you first approach his gate, use the computer icon on one of those skulls impaled on a post. You learn that the bones are prehistoric in makeup, but only about four hundred years old. What gives? Talk to him about everything, and give him the polished crystal.
Enter Adam's residence and explore all the rooms. There is nothing to do in the bedroom. In the Library, remarkably, there is only one thing to do: take the Amulet, which is hanging on the wooden post to the left side of the room. In inventory, it is described as "a sort of necklace that seems to be hiding something." In the study, Adam seems to be incubating some large eggs under the heat of a lamp. On the other table, you will find the Pieces of Wood, and a History Book. Look in your computer to read three pages of history. Also on that table is a silver samovar. Place the small mushrooms in it to learn the fate of your pilot.
|
Open inventory and combine the pieces of wood with the amulet. A puzzle is revealed. This simple puzzle requires the pieces to be rotated and put into position. The amulet changes into the Opened Amulet "seems like a key." Here is
one of many solutions. Once the amulet is opened, go to the room
with the locked chest, and use the amulet to open the chest. |
Click on the bust to learn about Professor Hartwigg. Take the Letter and the Union Letter and read them. Here are the texts, for those who find them difficult to read:
The Letter:Dear Friend: Please take care of the bust of this great forgotten man and pass it down to your children as a souvenir of our humanistic conquest. May the fellowship flourish and progress along the paths of progressive science. Armand Latifère |
The Union Letter:Gentlemen! Our
agreements have been concluded. They will not admit of any other
alternative; by writing against the danger we will thwart any threat
from abroad. Our wise and well-preserved world would not survive a
ruthless war of conquest. |
In the same room, take the Pigments from the table. Exit the home, and when you come to the skull-gates, go left and cross the suspension bridge. As you do, your Pterodactyl friend flies by, and the computer brings you a dire news bulletin regarding escalating strife on the surface. Continue the full length of the bridge, go down the ladder, and make your way to the path blocked by vegetation. Use the Machete to create a path, and before you enter, pick up the Large Leaf from the ground.
It's a good thing Rex is nearsighted, and already has something to eat. Go to the right, and find the fallen tree. You need to construct a Tyrannosaurus-sized splatball. Put the Large Leaf on the stump, then the Pigments, the Black Powder, and finally tie the whole thing up with the Vines. Set it on fire, and watch the fireworks. Rex goes away, and you are free to explore. (I found the walking-hotspots messed up, as they are in several areas. You need to go back to where you entered, then around the dead animal's head.) When you get to the far side, there is a cute little dino trying to grab a fruit from a tree, but it's out of reach. Pick the fruit. Dino will follow you anywhere now. Go to the rail car. The hotspot to get there is very narrow; look just under the ends of the railroad ties.
You receive an e-mail saying that the pilot has been rescued. Of course they can't find you, because you are underground. Open the squirrel-cage and place the fruit inside. Close the cage, and you are off to Askiam.
Talk to Ocine, the guard, about everything. If your hearing is sharp, at the end of the thread where he asks you to repair his camera, you heard something go into your inventory. It's the key to the tower. Enter the tower. Click the computer icon on the camera. Strangely, the information that is provided describes the enlarger, not the camera. Click the computer icon on the paper on the wall to get instructions for photo processing. Click on the table to get a close-up view. Turn on the red safelight. Take a piece of photographic paper from the pile, and place it on the easel. Switch on the enlarger by clicking on the left, then switch off the enlarger by clicking on the right. Take the paper and place it in the first tray, then the second tray, then the third tray. Now the photograph can be viewed in your computer. Now Ariane understands that she was being watched. For further evidence, turn off the safelight, back away from the table, and look at the photos hanging on the line above.
Enter the city, and meet Wallace, the Chief Engineer. By the time the conversation ends, Ariane starts to grasp the situation. It seems that time passes more slowly here than on the surface; she has missed about two years! Also, she is not allowed to contact her friends, or to try to leave. She is a welcome guest, but actually a prisoner. Click the computer icon on the advertisement and the historical poster.
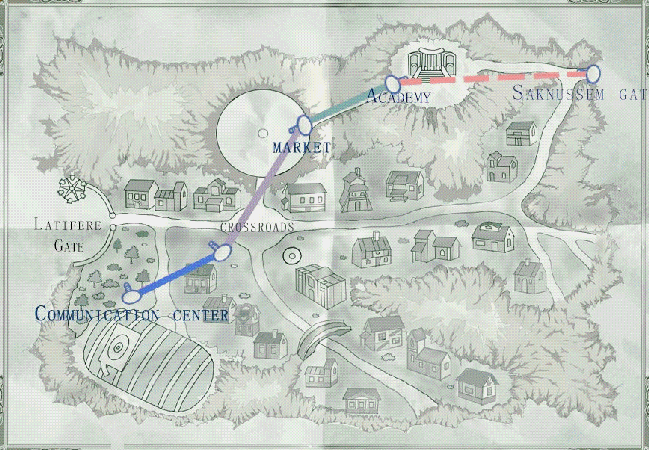
Exit the city gates area by clicking on the bottom left of the area (there is no footprint to guide you.) At the crossroads, go left, and find the Communications Center. Go inside, and examine the clock on the wall.It is stopped, and you need to use the microphone to report the clock’s condition. When you do, you will be invited to visit Figaro in his office.
Enter the main office, and talk to Enrique about everything. He gives you a film and a key. Leave the office and enter the projection room across the hall by using the key. On a shelf, at the far lower right, find the "Performance Book." Read it in your computer. Yep, it really is 2007, alright. Now click the reel of film on the projector. Watch the film, and figure out that the time-line between the surface and the underworld are vastly different. These people seem to be fearing events that have long ago passed for the surface dwellers.
Go into the office again and take the elevator down to Figaro’s workroom. It seems there’s a severe power shortage, and Figaro doesn’t quite understand how to fix it. The energy collector is working, but the coordinates have been changed, and he has lost the sheet with the computation formula. Take the elevator up, and find the computation sheet next to that weird machine. "Calculate" the sheet, and make note of the coordinates.They are: 6283, 1667, 5483, and 2092. Go down the elevator again and enter the numbers into the panel to Figaro’s right. Tell him it is repaired, and you can charge your battery. He gives you a telegram to send.Go upstairs, and hand the telegram to Enrique. Exit to the street. Leave the communications area to the right, and leave the crossroads to the right. Leave the next area to the right.
Talk to the guy standing outside his shoppe. He is Heracles, antiques dealer and animal keeper. Talk about everything. He needs dinosaur eggs, and Adam is one of his sources. Enter the Shoppe. Click on the main countertop. Take the Book and the punch cards. Underneath the cash register is a button that unlocks the secret door to the inner room. Look at the clock on the high shelf. The clock explains the year, but not the war.
Well I'll be darned! There’s Adam again. Talk to him about everything. He is suspicious of Wallace. He needs Hanagra of Syl. Go to the shelf behind him, and take the Needle. Look at the holographic display on the shelf to the right. Take the Note from Heracles and read it, regarding his need for some Biocardamon. Talk to Adam about the Telelogram (holographic display.)
Look in the book of prescriptions and find the Hanagra of Syl recipe. Use the needle on the punch-card to create a prescription. (It should be that easy to vote in Florida!) Exit the Shoppe. Go Down, Down-right, and far-left. It’s the Pharmacy.
Talk to Armanda.Grünfeld. Pretty unfriendly, huh? Show the prescription to her; but she is unimpressed, recognizing Adam’s trick. Talk to her about Biocardamone. Give her a rail-ticket to let her go to the university. Now put the prescription card into the slot. You cannot see the slot, Ariane is standing right in the way. Move her to see the slot. Then push the lever to spin the wheel. Take the Potion. Exit the area, and you will be at the Shoppe crossroads, Exit down, and then up and left under the "no Dino’s " Sign.
You are at the Marketplace. You may talk to the Balloonist if you like, but what is necessary here is to cross the market and go the to stall opposite the Balloonist. You must find the one stall that has an active cursor, and take the Old Dinosaur Skin and the Grease. Exit here, and use the Monorail to find the Academy, which has been closed until now.
Finding your way around the Academy: As you first enter, there is a bright reflection on the floor, and the door you can see is the exit. Go to the far left from this scene for the Lab, or go to the far right for the Archive room.
Enter the Laboratory, the room seen from the balcony. Armanda the bitch is there, and tells you you have no business being here. Ask her about the box. Just leave, and go to the room on the far right. Meet The Engineer and Alexandre. Listen to the whole conversation. Take the Newsreel from the desk. Also take the book on Beliefs and Spirituality. And the book on Perpetual Light. Then look at the Giant Typewriter to the right. Press the lever and receive the "Selection Sheet." Read it.
Return to the lab. (Once you exit the Archive, go bottom left and left.) Take two items from the table, the iron and the file.
Pick up the Helium Bottle (hard to see.) Then Exit.
Go to the communications center and watch the film. ANALYZE the first one.
Return to the main city gate, and enter the darkroom. Combine the file with the Iron Plate. Use the Filed Iron and the Grease on the camera. Tell Ocine his camera is repaired. He lets you leave the city. Click on the vehicle once to return to the jungle. Go to Adam’s tent and take the egg.
Return to the city, and give the Egg to Heracles. He tells you about Gustav and the Giants. Go inside and give the Potion to Adam. He tells you more, and gives you an aerial navigation map. Go to the marketplace and talk with Gustav, the balloonist. Talk with him about everything, then enter the balloon and use the old dinosaur skin on the broken pipe, use the helium bottle on its fixture, and use the navigation map on the control panel. Enjoy the cutscene.
(Having trouble placing the helium? Face the man, and search for a very small hot-spot that creates a close-up view. That's the place for the helium.)
Gustav brings you to an amazing area, flying over browsing dinosaurs, and landing in a field full of Mastodons grazing on the vegetation. A giant is tending the herd. Talk with him about everything, then take the Mastodon Hairs lying on the ground. Go to the Village Gate, and find it impassible because of a force field. Talk to the Giant again, and he will give you some tobacco, and tell you the secret to entering the village. Go to the village gate now, and place your knives on the ground. You will be able to enter.
Visit with the Matriarch, Aîra Mnudé, who is standing in the twig house. During the conversation, you learn that there is a problem with the force field that protects them from harm. (Sounds sort of like the hole in the Ozone layer!) Talk with her about everything, then visit the fisherman, who is at the far left. Give him the tobacco, and talk with him. He knows about the weather, and he needs a rare firefly for bait. If you go back toward the Matriarch, and further right, you will find the Gardener. As you talk with him, you understand his concern about tomorrow's weather, and how it could affect his fragile plants.
Ask the Fisherman about the weather, and he expects fog. Warn the Gardener about the fog, and he will request that you visit the healer. Her name is Jahiné Duubra, and she is to be found further in the village, tending a sick baby Mastodon. Notice as you approach her infirmary, you can see an island floating in the distance, between the mountains. Talk to her about everything, and she will cast a spell to protect the Garden. She asks you to gather some Bitter Berries. They are found at the base of one of the posts in Initiation Alley, which is in the far rear of the village. If you had explored before, the alley was blocked by a force-field, but the way was opened when you talked to the Matriarch. She also gives you a protected branch, whereby you may enter the bamboo Jousting Arena. Examine her shelves, and take the Empty Shell.
Go further toward the cleft in the mountains. Look closely at the posts on the left, and find the Bitter Berries on the ground. She told you to protect your hands, so use the Gloves to pick the berries. Return to Jahiné Duubra and give her the berries. Now you have her trust, and she tells you she is aware of the conspiracy, and how to approach the puzzle making the floating island accessible. She says the sounds are produced by selecting two of six choices, and that they must be in order. Get the clues from the six posts at the arches.
Inform the Gardener that his plants will be safe from the fog. He gives you a firefly, which you should take to the Fisherman. He is grateful, and gives you a living shell. Regarding the Initiation Alley posts and symbols, he informs you that the sequence of the symbols' meaning is the five senses. The order is Smell, Hearing, Sight, Taste and Touch.
Return to the Gardener's area, and use the Repellent Wand to open the Jousting Arena. Talk with the magician, but pay attention! When you exit the conversation, he will vanish. Look at the stone urn. Place the Empty Shell, the Living Shell, and the Mastodon hairs in it. The hairs cause the creature in the Live Shell to abandon his quarters, and hide in the empty shell. Now take the formerly live shell, and it shatters, revealing a Vegetable Lens.
As you pass between the arches in Initiation Alley, copy down the six different symbols visible on the base of the posts. These symbols represent the sounds you will hear while solving the Floating Island puzzle.
Are you really intrepid and a glutton for punishment? It is actually possible to solve this puzzle by a combination of logic, brute force, patience, and luck.
You will find six posts surrounding the pit where the island arose. If you close any two holes by sliding the leaves across them, then touch the Mask, a sound will be produced. Note that there are thirty possible combinations of two posts, and only six are correct, and to make it just a teeny bit difficult, you must produce all six sounds in the correct sequence, with absolutely no mistakes or you must begin anew.
A major complaint I have about this puzzle, is that it makes no allowance for people who cannot hear the sounds. Anyone who is either short on hearing ability or short on patience may click here to see the solution.
Well. whaddya know? There's Adam again. Do you have the Vegetable Lens in your possession? If so, DO NOT open the topic called "Come Down." If you do, you will need to solve that big Island-lowering puzzle again. Is that fair, or what?
You must go to the far right-hand end of the island to place the Vegetable Lens over the Halo that is producing coarse light. (If you do this before talking with Adam, the topic of "Come down" never arises. Once you have placed the lens, say Goodbye to Adam, and you will exit the island. Go through the village, and across the pasture where the Balloonist sits. Go to the door in the stone, and you will be at the Submarine Dock.
Notice the "People-Counter" in the entryway, that says "17." Enter the submarine, and either attempt to enter into the hold, or speak to the Captain. He asks you to leave. Exit the dock through the round door, and return to the village. Go to the Fisherman, and speak to the character standing there to his right. He is a child, who will accompany you to the Submarine Dock. Since you enter together, only one person is counted. (Still says "17.") When the child exits, the counter resets to "16", making it seem to the captain that you have left. He lets his guard down, and will not be there when you enter the sub.
Use your glove to open the door, and find the control panel at the left of the next door. Enter the Code that Adam gave you, and you will enter the hold, hide there, and the sub departs for the mine.
Talk to the Captain about everything. He wants a favor, and will give you a visitor's pass in return. You need to sneak into the mine by hiding in the automatic rail car. Set the control on the side, and hop into the car. You arrive at the site where Maoro Fi is working. Talk to him. Give him the seeds. He gives you a message for Angus, the Captain. Read it, and return to Angus. Give him the message and learn about the revolt that is brewing. He gives you a Visitor's Pass. Walk into the mine.
Speak with the worker standing there. He needs a Filter to repair the equipment, and gives you an Order Slip. Find the elevator across the tracks, and take it up to the top. Cross over the pipe, and talk with Hutha Méo. He says you can't visit the Geyser (which is right where he's standing.)
Go into the warehouse. Talk with Amalia, and give her the Order Slip for the Filter. Pick up the Telegram that fell out of her window. It seems not everyone is wholly truthful all the time.
Go around the first shelves, then search on the right for the Filter.
Opposite that point, on the left, find the pencil and paper. Combine the pencil and paper to reveal a diagram. Read it. Then proceed to the rear of the room, the sorting area where Kia Tran is working. Read the posters on the wall on the way to the rear. (You can cross the little bridge at the end of the room, or talk to Tran from the side where the posters are; it doesn't matter.) He is not quite honest, but he informs you about a Laboratory. (The laboratory is inaccessible because Hutha Méo is still guarding it. You need to find a way to distract him.)
Exit the warehouse and take the elevator down. Give the Filter to the Technician, and he will tell you to help adjust the machinery. Look at the control panel, and set the dials according to the information in your encyclopedia. If you do it correctly, the Technician will admit there might be a way to the surface.
Go up the elevator, and find the Operations Shack, the solitary blue building. Inside, you will meet with Taal Nadi. Talk with his about everything until suddenly, Bârès Mohul shows up outside the building. He is not to be trusted, and you should ask Taal Nadi to get rid of him. You will be alone in the Operations Center. Find the Sheet of Iron leaning on one of the machines, and take it. Look at the control panel that happens to be the security system for the Geyser. You must swap the black and white numbers. It's easy, but if you can't figure it out Look at This:
Exit the Operations Shack and find the Paddle Wheel. This provides power to the generator that supplies electricity to the mine. Put the Sheet of Iron in the sluice, and the water stops. Now you can descend into the hydroelectric pit. Use the Machete to cut the leather belt. (You can descend into the pit with the water running, and see the wheel turning, but you can't do anything until the water is stopped.) Now if you talk to Hutha Méo, he will leave his post and try to repair the system. You can now take the Geyser up to the higher level, providing you have unlocked the security system. In order to talk to him, you must walk out into the central area where you get the panoramic overhead view, and click the talking head on him. If you try to walk up to him directly, you can't.
Entering the Geyser, you must punch in the correct code on the diamond-shaped panel. Refer to the document called "Schema" in your computer for the pattern. The device squirts your little car upstairs, to an exterior walkway that leads to the Laboratory. Enter the lab, and hide behind the bookcase while Armanda wraps up her conversation on the phone. Armanda leaves, and you are locked in. Walk in front of the lab-bench, then when the scene reverses, go to the upper right and find the Vial of Acid next to the sink.
Open the bookcase and read the document found in the large red book. Yes! They are dealing with people on the surface. The plot thickens. Go to the desk. The way to get there is a little dicey; click on the little bit of floor visible to the right of the bookcase scene, then on the little bit of floor to the right of the desk. Once there, pick up the document under the scales.
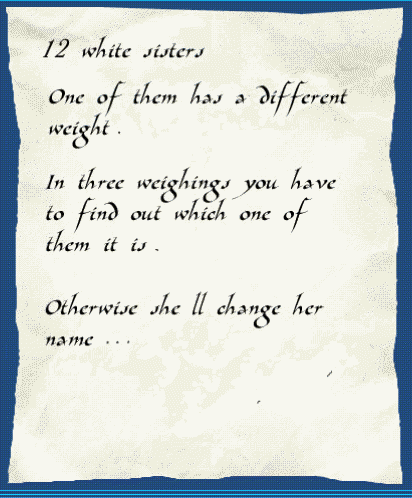
Translation: There are twelve white balls in the puzzle. One of them is different; that is, either lighter or heavier than the others. You can weigh sets of balls to find the different one, but only three times. You must deduce from the three weighings which one does not match the rest. If you have to re-do the puzzle, the odd one is randomly chosen.
|
To use the scales: Place the desired balls on the two trays, and press the control tab (looks like marble) to compare the weights. The green number tells you which trial you are performing, and the red triangles point to the center (equal) or to the left (Left group heavier) or to the right (Right group heavier.) After performing a trial, the pans need to be reset. Press the control once more to set the pans. The number switches from 1 to 2 and the triangular indicator goes out. Do the same thing between trial 2 and 3. Don't reset the pan after the third trial. When you know which ball is different, pick it up, and close the scene by clicking on the icon at the upper left. This exits the puzzle with a ball in your inventory. Examine the ball to see if it is unique. |
Let's do it by the numbers: Start by making your three groups 1,2,3,4 - 5,6,7,8 - 9,10,11,12.
FIRST Weigh 1,2,3,4 and 5,6,7,8. Three outcomes are possible.
Equal
Left-heavy
Right-Heavy.(If they are unequal,either the heavy set contains the heavier ball or the lighter set contains the lighter ball, you can't tell which, yet.)
Jump down to the appropriate paragraph:
_____
Suppose they
were equal on the first try. This means the odd one is in the other
group; 9, 10, 11, 12. To sort out the odd one in only two more weighings,
replace one ball in this group with one *known* not to be the odd one. For
example, 9, 10, 11, 8.
SECOND Weigh 9-10 against 11-8. Again, three outcomes are
possible.
Equal
Left-heavy
Right-heavy.
If they are equal, the odd one must be the one you left out (12) You don't care if it's light or heavy, just different.
If the left pan weighs
heavy, either the heavy ball is 9 or 10, or the light ball is 8 or 11, and it
can't be 8.
THIRD Weigh 9 against 10.
If 9 or 10 shows up heavy, there's your answer.
If equal, that leaves 11 as *light*
_____
Suppose they
were left-heavy on the first try. This means either there's a heavy
ball in the left group, or a light ball in the right group, and the third group
(9, 10, 11, 12) are all neutral. Now you want to weigh two sets of three balls.
As before, take one from the *known* group (I'll use 9) and add it to the
others, and treat them as follows: (Notice you began with three sets of four,
this time you are using three sets of three.)
SECOND Weigh 1-2-5 against 3-6-9, leaving 4, 7, and 8 out for
now.
(Why this way? 5 can't be heavy and 3 can't be light, and 9 can't be odd.)
If they are equal,
then either 4 or 7 or 8 is your odd-ball.
THIRD Weigh 7 against 8. You will find the light one there, or
conclude that 4 must be heavy.
If the left pan is
heavy, then either the heavy ball is among 1-2-5 or the light ball is among
3-6-9
THIRD Weigh 1 against 2. You will find the heavy one there, or
conclude that 6 is light.
If the right pan is
heavy, then either the heavy ball is among 3-6-9 or the light ball is among
1-2-5
THIRD Weigh 3 against 9. Either 3 will be found to be heavy, or
conclude that 5 is light.
_____
Suppose they
were right-heavy on the first try. This means either there's a heavy
ball in the right group, or a light ball in the left group, and the third group
(9, 10, 11, 12) are all neutral. Now you want to weigh two sets of three balls.
As before, take one from the *known* group (I'll use 9) and add it to the
others, and treat them as follows: (Notice you began with three sets of four,
this time you are using three sets of three.)
SECOND Weigh 1-2-5 against 3-6-9, leaving 4, 7, and 8 out for
now.
(Why this way? 5 can't be light and 3 can't be heavy, and 9 can't be odd.)
If they are equal,
then either 4 or 7 or 8 is your odd-ball.
THIRD Weigh 7 against 8. You will find the heavy one there, or
conclude that 4 must be light.
If the left pan is
heavy, then either the heavy ball is among 1-2-5 or the light ball is among
3-6-9
THIRD Weigh 3 against 9. You will find that 3 is light, or
conclude that 5 is heavy.
If the right pan is
heavy, then either the heavy ball is among 3-6-9 or the light ball is among
1-2-5
THIRD Weigh 1 against 2. Either 1 or 2 will be light, or you
conclude that 6 is heavy.
Take the ball you know to be different into your inventory. Examine it to be sure it is "a unique specimen and very hard to find" and exit the lab by using the acid on the locked door. Go into the Geyser, and place the White Ball on the pipe-stand to go up one more level. You will be entering Alexander's private office. Go to the desk. Find and examine the Photograph, read the page from the diary, take the Original Reel of film, and the CD. Analyze the CD to discover that he is, in fact, dealing with people on the surface.
CAUTION!!Save your game before you try to exit the office. The Large door leads to the Surface of the Earth The Small door leads back to the mine. The choice is yours. |
You can explore up the stairs if you wish, in which case you get a nasty-gram from your publisher. Pooh!
The Large door, leading to the surface results in your instant fame, and welcome from your friends. However, you cannot return below, and the game ends.
![]()
The Small Door takes you back to the mine area. At the foot of the geyser, Taal Nadi talks to you, and believes you now. He tells you to talk to Adam, the Shaman, who is in the Control Shack. Talk to him, and he gives you some instructions for opening the safe. Read the paper on the floor, and it says to add Black Diamond powder to the acidic solution, and White Diamond powder to the basic solution. Before you leave, that that Sheet of Iron again.
| Now you need to find some black and white diamond powder. What better place than the sorting room? Go to the rear of the warehouse, cross that little step-bridge, and take the material from the conveyor belt. Don't look for two piles; you get both the black and the white on the first attempt. | 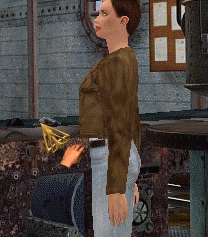 |
Return to the Laboratory. This means enter the geyser and take it up one level, using the diamond-shaped panel. As you enter the lab, the safe is on that wall, to the right, Before you can unlock it however, you need to go to the far opposite corner of the room, where the dirty sink is. Take the Test Strips from the left sideboard. Be sure to "Analyze" them. (Read about them in the computer to activate them.) Now go to the Safe. Test each tube with the test strips, to determine which is acid, which is base, and which is neutral. Add the Black powder to the blue tube, the White powder to the red tube, and you are done.
Turn the wheel to open the safe, and read the documents: The accounts and orders. Return to the bottom of the Geyser, and talk with Taal Nadi. He trusts you still, and will wait for you in the village. Go to the Derrick, in order to go downstairs into the mine. Before descending, take the Ladder that is lying on its side at the Derrick. Go down into the mine. Go to the right, across the tracks, and place the ladder at the device that looks like a Laundromat. (If it is dark in the mine, find the switch that is also right there.) Go up the ladder, and see the Dynamite. Use your knife to cut the fuse and take the dynamite. Come down the ladder, and return to where the elevator is. Go left and find the rail car on the tracks in front of a large locked gate. Look at the car full of dynamite. Ariane remarks about pushing it into the sea. Put the Gloves on and change the Switching Mechanism.
Exit the mine to the dock. Talk to Angus. He doesn't believe you yet. Find the little footsteps that take you to the very end of the tracks, and place the Piece of Iron there to create a sort of ramp. (Isn't is weird how the big piece of iron in your inventory looks smaller than the reel of film? That must be some movie!)
Go back inside the mine, across the tracks near the Derrick, and go left until you find the mine car full of dynamite. . Then shove the mine car down the tracks and it will crash into the sea in full view of Angus. Talk to him, and now he is convinced of the dangerous conspiracy. He takes you back to the land of Giants.
Talk to Gustav when you arrive. He gives you a choice. You could either go to the Giants' village or to Askiam. Both paths are correct. I chose to go to the Giants.
Enter the Giants' village, and talk to Jahiné Duubra. (If she was such a great healer, you'd think that baby Mastodon would be all better by now.) You need to retrieve the Memory Ball from the Arena, in order to provide absolute proof of Alexander's guilt. She gives you a Butterfly to help open the wall to the arena. Take the big red Snare-Flower from her shelf.
At the Arena, you need to water the flowers. using the Flask. Set the Butterfly free, and you will be able to enter. In the arena, place the Trapping-Plant on the stone slab in front of the main altar, It entices the Memory Ball, which is trapped. Sort of reminds one of Harry Potter snagging the Snitch, eh? Take the Memory Ball to Jahiné, who believes your story now, and gives you a flute which will provide access to the Garden at night. Use the flute to enter the Garden. The Giantess is nowhere to be found; she must be up there on the floating island. Go around the pit to the Stone Mask. The mask is broken, and unable to lower the garden, but there is a Message there. Pick it up and read it. Ariane, better keep your head down and your mouth shut for a while. There's no shortage of enemies lurking about.
It would be nice if we could summon Gustav, and get a ride out of the garden, but no - you must walk all the way back through the village and across the dung-strewn pasture. Talk to Gustav and get taken to the city of Askiam. Visit the booth to get two items.
See where the cursor
is on the wooden table?
Click there to get to the correct booth.
There is no hot-spot to indicate you should go there
and you could feel very stuck.
Take the Blue Cloth and the Telephone Token. The Altimonorail is not an option right now, Armanda is guarding this station, and Bârès Mohul is guarding the one near the communications center. You must distract him, for you need to get to the Academy. Try to go to the communications center, and you cannot do so, while he is guarding it. Go to the Crossroads, and talk to Enrique, who is standing at the Altimonorail station. He will provide you with a list of phone numbers for the five telephones in the city. Be sure to *read* the list. You must visit all the other four phones in order to trigger the desired action.
In any order you like;
Once you have seen all the telephones, you have deduced the number of the one where Mohul is. Place the Blue Cloth over the phone's microphone, and use the token to call him. He will be gone. Take the monorail to the Academy and enter the Lab. Pick up the document on the table (Conference paper) and be sure to *read* it, looking at page 1 and page 2. Also open the little wooden box, and take the document. Analyze the document to learn the coordinates. Go to the table at the other end of the room.
This is a "Tower of Hanoi" puzzle. A brief hint: Starting from a pile containing an odd number of pieces, move the first piece to the peg you want to finish on. Starting with an even number of pieces that need to be moved, put the first piece on the peg you don't want to finish on. Thus, the first move should be from one to three. Having solved the puzzle, take the document and the bottle of Plimentaire.
Exit the Lab, and go into the Archive Room. Find the funny teletype machine, and click twice on the handle to get a look at the Rector's recent reading choices. The plot thickens. Also isn't it curious that they have a globe depicting the Earth as we know it? Exit the Archive room, only to be discovered by Alexander and Bârès Mohul.
![]()
After the threatening conversation you find yourself in jail. Go to the right, to the other end of the room. You see a table where someone has recently been eating, a basket suspended from a rope, and a chest of drawers with a document sitting on it. Take the document and read it. Walk up to the closed stone door, and push on the left side to open it.
In the next room, find the Fuse and the Periscope diagram on the long table. Go to the far corner and find Peter. He is reluctant to talk, but talk to him anyway, about everything. He mentions missing some parts as indicated on the diagram, but needs a way to illuminate the interior without actual flame. Maybe you can help, but he is skeptical. Come around the near side of the Periscope and rotate it, only to get yelled at.
Return to the other room. Combine the fuse and dynamite, and place them in the hanging basket. Use the lighter to ignite the fuse. (Movie) Ariane lights the fuse, pulls the basket upward, and blows a hole in the ceiling. Pick up the Iron Rod. Combine the rod with the rope. Finally! a use for the rope. Step back toward where you started, and use the rod/rope to climb up through the opening. You are in the coal cave, right back where you began. Exit out the back, through the "Seals" door, and into the Mushroom Forest.
Talk to Adam, who is right there, but hard to see. He tells you to go to the jungle, to visit Jahiné, and to find some bones. He also tells you he needs food, a blanket, a mattress, a box, and some coal. What he doesn't tell you is where to find those things. Actually the box and the coal are nearby, in the mine. Go back into the mine, and to the area where you first found the metal seals and the old chisel. The box and the coal have been there along, but you must have had the conversation with Adam in order to trigger the ability to pick them up.
Return to the Mushroom forest, and go one node past Adam, and pick some ferns. This will serve as his mattress. Go up to the lookout post atop the mushroom, and take the blanket and the food. Now you can return to Adam and give him everything ("Installation.) Continue on, all the way through the forest, across the plank bridge, past Adam's lair, and up to the start of the suspension bridge. Find the bones next to the large rock. Cross the suspension bridge, through the weeds, around the right-hand end of the deceased dinosaur, and talk to Gustav. Convince him to let you visit the Giants before taking you back to Askiam. As you cross the Mastodons' pasture, pick up the Mastodon dung (whew!) and the Coconut.
Enter the Village. Visit with Payan Ouva, the fisherman, and ask for a firefly. Do him the favor of sorting out the lobster traps. They are color coded, just switch a couple of them around (using the bait,) and it's solved. Get the firefly. Go to the Gazebo and talk with Taal Nadi. Go to Jahiné and talk with her. You need to cook up a potion. It need berries round in Initiation Lane. The berries are somewhat toxic, I assume, so use the Gloves to pick them. Return to Jahiné.
Put the Mastodon Dung on the rock. Use the lighter to ignite it. I'll bet it smells even better after it's on fire! Put the coconut shell there to act as a cooking vessel. Then add the berries and bones. Talk to Jahiné about the preparation. Again using the Gloves, pick up the potion. You have a "ready sponge." Go to the Gazebo and talk to Taal Nadi. Use the sponge on the holes in the floor. Talk to him again. Go to the Valley of the Spirits.
You are lifted up to the island, apparently by Taal Nadi. Speak with Aira. When she finally sees the Memory Ball, she is convinced. Traipse all the way back through the village and pasture, and have Gustav take you to Askiam. As you land, the phone is ringing. Answer the telephone near the Marketplace exit. Enrique urges you to visit him. To prevent the balloon being gone, click on the basket, then take the Helium Bottle.
Go to the Communications Center and talk with Enrique. He gives you a key, and will help with the emergency. Go up the lift to the next level, look at the control panel, and turn off access to the Academy. Before you leave, be sure to find the Pliers on the floor.
Go to the Pharmacy and talk to Wallace about everything. He didn't know about the poison or the diamond plot. Go next to the Pet Shop and open it with the Master Key. In the back room, find the Magnifying Glass. Use the Pliers to extract the Lens. Now go out the city gates, and talk with Ocine. He generously offers you the mirror out of his camera. Go into the darkroom, and take the mirror. Then, using the little cart that got you here, leave the city. Poof! You are back in jail again. Come around to the side of the periscope, and open it. Put the Firefly in, so you can see what you are doing. Then the lens, in the middle bracket, finally the mirror in the bottom. Take back the Firefly.
Talk to Peter. He tells you the coordinates are on the table. They are on the table, not on the desk he pointed to as he was speaking. Read the coordinates. Use the Periscope for the final time.
![]()
|
|
The table shows the seals as they first appear. (You are free to scramble them around, in and out of the circle, because if you back away from the puzzle, then re-start it, they will all reset to their original positions.) I have numbered their positions on the grid, representing the sequence they should appear on the circle, starting at the top-left, and proceeding counter-clockwise, all the way around to the top-right
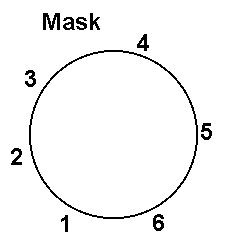 |
Cover
holes 1 and 4, then touch the Mask.
Cover holes 3 and 5, then touch the Mask. Cover holes 4 and 6, then touch the Mask. Cover holes 1 and 5, then touch the Mask. Cover holes 2 and 3, then touch the Mask. Cover holes 1 and 6, then touch the Mask. |
It's a simple pattern, that works by making all the possible moves alternating colors:
Move one black number to the right.
Move two white numbers to the left
Move three black numbers to the rightthen four, five, five, four, three, two, one.
This document was provided to GameBoomers.com and may not be distributed without express written permission of the author and the content may not be altered in any way.