![]()
Walkthrough by Tally Ho
Winter, 2006
![]()
Pay attention to the story Nathaniel tells in the introductory movie. Keepsake is a tightly-knit story, which is gradually revealed throughout the play, ending with a meaningful conclusion.
You will meet Mustavio first of all, who will give you a brief tutorial on the game's interface. one of the most important things he tells you is that help is always available by clicking on the Question-Mark button at the lower left of the screen. Any time you are attempting to solve a puzzle, it will give you a series of hints. The First Hints tell you the object of the puzzle, the Second Hints give you more details, and the Third Hints tell you as much as possible without revealing the solution. If you still can't figure out the puzzle, the final option is to simply give you the solution. If you are NOT in the middle of a puzzle, but rather meandering around wondering what to do next, the Help button will tell you what you need to do next, and where. It does not, however, tell you how to get there. That's where I come in. Finding your way around the school is half the battle. It's a very large environment, and it takes some getting used to.
I will be following the game in the same sequence that the built-in walkthrough uses. That way, you can mostly follow it, and will only need to refer to this one for navigational help, or further assistance with the puzzles. Actually, the game is linear in some respects, and very much non-linear in others. A word about saves - You can save as often as you want; but there are only eight slots. So of you save twelve times for example, your first four saved games have disappeared. Also there is no "Load" option. If you need to return to a previously saved position, you will need to Quit (or save and quit) and "Continue" into the saved game of your choice. Do not expect to be able to ask for a saved game from any of the forums; they will not be available. You don't need them anyway, since you can obtain the solution to any puzzle right from the game itself.
Your first order of business is to find Mustavio again, and have a discussion with him. (You can actually leave this part out until much later and it's more efficient to do so, but eventually you will need to talk with him.) After he leaves, go straight ahead toward the water-fall, then toward the school. After you find the entrance locked, go down the steps and to the right, into the forest. Follow the path until you come to Mustavio, and talk with him about everything. (As with all adventure games, you must complete every conversation thread.) He says that he wants you to find his barrels of wine. He also wants you to buy some figurines you will need for a game, but you have no money.
Return to the Academy. You need to unlock those big doors somehow. Climb the steps to the fountain, where Celeste had promised to meet you. Find the button to press on the fountain, which rotates a mechanism and reveals a simple puzzle. (Use the Help button to see what the button on the fountain looks like, if you have trouble finding it.) The four Minotaurs stand up when you touch them. After they all stand up, the four bells descend, one at a time. The bells always descend in the same sequence, and the Minotaurs attempt to strike them, but in the sequence you chose to touch them. If you watch the bells. you will know the order to touch the Minotaurs. Upper Right, Lower Left, Upper Left, Lower Right. The doors open, and your next task is to enter the school.
You should always feel free to poke around and explore. You can't do any harm by doing things out of order, and you can't "die." Whenever you feel stuck, the built-in help will guide you to the next necessary step. If you accomplish a task out of sequence, no problem - it is automatically dropped out of the help.
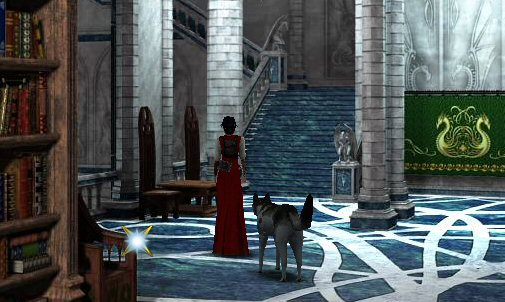
Looking into the Grand Hall, you see a large Dragon Statue, a Rose Window above the statue, and two large staircases. The stairs are connected by a cross-hallway at the top, and it will only be necessary ever to go up the right side. For now, however, don't go upstairs; instead go toward the right stairs, and around behind them. Enter the Machine Room Walkway, and continue into the Store Room. You hear a strange sound.
You must free Zak. Look at the Help to see how. You can have a conversation with Zak before or after you set him free. Look close-up at the door, then press the blue magical lock above it. Meet Zak, mighty dragon, er, Wolf.
Lydia tries to leave the storeroom, but you have something else to do before you go. There is a key-ring you need, in the cabinet you just opened. (Zak will remind you to take it; but only this once.) Open the left-hand door to find them. If you have been exploring on your own, and found all the doors locked; this will change that - now you can open everything except that large gate in the main hall. Return to the main hall, and climb the large stairs on the right. At the top, you are facing a long bookcase. (Turning left takes you into a short dead-end.) Turn right. Look at this picture. I'm going to call this place the Upper Landing, in order to be able to quickly refer to it later.
Find the small hotspot just at the arm of the chair to give you a view over the railing. Go down those narrow steps. At the bottom is a brown staircase. Don't go down there, yet. Make a U-turn at the bottom, and proceed up the green steps and across the Dark Green floor. This is the Enchanted Hallway. You are looking for a torn book lying on the floor. It's possible that Zak may be standing in the way, and you can't see it. If that's the case, use the Help button to see where it is. Take the Book. It's in a language you cannot read.
Incidentally, Lydia and Zak will have several spontaneous conversations throughout the game. They are triggered as you cross certain locations. They also occur if you stand around doing nothing for a stretch of time. If you have one of these conversations because you are idle, then it won't get triggered by a location, so they are somewhat unpredictable. I won't include any mention of them here.
Next, walk across the footbridge leading from the Enchanted Hallway. You need to find the Garden. At the end of the footbridge, you see several wooden benches. Go right, until you come to the last bench. Ahead is a stairway, and a level path. Take the path. Go down the stairs. Explore further into the Garden. An automatic scene unfolds as Zak finds Celeste's Doll. (Caution - have at least five uninterrupted minutes available while Lydia has a Vision. You can't stop the Vision while it's in progress, but you could repeat it if you need to. It's stored in your inventory.)
Every time Lydia has a vision, she ends up in an unexpected location. It's as if she was sleepwalking. You need to go to the Basement next. To get there, return to the Garden. (Up the right stairs, turn right, find the small hotspot and the narrow staircase you took before, through the Enchanted Hallway, the footbridge, the path, down the steps and turn toward where the Doll was.) Continue along the Garden Path until you come to the entrance to the Basement. Go on in, it's not locked. Go down the steps. Eeek! Zak, the Mighty Dragon, is afraid of ghosts. Go to the hotspot at the top of the screen, and find the next staircase down. Through the archway, and look for Mustavio's crates. Click on them to gain knowledge about them. Now you must find the other exit. Return through the archway, and down the next steps. (If you are really observant, you will notice a large owl sitting there at the left, watching everything you and Zak do. Click here to see the Owl.)
You will see a double archway, one with steps leading down, and one with a flat floor. Remember this location, for you will need to return here later to open a magical door. Go down the steps for now, and continue through the basement rooms. You will find a broken place in the wall. Step through the opening. Oops, Oh No! Lydia trips or falls or something, and breaks the Pendant. Continue on toward the Water Wheel. (As you step out into the open, before going down any steps, you can see some flowers growing in the shade. You will need to return here to pick some later.)
Go around the corner from the Water Wheel, and find the puzzle with two Lead Weights. Here's how it works: Each wooden disk serves to raise its weight up as far as it will go. The outer lever lowers the weight as far as it will go. The inner lever connects the weight's mechanism together, and lowers the one it's attached to, while raising the other. Neither weight can exceed its upper or lower limit. The blue jewel at the top will reset everything; and the Rune in the center is the switch to press when you have aligned the weights correctly. The object is to align both weights with the blue lights flanking the channels.
1. Raise the Right side (Wooden disk.)
2. Pull the Inner Lever on the Right Weight, lowering it partway and raising the Left side.
3. Pull the Outer lever on the Left Weight, lowering it all the way.
4. Pull the Inner Lever on the Right Weight, lowering it the rest of the way,
and raising the Left one to one step below the final mark.
5. Raise the Right side (Wooden disk.) Now the left is one too low, and right is one too high.
6. Pull the Inner Lever on the Right, lowering it and raising the left. Now they are aligned.
7. Press the Rune on the Center column. You did it!
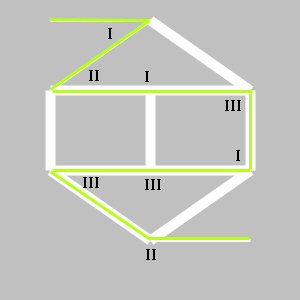
Now you have a bit of a puzzle to get the power distributed to all the machinery. Go to the Machine Room. You can enter it right there, just go past the Water Wheel and enter the Wooden Door. (If you explored before, and tried to exit that door from the inside, you couldn't because those tools were jamming it. Go down the steps, and look at the strange console on a pedestal. You see a diagram on the stone surface, with gears, circles, lines connecting everything, and the numbers I, II, and III on the diagram and on the outer rim. Obviously, you need to select I, II, or III, on each of the eight consoles, but how do you decide?
The Roman numbers indicate how the power will flow. The power comes from the source, represented by the uppermost symbol on the diagram. (Hence, you are looking at the last controller in the series.) How you set this one depends on where the power will be coming from, the left side or the right. Both are possible; there are at least four solutions. You should try to work it out; it's fun! Only took me half a day.
Let's figure out how to describe the diagram. You have an upper Triangle, a lower Triangle, and between them, a Rectangle. The Rectangle has upper left, upper center, upper right points, and also three lower points. Looking at this, the last controller, the numerals are around the point of the lower triangle. Thus, if you select III, the power would come from the lower-right corner of the rectangle and go to the final machine. If you select II, the power would come from the lower-left of the rectangle, and go to the machine. If, however, you select I, the power would pass between the lower corners of the rectangle and be useless.
I suggest you find the first controller, rather than the last. Proceed further into the room. You will see another controller there, and walk past it until you come to some steps going up and down. Go down. There is the first controller, on the lowest level. If you set it on I, power is sent to the upper-left machine on the rectangle. If you set it on II, power is sent instead to the upper-right machine. Either way is correct, but it affects how you set the others. Either way, you will want to go all the way upstairs to set the next one. Oh, and you must activate the machines One At a Time. If you send power back to a machine that already has power, it shorts out the circuit and you must start over. Sorry! One possible route is Source, point of upper triangle, Upper left, center and right of rectangle, lower right, center, and left of rectangle, point of lower triangle, then final machine. To get that route, find the controllers in that order, and set them so: I, II, I, III, I, III, III, and II. (If you get clever and try to set these controllers before the power to the Water Wheel is connected, it won't "Take" and you will have to set them again.)
The path the current takes will be this one:
Now you have restored power to the gates, magical doors, and other devices throughout the school. Return to the main hall. The easiest way is to climb to the top level of the machine room and return through the storeroom where Zak was trapped. In the Main Hall, you can now open the gate; the one you found yourself standing before following the first Vision.
Pull the lever, and climb the stairs. Lydia has another vision.
![]()
After the vision, Lydia has been sleepwalking again. This time she is further up the stairs, so don't turn back, but go all the way to the top. Lydia knocks on the door, and the Guardians speak. You will automatically meet the guardians. After the cutscene, click on one of them to start a conversation. You learn about the three Trials - Allegiance, Wisdom and Triumph. Following the conversation, you must descend the stairs and find the Key to the Caretaker's Office on the floor, partway down the stairs. Down, down and down. Pass the Stained Glass window, and down again. The key is on the landing. Pick it up, and notice the number etched on it - 24345. Now go downstairs, all the way to the bottom, and into the Main Hall. Take either the Left or Right stairs up to the crossover (First landing,) and use the brass key to enter the Caretaker's Office.
Look at the Old Parchment on the Desk.
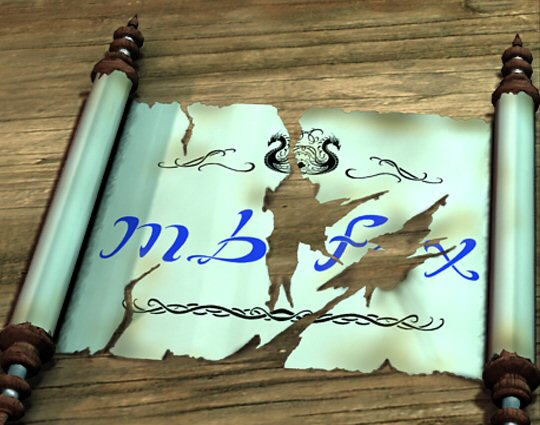
Also read the rolled-up note on the desk. Then, look behind you and to the left. Find the Wooden Staff. Finally, look in the other corner, and look close-up at the safe. You can probably guess the combination, but entering it might prove tricky, since moving one of the tumblers changes others. Read the hints if you need to. This is a simple puzzle if you understand how it works, and darned near impossible if you don't. Begin by solving the 4th digit, then solve the one affected by the 4th one. (The 4th tumbler changes the 2nd one.) Still confused? Fix them in this order: 4, 2, 3, 5. You never have to touch the first one. In plain English, click 3x on 4, 2x on 2, 3x on 3 and 3x on 5. Twist the key at the upper right, and take the precious Tiara. It allows you to read the magical language.
Open your inventory and read the torn notebook. Then return downstairs to the Great Hall, and read the plaque attached to the Dragon Statue. {Checking the Help; the next instruction could be confusing. It says you must open the Allegiance Trial Door below the Enchanted Hallway Footbridge.} Don't go the Enchanted Hallway itself; that's the way to the Garden. Instead, go through the Gate you recently opened, and up the first big flight of stairs. Turn right at the top to find the correct magical door. Lydia will open it with her staff. If this doesn't happen, and if Zak says "You can't open it, it's Magical," you need to climb the stairs all the way to the top and ask the Guardians how to open the doors. Then return to this door and try again.
Enter the door, and click on the three-headed
stone beast to undergo the Trial of Allegiance. Answer the three questions.
Wisdom, Power and Balance
Time
Without Wisdom, Power has no meaning.
Now it's time to find the Second Trial; it's a bit of a trek. Go downstairs to the Great Hall, and up the Right Staircase, to the top. Turn right as usual, then go through the archway and up the next stairs to door at the top. Exit the door and go left, past the large Rose-Window. Oops, Zak doesn't like it here. He's afraid of heights; Mighty Dragon that he says he is. Well, that's too bad, You have work to do. Go past the window, around the next corner and into the first door you find. Here is another foot-bridge. At the other end of the bridge is the door you are looking for. Halfway across are some more pages torn from the notebook. Read them. Open the magical door. Oops; the test is on the other side and you can't get there from here!
You will have to go talk with Mustavio in the forest. Just reverse the path you took to get here, and exit the School. Take the forest path until you find Mustavio. Ask him to repair the Pendant. He needs some parts. The tools on the shelf in the store-room are just what he needs. He also wants to know where his Crates and Wine Barrels are. You have already found the Crates, but the Wine is locked behind a charmed door. You must return to the Cellar and figure out how to open that door. (The clue is the paper you picked up from the Caretaker's Desk.)
Return to the School. Up the right staircase, down the narrow stairs, across the footbridge, down and out into the garden, then into the Cellar. Down three flights of stairs, and toward the two arches we mentioned before. Around back of the items stored there is the door which is magically locked. You must select the letters in the proper sequence in order to open the door. Apparently from the clue, you need to press six bricks in a row. The clue gives you m, b, (?) f, (?) x. Each letter you press gives you three new ones. m = csb, c = xms, s = brk, b = xtr, x = msk, k = fcb, r = tfx, t = fmk. Pressing m, b, t, f, c, x opens the door. Enter the Winecellar. Go up the short stairs and to the right to find the barrels Mustavio wants. Next, you need to provide a way across the river for him.
Exit the Winecellar, and go further down into the basement as before, taking the exit through the broken wall where she dropped the pendant, and go out past the water wheel and beyond the weights puzzle. Down the steps, and follow the path along the river. Lydia has another Vision. Following the vision, you are much farther into the woods than when it started. You can go ahead one more step and talk with the tree if you like, but the program's built in help wants you to build a bridge instead. So, go back the way you came, crossing a small wooden bridge, and find the Strange Signpost. Touch the vine, and watch the bridge grow. Amazing! Cross the bridge, and tell Mustavio you found the wine barrels. He will give you the figurines; a minotaur and a goblin.
Return to the school, go up the right stairs,
right at the top, and down the narrow stairs. U-turn, up the green steps, across
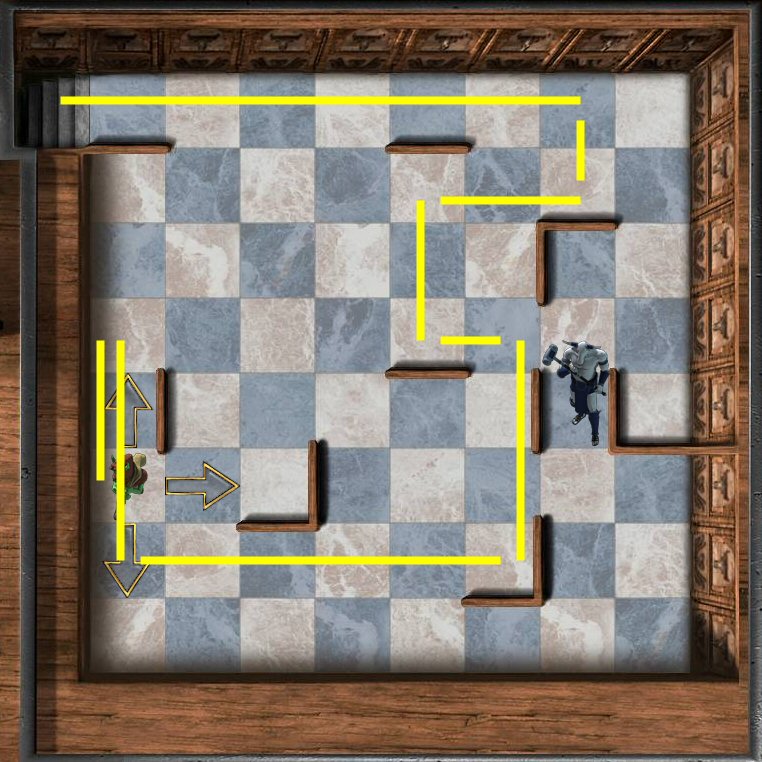
the footbridge, and go to the Minotaur Maze game at the left. To get the Goblin
into the stairs, you must figure out how to move so as to trap the Minotaur
behind the barriers. He gets two moves to your one, but you are more clever than
he is.
Move up twice, down 3x, right 5x, up 3x, left once, up 2x, right 2x, up once,
and continue left to the exit. You receive a Nigilis seed.
You need to plant the seed. Leave the Maze game, and go to the garden. As you descend into the garden, go straight ahead and up the other stairs, do not make the U-turn that takes you toward the Cellar Door. Past the dragon statue, and across the other little stone bridge. Plant the Seed.
Look at the symbols surrounding the circular planting area. You need to be able to recognize this one, the Nature Rune.
Now return to the Dragon Statue you just passed, and find the Magical Light puzzle on its octagonal base. By manipulating the sliding buttons, you will be able to produce the Magical Light required by the tree. The pattern you produce will look like the above symbol. Use the second knob on the left, and the second and third knobs on the right.
Now the seed needs water. Return to the interior of the school via the footbridge by the maze puzzle, and go to the foot of the narrow stairs. Remember I said there was a brown stairs descending from that area, but not to go there yet? Now's the time, to solve the water works puzzle. Go down those steps, and into the Pump Room. Open the box
 Before |
After |
Number the gears as if they were a slider
puzzle (which it's not) 1 through 16. Swap the gears thus:
1/8, 2/15, 4/11, 5/14, 6/10, 7/16, 1/9, 7/10, 12/14. Test your result by pulling
the lever at the right side of the puzzle. If some of the gears spin, but not
all, you messed up something. You can either figure it out or reset the puzzle
with the blue gem at the left. If they all spin and the box closes,
you got it right! Go down to the bottom of the pump room and pull the lever to
start the water flowing throughout the school. (If you got clever and tried to
solve this puzzle before the Water Wheel was connected, it won't "take" and you
will need to do it again.)
Return to the Garden, and pull the lever in front of the growing area to raise the water level. Say the magic words and Presto-Change-o there's your basic Nigilis tree! Now you need to get to that balcony to retrieve a fruit. The Help says to solve the puzzle of the locked door in the Nightingale Study. If you have been an intrepid explorer, you might have been there-done that, but if you are closely following their help or mine, you have not seen it yet, and would not have a clue how to find it. Here's the route: Re-enter the school, and to as far as the top of the narrow stairs. Don't go down to the Great Hall, but rather into the archway and up to the balcony where Zak was afraid of heights. This time, pass the wooden door (Where the second Trial was) and around the corner into the room without a closed door. (Read the plaque on the floor, describing Nightingale.)
On the left wall of the room is a door locked with a simple puzzle. You must exchange the left and right pieces to unlock it. We have all seen this puzzle before. If you can't do it on your own (and I believe you can ~ also check the built-in help for the rules) number the pieces thus:
Green
Pieces -- White Pieces
3,2,1 -- 1,2,3
Click on the
pieces in the following order:
G1, W1, W2, G1, G2, G3, W1, W2, W3, G1, G2, G3, W2, W3, G3
There - that should move all the pieces to the other side and the door opens. Enter the door, which takes you to a wrap-around balcony. Go around the building until you are reach the Nigilis Tree, and pick a fruit. Then enter the open doorway right next to you. This is WinterOwl's study. Take the torn pages from the table and read them. Also read the metal plaque on the floor. Return to the building proper, by taking the wrap-around balcony. You might see Mustavio crossing a footbridge below. You need to talk to him, and he can be found in the Enchanted Crossway. Outside again to the first balcony, then down the steps to the Upper Landing. Take the Narrow Stairs down and around, and instead of going ahead to the green stairs, turn right into a small alcove.
Talk to Mustavio. He will generously repair the broken pendant if you bring him the tools. The tools can be found on a shelf in the Store-Room. To get there, up the narrow stairs to the Upper Landing, then down the Right Stairs and around back to the Store-Room, where you first found Zak. Take the tools and retrace your path to Mustavio. Give him the tools, and he fixes the musical Locket.
Exit the front of the school, and take the path through the forest to the place where Mustavio and his wagon were originally. (He's not there now.) Cross the vine-bridge and go right at the other side. Go as far as you can, and talk with Elvandar. He gives you a Headen Flower, which looks sort of like a Pansy on steroids. It's time to find the Dining Room/Kitchen area. Return to the school via either route. Across the vine-bridge and on to the front door is one way; or you can stay on this side of the river and enter the bottom level of the machine room and climb up to the ground floor that way. In any case, go up to the Upper Landing and down the narrow stairs, and outside as if you are going to the Garden. Take the stairs up instead of the level path. At the top is a door leading into the Dining Room. The Dinner Hall has two levels; go down to the lower level and find the papers on the table. The page describes Yewlock Leaves, which grow in the dark. Have you seen some plants growing in a deeply shaded area? Go pick the leaves.
Shortcut - go through the Kitchen, and right into the pantry. On the back wall is a dumbwaiter - a sort of lift. Use it to descend into the Winecellar. Exit the Winecellar into the basement proper, and down to the lowest level and exit the broken wall. When you get to the waterway, don't go down the steps to the water wheel, but look for some flowers growing in the shade behind the large barrels. Take some Yewlock leaves.
Now it's time to brew a potion in the kitchen for Zak. Have a look at the magical fireplace in the kitchen. You need a cauldron. I saw one in the Winecellar. Go back down there. Ooof! It's way too heavy to carry. Maybe we can get it to the lift somehow. Go to the lowest level of the Winecellar. There is a sort of ramp-lift there. Pull the lever to lower it. Go up to the Winecellar and push the Cauldron onto the platform. Go back down and pull the lever again, raising the platform. Now you can shove the cauldron into the dumbwaiter. You can send the hoist up by pressing the blue button, or you can go up to the kitchen and use that blue button to call the lift. Anyway, you need to take the long way around, because you can't all fit into the hoist. Climb all the cellar stairs to the top, and you will be in the garden area. From there, you can go up the steps into the dining hall. Go to the lift, and take the cauldron to the fireplace. Brew the potion for Zak. He keels over.
Lydia has another sad vision; this one is where Celeste's mother is dying and her father feels frustration at not being to help her. The vision ends, and Lydia has gotten to the first trial door at the end of the footbridge somehow. When she goes to find Zak, she is surprised by a Siamese cat, who turns out to be none other than Zak himself. Lydia wants him to *shudder* walk across the roof to the broken window. To get there, Zak must exit one of the windows in the Pantry. Re-enter the building, down to the Upper Landing, down the narrow stairs and out to garden exit. Up the stairs into the Dining Room and through the kitchen into the Pantry. Facing the lift, look at the table on the left side of the room. Send Zak out the window. Watch the cutscene as Zak overcomes his fears, and you and he will wind up in the second Trial Room, on opposite sides. He will start out one level higher than you. This puzzle is Very Confusing because the view keeps switching in a way that it's difficult to tell who's on which side.
You need to cooperate in order to get Lydia to the test site, which is directly across from where she is standing (I think)
1. Lydia looks at the lever and says "Let's
have Zak try something," switching control to Zak.
2. Zak looks at his lever and says "I'll try this lever" raising the bridge to
Zak's level.
3. Zak walks across the bridge.
4. Zak pulls the lever on the other side
5. Zak looks at the lever and says "Let's have Lydia try something."
6. Lydia climbs upstairs and switches to Zak.
7. Zak pulls the lever.
8. Zak switches to Lydia.
9. Lydia pulls the lever. (This is the only time Lydia actually pulls a lever!)
10. Lydia switches to Zak.
11. Zak goes downstairs and pulls the lever.
12. He pulls the same lever again.
13. Zak switches to Lydia.
14. Lydia goes downstairs and switches to Zak.
15. Zak pulls the lever and the way to the Trial puzzle is open.
The left lever rotates the bottom plinth, revealing four vague poems:
| Howling out of sight Caress without a touch Whispers in the night That doesn't say much. |
When around me, You're never alone. But when I hide, Your friend is gone. |
| Hard as rock or soft as moss, I am a source of life but kill as well. And when your last dance comes, In my welcoming arms you'll dwell. |
It's everywhere but you can't grab
it. It's in your possession but it own you. If by misfortune you lose it, Surely it'll be the end of you. |
The right lever rotates the top turntable and
reveals eight runes as follows:
Slund, the spiritual
Undar - water
Aetern - celestial
Dria - nature
Gradion - energy
Kyros - fire
Nexan - movement.
Your job is to figure out which poem represents which rune and match them. Press the jewel underneath the book to place it on the plinth.
Howling out of sight = Aetern, the celestial .
When around me = Kyros, the fire.
Hard as rock = Dria, the nature.
It's everywhere = Slund, the spiritual.
When you place the fourth book correctly, you see a cutscene where the second guardian is satisfied, and turns his back on the rune on the floor. The door to the third trial is partway up the Whispering stairs that leads to the Guardians. Open that door and take the third test - the Trial of Triumph.
It's not a puzzle; just a test of your determination and willingness to overcome your worst fear. In this case, Lydia relives the scene where she was trapped in a burning house, and was rescued by Nathaniel. Except this time, there's no Nathaniel. She must make up her mind to enter the flaming house herself. Just keep selecting the door and the window, and eventually she'll do it. The third Guardian steps back, and you will be able to enter the upper region of the school.
![]()
Go upstairs to the Guardians. They are satisfied, and will let you pass. The cutscene ends with you and Zak landing in a large classroom. You must find and visit Celeste's room. Go left and up, onto the blue and yellow floor, and her room is in the upper right. Enter, have a conversation with Zak and lock him in. The scene ends in another vision, and you will find yourself at the red transporter in the Laboratory. Take the short footbridge into the lab and - there is Zak! Ask him everything. After the scene ends, step further into the lab and read the metal plaque on the wall. You learn something about potion-making.
Exit the side door of the lab, and use the yellow transporter. That takes you to a kind of way-station tower, with only another yellow teleporter. Use it to go to the main Teleport Hub. Now take the black teleporter from there to the Teleporter Control Room. There are four controlling obelisks you can look close-up at, and make adjustments to power up the teleporters. The object is to get all three lights in all three colors working. Number the obelisks thus:
Lower left = 1
Upper left = 2
Upper Right = 3
Lower right = 4
Go to Obelisk 2 and turn it once. This switches everything off. (This will give you a good starting point in case they get mixed up because you like to experiment! If you get mixed up, turn each obelisk to its off position and start over.)
To solve it, turn #2 once again; then turn #1 three times, #4 three times, and #3 twice. Now that you have powered up all the teleporters, there will be no reason to return to this room. Use the teleporter to return to the Hub, and take the Red Teleporter from there to a waystation containing a red teleporter, and a magic transmitter door. Step through the door, and you find yourself on the outside of a tower. It looks like it might have been designed by Escher; part of it is sideways. Walking straight ahead will turn you sideways; don't go there yet, but up and to the right into the Art Classroom.
Examining this room reveals several things. Ahead, are five display cases each containing several pieces of artwork. It is possible to look close-up at each piece of art. To your right is another piece of furniture, where you can place artwork. It's a puzzle for which you do not have the clues yet. Further right, to the right of the window, is a Rune on the wall. Press it, in spite of what Zak says. Finally, in the lower left corner of the room, you can see some paint cans and an unfinished painting on an easel. It's another puzzle for which you do not have the clues yet. Exit the room, and go down those stairs that will turn you sideways. You come to another Portal. Take it, and you are on the Watch Tower, also called the North Tower.
Climb the steps to the top, and you find red and yellow teleporters, a puzzle that isn't activated yet, and a strange floating ball over the stairs. Take the Yellow teleporter to the Statue Tower. Explore the tower if you like, but you need to take the footbridge leading to Nathaniel's office. On the way, you get a brief reminder that you are in a sideways world. Does that mean that Nathaniel is a lateral thinker? LOL
Go around to the business side of the desk, and take the notes. They reveal something about the Orb that Zak was forced to retrieve for Nathaniel. There is much more to do here in the office, but return instead to the Statue tower. Take the Blue teleporter to go up, up, up to the Observatory. You need to activate the Rune on the wall. That's all you can do in the Observatory for now. Return to the Watch Tower via the Statue Tower, and take the footbridge over to the Library.
Oh! That dratted owl stole the Caretaker's Circlet. Watch the cutscene as Lydia and Zak travel to the Sacred Hall via a hidden Portal. You will need to remember where that Portal is later. On the other side, she gets the Circlet back, and meets with Grandmaster Nightingale. Talk with him about everything. Okay, now you have the setup for this chapter. You need to locate and retrieve four magical items. In addition, you need to learn how to transform Zak into a human, and locate the ingredients to make his potion. You will no doubt encounter some puzzles on the way.
Use the Portal to return to the Library Tower. Just for reference, inspect the wall behind you, in order to see where the Portal is hidden for later use. Return to the Watch Tower. You might have inspected the game located at the center of the tower, but it didn't work. You need to de-activate the Protection Spell by saying the magic words to the ball-and-rings device. Dragonus Enferinis! Now the game will be active. The objective is to illuminate all the lights surrounding the tiles. Each row, column and diagonal must contain one each of the four symbols, Planet, Star, Sun and Moon. There are many correct solutions. Here's just one:
Take the Red Teleporter, then the next red one to arrive at the original Large Classroom. Go to the other end of the room and take the Yellow Teleporter, arriving in the Student Lounge. Find the game, "Dragon's Lair." You can unlock it by saying the magic words to the lock, which is at the lower right corner. Bear with me - this is a TEDIOUS game. It takes over sixty moves to plod through. The good news is if you make an error, it's easy to overcome, unlike a game such as Hanoi Towers, where if you slip up once you're kaput.
Do you really want to grind through this? Click Here for a solution
My choice would be to cop-out and ask the hint system to solve it for me. (Especially since I really did solve it last week and don't want to have to repeat it, heh heh) After you finish this puzzle and procure the Aleunder Root, take the Yellow Transporter back to the main classroom, and go beyond the area where Celeste's room is, into the Atrium. You must visit the Herbalism Classroom (also called the Solarium, it has a large tree growing in the middle of it.) To get there, continue through the Atrium, until you see an arched doorway on the left. You want the doorway on the RIGHT; which you can't see from here. Activate the rune on the wall.
Now it's time to visit the Forge. Exit the Solarium and go through the opposite door, into the stairway complex. Go up the stairs, to find two more stairways. Go up the right one to find a Blue Teleporter. Take it to the Forge Room. Activate the rune on the right-hand wall. Then inspect the puzzle high above your head on the same wall. That's all in the forge for now; you will be returning here later. Exit via the Blue Teleporter, and go down the steps to the landing where there are two staircases. Go between them. Down, down, until you come to the first stone leading to the Oracle. Say Dragonus Enferinis to the ball-and-rings, and the puzzle begins. The first stone is marked with a code - three vertical lines. I I I indicates Off - On - On. This means you should not toggle the light on by clicking this first stone. (If you turned it on, turn it off again before you go ahead to the next island or you will have to come back and start anew.)
Once you de-activated the spell, a new bridge appeared on the right. Take it, and as you reach the next island, that bridge vanishes and a new one appears. Click on the stone, and click on the dragon symbol to light it. Continue on. Turn on the third stone and go to the fourth. Here you get a new code; On - On - Off. So turn this one on and proceed. Fifth is already on, turn sixth off. Seven - get a new code: On - On - Off - Off. Turn this one on. Eight (is where you started; ignore the original code now - it's obsolete.) turn it on, Nine off, Ten is off, leave it. Eleven - get a new code: On - Off - On - Off. Turn it on. Twelve - ignore the obsolete code; turn it off, Thirteen on, Fourteen is off; leave it. Fifteen - there's your Dragon Skeleton! Click on the fossil and receive a handful of magical Moss for your efforts. I always like to save the game after a lengthy puzzle, just in case of a crash or something.
Now you have enough ingredients to brew a potion. Go to the Lab. Shortest way is to go to the two staircases and climb the left one, where you will find a Red Teleporter. Take it to the Lab and click on the apparatus to brew a potion. Use the recipe containing the Oracle Moss. Zak becomes a Dragon! (If you use the other recipe, he becomes a wolf instead.) It's time to go to the Library. Return to the Watch Tower thus: Take the Yellow Teleporters from the lab to the Hub, then the Red Teleporters and the Portals to the Watch Tower. From there, it's the footbridge into the Library. (Lydia suggests going to the Forge, which you certainly can, but I suggest the Library instead, since that's where the built-in walkthrough takes you.
First thing to do is to pick up the Magical Ball. Its on the center post in the banister. The ball is used to open the doors into other rooms. Let's say this is the North side of the room.
| Tapestry Green |
||
| Tapestry Red |
Blue/White | Tapestry Light Blue |
| Blue/Blue Ball |
Stairs Ball |
Grey/Rose Ball |
| Brown/Beige Ball |
Marble | Tapestry Blue/Gold |
There are four Magical Balls in all, and you need to find another one right now, so as to be able to enter rooms that require two stones to open their doors. From the place where you take the first stone, look at the wall beyond. You see a blank stone door, flanked by two panels. The left panel has a gothic arch niche on it. This would be the West side of the room. Click there. It opens, and you can place the stone in its holder, opening the door to the next room. Take the new ball from its holder, and exit back into the Main Room. Retrieve your original ball from the niche, and go now to the opposite side, the East side of the room. Use your two balls to open that door. Enter, and take the third magical ball. You can use it to open the door on the North wall of this room, taking you to the Bright Blue chamber. Go to the far side of the room and look close-up at the tapestry. You will retain a copy of it in your inventory. If you study the pattern, you see four different runes displayed in four different colors. More on that later.
Exit this room, take back the ball, and exit again and take back both balls. You are in the Main Room again. You've gone East and West (You will go West once more) but for now go South, the door you would face coming up the stairs. Enter the marble-colored room, and have Lydia turn right (West.) Open that door into the Brown/Beige room and take the fourth Ball. Exit and retrieve both balls, and go to the other (East) side of this same room. Open it, and examine the Tapestry on the far wall of the Blue/Gold room. It seems to be a riddle.
Exit and exit, taking back all balls. Re-enter the West room, the first one you entered before, and go into the room North of it. This room is decorated in Red, and the Tapestry shows the names of the four elements in English and Runic. Exit, and exit, retrieving the balls as usual. Finally, go into the North room, which is Blue/White, and into the room North of that, decorated in Green. Take the final tapestry, which appears to display various plant species which are compatible or not with each other. Exit and exit. Before you leave, double-check your inventory to insure you have all four balls in your possession. You will be needing them later.
Exit the Library and walk back to the Watch Tower, and take the Yellow Teleporter to the Statue Tower (also called Fountain Room.) De-activate the ball-ring lock found next to the transporter. Now you can use the Season-Changer; the large glass orb left of the statues. It serves to alter the seasons in the Herbology Classroom. I suggest setting it to Winter and leaving it there (but I won't tell you why yet.). Now take the blue teleporter up to the Observatory. Fasten your seatbelts - there is one Doozy of a puzzle coming. Remember, if you start pulling your hair out, you can always bag it and ask the game to solve it for you. Think of the satisfaction if you actually DO solve it. Hey, I had to! I wrote all this long before the game was released; and there was no WT to refer to.
Go up the first set of stairs and use the Constellation viewer. There are eight constellations, consisting of 4 stars each. If you expect to complete this puzzle yourself, without looking at the spoiler, take notes and make reasonably accurate sketches of the constellations. You will see them again through the telescope, but without names or drawings superimposed on them. Then go up the next stairs, where the Telescope is. When you go to the telescope, the sky should turn to night. If it doesn't, step on the Moon tile on the floor. BEFORE you start playing with the rings, read the first and second hints. They describe the action of the rings, and tell you (vaguely) how to understand the coordinates. There are four vertical sets and four horizontal. What you need to do is decide which 4 sets of coordinates you want, and which 4 you do not use. The clue comes from the "First Tapestry" taken from the Library. It's the one with the Riddle on it. The four couplets each hint at one of the constellations.
"Gift of Life . . ." is for the
Mermaid, referring specifically to her navel.
"the Strongest" refers to the Minotaur and his massive biceps.
"Poisoned" refers to the stinger on the Manticor
(lion/scorpion)
and "Feathery" refers to the Griffin's wings.
Now, deciding which sets of coordinates to use, can only be done by trying them all, and looking at the telescope each time and comparing them with your sketches. When the telescope is correctly aimed at a constellation, you can click on each star and illuminate its corresponding number on the circle. You should, however, only light up the number that is represented by the appropriate body-part.
Now, for building the constellations - you must get all four numbers of the desired coordinate onto the same row. It can be any one of the four rows, but they do not have to be in sequence. Rotate the golden ball so that it indicates the row you have assembled. Then look in the telescope. If you have aimed it at a constellation, it will be visible. Then select the appropriate star to illuminate the one correct number.
The four sets of numbers you
must use are:
86, 59, 73, 68. The Mermaid. Select 73 in the scope.
11, 47, 32, 95. The Minotaur. Select 47.
62, 33, 46, 25. The Manticor. Select 33.
87, 25, 68, 95. The Griffin. Select 87.
Careful - you must not have any other numbers illuminated except those four. When you get it right, you receive an object for your efforts. It is a piece of a meteorite enclosed in a magical container. It's one of the four elements you are seeking which will unlock the Sanctuary. Go down two flights of stairs, and take the Blue Teleporter back to the Fountain Room (Statue Tower) and cross the footbridge to Nathaniel's office.
Dragonus Enferinis! De-activate the lock, and examine the Ship-in-a-Bottle. Whoa! You are inside the bottle! Clicking on the bottle now lets you see the "treasure map"; clicking on the bottle next to the map takes you back to the office; clicking on the back arrow returns you to the boat inside the bottle; clicking on the little door under the Poop Deck will take you to the puzzle. You must try to follow the path as indicated on the map. It's pretty obvious what to do.
Upper Left
Upper Right
Lower Right
Upper Right
Upper Left
Upper Left
Upper Right.
You are in a virtual "Nathaniel's Office" Go behind the desk and open the drawer. (First click unlocks it; second click opens it.) Click on the bottle to return to the real office. Now you will be able to pull open the desk drawer. Take the Portrait of Celeste. Open the drawer AGAIN and press the blue button. A secret Teleporter is revealed. Take it to the Secret Room. Find the handwritten note on the desk. Then attempt to de-activate the ball-ring lock. It doesn't work. (You need to try it now, in order to get the correct password from the Master.) Now that you have Celeste's portrait, you can work on the puzzle in the Art Room. From the office to the Fountain Room, to the Watchtower (Yellow) through one Portal to the Turn-tower, and into the Art Room.
You need to create a painting in order to continue. Click on the easel. It expects you to use four colors in the correct sequence. Have a look at the tapestry from the Library:
See the Rune at the bottom? Find the four Runes that match it, and use the colors from top to bottom - Red, Yellow, Blue, Green, in that order.
The painting magically jumps to its frame in the display case. Go take it. Notice as you take it, there is a greyed-out square in the upper-right of your screen, depicting the Easels. Click on the square to go to the easels and place the landscape in the left easel. Now there will be a square at the upper left, depicting the niches. Click on the square to return to the niches. Do not return to the art room itself, for that will reset your puzzle.
You must select two compatible paintings from the niches, and place them on the easels. If you choose wisely, they will magically transform into two new paintings. For example; dragons are connected with Fire. Pick the painting of the Fire-Rune, and the sleeping Dragon. Place them in the easels, and you now have a Nature-Rune and a flying Dragon. Click on the Nature-Rune to return it to the niche, and leave the flying Dragon in the easel. Return with the landscape you created a short time ago, and place it in the empty easel, creating pictures of a closer view of the Academy, and a stylized Dragon. Take the Dragon back to the niche, and return with the silhouette figure (Grim Reaper?) and you will have pictures of Celeste's Mother, and Elvandar's forest. Take the forest picture to the niche, and return with Celeste's portrait. You will see a shooting star picture briefly, then receive another of the four elements. This one is filled with "Soul Dust."
Return to the forge. Get there by going around the turn-tower, through the Portal to the Watch Tower, and take the Red teleporter to the large classroom. Then through the atrium and the stairs complex, up the right side to the Blue teleporter. (You might have an automatic conversation with Master Nightingale in the classroom - if you do, talk with him about everything. That includes mentioning the Orb.) In the Forge, you have three puzzles to solve; and they are all fairly easy. You can do them in any sequence; solving all three will yield the item you desire.
Now that you have a Dragon for a companion. you can examine the one high up on the wall, over the Magic Rune. Have Zak take a look. There are eight lights, which I would number starting at the top. Numbers 2, 4, 6 and 8 are burning, and 1, 3, 5 and 7 are not. The object is to light them all. Each lamp you click on will change its state, and that of another. Easiest solution: click on them in this order: 5, 2, 1, 4. {5 - lights 5 and puts out 2; 2 - lights 2 and 3; 1 - lights 1 and puts out 4; 4 - lights 4 and 7.}
On the floor, you see a cross composed of red and yellow branches. There is a pedestal at the center. Examine it to see nine circular switches. Clicking on them reveals runes similar to those on the Second Tapestry from the Library. Since we are in the Forge, the logical word to focus on would be "Fire." The object of this puzzle is to illuminate the runes that spell that word. (The object is NOT to illuminate all nine - that would be too easy; by pressing 7-9-3-5-1. Instead, you must press 8, 5, 6, 7, 8 in that order.
Finally, you must light all eight floor tiles. There are four controllers, one in front of each forge. The one at the lower left shuffles the red ones around; that's useless. The one at the upper left removes one red tile and lights two yellows. The one at the upper right takes away one yellow at a time; and the one at the lower right adds red ones. If you overload a row, the puzzle resets. Thus, it makes sense to clear all the yellow ones first. Activate the upper right controller 3 times. That turns off all the Yellows. Then use the upper left one three times. That lights all the Yellows, and turns off all the Reds. Now use the lower right one, lighting all the reds. With all three puzzles solved, you get the lantern.
Exit the Forge, and Lydia will have a rather lengthy vision, winding up at the Sanctuary again. You need to talk with Master Nightingale again, and he is not here, he is still in the classroom. Return through the Library, and North tower, taking the Red Teleporters to get to him. Talk to him until you get the password which will de-activate the Protection Spell in the Secret Library. Okay, back the way you just came - Red teleporters to the North tower, then yellow to the Statue room, and into Nathaniel's office. Use the secret teleporter.
Deactivate the spell, and examine the bookshelf. You discover a blue book on the bottom, and a choice of touching the red or purple books adjacent to it. You discover that the Red books move the Blue one up or down, the Purple ones move the Blue book three spaces right, and the Green ones move it three spaces left. Backing out of the puzzle resets it.The object is to get the blue book moved up to the White one.
Start with the Purple book at the right of the blue one. Follow that move with these:
Red (R)
Green (L)
Red (L)
Purple (R)
Red (L)
Red (R)
Green (L)
Green (L)
Red (R)
Red (L)
Purple (R)
That places the Blue Book atop the White one, whereas all the other books disappear, and you have possession of the Spellbook. You can take it to the Master now if you wish, but there is one more major puzzle to solve first.
Go to the Solarium (Herbology Classroom.) and walk down the steps to the actual classroom. Listen to the conversation between Zak and Lydia, then look at the pots under the gazebo. Examine the Fourth Library Tapestry to get some understanding about which plants are incompatible. You will see that Red and White and Red and Blue cannot be grown together; and Green and White and Green and Violet cannot be grown together. Orange, Pink and Yellow are neutral, but Red and Green are mutually attracted. You must conclude that Red's and Green's enemies are therefore friends of each other. Confused yet? You want to grow White, Blue and Violet.
Now for the seasons. Some plants grow in only one season, and some grow in two. Just like nature. What season is it in your arboretum? Want to solve it on your own? You will have to take notes; and change the season four times, experimenting to see what will grow and what will not. If it's Winter, as I suggested you leave it, you can grow White, Red, and Blue flowers. Make two of the pots White and Blue, and leave the other one empty for now. Return to the Statue Tower, and change the season to Summer. Return to the Arboretum, and grow Violet flowers in the third pot, and you are done. You receive the container with the Pearl inside.
Now it's time to return the Spellbook to Grandmaster Nightingale, who is still in the Classroom. (They call it the Student Quarters Hallway sometimes.) Go there, and finally get the formula Zak needs. Go to the Lab via the stairway complex, up, Left steps, Red teleporter, and you are in the Lab. Talk to the Owl about everything. Clip one of the Dragon's toenails. Brew a potion to change Zak into a Wolf and collect some drool. Brew another potion, changing Zak into a Cat. Collect some hair. Now you can brew a potion to change Zak into Human form.
Go to the Sanctuary, send Zak up the steps, and have him solve the puzzle as suggested by the riddle. The Hints will take you through it, if you don't get the riddle. Then you need to open the door by solving the puzzle on it.
Before you open the Portal to the Sanctuary, please insure that you have about twenty minutes set aside and that you won't have any interruptions. The closing cutscene is emotional, and more effective if you don't have to deal with telephones, kids, or whatever.
![]()
Here's the solution to the Portal:
Number them starting at the top. Click on 1 2x; 3 2x, 5 1x, 6 3x, 7 1x, 9 2x, 10 2x.
This document was provided to GameBoomers.com and may not be distributed without express written permission of the author and the content may not be altered in any way.
![]() GameBoomers
Walkthroughs and Solutions
GameBoomers
Walkthroughs and Solutions