From the Player's Handbook, we learn that the Lighthouse is the home of Dr. Krick and is the location of his laboratory and that the object of the game is to rescue him and his baby daughter Amanda. It also tells us that the game is comprised of 6 distinct regions to explore with numerous challenging puzzles.
While the puzzles are at times quite difficult, they can be solved. A few can be solved in different ways, and you often have a choice of the order in which you do the puzzles and explore the different regions. This guide will attempt to cover all situations. The tone of the guide will be see all -- tell all, so it is up to your discretion and discipline to read no further than necessary so you do not learn more than you really wanted to.
A technical note is warranted here. Sierra has patches available which, in addition to correcting deficiencies, make some puzzles easier to solve. This guide is based on the latest (as of Dec. 2000) version. Any patches should be installed before the game is started, since previously saved games will not be useable in the new game version.
The game opens in a small cottage on the Oregon coast. As you rummage through the single room, you keep an eye on the thunder squall raging outside. The first thing that catches your eye is the telephone. You listen to the messages on the phone and get your first notion of the urgency of the task before you. When you read the journal in the desk drawer, you begin to realize its magnitude. You find a lighter in a file box on the desk. At about that time, you see a bolt of lightning strike the lighthouse in the distance. Searching through the drawer of the smaller desk, you come up with a set of car keys. As you dash out the door (clicking the keys on the car), you grab the umbrella and inventory bag from the coat rack by the door.
Well, thank goodness for small favors! It has quit raining as you step out of the car. Checking the mailbox, you find a letter. Walking toward the door, you notice all the lights are out and wonder how much damage that lightning bolt did. You search all the common hiding places for keys and find the door key under one of the objects sitting on the stoop and another key inside the light fixture.
Having noticed a small shed on the side of the building as you approached the house, you decide to try the second key there. You find the key does indeed fit, and the first thing you notice is the electric panel, where you try to turn the lights back on. Success! Or at least partially so; two of the three breaker switches reset with no problem. The third one though still exhibits a fault in the circuit. Looking around, you find and take a pry bar from the shed and return to the front door. Noticing that some of the house lights are now on, you try the door key in the lock on the front door. You half-way expect it not to work; things are going too well. But it does, and the door opens allowing you to enter.
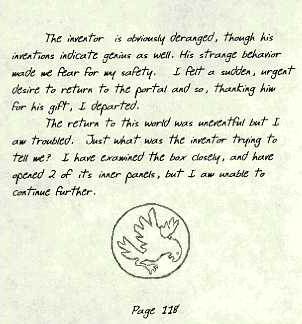
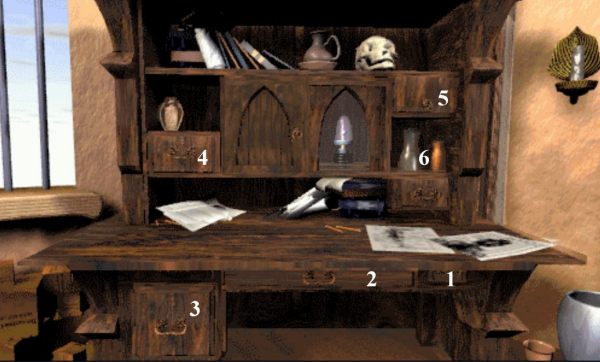
You see several doors and, like a true adventurer, you choose the first one on the right. The room seems to be a study with book shelves at one end, a desk at the other, and some curio shelves along another wall. You find a tiny replica of a bird, a collection of shells, and a pair of strange tear-drop-shaped objects with a bright red color among the curios. You put these things in your inventory, although you haven't the foggiest notion of how you'll be able to use them. At the desk, you find a letter opener in the upper drawer and some pages from Dr. Krick's journal, when you look inside the roll-top. Next to the pages, you discover a strange box, which you can turn but not pick up. As you read the journal pages, you come to believe that the box is the object he is describing. You are determined to investigate the box but decide to explore the rest of the house first. Crossing to the book shelves on the other side of the room, you move a few books on the middle shelf. This reveals a wall safe, something else to investigate when you've finished touring the house.
The next room on the right turns out to be the bedroom; Amanda, Dr. Krick's baby daughter, is in her crib. You pick up a toy soldier from the floor and cross to the far side of the room. There, on the night stand, you discover some more pages from the journal. Baby Amanda, although fussing a bit, seems to be alright, so you turn to continue your tour of the house, picking up an alarm clock from a table on the way out.
The next door on the right seems substantial enough to be a vault door, and it is locked with a high-tech combination lock, so you pass it for now and go to the room across the hall from the nursery. It is a combination den and kitchen. You find some more journal pages on the kitchen counter and add them to your collection. Finding a baby's bottle with some milk in the refrigerator, you decide to take it to Amanda.
|
Click on Amanda and she starts crying. Then get the bottle from your inventory and click it on her. (This sequence isn't necessary to complete the game, but it adds a little realism. If you don't click on the baby, she won't start crying and won't need the bottle.)
The next item you pick up initiates the kidnap sequence if it hasn't already occurred. It won't be long till you hear the baby crying again, and when you go to investigate you'll see Dark Being abduct her and disappear through a portal to the parallel world. This is an ideal spot to save your game. Whether or not you decide to pursue the scoundrel, you may want to return to this point to try the alternate option. Whichever route you take, you must return again to the lighthouse from the parallel world. You cannot completely solve the box in the desk until you bring an item back for it. If you decide to go after Dark Being, click HERE to jump to that section. |
Returning to the den, you cross the room to a bookcase. You open the door and find a compass, which you add to your inventory. Seeing nowhere else to explore, you turn to the items in your inventory. You use the letter opener to open the letter and find a short note inside. The numbers beneath the message appear to be a safe combination, so you head toward the study and the wall safe you saw there.
Click on the safe to get a close-up view. The cursor will turn into a clockwise arrow when placed on the right side of the knob or a counterclockwise arrow on the left. The knob will spin rather rapidly if you hold the mouse button down. Click off one number at a time when you want greater control.
|
You remove the journal from the safe and, while scanning the pages, you find another combination (8-24-96) on one of the diagrams (page 59). You think that might be what you need for that locked door, but now that you're back in the study, you're itching to tackle that mysterious box.
| If you've completed all of the box except the last puzzle, click HERE to jump there. Click HERE to defer the box solution till later. |
The box is the gift that Dr. Krick received from Martin and mentioned in his journal. You recall Martin mentioned it in his notes too, saying that inside it he had hidden a piece of the weapon designed to capture Dark Being. You notice that each side of it has some sort of latch at its center, some that you push and others that you turn. Most of them seem inoperative at the moment, but you finally find one that unlatches its side.
|
You proceed with confidence, readily solving the first puzzle of the box by pressing all the small square blocks in order from the top down then sliding some lower blocks that are now free to move. This reveals a small red button which you push. |
|
The box seems to come alive, closing the side where you were working and opening the back side of it. When you turn the box to examine that side, you see what resembles a target with a red bull's eye. You press the bull's eye almost by instinct, and the box moves again, this time exposing the side to the left as well as the one that's open. It seems to be inviting you to press that side's button, so you do. The box then turns its open side away from you as if to demure, so you must turn it back where you can see the open side and press the bull's eye again. This time a drawer opens, and you remove a key. Another press of the bull's eye causes the drawer to close and the box to turn to another side.
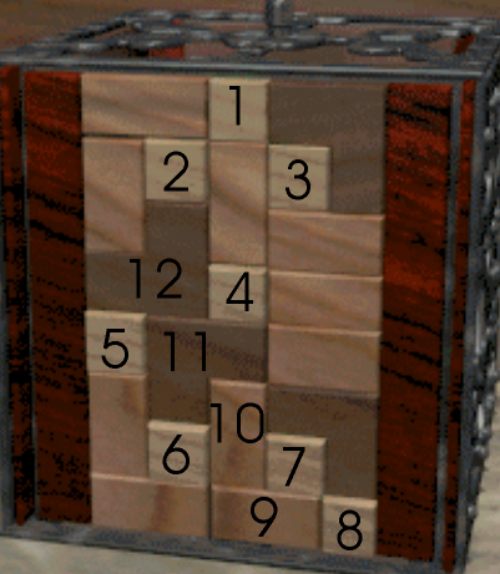
This side is open a mere crack, and you turn the box toward you to see better. Part of the design inside becomes visible, and you notice what appear to be two push-buttons. When you push the one on the right, you find the reason Dr. Krick could proceed no further. It's one of those ubiquitous sliding-block puzzles. And there's no doubt in your mind that, when solved, it should look like that hawk figure sketched in his notes.
|
|
You start solving by identifying the blocks that belong in the top row, which is relatively simple, since they show the curved arc of the upper part of the circle. Then you line them up in sequence somewhere below the top row. When they're in the proper order, you slide the whole row into place, one after the other. There is no need to disturb that row once it's in place.
Now you repeat the process for the next rows. You realize the final two rows must be solved simultaneously, so you move the blocks in a circuitous fashion with one row moving right and the other left, so as not to disturb the other rows that are already in position. You make corrections in the block's positions, while you're moving them, until both rows slide into position. You resist the urge to grab the strip that then protrudes from the box, until you have made a note of the symbols you see on it. Then as soon as you touch it, it retracts into the box again, and that side closes.
|
|
You turn the box to find another active latch. When you find one that turns, that side doesn't open, so you continue trying and find another active latch. This time, the side opens to show you a mosaic of tiles. After trying several unproductive sequences, you push all the blue tiles and then the lower one shaped like a fish. The fish swings out, revealing a button, which you press, and the fish swings closed again. You think the same technique might work again, and, after a few experiments, you press all the gray tiles and then the upper fish-shaped one, causing it to swing out. Behind the fish is a key hole, into which you immediately place the key you obtained from an earlier puzzle. That whole side swings open, revealing a gray disk.
| The next step in the solution of the puzzle box requires an inventory item from the parallel world. If you don't have Martin's medallion, the final solution of the puzzle box must wait until you bring it back. |
You place the medallion you took from Martin's corpse on the disk. Two spaces with a familiar shape are left vacant. After a moment's thought, you remember the red objects you found on the shelves. You try them and they fit perfectly. You press the button on the top of the box,, and the side swings up, revealing the final puzzle.
You see a cylinder with moveable rings that have symbols on them. You adjust them so they all show a square and hear a faint click. Then you set them all so the circle is showing and see the top move slightly. Now you set them to the triangle and the bottom ring moves. Suddenly you remember the symbols on the strip that protruded from the box earlier and set the rings to those symbols. The whole cylinder now opens, and you take the small vial from inside.
You are ready to learn what's behind that locked door. You remember the group of numbers from the journal pages (8-24-96) and plan to try them on the lock. Disregarding the hyphens, you click on each of the five digits in order and then click ENTER. It worked! The door slides open, and you can see Dr. Krick's laboratory; you step inside. Several pieces of strange equipment are visible, but you recognize the viewing screen of a computer monitor, and you head toward it. It seems to be working, but its read-out doesn't hold out much hope for the rest of the equipment. You look over the odds and ends on a table to the left of the computer monitor and pick up some more journal pages, a piece of fuse wire, an electron tube, and a tool of some sort. Thus equipped, you begin checking out the equipment.
|
You start looking around some more for the power modulator; notes in the doctor's journal indicate that it is some sort of tube. You noticed a storage bin earlier between the computer and the door but couldn't open it. Now you decide to try the pry bar on it. After two tries, it gives way, and you take one of the three power modulator tubes. You also know from the journal that it has to go into the fresnel lens, high up in the lighthouse. You go up the stairs by the door and encounter a locked scuttle. You aren't going to be stopped now by a little lock, so you attack it with the pry bar. It falls in pieces after only three blows, and you have access to the upper level. You open the door on the fresnel lens and remove the old, spent power modulator. Replacing it with the new one you just found, you close the door and plug in the wire from the lightning rod on top. On your way down the stairs, you think about needing a new power modulator for each time the portal is opened and decide to take a second power modulator as a spare.
Retrying the computer, you find that everything is now working. You turn around to the control panel again and pull the other lever. The portal opens and you step through.
| If you've already explored this area, click HERE to jump to where you chose how to leave. |
Whether you travelled via Dr. Krick's machine or were deposited here by Dark Being, after he conked you on the head, when you followed him, you now find yourself on the beach in the parallel world. You wonder around awhile, picking up a few small stones, before discovering a pier extending out over the water. As you approach the pier, you find a corked bottle among some flotsam beside the pier. Removing the cork, you take a note from inside the bottle. You continue to explore the pier; going to the very end of it and down a few steps. You find a T-shaped tool of some sort on the lower landing. That seems to be the only thing of interest on the pier, so you go back to the beach and travel toward a tower you've noticed in the distance, continuing to pick up small stones when you see them.
You notice, as you approach the tower known as Martin's Roost, that the drawbridge is open. Examining the metallic bezels on the stone abutments, you discover that the left one opens to reveal a hole. You try using that tool you found on the pier as a key, and a panel opens, uncovering a joy-stick-type control. Taking a closer look, you see that it controls a hook, which must be moved through a type of maze to engage and lift another hook. This second hook, in turn, releases the mechanism that allows the bridge to drop.
|
Moving the joy stick will move the hook in the same direction as far as the next intersection or change of direction. Like some of the other controls in this game, it may be difficult to operate with the mouse. You may find the arrow keys on the keyboard work better.
If you need help with the maze itself, it's 1 click to the left, 2 down, 3 left; then 1 click each down, right, down, right, down, left, and up. |
You proceed up a walkway that encircles the tower as it spirals upward. You pass a door and make a mental note to explore it on your way back down. You haven't gone far, when one of the mechanical birds, that has been circling overhead, roosts beside a gate you were about to open as if to guard it. You soon learn that is indeed true, since it attacks you as you try to enter.
Something about a clock on the wall by the gate catches your eye. You think it must somehow be involved with the gate and proceed to put it back in operation. You decide that it is a cuckoo clock because of the door and that the little bird in your inventory might belong there. You take the wind-up key from the toy soldier in your inventory. Using the key to wind up the bird, you place it in the clock. A small push of the pendulum starts the clock working, and the guard-bird leaves.
|
In case either the key from the toy soldier or the little bird is missing from your inventory, there is another solution to the bird problem. Throwing stones at them will knock them out, but it takes 3 stones per bird, and there are 3 birds. You'd probably have to make at least one more trip back to the beach for more stones.
This is also a good time to save your game; you are approaching a critical spot, also you will soon have to choose between two paths to take. |
You continue up the walkway and enter a room. You surmise the corpse you see is that of Martin. You remove the medallion from around his neck. (If you should happen to bump the skull, it will clatter to the floor. Don't let this startle you!) He is obviously beyond help, so you cross to the desk to start searching it.
Birdman, flying around outside, will come in the window and take something you need from the desk, unless you act to stop him. If that should happen, you'll find it later somewhere else (you may want to try this in a subsequent game). To prevent this, you must close and lock the window (step 1 below) before you do anything else at the desk. The other steps may be done in any order.
|
On your way out, you notice a scuttle in the ceiling with one end of a ladder protruding; having no means of reaching it, you proceed out the door. You mentally review all the strange things you've learned, on your way back down the exterior walkway. You open the door you passed earlier and step into a short hallway. You see Birdman working in a shop directly ahead and a stairway leading down on the right. For a moment you hesitate, pondering which way you should go.
| It is almost time to leave Martin's Roost to travel to the next region to explore and time for you to make your choice. The stairway leads to a submarine and the places you reach by water. The other route takes you by air to the temple. If Birdman got away with the throttle handle your options are limited and you'll have to go by air. If you opt to go by submarine click HERE. Entering the workshop will be a little easier if you've waited until Birdman isn't there. In that case you can skip the first paragraph below. |
As you approach the workshop, Birdman sees you and pulls a lever which closes a gate. You pitch a stone at Birdman's head; then quickly lob another one at the lever which operates the gate. You enter the shop quickly before Birdman recovers sufficiently to close the gate again. Realizing he was outsmarted, he leaves; you quickly close the window and lock it with the key.
Moving to the workbench, you pick up a strange multipurpose tool and a handful of miscellaneous hardware. On a small table, you find some sort of remote control box. It doesn't seem to be working, so you place it on the bench with a power screwdriver attached, and use it to open the remote control box. You loosen the two terminals with the multipurpose tool and remove a damaged, coiled wire. You replace it with the one you got from the desk upstairs and close the remote control up again.
| If you didn't get Birdman locked out in time, he will beat on the remote control with the hammer. The only damage he does, however, is to knock the antenna off. If this happens, pick up the antenna from beside the hammer and replace it on the remote control. |
Picking up the remote control, you try it and find it to be working now. And you discover that one of its functions is to control a ladder. You immediately head back to the upstairs living quarters where you found the inaccessible ladder. You select the ladder function on the remote control and press the button. The ladder lowers, and you scramble up it and through a scuttle in the ceiling.
Emerging into a cluttered loft, you turn completely around, scanning the room, before you even try moving. You discover a desk right behind you and see some plans for some sort of aircraft. Also on the desk, you find a hex-key type of wrench. There is some type of launching track going through the middle of the room, and it looks like you'll have to climb over it to get to the other side of the room. In doing so, you almost trip over a pile of gears, which you pick up from the floor. Having more room to move around on the other side, you move to the rear, where you see another ladder. Ascending it, you find the roosting area of the mechanical birds you saw earlier. You think it possible that they might be controllable by the other functions of the remote control.
|
Indeed, this author has heard rumors to that effect but has been unable to duplicate the action as of this writing. This section will be updated, though, if there are any late developments.
By the way, if you disabled the mechanical birds by stoning them earlier, you won't find them roosting here now. |
Returning to the lower level, you find a control on a post next to the ladder. There are guard brackets on it preventing movement of the control arm. You use the hex-key on them then move the control arm. You are startled by an aircraft of sorts that descends onto the launch track. Returning to the front part of the room, you place the gears from your inventory on a stanchion (which happens to be missing some gears) next to the aircraft. You find a crank on a hook on the wall behind you and attach it to one of the gears.
|
The wings on this aircraft, in case you haven't noticed, resemble those of a bat. That has earned it the name, bat-plane. There is even a high-pitched whistle, which you found in the desk, that can be used to recall it if it is at the other end of the line, and you are here. To use it, set the pitch control to its highest position.
The craft is spring driven, and you must wind up the spring, so that the gauge inside registers in the blue area. Thirteen turns of the crank will do it; any more will overload the system, and it will completely unwind itself. If this happens, just start winding again and count more carefully. One winding is enough power for a round trip. |
You bravely climb into the cockpit of this frail-looking aircraft, determined to make it fly. You spot a control handle on the left, but it is prevented from moving by a black guard. You push and pull on it, but it won't move. Finally, you press on the pivot pin that holds the guard, and it swings out of the way. You then move the lever and you're airborne.
| You arrived here by one of two flying machines: the ornithopter from the Island Fortress or the bat-plane from Martin's Roost. In either case, find your way to the portico. From the bat-plane, which lands on a perch at ground level, take an elevator up to the raised portico. The ornithopter lands on top of one of the chambers. Go down the stairs into that chamber then out the door to the portico. If you've already explored the temple and have returned to use the teleporter, click HERE. |
Once on the portico, you find doors to three chambers and enter the middle one, where you meet Liryl, the guardian of the temple. She is lonely since her friends, the priests, have not yet returned from their latest voyage, and you listen to her for a bit. You show her the note from the priests, that you found in the bottle on the beach and give her some seashells, that you happen to have in inventory. Liryl keeps talking, even though she still regards you as a stranger; so you risk being thought of as rude and turn your back to leave and explore the rest of this interesting place.
You enter the chamber on the right and discover the Kinetic Sculpture which resembles an overgrown onion. It has a pair of spheres attached to some arms at its base, and there are some chimes or bells on the ends of the arms. You discover that if you make the chimes on both ends jingle at the same time things happen; first the spheres open to become eyes and then, after more jingling, the whole sculpture opens, revealing an assortment of levers. You swing the two short levers--near the bottom--to the opposite sides to create a slot.
| The final position of the levers is critical; to be sure you drag them all the way, don't stop or let up on the mouse button until the cursor completely leaves the lever on the far side. |
You move the long lever in the middle forward and down into the slot. Jingling the chimes on both sides again, you move the helical lever while they are still jingling and take the CD that appears near the bottom. You remember reading in the game manual that the CD contains the history of this world, that you must learn to gain Liryl's trust, so you take it to the chamber on the left where you find a holographic CD player. Placing the CD on the player to your left, you press the button to view the presentation (you don't have to listen to all of it).
You return to the middle chamber and turn left after reaching the center of the room. You approach the controls to what looks like an electromagnet. As soon as you move the activating lever, Birdman suddenly appears and starts to attack Liryl (dropping the throttle lever for the submarine on the floor if he has it). You haven't any experience with this machine, but you move the levers anyway, positioning the electromagnet near Birdman. After a few tries, you eventually succeed in catching Birdman on the magnet. Liryl thanks you; when you leave the electromagnet to go talk to her, she says that she trusts you.
You go to the control in the center of the room and move it downward, and the floor of the room descends to the lower level. You see that this level is littered with old machinery. Without even turning, you find a circuit board inside a piece of equipment on the right. Then, turning 90 degrees to the left, you find a weapon piece inside a crate. Turning another 90 degrees, you see a display panel. You move closer to get a better view and find a drawing on the wall behind the display. The display lights up with a picture of the Dark Domain volcano and the coordinates of it (22.01, 119.11) when you click on the ram's horns. You make a note of these for later use. Clicking on each of the three crates in front of the display, you find three repair parts for the machine on the upper level of the temple. You assemble the three pieces into a single assembly in the inventory viewer. Finding nothing else of importance on this level, you return to the main level.
|
The drawing you just found is for the weapon you are going to build. One of the 7 pieces it shows, the stock (#6), is already at the work area where you will assemble the weapon. The other six are scattered, one at each of the six regions.
The upper level of the temple houses a teleporter that can transport you back to the lighthouse or some other places you've already visited. Your other option is to return on one of the aircraft and explore other paths from there.
|
You move the control lever in the center of the room upward, and the floor moves to the upper level. You are facing a large control console (pictures below), and you study it for a few minutes before noticing a few large power modules to the left. You go to the left module and connect its electrical cord to an outlet supplying power to the system. You then go to the console and turn on switch (2) and see the panel "power up". You move to the TV screen on the right to select where you want to go.
|
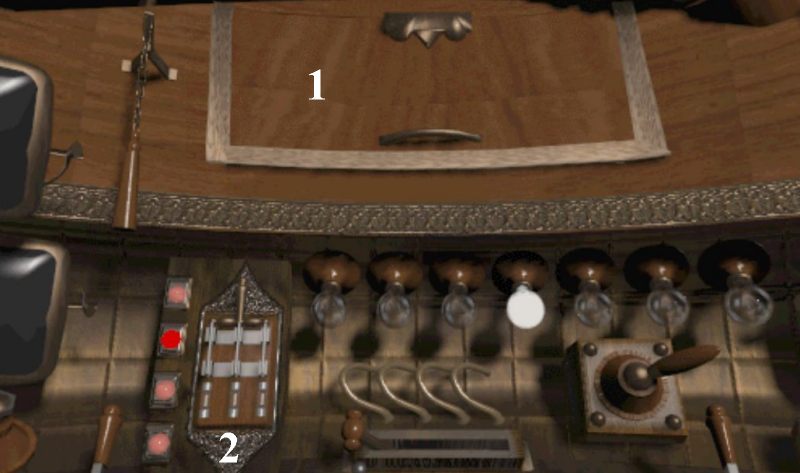
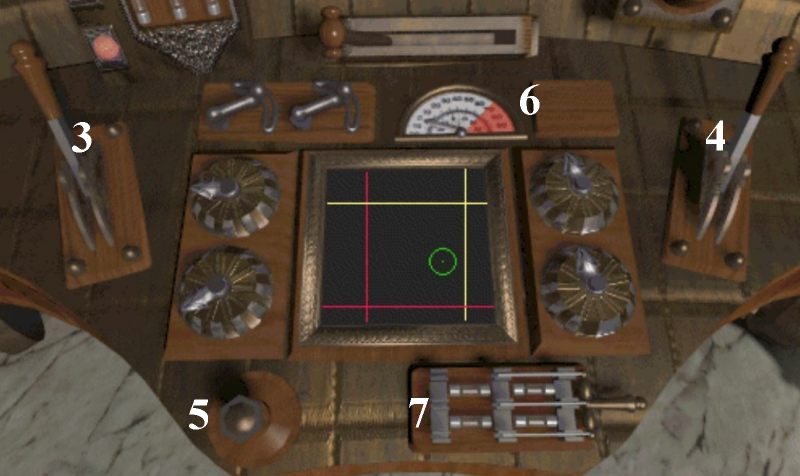
You return to the center console and, moving lever (3),you watch a walkway unfold; moving lever (4) causes the dome of the roof to open. You turn on the viewing screen with button (5). Using the four knobs around the screen, you align all the lines with the target; when you get them all within the target circle, they snap into perfect alignment with the center of the target. You keep a close watch on meter (6) as it rises. When it indicates exactly on the line between white and red, you turn on switch (7). Then you turn around, find your way up the walkway to the open portal, and are on your way after a few parting words with Liryl.
If you allow the meter to rise into the red area, the power supply inside door (1) will be damaged, and you'll have to replace some parts with those you found on the lower level. Then press another push button switch inside the door and start this sequence over.
|
In the hallway of Martin's Roost, as you approach Birdman's shop, you turn right between the two posts with green finials. You descend a stairway that twists and turns down to a loading dock at water level. The first thing you notice is a submarine bobbing in the water, and your eye is drawn to the outlet to the sea, which is blocked by a seagate of sorts. Realizing you must open that gate in order to go anywhere, you start checking over the crane, for no other reason than it's there. It proves to be operational, but you only see a few items within its reach.
| If you've used the sub before, click HERE to skip the preliminaries. To operate the crane's controls, click the spot where you want the control to move rather than dragging it. The vertical control for the hook works only at locations where it's useful. |
You use the crane's controls to swing the boom over one of the weights and lower the hook. Picking up the weight with the crane, you swing the boom around to the only other place where you can lower it, the counterbalance platform out in the water. The platform lowers slightly with the weight. Encouraged by your progress, you repeat the process with the other weight; the platform lowers some more, but the gate remains closed. You swing the crane around to the only remaining item, a loop of metal protruding from the floor. You lift the loop with the crane, and this time the gate opens.
You walk toward the submarine, but there is no gangplank in place to get to the boat. You operate a nearby control wheel, winding it counterclockwise to extend a gangplank. Then you quickly latch the wheel in place with a nearby lever and proceed to board the submarine. You take a few minutes to explore the boat, ending your tour at the controls up front.
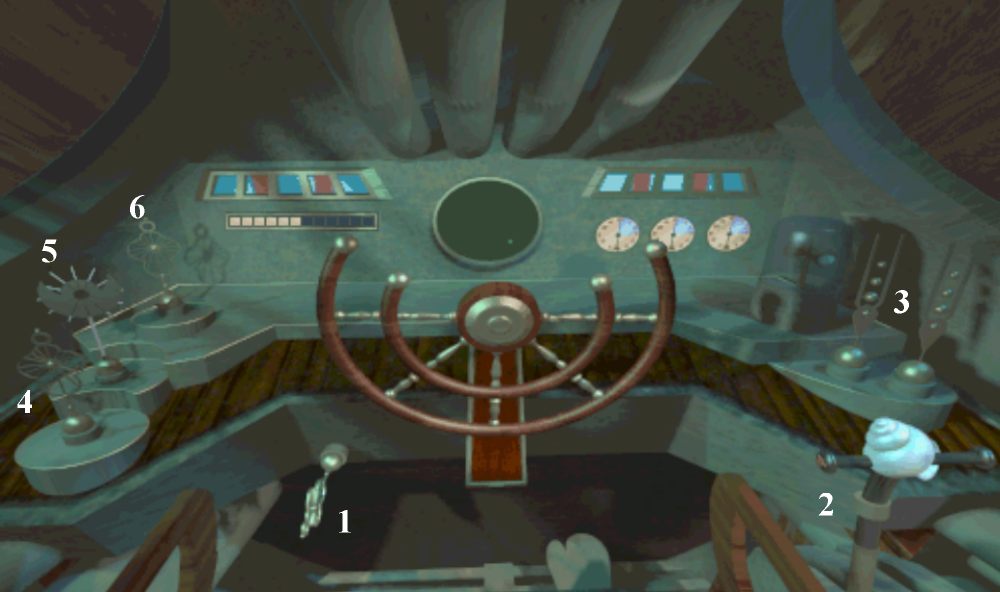
| The first time you use the sub, you must install the throttle handle (2) and make sure the switches (3) that seal the water-tight doors between compartments are in the upright position. These things will not usually need to be repeated. The remainder of the startup procedures will have to be repeated each time you go to sea. However, most voyages are on the surface, and Martin's Roost is the only location where adjustments must be made in the ballast. |
You turn on key-switch (1), which supplies power to the complete panel. Turning on engine-room switch (6), you head to the rear of the boat to start the engines. You turn a small handwheel to open the door and enter the engine-room. When you move the lever on the right, you are startled when many things in the room start moving. Returning to the control area, you turn off switch (6) and turn on ballast panel switch (4). (Having too many switches on at one time overloads the system.) Just behind the control area on the left side of the sub (your left as you face the control area), you find the ballast control panel. You move two levers that control the ballast tanks shown on the panel. Then you turn the left valve, and the left pair of sight-glasses begin filling. When the water level reaches the blue, half-way mark on those sight-glasses, you turn the other valve to begin filling the other sight-glasses. You watch a video clip of the sub diving. Then you turn off switch (4) and turn on the navigation-room switch (5). About half-way back on the boat's left, you find the navigation computer. You examine the map tubes behind the desk and find one with the coordinates 20.67 & 118.96, a much more accurate location for the shipwreck than the note from the bottle. The map opens when you click on it, and you see a red target for each location already entered. You click one of the buttons over the keypad, key in one of the coordinates you just found, then click the other button and key in the other one. When you click on ENTER, a new target flashes at the bottom of the map.
| The target in the middle is the Island Fortress; the one at lower right is Martin's Roost; and the one at the very bottom is the Wreck of the Ironclad, which you just entered. When you key in the coordinates for Dark Domain, its target will be at the very top. When you click on one of these targets, its coordinates appear on the keypad display. Click ENTER on the keypad; that target will flash and that will be the sub's next destination. |
You now take a seat at the control panel and push the throttle lever forward. You watch the voyage in a video clip as the sub travels to the selected destination, shutting itself down upon arrival. If you've arrived at either the Island Fortress or the Dark Domain, you go to the main hatch and debark. If you're returning to Martin's Roost, you turn the key-switch back on along with the ballast panel switch and go to the ballast panel. You move one of the levers to jettison ballast and bring the sub to the surface; then you debark via the hatch. If you've arrived at the shipwreck, you continue below.
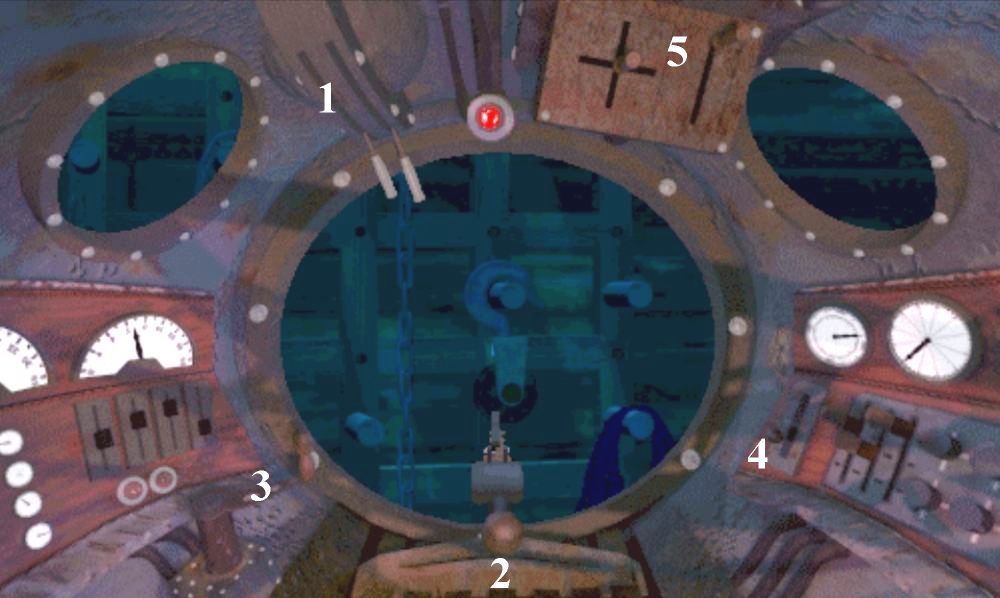
Walking to the main hatch, you descend into another hatch below it and enter a diving pod. You pull the undocking levers (1) then turn to the panel on your right to operate the diving lever. You watch a video clip of the pod moving toward the shipwreck. You navigate the pod to a spot over a hatch on the front section of the wreck by pulling the propulsion lever (3) five times with the directional control (2) to the right, then pulling it once with the directional control in the center. You then watch another video clip of the pod positioning itself over the hatch. Using the diving control to your right, you descend into the hatch. You turn the pod 180 degrees (two turns in either direction with controls (2) & (3)) and spot a hook hanging on the wall (see picture below).
 Mini-sub positioned to grab the hook.
|
You deploy the robotic arm and position it under the hook at its lowest possible position. Then, barely touching the control, you inch the arm up in the smallest increment possible. Operating the lever that extends the arm in a grabbing motion, you snag the hook off the wall. With the hook securely on the robotic arm, you use the diving control on the right to ascend up out of that hold.
You navigate the pod to a different part of the shipwreck (using controls (2) & (3) as before) going left twice, straight forward once, left twice again, and straight forward one more time. You think the pod must have a mind of its own, the way it moves and turns inside the wreck and finally stops facing a skull. "One of the priests?" you think to yourself. Now you use the diving control again to ascend. Turning the pod once to the left, you see a safe under several timbers. You use the arm to knock one timber away and then turn the pod to the left again. You now see why you needed the hook; there is a massive timber with a piece of metal on its end. There is a hole in the metal piece, and you line up your robotic arm to hook into that hole. You extend the arm and watch a video clip of the arm clearing the debris away from the safe, leaving the pod facing the safe again. You extend the arm to open the door and once again to grab the weapon piece inside. You learn the pod does indeed have a mind of its own, since it now finds its own way back to the main sub.
You climb out of the submarine onto a pier. You haven't gone far when you notice a fishing pole stuck in a holder at the far end of the pier. From the way the pole is flexing, you suspect there is something on the line. Clicking on that end of the pier, you see a close-up view of the rod and reel. You reel in a fish. Turning, you see a door into the fortress; you go in and find yourself in a woodworking shop. Surveying the shop, you find some power tools that are driven by a belt system from a power source somewhere nearby. There is a cluttered workbench on one wall with a crate full of spare drive shafts on the floor in front of it; you take one. Exploring a darker doorway, you find you can't go far before encountering an unbridged canal.
You try another doorway and discover the power source for the workshop--good old wind power. You go to the windmill you see directly ahead of you and crank it up into the wind stream. You then pull the clutch lever that's near the crank. Looking to the left, you see where the drive shaft turns the belt pulley and pull the lever to engage it. OOPS! Too late, you realize you should have engaged the gears before pulling the clutch. So, you go release the clutch, then get the spare drive shaft from your inventory, and click it on the broken one to fix it. Then you engage the gears first and then go pull the clutch lever. (NOTE: The shaft has to be replaced only if it actually broke off.)
With power to the shop, you now proceed to build a bridge across that canal. You go to the ripsaw and cut two stringers. Then on the crosscut saw, you cut eight treads. You proceed to the dark doorway and place the stringers across the canal. You are about to lay the first tread when a monster appears and tears out the stringers. You go cut two more stringers, while trying to figure a way of getting the bridge built in spite of the monster. As you pass the window by the door to the windmill room, you hear something outside and go to look.
Each time you look out the window after being away from it, you'll see different things. Back off from the window and come back to see something else.
|
Seeing the monster moving toward the right tower, you go back to rebuild the bridge. You cross over into the room beyond which appears to be a foundry. Moving to the far side, you find a stairway and ascend to a tower which houses a cannon. You look around a bit, and it's not long before the monster appears in another tower for sentry duty. You look at him through the telescope and decide to set things up for some target practice. Going back down the stairs, you go back through the shop to the windmill room. You go up the stairs and into the base of the other tower, where you see a statue and a ladder. Hoping not to come face to face with the monster, you climb the ladder into the monster's sentry post. Looking up you see a hook on which you hang the fish you have in inventory. You now retrace your steps to where you found the cannon.
You remove the pin in the base of the cannon and aim it at the monster's sentry tower. You then pick up a cannon ball, a piece of fuse cord from a spool laying there, and a sack of gunpowder. Clicking on the cannon to get a close-up view, you open the breach of the cannon and load it with the gunpowder first and then the cannon ball. Closing the breach, you place the fuze cord in the hole provided for it. Looking up from the cannon, you wait for the monster to find the fish, if he hasn't already. You get your lighter from inventory, open the lid, flick the flint-wheel to light it, and touch it to the fuse. Bye-bye monster!
Retracing your steps again, you return to the tower above the windmill room, where you saw the statue. This time you go around the statue and out the other door. You have free access to the walkway between the towers, now that the monster is gone. You enter the other tower and find the loft where the other aircraft, the ornithopter, is kept. You notice it has a broken part but decide to investigate it later, because right now you're more interested in something you see on the workbench to the right. You pick up a key and head straight back to the statue in the other tower. You want to try the key in a locked compartment you saw in its base. It fits, and you take a weapon piece you find in it and return to the workshop.
|
It's option time again. You have a choice of returning to the submarine and traveling to another region, or repairing the ornithopter and flying to the temple. |
Having decided to repair the ornithopter, you enter the foundry where you plan to cast a new part for it. Turning to the left as you enter, you find a mold for the part on one of the benches. You walk around to the other side of the central work bench and place the mold in the middle of it. Finding some wood and some coal along the wall, you put first the wood, then the coal into the furnace at the right end of the work bench. You set it ablaze, using the lighter. You find some iron ingots along the same wall and place them in the crucible. You push the lever on the right to move the crucible into the furnace. You leave it there a full 30 seconds to give it time to melt, before pulling the lever to bring it out. Then you push a button along the edge of the bench to pour the molten metal into the mold. Using the lever beside the button, you move the mold into the quenching tank. When the steaming stops, you move it back to the work bench and open it. You pick up the newly-cast part and take it to the loft where you found the ornithopter.
You move as close as possible to the damaged part and click the new part on it to fix it. You then turn toward the bench on the right and pull a lever which turns the aircraft around. At the rear of the aircraft, you find a crank to wind it up. You click a button near the top of the mechanism to connect it to the aircraft and then crank it until it stops. Moving to the front of the ornithopter, you jump into the cockpit. You move a lever on the left to move the aircraft to the end of the launch track. You move a knob on the right side of the control panel which unfolds the wings; then a lever on the left side of the panel which starts them flapping. You now push a larger lever on the right, and you're airborne.
As you arrive at Dark Domain (Dark Being's lair), you get a brief glimpse of an open drawbridge on a higher level. Clambering out of the submarine, you happen to look to the left and see Dark Being through a window; apparently, he sees you, too. You jump over to a dock where you see a driller train over to the left; it's a large machine with an auger on the front, a winch on the back and running on railroad tracks. But you find a locked gate across the tracks and start looking for a way to open it. Looking in the train's toolbox, you see some dynamite and a few tools. You take the bolt cutters and use them on the lock; then you open the gate. Entering the train, you turn on the main switch on its rear wall; then you move to the front. You see a lever on the right which you surmise is the throttle, because it has both forward and rearward movement. You press a button next to it, and the engines come to life. There are other controls which you figure you'll learn about as needed. For now, you click on the slot ahead of what you think is the throttle to move it, and the train moves forward, but it stops after going a short distance on what appears to be a turntable.
You click on a red button on a small panel which appeared as the train stopped and find yourself outside on the turntable. The turntable appears to be mounted on tracks to move vertically as well as rotate, and you go to one of the gearboxes nearby. You find a lever on it which you move, and the turntable rises to the next level. Having more room at this level, you look around and find tracks going in all four directions, and they all look similar, except for some boards above one track. You think this could be the granddaddy of all mazes and decide to take the compass out of inventory and use it. Doing this you learn that the eastbound track is the one with boards over it.
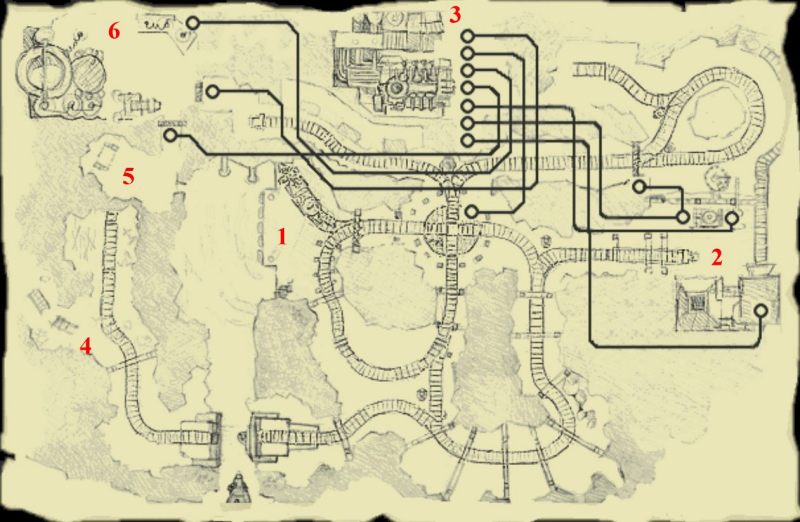 This map shows the layout of the tracks and the steam pipes which power everything here. You'll find the map in the game as you explore the volcano, but you won't be able to take it with you. Some locations have been numbered to help you orient yourself.
|
You click the red button again to reboard the train. Deciding to explore some of this maze of track, you move the throttle to proceed on the eastbound track. After passing a few sidetracks, you find yourself back at the turntable headed north. You continue across the turntable, northbound, and notice a red light appearing on the control panel, next to a lever, as the train approaches the switch to another side track. Never-the-less, you continue on until the train comes to a stop, where a gate across the tracks blocks the way. All of your attempts to breach this gate fail, so you back the train back to the turntable, stopping on it.
You now proceed, northbound again, and this time when the red light comes on, you move the lever by it. As you suspected, it operates the track switch, and you go in the other direction. (NOTE: This lever works on the switches only when the train is in motion.) You haven't gone far when you see Dark Being, and unfortunately he sees you. He releases a pile of rocks that roll across the tracks, blocking them. You remember the dynamite you saw in the train's toolbox and get out to get some of it. You place a few sticks on the rocks and use your lighter on it. With the track cleared, you proceed a short distance to a dead end. You get off the train and find a door which you can't open. You see some steam pipes and think that the steam is probably turned off somewhere. So you remember the looks of the pipes, to possibly identify them on the other end, and return to the train. Again you return the train to the turntable.
You get off the train at the turntable and go to a control you noticed earlier next to one of the four gearboxes. When you find it, you open it and turn a small crank one turn clockwise. As you suspected, it rotates the turntable. But since it only turned 90 degrees, you do it again to turn the train so it's headed south. Back in the train, you start traveling south retracing in reverse the route you took earlier. You pass a pair of sidetracks close together and awhile later, you come to a third one. This time you operate the switch when the red light comes on and take the siding to the right. When the train stops at a barricade, you get out to explore the area.
You hear some type of machinery operating, and as you get closer, you see that it is a conveyor belt system moving small rocks to what looks like a crusher. And there is baby Amanda at the controls. You check the two controls you see in front of Amanda; each is supplied by a separate steam pipe. The one on the left seems to have steam in its pipe, because its gauge rises when the valve wheel is turned on. And when you move that control lever you hear something clank. Your curiousity aroused, you get the umbrella you've been carrying in inventory, and after a few timing failures, manage to stick it in the hole above one of the conveyor's doors while it's open. Crawling into the open doorway, you can see the tracks in the next tunnel over--the tracks with the gate blocking them. You go operate the control lever again and come back and verify that it does control that gate, and that with the lever pushed, the gate stays open. You retrieve your umbrella, thinking that it might come in handy again. You try the other control but to no avail; there's no steam in that pipe. Disappointed that you cannot rescue Amanda at this time, you make a mental note of that pipe's appearance and go back to the train.
You back the train to the switch and far enough beyond it that it is almost out of sight. Then you travel forward again, taking the left track at the switch and stopping when you reach the turntable. Now that you know the gate is open, you want to go on that track again. So you turn the turntable to the north and follow that track to its end. What you find makes you think you have journeyed to the volcano's core; steam is being generated by the heat of molten lava. You find a row of valves in front of the steam boilers and look for pipe styles that match those you noted earlier. You find the pipe on the far right looks like the one at the door you couldn't open, so you turn it to the left to open it. Then you open the third one from the left, since it looks like the one in the rock-crusher room. Testing the other valves, you find them all open except the fourth from the left. You hesitate to open it, not knowing what it does. You turn to the right to explore the lava pit in the next room and notice a map on the wall by the doorway. Studying the map, you learn that the steam pipe with the closed valve supplies power to another door. So you go back and open it by turning it to the left.
Returning to the lava pit, you go to the end of the walk-way and carefully peer over the edge. You see an elevator car, suspended from a cable, but part-way down in the pit. Looking around, you see a control panel a short distance to the right, but the walk-way has parted and one section is left hanging. You click on the hanging section to get a close-up view and then snag it with your handy umbrella. While holding it up in this manner, you latch a small hook near the right edge of the walk-way to keep it in place. You move a lever on the control panel, and the elevator car moves to the top. You get in the car and bravely depress the control to descend. You watch a video clip of the car starting to descend while turning 180 degrees to position a viewing window and some type of implement toward a wall that has some pipes attached. When the video ends, you move the car the rest of the way to the bottom and discover a heat-resistant metal sphere. It is obvious to you that you must manipulate the valves you saw, using another robotic arm, to cause this sphere to open.
|
This is perhaps the most difficult task in this game. This arm seems harder to control than the one in the mini-sub. The horizontal arrow keys on the keyboard will move the arm horizontally; the vertical arrow keys operate the car's control. You can also use the mouse and cursor to operate these controls. You must click on the arm's joy-stick control to extend the arm. The knob next to the joy-stick rotates the end of the arm.
The task is to turn four of the six arrow-shaped valves from the vertical to the horizontal position. They don't all turn the same direction. Tracing the pipes up from the sphere will give you a clue to which ones to turn; escaping steam indicates a wrong choice. Counting from the top down, turn 1,2,4, and 6. Strangely, the valves seem to turn in the opposite direction from the end of the arm. And sometimes the valve doesn't turn, even though the light is on indicating that it should. Before leaving the lava pit, you must put all valves back to their original position with the arrows vertical. Otherwise, there won't be sufficient steam to hold that gate open and you'll be stuck here. |
When you have the valves positioned to open the sphere, you descend to the bottom. Extending the arm into the open sphere, you find you must raise the car slightly to reach the weapon piece inside. You then start your ascent, stopping to reset the valves to their original state. That done, you continue upward. The car stops before reaching the top, and you push the control upward again to initiate the video clip of the final ascent. Having collected your prize, you scurry out of this inferno and back to the train.
Remembering the map you just saw, you have no trouble finding your way back to Amanda. Now when you turn the right valve handle in front of Amanda, the gauge rises. You pull the control handle and turn to see an electromagnetic hoist move over the conveyor belt at the far end. You've noticed that every third rock moving along the conveyor is a tad bigger and is light brown in color, indicating that it is iron ore, which is magnetic. Now you notice that each time the crusher behind Amanda comes down on one of these, another one is under the magnet. So you watch for the next piece of iron ore to enter the crusher. Then you push the button, next to the control lever, just as Amanda begins to lower her left arm to move the conveyor. Now you push the control lever to move the magnet with the piece of iron ore toward you; pushing it again, you move it over a lever beside Amanda's cage. You drop the rock by pushing the button again, and Amanda drops from her seat and moves out of sight. You do your umbrella trick on the conveyor door again, only this time, you must open the door yourself. You crawl in and get Amanda. You are a tad loath to put Amanda in your inventory bag, but you don't have much choice.
Boarding the train again, you take it to the turntable where you turn it to face east. You proceed eastward, passing the siding going to the rock crusher and watch for the red light to come on as you approach the first switch of that double intersection. But it doesn't come on, so you stop at the switch to try to fix it. Getting out of the train, you find a hex bar in a box by the switch machine. You place the hex bar into the switch machine and go to the train to look in its tool box. Finding a wrench there, you take it to the switch machine and use it on the hex bar. You back the train a ways down the track, then come back forward, trying the red light again; this time it works, and you continue to explore that sidetrack. A short while later you are stopped by an open drawbridge; what's more, the draw is on the other side. You get out and look to see how it might be lowered from this side. You finally find a lever located below track level, but now you're faced with the problem of how to reach it. Finally, you remember the winch on the back of the train and head for the turntable to turn it around. On the way back, you find it a mite tricky operating the switch while going backward, but after a couple misses, you get the knack of it. When you get out of the train at the bridge, the winch controls go with you. You lower the hook, and when you raise it again, it catches the lever and lowers the drawbridge. Having a desire to see where you're going, you go to the turntable again to turn around.
You've already had to fix a switch and lower an open drawbridge on this siding, so you proceed cautiously, expecting to find more difficulties. (Good spot to save your game.) Sure enough, you haven't gone far beyond the bridge, when you see a broken rail up ahead and stop the train barely in time. Looking in the train's toolbox again, you take the only tool available. Clicking on the track to get a close-up view, you use the tool to pull the spikes holding the broken rail down and remove the rail. You see a section of abandoned track over to the left and go to it. You use the tool again to remove a piece of rail there and take it to repair the broken track. Back in the train, you continue uneventfully to the end of the track. You remember, from looking at the map, that the room where you would like to be is on the other side of that wall directly ahead of you. You decide to try the auger on the front of the train. You click on the control in the middle of the control panel and watch a video clip of the auger in action. And then you proceed through the hole into the workshop and move to the workbench where you will build the vacuum cannon.
You should have the assembly drawing and six of the weapon pieces by now and be ready to put it together. Click on the stock in the vise to get the assembly screen. You can turn the pieces to facilitate assembly; a rear view of the weapon seems to work for most pieces.
|
You step back from the workbench and do an about-face to face the entrance to the lab. You find a steel door similar to the one you found earlier; but this one opens when you click on it. As the door opens you see Dark Being moving across the room. You take one step into the doorway to watch better without being seen. You get the cannon from inventory and watch Dark Being as he prepares to open the portal. You see him moving from left to right as he:
- Installs a power modulator tube in the machine.
- Turns a wheel 2 or 3 times.
- Pulls a long, floor-mounted lever.
- Pulls a shorter lever.
- Turns a crank several times.
- Moves to pull another floor-mounted lever but you capture him with the cannon before he moves it.
| Actually, you can capture Dark Being at any point during the above procedure; but the more of it you let him do, the less you will have to do when you want the portal open. On the other hand, if you let Dark Being complete the procedure and open the portal, he escapes from you. If this happens, push that last lever back to its original position to close the portal and return to the train. When you come back to the lab, Dark Being will be opening the portal again. Or you can continue, without capturing Dark Being (one of the alternate endings). |
With Dark Being out of the way, you explore the lab, finding Dr. Krick lying on a trance-inducing machine. You go to the machine and move a lever on the left to place an electrode on Dr. Krick's head. You see two switches next to the lever and operate the one on the right. Then you set the knob to the second mark from the top. You then operate the lever on the right three times to bring Dr. Krick out of his trance. He complains of a headache, but you figure that will wear off, and you push the lever that opens the portal. Now when you click on Dr. Krick, he says he can't leave without Amanda. So, you get Amanda out of inventory and click her on him to show him. He then asks about his blueprints. You spot a strongbox under a table that might contain them, only it's locked. You head for the train to get a tool.
As you reach for the rock hammer, you spot the dynamite and decide to build a bomb. You click on the dynamite (if some goes to inventory, click again on what's left in the toolbox) to get a close-up view. Now you get the circuit board and alarm clock from inventory and add first the circuit board and then the clock to the dynamite. You have a time bomb! And only one hour to go! You hurry back to the lab and click on the strongbox to get a close-up view. You attack it with the rock hammer and open it to get the blueprints. When you show the blueprints to Dr. Krick, he gets up and steps through the portal. You follow with Amanda and the blueprints still in your inventory. You all meet in front of the fireplace in the lighthouse den. Dr. Krick thanks you and, as a finishing touch, asks you to throw the bottled Dark Being into the sea.
Direct all comments and requests to the author, Tom Sr
Copyright 2001 Tom Sr