Lost Chronicles of Zerzura
By Cranberry Production
Walkthrough by MaGtRo November 2012
Gameplay:
The main menu has new game, load game, continue
game, settings, The Team and quit.
Settings selection has adjustments for game, graph and
sound.
Game has adjustments for display dialogue text,
software mouse pointer, additional game help and activate hotspot
indicator.
Graph selection has screen resolution, refresh
rate, gamma and quality adjustments.
Sound selection has general, music, speech,
effects and environment volume control.
The hotspots, in game menu and diary are seen
at top right when the cursor is placed at top of the screen.
Inventory bar is opened when the cursor is placed
at bottom of screen. There are scroll arrows at either side of the bar.
ESC key accesses the main menu and skips video
sequences.
The tab key skips in-game cutscenes.
The manual is found in the installed game program.
Puzzles can be skipped if the additional game
help option is selected. The skip option appears (laurel leaves) after certain
time or after a number of failed attempts. The puzzle can be left for
another time by clicking the door icon.
Hotspots in the game screen can be seen with the
space bar if that option was selected.
The left mouse button is for all actions in the
game.
The mouse wheel scrolls through the inventory
items.
The right mouse button shows the information about
an inventory item
The cursor on an active item or character changes
to a symbol that shows the possible action that can be done.
Read the diary to learn what Feodor plans to do
and get clues.
The saved game files are found in My Documents
folder.
Thanks, Ludwig.
The Inquisition has arrived. In a room, white
haired Susanna delivers her second son. The Inquisition knocks
on her door. Thabit her companion takes the white haired older son and
newborn child down the cellar. The door was forced opened. Gonzalo, the
leader of Inquisition takes the key from her neck. Susanna is burned at
stake.
20 years later in Barcelona, 1514
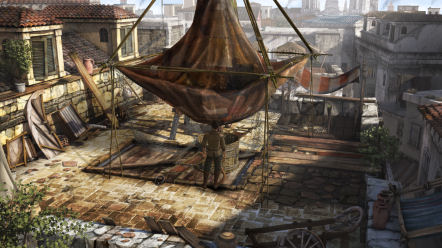
Test Flights:
Test flight 19: Feodor
Morales shows Senor Conde the test flight of the flying machine.
A safety net across the trees at right was
installed after Ramon's accident during test flight 17. The Spanish
Inquisition sailed into the harbor today.
Look around. Check the offering stone, cover for
the flying machine on the ground, landing site and the path.
Check the flying machine up the hill at left. Talk
to Ramon. Learn that Feodor has a kind of vertigo.
Talk to Conde. Learn that he has a wager with
Count of Florence; who hired Da Vinci to build his flying machine.
Begin test fight by clicking on the flying
machine. Ramon flies but hits the trees and falls off the cliff. Ramon lands on a protruding tree.
The Conde gives them one week more to produce a
viable flying machine that will win him the wager. After he threatens them
with the inquisition, the Conde leaves.
Get Ramon off the cliff:
Examine the workshop cart. Take the rails
and rungs. Check the toolbox to get a knife.
Go to the tree at right and use the knife to cut a
piece of the catch net.
In inventory combine the rungs with the net to
make a rope ladder.
Go to the cliff and talk to Ramon. Use the rope
ladder on the root of the tree. Ramon climbs up.
Get the flying machine down:
Ramon cannot help since he hurt his leg.
Take the rope ladder again from the roots
by the cliff.
In inventory combine the rope ladder with the
rails to make a ladder.
Use the ladder on the tree. Climb the ladder and
Feodor takes the flying machine.
The brothers go back to town.
New flying machine:
Workshop roof: Feodor
thinks of lighter materials for his machine.
Look around. Check the toy - pig bladder hanging
on the left wall. It is light and airtight.
Take the invention - water pressure machine
under the bench at back wall. Right click to check it in inventory. It needs
a hole so that it can shoot water when pressure is applied.
Check the other items: wing and old flying
machine. Check the crane and hatch.
Workshop: Go downstairs
and look around.
Check the basket by the stairs, boat skeleton on
top of cart, bellows above the boat, wagon wheels and fishing rod by door.
Water pressure machine:
Go to the lathe at bottom right. Use the water pressure machine on the lathe
to bore a hole.
New invention ideas:
Sit on the worktable and see drawings for a new flying machine idea.
Select in order: boat skeleton, fishing rod, pigs
bladder, bellows and basket.
Feodor needs willow fishing rods, light leather, a
net and a large basket.
Items: Check the cart to
get the net.
Pick up the calamine from top of anvil.
Take pliers and the money - copper coins left of the anvil.
Take the leather hose right of Ramon.
Ramon: Check the artefact
- ankh on the table at bottom right. Read the letter from Uncle Thabit
beside it. Thabit found a glass artefact in North Africa; it is a part of a
larger piece.
Check the drawings (ankh and Uraeus) at left and
the bowl of tar in front of Ramon.
Talk to Ramon. Ramon is interested in Egyptian
artefacts only and has a goal. Feodor tells him about the new flying machine
idea.
Idea for an invention:
Gather the parts:
Exit the workshop and Ramon reminds Feodor to
visit Uncle Thabit.
Check the different places in the marketplace:
Fisherman's window shutters and Hernando's fruit stall.
Uncle Thabit: Enter the
shop at right. Talk to
Thabit about Ramon, leather and artefact. Thabit gives the glass artefact.
Look around at everything in the store especially
the stone figures by the scales in front of the left window.
Talk to Thabit about the stone figures. Customers
want gold not stones. Take the stone figurines.
Go back to the workshop. Give Ramon the glass
artefact from Thabit.
Forge brass figurines:
Open the furnace. Take the stone jug inside.
In inventory, place the copper coins and
calamine (zinc oxide) in the stone jug.
Place the filled stone jug inside the
furnace.
Attach the leather hose to the bellows' hole
and the other end to the forge right of furnace.
Pull the rope hoist to heat up the furnace.
In inventory combine the pliers with the stone
figures.
Open the furnace and use the pliers with stone
figures with the molten brass inside the furnace.
Get brass figures and pliers
back in inventory.
Take the leather hose off the bellows.
Go back to Thabit's shop. Give the brass
figurines to Thabit. Ask for the leather. Thabit gives the camel leather as
well as a silver coin.
Exit the shop.
Pedro the Angler: Go to
the harbour. Talk to Pedro fishing at end of dock.
Ask about wicker and the Inquisition ship. His
boat is broken.
Fix the boat: Check
the rowing boat and see the hole.
Take the planks (with hammer and nails)
on the dock. Check the barrel left of boat. It has flax fibers.
Take the thin leather hose left of the
barrel.
Use planks and then the flax fibers on the
broken boat.
Go back to the workshop. Ask Ramon for the tar
in front of him. Take the bowl of tar.
Go back to the broken boat and use the bowl of
tar on the boat.
Talk to Pedro the fisherman. He gives the
willow fishing rod.
Silvia: Pedro wants
Feodor to tell Silvia his wife that he will be bringing fish home
tonight.
Go back to the marketplace. Knock on the
window shutter of Pedro and Silvia's house.
Talk to Silvia. Ask for the rest of the
wicker fishing rods.
Merchant: Talk to the
merchant - basket seller at right.
The basket seller will sell a basket for one
silver if Feodor can make him something to cool his stall.
The fruit seller has not been seen for 2 days.
Make a cooling contraption:
Check the cloth awning over the stall. The sun heats it up.
In inventory combine the thin leather hose
from harbour and the holed water pressure machine to get machine and
hose.
Use the knife on the hose of the contraption
to get far water pump. Give the far water pump to the basket seller.
The merchant will deliver the basket to the
workshop
roof.
See inquisition soldiers enter Thabit's shop.
Build the flying machine:
Go back to the workshop. Now that he has all the
parts, Feodor runs to the roof to put the flying machine together.
Combine the wicker and the rope left of the crane.
Attach these to the crane. See a house like frame over the hatch.
Cover the frame with leather from bottom left.
Attach the net to the frame.
Place the basket on the hatch. Feodor attaches the
wings to the basket.
Attach the net to the basket. Now the skyball is
put together.
Attach the leather hose to the flying machine and
the other end to the hatch.
Go downstairs and attach the other end of the
leather hose to the bellows.
Ramon abducted:
Talk to Ramon. Ramon and Feodor argue about
Ramon's preoccupation with the artefact.
Thabit enters with 2 inquisition soldiers.
The soldiers arrest Ramon. Feodor is hit
unconscious by one of the guards.
Thabit explains that the soldiers ask about the
glass artefact that he got in his travels. He told them about Ramon.
Thabit tells Feodor about his mother who he met at
Tripoli. She was burned at stake by the grand inquisitor himself.
Feodor wants to break in that ship.
Get inside the ship:
Silvia: A woman of the
night walks away after being told to go away by the soldiers. Talk to
Silvia, Pedro's wife.
Ask about the ship. Learn that there are only 2
guards in the watch.
Look around and see the 2 guards aboard the ship
and seagulls on the bowsprits.
Pick up a paving stone beside Silvia. Get lumps of butter from the barrel in the
foreground.
Thabit: Tell Thabit to
hide among the barrels.
Give the paving stones to Thabit. Tell him to
throw it to the seagulls when a signal is given.
Pick up another paving stone beside Silvia.
Torch: Use the paving
stone on the torch. Feodor gives the signal to Thabit and at the same time
throws the stone on the torch. The torch goes out.
Cannon port: Go to
the cannon port. See that the hinges are rusty. Use the lumps of butter on
cannon port.
Try to open it. Something is holding it back. Use
the knife on the rope holding the cannon port and then enter.
Open the hatch:
Look around and see a locked hatch. If only we can
pick the lock.
Check the cannon to get matches. Pick up
the rope from the floor.
Take the copper cauldron from the wall at
back. Use the pliers to take the nail that held the cauldron to the
wall.
Check the lantern, vice, stove and fireplace. The
stove is open to the sky and there are still embers in the fireplace.
Take the sailcloth from the center post.
Prepare the fire:
Remember that the stove is open to the sky.
In inventory combine the sailcloth and rope to get
bundle of cloth.
Use the bundle of cloth on the cannon port to get wet sail cloth.
Use wet sail cloth on stove.
Use the matches on lantern to get lit match.
Use lit match on fireplace.
Make a lock pick: In inventory
combine the pliers with nail. Use nail with pliers on fireplace.
Use pliers on fireplace to get the glowing nail.
Use glowing nail on vise and get a lock pick.
Use lock pick on lock of the hatch.
Go down the hatch. Feodor talks to Ramon locked in
a cage.
The soldiers come down to check the noise. Feodor hides at the left room. One soldier is left
here to guard Ramon.
Get off the ship:
Feodor wants to get off the ship to think of a
plan to get Ramon out of here but he is trapped.
Hatch: Check the hatch
and see that it has some water and will fill with water when the ship leaves
for Tripoli. It is a good hiding place though.
Look around. Check the cannon barrel and the side
of the ship. Check the knothole and the cover on the ceiling.
The barrel and chest have food in them.
Arrange the escape:
Save game here, just in case.
Move the cannon barrel to face the side of the
ship. It makes a noise. Immediately enter the hatch. The guard checks the
noise.
The cannon dropped a cannon ball. Take the
cannon ball. It doesn't have any gunpowder.
Use the knife on the knothole at the ceiling and
gunpowder pours down. Pick up the gunpowder.
Tilt the cannon barrel to the ceiling. Use
gunpowder, then cannonball and then flax fiber on cannon barrel.
Tilt the loaded cannon barrel to the side of the
ship.
Use the match on the lantern. Use the burning
match on the cannon barrel.
A hole is made on the side of the ship. Exit
through hole.
All is lost:
Hot air balloon: At the
workshop while holding on to the door close, Thabit tells Feodor that Tripoli is where she met their mother.
She was holding on to Ramon and very pregnant with Feodor.
The soldiers throws torch in the workshop. Thabit
will hold them back while Feodor escapes.
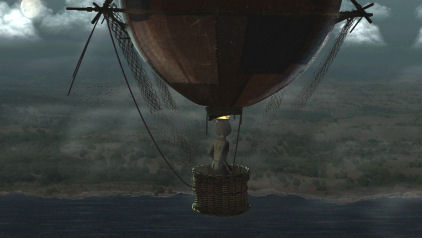
Feodor runs to the roof and see that the hot air
balloon is inflated because of heat. Click on basket to climb in.
Feodor catches a lit torch thrown by a
soldier.
Flying in hot air balloon:
Check everything. The stars guides Feodor and the
flight direction tells him he is by the coast and going southward.
Heat the leather balloon: Check the leather balloon and see that it is going down. It needs heat.
In inventory use the pliers on the copper pot to
remove the handle. Use the pliers on the handle to get 2 hooks.
Use the 2 hooks on the leather balloon and Feodor
attaches them inside the balloon.
Use the copper cauldron on the hook to get a stove. Place the torch in the cauldron.
Check the wings and get Ramon's personal
talisman - a lion mask.
Take the wings. Use the wings in the
cauldron that has the torch.
Use the knife on the basket to get branches.
Use branches on copper cauldron.
Feodor hits a church tower and stops the hot air
balloon trip.
Southern Spain - Almeria, a harbour town in
Andalusia
Get down the church spire:
Look around. Check the ocean and the city below.
There's noise of a battle.
Use the knife to take a piece of the net.
Open the hatch: Check the
hatch and see that it is locked.
Take the iron bar from the hanging assembly
on the ceiling. Pick up a loose stone from the ledge.
Place the stone beside the hatch. Then use the
iron bar on the stone. Feodor pries the hatch open.
Climb down the tower:
Go down the hatch.
Take the board by Feodor's foot and place
it on the gap at left. Feodor walks to the left ramp.
Check the window at left. Feodor wants a safety
protection - so use the net on the window.
Climb through window. Feodor is in one piece on
the next lower level.
Climb down the ladder at right. Creak.
See a ladder and a wooden platter across the way.
Use the stone on the wooden platter to make a bridge.
Jump to the frame at bottom corner. Then go down
the ladder.
Barricade:
Jamila: Feodor exits the
church but is pushed back in by a strange girl.
The girl wants Feodor to fix the hot air balloon
so that her father can reach North Africa. The girl runs away after learning that Feodor
can't fix the hot air balloon.
Follow the girl since she mentioned North Africa.
Guard: Meet the guard
that is guarding a barricade. He wants something to drink and gives Feodor a
canteen.
Talk to the guard. Learn that his order is to seal
the city from the corsairs that arrive 3 days ago. No one leaves the city.
Go back to the front of the church. Fill the
canteen from the well.
Try to take peaches from the bush right of the
church door. The wasps stop Feodor.
Take the wooden pole left of the church
door and use it on the peach bush. Pick up the fermented peaches.
Combine the canteen with water and fermented
peaches. Check the canteen and learn that the water stinks.
Go back to the guard. Take a lemon from the tree
left of the guard.
Use the knife on lemon. Add the cut lemon
to the canteen.
Give the canteen with fermented water to the
guard. He drunk it fast and the fermented peaches had an effect. He told
Feodor to watch the gate.
Corsair Ship
Imprisoned:
Go towards the harbour and meet a Corsair. The
strange girl, Jamila stops her father Capitan Carlos. Feodor is taken as a
slave.
Jamila gives Feodor dried leg
of mutton and bread. She says that it is nearly her birthday and that
he is her gift.
The ship is attacked and a hit makes a hole on the
side of the ship.
Get out of the cell:
Check the wooden grille, iron fittings and lock of his cell.
Take iron rivet and cutlass by his
cell.
Use the cutlass on the iron fittings of the cell
grille. The cutlass has notches on the blade now.
Use the notched cutlass on the wooden grille.
Take the hand crossbow. It needs a bolt.
Right click the dried leg of mutton and get bone.
Combine the rivet with bone to get bolt. Use the bolt with crossbow to get loaded crossbow.
Use loaded crossbow on the bracket of the
grappling hook. Take the grappling hook.
Use the grappling hook on the key ring. Use
the key ring on the lock of the cell.
Take the lock from the cell.
Check the mast at center of the ship. Check the
spices, bale and rum on the wall.
Take the broken pump drill, hammer
and chisel from the chest.
Go to the next room: See
that entryway is blocked by barrels.
Open the wooden grille at right. Feodor
enters and is now under a grille with a heavy barrel.
Fix the broken pump drill by combining it with the
crossbow to make pump drill.
Use the pump drill on the heavy barrel. The water
flows out. Move the wooden grill and Feodor climbs out.
Take the empty bucket from the wall.
Save Pig headed Jamila:
Check the ladder at right and see that it leads to
a closed hatch. Climb the ladder at left to be outside.
Hear Jamila cry for help. Her cabin is on fire.
See that her cabin is blocked.
Get water: Go below deck
again and enter the bilge to go to the other area.
Go left and see that Feodor's old cell is filled
with water. Use the bucket on the bilge filled with water to get a bucket
with water.
Go back up to the deck.
Put out the fire in the cabin:
Look around the carnage at right.
Check Capitan Carlos in bloody red outfit. Feodor
takes his sabre.
Look close at the dead corsair left of Jamila's
cabin. Take the gunpowder horn.
Take the Arquebus-rifle right of the dead corsair.
See a split-gap on the wall left of the cabin
door.
In inventory use the hammer and chisel on the
Arquebus to get bent barrel.
Use the sabre to open the gunpowder horn.
Use the bent barrel on the split on the wall. Use
the opened horn on the end of the bent barrel.
Use bucket of water on the funnel
contraption. It puts out the fire in the cabin.
Jamila comes out on deck and finds his father.
The inquisition soldiers fired at them with no warning.
Make the Corsair ship functional:
Talk to Jamila. Find out that a substance like tar
is in a barrel with white twine on the lid.
Jamila gives the necklace with key to her
father's cabin so that his map can be checked. Jamila saw the one that shot
her father.
Captain's cabin: Go below
deck and climb the ladder to the cabin.
Look around. Check the chest at center of room,
burn marks under table and chair.
Close the hatch and see loose planks behind it.
The planks covered a chest.
Use the key on the necklace to open the chest.
Take the contents: Portolan chart, navigation devices,
telescope and razor.
Look at chest again and see a false bottom. It was
loaded with IOUs.
Take the sack full of nails right of the
chest.
Seal the leak:
Go back down and then check the empty barrel that
Feodor drained the water from earlier. It is left of the bilge. Use the
hammer and chisel on empty barrel to get planks.
Climb the ladder to the deck. Look close at the
door to the blocked cabin. See that the fallen mast has thick rope. Use the
razor to scrape hemp fibers off the thick rope.
Go back below deck and enter the bilge. At left
side, check the barrel that blocked the entryway. It has rubber. Use the
bucket to get bucket with rubber. (If your bucket has water, empty it
on the bilge that has water at left. Be sure to stand on the foreground and
then click the bucket on the bilge.)
Go far left to the bilge filled with water.
Raise the wooden grille. Use the planks on the
wooden grille.
Use the hemp fibers on the planks of the wooden
grille. Then use the bucket of rubber on the wooden grille.
Close the wooden grille. Use the lock on the
wooden grille.
Find out where the ship is now:
Go up to the deck. Use the telescope on the ocean.
In inventory, combine the Portolan chart and the
navigational device.
See landmarks through the telescope.
Use the arrows at right and left to see 4 points of
reference. Click on each landmark so that Feodor will note it in the map.
The points of reference are: a
town on a rocky hill, a sunken ship, a castle and an island with one tree.
Click on the map at top right. See the map and the
4 arrows that mark the directions of the points of reference.
Click-hold-move-drop the marker to get the arrows
over the
icons that marked the ship, castle, island and town. Got it!
They are close to Malta.
Sail to land:
Check the hand cart at center of the ship right of
the broken mast. Use the hammer and chisel on the hand cart to get the wheel
hub.
Use the anchor winch at left on the broken railing
at far side of the ship. Jamila helps to place the railing through the
anchor winch.
Open the covering on deck left of Jamila. See 8
oars inside. Use the wheel hub on the 8 oars. Feodor makes 2 paddle wheels.
Use the paddle wheels on the anchor winch with
railing.
Now that all preparations are done, talk to Jamila.
Being in Malta is good and bad.
Malta is where the secret base is located and
Jamila's father is not in good graces with the leader of the Corsairs.
Capitan Carlos sailed alone without permission.
Tell Jamila that the drive is ready. Use the razor
to drop the anchor at bottom left.
Jamila and Feodor hit a reef close to Malta. They
swam ashore.
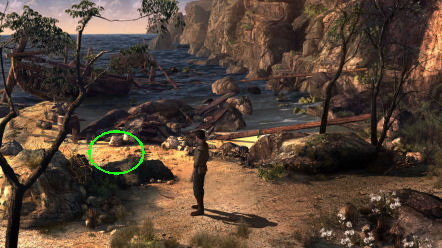
Malta
Learn of the Leviathan
in Malta:
Beach: 2 pirates meet them on Malta's shore. Their talk
about her father angered Jamila. The Leviathan is the head of the Corsairs
and doesn't want anyone to leave. Jamila is going with Feodor to Tripoli.
Talk to Jamila and learn that her father is a
gambler and not well liked in Malta. He owned almost everyone money. They
expect Jamila to pay them.
They need 5 advocates to get the Leviathan to even
see them.
Look around and see birds: blue rock thrush and
other birds. Pick white flowers at bottom right to get bouquet of wild
flowers.
Find 5 captains:
Drunken captain: Go right
and see seaside cliff houses.
Take the shovel at right and stones
beside the Corsair at bottom right.
Talk to the drunken Corsair. He is a Captain with
a terrible hangover.
He wants his grandmother's old smoking weed tin
that he lost yesterday before he helps Feodor. He can't remember where he
was yesterday.
Fencing
captain: Enter the cave. Talk to the Corsair Captain
standing at right.
He wants someone that can defeat him in fencing.
Look around and take the red cloth on the
ladder behind the captain. See a pink chest with a chamber pot at top
landing.
There is a wine barrel by the exit.
Gambling captain: Enter
the tent at right. Talk to captain.
He will advocate Feodor if he wins half a treasure
or win one game of skull and bones.
Risk to play a game. Learn the rules. Throw 3
dice. There are 11 penalty stones and the one that gets 6 stones of the
opponent wins.
Feodor plays anchor and he plays skulls. So it is
good to accumulate skulls.
Risk a game. The gambler stands and gets new set of
dice from box at right.
Throw by clicking on cup at right. Feodor loses.
The gambler returns the loaded dice in the box at right. Exit the tent.
Maid: Go left and see a
chair that is like a throne. There is a cooking area in front of the maid. See a bellow on the floor and booty at left wall.
Talk to the maid.
Don Juan
captain: Go left to the camp and be at the bar.
Talk to Juan, the captain smoking a pipe. He will
advocate Feodor if he can get the courtesan to get together with him.
Bird lover captain: Talk
to the bartender.
He wants his blue rock thrush back in her cage.
Talk to him to learn about the bird's special fat food.
He gives a small cage. Look around the bar.
Get the blue rock thrush:
Make special fat food: Go
right to the main cave.
Get oats from the sacks at left wall. Take
the stone jug beside the sack.
Go back to the left and be at the bar. Use the jug
on the barrel of oil to get jug with oil. Go back to the right.
Pour the jug of oil in the cooking pot in front of
the maid.
Place the oats in the cooking pot to fry it. Take
the fried oats - fat bird food from the pot. Place the fat bird food in the cage.
Go outside and then left to the beach. Place the
cage with the fat bird food on top of the flat rock at right.
Automatically get bird in a cage. Bring the
bird in cage to the bar and give her to bartender.
The Dream Man:
Talk to the courtesan. Learn what she wants for
her dream man. She wants that the man should have manners, changes his shirt weekly,
give gifts, has money and no pipe smoking.
Talk about Don Juan. Feodor convinces her that he changes
shirt and that he has money.
Talk to Don Juan and he gives his pipe to
Feodor.
Go outside to the beach and talk to Jamila to get
tips for a dream man. She advices to talk, listen, not gaze at her breast
and to give compliments.
Go left and (if you haven't yet) pick some wild flowers at
bottom right.
Go back to the bar. Talk to Don Juan and give him
the tips on women stated by Jamila.
Give the bouquet of wild flowers to the courtesan
and say it is given by Don Juan.
The courtesan agrees to sit at same table as Don
Juan. Overhear the talk between Juan and Anna.
Talk to Juan. He agrees to advocate Feodor.
Smoking weed tin:
Go back inside the cave. Get another stone jug
from left wall.
Go to the bar at left. Use the stone jug on barrel
of rum to get jug of rum.
Go outside and give the jug of wine to the
captain with hangover.
After drinking the rum, he recalls that he was at
the bar with Dolorita and offered her the smoking tin. Then he can't
remember.
Go back inside the cave and talk to Dolorita the
maid. Learn that the drunken captain fought with slimy Don Juan.
Go left to the bar and ask Juan about the tin. The
tin might have been inserted between the barrels.
Check the barrels behind the bartender. Get the
smoking weed tin.
The captain with hangover walks in the bar. Give the
smoking weed tin to the captain. He will give a good word for Feodor.
Dice game:
Go back to the tent at right side of the cave. Be
sure that you already played a dice game and note that the dice are loaded.
Stand by the box at right. Wait until the gambling
captain wins and places his winning in his pocket; then immediately take the
loaded official dice from the box.
Unload the loaded the dice:
Exit the tent.
Right click the dice in inventory. Feodor sees
metal in the dice.
Place the dice in the bellows on the ground in
front of the cooking pot. The opening is too big.
Insert Juan's smoking pipe on the bellows. Use the
loaded dice in the bellows. Automatically Feodor uses the bellows and
the metals on the dice are sucked out.
Go back to the tent. Place the unloaded dice back
in the box.
Play the game: Talk to
the captain. Ask to change sides and then risk a game.
The captain took the unloaded dice from the box.
Play the game. Use the cup at bottom right. Keep
any skulls you throw. Eventually win the game.
Talk to the captain. He agrees to support Feodor
because the captain is an honest man.
Fencing bout:
Just to be nice, go to the beach at left and get a
bouquet of wild flowers. Give it to Jamila by the cliff houses.
Ask Jamila to accompany you to the fencing
captain. Go to the cave and the captain.
Talk to the captain and provoke him on fencing
with Jamila. He won't give his vote until she settles her father's debt.
He will settle for 100 gold or something of
similar value.
Find gold piece: Go to the bar
and check the treasure map at right corner of the bar.
Take the treasure map. Go to the beach.
Click "interesting places" in the sand. Feodor
will check it in the map.
Click on the "interesting place" in front of the
shipwreck. It is still not checked in the map.
Use the shovel on this "interesting place" and get
a wooden casket. Open the casket by right clicking it. It has a golden
sceptre.
Go back inside the cave and give the sceptre to
the greedy captain.
Test:
The Leviathan meets with Feodor and Jamila. Feodor
Morales explains his quest.
Feodor has to prove himself for the Leviathan to
respect him. He has to perform a test.
See the 5 tests at bottom left. Click on the tests and
Feodor decides to dive and get a diamond on the helm of a sunken ship.
Feodor is allowed to use aids.
Prepare the diving aid:
Go to the bar and talk to the bartender. He would not give the wine barrel
because it still has wine.
Talk to the drunken captain and convince him that
he can drink more if he drinks wine.
Talk to Juan and get him to drink wine also. All
the customers drink wine and eventually empty the wine barrel.
Talk to the bartender again about the wine barrel.
Go to the wine barrel and click on it. Feodor
rolls it out to the edge of the water.
Use the stones from the ground on top of the
wine barrel.
Hold the stones with the red cloth from the ladder
in the cave.
Click on the barrel to get Feodor to dive with the
empty barrel as his source of air.
See Feodor give the diamond to the Leviathan.
Tripoli
The Leviathan got a trading ship to bring Jamila
and Feodor to Tripoli. They were smuggled into the city inside 2 wine
barrels.
Tripoli - Smuggler's hideout:
Rafi opens the barrel. Jamila greets her old
friend and got his help in avenging his father.
Look around. Try to take a black sash from the
post.
Talk to Rafi. Learn that half a dozen people were
taken by the inquisitors and kept at the old palace of the Emir.
Talk to Jamila. The black sash is for smugglers
only. Exit the house.
Get in the palace:
Marketplace: Go to the
marketplace and see the gate to the palace. Knock on the gate to the palace.
Talk to the merchant at left. Go back to the
right.
City Gate: Go to bottom screen
and try to talk to the thief. He ignores Feodor.
Go back to Rafi's place. It is empty. Take a black sash. Go back out and to the
city gate.
Show the black sash to the thief. Learn that the
inquisitor left 2 days ago with soldiers as his entourage - no prisoners.
Only prisoners and slaves are allowed in the
palace. The last slave trader sells dates now.
Marketplace: Go back to
the marketplace and see Jamila. Talk to Jamila.
Talk to the merchant who is also the last slave
trader. Jamila and Feodor are sold as slaves to the soldiers inside the
palace.
The captain of the guards is the one that killed
Capitan Carlos.
Do slave duties:
At the courtyard, Feodor is given his tasks and
Jamila is taken by the captain of the guards inside the palace.
Go to the window left of the palace gate and
overhear that Jamila is to mend shirts.
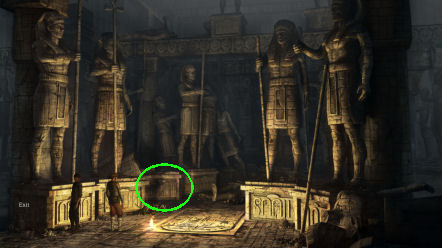
Suspicious spot: Check the
suspicious spot at center of courtyard and the guard stops Feodor.
Clear the camel dung:
Scoop camel dung from the pen at left and place them on the pit below the
guard standing by the shaded gate.
Take the halter on the planks now that the
dung has been removed. Feodor takes only the metal rings.
Fill the trough: Take the
bucket by the well. Use the bucket on well. Use the bucket of water
on the trough under the barred window of the prison.
Sweep the entrances: Take
the broom right of the prison.
Check the awning in front of the palace doors.
Click the broom on the entrance to the palace to get Feodor to sweep there.
Use the broom on the gate and Feodor asks the
guard to move away. The guard goes to the shade of the prison door.
Find a way to contact Jamila:
Wooden chest: Check the
wooden chest by the gate and get leaflets. Read the proclamation
about finding white haired people.
Suspicious spot:
Use metal rings on the barred window of the prison. The guard hears it and
enters the prison.
Check the suspicious spot on the courtyard ground.
Get charred branch and 2 bottles of wine.
Write to Jamila: Combine
the charred branch and the leaflet to write to Jamila.
Move the guard again:
Fill the bucket with water again. Use the bucket of water on the planks now
that the dung has been removed.
Take the planks and prop them on the awning by
palace door.
Use the broom on the prison door to get the guard
move to the now shaded palace door.
Contact Jamila: Use the empty
bucket (if filled use the bucket on trough) on Jamila's window left of the
palace door. Click on window and Jamila comes.
The captain wakes up and talks to Jamila. Click
the note-leaflet on Jamila.
Jamila brings the note back and a shirt. Take the
note and read it. Take the shirt and then the bucket.
Enter the prison:
Use the empty bucket on barred window of prison.
Use the shirt on trough with water to get wet
shirt. Use wet shirt on barred window. Use the broom on
barred window.
Turn-click the broom handle. Feodor enters the
prison.
Ramon:
Feodor looks for Ramon. Ramon is in the cell at
left. He is ill.
Talk to the cell again. Learn that the other
prisoner with him is the Emir. The Emir has been in prison for 7 years.
Ramon has a fever. The Emir says to get the key
because it is the only way to open the cells.
Ramon mumbles Zerzura, Zerzura. It is the lost
desert city.
Take care of the guard:
Get items: Look around.
See a Spanish horse in front of the cell. The horse has notches at the
bottom.
Take the Spanish boot by the rack. There is
a rope hanging right of the rack. Take the spearhead left of the
rack.
Go right and examine the 2 chains hanging by the
next cell.
Check the grinding wheel below the chains. Take
the crank of the grinding wheel. Pick up the wooden construction-
table legs right of the grinding wheel.
Check the barrels at right and get lid and
base-floor.
Check the chains right of the exit door and get
3 meat hooks.
Move the Spanish horse:
Use the meat hooks on the 2 chains by right cell and the rope left of the
Spanish horse.
Raise the Spanish horse by placing the Spanish
boot under the horse.
Use table leg on the lid (with hole) to get
axle with wheel. Use the other table leg on the grinding wheel.
Now that the horse is raised, use grinding wheel
on horse. The front side now has wheel.
Use crank with spearhead to get a drill. Use the
drill on the floor (base) to make a hole. Combine the floor (base) with
hole with the axle with wheel.
Now place the axle with 2 wheels under the
Spanish horse. Now the horse can be pushed.
Make a battering ram-horse:
Click to get Feodor move the horse to the right.
Attach the 2 chains with meat hooks on the Spanish
horse. Feodor removed the wheels.
Use the rope by the rack on the Spanish horse.
Raise the horse by turning the wheel left of the
rope.
Guard: Get the guard's attention
by using the metal rings on the door at right. Feodor releases the Spanish
horse.
Go outside and check the guard. No keys. Take his
sword.
Release the prisoners:
Take the bucket below the prison window and
place it under Jamila's window.
Click on window and give the sword to Jamila.
Jamila avenges her father.
Get the cell key from Jamila.
Go back to prison and release Ramon and the Emir.
Rafi is here and helps in taking the guards
prisoner.
What is Zerzura?
Hideout: Learn about
Zerzura and the connection to the white haired inhabitants.
They feel a longing to be back home. Drinking the
water of Zerzura heals and gives the inhabitants white hair and bright eyes.
Feodor and Ramon are Zerzurians. Feodor has not
drunk the water of Zerzura yet; that is why his hair is black and has no
longing to find Zerzura.
The Grand Inquisitor wants the key to Zerzura. The
key was broken into 12 parts and distributed during the great flight.
Prepare for trip:
Talk to Ramon. Learn about the Queen, mother
Susanna, Bastet, Sekhmet, Zerzura, Grand Inquisitor and Crusader knights.
The Crusader knights stayed at Zerzura 200 years ago.
Talk to the Zerzurian at bottom left. Learn that
many died during the day they left Zerzura. The queen is immortal. There is
a description of the route in an old Egyptian temple ruin, 5 days from
Tripoli. The Queen's 12 counselors know the source of the healing water.
Companions: Talk to the
Emir, Jamila and Rafi about their quest.
Preparation: The Emir has food supplies
hidden in the palace. Rafi and Jamila will get the tents and other supplies.
They need camels: there is one sick in the palace
and the Emir can get 3 more. Feodor will get 2 more camels.
Beggar: Go to the marketplace
and give the wine bottles to the beggar.
Sick camel: Enter the
palace. See Jamila. Check the sick camel at back right.
Exit the palace compound and talk to the beggar
again. Learn that he is a camel doctor. The camel doctor wants salt and fern
leaves to heal the camel.
Get cure: Get the fern
leaves by left columns.
Exit the palace, marketplace and then go to the
city gate. Talk to the Bedouin trader.
Feodor traded the Spanish boot to get salt.
He will give a camel if he can sell his good. He sells soap and stonecraft.
Go back to the palace and give the salt and fern
to the camel doctor.
Get another camel: Talk
to the merchant outside the palace gate. Feodor gives the merchant the key
to the prison.
The merchant trades with the Bedouins. The Bedouin
gives Feodor a camel.
Hideout: Go back to the
hideout and see Emir and Ramon discuss the route.
All are ready and they will leave tonight.
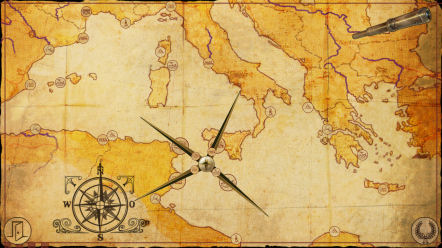
Desert
Map to Zerzura: The
desert map is now in inventory. Right click it to open and see. Click on
a structure and you can jump to be there.
Watering Point:
Ask the Emir about the mountain looming at left.
It is the Mount Sababah the forefinger, the highest mountain here. Feodor
says they will check the route at the ruins and then look for the rest of
the keys.
Click on the mountain to learn that there is
supposedly a family of Zerzurians living in the mountains.
Talk to the others: Rafi, Ramon and Jamila. Learn
that the key fragments are just like the crystals that got Ramon arrested.
Look around. Take the water jug and
stones by Rafi.
Open the saddlebag at right and get Feodor's
tools: knife and pliers.
Check the large stone at left and Feodor scoops
sand.
Ruins:
Use the map and jump to the Ruins (seen right of
the watering place screen).
Spanish soldiers: They
find a very ill soldier.
The rest enter the ruin while Rafi checks the
soldier. Inside they find the other soldier dead.
Feodor gets a scroll from the dead soldier.
Rafi says that the other soldier died and that they died from contact
poison.
Engraving: Check the
engraving on the floor.
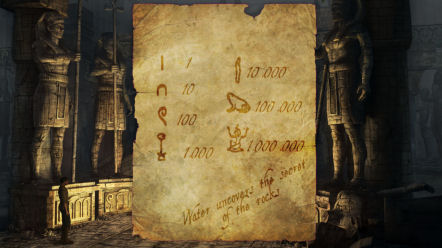
Rafi translates the hieroglyphs as:
- even if war defeats the false lords...
- none who are unknowing should find the white
city...
- dedicated to those, who in each of the 31
years built five sentinels...
- only the first of the last 24 points the
way...
There are more than 5 statues - so the" 31 years
built 5 sentinels" is a clue (31 x 5 = 155). First of the last 24 might mean
155 less 24 = 131 and the first of the last 24 is 132.
Check the scroll in inventory and see that it
is translation of the Egyptian number symbols. Water uncovers the
secret of the rocks.
Statue 132: Talk to Rafi
again and he will verify the calculations. Geez.
Examine the statues and see that the pedestals have
numbers on them. Look for 132.
Click the scroll on the statues label-tag. Now all
the pedestals have numbered labels.
The pedestal with a fallen statue at back left has
132 on its pedestal. Click twice on the number and then push it.
Ask Rafi's help to push the slab. They need
lubricant.
Tripoli: Use the map to
jump to Tripoli.
Rafi goes in the city to check. They can't come in to
the city because the dead captain of the guard was found and they are hunted.
Talk to the Bedouin merchant. Feodor gets soap.
Ruins: Jump back to the
ruins. Check the store at the soldiers' tent to get
rope.
Plinth 132: Go back
inside the temple.
Use the knife on the soap to get soap strips.
Then use the soap strips on the water jug from the watering point to get
soapy water.
Use soapy water on plinth 132. Ask Rafi to help
again. Push the plinth and enter the corridor.
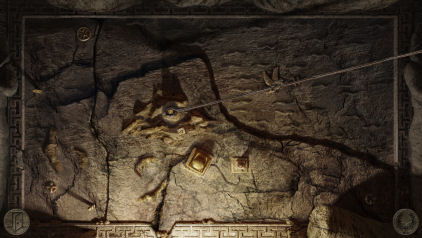
Map room: See a large map
on the right wall. The rest arrives.
Click on each prominent structure on the map
to identify them.
The Emir says the Large mountain is Mount Sababah; it is the one travelers used to navigate.
The dove means Zerzura and the symbol for
distance is beside it.
Use the rope on Mount Sababah - large
mountain.
Click-hold the rope and move it to lie over
the dove - Zerzura and the symbol for distance.
Move the knot of the rope over the dove to
mark its distance.
Without moving the placed knot, move the rope
until the knot crosses the watering place at bottom of the map. Feodor
will say that Zerzura has to be there.

There is an old monastery by those mountains. The
inquisitor travelled southeast. The pieces of the key are not just as a key but
insures that the city can be found.
Key fragment in Mount Sababah:
Now that the location of Zerzura is found, we look
for keys.
Mount Sababah: Jump to
the Mountains in the map.
Inside the cave dwelling, see that the whole
family is dead. Look around and see the skeletons by the entrance.
Pick up the parchment in front of the skeletons.
Look at it in inventory. It looks like drawings of the cave dwelling.
Check the wall painting left of the fireplace.
Talk to Jamila, Emir and Ramon. Show the parchment
to Ramon.
Back part of the cave: Go
to the other room. Look around.
Take the book on the rock table at left and
see another parchment.
Check the sleeping quarters above. Talk to Rafi.
He thinks the family died 10 years ago.
Check the sleeping quarter at top right. Take the
ladder from left and use it on the one at right.
Climb up and see another skeleton. Take the
chain with large ruby.
Ask Ramon about the book and chain with ruby. The
diary is Zerzurian written by a young child. They all got sick.
The chain is a wedding necklace blessed by the
Queen. It is not ruby but crystal.
Find the key: Study the
book that Ramon says has the symbols that refer to the lost key fragment.
In inventory combine the parchment drawing with
the book that has another drawing.
Use the book on the light by Jamila. The picture
when placed together and studied by sunlight showed a drawing similar to the
wall painting.
See a lion at bottom left and it is circled.
Study the lion on the wall painting left of
fireplace. Click on the lion again to see an opening. Get the key
fragment.
Rafi looks at the key fragment. Rafi says that he
saw one just like it in the thieves' hideaway.
Jump to Tripoli. They buried the dead.
Thieves' leader in Tripoli:
Thieves' leader: Talk to
Rafi about the guild of thieves. Feodor shows the chain. Rafi leaves to get
the Thieves leader.
Rangar, the Thieves leader talks to Feodor. They
make a
trade of key fragment with wedding necklace.
Bedouin camp:
Bedouin: Talk to the
Bedouin merchant. The painted stones he sells are reproductions of the holy
crystal revered by their tribe. The priestess takes care of the holy crystal
relic.
The merchant does not trust Feodor. Show the
merchant one of the crystal fragments. He now thinks Feodor is an important
man.
The route to the tribe is marked in the map. Use the map to jump to Bedouin camp.
Feodor sees
the crystal fragment in a shaded altar. The altar is encircled by stones
resembling the key fragment. The altar is made of rotten wood.
Talk to the priestess. She is a Zerzurian that has
tasted power. Learn that there are 12 parts of the key.
Talk to the make Bedouin at right. Learn that sunlight on the crystal will light it up.
Get to the key fragment:
Take the shield from the ground at far right tent. This gives
Feodor an idea.
Take the piece of cloth from the clothes
line at left.
In inventory, use sand, then water and then the
stone taken from watering point on shield.
Use the piece of cloth on the ground shield to
give it a shine.
Use the mirror shield on the tent at right. Feodor
places it on the ground.
The altar burns. The priestess caught fire when she
tries to pick up the burning key fragment.
Use the pliers to get the key fragment.
Feodor runs away.
Plans to get the rest of the keys:
Feodor informs the rest that there are 12 key
pieces and they have 3. Rafi tells them that the rest are already gathered
by the Grand Inquisitor because he has been going crazy looking for the 3
crystals.
The Emir pointed the way to Stone Monastery of the
Holy Virgin. The Emir is turning back to return to Tripoli. He will fight
for his city.
The group travels to the Monastery where the Grand
Inquisitor is in residence. A storm is coming.
Arched area: The 3
decide that they will enter the monastery as Bedouins-Nomad asking for a
place to stay the night.
Ramon is very ill. Take the blanket hanging at
right structure and cover Ramon with it.
Look around. Check the saddlebag by the rock at
left to get the scroll.
Make Bedouin clothes: Check
the stones positioned as a square behind Rafi and Jamila.
Check the uncovered mat. Take bits of
cloth, grain and piece of bone from the exposed hole.
Use the knife on bone to make bone splinter.
Use the knife again to put a hole and make it into a needle.
Use the knife with the mat to get palm fibers.
Combine the needle and palm fibers to get needle and fibres.
Use needle and fibres on cloth to get Bedouin
clothing.
Use the Bedouin clothing on Jamila. Feodor talks to Ramon. They decide that Feodor
carries the 3 key fragments and Ramon stays here alone.
Monastery
Enter the Monastery of the Holy Virgin:
You can die on this chapter, so save often. You
get other chances to continue on with the game.
Go to the monastery and be at the door on the
cliff side.
No one answers the knock door. Rafi leaves to look
for another entrance.
Secret of the rocks: Read
the 2 slabs on each side of the path. Only he who knows the secret of the
rocks will gain entry.
Remember what is written on the scroll from the
dead soldier at the ruins - Water uncovers the secret of the rocks.
Take the cross from the small hole on left
cliff wall.
Use the water carrier on the small hole. See that
the water pours out of large hole at right. (If not done, smoke will come out of large hole
and kill.)
Click on mysterious hole at right. Feodor feels a
rope and pulls it. A bell rings. After some discussion, they are allowed in.
Grand Inquisitor: The Inquisitor
welcomes them to the monastery.
Get the monk out of the room:
Look around the dormitory. There is a conspicuous
bed at right corner of room.
A monk prays in front of the altar. Try to
talk to the monk.
Exit and talk to the soldier at the herb garden.
Ask the soldier about the praying monk.
Learn that the monk only stops praying during the
evening meal. The bell will ring to signal the evening meal. The soldier is
looking for herbs for the special meal. He uses the book to identify the
herbs.
Check the bell left of the large door. Enter the
large door and talk to Brother Jeremiah, the cook monk. Learn that more soldiers are coming.
Brother Jeremiah leaves after learning about the
soldier looking for herbs.
See the rope attached to the bell outside is
hanging at left. There's a bellow on the floor.
Attach the rope to the bellow. Use water carrier
on the fire to dampen it down.
Feodor leaves. Brother Jeremiah returns to the
kitchen. Hear the bell ring when he used the bellow.
The praying monk exits the dormitory.
Monastery cellar:
Secret of the conspicuous bed:
Enter the dormitory and check the conspicuous bed. Feodor pushes the bed and
exposes a secret door on the floor.
There is no opening mechanism.
Check the altar. The statue at left is a monk
keeping his eyes closed.
Click on the niche at right and Feodor says
that there is one statue that can't see and one that says nothing.
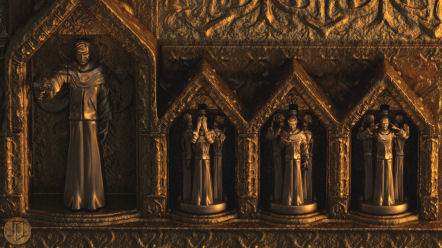
Check the small shrine at center. See 4 monk
statues.
The large one at left has arm that can be
moved. The 3 smaller ones can be turned to show
different actions.
Since the bigger statue on the altar above is
holding his hands over the eyes - turn the left small one to show a
similar position.
Then change the middle one to ring-haired monk
that says nothing or finger on his mouth (as Feodor mentioned).
Following the 3 monkeys, change the right one
to one that has his hands on his ears.
Pull the arm of the large statue at left. The
secret door opens.
Go to Inquisitor's room:
The Abbot:
Go down the secret passage. Look around.
Check the bag at center. Meet the Abbot of the
monastery. Talk to him. Learn that the Grand Inquisitor was his student.
There is a secret casket in his room. The abbot
tells how to get to his room via the shaft.
Shaft: Check the shaft
mentioned by the abbot at left. Pull the rope and learn that it needs a
counterbalance.
Take the bag - sack with cloth remnants
beside the abbot. Use the sack on the water.
Use the wet cloth remnants on the rope of
the shaft.
Climb the rope to the roof. See soldier come in
with Rafi. Rafi meets with the Grand Inquisitor.
Casket:
Look
around. Check Mary full of Grace statue on the wall to get a key.
Check the casket on the table. Take the heavy
ivory cross left of the door. Take the candle holder by bed.
Check the chest by window. Use the key taken from
Mary full of Grace statue on chest. Nothing there.
In inventory, right click the ivory cross and get
a cross with knife.
Save here. If you die, you get other chances to
continue on with the game.
Use the cross with knife on casket. Feodor takes
the key fragments.
When the soldiers, Rafi and Grand Inquisitor enter
and dialogues are done, immediately click on window to escape.
White City of Zerzura
Jamila and Feodor get Ramon from the camp. The
sandstorm comes.
During the cutscene, use the Bedouin clothes on
Ramon to cover him.
The storm passes and the trio reach the gate of
city of Zerzura.
The Gate of Zerzura:
Look around. Check the mountains, sand and the old
cart. Take the metal ring of the wheel and bar from the old
cart.
Look at the statue of Sekhmet framing the gate;
the dove at top of gate marking the city of Zerzura, Eye of Horus, and cat
that signifies Bastet.
Talk to Ramon. Ramon says to place the pieces on
the gate.
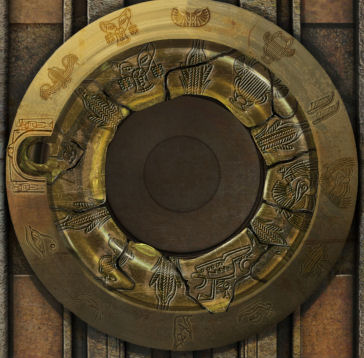
Key fragments: Use the 12
key fragments on the hollow on the gate.
Place the fragments correctly under the gold
rim of the circle.
Place the pieces with knobs on them first
because they don't fit if there are others beside it.
Take note of the icons on the gold rim; they
are clues to the drawing on the key fragments. Similar drawings should
be together.
Place the ringed knob with small bird on the
indent at left. The cat with knob piece under the cat icon on the gold
rim, etc...
Left click-hold-drop the fragment in position.
Right click turns it.
Make handle: Use the
metal ring from old cart's wheel on the key but it is too big.
Use the metal ring with the pliers and it is cut
smaller. Use the metal socket on the key.
Use the bar from the cart to hold he metal socket
in place.
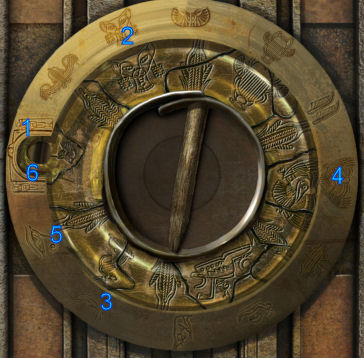
Turn the key: Talk to Ramon
again. Ask about the story.
The story is about a little bird that
broke its wing when it fell off its nest. The bird met a cat and
told it that it wants to get back to its nest up in the mountain.
The cat took the bird it its mouth and climbed the mountain. Upon
reaching the top, a vulture came and scared the cat away. The
little bird closes its eyes thinking that it will be eaten. But
the mountain shook and the vulture was scared away.
Go back to the key and study the icons on the
gold rim. See all the characters and items mentioned in the story.
Click-hold-turn the little bird clockwise to
stop at each character or item that are in the correct sequence of the
story: start with the little bird, cat, nest, vulture, eye and back to
start.
Mother's house:
Feodor and Jamila push the door open. The trio
enters and Ramon is excited.
Ramon remembers the house he was born in and walks
towards it. Ramon collapses before he reaches the doorway. They need the
healing water.
Temple and drawbridge:
Look across the way and see the temple. The drawbridge is raised on the
other side. There is a crevasse between the temple area and the houses.
Feodor has to get to that side.
Susanna's
house: Check the lion's head. Enter the house with the
lion's head. Look around. Check the walls, ceiling and mosaic floor.
Check the statue and take the wedding chain.
Check the parchment on the floor in front of the
divan-seating. It is Ramón's drawing.
Take a shard of glass on the floor at left.
Exit the building.
Foundation: Check the
foundation at bottom left. It looks like a foundation of a church. Look
around.
Take the book below the cross. Read the
book in inventory. The Zerzurian who wrote it is descended from a crusader
and he laid the
foundation of the church. He was cast out by the queen. He is jealous
of Susanna who guards the river's influx. Susanna's house is around the
influx. The crusader descendant threatens the queen. Ah...
Take the spade by the columns and the
pickaxe at center foundation.
Look at the date tree and Feodor takes a dried
palm leaf. Check the statue of Sekhmet.
Mill house: Go to the
building across the main square.
Take the clay pot on the bench and the
rags on the bed.
Check the cross, painting behind the wall, box,
ceiling, broken millstone and grinding mill.
Find the river's influx:
Susanna's house:
The diary states that the house is around the river's influx. Go back to the
house.
Check the walls and Feodor can hear a noise. The
wall is damp.
Exit and take the upper stone of the column
in front of the lion's head. Click it on the mill house door.
Place the column stone on the grinding mill. Place
the spade on the column stone.
Place the grain on the grinding mill. Turn the
wheel. Click the mill to get flour.
Go back to Susanna's house. Use the flour on the
damp wall. Feodor blows the flour around.
See the detected damp wall. Use the pickaxe on the
wet wall.
See an underground river. Go through hole and
Feodor falls in the water.
Drawbridge: Feodor comes
out the other side of the river.
Use the handle of the drawbridge to lower the
bridge. Turn the wooden handle again and it breaks off.
Take the rope at water's edge.
Temple:
Go to the temple. Check the skeleton of the guard
with the leather armour in good shape.
Door: Check the cog wheel
above the door. Check the 5 niches and symbols on either side of
the door.
Ramon: Ramon would know
the symbols. Go back to Ramon and search for notes. Get parchment and
a match.
Read the parchment. Learn about Sekhmet.
Study the left page and see the notation and
drawing for Zerzurian blood; fire, flowing water, sand and amber - flash.
Door: Go back to the door of the
temple. Use the parchment on the symbols to learn the
meaning of the symbols.
Symbols:
Collect the symbols:
Zerzurian blood: Use the
knife on the top right niche-blood alcove and Feodor cuts himself. Nothing
happened. Maybe it wants one born here like Ramon.
Go back to Ramon and use the knife on him. Feodor
collects Ramon's blood on the rag.
Sand: Go outside the gate
and use the clay pot from mill house to get sand.
Amber-Flash (Thanks, Ludwig):
Go back to the temple and use the knife on the armour of the skeleton to get
metal disc.
Place the symbols:
Place Ramon's blood in the top right niche or
Blood alcove. The cog wheel moves.
Use the water carrier in bottom right niche or
water alcove. The cog wheel moves.
Place the clay pot with sand in the sand alcove at
top left. The cog wheel moves.
Place the soldier's metal disk in the amber
alcove. The cog wheel moves.
Place the palm leaf and wooden handle in the fire
alcove at bottom left. Use the shard of glass on match to get burning match.
Use burning match on the filled fire alcove. The cog wheel moves.
Outer chamber:
Enter and see carnage. Check the bones of
Christians and Zerzurians. Note the shield and weapons left of the statue of
Sekhmet.
Gate: Pull the handle
right of the right statue.
See 3 rotating blades on right and left wall of
the passage.
Take the war hammer left of the gate. Use war
hammer on the first right blade-knife trap. One is stopped.
See a Sekhmet head and an armoured skeleton
at the back area of the passage.
In inventory combine rope and pliers to get
improvised grappling hook.
Use the improvised grappling hook on head of
statue. Feodor pulls it in. Use the head of the statue on second knife trap.
Two are stopped.
Click on the armoured skeleton to make Feodor time
his run to it. He automatically uses the skeleton on the third trap and
pulls the lever to stop the other traps.
Sealed gate: See a lion's
head on the sealed gate. Use Ramon's talisman on the gate.
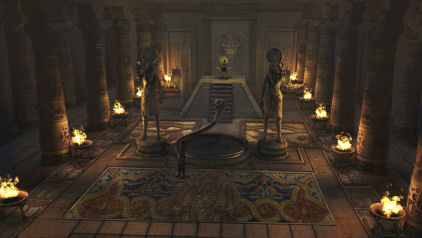
Throne room:
Queen: Enter the main
chamber. The brazier lights up. Feodor talks to the Queen.
The Queen asks Feodor to fill the fountain; she
can make healing water enough for a drink or 2. She doesn't want Susanna's
son to die.
Anyone who wears the lion mask becomes the high
priest of Sekhmet and is bound to her.
She lost control of Sekhmet only once in thousand
years. That is 20 years ago. The one that build the temple to another god
caused the anger. During the uprising the queen lost control of Sekhmet's
anger and slaughtered everyone around her. The rest closed the gate to seal
her in. She is now in control and welcomes her people.
Fix the fountain:
Locate the fountain pipes:
Click twice on the fount for Feodor to check the pipes there.
Now a main intake is seen at back of the fountain.
Click main intake so that Feodor can follow that to the front part of the fountain
under the floor.
Click on the paving stones and Feodor removes the
mosaic stones to show the pipes.
It leads to the left side. The large stone slab
over the pipe is too heavy but it has a hole in the middle. Use the improvised
grappling hook on the hole of the slab.
Take the end of the rope and tie it
to the closest statue. Now push Sekhmet. A shaft is exposed.
Fix the left gears: Study
the gears.
From left to right: See that there is a missing
second cogwheel that connects 1 and 3.
Go back up and take the ankh once carried
by the fallen statue from the floor. Pick up the rope also. Go back
down.
Use the ankh on the bracket of the second broken
cog wheel.
Pull the weights to see that the left side now
works.
Fix the middle gears:
Study the middle cogwheels. The left cogwheel does not connect to the left
set of gears and the right cogwheel does not contact the left.
Use the rope on left middle cogwheel to connect
middle left cogwheel to the working gears at left.
Use the knife on the worn right middle cogwheel so
that it connects to the left one.
Pull the weights again to see if it works.
Get healing water:
Go upstairs. See that the main intake is shooting
water outside the fount. Click on it to seal it and get water flowing on the
fount.
Use the water carrier on the flowing fountain.
Give the filled water carrier to the Queen.
The Queen comes down and sanctifies the water
carrier.
Gonzalo:
Jamila arrives with Rafi holding Ramon.
Gonzalo the Grand Inquisitor follows them. Learn
who Gonzalo really is - one that wrote the notes on the bible and incited a
revolt.
The Queen cannot trust Gonzalo because he
hesitates when she asks him to pledge himself to Sekhmet.
Gonzalo stabs the queen. Gonzalo takes the mask
and wears it. Gonzalo picks up the water carrier and says that in his rule
no more healing water will be available to others; just for himself.
Rafi fights Gonzalo and is also killed.
Save game here.
Now Gonzalo attacks Feodor. Jamila goes to the
other side.
Click the flour on the brazier above Feodor.
Feodor blows flour on the fire causing a flash. Jamila uses her sword to
flip the healing water to land in the fount. Jamila and Gonzalo fights.
Pick up the water carrier from the fount.
Gonzalo holds Jamila.
Right click the water carrier to get Feodor to
drink it. Feodor moves to other side of the fountain. Gonzalo comes closer.
Use the stone slab that seals the main water
intake.
Take the sword left of Gonzalo and fight.
Watch what happens.
This document may not be
distributed without express written permission of the author and the content may
not be altered in any way.
For Questions or Comments
on this Walkthrough,
Please write to:
MaGtRo
Copyright © 11/2012
MaGtRo
 GameBoomers
Walkthroughs and Solutions
GameBoomers
Walkthroughs and Solutions