 |
 |
Last Half of Darkness: Beyond the Spirit’s Eye
By: William R Fisher
Walkthrough by TLC June 2007
I recommend you play this game in the dark and be ready to jump in your chair. My opinion, Bill has another great game here and I’ll be looking forward to more in the future! Enjoy the game!
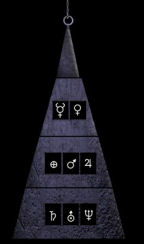
You start in a room with a drawing and a circle puzzle. From the drawing, it shows that a key is needed.
|
|
|
Go through the open doorway until you come to a being, which drops a key. Take the key and go back to the room with the circle puzzle.
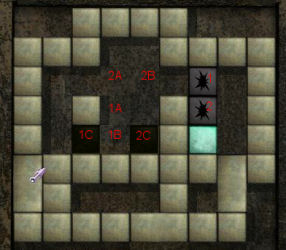
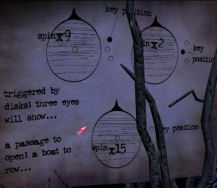
Put the key in the key slot at the bottom right of the circles. You'll see that the key turns 3 times. Turn the key to the top position and spin the upper left circle 9 times, you'll see the eye pop up into position. Then turn the key to the middle position and spin the upper right circle 2 times, for the eye to pop into position. Then turn the key to the bottom position and spin the bottom circle 15 times, the eye will pop into position. Once the puzzle is done, an opening in the floor will open.
Go down and enter the boat to go for a ride. When you get to the house, enter and look at the book to the right on the counter (with bottles and a skull). Click on the candle at the lower left screen. Then click the table under the wall hanging. You'll play hangman with the Ouija board. When you're done, go forward to talk to the witch and ask all questions. When you're done, go back. The door is locked, so time to play hangman again. When that's done, go back to the boat to go for another ride.
Enter doorway and go to the crypt. When you're in the crypt, click the doorway to exit. Move right to enter the graveyard, then enter the next crypt, there's no hotspots, so go back. Go to the gate at the right side of the screen, its locked. Go back and go up the stairs to the left of the screen. Look at the hole on the floor, then back out of the close-up and click the open doorway on the right to go back out. When you're in front of the crypt, click back again. To the right of the screen, click move right.
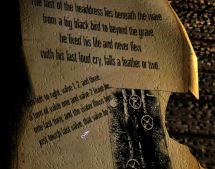
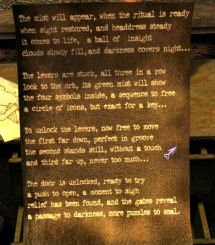
You should be facing a building with a fire escape. Enter the building and move right, you can click on the chair, wall art and painting. Enter the hallway on the left. Click on the candle on the left wall, then the piece of paper with the poem and talking about valves.
Back out of the close-up and go forward. Look at the strange sheep head above the door, and then enter that door. Look at the chair and the fountain. The open door leads outside but I didn't want to go there yet. So click back and go back to the entrance hall. Enter the doorway under the wall art and click to move right. You can click on the table and chair. Enter the elevator but it doesn't work. Leave the elevator and go back to the entrance hall. Click right screen to move right. Get close-up of the table and read the note.
Back out of the close-up and enter the stairway and move up the steps. Enter the bathroom; go to the bathtub to find an old key.
Click back and move right, look at the paintings and mirror then get close-up of the sink try to turn on the hot or cold water. Back out and leave the bathroom. Enter the East Hall; you can look at the swords, sofa and wall hanging. Enter the doorway on the left. You can look at the bed, candle and painting. Enter the closet, I have no idea what to do with this puzzle, have to come back to it later. Back out and return to the hallway. The other door is locked; the key found in the bathtub doesn't work. Click to go back and go up the stairs to the top.
Pick up the puzzle box. Enter the room on the left. Get close-up to the table; touch the small box with an eye and bones.
Look at the globe, bottom left corner and the maps on the wall. Look at the table, lower right corner, open the drawers to find a note about a ritual. Look at Gargoyle head above the table.
Click back and leave the room. Go forward; enter the room on the left. Look at the chair and painting. Get close-up of the small table to the right of the door, take empty lab jar.
![]()
While in close-up, look at the masks and the statue. Go back and move left. Take the hanger, get close-up of the shelf.
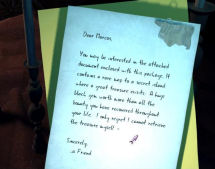
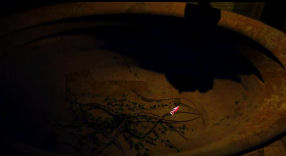
Look at partially filled bottle with a red liquid, jar with an ancient head, tribal jewelry, and tribal statue and take the tape reel. Click back and look at the cart with several bottles and empty plates. Move right and exit the room. Go forward to enter the hall, click forward again. Look at the ancient rug with a ritual-like pattern. Get close-up of the table to the right of the screen, to see a tape player, add the reel tape and click to play. Back out of close-up. Watch cut scene and see an item thrown into a well, it looks like it will fit in the hole, seen at the area at the graveyard. Click to go back to leave the room and back once more. Enter the room on the right. Read the note that was placed under the door and back out of the close-up.
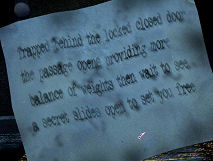
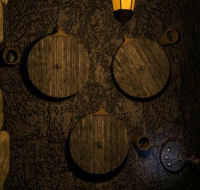
You can either click the exit on the left, to open a passageway or click on the statue on the right. If you choose the statue, pull the chain coming out of its mouth, then click back. Go forward to enter the passageway, and then click forward two times. The passageway is blocked. Look to the right of the screen to see the weights that was mentioned in the note.
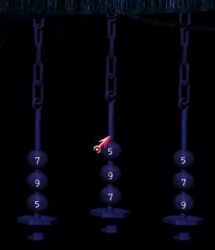
Balancing the weights will open a passage. The chains need to have an equal amount of weight of 5, 7 and 9. The passage opens.
Go forward. Look at the painting on the left. Get close-up of the bookshelf, look at the book about planets and take the clock. Back out of the close-up and move right. Click on the bed. Get close-up of the small table to the right of the door, look at the various perfume bottles. Open the drawer to take a quarter.

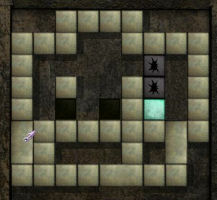
Open the inventory to look at the clock, notice a small hole. Combine the hanger with the clock, will add a handle to inventory. Combine the handle with the puzzle box. Right click on the puzzle box for a new puzzle.
|
|
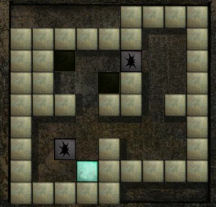
Move 1 to the 1A Move 2 to the 2A Go around and move 2 to 2B Move 1A to 1B Move 1B to 1C Move 2B to 2C
Thanks Ana! |
Once it’s complete, you’ll see a new puzzle.
|
|
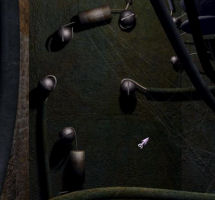
Move 1 to 1A Move 1A to 1B Move 2 to 2C Move 2C to 2D Move 2D to 2E Move 1B to 1C Move 1C to 1D Move 1D to 1E
Thanks Ana! |
Return to the hall. Click back and go back downstairs, then back to entrance hall. Move left twice and leave the building. Move right, twice. You should be facing the Bar. Enter the bar and go forward, take the matchbook from the table, then move left. Go behind the counter and get close-up under the counter, take corkscrew. Get close-up of the shelf on the left wall, look at the ship in glass bottle, and use the corkscrew on the cork. Get close-up of the bottle and use the hanger to get a silver key. Back out three times. Use the silver key on the locked door. Click on the sheet, this machine looks very familiar, will have to come back later, only have one quarter. Back out of close-up and look at the box on the shelf. Use the matchbook and take the screwdriver. Leave the Bar and move right. Enter the warehouse. Look at the vase in the crate on the left. Look at the right wall near the crates, to find a drawing on the wall. Leave the warehouse and move left to face the Bar. Get close-up of the garbage cans, open the one on the right to find a newspaper.
Back out of the close-up and move left. Click to move down the street and enter the doorway on the left. Enter the next doorway on the left. Look at the clock and take the map.
Go up the stairs, get close-up of the box, take and read the journal. Back out of the room. Go to the hall and forward a few times. Get out of the bed. Back out and try to go to the hall again. Go back twice to be outside. Go to the garden and click the statue base. Click back and talk to Tia. When done with the conversation, move left. Enter the doorway and go forward and click left to go to the courtyard. Go to the shed, take the ladder and look at the bag of birdseed, the still, heavy chains and the crate.
Go back twice and go up the stairs at the center of the screen and enter the doorway. Go to the table with the old crystal ball and touch it. Back out and move left. Look at the hooded figure statue on the table, vases on the floor, painting and the couch. Enter the doorway. Go to the table and talk to Tia. Back out and exit the room.
Move right and exit the room. Back out twice and you’ll be back at the courtyard. Go through open door, then enter doorway, move right and enter doorway, go forward to street. Enter under the bridge, look at the valve, and then go to the wharf. Move right and enter doorway. Look at the table in the center of the room with the open cans of fish and skeletons. Back out and look at the barrel on the right, use matchbook to see the skeleton bones. Go forward to the office. Get close-up of the box in the center, take a can of fish.
Go up to the office. Look in the garbage at the bottom left corner, take torn poem. Use screwdriver on the file cabinet, read note about the fire extinguisher. Go to the desk, open the drawer and look at the ship log. Take fire extinguisher and look at the map above the desk. In inventory, right click torn poem and piece it together. Leave the office, move right and go to the cabinet on the left side of screen, can’t open it yet, will need to come back later. Back out of close-up and go back. Move left and enter doorway and click back. Go forward, should be facing the lit Bar sign. Move left twice and enter the graveyard.
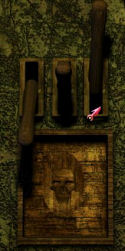
Click to enter the gate, get old key from inventory and use it on the gate. Go through gate and go forward. Go to the tower, then the shed and take the hammer. Back out and go to the back of the building. Enter the building, look at the statue on the left, then go to the piano, we’ll have to come back later. Move to the front of the building, then click back, six times.
Move right and enter the building with the fire escape. Move right and enter the doorway under the wall art, then enter the elevator. In inventory, get screwdriver and use it on the elevator button. We have to match the current. I numbered them 1–4, one being the top right one.
The sequence is:
1, 3, 4
1, 1, 3, 4
3, 1, 1, 3, 4
2, 3, 1, 1, 3, 4
3, 2, 3, 1, 1, 3, 4
Back out of close-up and push the button.
Exit the elevator and enter the doorway. Open the fridge and take the frozen finger. Open the cabinet to the left of the fridge, take the knife. Go to the sink, put the frozen finger in it and turn on the hot water, take the thawed finger. Enter the pantry. Open the cabinet, right side of screen above the counter with the bowl, take the empty bottle. Go to the pantry stairway and enter the basement. Take the dolly. Try using the hammer on the boards. Use the empty bottle on any of the kegs to get wine. Get close-up of the barrel to the left of the doorway. Use the matchbook on the barrel and take quarter. Click on the doorway to go back, and then click back three times. Get close-up of the fireplace. In inventory use the bottle with wine on the lady statue, take burned paper. Back out of close-up. Look at Marco’s painting above the fireplace. Move right and enter the elevator and push button.
Go back to the entrance hall, move right twice and leave the building. Move right once and then move down the street, enter under the bridge and go to the wharf. Move right and enter the doorway. Go to the cabinet at the left side of screen. In inventory, use the fire extinguisher on the rusted bolt, then use the hammer. Open the door and take the bolt cutters. Back out of close-up.
Go back, move left and enter doorway under the bridge. Go back, then forward, then move left. You should be at the building with the fire escape. Enter the building, move right twice, enter stairway, and then enter east hall. Enter the doorway on the left and go to the closet.
Move the lever to each letter position in this order: E, C, F, A, D, B Enter and click on the chest, take the metal cylinder, and then back out.
Back out three times and return to the hall. Back out, then back down the stairs and back to entrance hall. Move right once and leave the building. Move right twice and enter the bar. Go forward once and move left, enter the door. Go to the machine and insert both quarters. Go up and click the red button, take fortune card. Back out and back through the door. Click back three times to be outside of the bar.
Move left once and move down the street. Enter the doorway on the left and click enter doorway on the right. Use the finger on the lit panel and enter. Look at painting, green plant, couch and the gate. Enter the doorway to the right of the painting. Look at the microscope at the left side of the screen. Get close-up of the shelf to the right of the microscope. Look at the rolled paper on the top shelf. Look at the shelf to the right, look at another rolled paper, on the top shelf. Look at the body in the jar. In inventory, use the empty lab jar on the table towards the bottom of the screen.
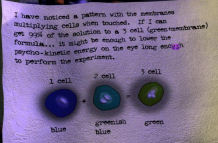
Blue + Greenish blue = Green
You need to make the blue and greenish blue cells to touch to make 99%, 3 cell organisms. When complete, it will fill the jar.
Back out twice, then back to street. Click back, and then move left two times. Enter the graveyard, and then enter the gate and go forward, then go to the tower. Click back of building, and then enter building. Go to the piano and add the metal cylinder. Take the book and read it. Back out and go outside. Click forward twice to go to the gazebo. Click on the square cover, need to find a pipe, will come back to this later. Click back twice and go to the front of the building. Click back twice, and then go to the right of screen to follow the East path.
Go to the house and enter the door. Go upstairs. Look at the jars on the shelves, strange thing in the left corner and then the barrel with the small hole. Move the cursor up towards the top of the barrel. Get close-up of the hole in the barrel and use the hammer. Look in the barrel and take the necklace. Click back nine times, move right twice and move down the street. Enter the doorway on the left. Go to the garden, move left, enter the doorway and go forward. Get close-up of the sewer grate, use the bolt cutters on the padlock. Use the ladder from inventory and go down into the sewer. Use the bolt cutters on the fan, and then enter the sewer. Pick up the magnet from the puddle on the left. Go to the mine entrance and go forward once. Go to the right and pick up the bucket. Need to go back to the well in the graveyard. Click back twice, click the sewer, then go up the ladder. Click on courtyard and go left, then go back, then forward to entrance hall, move right twice and leave the building.
Move left once, enter the graveyard, and then enter the gate. Go forward to the water well, click the wheel once to lower the rope, halfway down. Click back five times, move right twice and move down the street. Enter the doorway on the left, go to the garden, move left and go forward. Climb down the ladder in the sewer grate, enter the sewer. Go to the mine entrance, go forward and right. Get close-up of the well, add the bucket to the rope, and then add the magnet to the bucket. Go back, move left, go forward and take pipe at bottom middle screen. Back out three times. Go to the sewer, go up the ladder, click on courtyard, move left, enter doorway, go back then go to the entrance hall. Move right twice and leave the building. Move left once, enter graveyard, enter gate, forward once and go to water well. Click the wheel twice, take ancient coin from the bucket.
Back out once, go to the tower, and click back of the building, forward to the gazebo. Open the cover on the floor, add pipe, and then turn the wheel. Need to go back to the sewer. Go back twice, move to front of the building. Click back six times, move right twice, go down the street, enter the doorway on the left, then enter the garden. Move left, enter doorway, and then go forward. Enter the sewer grate, enter the sewer, then mine entrance, forward once, move left, go forward three times to go for a ride. Use hammer on the boards. Move left.
Click the valve on the right, then the one at the bottom. Watch water fill the tank. Move right, enter doorway, click back four times, move right, and enter the elevator and push button. Exit the elevator and go to entrance hall, move right, enter stairway and move up the stairs. Enter the bathroom to the left of the hall, and then enter the doorway. Click on the fountain and take the crow feather. Back out of close-up.
Enter the doorway, move right and exit the bathroom, back down the stairs, back to the entrance hall, move right, leave the building. Move right, move down the street, enter the doorway on the left, go to the garden, move left, enter doorway and go forward. Go to the courtyard at the left side of screen. Go up the stairs at the center of the screen, move up the stairs, enter doorway. Move left and enter doorway. Go to the table. In inventory, combine the ancient coin with the fortune card. In this game, you need to swap letters to spell “key” nine times. When complete, take the key.
In inventory, left click the necklace. From top to bottom, left to right, you need to put the planets in order, from closest to the sun.
Back out and move right. Exit the room, go back twice, move left, enter the doorway, go back, go to the entrance hall, move right twice and leave the building. Move right, go down the street, enter the doorway on the left, enter the garden, and click the statue base. In inventory, combine the gem with the strange object. Use the strange object with gem on the base of the statue, get blood stone.
Click back, move left, enter the doorway and go forward, go to the courtyard and move left, enter the doorway, click back, go to entrance hall, move right twice and leave the building. Move left and enter the graveyard, walk up the stairs to the left of the crypt. Use ancient coin at the hole in the floor.
Click back twice and enter the crypt on the left. Thanks MaG!
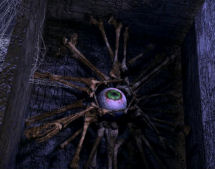
Go to the skull. In inventory use the knife on the can of fish, take the eye. Place the eye on the skeleton on the right eye socket. Place the crow feather at the top of the head. Click back twice, move right, and enter the building with the fire escape. Move right and enter the hall. Go forward and enter the doorway, move left. Go to the orb. Get blood stone from inventory and use it on the orb. Make note of the shapes, you’ll need them at the crypt passage.
Click back three times, go to the entrance hall, move right twice, leave building. Move left and enter the graveyard. Enter the crypt at the center of the screen, and then enter the crypt passage. Go to the levers on the right. Turn the wheel to the first symbol and press the button, do the same with the remaining three symbols, the panel will close. In case you didn't make note of the symbols and order, here they are. 1 is dark circle, 2 is Half moon with star inside, 3 is jagged circle and 4 is Cross. Move the levers to the correct position.
Back out of the close-up; go forward through the now unlocked gate. Go forward twice, ouch! Go forward five times. Look at the strange power source. Move left and enter the doorway. Go to the computer, in inventory get the key with the white stone and use it on the key slot. Back out. Go to the device.

In inventory, combine the blood stone with the lab jar with solution. Place the bloodstone with solution in the device. Go back to the computer. You’ll see at the bottom of the screen: # volts, # temp and 0 amps. The volts and temp are random numbers. You need to set the amps to the correct number. Its a random puzzle (2-4 digits) and can be found on the last page in the Journal of Dr. Benzor, which was shipped with the game. Thanks Bill!
In the computer, type in: amps=####. If you put in the correct number, you will need to type in, program 23. You'll see a countdown cut scene, click back, then exit, move right, enter the corridor, forward, then back.
You’ve done well, Stranger……………………… give the Acareous Eye to the dark being. No, wait……………………….Give the Acareous Eye to Tia………..
Watch cut scene……….The End.

This document was
provided to GameBoomers.com and may not be distributed without express written
permission of the author and the content may not be altered in any way.
Copyright © 06/2007 TLC