![]()
Day One: In a Nutshell
Responding to a telegram from Allistair MacFarley, you have traveled to Scotland, and arrive at the family castle, on a hill above the shores of Loch Ness. Mr. Shastra greets you, and introduces you to Ursula MacFarley, who is visibly upset. Her husband has been kidnapped, and her daughter Moira won't arrive until tomorrow. The stress is too much for her, and she swoons. She is escorted off to bed, and you are alone in the drawing-room. Have a look around. On the desk is a newspaper describing the theft of a rare Celtic book, and some amber disks. You can also look close-up at a book about Electricity and Magnetism. Checking the sitting area, are three hotspots. A cushion on the sofa and a liquor bottle on the small table reveal red hotspots, indicating there is reason to examine them, but that they are not yet accessible. On the coffee table, there is a game of chess in progress. White appears to have a slight advantage. (Don't fuss about the chess game; it has no actual part in the game.) Before going any further, check your inventory (right-click.) You don't have much: no actual items, but on the bottom are your notebook, an empty wallet, and a map that is not yet active. Read the notebook for some helpful suggestions. It suggests picking up your bag from your room, and exploring the kitchen. The manservant said your room is on the first floor. That would mean up the stairs one flight, not the floor we are on.
Exit the drawing room the way you came in, and go upstairs. At the top, go left, and left again. Your room is the second one on the right. Pick up the bag from the bed. A check of inventory reveals what you now have: A flask of bourbon, a knife, a rope ladder, a camera, some Copper Oxide (it's a fine black powder) ink, and paper. Also, in your wallet is the telegram. Find the kitchen thus: Go down stairs, and enter the main part of the house through the doorway between the staircases. Turn right, and go left into the hallway, to the end. The grey wooden door on your right leads into the kitchen.
Explore the kitchen thoroughly. Find the matches and candles in the drawer in the wooden table. Have a look at the call-bells. Take the rag from the sink. Open the wooden key-box next to the door and take the Passkey. You can do these things in any sequence; when you do them all, the bell from Mrs. MacFarley's room rings. She wants a cup of tea. Exit the kitchen the way you came in. (The stairs near the fireplace lead up to a dead-end; and the spiral stairs at the other end of the room lead up to the laundry room.) At the end of the hall, just to the left, is the other door into the drawing-room. Go in there and look at the sofa. The old lady must have lost her locket when she fainted. Take the pills and the key. Go back to the kitchen, and straight across from where you enter, is a dumb-waiter with a cup of hot tea sitting there. Pull the lever to send it upstairs. Go up the spiral steps. When you arrive, look right to find the laundry room. Take the tea. Go to her room, which is at the head of the stairs. You think she needs a little help. Open your inventory, combine the pills with the tea, and give her the cup. She speaks of three crystals, a banshee, and suggests looking in her chest of drawers. Turn around, look in the bombé chest and take the bottle of chloroform. Then go into the bath-area, unlock the chest on the marble table with the Small Key, and take the Attic Key from within. Go to the dressing table beside her bed and take the Picture from the drawer. Exit the room, turn left, and go into the next room, using the Passkey to unlock it.
This room, the green one, is Mr. MacFarley's bedroom. Immediately to the left is a bookcase you can open, and take a document. This item goes into the wallet, and is instructions for operating the telegraph. Save that for later. Go to the other end of the room and examine the curly-maple table. In the drawer is an appointment book displaying a date to meet McGrab at the distillery. Use the left-pointing cursor to see some fingerprints. It would be nice to 'lift' them somehow. Use some Copper Oxide, followed by some ink, to make the fingerprints visible. Then apply the paper to them to keep a permanent record. Let's go find the attic. Exit this room, turning left. Follow the corridor until you come to the attic stairs. Go up, and keep going until you get to a locked door. The Attic Key let's you in. Hey! Someone slammed the door, and locked you in. Besides that, it's dark. Step forward once, and look left to find the candlestick. Use the candles, then the matches to brighten things up. Look in the box on the table near the tower to see the photo album. There are pictures of your father, Bruce McGrabb (it was spelled with one 'b' in the appointment book), Ursula, Allistair and Moira MacFarley. Take his picture, you might want to describe him at some point.
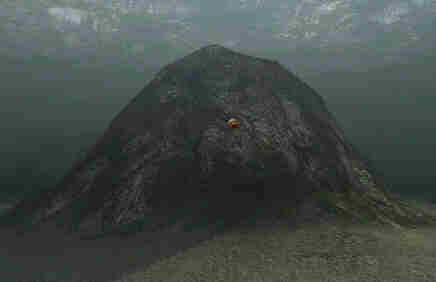
Go to the left. You find another door but it, too, is not accessible. Still locked in. Go left again, and open the cabinet. The paper lying there is a map of the area. Take it. It too is not accessible, so you cannot use the map to escape the attic. Left again, to the pile of stuff in the middle of the room. Take the crowbar out of the box. Head into the tower in the far corner. Seems like nothing to do here, until you try to leave. You watch yourself being startled by a noise. Now the boarded-up window is active. Pull down the boards with the crowbar and have a look outside. Holy Smokes! What you see when you don't have a camera. Oh, but you do have one. Quick! Snap a photo of Nessie before she decides to go for a swim. Now try that other door. This time it is active. "Unlock" it with the crowbar. At the other end of the short hall is a trapdoor. It goes to the laundry room where, Zounds! A ghost. That's enough to drive you to drink. Head into the drawing-room and pour a shot of bourbon in a glass. Wow! There's one of the crystals. Now go across the main hall and enter the room that is newly accessible. Go straight across the room, where there is a chest in the corner. Open the chest and take the Mead. Mead is an alcoholic beverage made by fermenting honey. It can range from mild to knock-your-socks-off potent, and is frequently flavored by the addition of fruit juices. Here's a little ditty for fun:
|
Go to the far end of the room and find the locked cabinet. You don't have a key that fits, but perhaps you could pick the lock with your handy fishing-knife. Inside is an ancient document, the Auld Alliance Treaty, which dates from October, 1295. That's all in this room. Go between the stairs, into the main house, and down and around the left corridor, to find the Library. The Library door is the one with the red drapes, next to the back stairs. Poke around if you wish, but there's only one thing to do at this time: Find the book on the side-table by the sofa and see the Phalaenopsis flower alongside a diagram of a greenhouse. Hint. (Phalaenopsis orchids are wonderful showy plants favored by collectors and hobbyists. Some cultures attribute magical or aphrodisiac powers to them.) That's all for now. Go to the front door and exit the house. Forward once, then around to the right. Keep going until you come to the greenhouse. Go in, find the flower, and pick it using the knife. Then return to the front of the house, and walk toward the loch until you arrive at the Celtic cross. On the base, place the Phalaenopsis blossom and the decanter of Mead. The Banshee appears, and gives you some history and some advice. This is the end of Day One.
![]()
Day Two: In a Nutshell
Exit your bedroom, and you hear muffled voices. Follow the corridor around to where the back stairs are, and it seems the people are in that room above the library, but the door is not accessible. Go down the stairs and into the Library. Someone left a Gramophone record stuck, and it's most annoying. Go turn it off. Now you can hear the voices again, and make out part of the words. Go up the spiral stairs, and turn around at the top, so you are facing the room. Overhead, there is a trap door.
 |
Here is a view of the hotspot for the trap-door. I found it difficult to find, until understanding that it is completely behind you when you arrive at the top of the steps. |
Have a peek, and overhear Bruce McGrabb and Moira MacFarley engaged in a rather unpleasant conversation. She ends by wondering just what he is concocting in his distillery. Well, now! Whatever did she mean by that? Head into the main entrance hall, finding the front door still inaccessible. Turn around, and on the bench by the suit of armor, is a small case. Open it, take the Signet Ring and a letter intended for McGrabb. He appears, and asks to meet you tonight at the distillery. You think it's prudent to go there right now. Out you go then, the front door is working again. Around the left side of the house this time, and to the stream at your right. Go to the boat, pick up the oars, and row to the distillery. Watch the caretaker, that's the mean-looking dude with the shotgun, as he enters the building and shows you his best "Do Not Enter" look. If you try the door where he went in, he glares at you through the slot. "We're closed!" To the left, toward the corner, you can peek in the window to figure out where he is. To the left, find the bolt-cutters between the barrels. Keep going around, where the water-wheel is, and find the chained door.
| I haven't been nagging you to keep saving your game, because you could get into relatively little trouble up to now. Here, it is possible to die. If you have not created a saved game recently, do it now. |
Cut the chain and step inside. DO NOT go to the right. If you do, you will kick a bottle on the floor, and alert the caretaker. When you try to go through the door, the result is Game Over. Instead, go straight ahead, then right toward the door. Step in, and realize that the office just to the right is where he is sitting. Don't do a lot of roaming around; go to the office door and quietly pull it open. In your inventory, combine the Chloroform with the rag. Use it on the old bugger to make him sleep. Now it's safe to rummage around. Look at the little satchel hanging on his chair, and take the Grand Book of Kelia: Crystals and the Ogams. Hey! Isn't that the book that was reported stolen? To the right, on the floor is McGrabb's walking stick. Take the Chest Key from the top, then pick up the cane itself. Go out to the waterwheel and use the cane to stop the mechanism. Then, back inside, the access to the cellar is no longer blocked by water. Go down the ladder. Fortunately, someone left a lantern burning in there. Strange room! An electric chair, of all things, and some sort of machinery; possibly an air-pump. The only thing that seems to work is the small chest under the chair. Open and take the disks, also probably the stolen items reported in the newspaper. Now that you've done that, the chair is active. Pull it out, and enter the door behind it, using the Signet Ring. Then, down the corridor, you face three doors. At first glance it looks like a maze, but fear not. It's just three corridors. The left one bears the sign of the Raven. At the end is what appears to be a puzzle, not yet active. The center one, marked by the cross, leads to a closed door - possibly to the chapel. The right one leads to a circular room containing a chest and an armoire with what seems to be diving equipment. Perhaps my guess about the air-pump was right. Exit through the door, and you find yourself outside the back of the castle. So the tunnel from the distillery connects to the main house.
Go around front and inside again. (Any time the map is working, clicking on the castle will take you just inside the front entrance.) Head for the Library. At the back of the room, to the left of the curved wall, examine the symbol in the niche. It looks familiar. A matching symbol is on the head of the cane. Use it to unlock Mac Farley's office. Don't go up the stairs just yet. Look to the left to see a bookcase. Go to it, and look sharply down at the right side to find the hotspot. Use the chest key. Opening the door, you find the inside of the door inscribed "Foedis Francorum Scotis, Anno Dominici" (I think it should say Anno Domini) Look familiar? That's the title of the Auld Alliance Treaty between France and Scotland in 1295. See the lockbox? It needs the correct date set into it. Can't remember Roman numerals? Try this: MCCXCV. Your discover the instructions for an armchair puzzle.
| Soon, it is possible to die. If you have not created a saved game recently, do it now. |
Poking around downstairs reveals no further action to be taken. Go up the stairs. (I always wanted a room like this!) Proceeding upwards, you find an elegant armchair that seems to match the instructions you just found. Don't do it yet, you would be zapped. Keep going up. Enter the laboratory. This looks like a fruitful place to carry out some kind of experiment, but don't get your hopes up too high. Go to the near end of the table and pick up the Metallic Glove and the Window Handle. That's all for now. More later. Go to the armchair and solve it according to the instructions you found. Watch out! Use the metallic glove to take the crystal, else you will be speared and it's Game Over. Someone locks you in! Now you are in a timed sequence. Too slow and it's Game Over. Go to the window and use the handle. You descend via the rope, but someone cuts it and you land in the moat. You meet with Moira again, and Day Two comes to a close. Hope they Scotchguarded that sofa!
![]()
Day Three: In a Nutshell
You awaken again in the guest-room. Go directly to Mac Farley's secret office, opening the door by using the cane on the symbol. Look in the top left drawer of his desk and take two items: the Observatory Key and an Indian Dagger. Head up the stairs, and enter the metal door using your new-found key. At the top, look right and open the cabinet. Take two items: the Raven Statuette and the Files. Examine the files to learn how to operate the machine downstairs in the lab. Now look close-up at the Thermofax machine. There are two views; the dial-up control and the send-receive scanner. Turn on the power. Consult your documents (the memorandum) to review the instructions. You find two codes; 95612 and 75436. The first one seems to not work, so try the emergency one, followed by your I.D. - 65. Now the scanner will work. Send three documents: the Fingerprints, Nessie's photo, and Moira's Code. When you back away, the receiver rings, and you can pick up the prompt acknowledgement. Their note suggests a full reply will require some research, so let's poke around the lab a while.
|
At the far end of the lab table is a holographic projector. While such a device might have lived in the imagination of sci-fi authors, it couldn't have truly existed. Let's play with it anyway. Check the instructions in the "Files" you picked up. It says to put the Amber Disks on first, then the Mirror Disks, finally the Raven Statue. Finish the job with MacFarley's crystal, and observe the results. The bird is projected in 3D holographic form, and you can read the inscription:
If you seize the Celtic Triskel,
only the Raven will know how to open the path.
Sounds like a helping hint if I ever heard one! Take the crystal and the raven. Back away, and the fax rings again. Go get the documents. Three things arrive: A note revealing the fingerprints as being those of McGrab, and telling about the H.M.S. Grondo Conqueror submarine; a sketch of the sub, and MacFarley's message about the location of the Chapel Key. Go to the office, and look behind MacFarley's oval portrait. Open the box with the Indian Dagger. Take two items: the thirteenth-century key to the chapel, and a document that says:
I am the stones of Power
But also the Messenger of the Gods
I will half open the passage
To the one who in the proper order
Will know how to write my name.
Time to go to the chapel. You can get there the long way, or just haul out the map and click on the chapel. Insert the key, and Oooops! it snaps off, leaving you locked out. Drat! Guess that's to be expect of a seven-hundred year old key. Belinda Banshee shows up and says something about knowledge and sky; and of the Book of Kelia. You decide this means going in through the roof somehow, and search for a rope. Remember that strong-box where you found the oars? Check it now, and it can be opened, if you use the correct tool. Bolt cutters should do the trick. Take the rope and grappling-hook. Go back to the chapel, and around to the side. Combine the grapnel with the rope, fling it over the peak, and up you go. Well, looky here! These symbols match the runes found in the Book of Kelia. Decode them to discover what they spell. From the left, they say "R, C, D, S, A, I, H." Spell out the name "Sirdach" by pressing the characters in the proper sequence: 4, 6, 1, 3, 5, 2, 7. Well, the message was accurate at that! It half-opens the passage. It's big enough to squeeze through, provided you don't break your neck in the process. Use the Rope again. On the wall to the left is a marble tablet inscribed:
Risen from ancient times,
King, Queen and Knight will cross
glances and discover the path of
the inexpressible power.
Huh? Well, if you examine the window over the main entrance, there is bright multicolored light coming through. If you stand in the center of the chapel, the spot where you landed, you can see three stone figures that rotate. Maybe if you turn them so they face each other . . . Aha! The trapdoor opens, and you can enter the underground chamber. There is the Celtic Triskel on a pedestal. Take it and, uh-oh. The trap-door closes, and the other exit is locked. Now what? What did that hologram say? Only the raven . . . put the bird on the pedestal, and there you are, back in the tunnels. Go through the one on the right, that leads to the house. Quick tip: Use the map. You arrive at the front entrance, converse with Mr. Shastra; then it's off to bed for the night.
Day Four: In a Nutshell
Go to the Drawing-Room. My! What's that sound? Check the window at the end of the billiard-table. Watch Nessie (beast or machine? We don't know for sure) as she approaches. Go outside, over the stone bridge and to Menhir. Pick up a piece of fused rock, and wonder why it crumbles. You decide to check underwater. Go to the cellar and take the diving gear: Suit, Helmet and Boots. That, plus the air-pump, is more than you can manage to carry. Go outside, and over to the greenhouse. Find the Wheelbarrow and Hose around the side of the greenhouse. You take it to the cellar. Step around it, and put the diving equipment in it. Then try to lift the pump. Maybe big, burly Mr. Mohr can help. Go find him in the greenhouse. "Yerr not partic'rly fonnd o' this life, arr ye?" Now's your chance to ask him what's under that kilt, anyway? On second thought . . . into the Loch with ye.
| Now, raise your hand, all of you out there who are already aware of my feelings toward MAZES. Say, that's quite a showing! I must have made my point before. Guess I don't have to elaborate too much on acid-reflux, grinding teeth, clenched toes, handfuls of hair, and the like. Suffice it to say that you Better Save Your Game Now. You will be searching for an algae-encrusted gate. When you scrape off the algae, the air-supply will stop and you have very limited time to return to the starting point. Tip: Save Your Game Again, just before you clean off the algae. |
This is a bugger of a maze to map. It's also hard to describe. ("Go to the rock, turn left; go to the rock, go to the other rock . . . It's like saying "Meet me in Nantucket, by the gray house with white shingles.) Before you move, turn around and observe the bicycle, and the closed exit. This is what you will be searching for when time is running out. Poke around a lot, and learn what the nodes look like from all directions. Here, in my opinion, is the most important one. Learn to recognize this particular rock. It's the key to getting home.
The reason is, that stepping just to the RIGHT of it will help you get home. You should practice that route now. To the left side, are three active arrows you can take. Only the leftmost one is correct. The other two are dead-ends. Stepping through that left one puts you facing an enormous rock wall. Swing left, toward some junk on the bottom. Then stay close to the wall once more, and look straight down at your feet. Pick up the Broken Bottle. Again, go along close to the wall. You see a sunken rowboat. Step over it, and turn right at the next node. Again you see three choices. Take the one that goes between the two seaweeds. Here is your gate. Remember, before you clean off the algae, save the game. The Raven-Symbol is revealed. When you step away, your air is cut off. Go back, step to the right of the two weeds, past the boat, along the wall, over the junk and come to the rock pictured above. Now go to the right side of it, and then slightly left, slightly right, etc. until you see the shipwreck. Go right of the wreck, another step, and you should see the bicycle and be able to step on shore. Climb up, only to discover that Fergus has been knocked unconscious. Now you hear Moira scream. Go to the house.
Check MacFarley's office. Someone has ransacked the place. Step further in, and Ursula appears and tells you that Moira has been kidnapped and taken to the distillery. You tell her about Fergus, and she advises you to take the pistol which is hidden in the drawer of her dressing-table. Take it, and use the map to zip to the distillery. On the way in, across from the water-wheel, pick up the sack of sawdust next to the barrow. Then, enter, only to find yourself locked in. Cripes! Who's following us anyway? No worry, you can still exit by the other door, the one with the slot in it. Oooff! The maid has conked you on the head, and locked you in the cellar. Evil bitch! You had suspected her already, partly because everyone else could be eliminated one way or another, and because you caught a glimpse of her as she locked you in the office. Look around.
There is a leather strap hanging on the outside wall. Take it, and attach it to the rightmost window. (It's not obvious what you've done, for the strap becomes invisible, and the window appears inaccessible. Strange.) Go across the room to the electric motor and attach the other end of the strap to it; turn on the motor, and yank the bars out, allowing you to escape. In the process, you have dropped your inventory on the ground. Pick it up, and you will be confronted by the maid. This time she has a gun. Take your revolver, and shoot the ropes suspending the heavy sack over her head. Whump! She is knocked out, and you can take the booklet from her purse. It contains the Banshee, who gives you more insight. Get a good night's sleep; it's the longest night of the year.
Day Five: In a Nutshell
Hope you're well rested; this is one tough day coming up. Check your notebook. It implies you need to go underground. Check your documents. McGrabb's book refers to Alban Arthuran on the Winter Solstice, Dec. 21, with the sign of Capricorn. As usual, your day starts in the guest-room. Use the map and zip to the greenhouse; not because you want to go in there, but it's the quickest way to the cellar. From the greenhouse, go toward the back of the castle and enter the cellar. Use the tunnel to reach the junction of the three tunnels, and enter the left one, with the raven symbol above. You find the zodiac wheel puzzle. On the opposite side, see the beam of light. This is the point where you must place the correct symbols. The Alban-Arthuan segment is facing you on the outer wheel. Click twice to place it at the light. (It's spelled 'Arthan' in McGrabb's notes. These guys are a little loose with their spelling) Then place the Capricorn symbol at the light. Capricorn looks vaguely like '76' and starts out close to you It's between Aquarius (wavy lines) and Sagittarius (arrow.) Click to the right five times to get it to the far side. Listen up! The only clue you have that you solved it is a little extra grinding sound, indicating that something has changed. If you turn around, the Triskel symbol on the rock can be entered.
| Here, it is possible to die. If you have not created a saved game recently, do it now. |
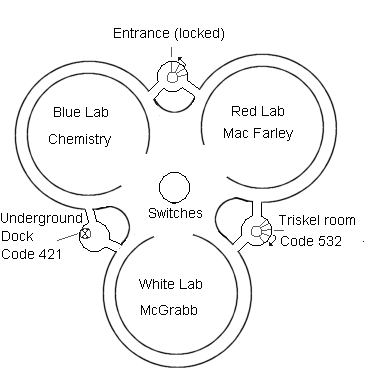
Now, I have already vented my spleen about mazes. This isn't exactly a maze, but it sure feels like one. Click here for a map. What you have here are three circular rooms, a central area, and three exits. The way you came in is locked. Another exit leads upstairs to the Triskel, and the third one leads to the underground dock, for access to the submarine. These exits can be accessed if you know the codes. The same notebook that gave you the Capricorn clue contains the codes. The three circular rooms are laboratories, and can be rotated. You can prowl around outside them and peek in the portholes. One view shows you a chemistry lab, another shows poor old Mac Farley wired to some kind of gruesome experiment, and the third shows McGrabb and his Druid friends in a meeting. He describes his absolute power, and the plan to destroy London. When the meeting ends, you better turn around and duck into the exit, or face the consequences. (Game Over.) After they leave, you have the run of the place. Go to the central area. McGrabb has rotated his room, the white lab, so his friends could leave You can walk in. On the far wall, find the controls and turn the wheel. This provides power to the three switches on the central pillar, so you can rotate the other labs and gain access to them. Turn around and take the Triskel Chest from the desk, and the Metallic Pliers and Platinum Key from the drawer. Go out the door to the three switches, and open the red and blue labs by rotating them.
Visit the Chemistry Lab first. To the right, as you enter, is a bookshelf you can examine. Learn the recipes for two explosive mixtures.
Black Gunpowder: 50
grams saltpeter |
Dynamite: 120
ml Nitric Acid |
I found the ingredients for Dynamite in the right-hand cabinet over the sinks. Some players report having to make Black Powder instead. I am speculating that it is randomly chosen which recipe you must follow, and that the charcoal, sulfur, etc. are in the left-hand cabinet. Notice that when you pick up the glycerol, a pipette comes with it. Gather the bomb-making ingredients now, while you are not being timed. Then go see Mac Farley. Jeez! Those wires look like the back of my computer! Read the warning on the wall. It says to do the handcuffs last. Following the wires, you turn off the helmet, then the anklecuffs, then the handcuffs. Middle, Left, Right. Revive him with the contents of the bottle. Following his dialogue, you turn to leave, only to hear Moira scream. The countdown starts. The timer will stop when you free Moira. The choice is yours, how efficient you feel. If you wish to assemble the bomb now, then free her, it's more efficient, but you must hurry.
To free her first, go to the exit leading to the underground dock, and enter it by using the code: 421. There's the submarine, Moira in a cage, and some equipment on the far left. Go to the equipment and look for a bucket on the floor. Take the star-key. Now, by following the connection from the crane suspending the cage, locate the crane's controls. Use the star-key to activate the controls. Now the lever. Careful! The lever goes both ways. If you choose the wrong direction, she is lowered in the water, and it's (Game Over.) for you AND Moira. Ta-Ta, Toots! To raise the basket, place the cursor under the lever. Go set Moira free by clipping the chain. She heads home. You are no longer being timed, so if you haven't created the bomb yet, go back to the laboratory and do it now. The dynamite recipe calls for 120 ml of Nitric acid, and your container holds 30 ml. Use it four times. Then four doses of Sulfuric acid (4 x 20 = 80), and one of Glycerin. Pour the mixture into the water. Place the pipette. Put the sawdust into the green bottle. Finally, take the pipette and put the nitro in the sawdust. Take the bomb.
Go to the rear of the submarine and place the bomb. Now for the Triskel. Go up the stairs to the Triskel Room and enter, using the code: 532. Open the hatch, place the Triskel cabinet inside, and retrieve the Triskel using the metallic pliers. Don't touch it with your bare hands, or it's (Game Over.) Take the chest with you and go to the Observatory. There's Moira. Step to the window and watch the sub. Then, it's up to you to detonate the bomb. The timer runs, giving you only a moment to aim. Center the crosshairs on the sub and fire. That's the end of McGrabb and his evil plans. One final thing to do: Go to the Celtic Cross and give the Triskel to the Banshee. She thanks you, and returns the Triskel to its legendary place. Well done, Detective.
![]()
![]() GameBoomers Walkthroughs and
Solutions
GameBoomers Walkthroughs and
Solutions
Checklist for day one:
Drawing-Room: Meet Mrs. Mac Farley
Guest-Room: Retrieve your inventory
Kitchen: Take matches, candles, passkey, rag
Drawing-Room: Take key and pills
Kitchen: Send up tea
Laundry Room: take tea
Her Room: combine pills and tea, give her tea, take chloroform,
take attic key, take picture
His Room: take document, lift fingerprints
Attic: light candles, examine photo album, take photo with
you, take map, take crowbar, use on window, take snapshot of
Nessie, use crowbar to exit
Laundry room: see ghost
Drawing Room: Drink Bourbon, get crystal
Front parlor: Take Mead, pick cabinet lock and take old document
Library: examine flower book
Greenhouse: Pick flower
Celtic Cross: Give flower and mead, listen to Banshee.
Checklist for Day Two:
Library: Hear muffled voices; peek at them from the stairs
Front Hall: Take McGrabb's ring and his mail
Go to boat; row to Distillery
Distillery: Take the bolt cutters near the barrel
Snuff the old guy with chloroform
Take the book, key from cane, and cane itself
Stop the waterwheel
Cellar: Take the amber and silver disks; exit to the castle.
Library: Open MacFarley's office
Find lockbox with instructions to the chair
Laboratory: Take glove and window handle
Stair landing: Open chair and take crystal
Exit window, fall into moat.
Checklist for Day Three:
Office: Take dagger and Observatory key
Observatory: Take Files and Raven from cabinet
Send Three telegraph/faxes
Receive acnowledgement
Operate Holograph according to instructions in Files
Receive three faxes
Office: Take Chapel Key
Chapel: Break key; find rope and grapnel; combine.
Climb on roof; solve Sirdach puzzle
Climb down into chapel; solve statues puzzle
Lower level: Take Triskel; open tunnel with Raven
Go to main house
Checklist for Day Four:
Drawing room window: See Nessie
At Menhir: Examine crumbly rock
Cellar: Take diving gear;
Greenhouse: Take hose and wheelbarrow
Get help from Fergus Mohr
Underwater: Learn maze; take broken bottle to Green Gate;
Escape before air runs out
Office: Speak with Ursula
Her Room: Take pistol from nightstand
Distillery: Take sawdust; enter; get locked in.
Exit; get conked, get locked in cellar
Cellar: Use strap on window and motor to pull down bars.
Exit; pick up inventory sack; face maid with pistol, shoot down
sack
Take booklet; see banshee
Checklist for Day Five:
Cellar - Raven Tunnel: Solve Solstice-puzzle; enter laboratory
complex
See portholes: Chemistry; Mac Farley, and McGrabb.
McGrabb Porthole: Watch sequence; hide.
McGrabb Laboratory: Read recipe-book; take ingredients from cabinet
Red Lab: Release and revive MacFarley
Underground: Enter using code 421; Find Star-key; release Moira
Chem Lab: Make bomb
Submarine: Plant bomb
Triskel Room: Enter using code 532, open door, place chest
Pick up Triskel with pliers
Exit where you came in. Go to house.
Observatory: Watch submarine; detonate bomb
Celtic Cross: Give Triskel to Banshee.