THE LOST CITY OF MALATHEDRA
Walkthrough by Chrissie
January 2009
In-game controls
Click on arrow to walk.
Right-click to bring up options then hold & drag cursor to icons eye (look at), mouth (talk to) or hand (perform an action e.g. pick-up, take etc).
Left-click to access inventory then right click on inventory item & either drag onto another inventory item to combine or move outside inventory box to use in the game screen.
To save, load & exit click on icon at bottom right of screen.
PROLOGUE
Malathedran Gate
Brush away foliage to the left & right in front of the gate
Walk to either pedestal to find they are touch sensitive. You need a weight on both!
Take rock from top left of the screen. Shake coconut palm & take coconut.
Use rock then coconut with left pedestal.Walk to & across right pedestal to stand on it.
The gate opens.
Bell Room
Walk to & ring each of the four metallic pillars in the corners of the room.
Walk to grate, look at grate then pull grate.
The Light Room
Light up all of the crystals by clicking on the four corner ones then the one in the centre i.e. bottom left, top left, top right, bottom right, middle.
PART 1
Port Placid
On arrival you learn that Rebecca’s father is staying at The Bread & Board Inn. You have some cash in inventory.
Walk to the left of the ‘Welcome to Culuco Island’ sign to find the inn.
The Bread & Board Inn
Pick up the matches left of the steps & click on door to enter.
Talk to the innkeeper. Rebecca’s father owes her money. Use cash with Ethel. You have no money left in inventory.
Walk to rooms on left.
Take dad’s notes from dresser & automatically read them.
Leave the inn & walk south.
Fabricated Fortunes
Click on door to enter. Use the slot machine on the counter. Talk to Shop Owner about all subjects. Learn about the sport of Geo-caching & note that if you win on the slot machine you get an underwater treasure map plus diving gear. Pick up the empty ink bottle on the floor left of the desk.
Leave the inn & walk to the right along the seashore until you come to a sandcastle. Pick up the plastic shovel. Continue right.
Age Old Antiques
Click on door to enter. Talk to shop Owner about all subjects. She gives you a map of Culuco Island. She also mentions the Ruins.
Leave the shop & walk north.
Mad Miner Murray’s Excavation Outfitters.
Click on door to enter. Take note of the sticks of dynamite for $1.00 each.
Talk to shopkeeper as much as you can.
Leave the shop & walk to the left & up behind the Welcome sign until you come to an arrow ‘the jungle path’. Click on the arrow to bring up a map of Culuco Island.
Walk to Ruins.
Ruins
Take lantern. Walk into the ruins until you come to a fractured wall. Look at it - ‘the wall looks weak’. You need to find someway of getting through as maybe your father is on the other side.
Leave Ruins to return to map. It’s time to explore the Island!
Visit each location on the map, in any order, to discover what’s there.
Shady Lake
Walk to berry Bush & take red-berries. Walk further along to a cottage.
No-one is home.
Bongo Beach
Look at collection dish, it has $1.00 in change. What have you seen that you can buy for $1.00? Mmm……….Talk to musician & learn that he has lost his flute. Talk to treasure Hunter – he’s been searching for four years & hasn’t found anything. Look at the sand-pile. Walk left to the Tiki Bar. Look at the Tiki Bar – it has ice, umbrellas & bamboo cups.
Lake Luna
Look around. There’s nothing to do here just yet.
West Beach
Talk to bandana-wearing guy. Learn that he carves items from bamboo but has lost his knife. Walk left to the seashore & look at sand-ditch. Try to dig through sand-ditch. Return to jungle path.
Port Placid.
In inventory use red-berries with empty ink bottle to get instant red ink
Walk to Fabricated Fortunes & use ink with Ethen. He marks a red X on your map.
X Marks The Spot.
Use plastic shovel (taken from seashore in Port Placid) on dirt mound.
Take glowing treasure to get candlestick & dirty rag in inventory.
Bongo Beach
Yell at Larry. In the conversation choices click on ‘Have you checked over there?’ When he’s gone use candlestick on sand pile then see what happens.
Take metal detector.
Walk to Tiki-bar, click on it & take Bamboo Stick.
West Beach
Use metal detector on sand-ditch by seashore. Take knife & use with Bob.
Use bamboo pole with Bob. He carves you a bamboo flute.
Bongo Beach
Use bamboo flute with Javas. Take money from collection dish.
Port Placid
Go to Mad Miner Murray’s Excavation Outfitters.
Take a stick of dynamite from the Valumite cart. Use money with salesman.
Ruins
Use stick of dynamite with fractured wall. Use book of matches with dynamite stuck in crack. Click on gaping hole.
Take Metal Thing & Note. Leave the Ruins.
PART 2
Port Placid
Go to Age Old Antiques & talk to Maddie.
Go to the rooms at The Bread & Board Inn & click on Bed.
Take Prybar from floor. Look at muddy footprints.
Leave the inn & automatically be at Shady Lake.
Shady Lake
Walk to cottage. Use prybar with cottage. Click to enter.
Take keyp parts & pick up pitcher of ice-water from coffee table.
Walk to refrigerator & take magnet. Use pitcher with little thief.
Go to Age Old Antiques & talk to Maddie again. She wants something before she will help you & marks a new location on your map.
McKellin Estate
Talk to commbox on wall left of the gate.
Watch cut scenes & go back to Age Old Antiques & talk to Maddie yet again. What you need is under water!
Go to FABRICATED FORTUNES & use magnet (from Ivy’s cottage) with slot machine. You win, & Ethen gives you two diving suits.
Lake Luna
Walk right to the lake shore. Use diving suits on Rebecca then click on lake.
Look at strange slot right of the gate. Walk left & forward to a metal hook. Use lantern with metal hook. Walk forward to tomb. Try to open the tomb. Use prybar on tomb then look at it. You don’t see anything in there.
Walk back to lantern & turn it off. Walk to glowing thing in tomb. Look at glowing thing & take glowing thing.
Use glowing rod with strange slot next to gate.
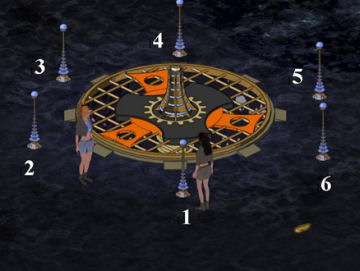
Elevator Room
There is a pedestal surrounded by six switches. Look at pedestal then use glowing rod with it. Go round & touch all of the switches. Each gives a piece of Malathedran history. You need to touch the switches in the right order to tell the history in sequence.
There are clues to the sequence in the descriptions! (Four have numerical references)
1 – And at the behest of the tri-elder council
2 – Malathedra owes it’s birth to fire
3 – The four ministries obsessed over immortality
4 – And in the end the jealous majority delivered the final blow
5 – Not even a fifth of our people were granted this gift
6 – With science dominating through it’s second age
Click on switches in this order: 2 – 6 – 1 – 3 – 5 – 4
Lava Room
The bridge is too hot to walk across (try it!)
Turn on valve - the bridge is cooled but heats up again when you let go of the valve! Talk to Ivy & ask her to hold the valve down. Walk across the bridge. Turn on the valve at the other end so that Ivy can also cross.
Click on door.
Skeleton Gate
Walk to broken machine & pick up tarnished metal plate.
Look at the sentries on either side of the gate. The eyes look deadly.
In inventory click dirty rag on tarnished metal plate to get polished metal plate.
Use polished metal plate with one of the sentries.
Control Room
Look at one of the pedestals. Talk to Malcolm. He gives you the key parts.
Talk to Ivy. Watch cut scene. Take key parts.
Automatically Rebecca & Ivy are back at Ivy’s cottage.
Port Placid
Go to Mad Miner Murray’s Excavation Outfitters. Talk to Murray. Use diving suits with Murray to get excavator bomb.
X Marks The Spot
Use excavator bomb with dirt mound.
Use the key of Malathedra with the gate of Malathedra
PART 3
You now have a map showing some areas left in the City of Malathedra.
It’s time to explore again!
Service Area
Click on massive door – it’s locked. There’s also an elevator that is also locked.
City Hall
Walk to thrones. Touch Malathedran device part to get into inventory.
Grand Commons
Walk to strange device. Note the colored circles surrounding it. Walk around the perimeter of the area & see something on the ground (it’s located just above the exit arrow). Touch Malathedran device part to get into inventory.
In inventory combine the two Malathedran device parts.
Talk to ‘being’. Exhaust all conversation. Combine the two Malathedran devices as many times as you need to until he tells you about the collars, the strange device & the pit. Also learn that to get the power on you need to override it manually.
N.B. You can now summon the hologram in any area to learn more about where you are by combining the Malathedran device parts & asking.
The Pit
Click on the red button left of the gate & the hologram reappears –meanwhile Ivy ‘explores’ – oops! Walk through the gate of the Infernal Machine. Look at pile of bones to get key card. Take metal thing from ground just inside of the gate & to the left.
Service Area
Use key card with service elevator. Use service elevator.
Reactor Room
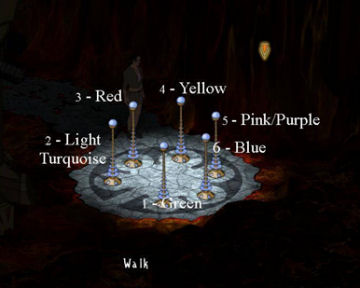
Walk to the right (behind the reactor) until you come to a set of six switches. Clicking on each a few times reveals that they emit light in various colors. You’ve seen that arrangement before in the Grand Commons & you need to emulate it.
If you have trouble distinguishing colors:
1 – Green (1 click)
2 – Light Turquoise (4 clicks)
3 – Red (3 clicks)
4 – Yellow (5 clicks)
5 – Pink/Purple (2 clicks)
6 – Blue (6 clicks)
You now have power. Leave reactor room.
Grand Commons
The strange device is now flashing. Use collar with strange device. Watch cut scene.
The Pit
Use collar with Ivy.
Service Area
The emergency door is open but then it shuts again! Combine the Malathedran device parts to summon the hologram.
Tram Room
You see a row of four consoles. Click on switch to the left of them. It’s stuck but Ivy helps. The consoles light up.
Clicking on each a few times reveals that they can show various symbols. Open you inventory to look at the key card. Match the symbols & their order on the consoles with those on the key card .i.e. from left to right: black circle, white circle with black outline & black dot in middle, white square with black outline, black circle with white star in centre.
Watch the cut scene.
THE END
This document was provided to GameBoomers.com and may not be distributed without express written permission of the author and the content may not be altered in any way.