GameBoomers' FAQ for Myst IV Revelation
By The Fellowship of the Quest
This FAQ document is based on questions and responses from the Myst IV Revelation Quest thread. The content has been edited to make it fit more easily into the FAQ format.
This document contains hints and serious spoilers – there will not be a warning before the spoilers. Some of the questions in the Quest thread inspired several responses. Multiple responses are therefore included below, because differing viewpoints are often more helpful than just one. Where there are multiple responses, these are designated A1 (Answer 1) A2 (Answer 2), etc.
TOMAHNA
Getting Power Restored
Q: Before he left, Atrus told me to restore the power in order to be able to use the crystal viewer. I am lost and don’t know where to start?
A1: The fuses have blown. There is a definitive procedure for restoring power:
Use the elevator to go down to the middle level. See and exchange with Yeesha a couple times.
Continue through the various conservatories until you reach a dam that has a lever with glowing icons. Pull this lever to reset the generators.
Return to Catherine’s workshop where you’ll find Yeesha explaining the power panel. When she leaves the room, open the power panel (roll top).
You must transfer power from column to column to get a specific ‘balance”. The spoiler is: transfer column 1 to column 4, column 4 to column 5, column 5 to column 3, column 1 to column 6, column 3 to column 6. You’ll see a response that lets you know all is right.
Go back to the dam and press the button on the top of the lever. Watch the lovely animation of power starting.
When you return towards the crystal viewer you’ll experience an ‘earthquake’; this is normal. You’ll wake up at night with some walkway damage.
Crystal Viewer and Telescope
Q: I found/read journal, opened roof (switch near the three security monitors), got in chair to the telescope, hit button that glowed, went to crystal viewer and did sequence of shapes and colors and put in correct five spots. BUT when I hit red button; no Atrus.
A1: To get the telescope working -- you must open the roof (via switch) go up in the chair and look at the viewer in close-up (magnifying glass). Aim the antenna by pushing the button on the top right of the telescope console (looks like there's a lighthouse on the button). When you push this, you'll see the light become bright orange and you'll hear static starting on the crystal viewer. When you get out of the chair and look at the crystal viewer, you'll now see static on the screen there.
I
have written down a list of the crystal shapes and what number they are on the
slider -- the slider moves so quickly that it's easy to miss them. Here they
are:
Slider Position 1 -- tear drop
Slider Position 2 -- single spire
Slider Position 3 -- double spire, short, close together
Slider Position 4 -- fox ears
Slider Position 5 -- engagement ring
Slider Position 6 -- multiple spikes
Slider Position 7 -- double spire, tall, close together
Slider Position 8 -- single spire, angled top
So using these (admittedly strange) descriptions, link to Rime is solved this
way: (note the console I'm talking about with buttons is UNDER the static view
screen)
Red-multiple spikes (slot 1)
Light-blue double spire, short, close together (slot 2)
Yellow-single spire, angled top (slot 3)
Green-single spire, angled top (slot 4)
Dark-blue single spire (slot 5)
- Then hit the middle button on the console.
A2:
Once you get power up and the roof open and antenna aimed, you will be able to
enter the crystal symbols into the viewer. The difficulty with this puzzle is
that the pictures in the books don't always look exactly like the crystal
symbols in the machine. In fact, two of the tall crystals (the ones with twin
spires on them) can look very much alike.
So, to alleviate us from this ambiguity, some have posted solutions by noting
the color and position (#1 - #8, left to right) of the slider (the slider is
what you use to change the crystal symbol shape). When I am frustrated by a
puzzle, I like a direct spoiler type of solution like this.
So, go ahead and enter the symbols and colors per the book. If you still have no
image, you might try referring to the following solution using the slider
position numbers:
red – slider position #6
light blue -- slider position #3
yellow -- slider position #8
green -- slider position #8
dark blue -- slider position #2
Bookcase Puzzle in Yeesha’s Bedroom
Q:
My eyesight is very poor and I can't
make out the titles on the chart and on those books well enough to distinguish
quite a few of them, so I don't know which ones to push when.
Could someone please give me a flat-out spoiler on those books in Yeesha’s room?
A1: Solution:
Number the books 1 - 8 on top row and 9 - 16 on bottom row.
Click books in this order: 12, 6, 8, 3, 14.
The bookcase will slide open and the dock is accessible.
Fireplace Puzzle
Q: The fireplace puzzle: a hint of some kind will be appreciated....
A: Spoiler:
Click in row 2 (from the top), column 2
Click in row 3, column 6.
Click in row 4, column 3 and 4.
Click in row 5, the first and last column.
Click in row 6, the sixth column
SPIRE
The Book that Won’t Open in the Linking Chamber
Q: When I was leaving Spire there was a book that I could not open which was sitting on the bench located in the front part of the linking chamber. (The Tomahna linking book was in a see-through case in the back part of the chamber). Was I supposed to have been able to open this book?
A: The book in Spire wasn't there to be opened (I don't think), but you should get some information from the amulet when you zoom in.
Flying the Ship – Setting the Two Power Panels Correctly
Q:
I've gotten the ship up to where I can get on it (at the Dock bay)...went and
got on, couldn't get it to fly...got back off, went back to the panel and
screwed it up and haven't gotten it back up to flying level again since! LOL
Once I get IN the ship, I'm not sure how to get it to FLY!!!
Any hints on actually FLYING it??
A: OK, you need a proper balance of PULL from the top magnet and PULL from the bottom magnet. You are where I was... you probably have one power light on the top power panel and 6 power lights on the bottom power panel. This is the correct differential (i.e., the bottom must have 5 more lights than the top to get the ship at the docking bay). But, you must get the CORRECT balance AND level of power to get the channel open to cross to the floating palace.
So, if you can find a way to get TWO power lights on the top panel and SEVEN
power lights on the lower panel, the ship will have the proper differential to
float at the dock level PLUS it will have the proper level to fly across.
So, play with the slider on the top power panel first to get it to TWO power
lights, then fool with the bottom one to get it to SEVEN.
By the way, the power lights are the ones at the top row in each control panel.
There are max four possible on the top panel and max seven possible on the
bottom panel.
Spire Spider Chair
Q: How do I tune the crystals? I have set and reset the gears several times at the bottom of spire. There is no sound when I move the sliders to open the locks.
A:
Tuning the crystals: did you make the connection between the gears beneath the
throne place and the gauges on the 3 big crystals up above (one near the access
to the docking bay, one near Sirrus' sleeping chamber and one viewable by the
telescope on the other palace)? Each set of gears has a different symbol on it
and each crystal has a different-shaped setting. Each gauge has a "set mark" on
it and also a lever that is affected by turning the gears below. On crystal
#1--the crystal above the access to the dock with the pentagonal setting, which
corresponds to the first gear--the correct setting is four places from the top.
All the way up (on the gear) and all the way down count. Try moving the gear and
going back and forth between there and the crystal to see what I mean. You can
actually check on two of the crystals to see if they're right, but on the one
with the gauge blown off you'll have to hypothesize.
Hope this helps--it was the last connection we had to make to get things going,
anyway.
Q:
O.K., I'll take the award for most dense. Have read each post re this puzzle at
least 3 times. Since I can't get any crystal to vibrate in the slightest, am I
in the right place to begin with?
In the spider chair, gears have been positioned. Have gone up one level from the
gears to a "console" that has in the center, 4 circles with a crystal in each.
There are 3 antennae like thingies with 12 green circles around each between the
4 circles with crystals with two each of the four circles on either side of the
3 antennae array. Is this where I am supposed to be sliding the 6-12-4 etc.
positions on the green circles of any one of the antennae? I can understand that
I am missing accuracy on this and not winning but, after numerous tries,
shouldn't I get some kind of movement out of any of those crystals inside the 4
circles?
Edit: you can go in the sequence of 1-2-3, 3-2-1, 1-2-3, 3-2-1 hitting the
antennae? I believe I am in the right spot, doing the right thing, its just
reading somewhere that when you got close to the right positioning, the crystals
shake. Mine surely ain't shaking!!!!
A1:
This happened to me. It was because my gears were incorrectly set. The gears
start out in the number 1 position. I thought they started at zero but they
don't. Reset your gears and start counting again from 1.
This puzzle is a BEAR! Good luck.
A2: You are probably off by one on each gear.
Spoiler: The gears should be on position 4,
3, and 7. Remember that you START on position #1, so click three more to get to
position #4.
And, yes... it is BEST if you go 123, then 321, etc., on the sliders. You will
move faster if you do it that way and the game allows it.
Q: Yes, well I'm stuck also - I got that blasted chair moving and am now hanging below it with no clue what to do. There are three gears in front of me and I can pull each one down once and they lock in place and the only way to release them is to press the levers under them - is that what they are supposed to do? I think I'm missing something somewhere –
A:
Those gears should be moveable to any of the notches. You need the correct
tension to solve the next puzzle. There are clues to it in the documents Sirrus
left around. Stop reading now, and go back and read up, or....
Complete Solution -- Move left gear to the 4th notch (important note... you
START on notch #1 for each gear, not notch #0), center gear to notch 3, and
right gear to notch 7. Then go up for the toughest (perhaps) of all of the Myst
IV puzzles, tuning the crystals.
Q: I got to the spider chair to adjust the crystals I touched the slider on the left and sparks flew out of the machine next to the door and all the lights went out on the spider chair control and the panel went dead. Was I supposed to fix that machine somehow before I tried to adjust the crystals?
A: A simple hint for the spider chair is that you've just blown the fuse... you have too much power connected to the chair.
Q: Okay set the gears at there position, noting that one is already in position...now going back up to the keyboard slider...I have a question here…once you play the first frequency, do I press the left blue button and play the second set of tunes, and so on?
A:
OK, you are at the Spire spider chair, about to play the frequencies to vibrate
the crystal-rocks. This is tricky, because it's timed... Some of the crystals
vibrate for longer times, so they should be tuned first. You have to get all
four vibrating (tuned) at once to move on. NO NEED TO PRESS THE BLUE BUTTON
BETWEEN TUNINGS.
So, once one rock is tuned, IMMEDIATELY move the same slider that your hand is
grabbing to the next position... that is, there is no button to push between
each tuning. Just get it vibrating, then move on quickly. You don't have to move
the sliders starting from left to right…any order will work.
Hope this makes sense... good luck.
Q:
The keyboard music tunes, is way too hard...I don't know if I am doing it
right...
When I get the first set, and the slider is up, can I go slide back down to set
the other set of tunes...
What I am trying to say when I slide the first set 6-12-4 to set the second set, could I slide down the slider all the way and set the second, or can I slide up and down? I hope someone understands what I am trying to saw…because sometimes when you adjust the sets you don't have enough room to set the other set to go up.
A1:
Yes this was the most difficult one for me because of the timed nature. You have
the order correct! Think of it this way:
- for the first set of three slider settings (6-12-4), the crystal will be
"tuned" the moment you get that third slider on "4". No need to release the
slider at this point.
- what worked fastest for me was to then immediately drag the slider from "4" to
"7" which is what the right-side slider needs for the second crystal tuning.
- then I jumped to the center slider and moved it from "12" to "1" (side note:
this is a tricky one because you want to drag it all the way to the bottom, but
be careful...it is possible to pull the slider down BELOW the "1". The same is
not true for the "12"s... you can shove the slider all the way to the top and it
will lock on the "12"s). Then the left slider, etc....
See what I mean? The moment the crystal is tuned and vibrating just move right
on the next settings... you have to be fast, because you need all four crystals
vibrating at the same time to solve the puzzle.
A2:
Re: Spire spider chair harmonics. I finally worked it out. I couldn't really
find help elsewhere that would help me shorten the time to move the sliders but
here is what I did:
1) I noted that it didn't matter which slider you started on or you finished with to create the element vibration (i.e., 123, 231, 132, etc);
2) I found it a lot easier to focus on the 'lights' rather than the notches on
the slider for counting. Once the white quartz harmonics started the border
between on/off lights in the bank had turned the corner. From this point I found
it easy to count lights on or turn off through the 'feel' of the appropriate
slider.
So I made my slider sequence (starting with quartz) 132, then 123, 321, 123
The corresponding lighting sequence is #1 6 off, #3 4 off, then with a deep
breath...#2 slide 12 off (the race begins), then to #1 slide 3 on, #2 (slide 12
on then take 1 off), #3 slide 3 off, (pause),#3 slide 2 on, #2 slide 4 off, #1
slide 7 off,(pause) then push all three sliders to the top.
I use the word 'pause' so that you come to a complete stop and not to a
'rolling' stop as some auto drivers often do.
Anyway, focusing on counting lights on/off once I passed quartz was my saving
grace. I know one thing...I'll never be a Starfighter pilot.
A3: Here is a step by step for solving the slider tuning puzzle.
When you sit in the chair all the crystals (lights) around the edge are dark.
Left slider is #1
Center is #2
Right is #3
QUARTZ:
#1 Push until 6 crystals are lit (starting with lower right side and going counter clockwise.
#3 Push until 4 more are lit
#2 Push all the way up
BLUE CRYSTAL:
#2 Pull all the away back (reset) Push up until 1 crystal lights up
#1 Pull back until 3 crystals go out
#3 Push until until 3 crystals light up
ROCK:
#1 Push until 7 more crystals light up
#2 Push until 4 more crystals light up
#3 Pull until 2 crystals go out
NARA:Push all 3 sliders all the way up to 12
Sure saves trying to count little dots.
A4:
I thought I'd write this for encouragement to those of you who are having
trouble but want to finish the puzzle yourselves.
Speed is not the important thing here, accuracy is. If you set the
sliders only approximately right the crystals will vibrate, but the vibration
won't last long enough for you to finish the puzzle. But if you take the time to
set each exactly right, the crystals will vibrate much longer and you will be
able to move a bit more slowly. So practice, practice, practice! until you can
set each slider by sight, exactly where it is supposed to be, without counting.
Just remember lots of us (even little me!) have finished this puzzle, and we are
here to hold your hand!
A5: One thing that really helped me on the crystal tuning in Spire was to turn the cursor color setting down to its lowest level (like it helped me to turn the cursor to red in Haven). You can then set the cursor directly over the top of the slider and actually see the green marker through the slider and know when to stop.
A6:
Spider Chair Strategy:
1. Before setting the sliders on the spider chair you must be certain that the
gears under the chair are set correctly. If you push all three sliders to the
very top of the console, and the knight in the top right lock does NOT tremble
and retract, then you know that the gears aren’t set correctly.
2. Setting the sliders is tricky. The slider opening/window tends to “slip”
downwards. Put the center of the slider window slightly ABOVE the green circle
marker you’re aiming for – it’s more likely to stick there.
3. When you pull the slider to the bottom, there is a slot ZERO possible below
slot 1. Make sure you don't go too low when trying to set slot #1.
4. Each slider sequence (i.e., 6-12-4 is one sequence) can be set in any order –
you don’t have to go left, center, right each time.
5. Once the first two sliders are in position for a sequence, you don’t have to
accurately set the third slider at all – you just have to move the third slider
up or down PAST the third setting, hitting it for only an instant as you
continue to the next setting without letting go.
6. The final setting is easy – just bring all the sliders up to the top as fast
as you can. Even here, though, they can slip down – make sure they’re completely
at the top.
7. The order of the settings: 6-12-4, 3-1-7, 10-5-5, 12-12-12.
Here is the step-by-step fastest order for tuning the Spider Chair Crystals
RIGHT SLIDER to 4.
LEFT SLIDER to 6. (Timed portion doesn’t begin until you set the center slider.)
CENTER SLIDER to 12 up at the very top (don’t let go) CENTER SLIDER to 1.
LEFT SLIDER to 3.
RIGHT SLIDER past 7 (don’t let go), then down to 5.
CENTER SLIDER to 5 (center slider knob on a horizontal line with the right
slider knob).
LEFT SLIDER TO 12 (go past 10 without stopping).
CENTER SLIDER TO 12.
RIGHT SLIDER TO 12.
HAVEN
Elevator Balls in Box Puzzle – Getting into the Shipwreck
Q: Have explored around the shipwreck further. Discovered that the cannon balls can be moved. Tried moving all of them into crate and tried to crank it up, but too heavy. So removed one and then it went up. Also found a movable box inside where the crank wheel is. Moved it over and put all the cannon balls into it. Then I cranked the box up. It won't stay up though when I move out. What must I do now? Thanks again for all the help here.
A: The box must have the right number of cannonballs in it to allow the lift to go up (remember to crank the rope each time you try). Then, when at the top you push the box off of the lift and it raises an access bridge to the shipwreck. Enter the shipwreck and explore. Lot's to see and learn!
Q: Here's what I did - put 3 balls in box to left of elevator, 2 balls in box in elevator. Turn wheel to raise box outside elevator, turn and push box on elevator off, then pull lever. The elevator goes up. But when I go towards the ship, can only go one step forward. There is a section of the boardwalk missing here. What could be the problem here? Sure hope you can tell me what I should be doing.
A: Raise the elevator before pushing the box off.
Gate Puzzle in Woods
Q: Is there a way to reset the gate puzzle? I have tried closing it, but it doesn't seem to work.
A:
You are talking about the gate puzzle in Haven, right? With the wooden gate and
puzzle on the left of it?
I could not find a way to reset this. I read in another forum that there was no
way to reset it. If this is so, then you'll have to figure out the puzzle like I
did (by thinking it out). So, start by understanding how the lock works:
- You must get the sliders (top and bottom ones) completely off of the little
silver buttons. Then, once this is done and the sliders are no longer blocking
the silver buttons, you flip the latches onto the buttons, gate opens!
You can maneuver left and right by flipping the latch up and down. Experiment
and you'll get there.
Q: I am at the gates in Haven I cant get the top or bottom sliders to move the hammers are open but they sliders will not move. The middle slider moves freely. How do I get the top and bottom slider to loosen up?
A:
OK, here's how the lock works. There are three sliders that you can grab and
move left or right. Also, there are two vertical "rockers" that can be toggled
up or down. You have to understand how they work, and the only way to do it is
to try playing with them. Try grabbing and lifting the metal rockers up and
down, and after doing that, then try to slide the three sliders left or right.
Try all three. I guarantee that at least one of them can move. It's a game of
toggling the rockers up and down then sliding the sliders that are "free" right
and left. You work the puzzle until the little metal buttons no longer have the
sliders covering the two little buttons. When you have achieved this you can
then toggle the rockers onto the two buttons to open the gate.
You have to get to the point where you understand the movement, and it sounds
like you haven't gotten there yet.
SLIDERS: move left and right when the rockers are engaged in the right spot.
ROCKERS can be grabbed and toggled up and
down to release the sliders.
These are my terms for these elements... they are the best I can come up with.
Monkey Totem Puzzle
Q:
Oh Oh I've missed a clue somewhere and I don’t know where. I'm in a jungle
hut/blind looking at monkey-critters playing on a totem-pole. In front of me are
three siren-horns. I suspect that I must play the horns in some sequence to rid
the 'critters from the totem. If this is the case, where would I find this clue.
So far I've been able to open the wooden gate (puzzle) and have seen four other
totems (and the 4 symbols) in my travel. I believe I need to know the 5 symbols
to open the draw-bridge.
A1:
If you've read Achenar's journals, you should have read some interesting things
about how the monkeys communicate--you could try pretending you're a monkey, but
you'll need to listen to their language a bit first...
On a similar note, I seem to have "finished" all of Haven having only found four
totems total....I still don't know where the fifth one is. I found one by the
monkeys, one in the grassland, one in the swamp, and one behind the wooden gate,
but the fifth one seems to have gone on a vacation...
A2:
I can't remember where I found the clue. I thought it was there in the hut on a
piece of paper. Try the in-game hints. You have to play three tones I think:
some short, some longer, then they'll scatter.
Yes, you need the 5 totem symbols and their order must be correct for the
drawbridge. There are solutions for it in this Quest topic. The totem that most
seem to be missing is the one on the beach near the shipwreck.
A3: Thanks again. I finally got rid of the monkeys from the totem:
Its 1) wheel 3 for 1.5 seconds (I think about 1/2 a turn); 2) wheel 1 for 0.5 seconds ( about an 1/8th); and finally wheel 3 again for 1.5 seconds.
Drawbridge Puzzle
Q: Does anyone here know the right order to lower the bridge?
A:
I think the order is determined by the document in the "hunting lookout". This
is the elevated hut that has the view of the totem that is covered by the little
monkey creatures. There is a document that shows footprints of the various
creatures.
I used the in-game hints for this which says:
...the order of the symbols for the bridge puzzle is determined by the
"food-chain" order of the different animals. In other words, start with the most
dangerous animal (left symbol) and put them in descending order to the least
dangerous animal.
Q: Can you help me with the bridge? I don't know to what animals the symbols belong to -- I am only sure of the mangree symbol.
A:
The Cerpatee is the white square.
The Camoudile is the 3 triangles at 10:00, 2:00, 6:00.
The Mangee is four triangles, 12:00, 3:00, 6:00, 9:00.
The Karnak is two triangles at 12:00, 6:00.
The Zephyr is two squiggley white globs with a diagonal "S"-like line between
them.
How do you like that description for the Zephyr?
Mangree/Camoudile Puzzle
Q:
Now I am at the mangree puzzle. trying to figure out how many times to turn
these wheel. Found the sketches of the mangree, don't understand what are they
for….
Anyone been here, a little push would be nice….
How much is 1.5 seconds? Looking at the hint in the game?
A:
There are four Mangrees, each with their own "call" which consists of two tones.
There are pictures of each one with it's call code indicated. The top row is the
first tone, and the second row is the second tone. A short dash in column one
would mean you turn the left wheel for .5 seconds. A long dash in column two
would mean you turn the center wheel for 1.5 seconds.
Another timed one... you have to be really quick with the final three tone
signal which causes the Mangree on the far left to toss the poison berries
before the Camoudile gets free from the pit! Took me about four tries!
Q:
Finally I get to understand this puzzle, but what I don't understand is when I
got the camoudile in the pit and I press the 3 final tones, the mangree doesn't
come out...Is the elderly (white one) supposed to be in the leftmost nest, or
can any mangree be there? I been trying this for about 1hr now and when the
camoudile is in the pit, and turn the wheels to 3 tones no one comes out to
throw the berries at him….
For example if I have the (white one) in the leftmost nest ready to throw him
the berries, and turn the 3 wheels to the tones, he doesn't come out, and I do
it again, and he comes out, but by that time the comoudile gets out…and I have
to start again with the set up...I hate this one:(
I’ve got a map of the 5 nests, and who is in each of them, and get a set up, so
he can chase the mangree to the point when he falls in the pit and have one of
the mangree in the leftmost nest to be ready to throw him the berries, but they
just don't come out. Maybe I have the last 3 tones wrong. These are the tones
I am using...wheel 3 long tone,w1 short tone,w2 short tone....
A:
Those are the correct tones. I made the mistake several times of going from
wheel 3, then wheel 2 and 1 instead of 3 to 1 to 2, but you have it right.
Here's what I finally did, I chased him around till the white mangree was in the
left nest, then used only the other three tones to chase him until he is pitted.
That way, the white mangree was ready to toss the berries.
Hope you get it. The only reason I saw for the mangree not to react was that I
made a long-tone too short or slipped with my hand. The short tones seem to work
with just a little beep, even less than a half second.
Q: Could I get the spoiler for the mangree puzzle? The hint system in the game isn't working correctly. There are words missing at the bottom of the pages. And on this solve 5 and 6 are missing. Anyone else have this problem with the game?
A:
I didn't have a problem with the in game hints, but many other have reported
that half a page is missing (reportedly due to video drivers that are not the
latest). Problem is, many are reluctant to go back and look because it takes so
much time.
If you miss getting him the first time (according to the ingame hints) then
you'll have to try again, and the pattern of the in game hints won't work. So,
you'll do well to read what we said and hopefully learn enough to solve it by
understanding the basic logic. Keys:
- Make sure you get the white mangree in the left (with poison berries) hutch,
then leave him there.
- Then chase the camoudile around (with the other three mangrees only) till he
falls in and use the 3 tones (QUICKLY!) to have the poison berry thrown.
Q: Just wanted to vent my frustration! I am STILL stuck on the Mangree/Camoudile puzzle. I have been on this one part of the game for days now and I still can't get the Mangree to throw the berries! ~UGH~!!!!!!!!!!!!!!!
A:
I am sorry to hear that you are still stuck
on that puzzle.
I have to presume that you read all of my posts on this one, right?
1. Have you gotten the white mangree into the left-most hutch (the one with the
berries)?
2. Have you then chased him with the other three mangrees (avoid using the code
for the white mangree and he'll stay there)?
3. Eventually with only the three mangrees chasing him around, he will fall in
again. Have you gotten him into the pit?
4. Have you been able to give the code for the berry throw in time?
I'm guessing that you are achieving the first three but are late on the last
one, eh? I found that I could just give the wheels a brief yank (less than .5
seconds for sure) for the "short" tones, and that helped me speed up the toss of
the berry.
A2: Unfortunately, you cannot "test" a throw from the white mangree if the camoudile isn't in the pit…he just swears and gets frustrated. It's wheel 3 for 1.5 sec, wheel 1 for .5 sec, wheel 2 for .5 sec. I made the mistake of going from wheel 3 to 2 to 1. That is wrong.
A3:
What I did was pull a save after I was sure I had all the mangrees in position,
except for the last one before the attack call.
Then before I went back in I practiced on paper what I had to do. Also to
memory. I found on attack call, that last 2 short seem to be "just a SHORT 2"
Q:
That dratted Mangree Puzzle.......
I have 4 codes for the four mangrees.
2 short, 1 short
1 long, 2 long
1 short, 3 long
3 long, 1 short, 2 short.
Now what???? When I put in the codes, just to see what is where, the little
Mangree's hutch's open, but they don't go anywhere. I have tried different order
of playing the tones, but no one runs across the ropes with the exception of one
in first hutch on left runs to the hutch on far right. I have read all threads
on this puzzle, but don't see anything that explains the sequence.
Any help out there from people who have gotten through this one?
A:
You are missing the code for the white mangree (its LEFT long, CENTER long).
The last 3 code signal is the command to throw a poison berry.
The posts here don't explain a sequence, but they do tell you what you have to
do.
The mangrees don't like to run too often. They sit and stare when they are
tired. This usually happens when you go back to one too soon. This was discussed
in some of the posts here. So, read the posts.
Q: Ok if the first thing I do when the puzzle is reset (leave and walk all the way up the path and back down resets the puzzle) is hit 1, 3 and the mangree on the left opens his hut. I haven't got him to leave the hut after that. What am I doing wrong? I am totally ignoring the Myst hints and trying a new combo every time. I tried to solve it again tonight and gave up after 2 hours of trying. I get the camoudile in the pit quite often. I do the 3l, 1s, 2s with VERY short tones and NOTHING ever happens. I'm at my wits end! above, get the white mangree in the left hutch, then work with the other three keeping track of which one you "called" so you don't go back to him too soon (that is, rotate through the three).
A:
1. Have you gotten the white mangree into the left-most hutch (the one with the
berries)?
2. Have you then chased him with the other three mangrees (avoid using the code
for the white mangree and he'll stay there)?
3. Eventually with only the three mangrees chasing him around, he will fall in
again. Have you gotten him into the pit?
4. Have you been able to give the code for the berry throw in time?
It takes experimentation to get there. If you reset the puzzle, you have a
longer road to hoe. When I started at the beginning it took about 8 moves to
finally get the white mangree in the left hutch. Keep moving them until the
white mangree is in the left hutch (he is left 1.5 and center 1.5). Once he's
there, leave him there and work with the other three to get the beast into the
pit. Then hit the 3 tone code and zap him. I just tried it again and it does
work.
Sorry you are having so much trouble. Hope this helps.
Q:
1. Isn't that the white mangree in the hutch to begin with? Or am I suppose to
put the really white one in there? If so, then no I haven't got him there. Don't
know how...
2. I've chased the white mangree but none of the mangrees ever go in the left
hutch. And the mangree that starts in there never leaves.
3. I have gotten the camoudile in the pit MANY times.
4. I give the code and never have berries thrown.
A:
1. Nope, the white Mangree doesn't start there. You have to move the mangrees
around... it'll take several moves. Experiment, and remember to rotate which
mangrees you move.
2. I just did it with my game and the white mangree does go to the left hutch
after several moves. The mangree that starts there will leave.
3. Good! That's half the challenge.
4. With the camoudile in the pit and the white mangree in the left hutch, and
the correct code given, berries will fly. You have to have to be quick!
Q: I went back and tried the Mangree puzzle again determined that it was not going to defeat me but,I think I have a kink in the Mangree puzzle I get the Mangrees in the right places. I try to open the white Mangrees nest when the bad guy is in the pit the white Mangrees nest does not open on the first try. I have been really careful the last few times I have redone the puzzle and turned both wheels twice. The nest opens on the 2nd try and it is too late. This has happened over and over again.
A:
That happened to me as well. Once I had him in the pit and turned the wheel, the
monkey would not come out, and do it again, but it was to late and also this
would happen as well, when he gets in the pit and I turned the wheels, the white
monkey would come out and throw him with the berries and nothing, he would come
out of the pit again, and I had to start all over again, this happened to me
about three times, just when I got him on the pit, and the monkey throws the pit
nothing would happened….
This how I succeed, once I know that one of the monkeys is going to be place on
the rightmost nest, and I know that thing is going to chase him, my hand on the
wheels for the white monkey ready to throw him the berries, I know this part
gets nerve-racking, relax and just remember, the combination even before you
touch the wheels, don't give up, it will take some time and a lot of
practice...I thought I would never get this one, but I calm down and set him up
and ready to throw him with the berries.
A2: I DID IT, I DID IT, I DID IT !!!!!, I put the bad guy to sleep in the Mangree puzzle. I realized what I was doing wrong I was trying to open the nest first. Then all of a sudden I thought you dummy try the attack mode and it worked 2nd time!!!!
Q: How do I get the mangree out of the left hutch???? Any code sequence I can try? I think I have tried everything! I've NEVER had ANY puzzle tick me off like this one.
A:
This is supposed to be fun, so don't let it get to you.
If you have reset the puzzle and are starting from the beginning try the
following:
L 0.5 R 1.5
R 1.5 C 0.5
L 0.5 R 1.5
L 1.5 C 1.5 (this is the white mangree)
C 0.5 L 0.5
L 0.5 R 1.5
R 1.5 C 0.5
L 1.5 C 1.5 (this should move the white mangree into the left hutch)
After he gets there, don't play his tone again. Use only the remaining three
until the beast gets caught then hit him with the poison tones QUICK!
Q: I am at the infamous 'Mangree/Camoudile'puzzle...I have a couple of questions.
[1]..How precisely must the wheels be set -- this
'hamhock'of a cursor gives little leeway....
[2]..Must I rush to turn the wheels before the
'ATTACK' sequence…or can I take my time....
[3]..I'm not getting any Mangree action -- why do
you suppose?
A:
1. Not very precisely. I found that experimenting was the best way to know. I
rotated the wheel steadily for about 2 seconds for the "long" and just a short
chirp for the short. I think it basically just needs to be able to distinguish
between short and long. Biggest cause of failure is due to a hand slip where you
go up and down instead of around with the wheel.
2. Take your time on the wheels when moving the mangrees around... no rush
there. BUT !... when the camoudile falls in the pit, there is a BIG rush to play
the poison-throw tone to get him before he climbs out of the pit.
3. The mangrees won't move if they are tired (i.e., you went to a mangree again
without resting him at least two moves by the other mangrees). They also seem to
not move if there is not a convenient perch open for them (i.e., they only move
to certain perches from certain perches).
SERENIA
Getting to Serenia
Q: In Haven, I touched the lever & I went flying across the island to the cove with the linking chamber. Inside was the linking book to Serenia, right?
A:
The linking book you used in Haven brought you back to Tomahna, not Serenia.
Tomahna is where you started the game, as you know.
To get to Serenia, you have to go to the dock under Yeesha's room. That is where
you'll find the Serenia book. After you first link into Serenia, you'll see a
link book on the ground that will take you right back to Atrus' study in Tomahna.
Then you can permanently unlock that door in Catherine's study so you can go
back and forth. After you have explored Atrus' study, there is a link book there
to take you back again to Serenia and work on that Age.
Dreamworld Floating Lights Puzzle
Q:
Well I have dreamed about as much as I can take.
Is there a strategy for the dream puzzle?
A:
Serenia is a very cool age. I found that various protectors would speak to me in
different places as I left and came back numerous times. For me, the protectors
in the chamber didn't awaken until after I closed the last water gate down by
the workshop.
If you click on the colored floating dots you will notice a pattern to the color
changes. All colors change in the same order! I can't remember what the order
is, but for fun let's say its Red, Purple, Blue, Cyan, Green, Yellow, White (I
KNOW that the last two colors are Green and Yellow). So any time you see a
yellow dot, ONE click will turn it white every time! Green dot; TWO clicks turn
it white. You have to get all of the colors White "to achieve unity". The only
problem is you cannot go back and forth between only two colors... must use
three in a triangle as a minimum, or it will not change the colors. It is hard
because you cannot see beyond a limited field of view so you can't see where any
remaining colored dots are!!
But, rest assured... when you get the LAST dot to turn white, the dream speaker will immediately tell you that you've succeeded. If he doesn't speak to you, it means that there is AT LEAST one colored dot remaining that needs to change to white. This means that you'll have to make your way left and right and up and down turning dots that are already white back to colored so you can travel around. Know what I mean?
Q:
I am in the Dream world. Staring at multiple lights, of different colors.
The spirit guide: “in order to get message from Yeesha, I have to seek the
ancestors”.
I don't understand how to make the colors do what and what order etc. I sense
it has to do with the colors I found in Yeesha’s journal but don't know how to
do this puzzle. I'm touching lights all over the place and getting nowhere.
A1:
I've also done this puzzle. The strategy to take is to methodically work your
way across the field of colours using triangles of three lights at a time. Keep
going round the triangle until the lights go white, and then rotate the triangle
to include fresh colours. Your may well have to allow lights to go red again to
work your way around the whole area.
Eventually you'll get down to the last few lights, and not be able to wipe them
out very easily. In this case, keep wandering around in triangles (trying not to
repeat yourself) until you find a white light that will not change - this is
Yeesha. Then you can work at the lights around her until they all go white...
puzzle solved.
A2:
Remember the fact that the colors change in a preset order! So, knowing this,
you'll be able to tell when you are a click or two away from turning white. This
way you can plan your clicks so that you get groups of them to turn white and
lead you to the next colored one. (You don't actually click, you just pass over
them with the cursor)
Also, a very big key: If the voice doesn't tell you that you have succeeded,
then it means that there is at least one more colored spot out there. It may
mean you have to turn spots that are already white back to colored so you can
"traverse" around looking for the last colored ones.
Q:
I can't seem to grasp the method needed to do this. Sometimes the screen is
almost white with all the right ones but then colors keep destroying all I do.
Is it possible to give an example of how to do a 3 color triangle using some
colors to explain? And how do I move on without the others getting wrecked?
A1:
The next triangle will almost certainly have light(s) in common with the
previous one.
Just keep going round the triangle until a light goes white, and then modify
your triangle, repeat, until all triangles go white.
Patience, patience.
A2:
You have to turn them ALL white. No, really.
Fortunately, this is one of those puzzles where you're bound to get it
eventually if you just keep going. A few tricks I found helpful:
When you get down to only a few patches left, start working in triangles of
three.
And: colors change in a certain sequence. As I remember, they started at dark
blue, and each time you touched them they would change to the next color,
eventually reaching yellow and then white. So: go for the dark blue ones first,
then the next color, etc., working your way up to the yellow and white ones.
Try to get as many pieces as possible to be all one color, regardless of WHICH
color. Then change them all at once until they're all white.
Q: I give up on the Dream Realm there must be thousands of those things to change color I get a bunch of them white then get the bong bong bong and they all change again. I tried one color at a time and everyway I could think of and nothing works. I have tried for hours. Why don't they stay white when you make them white? I know just to drive us crazy. Thanks for all of everyone’s help in this game it has been fun.
A1: They go back to coloured if you move from A->B->A, instead of A->B->C->A.
A2: Yes, you must make sure that you don't go back and forth between two... the dream world doesn't like that and will make a 'bong' noise and change the ones in the immediate vicinity back to colored.
A3:
It took me two days to complete the dream world puzzle...but what I found to be
easier was the triangle of three, like touching only three at a time in a
triangle.
For example:
1 2 3 then go back to 1,2,3 until turn yellow, then white, keep doing this
triangle of three all over with the color lights, if you have to sacrifice a
white one to make another triangle do so…. This puzzle takes a lot of time and
patience, eventually you will get it, don't get discouraged when sometimes they
turn back to colors, just keep doing the triangle and eventually you will get
the last one to turn yellow and then white….
Spirit Guide Puzzle
Q:
Spirit guide, gave the offering but nothing happened. Very difficult to carry
the offering to the spirit guide when the spirit guide is no where to be found.
Anyone manage to get pass this one, if so, how did you do it?
I think the offerings are too far away from the spirit guide, by the time I get
the offering to the spirit guide I loose it….
A1:
When you give the offering to the spirit, it will hang around for about 10
seconds and I think I remember some kind of reaction (some sparkling??). If it
disappeared immediately, you were probably too late. It took me 5 tries... I was
always late or dropped the gift.
In any case, I had expected something bigger, like the guide talking to me or
escorting me. That doesn't happen.
So, you may have been successful!
A2:
I found there were three important things about this puzzle:
1. If you go more than about 4 screens, the bubble/dandelion/fire thingy will
pop/fly away/disappear, so if you have to go further than that, you're going to
the wrong place. There are numerous wells/etc., and there are also multiple
bubble/etc. generators. Each generator is within an appropriate distance (4
screens) of ONE well/tornado/fire, but not necessarily the one you're trying to
get to.
2. Once you get to the proper screen, you need to click on the spirit guide.
Otherwise, your bubble/etc. will pop/etc.
3. The spirit guide is only at ONE location at a time. If you walk by it and
don't have an offering, it will usually change locations. So even if you manage
to reach the well/etc. before you lose your offering, the guide may not be
there. It might be a good idea to check where it is before you start. You can
usually tell from a distance if it's there or not.
A3:
Bubble to spirit:
For me I found the best place was the bubbles just outside the cave where you
come in from a linking book.
I would take a bubble from there and gently walk 3 clicks down the path and
slowly turn left and up those stairs (one click) and carefully turn to my right
and then its like a very small moment where we look at each other (but don't
hesitate) and then I clicked left mouse and it worked.
I hope this will help someone.
Q: The spirit guide, came up as long as I don't get close to it, it will stay there, so I came back with the offering got close, the view turn towards the spirit guide and I had the offering in my hand and it stood there and then it disappeared...I don't know if I succeed or not, how can I tell if I need?
A:
Did you click the offering over the guide?
Did sparks swirl around ... I got the air spirit guide, so I don't know what the
fire & water ones do in response.
If you go to the dream chamber without having succeeded, I'm sure you'll not be
able to dream, so you can tell.
Q: Do we have to feed all the spirits in Serenia or just the water spirit? How do you know which place they are going to pop up or is it just by guess and by golly?
A1:
if you got the water spirit that is the only one you to feed (offering)….
Where you see a pool, and if the water spirit comes up, do not approach it, turn
away from it and go get your offering, and then come back to the same place you
last saw the water spirit.
If you approach it without an offering it will splash back down in the pool and
then you have to check the other pools to see in which one it is in....
So when you go search the pools, and you see it, don't get close to it, go get
your offering and come back and then get close to it with your offering and
quickly click on it.
A2: We presume that the protector that spoke to you DID say that your spirit guide was the water spirit, right? That is how you determine which one to go to... she will tell you.
Harvester/Water Wheels Puzzle
Q:
Can't get access to the back of harvester, I even read the hints, but still
can't get enough water out of the well, to get access to the back....
I think I have these waterwheels all wrong, but don't where to start.
The waterwheel that was locked with that snake thing, in which direction should
the water flow, left or right?
The waterwheel with the broken wheel, in which direction should the water flow,
left or right, I moved it so now I don't remember which way it was before?
The waterwheel with the handle and rope, in which direction should the water
flow, I moved this one and I don't remember in which direction it was before....
I follow the direction in the hint system, and I have no access to the back, and
maybe I am looking the wrong place to access this secret tunnel?
Anyone could help me out, in what I am doing wrong, would be most
appreciated....
A:
The water in the two upstream diverters should BLOCK water going to the left
(i.e., let the water flow right only).
The one with the snake puzzle near the workshop just needs to be turned so the
water fills the fountain next to it. No diverting necessary.
But, you are not done yet. You have to do a few dunks and drains using the
harvester and playing with the harvester door to it to drain the last bits of
water and get access to the door. You'll know when you've done it because the
door down the stairs inside the harvester area will be open when you get there.
Q:
Done the diverting with the water, everything is flowing to the right, except
the one with the broken cogwheel, it has three paths of water.
The waterwheel on the stone plaze, the water flow is to the right.
The one with handle and rope is also flowing water to the right (cart).
I been dunking the harvester about 10 times and nothing, I even added water
inside the harvester and closed and brought it up and open the harvester and
spill out water and nothing is happening.
A1:
Maybe you are misunderstanding WHERE you go to get into the secret workshop
door.
The "back" of the harvester does not open. It is not where the secret door is.
The place you want to go is found by looking down in the pit where the harvester
goes. Look on the right side of the pit... You should get a "forward" icon. Go
down there and you'll see some stairs, and once you've emptied the water enough,
you'll the access to the infamous door puzzle.
A2:
Finally got access to the stairs. I knew I was looking in the right place for
the stairs, I could see them even with water in the pool....
What I didn't notice, was that the waterwheel with the broken cogwheel there
shouldn't be any water flowing there. I couldn't get the other waterwheel to
stop the flow by the broken cogwheel, even if I turned them all right. So turned
back all the waterwheels back to its original position...and started again, and
then when I went back to the broken cogwheel, there was no water flow there,
this is when I knew I got it right this time.
So when to the harvester, empty out some water, had access to the stairs, turned
the wheel under a window, which opened a tunnel, went down, but the door was
locked, so went back to harvester, empty some more water and went back down the
stairs and the door was open.
Snake Challenge
Q: Try as I may, can't get the lousy snake lock to uncoil back at Serenia.
A1:
Sorry you are having trouble with the snake. Don't let it get to you, my friend.
The snake puzzle worked for me the first time and every subsequent time without
a second try needed. So, I suspect there is a matter of understanding the
process that is missing.
Find the lower right black stripe on the snake. Click (and hold the button down)
on the right edge of the stripe and drag the mouse horizontally to the left over
the stripe. At the left end of the stripe stop and release the mouse button. I
think of it as petting the little guy, but it important that you stroke right to
left.
Do this three more times and the snake should come alive, then click his head.
A2: this is what worked for me to wake the snake up: Hold down the left mouse button and stroke the bottom stripe right to left. Release the mouse button as you move your cursor left to right and depress the button again as you begin each stroke. You have to stroke fairly quickly. Also, getting out of the lieft chair and getting back in after a failed attempt seemed to help reset the puzzle.
A3: Maybe what you are missing is the release of the mouse button after you drag it right to left. I also checked where the hand cursor works best. You can put your fingertips on the stripe, or the palm of the hand.. it works both ways. Make sure you start your stroke on the right end of the black stripe (as opposed to starting off the right edge) and ending the stroke while still on the left end of the stripe (as opposed to running off to the left). Also, don't drag too slowly... it seems to miss the very slow strokes.
Colored Marbles Lock
Q: Hi everybody. I am in Serenia trying to unlock the door to the workshop. I did the Dreamworld and got the colors when I turned all the spheres white. I drained the hole to the door. I tried the color combos every way I know how. Every time I press the button the door closes and resets the puzzle. Does any one know the correct placement of the marbles? I have been trying for almost 2 days. I sure do need some help. Thanks. By the way, this is a great Quest.
A1:
To solve the colored marble puzzle, you need to find a clue in Spire. Without
this clue, the puzzle's pretty hopeless.
You'll need to make sure you've finished ALL of Spire, then get a good look at
the elevator there.
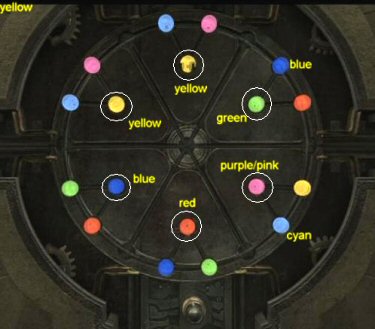
Q: I went to Spire and took a picture of the round thing hanging on the elevator. That thing has a purple marble on it. There is no purple on the lock that is on the door. Starting from the top going clockwise I had red -cyan- red- green -purple -blue. The colors you get in Dreamworld are green -red- blue and pink-yellow-cyan. Is this correct?
A:
I found out by experimenting that Purple (Spire) = Pink (Serenia) and that Green
= Green and LightGreen = Yellow.
So, the purple is easy... treat it as pink on the door combo.
But, the real question is whether you saw a green or Lightgreen on that
medallion. For me it was easy because I had both Green and a LightGreen on the
medallion and I figured it out.
ALSO: The code from the medallion is different for all of us, so we can't give
you an absolute solution, only advice.
Q:
When I pressed the medallion and get two sets of colors...for example I am
getting a vision of inner blue, red, green-one set, the other is inner light
blue, purple, yellow....
My question is this. Is this my combination for the door puzzle, if so, at the
door puzzle, you have 3 triangles on the top and at the bottom you have 3 more
triangle, in which direction do you start, from left to right or from top to
bottom.
For example, if I am going to put, inner blue, green, red, at the left top, what
about the 2nd top, and the right top, are all the colors be the same, or do I
have to switch them around…and do I do the same for the bottom triangle..
I know how to move them....
A1: The combination STARTS with the six colors in the medallion from the elevator in Spire. Each of us got a different set of colors from the medallion.
SOLUTION:
1. Those six colors must be moved to the six positions that I have shown with a
white circle around them in my screenshot. I put them in the same positions they
had on the medallion.
2. The dream world clue tells us that we have to add two colors to the triangle
of each of these six colors that when blended together, will form white.
Blue-Red-Green is one combo. Yellow, light-blue, purple(pink) is the second.
3. So, after you have the six colors set, go to each triangle and augment with
the correct additional two colors to satisfy the puzzle.
4. THEN (this is important) when you have it
right, you must press the button at the bottom to open the door. If the code is
right it opens; if wrong, the puzzle resets (bummer).
In the case of my screenshot (see below), notice the color at 6:00 was Red on
the medallion, so I put Red there. Then I added Green and Blue to the other
corners of that triangle. The color at 12:00 on the medallion was Yellow
(actually looks light-green on the medallion), so I put Yellow at 12:00, then
added Light-Blue and Pink/Purple.
I took care in making sure that colors were always in the same order in each
triangle (that is, Red-Green-Blue, or Yellow-Lightblue-Pink going clockwise, but
I don't know if the game is that picky.
(Supporting screenshot for this answer is below)
A2: In my door puzzle I made sure that the little triangle apexes aimed toward the center of the door mirrored the colour wheel from the Spire medallion. My colours were,clock-wise from 12, red, green, red, magenta, light blue, and magenta. If I recall there is a memory scene which will display two colour wheels each containing three colours (I think it was from the dream scene). Anyway your triplex of colours for each triangle should then reflect the colour scheme of the two colour wheels (from that dream). I hope I haven't made it too confusing. When you finish with the last triangle they should all glow white.
A3:
Note that your six colors (blue, purple, blue, yellow, yellow & green) must be
in the positions with the white circles around them. So, if BLUE is at your
12:00 position, the two other colors in that triangle must be GREEN and RED. If
PURPLE is your color at 2:00, then the two remaining colors for that triangle
must be LIGHTBLUE and YELLOW.
When you have it set properly, you have to press the button (bottom) again. This
can be painful, because if it's wrong, the puzzle resets and you start over
again.
A4:
Just a note to others, it is LIGHTgreen on the medallion that looks yellow on
the door. There is also a Green (darker) on the medallion that will look green
on the door.
Here's a summary of the colors avail and what they might look like on the door
puzzle.
MEDALLION--------DOOR
Lt. Green-------Yellow
Lt. Blue--------Lt. Blue (Cyan)
Purple----------Pink
Green-----------Green
Blue------------Blue
Red-------------Red
Location of the Medallion in Spire
Q: I’m in Serenia and I can't remember where the medallion in Spire is. How can I get back there to check the colors?
A: There is a linking book to Tomahna back at the spot where you first linked in here. It's on the ground. It takes you to a yet unvisited area of Tomahna, so enjoy! You'll find your way back to the Spire linking book below Atrus' fireplace. The medalion will still be there on the elevator (near the top) assuming you haven't started working with someone else’s savegame along the way.
Replaying Yeesha’s Memories
Q:
Is there any way that the puzzle with
Yeesha's memories and the five floating objects can be
reset to the beginning?
Unfortunatly I jumped the gun and messed up
most the icons [like I knew what I was doing] and my
'saved game' reflects that...I sure hope I don't have to go way back because I
didn’t 'save' as often as I should have....
A:
I haven't experimented with it myself, but I have seen other posts in other
forums that have said you CAN'T reset the puzzle. So, if you intend on following
the ingame hints exactly, save at the beginning and then save at the halfway
mark.
ALSO! (and this is a big ALSO...) save immediately after the dream ends
and you are still in your chair!!! Otherwise, if you want to go back and
experience the ENDGAME videos, you'll have to solve the memory puzzle again
(ugh!).
Serenia Map
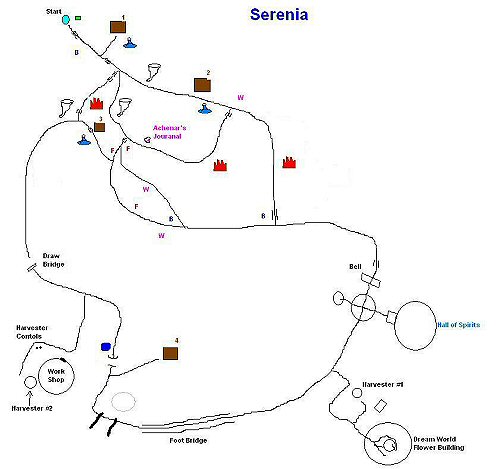 |
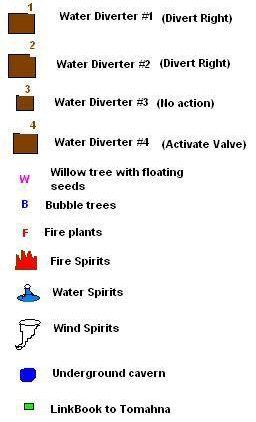 |
What to do if the Game Menu is Slowing Down
Q:
It seems, no matter what system you have; that as the game progresses, the time
element for: ESC. to SAVE and SAVE to EXIT and also LOAD GAME to ENTER is:
taking longer and longer.
Plus I was wondering if should be mentioned here at Boomers or future
walkthroughs, because some gamers have been depending on a fast ESC. to work on
the slider/lock puzzle in Spire and should do Spire right away, because later in
the game may not have that option ????????
A1:
I'm not sure if it's the number of saved games, or the size of the saved games
or both.
I create lot of save games, and I took lots and lots of pictures with the
in-game camera. My save files kept getting bigger and bigger, as the save file
includes all the pictures you took. My last save file (and I still have one age
to go!) was (I kid you not) 85MB. No wonder the game was loading and saving very
slowly.
So, I copied my save games files over to another folder, and then I copied over
a couple at a time to myst4-revelation savegames, which is where Myst IV stores
the save game files. I brought up each save file, and deleted the screenshots I
took, one by one, and I resaved each save file. Now most of the save files are
small. The game seemed to be loading and saving faster, but I'll have to play
around with it, to be sure.
I'm going to go submit this issue as a bug. Hindsight is a wonderful thing, but
perhaps, if future games use an in camera, there can be a better way to
implement it so it doesn't affect game saves and loads.
Oh, that is my theory of what is happening - the size and number of game save
files is affecting load and save. I think that's what's causing it, but I don't
know for sure.
A2: I've deleted all but the last five of my save games and it has indeed made the menu system react much better!
Q: Could someone tell me step by step how to go into computer and delete the saved games?
A:
You don't have to go into the computer to delete games, just go to "load" in the
options. The middle option (I'm pretty sure it's the middle, but it's labeled
anyway) is to "delete", so you just highlight a save and click that. There will
probably be a box asking it you want to delete it.
I wouldn't take out all of the saves--leave some so that if you have to go back
you won't have to repeat huge chunks of the game...
Myst IV Revelation’s Questers: dadguy, Becky, Annie, Adventuregamegirl20, bergmag45, charward2, chiefette, corny3456, Dawna, Demosthenes, dianne, dogpenny, dragonia, flotsam, gamenut, GeeGee, girlgeek, gremlin, Henny Tiben, housewife, jacqieh, jayne, Jeepers, Jenny, jerryw, jhorgan1, joanieS, katielou, kjos, lucinda, maggiebe, marty, Mordack, MrEno, msblue, mszv, Pere, philby, puppytoes, rain2, rockingrjranch, Sequoia, SKIPPIDY, SOLVER, syberia1, syd, tazmanw, texaslady, TLC, Vizagoth, wysewomon
copyright © 2004 GameBoomers