Mysterious Journey – Schizm
Bridge building 101
by Mordack
Over the years Adventure Gamers have met their share of challenges but in many eyes what comes up as the greatest challenge is the infamous bridge puzzle in Mysterious Journey (Schizm). The following is NOT a step-by-step guide to completing this puzzle but more or less a guide to understanding it. Maybe with a little understanding your bridge won’t fall.
A complete step-by-step guide to wining this puzzle can’t be given because of its randomness but the first five moves the player should try and make can be. We will concentrate on the second bridge as this seems to be the more difficult of the two.
When you start the puzzle the computer makes the first move. There is no rhythm or reason for its selection but it will not affect the player’s strategy. More often than not, the computer tries to make a straight connection from the top to bottom. It does this when it does NOT see a challenge from the player. In other words, if the computer doesn’t see the player’s strategy it will continue with its own.
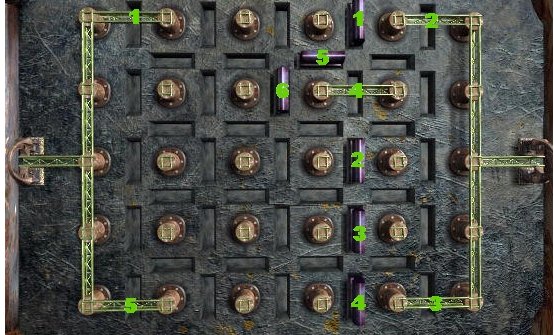
Below is a screen capture of the first 5 moves from the player and the first six moves from the computer (marked accordingly in yellow). These are the first 5 moves that the player should always attempt to make.
At this point a couple of things can be said. The player’s move #4 is to prevent the computer from winning and it’s also the first indication of the player’s path. This explains the computers moves #5 and #6. It’s an attempt to block. If during your game the computer makes its sections that are not in a line as seen above then make those four corners selections first and your fifth move can be in the same row that has the most blocked by the computer. Below is the player and computers next 2 moves.
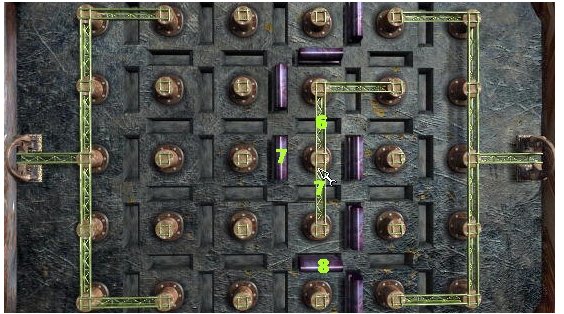
The computer now knows a path is being formed by the player and thus tries to block the direction of the path with move #8. At this point the player only has one move left. The computer sees no threat currently by the bridges in the four corners, not yet anyway. Next two player/computer moves below.
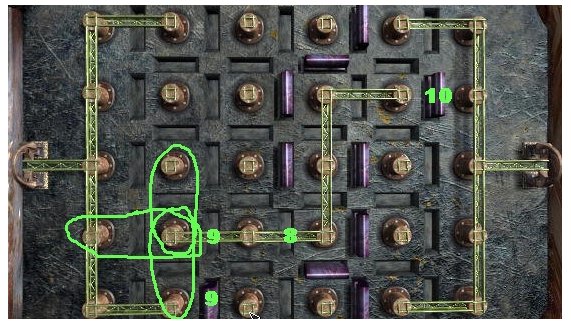
The player is well in control of the game and by now the computer “see’s” the threat of the corners but it’s too late. The screen shot above really shows the advantage of getting those corners. The player has three paths of choice on each side (circled above on the left only) to make the final connections. The computer attempts (#10) to block but can’t possible block all the paths. If earlier in the game the computer blocked off any of the circled paths the player should not react to this but consider it a free move. Why? There are still two paths that can be won on and until the computer only leaves the player one path don’t complete the bridge to that side. One strategy is to let the computer eliminate the player’s multi-path. This allows the player to concentrate on building the bridge elsewhere. The player just has to keep in mind when the proper time is to complete either side of the bridge. Below shows the players final move to win.
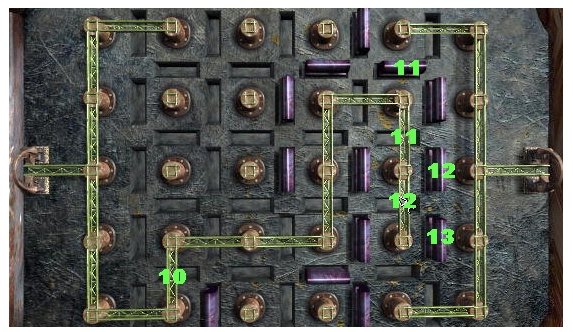
In summary, the keys to winning are getting as many moves made before the computer senses a players strategy (i.e. get those corners). Next, leave those multi-paths open and let the computer take them away. Finally, play a couple of games following this strategy not to win or lose but to get a sense of understanding. Therefore you will be better at making choices for those moves by the computer that are random. Have fun!