
Walkthrough by Soren Andersen
Patch
If you do not have V1.22 of this game you will more than likely need a patch available from the Ubisoft web site for PC and for MAC that will correct problems encountered in starting game play.
Walkthrough
Exile is not a linear game, and this walkthrough is presented in but one of several possible sequences. For example, you may link to the Amateria, Edanna, or Voltaic Ages in any sequence you choose. Another instance is that the puzzles in Amateria may be attacked in any order. The walkthrough is written with the idea that you may consult it wherever you find you might need assistance.
You may read the first few paragraphs of this walkthrough, the Preface, without anything being given away. Included at the end are a couple pages of screenshots and diagrams; these are not spoilers. The screen-shots are available in the game and are presented in a bunch for con-venience to the player. The diagrams are aids to help keep track of puzzle results as they are solved. Make your own copy and mark them as you play.
Preface
To start with, a word about linking books. These items are basic to the game, as well as the two previous games, which would have you think the art of writing them was perfected by the D'Ni, Atrus' people, and from whom he learned the craft. Both he and his wife Catharine are masters of this art. In this game it appears that the D'Ni have previously suffered some sort of devastating setback.
By writing these linking books, the compelling impression is that a new "Age" is produced, and the book is how one connects with it; however at times it seems the Age exists and the book is only the means to get to it. The physical limitations of an Age appears to be indeterminate, but experience with the Myst games indicates that they are usually an is-land or group of islands set in a vast limitless sea. Once a linking book exists, anyone can use it to link to the Age for which it was written. Open one, and in the center of the first page is a picture in which are swirling scenes of the Age to which the book links; put your hand on the picture and you are off to that place. It is, however, a one way trip; you must have another book to return or to proceed to another Age. You'll see.
At the end of the first Myst game Atrus banished his sons Sirrus and Achenar for their misdeeds. Now we learn that he has apparently brought them back with the idea of repatriating them and making them useful members of his family. It would appear that this was a mistake; they remain scoundrels. They have inflicted their heinous wrongdoing on an Age called Narayan, and Atrus is seemingly unaware of this. A Narayan survivor named Saavedro, who may be slightly unhinged by his ordeal, is out to wreak revenge.
Atrus is an inveterate journal keeper, and at the game's beginning he gives you his latest one to bring you up to speed on a new Age he calls Releeshan. You must read this journal with care, perhaps more than once, so that you get an insight to Atrus' thinking. It reveals in excruciating detail how he has decided to write this new Age, in which the D'ni survivors can rebuild their society. As it happens, Saavedro also keeps a journal, which you may find near the beginning of the game. It too is useful in indicating what he is thinking, as well as providing hints of what to do, and apparently also some red herrings. Saavedro had been banished to an Age called J'nanin, reasons for this none too clear, but he found a linking book to Tomahna, the place that Atrus had built for his wife and new family, and where he, Saavedro, has made many secret visits to search for Sirrus and Achenar. He has also read many of Atrus' journals and found more linking books. You'll find out all about this in his journal as you keep finding pages for it scattered about.
Beginning
When the game opens you are just outside Tomahna, where you find Catharine with her infant daughter. Catharine welcomes you and gives you a message from Atrus, and suggests that you wait for him in his study. When she sits on a bench, go through the study door straight ahead. Inside you may look around as long as you wish. The prominent item is the Releeshan linking book, which is on locked display. Atrus enters and gives you his journal, which goes to inventory. You and he are about to link to Releeshan when Saavedro appears, causes a certain amount of destruction, grabs the Releeshan linking book, and links back out to J'nanin, but in so doing he drops his J'nanin linking book open on the floor. Put your hand on the swirling picture, and you are off in pursuit.
J'nanin Age 1
As you link to J'nanin, you get a brief swirling tour that is charac-teristic of the linking process. You get a good look at Saavedro's retreat on the top of a rock pillar, the round building that is on the User Manual cover. When you are set down on a rock plateau you see Saavedro disappear behind a rock. Follow him to see him go up a ladder in a rock face, then across a walkway into his retreat. When you get to it the door is locked and through the window you can see him pacing inside.
There is no apparent need for immediate action, so from your elevated location take some time to look around. Move back along the walkway and survey the island as you do so, as you will be moving all over this Age. You can see that it is a barren rocky place with steep cliffs surrounding a deep central ravine with a small lake or pond at the bottom. There are many steps and ladders up and down the cliffs, and bridges connecting them. Prominent among the jagged rocks are smooth unique tusk-like pillars (there are three), and in several places you can see things that are clearly man made.
Perhaps you can find another way to get to Saavedro in his retreat. Go down the ladders to the beach and turn right, moving along the sand a couple of clicks to where on the right is another ladder up a rock. Go up this ladder for another look around. Down at the bottom of the ravine there is a walkway that goes across the pond to what looks like a building at the base of the rock pillar on which the retreat is built, and down the cliff are steps that must lead to it.
While you are here, examine the apparatus that you find on this rock. On a pedestal is an object that bears a remarkable resemblance to an old time railroad bullseye lantern, but instead of one lens there are three of them on it. There is a blue fire marble on its top. By click-ing on the ring below the lenses it may be turned so that each lens will face you. Get closeups of these lenses as they turn in order to see what is in its field of view. There are other positions around this lantern where you may stand, and what you see in the lens may be dif-ferent as you occupy these positions. You can see more of these lanterns in the distance.
Return to the beach, turn right, and follow the sand path to its end, where you can observe a couple more objects in the near distance. Go up the sloping rock on your right to find another lantern, this one with a yellow fire marble on its top, but otherwise identical to the one you just examined, even to the squeaks as it is turned. Keep going past this lantern, past a post that looks as though something had been af-fixed to the top of it, and onward until you get near the base of one of the tusks. (You might want to dash up to see what's there.) Follow the steps ever downward, through a stone arch where there is a noisy wind, and to the walkway across the water to the building that you saw at the base of the retreat pillar. Cross the walkway to this colorful cottage, where the door is not locked. Enter, and find controls that will open a couple gates so you can get to the room inside.
The first thing to do is go to the hammock on the right and get Saavedro's journal and read it. Interesting and informative. Then go around the bench and examine the items on it. There is a generator that produces electrical discharges that suspend some scraps when you turn its crank, and if you move the plant root and again turn the crank the Venus flytrap opens for a bit. (There is an analogy here for other Ages.) There is a balance that indicates that four crystal balls equal the weight of one sphere that appears to be metal. To the left is another balance showing that four wooden balls are equal to the weight of one crystal ball. All the balls are of the same size. (Another bit of information for the Amateria Age.)
The main item of interest is the brown cylindrical elevator. Go around to the right of it, open the door, and enter. There is an aperture in the wall through which you can reach the switches that send the elev-ator up. It rotates a little, and through a viewing window you can see into Saavedro's retreat. Saavedro appears shortly carrying a linking book. He makes a couple remarks, then puts the book on a platter and taps it with the mallet he always carries. The bottom part of the platter takes the book down out of sight and a latticework football-shaped cage appears from below. Saavedro leaves and comes wandering back with another book, but there is nothing more for you here.
You can open the elevator door, but not the outer one beyond it, through which you can see the part of the island with the yellow fireball lantern. Push the green wall button to send the elevator down. Go out of it and from outside the elevator send it back up, then step into the well below it. Down here you can see where four panels have been broken and behind them is machinery. Presumably this was done by Saavedro to prevent access from the elevator to the room above, as just demonstrated. Look in his journal for some clues. At the end are four drawings that look like the machinery behind the broken panels. Set the three weights as he has drawn them, move the upper gear with the mis-sing tooth as shown in the sketch, and move the lever in the direction of the arrow. The full page drawing shows how to set the cylinders on the ends of the arms in the last piece of machinery. Step back out of the well, call the elevator, step in, and go up again.
Now when you reach the top and open the door your view through a different outer door is into the room. The latticework football is open and there is a linking book in it. Saavedro hurriedly puts his hand on it and disappears, the football closes and drops down below. You can now open the door and enter the room. Move around until, when facing the center of the room, you are between a large blue disk on the left and a smaller one on the right. Click on the smaller one. Three hemi-spherical wall panels open, and a projection of Atrus appears on the ceiling. He begins a message intended for his sons, then Saavedro takes over for a tirade directed to Atrus. Atrus planned to have his sons search J'nanin for three linking books, but Saavedro has made changes, and he says now you must look for three symbols to "open this device", presumably the latticework football that you can see below. Now it is your task to find the three linking books and then the symbols.
Move to one of the wall projectors and get a closeup. Around the edge of the center lens are inscribed tic marks at the eight cardinal and ordinal compass positions. On the lens is etched an icon. You must drag on this lens, moving the field of view until you locate a plaque match-ing the icon and bring the two together. There are horizontal and vertical wooden handles left and right of the lens; the horizontal one zooms the image in and out, and the vertical one adjusts the focus. You must exactly match the focused image with the etched one, then make a note of the position of the four marbles that have been circling the lens. There is a certain amount of interaction between these controls, and the focus one tends to be finicky. You will probably find it easier to locate the plaque if you zoom part way in before trying to locate it. The plaque is on a tusk, so it may help to look for a smooth surface.
Move to another wall projector; a different icon will be etched on the lens. Repeat the same process with the icon on that lens, then to the last wall projector to do it again. One of the icons is an oval, one is a bird, and one could be a diving whale or it could be a curled leaf; take your choice. When done you should have in your notes a record of each icon and the positions of the four marbles around the lens where the icon appeared. You may have inferred by now that the three linking books you seek are in the three tusks, and you must find a way to get into them. These tasks are independent; you do not have to follow the order taken in this walkthrough.
Linking Book 1
Using the handle to the right of the elevator door, call the elevator and ride it down. Go through the cottage room to the anteroom just beyond the entrance, turn right to see a couple steps beyond a doorway. Go out the door above the steps, cross the bridge to the shore of the pond, and turn left, where you can see a small teepee a couple of rocks away. When you go to it and click on the top, a light gray chipmunk pokes his head out of the entrance, but won't come out. The game calls this animal a squee. It wants to feed on the black and rose colored flowers to the right, but is afraid to cross the water in between. Help it out; click on the plant growing in the water, which collapses and spreads. Now when you click on top of the teepee, the squee scoots out and goes to the flowers, squeaking and chirping. Very strangely, with this chirping the bulbous flowers expand.
Leave the squee to its meal and go back to the bridge from the cottage. On the rock face ahead is another ladder for you to climb. Part way up is a small sloping meadow of flowers and moss, the flowers near the top being the same as those that the squee is eating. Move to this meadow, where above you can see the door in a stone tusk, but you can't get to it. Turn toward the chasm; between two small rock pillars you will find a drooping flower with a strange capability: it is able to direction-ally pick up and amplify sounds. Zoom onto this plant and move it around, whereupon you can hear the bridge creaking, the whistling rock, waves, and wind. What you want to hear is the chirping of the squee below. When you locate this sound, left click to have your view turn and see the flowers at the top of the meadow expand greatly. Now you can climb the ladder to the top and then cross on the expanded flowers to the door in the tusk.
This door is not locked, so in you go. Cross to the brown cylinder and get a closeup, where you will see four marbles in concentric races. Clearly you must place the marbles in one of the compass settings that you have just determined, and since there are only three to try, this in no great task. (Hint: try the bird icon.) Move the marbles in their races to the chosen setting, press the center button, and when you have the correct set the latticework football descends to display a linking book in it. The book is titled EDANNA and has the bird symbol on it, so you now have the name of an Age, and an icon for it. Click on the book to open it, then on the square swirling picture, and you will have linked to the Edanna Age.
Edanna Age
The first impression of Edanna as you circle around it is that it is a very large, very tall rock pillar alone in the ocean. Soon, however, it seems more likely that it is wood rather than rock, perhaps the remains of a huge tree. Immediately upon setting down you see a large red flower and a cage of tangled roots. There is something in the cage but you can't make it out. Turn to the flower; this is your introduction to an Edanna phenomenon that you will encounter frequently here, a lens flower. Zoom in on the lens in the flower center and you will see more clearly into the cage. In it is a book, and from the barely discernible three tusk icon on the cover, it is a J'nanin linking book.
There is a long passage that will take you to the bottom of a plant whose leaves--actually just one continuous leaf--form a spiral around the stalk. Step on the leaf and it begins to undulate, taking you upward to a level near its top. Pan to the top of the plant, then down. You will be following a curled stem that ends in a suction cup in a light blue basin of clear water. This is how the plant gets its moisture, rather than through roots.
Look up and right to another red lens flower. Click on it and a bird comes circling in from over the water and lands on its nest. Step closer for a better look; an even better look is had through the lens flower. The bird is feeding the one chick that has hatched. Below the nest is another cage of roots with something in it that cannot be made out.
Go out through the more or less circular hole in the rock or wood wall on the right and start up the yellow path. You will see another spiral-leaf plant, this one with its leaf dried and held close to the stem, the fronds at the top withered. A couple steps more and you can see that its water source is dry. There is a plump, moisture filled melon or gourd hanging over the dry basin. Continue along the yellow path and around the cliff on a ledge to an area of vegetation. Somewhere in all this the bird appears flying away.
Here there is another lens flower. It resembles a sunflower and it has a red berry in the center. Click on the berry and the flower unfolds to expose the center lens, somewhat different than the previous ones. Zoom in on the lens, and you can pan around to see the spiral-leaf plant and its dry basin. Zoom out, and glance at the lens flower to see that it is in the shade. Now turn right where there is a plant with long stalks on the ends of which are leaves like a palm tree. Click on the center of this plant and the stalks straighten and the leaves close. In so doing another J'nanin linking book is revealed. Return to the lens flower, on which the sun is now shining. Zoom in on the flower center where the lens acts as a burning glass, a burned spot on a root attest-ing to its heat. Train the bright spot on the moisture filled melon and in a very short time it bursts and fills the dry basin. You can see the plant suck up the liquid, and the spiral leaf reforms.
Return down the path to a point where you can step onto the newly revived leaf and you will get a long ride down to the Edanna lowest level. Some areas are pretty dark here, illumination mostly from the yellow bugs clinging to surfaces, but there are places where beams of sunlight penetrate. It is easy to get lost, but most of the time if you get on a wrong track you will circle back to a point you will soon recognize. Head now toward leaves that you can see a short distance away, then turn left to see a pink squid swimming in a small pool. Step toward it and you may note that it is luminescent, as the pink light travels with it, and along with that there are electrical discharges when it stops to feed on the roots that dangle into the water. That kind of squid.
Go to the left of the squid down a rock path to a lavender valley. Keep going four clicks through the valley, and to the right you will see sunlight shining on a brown speckled insect, which when you get close to it, turns out instead to be another thirsty melon. Click on the small yellow cap between the tentacles, and the melon begins to fill with water in pulses through the vine behind it, and finally brings along the squid, apparently none the worse for the transfer down the vine. Turn right to see a yellow patch; go to it and you will find more pages of Saavedro's journal. After you have read them, go directly to the yellow patch and through the opening on the right. Step down on a shiny tan root and turn right to see a log of questionable sturdiness. This log bridges a gap, and has growing on it the black and rose colored flowers that expand when a squee chirps, the ones used to get to the Edanna tusk door on J'nanin.
Cross the log, hearing as you do so some sort of commotion. Follow the pink root a couple clicks to where you see a round blue patch. Go up to the patch and click on the V-shaped notch in it. Turn slightly right and click on the left edge of the small irregular patch of sunlight, and through an opening you will see a hanging brown gourd lantern. Go to the lantern.
Pull on the vine dangling from it. The petals shading the light open up and things get bright, whereupon a large rolled up leaf shudders and then unrolls. Walk down this leaf and you are facing that decrepit log bridge with the expanding squee flowers growing on it. Can't get to it, though. Turn around and you will see a ledge on which is a small hemi-sphere with a rope affixed to the top. Can't get over there, either. Look up and you will see a blue vine with an end that looks like a coat hanger. Click on it and it extends downward. Now when you put your cursor on the ledge it turns the into coat hanger vine shape; left click and you swing over there.
On the far side of the clearing is the first non-organic thing you have seen on Edanna. The rope from the hemisphere runs to it, and when you click on the crank the hemisphere rises. It is a squee trap. Why would Saavedro want to trap a squee? Shake the plant with the pink nuts on it. One falls and rolls under the trap. Click on it to roll it farther; you don't want to trap the squee, you just want to frighten it. Go into the recess behind the tiny winch; for some reason you stumble. Get up and you find that you are again by the round blue patch with the V-shaped notch in it. Follow the path that you took before back to the lantern.
Start down the unrolled leaf and a very short cut scene shows a squee coming out of the shrubbery and getting the pink nut. Pull on the stirrup-shaped handle on the bank, the trap falls next to the squee, who runs across the old log bridge, stopping to chirp while on it. The flowers expand, breaking the bridge and it falls below. The squee escapes. Click again on the blue vine overhead, and this time use it to swing through the gap left by the fallen log bridge. Turn left to find another of the brown gourd lanterns. Turn it on just because you can. Another of the big curled leaves unrolls, but don't bother to go down it because it leads to a dead end. Instead, head for the hole in the pink wall. Turn left and go five clicks toward some plants in the distance. On the left is a giant Venus flytrap, and when you get close to it you find that it has captured the mother bird. That must have been what you heard as you crossed the log bridge. Probably went in looking for insects. You must free the bird so that she can care for her chick and eggs, but also you will need her help later.
Turn right and proceed to that triangular bit of the ocean in the distance. When you get there, turn left and move one click and you will find a brown path. Follow this curvy path four more clicks, then look back and you will see a painting of Atrus' sons done by Saavedro. At the foot of it next to Saavedro's paints is another of those thirsty melons; click on it and it is soon filled with water and the lumin-escent pink squid. Turn around look up. Above the tangle of thorny roots you can see the Venus flytrap. Move forward once. The tangle of roots are those of the flytrap. You can faintly hear the sound of the struggling bird above.
Go down the path to the left of the roots, passing around a large basin full of plants, and starting upward again. Watch very closely on the right for one more of those thirsty melons, and when you find it bring down the water and squid. Continue along the path past the melon until you are stopped. Turn right and jump down on a root that is at right angles to the one you are on. Move one step and look to the right for a pair of short vertical white marks. Click on these and you will be at a viewer where you can get another message from Saavedro.
Get back on the root/path and follow it right until it ends where on a vertical surface there is a bit of sunlight shaped like a two tined fork. The tines point left at another rolled up leaf, but here there is no gourd lantern that will provide bright light to make it unroll, so you will have to find another way. Go back up the path, and where you jumped down, jump up. Continue back up the path past the Venus flytrap roots, then turn around and go down the path to the right of these roots. Soon you will see on the right a white orchid, and on the left another one a little smaller. A couple of clicks farther you will dis-cover when you go to it that it is one of the many lens flowers. Click on the center to look through the lens, and you can move the view to see the rolled up leaf. (Now it seems to have some faint light on it that wasn't there when you were; this is probably so that you can locate it when looking through the lens flower.)
Get back on the path and go farther downward until stopped. Here you will see intense light reflected up from down below and falling on another purple orchid at the left: one more lens flower. Click on the lens, and you will see the squid in the melon, and to the left two orchids, one on each side of a limb. Train the bright spot on the left orchid. Now go back up the path and you will find that the first lens orchid is brightly lit and has a bright spot when you click on its lens. Place the spot on the rolled up leaf, whereupon it unrolls.
Return again up the path to the flytrap roots and down the left hand path to the now unrolled leaf. Cross on the leaf, then go up the long (4 clicks) steep path of mushrooms where you will find one of the sunflower lens flowers such as the one you encountered when reviving the wilted plant with the spiral leaves. Look through it and you will see that it is focused on the swimming squid. Go past it up to another purple lens orchid. Click on the lens, then pan around until the sun-flower below is in the center of the field of view. Back off and return down the path past the sunflower and into a shallow cave. Pan left a little and go toward the patch of sea; get close to it, then click just above the glowing mushrooms. Three clicks and you are back to the unrolled leaf.
Go up the familiar path to the flytrap roots, then down the right hand path to the end where the light from below is falling on the purple lens orchid. Click on the orchid lens and move the bright spot from the orchid on the left of the branch to the one on the right. A video shows the light going to the melon holding the squid, causing it to burst and release the squid and water into the basin below. The electrical discharges from the squid to the flytrap roots causes it to open and release the bird, which flies away.
You have pretty well covered the area around here, but there are some places above the unrolled leaf to be explored. Click on the lens orchid again and move the bright spot back to the orchid on the left of the branch so the leaf will unroll again, and once more take the paths to it. Go up the mushroom path three clicks and pan far right to an open-ing with a horizontal hollow log dividing the views of sky and sea. There is an indiscernible opening into this log in the dark area just to the right of the opening to the sky and sea. Click there and turn left. Go ahead around the corner, then look to the right for more pages from Saavedro's journal. Turn around and advance all the way to the opening to the sea. Just to the right of the opening is a brown cone that looks like a wasp's nest with a blue vine hanging from it, and on the end of the vine is another coat hangar such as the one that you used before. When the cursor changes to the coat hangar click the mouse button and you will swing to a new area.
You will see stairs that lead indirectly back to the coat hangar vine and to the area that you just left in case you need to go back there, but for now go down the path just to the left of the stairs and turn left into the dark swamp. You will immediately notice a large blue sphere on the water; it has leaves around it so it must be some sort of plant. Advance down the path observing this plant as you go. You will see two small curved stems on the top. Also keep an eye out for an area of small white flowers on the left. At the end of this long path you will find another spotted purple lens orchid in a patch of light. Click on the lens and move the bright spot to the stems on the top of the sphere; they will rise. Return down the path to the small white flowers, now on the right.
Go two clicks over the flowers and you are on path that will take you either left or right. Turn around to see what the exit to the main path looks like, just in case you need it. Take the path to the left a few steps while looking at the plant on the right. It is another of the spheres but it has opened because of the sunlight in which it is sit-ting. There is a cloud of insects flying around the stems. For reasons known only to this game, these insects must be made to move over to the other plant.
Return along the path continuing past the place where you entered. You will eventually find in the path another of those plants with the long stems and palm leaves. This one has the leaves closed; click on the orange bump at the base and they open, shading the open blue plant with the insect cloud. You can hear it closing. Go back along the path and you will see that it has indeed closed, but the insect are still there. Keep going until stopped by a hollow blue root. This must be the runner from which these blue plants grow. You can go over to the big blue plant to examine the brown ones; click on the largest of these and it emits a cloud of spores that drive the insects away. (If the plant is not closed the insects will not leave.)
Go back to the hole in the blue root. Just for the fun of it, click on the brown spore plant next to the root and watch the sneeze. Enter the root and go left. Travel the length of the root to the first blue plant, picking up more pages of Saavedro's journal on the way. The passageway ends at pedestal on which there is a black entity that looks rather like a cat. Click on the pedestal, then go up as far as you can. There are the insects flying around the flowers you raised with the orchid. Pan right past an opening showing sky and leaves to a bifur-cated stem or root. Click on this root for an upward view, then follow it down until the hand cursor appears. Click.
The plant contracts and sends out spores, and strange indeed for a plant, it makes a pretty loud bellow. Very shortly the bird appears and grabs enough of the plant that you are in it, and carries it back to her nest. She flies around, then lands and starts croaking. Look a little to the left to see a spiral plant, then down a little and click. Much commotion, ending with a convoluted ribbon on a rock. This is Saavedro's symbol for this Age. It is copied to a sheet that goes to inventory. Look up and to the left to see a J'nanin linking book; use it to go there.
J'nanin Age 2
Back in the room in Saavedro's retreat, move around the room until you are between the two blue disks, looking down at the latticework foot-ball. Put the newly acquired symbol on the larger disk to the left, where a copy is made on a screen below and the original returns to inventory. The latticework football rises but does not open. A holo-graphic Saavedro appears in the ceiling with a message for Atrus, telling him what Sirrus and Achenar did to Narayan, how they deceived the people, took what they wanted, and left Narayan to die. He tell Atrus to keep looking for symbols.
Linking Book 2
If the elevator is at the top of the shaft, use the handle to the right of the elevator door to send it down, then open the door and go over to the outer door. (Where did that floor in the elevator shaft come from?) Unbolt the door to the walkway, go down the ladder and over to the nearby tusk next to the sea. Note the icon that you can see on the tusk. There is no door here to enter the tusk, but not far away is opening in the rock with a ladder leading down. Go down the ladder, and you are in a cave with a large opening to the sea. At the end of a walkway on which you are standing is a door that should get you into the tusk, but you can't get to it because there is a large ornate barrel blocking the way.
In the cave opening there is a pillar and a barely discernible ladder on the rock beside it. Climb out of the cave and go over to this ladder. When you climb down you will find the pillar has on it two levers that will raise and lower sections of the walkway and cause the barrel to roll back and forth. Play with them to see how the barrel moves, and shortly you will be able to move it out of the way to the right end of the walkway, so that with the ladder vertical, you can climb down and get to the door, which is not locked.
When you open the door you will see across a room the brown pillar with the marbles on it, but you can't get to it because Saavedro has broken out most of the floor. He has left a barrel sized hole. Return to the walkway control pillar at the cave opening, and with the door left open you can manipulate the levers so that the barrel rolls into the room and fills the hole in the floor. Now you can get to the brown pillar, and from the plaque icon outside you know which marble position set to use to bring down the latticework. In this one is the linking book for the Amateria Age. Open the book, click on the picture, and off you go.
Amateria Age
During the linking process, and when it sets you down, you may well get the impression that this Age is an amusement park of sorts, and con-structed with an oriental motif. As usual it is surrounded by an ocean and many of the structures are built on pilings in the water. Your opening view is from a platform looking at a walkway, but first look around. A storm is brewing, though you can ignore it as it is just show and never gets closer. To your left out in the water is some construc-tion on pilings that you should note for future reference. One of the pilings is red and extends beyond the roof. Turning left again step forward to see a ladder going down to a rickety wooden walkway at the water's surface. On the fourth side of your appearance platform there appears a large round building with a cupola; this is the central building of the complex. You can walk a step toward it and see on the left a hexagonal box in which are thirteen smaller hexagons that may be individually tilted; clearly this is a puzzle for when you get more information. Toward the central building you can see two more of these boxes.
As you will see, there are elevated tracks all over this Age. Three of the four puzzles involve guiding an iceball dropped from the central building cupola (honest!) to go around the tracks through each puzzle and back into the building. The three puzzles may be pursued in any order that you wish, but you will be here directed to [arguably] the easiest one first. Observing on both sides as you go, proceed along the walkway to find a J'nanin linking book on the right. Continue ahead, still observing, to a rocky entrance to a rocky island.
Make your way through this serpentine entrance through the rocks and past a series of square pillars topped by fire marble lanterns. When you reach the last lantern you will see to the left an outside exit pathway, and on the right past an elevator is a tunnel illuminated by glowing crystals. Go through the tunnel, at the end of which is a chamber where there is another of Saavedro's paintings. Go around to the right and out through what looks like the ribs of an old wooden shipwreck. Bearing right you will reach a rough column that takes you up to an iceball track.
Sonic Ring Puzzle
On the right the track comes from the cupola, and across the way you can see it going back into the building. On the left is the puzzle, consisting of a series of hairpin track turns carrying the iceball through sonic rings, several of which you can see. You must set con-trols so that the ring sound is turned off as the iceball comes to it, otherwise the sound will shatter the ball.
Follow the track through the center of the puzzle and out to the first hairpin loop, at the end of which is a sonic ring that you can see and hear. There is also a short pier from which by turning right you can get a closeup of the first control. The control is a dial with irreg-ular shaped silver pieces at clock positions 10, 12, 2, 4, and 6. Place the pointer at the first position, 10. Return to the track where you will be right in the sonic ring, but the sound waves will not affect you, only the iceball. Continue left along the track, through the tunnel, and out to the next hairpin. This time you will have to go through the sonic ring to get to the pier and control, which must be set to the next position, 12. A diagram will be invaluable to keep track of your progress.
Follow the track, setting controls to successive indicators at each hairpin. The last control must be set to 6, then go to the puzzle center, and back along the entrance track to the column that you climbed to get to the track. Go down the column and through the ship ribs to the other side of the painting chamber. Against the left wall is a ladder that is a narrow ceramic column with handholds carved or molded in it. At the top go along the track as far as you can, then turn left and step off to a control panel. At the left is a long handle to pull, whereupon you and the panel will rise to where you get a good view of the puzzle, and the display will light up.
There is another handle just to the left of the display; pull this handle and incredibly the cupola rises and drops an iceball onto the entrance track. As the ball moves through the puzzle, cogs on the display move a marble over the blue lights, turning off the sonic rings as the ball comes to them, signified by the darkening of the crystals on poles above the rings. If you have set all five controls correctly the ball sails through the puzzle and back into the central building; if you have made a mistake the sonic ring will disintegrate the iceball at that location and you will have to try going around the track and setting the controls again.
After the iceball goes into the building, panels on each side of the control rise and join, and on them will be a brief video of the pilings out in the water as seen from the platform where you were set down. Watch closely as a bridge segment rises from the water in one of the three gaps, then sinks again. Note which gap before the video fades. After that happens, the panels fold and form a cover, on which is a pattern of some of the thirteen hexagons in the hexagonal box next to your landing platform. Note this pattern, of course, but also note the color of the hexagonal border.
Pull the long handle to lower the control platform, get back on the track, and go down the ceramic ladder. Go through the glowing crystal tunnel until you are back at the elevator; get in the elevator and click on the handle to take it up.
Metal Chute Puzzle
Here you see part of the workings of the metal chute puzzle. There is the chute itself, and a large moveable gear that is one of a pair whose axle provides a fulcrum for tilting the chute. There is also an orange balance ball; get a closeup of the latter to see that three of the quadrants are wood and one is crystal. Hanging below the end of the chute is a sling, and next to it a mallet. Tracks lead to both the sling and the chute. The balance ball is positioned such that an iceball moving on the track above it will send it off on its own track.
Return to the elevator and on the other side opening are some pages of Saavedro's journal for you to pick up. Take the elevator down and go past the lantern out on the wooden walkway, moving along until you get to a control panel that you can see on your right. When you are facing the control panel, pull the long handle on the left and the panel rises. From here you can get another closeup of the balance ball show-ing all wood and indicating that it is divided into octants instead of quadrants, seven of wood and one crystal. To see how things operate, move the handle on the right side of the panel downward. The cupola rises from behind the chute and drops an iceball, which shortly passes over the balance ball. The latter is dislodged and moves on its track around to the sling, getting there just before the iceball gets to the chute. The weight of the balance ball in the sling tilts the chute. Unless the tilted chute is in exactly the correct position, the iceball smashes rather than passing along it and onto the track at the other end. The mallet then sends the balance ball back to its original location.
The three horizontally moving handles on the control panel set the position of the fulcrum gear to either end of the chute or in the middle of it, as determined by the indication on the blue strip next to them. There is no end to the supply of iceballs, so try the gear at all three locations. None work; the iceball smashes each time. Use the long handle to lower the control panel and continue along the shore toward the building with the blue roof, looking carefully at the chute as you go. You will see that it is fastened to a wooden beam, and at the end of the beam a cable passes down through the roof of the house. When you get inside the house it is evident that the cable is part of a counterweight system.
Recall that in the cottage below Saavedro's retreat on J'nanin there were balances that showed 1 metal ball balanced 4 crystal balls and 1 crystal ball balanced 4 wooden balls. Assigning a relative weight of unity to wood, the balance ball has a weight of 11. The counterweight as you find it has a weight of 4. There are other wood, crystal, and metal octal counterweights lying about that may be added (dragged) to the 4 already there, but what is the value needed? There is no indication of what this might be, and you could try placing various combinations of octants to get the right counterweight by trial and error, but a good start might be the weight of the balance ball or multiples of that weight.
When you achieve the correct combination of counterweight value and fulcrum wheel location, the iceball sails through the chute and dis-appears behind it, presumably back to the central building. Panels on each side of the control then rise and join, and on them will be a brief video of the pilings out in the water as seen from the platform where you were set down. Watch closely as a bridge segment rises from the water in one of the three gaps, then sinks again. Note which gap before the video fades. After that happens, the panels fold and form a cover, on which is a pattern of some of the thirteen hexagons in the hexagonal box next to your landing platform. Note this pattern, of course, but also note the color of the hexagonal border.
Lower the control box and go back the way you came, all the way to the sonic ring puzzle and up onto the entrance track. Go to the puzzle center, then out the exit track. When the supports between the track rails end you can jump off to the left and move along on the stone pillars, then continue on the stone path beside the wall on your left. Eventually coming to a gate in the wall. Remember to observe as you go, perhaps moving a couple steps beyond the gate and then returning to it. Open the gate to the hardest of the puzzles.
Iceball Pinball Puzzle
Again there is a long handle on the left of the control console that will raise it to give a view of the puzzle. On each side of a four crossover track array is a set of six revolving iceball-sized rings, three with bottoms and three without. The iceball comes down from the cupola, goes through the first crossover track, and lands in a cup in the left set of rings, which then starts to rotate. On the control panel are a pair of disks with holes in them at clock positions 8, 10, 12, 2, and 4, and which turn in synchronism with the ring sets. At the bottom of the panel is a well containing three red pegs. You are to place the pegs in the holes in the disks so the iceball moves from side to side, ending on the right in a ring with no bottom and that is over the track that takes it back to the central building.
The number of iceballs is limitless, so you can play with this puzzle all you want in order to see how it performs, and probably come up with the solution. To get the cupola to rise and drop an iceball, click on the horizontally moving handle on the panel between the disks and the peg well. You may use any number of pegs, but if you analyze the ball movement you will see that you need two pegs in the left disk and one in the right. Spoiler: 12, 2, & 10.
After the iceball rolls back to the central building, panels on each side of the control will rise and join, and on them will be a brief video of the pilings out in the water as seen from the platform where you were set down. Watch closely as a bridge segment rises from the water in one of the three gaps, then sinks again. Note which gap before the video fades. After that happens, the panels fold and form a cover, on which is a pattern of some of the thirteen hexagons in the hexagonal box next to your landing platform. Note this pattern, of course, but also note the color of the hexagonal border.
Use the long handle to bring the control panel down. As you turn to leave pick up more pages of Saavedro's journal to the left of the gate. Outside the gate turn left and continue walking beside the wall, then along the rickety water level boardwalk to and up the ladder to your arrival platform. Go to the hexagonal box and try clicking on tiles in the patterns you have found until you have the one that when you back off snaps together the supports between the tracks. Do the same for the other two boxes and you will be able to enter the main building. Keep track of the solution border color progression.
Click on the oval door in the building roof and it will swing up so you can enter. When you do that a marvelous stairway swings around and unfolds so you can go up to the cupola where there is a red chair that turns to you when you click on it. Click on the chair again to sit in it, and if you wish you may get a video from Saavedro, but it is a duplicate. Look up to see a handle; pulling on it results in a visual commotion indicating that the cupola has moved up and is suspended. A display board turns over and you are presented with the final puzzle of this Age.
Cupola Puzzle
This puzzle is pretty easy once you understand the rules. You have of course kept track of which puzzle raised which of the three segments of the offshore bridge to the red pillar structure. Over the top of the puzzle you can see that the iceball track approaches this bridge from the right, so you want to raise the segments in right to left order: Sonic Ring, Metal Chute, and Iceball Pinball. From the colors of the associated hexagon puzzle borders, that is color sequence blue, yellow, and green. Around the borders of the puzzle are four colored lines representing the puzzles; each line has a hexagon on one end with a triangle pointing into it, which means that is the entry, and a point on the other end signifying the puzzle exit. In this cupola puzzle you have to rotate the disks so that you have a complete path starting from the blue exit through the yellow and green lines to the red hexagon. Then look up at the roof and click on the blue light to form and drop an iceball.
Before you do that, however, save your game and play around with this puzzle. Click on a disk to break your path and see what happens when you launch an iceball. With a complete path click on a different colored overhead light to see the iceball go through the puzzles. When you are ready to complete this Age, have your path continuous and click on the blue light to see some extraordinary programming. When the iceball forms you are in it looking through the transparent shell (and not rotating) as it goes through the puzzles. When it finally stops on the offshore terminus, the ice breaks and you will be looking at one of Saavedro's symbols, which is copied and goes to inventory. Look down for the linking book back to J'nanin.
J'nanin Age 3
Again you link back to Saavedro's retreat. As before, move between the two blue disks, then place the just acquired sheet with the symbol on the larger disk. A copy is made to the screen below, and the lattice-work football opens, but you cannot yet get to the book in the center of it. A holographic Saavedro appears above to taunt Atrus again. "One more symbol," he says.
Linking Book 3
Should the elevator be at the top of the shaft, send it down. Open the elevator door and cross over and exit the outer door. As you step out you can see the blue and yellow fire marble lanterns. Go down the ladders to the beach and follow the sand path past the blue fire marble lantern and on to the one with the yellow marble. From here you can get to the two objects you just saw as you were coming along the path. One of these is a turnstile that you can turn, so naturally that is what you do. On a pillar in the sea below the cliff is a large paneled sphere with a smaller one on its top. When you turn the turnstile the larger sphere rotates. Great! Do it some more.
After three turns you can see that a panel on the sphere is missing, one more turn brings it around so that sunlight shines into the sphere where the panel is absent, and a light beam appears from the top sphere to shine on the device to the left of the turnstile. This device some-how amplifies or concentrates the light, emitting a beam that is aimed at the lantern with the yellow fire marble. Return to this lantern, and now as you rotate it you can see a light beam emerging from one of the lenses. Stand with your back to the light amplifier and look through the lantern, rotating it until you see the lantern with the blue fire marble on it. The light beam is now shining on that lantern. Perhaps now these lanterns should be more correctly called reflectors, since that is what they do.
Now go to the blue marble reflector and repeat the process of standing with your back to the light beam and turning the reflector to see an-other one, then go to that one and again send the beam to another reflector. There are seven reflectors, and as you go to them you must note the color of the fire marbles on them. This is important. (There are some repeats of colored marbles.) The last of the reflectors is on the rock where you came to rest when you first linked to J'nanin from Tomahna and saw Saavedro run away. It has a red fire marble. In this case what you want to see when looking through it is not another reflector but an instrument that has the shape of the light amplifier on the edge of the cliff. (You may have already looked at it.) This unit evidently contains a prism because a broad multicolored light beam may be seen to the left of it. Now go to that unit and you will see that the colored beam is shining on a set of five buttons in a door which is in one of the stone tusks. Here is where your notes on the fire marble color series is applied. Push the buttons within the colors in the order of the marble colors as you came upon them. The door opens.
Inside the small room there is the familiar brown cylinder that has four marbles in concentric races on its top. There is only one marble pattern left to bring down the latticework container with the linking book. This one is titled VOLTAIC, and has the curled leaf icon on it. Click on the book to open it, then on the swirling picture, and you will have linked to the Voltaic Age.
Voltaic Age
You arrive in the Voltaic Age on a walkway facing a short stone tower on a very small island next to a very much larger one. Moving ahead and around the tower you find a round portal in it—-locked, of course. There is a sphere in which is a linking book back to J'nanin, so you are not stuck here. There is a water channel into the large island. The walkway also leads into the large island; with nowhere else to go, follow it in, passing a tunnel to the right as you go. It takes you to a large cavern open to the sky, which you should take time to examine.
Part way along the walkway is a circular one to the right; this leads to an elevator that does not work because there is no power. Back again on the main walkway, go to the end of it, passing a very large hemisphere. To the right is boat-shaped object that is a hot air balloon—-an airship. Turn right to a ladder that leads down to another walkway past the back side of the large hemisphere, at the end of which is a small platform with a three colored gauge, this in front of four wheel valves. Only three of the wheels turn, the fourth having been broken by Saavedro. However, nothing happens when you turn them. Turn left and step off the platform toward a pathway to the airship, but you can't use it because it too has been sabotaged by Saavedro. On the right is another wheel valve that does nothing. There is a ladder, however, that takes you up near the top of the cavern.
Go right to a round grate on which are some pages of Saavedro's journal. Click on them to read them and put them in his book. Next to you is a large hemisphere; click on it and it will rotate so that you can go through it to another platform. Ahead is a pipe that leads all the way to the other end of the cavern. It seems to be well supported, so walk on it to the other end and step off to the right to a short walkway that will give you a good view from this perspective of the cavern and its contents, much of which is support beams and cables for equipment and walkways.
Next to you is yet another hemisphere, part of a ventilation system. It may be opened by clicking on it. Go through the dark passage keeping an eye out for a grate in the floor. If you miss it and come the end, turn around and move one step forward and it will be at your feet. Open the grate and drop down into the lava pit control room. Not much to do here with no power, but you can unlock the door. Step out into the junction of two tunnels. It may occur to you that there must be some sort of standby power sufficient to provide illumination where needed.
Water Wheel and Power
Proceed along the passageway with the blue lights, the sound of running water getting louder as you go. On the way there is a short section which is depressed a little and where there is a ladder on the left and a diagram on the right. One step past this on the left is a broken observation window behind which are a series of paddles that will rise if you click on them and fall when you click again. Be sure that you leave them in the fallen position. Continue to the passageway end, where there is an area in which is a round portal, identical with the one in the stone tower where you entered this Age. To the right you can see this tower beyond the water raceway. Move toward it. There is a shaft with a ladder going down but you can't do this because the shaft is full of water. There is a vertical wooden member on the right with a gear visible on the top. Aha! On top...
Go back down the passageway to the ladder and go up. Here you can see the motionless water wheel, and that the vertical wooden member is the end of a gate that is blocking the water from going to the water wheel. Turn the red wheel to move the gate and allow the water to get to it. But the wheel is not turning; there are no paddles on it for the water to push. Next to the red wheel is an opening that used to contain a control to raise the paddles, but Saavedro has sabotaged that also. Not to worry, you have already done that through the broken observation window, but there is one thing you must do first.
Go back down the ladder and to the end of the passage where the gate is now in place and the water diverted. The shaft with the ladder is now free of water and you can go down. Open the wall panel where you can see the mechanism to engage the water wheel to the generator. Click on the crank to do that. (This could not be done if the wheel were turning.) Now go back up and raise the paddles through the broken window. The water wheel begins to turn and power is generated.
Return again to the passage end, and with power now established there is green light on the portal latch. Get across the turning axle and click on the latch so that the portal drops away and you can go down a ladder to another room. Here there is a viewer in which you can get another message from Saavedro. It is getting easier to feel sympathy for this guy. There is a tunnel with offset circular stepping stones that you should now follow to its end. Here is a very large cylindrical device of some sort in a large chamber; heavy cables around the walls suggest that it might be electrical in nature. Perhaps a giant coil.
Go down the ladder to the cylinder and you will see a symbol on it (the Rivenese symbol for the number 1), below which your cursor indicates that you can zoom in; do this and a panel opens showing a matrix of heavy electrical conductors. This a simple exercise in which you are to click on the blue buttons to move sections of the matrix until you have a complete electrical path from the terminals at the top to those at the bottom. There are five of these panels to be found as you move around the cylinder, and when you have successfully completed the circuits in all five, this success is signaled by the last panel closing by itself. (You may not have to do all five panels.) Go back up the ladder to the tunnel and turn to observe that there are electrical discharges jumping from the top of the cylinder, or coil, to the grid above it, presumably transferring energy upward. If you have not found more pages for Saavedro's journal as you went around the cylinder, go back and look for them.
Now find your way back through the tunnel, up the ladder, and through the entrance tunnel to the diagram by the ladder. All the symbols and connectors are lit except the top one, which indicates the little island where you arrived. Continue along to the metal door that you unlocked from the other side. Now that there is power you can take care of the lava pit problem.
Lava Pit Puzzle
What you need to do is to get into the lava pit and turn on the fan so that air heated by the lava can fill the balloon/airship in the cavern. Enter the control room, where from an observation window overlooking the pit there can be seen in it a large gear that opens a gate to allow molten lava to enter the pit, the motionless fan that needs to be turned on, and below it the vertical member of a platform that is used to raise and lower the platform by a barely seen gear on the right. You can hear the bubbling lava and see its rosy glow through the obser-vation window. Should you go down the ladder that is in the hole in the floor you would find the pit access hatch, and looking through the viewing window in it you would see the glowing lava; can't very well go in there with that in front of the entry. Go back up to the control room.
In front of the observation window is a control unit, in the circular face of which is a red knob used to rotate a lever around the edge of the face, and also through the horizontal slot had it not been sabotaged (Saavedro again) by having a pin driven into it as you can see. However, there is no impediment in the perimeter, so you can grasp the red knob and drag it up, then let it go and it will complete the travel around the circumference. As this happens you can see through the window the gear on the right lower the platform, whereupon the bubbling ceases and the rosy glow is replaced by ordinary illumination, signifying that the lava has drained away.
Now you can go down to the pit access hatch, click on the latch to open it, and enter the pit. Turn left and go along the platform to another control identical to one above in the control room except that it has not been sabotaged. The platform moves up and down to one of three levels: top, middle, or bottom; it is at the bottom level as you enter. Above the vertical section you can see the indicator light of the fan switch, just below the fan. You can now see better than from the control room observation window the overhead gear on the right that raises and lowers the platform by engaging the pegs on the vertical section. Note that there are pegs on each side of this section. The overhead gear assembly can be noisily moved from one side to the other by sliding the red knob from one side to the other through the slot in the control unit face.
The gate that controls the lava may be seen on the left wall. When the overhead gear unit is moved to the left, in addition to raising and lowering the platform it turns the large gear that controls the lava gate. If you are on the platform when there is lava in the pit, you are safe, though probably hot, as long as the platform is not in the bottom position. Not to worry; when the platform goes to the bottom position the lava drains from the pit.
The platform cannot be raised or lowered more than one level without moving the overhead gear from one side to the other by sliding the control unit red knob lever through the slot. The overhead gear is made to turn by rotating the red knob around the control periphery, and the gear turns in the same direction as the knob is rotated. If the gear cannot turn because of the limitation of platform movement, then the red knob cannot be made to go around, but it can always be moved back and forth through the slot. The finicky thing will sometimes do that when you don't want it to.
You will have noticed the round aperture in the platform vertical section. When the platform is in its highest position, through it you can reach the fan switch to turn it on.
So that's what you have to do. Drain the lava, enter the pit, and raise the platform so that you can turn on the fan. Then lower the platform so you can leave the pit, and in the control room move the platform to allow the lava back in so that the air blown by the fan is hot. To do the latter, the overhead gear must be in the left hand position when you exit the pit.
With hot air available to inflate the airship, that's the thing to do. Leave the lava control room through the metal door and take the passage to the right, which leads to the main walkway you took into the cavern. Be on the lookout for more pages to Saavedro's journal along the way. In the cavern you can operate the elevator at the end of the circular walkway now that there is power. The elevator takes you down to a lower walkway, and at the end of this one is a lever which will cause the big hemisphere to open. It closes by itself after a short period. Go back up the elevator, back to the main walkway, and along it to the end. Climb down the ladder and move across to the platform with the tri-colored gauge in front of the four wheel valves.
Airship inflation puzzle
Hot air that looks like steam is now coming from the valves above the three working wheels. Moving the floor lever to the right uses air pressure to raise the platform and gauge up one level, repeat to go up one level more. Move the lever to the left to go down. Note the dotted red line in the blue part of the gauge at about 10 o'clock; your task is by opening and closing valves to bring the gauge needle to that line.
Since air pressure is needed to raise the platform, you have to close some valves to do this, all three to get to the top level. The gauge is no help in indicating sufficient pressure to lift the platform. One approach is to move to the top level, closing all the valves on the first two levels, then work your way back down, opening and closing valves and watching the gauge, but this gets old pretty fast. When you get tired of trying, here is a spoiler: top level, close right valve; middle level, open the two left valves; bottom level, all three valves open. The gauge needle should be close enough the dotted line.
Go around the partition to the horizontal red wheel. Turn this valve and hot air flows to the airship, which inflates and rises to free itself from its tether, then moves along its guide cable until audibly stopped by the large hemisphere. You know what to do about that: up to the main walkway, along the circular one to the elevator, down to the lower walkway to the lever that opens the hemisphere. The airship sails out, moves a section of the lower walkway aside, and stops.
Go to the airship and get in the gondola. Pull down the bar and the airship follows its guide cable through the chasm, motive power undisclosed, and over the waterwheel until stopped next to another walkway outside. Go to the end of this walkway, pull on another lever there, and the walkway and airship swing forward, making a connection between the power cable from the waterwheel generator system and the stone tower power cable. Improbably, the tower and top of the island rise and become levitated, with what appear to be many scraps of paper suspended below. Speculation is that the energy for this comes from big sparking coil you connected. (Recall the generator in the J'nanin cot-age.)
Get back in the airship gondola and pull the bar again, whereupon the ship moves ahead to the small dock leading to the tower portal, the lock for which is now glowing green. Click on the lock, the portal falls away and you can enter the tower. At the center is a shaft with rings in it that serve as a ladder. Climb down the ladder and open the latch at the bottom. Gates swing aside, and from this perspective the floating paper scraps form a pattern, which is copied to a sheet that goes into inventory. You have found another of Saavedro's symbols.
Pan upward to compartment doors in a panel above the gate latch. Click on the doors, and they open to present the J'nanin linking book, which takes you back to the room in Saavedro's retreat.
J'nanin Age 4
This will be your last return to Saavedro's retreat. Put the last symbol sheet on the blue disk and after a copy is made a walkway extends to the Narayan linking book on the open latticework football. Atrus appears on the ceiling congratulating his sons and tells them to go to Narayan. Open the book and do that.
Narayan Age
Here is one Age that does not seem to be set in a vast ocean. However, during the linking process, this place where you have been set down appeared to be surrounded by fog, so perhaps there is water out there. You start in a more or less circular room with many panels of symbols along one side. All around are irregular loops of roots--around the floor, up the walls, forming columns, and wandering around the ceiling. Saavedro's journal made several references to a very important lattice tree, splicing and weaving its roots, so perhaps there is some connection. All of his loose journal pages have probably been found by now, so it might be a good time to review what he has written. Some of it does not logically fit together, and there are references to myster-ious things that have not been seen, but he writes much about Atrus, and Sirrus and Achenar. He also admits to having been in a mental fog much of the time.
On a raised area of this arrival room opposite the panels are a couple of spheres on short pedestals, and between them on another pedestal is a lever switch with a large handle. Conduits run between the switch and the sphere pedestals. If you click on the spheres you get a noise as though they want to open but cannot. The most likely reason is that there is no power. Behind the switch is an impenetrable force bubble (it looks like translucent plastic) covering an exit from this room, and to the right of this another opening covered by a lattice of roots or branches. Outside is a gondola hanging from a rope or cable. Finally, to the right is a stairway.
Go up the stairway and onto a large circular grid with illumination beneath. Immediately Saavedro comes out of a tower carrying the Relee- shan linking book and his ever present mallet. He was expecting to see Atrus, not you. He talks to you briefly, then rants to himself for a while, threatens you again, and retreats back into the tower. Look around. There is another enormous tower, or possibly a tree, that extends up into the fog, and some equipment that resembles artillery shell casings. Nothing responds to your cursor but a handle on a dome at the edge of the large grid; turn it, why not? That's what such handles are for. After a short period you hear the slowly rising hum of a generator, and power is established. And now that you have good chance to observe it, that fog surrounding the place appears in reality to be a translucent barrier resembling plastic, with patches of bubbles and other irregularities in it. This must be the shield that Saavedro claims Atrus has established, and which keeps him confined away from the rest of Narayan.
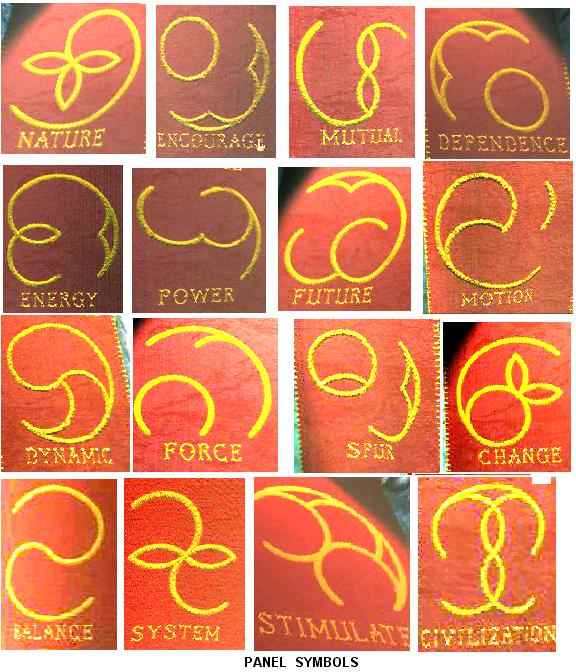
There is nothing more to be seen up here, so return down the stairs and turn your attention to the symbols on the wall. There are thirty of them, each with a word under it indicating the significance of the symbol. Perhaps some of the symbols might make you think that you have seen them before. In your inventory look at the symbols you have gathered at the end of linking to the Amateria, Edanna, and Voltaic Ages. From Amateria you can recognize the force and change symbols, from Edanna those for nature and encourage, and in that from the Voltaic Age there are future and motion. Now, though there is no hint that you should do so, examine Atrus' interminable journal, you will find boldfaced expressions of his philosophy containing exactly those words. Here they are:
(p12) Energy powers future motion (Voltaic)
(p17) Nature encourages mutual dependence (Edanna)
(p23) Dynamic forces spur change (Amateria)
Don't stop there, there is one more:
(p27) Balanced systems stimulate civilization
Note that each of these phrases consists of four words. With regard to the first three phrases, in addition to the words mentioned above, symbols for the remaining ones may also be found in the panels. The symbol for civilization in the last phrase is also to be found. For convenience, screenshots of these words and phrases are reproduced on an accompanying page.
Go to the switch between the two spheres and be sure the handle points to the sphere on the left, then go to that sphere. Click on it; now that there is power the pedestal rises. Click on the sphere for a closeup, and again to open it, and you will see three circles, one for each of the Ages to which you have linked. Get a closeup of one of the circles to see in it four circles, and in each of those four more, symmetrically arranged so that there are twenty circle segments. Click on any of the segments and it turns red, click on it again and the red disappears. Consider any of the above sentences, say the first one: Voltaic. In the top twenty segmented circle form the symbol for energy; moving cw to the next segmented circle form the symbol for power, and on around for the remaining two word symbols. When you have successfully formed the four symbols they all turn a brilliant white, then recede so that you can get a closeup of another circle and repeat the symbol forming for another sentence, then once more for the third sentence.
With all three circles of symbols glowing white, the scene shifts right and the force bubble over the room exit dissolves. Go out the exit where you can see that the gondola is not going anywhere because its cable disappears into the shield. There is another set of stairs leading to a room below which looks much the one you just left, and there is another set of panels in which you can find the three missing symbols for those words in the last sentence. With this information return up the stairs, but first be sure and get the Tomahna linking book next to the stairway and put it in your inventory.
Go again to the switch and turn the handle to point toward the sphere on the right, whereupon you will see that the force bubble returns. Open this second sphere as before and it you will find only one segmented circle set. Well, of course--you have only one sentence left. Build its symbols as you did for the others, and when the red segment patterns turn white, the shield disappears. Saavedro comes running from above in wonderment. Realizing that there might be life out in the pink mist, he makes some statements, plays with the switch alternating the appearance of either the shield or force bubble, then says that he will return the Releeshan book if you will turn the switch and remove the shield when he is out next to the gondola. He goes out to it, turns to you and says, "Do it!"
At this point save your game. There are quite a few endings to this game, and you may enjoy trying them all; remember, Saavedro still has his lethal mallet. Also remember he still has the Releeshan book, and he still has his well earned hatred for Atrus and Atrus' boys.
One thing that you can do is as he demands, turn the switch to dissolve the shield and trust him to leave the book behind as he departs in the gondola, then turn the switch and get it before linking back to Tomahna. Or you can walk out to confront him to get the book and do nothing until he gives it to you. What you really should do is scoot up the stairway and turn off the power. Without power to support the patterns you established in the spheres the force bubble and the shield return, trapping Saavedro between them. Now you are in control. Go back down and make him give you the book, whereupon you have a decision to make: you can link back to Tomahna and leave him trapped forever, or you can decide he has suffered enough and you can turn the power back on and let him sail off into the pinkness where perhaps his wife and daughters await. Before you do that, however, be sure that the switch handle is turned to the right, or you will regret your decision. Briefly.
Link back to Tomahna to receive the grateful thanks of Atrus and Catharine. Catharine says that the fire from the fire marble destroyed the J'nanin linking book and they could not follow to help. Curiously, it would seem that you have been gone a while, but Atrus is still covered with soot from the fire. There is an epilog in which Atrus adds ever more words to his journal, and the credits roll.
Commentary
Exile is a worthy companion to the previous two Myst games. The graphics are really outstanding, the story flows along very well, and the puzzles are intriguing. Playing is done using only the mouse, and by a right mouse click you can choose to employ continuous or intermittent panning. Inventory is no problem because other than a few books and papers, a total of seven at most, there is no inventory such as is usually found in Adventure games. Game storage appears to be unlimited, and there is a good sized thumbnail for each one--actually too big to be called a thumbnail. Of course, no game is completely perfect, and a minor improvement would be to have more space for describing stored games; also, it would be nice if the cursor would indicate when forward movement is possible.
There are philosophical contradictions that I find troubling. Among these are the fact that when it suits the plot only one linking book is possible, yet there are several linking books to get you back to J'nanin from other Ages, and in at least one Age there are two books. If Atrus has written a linking book such as the Releeshan one stolen by Saavedro, why can he not write another one? Catharine says they could not follow you from Tomahna because the fire marble destroyed the linking book; why not write another? You find that Saavedro has a linking book to Tomahna, presumably somehow left by Atrus on J'nanin, but Atrus expresses no concern about that. Because it is needed by the plot for you to return there?
In one place Saavedro writes in his journal of the Narayan elders saying that the weaving of the lattice tree roots is a survival custom that has gone on for thousands of years, yet in another place there is the claim that Narayan is a result of one of Atrus' linking books. Is Atrus immortal? Or is this another example of the continuing conundrum of whether the books establish the lands to which they link or just a path to them? I can not find, nor can I recall any place in the previous Myst games, where this is explicitly addressed. It seems pretty clear from Atrus' journal that he wrote Releeshan expressly to establish an environment for the D'ni to begin anew, yet how could he have written Narayan which has thousands of years of tradition?
Saavedro's journal tells us that Atrus spent several months in Narayan interfacing with the people and learning their ways, as well as with Saavedro personally. Perhaps I have missed something, but I cannot find any reason for him to put in place the shield that keeps Saavedro from Narayan, as Saavedro claims he did. It is an act out of character for Atrus. When and why did he do this? It may be that Sirrus and Achenar did it, but Saavedro attributes it to Atrus.
Though Sirrus and Achenar do not appear in the game other than their pictures, we learn from Saavedro that they have again proved themselves to be miscreants, but there is no indication of whether Atrus still regards them benignly as he expressed in his holographic appearances on the ceiling of Saavedro's retreat. Has he found out what villains they remain and are they punished for their offenses, or do they get away with them?
The Voltaic age is another one of those islands in a sea. What gives rise to the water gradient used to turn the water wheel? The first time I played the game I had to set all five connections in the perimeter of the large coil in the Voltaic Age; each new game since the first I only needed to set two.
Exile is a superb game. Let us hope there will be more like it to continue the Myst series.