The Dark Eye 2: Memoria
By Deep Silver
Walkthrough by MaGtRo September 2013
Gameplay: This is a third person point & click game.
The intro page has New Game-Continue game and Main Menu links.
The Main Menu has Resume Game, New Game, Save games, Settings, Bonus and Exit Game.
The Settings menu has selections for settings, graphics, volume and controls as shown by icons. Click on the icons to show the settings for each of them.
Settings-gear icon has selection for subtitles, hotspot indicator and combination helper. Move the cursor over the selection to get an explanation for each of them.
If the combination helper is enabled; an item glows when placed over a hotspot on which the item can be used successfully.
Graphics-monitor icon has screen size (full or window), HD cutscenes and additional effects.
Volume-loudspeaker icon has the voices, music, effects, cinematics and global volume settings.
Controls-game control icon has the settings for the mouse and other keyboard keys.
Left mouse button performs the assigned action-selects items.
Right mouse button examines inventory or hotspots and returns items to inventory.
ESC key opens the main menu and skips cutscenes.
T key toggles the subtitle and speech options to get one or the other or both.
M key mutes the game. It toggles it back on.
F1 toggles Geron's diary that shows the current task and hints.
F5 toggles the save menu.
F8 toggles the setting menu.
F9 is quicksave which will overwrite the last quicksave.
F10 loads the last quicksave.
F11 takes a screenshot and is saved in the user folder.
Spacebar highlights all active spots, person and exits in the screen. It also pauses cinematics.
Bonus has cinematics and achievements.
The inventory bar is at bottom of screen. The spells are at left end of the bar. At right end of the bar are gear icon for main menu; magnifying glass to see the hotspots and the book icon for Geron's diary and hints.
Geron, a birdcatcher is a hero. He freed Andergast from a sinister seer. The soul of his fairy friend Nuri is trapped in a raven's body. Geron is looking for a way to bring her back to her true form.
As Geron.
Fix the fortress:
The Woods: A tutorial option is shown here.
Go right and see a tent in the clearing.
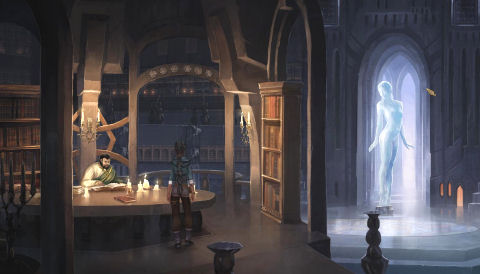
Clearing: Go to the tent. Geron says Jacomo Nauta sent him to talk about the riddle.
Meet the trader's daughter who questions Geron's ability to do magic. She wants Geron to fix her stick Keshal Rui fortress that she saw in her dreams.
Fix the stick fortress: Look around. Use the space bar (if activated) to see all the hotspots.
Right click to examine the stick fortress.
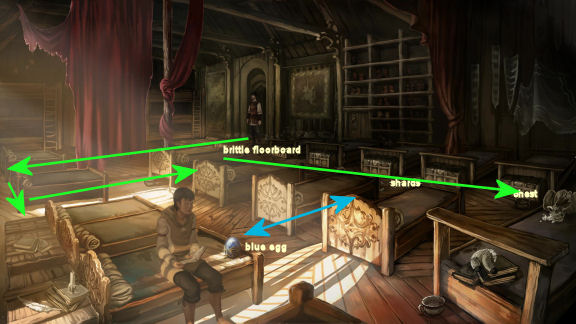
Open the chest and see a glass bottle.
Open inventory at bottom of screen. A knife and Nuri's necklace are in inventory.
Select the repair-destruct spell at left of the inventory bar on the glass bottle.
Repair/destruct spell can shatter small fragile objects and using Nuri's necklace can repair broken objects as long as all parts are there.
Pick up the glass shards. Use the glass shards on the stick fortress.
Save game here! Use the repair -destruct spell on the shards around the stick fortress.
Geron is allowed to enter the tent by the daughter.
Talk to the trader:
Geron enters tent and talks to Fahi, a traveling Tulamide trader. Fahi has a spell that can do physical transformation.
Fahi offers tea - accept tea.
Fahi asks Geron if he likes riddles.
Answer: No I don't like them to obtain the Getting the job done achievement. Do you like riddles?
The game ends. Go back to the saved game and play again.
This time select Yes, I like riddles - if solvable. Fahi likes that answer.
Fahi and his daughter dream of a princess who lived 450 years ago. Fahi tells the story.
I
As Sadja.
See a group of heroes being chased by stone guardians beneath Fasar.
The group less one stand before the ancient tomb gate of a Mogul Mage. Wizard Ghalwed says that the Mask of Malakkar is buried in the tomb of an ancient Mogul Mage. Alrik the warrior derides the late arriving Princess Sadja and Rachwan an outcast Ferkina.
Learn about the group and the mission:
There is a ruby in inventory. Right click the ruby to learn that it is Sadja's almandin.
Talk to Ghalwed the wizard. Learn about the group of heroes. Alrik is a good warrior. Rachwan is an outcast Ferkina that will lead them through the Rashtulian Wall, the mountains of his homeland. The magician is here for the mask. Harum, a hired blade was Sadja's personal bodyguard. Sadja, the princess was included because the mage wanted a Tulamid scholar.
The mission is to take the Mask of Malakkar from the burial chamber and bring it to the Rashtulian Wall.
Malakkar is a master of elemental and transformation magic. The Mask of Mallakar has power to turn any defeat into victory. They need it to win the war that is happening at the Gorian Desert. The Holy Army is made up of clerics that will combat the hordes of demons.
Learn that the gate lock is hidden.
Expose and open the gate lock:
Tomb entrance: Look around. Talk to Alrik and Rachwan.
Examine the grooved ornamental arch. See flowing sticky thing on the column right of the arch. Check the pillars and the broken guardian and its arm.
Hall: Go down to the hall. The mage notes that Sadja has a tattoo - the mark of Malakkar. She is a direct descendant of Malakkar.
Look around at the hall. Examine the broken guardian at center.
Examine the large hand the stone guardian and Sadja are standing on. Sadja says that Kasim will regret what was done to her when she gains her freedom.
Examine the colossus on the wall, the fracture on its left side and the tomb entrance. Look at the ruins at right.
Battle site: Go right - just left of the colossus.
Examine the guardian with no legs at center, monster and rock at left. Examine Harum hanging on the torch.
Pick up the dagger from ground. Use the dagger on Harum's bag. Items drop off.
Go down the path and pick up the dropped items: alcohol, brush and bandage.
Check the rope across the crevice. Sadja scolds herself for weakening.
Tomb gate: Go back to the tomb entrance and the gate.
Use the horse brush on the tomb gate lock. The mage removes the filth from the lock.
The mage lights up the 6 legs of the central beetle lock. Before the 6th leg is lit; the key falls off.
Use the dagger on the flowing sticky stuff (???) at right to get sticky dagger.
Give the sticky dagger to the mage to glue the fallen leg on the lock. The door falls down.
An inscription lights up on the top of the open door. The last princess of Fasar can read ancient Tulamidya.
The mage asks Sadja to translate the Riddle. Sadja only says: The gods be with me. It will change too much.
Light up the tomb:
Sadja and Ghalwed enter the dark tomb. The mage warns not to use fire or magic in here and not to destroy the green beetle on the fallen door.
Examine the sliver of light on the back wall and the ring on the central post where the mage is checking something.
Check the hook at left with a bowl hanging on the hook. Sadja pricks her hand on the hook and covers the hook with her blood. The bowl has an incense.
Clean the platter: Take and examine the dusty silver platter on the floor at center of screen.
In inventory combine the alcohol and the bandages to get alcohol-soaked bandage.
Use the alcohol bandage on the dust and cobweb covered silver platter to get shiny silver platter.
Use the shiny silver platter on the bloody hook at left that has the bowl. Sadja takes the bowl and incense.
The beam from the sliver of light is focused on the central post that is examined by the mage.
The post-bust of Malakkar has the Mask of Malakkar.
Guardian: The warrior yells that a guardian is here. A fight ensues.
A guardian with glowing eyes enters and steps on the beetle lock. The mage destroys it but it falls on the guardian. The door closes.
Activate the Staff:
Examine the Staff at top left. Get an image of blood, smoke and staff.
Use the bandage on the bloody hook to get bloody bandage. Place the bloody bandage in the bowl.
Use the incense on the glowing green eyes of the fallen guardian to get smoldering stick.
Add the smoldering stick with the bowl with bandage to get smoking bowl.
Hang the smoking bowl on the hook.
The Staff talks to Sadja in her head. He calls Sadja; Sharisad. Talk to the Staff. The princess and the Staff make a deal.
An activate-deactivate spell is added left of the inventory bar. Activate/deactivate spell can activate magic items or dormant spells. Sadja can cast spell as long as she is touching the staff.
Use the activate spell on the darkness. The Staff lights the braziers in the room.
Free the Staff:
The Staff tells Sadja how to free it.
Look around. See the magician under the hand of the guardian. Sadja needs magic.
See that a hook on a chain is on the staff. The other end has a metal ball.
Place the chain-metal ball on the ring on the bust-mask's pedestal at center of room.
Click on metal ball at end of the inserted chain and use it on the hole on the floor.
Take the caught staff from the ring. Sadja places the staff on her back.
The Staff doesn't think that they can leave this room.
Ghalwed: Use the activate spell on the guardian's hand that is on top of the fallen magician.
The hand is removed. Talk to Ghalwed. Automatically take the mask and the sticky dagger.
The magician's last words before he died is to bring the mask to Drakonia - to the prince.
Examine (right click) the mask in inventory.
Find a way to exit the room:
Look outside: Look through the tomb door. Too dark.
Look for the sliver of light that we saw earlier on the brittle wall. Too light.
Use the deactivate spell on the brazier to darken the room.
Use the sticky knife on the sliver of light on the wall to widen that slit.
Look through the widened sliver of light. See the guardian with no legs and dead Harum at the battle site.
Guardian: Activate the guardian with no legs.
Hit the rock face on the sentinel's left or right side 3 times.
Get the Causing tremors achievement if you hit left-right rock walls and ground often enough - 12 xs or more. Try to tear down the wall with the golem. (Thanks, Marjo.)
The brazier on the wall falls off. Take the brazier and throw-click it on the colonnade at left. The sentinel throws it there.
Right click to deactivate the spell-sentinel.
Tomb: Pull back from the slit-battle site. Activate the darkness to get light.
Exit the room:
Check outside the door: Look through the hole on the door of the tomb.
See the brazier thrown by the sentinel. Activate the brazier to get light at the tomb entrance. Examine the dead warrior.
Get the beetle leg: See the beetle leg on the floor. It is too far from the door.
Activate the guardian's body at bottom of screen. Click on the arm right of the activated guardian.
Click on the beetle leg. The guardian throws the arm to hit the beetle leg closer to the door. The beetle leg is still too far to pick up.
Combine the staff and the bandage to get staff with bandage.
Use the staff with bandage on the beetle leg.
Use the sticky dagger with the beetle leg to get sticky leg.
Use sticky leg with beetle on center of door. This makes a hole at bottom right of door.
Pull down the door: Pull back from door.
Take the chain that is on the hole on the floor. Place the other end of the chain on the bottom left hole of the tomb door.
Look through hole at right of door.
Activate the guardian's arm close to the door. Click the ornamental arch to get the arm to hold on to it.
Click on the metal ball for the arm to throw it close to the guardian's body at other end of the hallway.
Activate the guardian's body. Click on the metal ball. The guardian failed to pull down the door.
Activate the guardian's body again and click on the metal ball. Throw it down to the hall at bottom screen. The metal ball is now by the guardian at the hall.
Activate the guardian at the hall and pick up the metal ball. That action still failed to pull down the door. Right click to deactivate the guardian still holding the metal ball.
Activate the colossus. Click on the guardian holding the metal ball and standing on the colossus' hand. The colossus' hand wraps around the guardian with metal ball. This action finally pulls the door down.
Free:
Sadja is happy that she is free.
Rachwan an outcast Ferkina comes out of hiding. He wants payment for bringing them here.
Sadja answers that his employer is dead but she'll hire him to bring her to Drakonia. As payment, select ruby.
Sadja wants to win the war and be immortalized in history. Sadja al'kebir - greatest heroine in history.
As Geron.
Riddle: Select - the riddle from the dialogue.
Fahi says the words above the tomb gate is the riddle. Fahi had the ancient Tulamidya writing translated.
As the stone over the scarab, so rules the scarab over the stone. Enter to you the answer is known. If not, then forever your life I'll own.
Fahi gives Geron 3 days to solve the riddle and on the fourth day the merchant will leave.
Home: Geron is back at home. Nuri the raven has an open wound in her wing.
Make a salve:
Geron's house: Nuri sounds sad. Look around.
Use King chestnut at end of table. Geron makes Nuri giggle.
Check the bird seat and Geron explains why he wants Nuri back in her own body.
Check the broken artifact beside Nuri. It cannot be fixed anymore.
The birdbath is filled with magic fairy water from Nuri's cave.
Check Geron's parent's picture above the birdbath.
See that the pot in fireplace is filled with grease.
Examine the cage and Geron explains to Nuri why she has to go back in the cage tomorrow.
Recipe: Read the recipe left of Nuri. Mix ground up whirlweed with fat. Geron has only grease.
Pick up whirlweed from the pot by the window.
Place the whirlweed in the birdbath with fairy water.
Use the knife on the birdbath with whirlweed to get birdbath with whirlweed juice.
Check the curtain. Use the knife on the curtain to get strip of fabric.
Use the strip of fabric on the pot with grease in the fireplace to get greasy rag.
Use the greasy rag on the birdbath with whirlweed juice to get salve
Use salve on Nuri.
II
Forest:
Get the Chapter One complete achievement.
Geron tries to get Nuri to exercise her wings.
Get Nuri to think of something cheerful. Select any 3 items from the choices. Nuri will remember something sad about each one.
Check the rubble at right of screen. That is where they met the first time.
Go down to the campground.
Campground:
See that Fahi's camp is sealed off. The entrance has a rope barrier. There are 3 stone pillars with faces. They are like the ones from the tomb entrance in Fahi's tale.
See Master Owlrich Bodiak question one of the pillars. Geron asks what happened here. Owlrich calls on his assistant Bryda to answer Geron's question and send him on his way.
Bryda says that the School of Arcane Combat in Andergast closed the camp because a mob from Andergast came to run off the travelling merchant. There is no sign of the Tulamid merchant. The mob were turned into Tulamid pillars with Andergastian core.
Geron wants to check if Fahi left a trace for him to follow.
Camp: Go around the clearing - behind the fence of the camp to the back of the area. See that there is also a rope barrier here. Bryda checks the center of the camp and is in front of the tent.
Distract Owlrich:
Go back to the left to be in front of the camp. Listen to Owlrich question the left pillar. Take note of the questions.
Note that there is a tool bag leaning on the pillar. It has a hammer. Try to take it and Owlrich warns him that he is watching.
Use Nuri on the left stone pillar. Geron asks her for a favor. He tells Nuri to answer Owlrich's questions.
Select answers that are long and complicated.
- How many attackers were there? 11 to 15.
- What did the mage look like? Crocus colored brooch.
- From what direction did the attack come from? Northeast.
- Where did they depart? Northwest.
Owlrich calls Bryda to take note of the answers because he can't remember all of the answers.
Enter the tent:
Go around the clearing - fence of the camp to be at right and back of the camp.
Use the knife to cut the rope barrier. Check the closest stone pillar. Geron can still sense life.
Tent: Enter the tent. Look around.
Check the small box on the dresser at left. It smells awful and has strange symbols on it.
Check the pillow and rug under the dresser.
Check the cushion Geron sat on last night.
Check and take the exotic cucumber on the table at right.
Check the small box with red and white camel on it - like a card game.
Examine the bed and Geron moves the pillow to expose a shiny object. Take the key from expose area of the bed. (This will trigger Bryda to check the tent).
Examine the wall hanging beside the bed. Use the knife on the wall hanging. Exit to the outside.
Fourth pillar: Geron sees the fourth pillar behind the tent. It is holding the Mask of Malakkar from Fahi's dream. Fahi is hiding things.
Examine the mask and Geron notes that the pillar has the mask firmly in his hands.
Get the mask:
Cart: A cart blocks the way out. Check the cart.
Take the wedge holding the cart and it rolls to the right.
Chest: Go across the water. Check the locked chest. Use the key from the bed to unlock the chest.
Open the chest and see the glass bottle with the fortress inside. Take the chisel. Leave the chest open.
Exit the camp and go left around the clearing.
Distract Owlrich again: While standing behind the left stone pillar, use the destruct spell on the glass bottle in the chest. The chest is seen at right edge of screen.
Owlrich turns to check the noise. Take the hammer from the bag leaning on the pillar.
Stone pillar: Go back to the stone pillar behind the tent.
Use the repair spell on the broken bottle with the fortress in the chest.
In inventory combine the hammer from the bag and the chisel from the chest.
Use the hammer and chisel on the mask held by the 4th stone pillar. The mask is taken. Save game here!
Right click the mask in inventory.
Caught: Go left and Owlrich and Bryda catch Geron.
Owlrich sees the mask and recognizes it. He takes the mask and goes back to the academy to study it.
Bryda is left to question Geron.
If you answer truthfully; get the Honesty is the best policy achievement. Does Bryda know who you really are?
- A powerful magic weapon.
- It was behind the tent.
- Geron.
Then go back to a saved game and give answer that makes it exciting for a bored Bryda:
- I don't know.
- It belongs to me.
- Geron.
Bryda: Bryda allows Geron to go. Ask all the questions.
Learn that Bryda is a novice at Academy's combat training. Learn also that there are 5 people in the mob and that they met at the inn. They don't know what happened to Fahi. Owlrich collects artifacts and that once he went to the Rashtulian Wall in Drakonia. Bryda doesn't know the riddle.
Find more clues about the mob:
Geron's home: Geron deduces that there is a witness to the attack - a fifth person escaped. Nuri will sleep while Geron investigates.
Exit the house. Look around outside. Check the well, the pigs and the stocks.
Marketplace: Take the center street to go to the marketplace. Check Rondra's temple.
Merchant: Talk to the merchant now occupying Hilda's booth.
Learn that a thief stole a glass box from him. The thief has a long staff on his back.
Check the bathing children and shepherd at left of screen.
Fat Ham Inn:
Enter through the Fat Ham Inn taproom door where Bryda says the 5 people that formed the mob came from.
Jacomo Nauta: Talk to Jacomo. Jacomo witnessed Fahi use the transformation spell. Learn that Sadja took part in the battle between the demonic hordes of Borbarad and alliance of heroes led by Rohal the Wise in the Gorian Desert. Now no one remembers her name because there were no survivors.
Jacomo wants Geron to get him wine from Hilda's bar. He gives his wine jar.
Jacomo says that the 3 drunken men at the next table and also 4 others that left were here last night.
Jacomo explains what will happen to Nuri. She has to be close to fairy magic or she'll lose what makes her a fairy. Her body is her greatest source of magic. Nuri will forget her experiences, Geron, everything.
Roast pig: Turn the roast pig in the fireplace to obtain the Crispy achievement. Turn the pig on the grill.
Wine: Check the wine barrel on the counter left of Hilda. It was promised to someone else.
Use the destruct spell on the wine barrel. Use Jacomo's wine jug on the leaky wine barrel to get red wine.
Repair the wine barrel. Give the red wine to Jacomo.
Find the 5th person:
Interrogate the drunken men: Save game here!
Talk to the drunken men-group of heroes.
Question the lumberjack, Thorwalian and sleepyhead twice.
Express suspicion.
Answer the next question: The Thorwalian is lying.
When asked why you thought that:
If you select He keeps dodging my questions or He isn't hung over; obtain the Nosebleed achievement. The Thorwalian takes Geron outside and hits him. Do you have the guts to start an argument?
Go back to the saved game and select: He wasn't even here. Get the Master Detective achievement. Find out who of the adventuring party lies at the first try.
Hilda: Hilda stops Geron from upsetting the men. She admits that she is the fifth person in the mob.
Hilda recalls what happened last night. The demon with lots of horn and a staff on his back (just like the princess) changed the mob into pillars.
Demon trap:
Bryda: Bryda arrives and calls Geron outside.
For a demon trap, Bryda wants a drawing of the demon, bait to lure and astral accumulator.
She gives the Odem Arcanum-Hare's Eye (seen now as another spell left of the inventory bar). It can see traces of magic. It works only for 3 days.
Use the Odem Arcanum and click on the purple glow. Geron picks up a heap of shards.
Use the repair spell on the heap of shards. Some parts are still missing.
Demon bait:
Geron's house: Go to the well in front of Geron's house. Use the Odem Arcanum spell and see that the track leads to Geron's window.
Enter the house and use the Odem Arcanum spell. See a glow under the dresser. Click on the magic glow to get purple shards.
Combine the purple shards and the heap of shards. Use the repair spell on the combined heap of shards. An ugly glass box is formed. One piece is still missing on top.
Merchant: Exit the house and go to the merchant at the marketplace.
Show him the glass box. That was the glass box that was stolen There was a ruby on the lid. Several boxes with rubies were stolen in Middle Realm.
The merchant wants the box back but it broke into heap of shards again.
Taproom: Enter the inn.
Use the repair spell on the heap of shards to get glass box.
Wine: Check the wine barrel on the counter left of Hilda.
Use the destruct spell on the wine barrel again.
Use the glass box on the leaky wine barrel to get wine bowl.
Repair the wine barrel.
Demon drawing:
Hilda: Talk to Hilda. When asked about the attacker; Geron asks for a drawing.
Hilda gives a rough sketch. Geron wants another eyewitness report.
Demon bait continued:
Exit the inn. Go right to the Academy of Magic. Enter the gate.
Courtyard: The guard stops Geron. Tell him that Geron wants to talk to Owlrich Bodiak. See Master Bodiak on the second floor window.
Look around the courtyard. Check the coral braziers, Circle of Gods, latrines and straw dolls.
Enter the building.
Owlrich Bodiak: Enter the door left of the staircase. Talk to Owlrich completely.
Library: Enter the door at right. Check the tables.
Shadow: See a shadow moving in the bookcases at right. Talk to the shadow.
The shadow got a new spell from Punin. He can harden what is soft. He made honey as hard as stone.
Learn that astral accumulator very rare. He stole Old Owly's astral accumulator and it is now in the dormitory.
Show him the wine bowl. The shadow wants payment for hardening the red wine on the bowl
He wants something unusual from the Tulamid tent.
Give the strange cucumber to the shadow. The wine bowl now has a forged ruby. Geron has to hurry since the spell won't last long.
Astral accumulator:
Dormitory: Exit the library. Go down the hall to the dormitory.
Save game here! Geron is standing at the doorway of the dormitory.
Step on the brittle floorboards by Geron's feet 3 times. Obtain the Clumsy Oaf achievement. Shards crack loudly.
Go back to the saved game and this time, be quiet so that the student will not hear you.
Go left behind the red curtain. Continue to the left behind the left beds.
Go between the first and second bed on right side.
Repair the glass shards on the floor between the third and fourth chests on back wall. It becomes a pot.
Use the Odem Arcanum spell and see the magic glow on the fourth chest.
Click on the magic glow to get Geron to open the chest and take the lantern shaped power accumulator.
Go left and take the blue egg-power accumulator beside the student without being caught.
Exit the dormitory by the same route: go back to the chest area, between the first and second bed; around the back left wall, red curtain and out the doorway.
If you get the astral accumulator without being caught, obtain the Masterful Sneaker achievement. Tread lightly.
Find out the true astral accumulator: Go back to the library.
Show the 2 power accumulators to the Shadow. Shadow verifies that the lantern shaped one is the astral accumulator and that the blue egg is a talisman.
Demon drawing continued:
The drawing made by Hilda is a rough sketch and Geron wants another eye witness.
Exit the academy. Go to Geron's house and then left to the forest.
Stone pillars: Be at the campground.
Check Owlrich's bag leaning on the left pillar to get a magic seashell. It is the one used by Owlrich to talk to the pillars. Right click the magic seashell in inventory.
Use the magic seashell on the stone pillars.
The magic seashell gets a good memory of the demon from the stone pillar behind the tent. Geron added to the rough sketch to make it a good sketch.
Contact the demon:
Give the fake astral accumulator-blue egg to Bryda Get the Baited achievement.
Now give Bryda what she asked for: good sketch; forged ruby and lantern shaped astral accumulator.
Geron hears a voice that asked - How much farther is it? How far is it to Drakonia?
Bryda gets tired and collapses when eyes appeared on the trunk and branches of the large tree in the back.
Hear I am hungry, I need to eat.
As Sadja.
Camp:
It was Sadja's voice that they heard. She is hungry and asks food from Rachwan. Rachwan wants the silver platter as payment.
Look around to see if she can feed herself. The Staff is scared of his future with Sadja.
Collect the wooden logs from fireplace, pelt from Khoram beast and rope by Rachwan.
Pick up dandelion by the bush that can be used as hiding place.
Take the stick by the tree roots.
Prepare a trap:
Check the hole left of the tree. There's a rabbit in there.
Use the dagger on firewood to make them pointy wooden stakes.
Lay the pelt on the flower meadow right of the stone path.
Use the wooden stakes to get fastened pelt.
Take the stakes and see that the pelt has holes now. One stake is left to hold it in place.
Use rope on the pelt with holes. Sadja threads the rope through the holes of the pelt to get tied up pelt. The end of the rope is in the bush that can be used for hiding.
Use the stick on the tied up pelt.
Place the dandelion on the flat stone close to the tree roots.
Get more dandelion right of bush.
Use the dandelion on the rabbit hole at left.
Go to the bushes with end of rope. See the rabbit eat the dandelion by the hole.
Click on bushes again and Sadja moves away. The rabbit eats the dandelion by the tree root and moves to the pelt.
Click on bush again to pull the pelt trap.
Obtain the Firun's Disciple achievement. Catch the rabbit at first try.
Fix dinner:
Take the closed trap - rabbit.
Take the flints that Rachwan gives. He wants the staff as payment. Ignore him.
Place the wooden stakes in the fireplace.
Use the flints on firewood. The Staff thanks Sadja for not giving him to Rachwan.
Rachwan stands and hits Sadja on the head.
Sadja wakes up and realizes that Rachwan took everything except for the mask and the flint.
Go to the hills at left screen to follow Rachwan.
III
Get the Chapter Two complete achievement.
Trail:
Crossroad: Sadja sees that the path splits left and right. Both paths have tracks.
Sadja picks red berries and lays it on the ground at the crossroad.
Forest maze: Save game here! You can place berries on the ground at start and end of path to mark where you have been.
If you roam the forest and meet a fox, obtain the Phex be with you achievement.
To meet the fox; go from crossroad: Go top right, up, top right, up, up. Meet the fox and get the Phex achievement.
If you roam the forest long enough, get the Journey's the Reward achievement. The forest is my home.
See beast, boars in the forest as you trek along. Pick up blue berries to mark specific routes that you want to take.
After a certain time, see an exit door at top right of screen. You can use it to skip the maze puzzle.
Look for stolen items in the maze:
After getting the achievements go back to the saved game.
Remember to place berries on the ground at start and end of path to mark where you have been.
Rope: From the starting point: go to bottom left, middle (see the dagger on the tree), top right, top middle, top middle, top and top.
Be at a monolith with the mountain as backdrop. Take the rope with a loop-rotten rope.
Dagger: Trace the way back to the dagger. Go bottom left, right, left, bottom right and right.
See the dagger at top of tree and rabbit remains on the ground by the tree. Rachwan was here.
Use the rotten rope on dagger. Pick up the dagger.
Thorn bush: Go upper right, top middle, top middle, top and left.
See a thorn bush that blocks the path at left. See the dusty silver platter within the thorn bush at left.
Use the dagger on thorn bush to make a path.
Try to take the silver platter. There are small spiders there and Sadja says to leave it there.
Spider: Go left and see a giant spider web with a giant spider behind it. The staff is on the spider web. Ah, a trap.
Take the shrub at right. Tie the shrub with the rotten rope to get bundled up shrubbery.
Use the flints on the bundled up shrubbery to get fire.
Use the fire on the spider web. Take the staff.
Find Rachwan:
Go top path over the tree trunk and be at cliffside. The Staff still does not trust Sadja.
Get the Level Up achievement. Defeat the spider.
Destroyed camp: Go top and see a destroyed tent.
Check the tent and see that the people left in a hurry. Check the campfire.
Check the dead horse and Sadja said that Rachwan might have poisoned his dagger. See an arrow on the tree.
Go up along the path 3 times. Take the upper left path and out into the sunlight.
Waterfall and mountain: Sadja sees people by the waterfall. One of them looks familiar.
Follow the path to go down the mountain.
Rondra Amazons: See 2 Rondra Amazons. One of them is wounded by the Ferkina's poisoned dagger.
They know that Rachwan is an outcast. Rachwan the Ferkina is hanging upside down over water.
Talk to the Amazons. Do not tell the truth. Select lie or ask a counter-question; then change the subject.
Select all dialogue to learn that the red lioness is a symbol of their goddess. When the lioness speak; we obey.
She will not release the Ferkina. The young Amazon says that it will take a divine miracle for her to release the Ferkina.
Ferkina: Sadja needs Rachwan the Ferkina to get through the mountains.
The Staff has a plan but he needs the Ferkina's necklace.
Get the necklace:
Look around. Check the helmet and shield of the Amazon on the left. The shield has the red lioness - symbol of the goddess.
Check the Amazons, the large waterfall at background and the small waterfall on the stream below the hanging Rachwan.
Examine the Ferkina. See that his necklace is hanging down close to the water.
Check the rope and see it over a branch of the tree.
Study the piled rocks at right that has rock drawings.
Necklace: Take the stone on the other side of the stream. Use the stone to block the small waterfall at foreground.
Go right to be on top of the ledge.
Use the dagger on the branch that spread part of the rope. Get a branch. The rope loses the support and sags a little to lower the Ferkina. The necklace is now dipped in the water.
Use the branch on the large waterfall at background. Sadja throws the branch and it flows down the creek.
The branch hooks the necklace and is caught by the stone on the small waterfall.
Go down and get the branch and Rachwan's necklace.
Free Rachwan:
The Staff explains how the vision spell works. Vision spell sends visions to other people if one has a personal item of the vision receiver. Choose 3 objects which will determine the vision content.
Send a vision to Ferkina: Use the vision spell at end of the inventory bar with the Rachwan's necklace (personal item).
See circles that can be chosen for vision content. Select 3 of those circles to convey the idea for the Ferkina to be friends with the Amazons.
Select the Ferkina at center, the campfire rock painting at right and the old Amazon at left.
That didn't work. The Ferkina was not receptive to being nice.
Send a vision to the younger Amazon: The younger Amazon gives Sadja her red piece of cloth from her cloak to gag the Ferkina.
Use the vision spell at end of the inventory bar with the young Amazon's piece of cloth (personal item).
See circles that can be chosen for vision content. Select 3 of those circles to convey the idea to free the Ferkina.
Select the Ferkina, the fruit rock painting and the Amazon shield that has Rondra's symbol.
Release the Ferkina: Talk to the young Amazon and she believes that her goddess told her to release the Ferkina like a fruit dropping. This is the divine miracle that she mentioned.
The Amazon asks Sadja to take the Ferkina and place him on the horse. Release the Ferkina far away from them.The horse will return to her.
See the tied up Ferkina by the path close to the forest. Use the knife on the Ferkina. The Staff warns Sadja about releasing the Ferkina.
Once freed, the Ferkina attacks Sadja. The Staff turns the Ferkina's hands into stone with the petrify spell.
The Ferkina is howling. The Staff scolds Sadja. Sadja said that she fell and the Staff caught her.
Sadja orders the Ferkina to take her to Drakonia; feed and guard her. Or else she will not change his hands back or completely turn him into stone.
As Geron.
Geron at campground:
Fahi: Geron wakes up beside Fahi and a campfire. Talk to Fahi.
Select Dreams. Fahi warns about continuing the dreams to Drakonia - the story of Sadja is harmless but the end of it is not.
Select Demon. The Staff is the demon.
Fahi insists that Geron concentrate on the riddle.
Select The ruby is the stone; Sadja's heirloom as the descendant of the mogul.
Bryda: Bryda wakes up from the same dream about Sadja. Geron looks to introduce Fahi to Bryda but he is gone.
Geron asks Bryda what she knows about Drakonia. Bryda says that it is an ancient fortress at the Rashtulian wall. Owlrich is the expert on Drakonia.
Bryda realizes that Geron is not just a simple would be hero. Geron will tell Bryda about it all.
IV
Obtain the Chapter Three complete achievement.
See Nuri at the forest. She can fly now. Select all 3 memories. Realize that Nuri is beginning to lose some memories.
Academy courtyard:
Master Owlrich Bodiak is not in his office.
See the young novices and a lecturer at the Circle of Gods.
Check the latrine at right. Bryda comes out and explains that it is her detention.
The lecturer scolds Bryda for telling where Owlrich's house is located and tells Geron to leave.
Master Owlrich Bodiak's house:
Outside: Knock on the door and see that it is locked.
Talk to Shadow hiding left of the house. Learn about Bryda.
Open the door: Talk to the crows at right foreground. Nuri is one of the crows.
Talk to Nuri. Learn that Owlrich is inside the house.
Geron asks Nuri to fly into the house and find a way for him to get in.
As Nuri: See books, lockpicks and ruler in Owlrich's office. The books are on top of the lockpicks and are too heavy for Nuri.
Take the ruler at right and use it on the books. The books are toppled on the floor.
Something falls into a hole on the floor.
Pick up the lockpicks. See the mirror reflect the human Nuri. Nuri flies out the window.
As Geron: Use the lockpicks on the lock of the door.
Inside the house: Enter the house. See Owlrich as a statue. His hand is inside the open drawer.
Touch Owlrich and he collapses as a heap of dust. Obtain the Doombringer achievement. Ashes to ashes, stone to dust.
Use the repair spell on the heap of dust and Owlrich is back in shape. Touch him again and he turns to a heap of dust.
Do this at least 10 times to obtain the Sadist achievement. Stone, dust, stone, dust. (Thanks, Marjo!)
Attic: Go upstairs and look around. Check the skull on the post.
Take the broom. Check the door and the lock.
Heap of dust: Go down and look around.
Check the drawer that the statue had his hand in. It is full of dust.
Use the drawer on the heap of dust that is Owlrich. This mixes all the dust together.
Repair the mixed heap of dust and see Owlrich holding a key.
Get the key dust: Use the broom to sweep the dust to the right.
Use the repair spell on the swept heap of dust. Now the key dust is reachable.
Take the lit candle left of door. Use the candle on the key dust the statue is holding.
Take the waxen mold. Touch the statue with key again and they turn to dust.
Take the pot of honey from table. Use the honey on the waxen mold to get waxen mold with honey.
Get a key: Go outside and talk to the Shadow again. Geron tells him about Master Bodiak.
Use the waxen mold with honey on Shadow to get enchanted waxen mold.
Use the knife on enchanted waxen mold to get key.
Master Bodiak's office:
Go back inside and up to the attic. Use the key on the office door lock.
Enter the office. Look around. Check the charcoal drawings and list by window.
Take the container from the desk.
Secret compartment: Check the drawing of a fortress on a mountain. Geron takes the map off and sees a secret compartment.
See a petrified rat and drawing of studies. Examine the studies. Learn that Owlrich failed to get the mask but got the ruby.
Touch the petrified rat and it turns to dust.
Strange gleam: Examine the strange gleam on the floor. Geron wants to lift that thing out of the hole.
Look at secret compartment again. Collect the petrified rat's heap of dust with the container from the desk.
Use the container of dust on the hole with strange gleam. Geron pours the dust into the crack.
Use the repair spell on the strange gleam. The rat pushes the ruby out of the hole. Take the ruby. It's cracked.
Geron says there is someone next door and collapses.
As Sadja.
Ice wall:
Sadja cannot climb the ice wall. Rachwan refused to carry her up unless she turns his hands back to normal.
Staff, mask and spell: The Staff remembers something. He asks if there are letters inside the mask. Staff reads the writing inside the mask. He tells Sadja to place the mask on the Ferkina and he will Fulfill all your every desire.
Talk to the Staff. Learn about the mask.
The Staff teaches the petrify spell. Petrify spell can be used to turn living things into stone. The Staff cannot remember how to transform beasts and people.
Use the petrify spell on the plant at top of the ice wall twice.
The Staff has been here before. He was looking for a garden.
Look around. See Drakonia at background.
Talk to Rachwan. He says the cold is only in the mind.
Make fire: Sadja is cold. Check the fireplace, grass and thorny bush by the Ferkina.
Place the branch on the fireplace. Try to light the branch with the flints. It's too windy.
Use the petrify spell on the thorn bush right of the fireplace. It acts as a cover from the wind.
Use the flints on the stick-branch now to get large fire.
Make Rachwan cold: Since he says the cold is only in the mind. Let make his mind cold.
Use the vision spell on Rachwan's necklace.
Click on icy glitter at left; icicle on dragon statue and snow on rock pile at right.
Rachwan gets cold and sits by the fire.
Make Rachwan a slave: Petrify the grass that surrounds the sitting Rachwan. The Ferkina is trapped.
Use the mask on the Ferkina.
Select the correct words said by Staff:
Fdan Fasgadan Esplas de Quatan! (#2)
Hmurilor Grasz Ferell Goran! (#3)
Hll Bemutir Gherul Fellan! (#2)
Juntir Quatan Pheluntir Sodan! (#1)
The Ferkina loses his memory. Sylva gets mad at the Staff.
As Geron.
The demon:
Attic: Geron wakes up. Hear a voice thanking Geron for the ruby. The ruby is gone.
Go left to the attic and see the demon. The demon says that after the ice wall with the help of the Ferkina that lost his memory; Sadja is at the gates of Drakonia.
The demon wants Geron to prove himself by answering the questions raised by the masks on the gate.
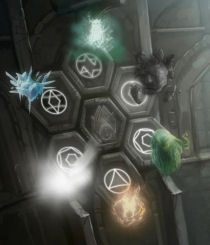
Element masks: 6 masks appear. Identify the element they represent by the riddle they say:
On the post at center: Keep me fed, or I will vanish away. Keep me in check, or I will harm you. Fire.
Top left on the ceiling: Like my sister, I am sometimes hot, sometimes cold and always in motion. But unlike her I am always the same. Air.
Bottom left: Keep me far from my sister in the middle. First she steals my form and then my substance. Ice.
On the floor at right front: I know the world like no other. One can reach through me, and yet I hide the greatest secrets. Water.
Left of door: I am the sister with the greatest patience. I shape my treasures for eons and bear the face of the world. Ore.
Top right at wall: Of all my siblings, I was the last to come into being. I give life to all, yet as I give, I also take back. Earth.
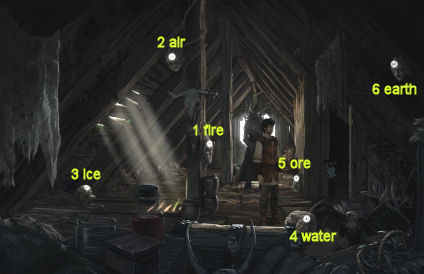
When correctly answered, the masks disappear. The demon says the gate to Drakonia is now open to you.
Go to the demon and look at it. Is it also petrified? The demon holds a book.
Bryda arrives. Bryda reads the book held by the demon. She reads the parts written by an air elementalist.
V
Chapter Four complete achievement received.
As Sadja.
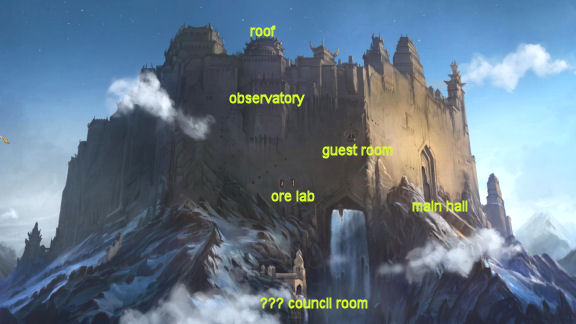
Drakonia:
Sadja: The Admiral Wachim wants Xerxes the elementalist to help in the war by using his power. Xerxes explains that the elementalists are not warriors. Xerxes does not think that the balance of the sphere are threatened.
The gate opens and Sadja enters. Xerxes welcomes Sadja to the Council of the Elements.
Talk to Xerxes. Sadja explains that she came from Fasar on foot and wants to fight in the war at the Gor.
When asked about doing magic; hand over the mask to meet the prince.
Tour: Xerxes shows Drakonia to Sadja. Drakonia was built by the dragons. When asked about the mask, give any answer. Drakonia is the oldest structure in Aventuria.
They pass through a room with spheres floating in the ceiling. Xerxes says that those are star systems that is not our own. They might show the past or future.
Garden: They climb another staircase to a garden. There are ripe zucchinis. Xerxes explains that the Council stays out of war while the balance of sphere is not disturbed.
Across the balcony is the Flying Fortress of Keshal Rhi held up by air elementals.
Learn about the prince. The fortress is carried by floating stones. The prince is a master of air elementals and controls those spirits that holds the fortress up.
The Holy Army in the fortress are clerics. Another army comes from Zorgan to Gor desert. The Holy Army will join them there.
Xerxes has weak legs and an air spirit has carried him through his life.
Prince: The prince is in this hole. Xerxes brings Sadja to the prince.
It is a trap. The prince is a prisoner. Talk to Xerxes. The prince tampered with the floating stones holding up the fortress.
This place is above the room with the spheres and is held up by them.
Xerxes wants Sadja to give him the mask, staff and dagger. Save game here!
Get the Renegade achievement if you throw all 3 items in the chasm-abyss.
Go back to the saved game. Obtain the Being Kind achievement if you give all items to Xerxes.
Sadja talks to the prince. It is the prince that had her thrown out of the palace. Kasim states that he is the sole heir of the Mogul dynasty.
Xerxes takes Sadja to a more comfortable place and tells her that they will send her back tomorrow. He has air spirit watch her.
Escape the room:
Look around the guest room. Check the bed, plant and the flying fortress.
Exit the room through door at right. Meet Xerxes at the dragon hall. He sends Sadja back to her room.
Air spirit: Inside the room, see that the plant's leaves are swaying but there is no wind here.
Sadja touches the plant and an air spirit in bird shape comes out.
Talk to the air spirit.
- Play with me.
- Let's play hide and seek!
- You hide me from the magicians.
If the correct answers are selected the first time; obtain the A Knack for spirits achievement. Persuade the spirit of air to help you straight away.
Talk to the Admiral Wachim:
The air spirit lifts Sadja outside the building. Select the room you want the air spirit to take you.
Select the bottom central structure labeled ???
Admiral: Sadja talks to the admiral. The admiral would not take her because she has no weapon and has been manipulated by Kasim. He would not take any risks.
They want to know the prince' evil plan but would not allow Sadja to come near him.
The weapon is anything blessed; since they are fighting demons. The other man Ariarchos is a deont and can bless the weapon.
Map: Click on the map in front of the 2 men. Demons are pouring out of the portals. The war in Borbarad is in 3 days time. The flying fortress is sacred ground and they will bring it to fight the demon army. The demon army is invulnerable to common magic. The Council of Elementalists would not help because there is no threat to the balance of the spheres.
Room: Look around the room. If you exit to the Dragon Hall via the stairs, you will be returned to your room by Xerxes.
The exit to the outside (follow the river course) is to the left.
Water coming from the waterfall outside flows around the council table where the Admiral and Ariarchos sit.
Check the underground vault and see that it is all one large room.
Lantern: See a bright lantern on the column left of stairs. It sounds different from others. Like it is singing.
Check middle and right lanterns. Check the seal under the right column lantern. It is warm.
Get a weapon:
Go outside to the left exit. See the Drakonia. There are 2 windows to the left of the waterfall. Enter the left window.
Ore laboratory: See the ore adept working on a magic instrument. If he catches you, he will call Xerxes. The dagger is beside him.
Look around. See a broom, tea table and water kettle on stove.
The staff is on the table on the table at right. Above it is a stone face. A whetstone, tablet and ores are on other work table.
Distract the ore adept: Pick up the water kettle and place it on the hot stove at right.
Immediately exit through the window to the outside.
Immediately enter the right window and pick up the dagger from table. Go through the left window again.
Admiral and Ariarchos: Go to the council hall left of the waterfall.
Use the dagger on the men and Sadja will ask that it be blessed. Blessing will take time.
Exit to outside.
Find out the prince's plan:
Woman: Exit to outside. Go the roof of the building. See a woman looking down the hole of the prison and an earth adept working on the garden. If caught, you will be sent back to your room.
Observatory: Remember that Xerxes said that the prison where the prince is held is just above the spheres and that is what is holding the platform up.
Go to the sphere's room by entering the observatory at center of the building.
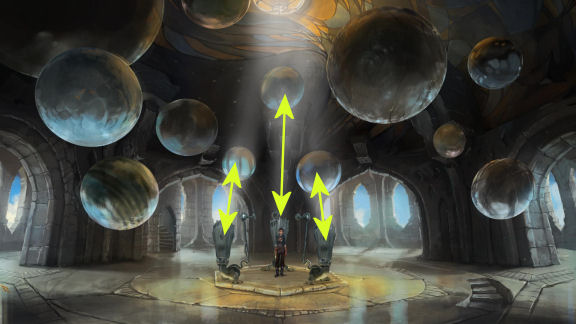
See a room with spheres floating at the ceiling and 3 horns on the floor at center of room.
Look at the ceiling and see stained glass.
Eavesdrop on prince: Click on a horn and turn it by clicking on a sphere above it.
Turn the 3 horns to focus on the 3 spheres under the stained glass on the ceiling. Hear whispers that gets louder: find the garden, name is mask.
When all 3 are focused correctly on the appropriate 3 spheres, hear the prince talk with a woman.
Learn that Kasim wants to find the garden and that he needs the mask. He wants to restore the realm of his forefathers while these people are busy with the war,
Get the Big Brother achievement if you do this correctly the first time. Adjust the horns towards the spheres.
Admiral and Ariarchos: Go to the council hall left of the waterfall.
Tell them what Kasim plans. Ariarchos knows about the Garden of Oblivion, a legend. It is a hidden cave in the Rashtulian Wall. It is a place that is forgotten by time itself. The legend also mentions about a mask.
The admiral is not interested on the prince anymore if that was his plan.
Bryda and Geron discuss the garden.
Back to Sadja; she asks if she can now join the army. Ariarchos likes her and the Admiral approves. They will sail at dawn.
Xerxes floats down the stairs and is told that Sadja is not part of the army. This means that she can roam freely.
Ariarchos will go to the library to research about the garden.
Information about the garden and mask:
Exit to the Dragon Hall via the stairs. Go up to the Main Hall.
Library: Climb the ramp or click on the balcony at right to be in the library.
Look around. See a giant ice statue and below it is a large stained glass window. At the center of the stained glass window on the floor is an odd indentation.
Reading room: Back out and go to the reading room where Ariarchos is researching.
See a bookcase with some books flying out intermittently.
Talk to Ariarchos. An ice djinn gave Ariarchos books about the garden.
Learn that Halef ben Jalif, a servant of Mogul Mage Malakkar was sent here to find the garden. He never found the garden. If the mask is placed on a person it can transform one to a lifeless artifact - like a staff. Learn more about Halef ben Jalif.
Learn that the Garden of Oblivion has a buried magic word. The magic word will wake the power of the mask.
3 secret chambers will point to where the garden is located. An ancient entity - servant of the guardian of time (Satinav) guards it.
3 secret chambers: The chambers are located here in Drakonia. Ariarchos gives a drawing that marks the chambers.
The mask is needed to use the chambers.
Servant of Time: The servant of time sleeps in these 3 chambers. It waits for a mage to wake him. Only the presence of magic will disturb his sleep.
Satinav: Satinav is the Guardian of Time. He guards the Book of Time; so that no one will disturb or change the book.
Power of the mask: The mask gives a choice: sweet oblivion (loss of memory) or undo things that once happened as if they never came to pass.
Sadja: Ariarchos mentions her tattoo that marks her as descendant of Malakkar. Prince Kasim is his brother. Ariarchos warns Sadja about what she is determined to do.
6 Element Runes: Check the runes of the 6 elements that is above the archway. Click on a rune and Ariarchos will identify them.
In order left to right: fire, air, ice, water, ore and earth.
Find the mask:
Since the mask is needed to get to the garden, let's get it.
Ore laboratory: Exit the library. Go down the stairs on the left side of the main hall.
Talk to the ore elementalist to learn what this lab is for.
He's working on an elemental sphere that gives him a good feeling. The mask on the table gives him an uneasy feeling. He pounds the table and a goblet rolls on the floor.
Learn that he only research what makes him feel good. The staff is ensouled.
Staff: Talk to the Staff. The Staff-Halef ben Jalif responds with blinking bright eyes.
Hear only her side of the discussion since that is only what the air spirit spy can hear.
Sadja forgives the Staff-Halef ben Jalif. The Staff also allows access to the 3 spells when he is touched.
Identify feelings of items in the room: Click on an item and the ore adept will tell what feeling he gets from that item.
The ores at bottom right is important and valuable to the adept. The broken tablet makes the adept lose his will to live.
He is indifferent to the whetstone. He uses the magical contraption.
He hates the broom. The tea reminds him of comfortable times.
Get the ore adept to research the mask:
Make the adept lose interest on the ore he is working on: Pick up the ore adept's goblet from floor (personal item).
Touch the staff. Use the vision spell on the ore adept's goblet.
Select 3 items that make the adept get bad feeling. Click on broken tablet, broom and sphere he's working on???
He wants to stop working on sphere but there's no alternative.
Make the adept get interested on the mask: Touch the staff. Use the vision spell on the ore adept's goblet.
Select 3 items that make the adept get good feeling. Click on ore, tea table and mask.
Research the mask: The adept starts to hate the sphere and studies the mask.
He learned that the mask store memories-everything that happens around it.
He wants to reverse the effect and access those memories.
Reverse the mask effects: The adept wants to do a modification on the mask. He wants to infuse reversalis spell into a gem. Since the masks words have been recited; instead of taking memories it will give memories.
The adept needs a gemstone to use for the reversal spell. Give him the ruby.
Pressure the researcher. After telling the ore adept that her life depends on it, he works on the ruby.
Sadja wearing the mask with the ruby has a vision. The activate-deactivate spell is now back in inventory.
Test the mask with ruby: To show the adept, use the activate spell (which works on magical items only) on the magical contraption in front of the adept.
A second spell is remembered but lost when the mask is removed.
Use the send vision spell on the goblet. Then select broken tablet, shiny object on magical contraption and broom.
Now the ore adept wants Sadja to remove the ruby and wear the mask without ruby (reversal spell).
Click on Sadja and she says that it might mean that she will not see the mask anymore. (Either the adept will keep it and/or her memories will be lost).
Use the petrify spell on the ore adept and he changes into a crystal.
Collect all elementals:
Ore spirit: Pick up the shiny (???) orb on the magic contraption.
The stone face above the staff start grumbling. Sadja uses the orb on it and the ore spirit is taken.
Go outside through the window.
Earth spirit: Go to the roof and be at the garden. Talk to the earth adept.
Go left to the first bed and use the orb on it. Get the earth spirit.
Water spirit: Go to main hall. Go right under the library to be in an underground lake.
Look around and see an ornament on the floor. Above it is the glass ceiling which is the floor at the library.
Check the monument across the lake and the lake with the heartbeat.
Use the orb on the lake. Get the water spirit.
Ice spirit: Go to the library. Check the bookshelf with floating books.
Use the orb on bookshelf. Get the ice spirit.
Fire spirit: Go outside and then to the council hall left of waterfall.
Use the orb on left lantern that seems to be singing. Get the fire spirit.
After collecting these 5 element spirits; get the Elementalist achievement. Collect all elementals.
Table: Study the table and see that it has 7 runes engraved on it. It has the symbols of the elements with one other at the center.
Find the first secret chamber:
Seal: While at the council hall, look close at the seal under the right lantern.
Sadja finds herself in a small room with plants, stool and seal on the wall.
Remember what Ariarchos said about the secret room and servant of time. Awaken the servant of time by doing magic.
Click on stool to get Sadja to sit down and use the mask with ruby.
Use the petrify spell on 4 plants. Hear a voice that wants to be awaken.
Use the activate spell on the seal.
Servant of Time: The servant of time appears and tells Sadja the first story.
Satinav has a Book of Time. It has the present, past and future. Anyone that deviates from the path written in that book is punished. Their soul is removed from existence - erased from the book.
He is the servant of Satinav - Mnemoremnon; the Djinn of Time. He goes around correcting the errors that happens in the world. One day, a woman with a dead son came to Satinav and begged him for his life - an adjustment of time. Satinav would not listen. He, the servant took pity on the woman and created a tool - the mask. The mask was given to the woman.
Automatically, Sadja is in the council hall.
Find the second secret chamber:
Dragon Hall: Climb the stairs to go to the Dragon hall. Examine the dragon statues.
Dark corner: See darkness right of the entrance to the council hall.
Go there and Sadja will take a lamp of darkness. The darkness enters the lamp and light is restored to that corner.
Library: Go to main hall at top of screen. Go to the library and then the reading room.
Talk to Ariarchos and report about the secret chamber.
Underground lake: Go out and right to the underground lake.
Look at the ornament on the floor. Use the drawing given by Ariarchos on the ornament. Something is still missing.
Look at the stained glass window at the ceiling above.
Go to the library. Look close at the stained glass window on the floor in front of the ice statue.
Use the enchanted ruby with reversal spell on the darkness lamp. The lamp is now bright as the sun.
Use the reversed darkness on the ornament of the stained glass window.
Underground lake: Go back down to the underground lake. See that the ornament now flickers. It has 2 hands and the drawing at the center.
Sadja looks close at the ornament that has the beam of light from the ceiling. Automatically she is in the second secret chamber. Sit on the stool.
Servant of Time: Activate the seal to awaken the Djinn. The servant of time appears and tells Sadja the second story.
The djinn tells the story of the mask. The mask gives a choice to the wearer of the mask. Once the written ancient incantation is said; blessed forgetfulness is given - a new beginning.
If the wearer of the mask says his true name; he appears and gives them whatever they wish for. He takes from the past and brings it to present.
He has overwritten the tyranny of time. Not the name Mnemoremnon as the giants call him but his true name. Satinav tried to banish his name. But he built the garden in a place in the Los that Satinav could not see. Here he dug a hole and placed his name. A garden grew over it. My name in my garden - the Garden of Oblivion.
Find the third secret chamber:
Reading room: Go to Ariarchos at the reading room in the library and report to him about the second secret chamber. He writes down her every word.
Prison: Exit to the outside and go up to the roof of the building. Look down into the prison hole.
Hexagon: See a hexagon on the wall of the prison. The air spirit is here now.
Place the 5 element spirits collected in order as seen on the table in council room and the runes in the reading room.
Since the air spirit is already in place; place the fire spirit at bottom hexagon.
Starting at bottom going clockwise: fire, air (already in place), ice, water, ore and earth.
See the center hexagon show the 2 hands symbol with the line between them.
Touch the seal at center. Sadja flies down and automatically be in the third chamber.
Last story of the djinn of Time: Sit on the stool. Activate the seal to awaken the djinn.
Satinav is jealous of the secret garden. He separates it from the world. He does not know what happens in the garden. When something happens in the garden, Satinav's quill pauses while he writes in the Book of Time - a page remains blank. So Satinav decides that nothing inside the garden can have consequences in the real world.
But tell the event - whisper it (outside) and he writes it in the book. And it becomes true.
But if he finds out that one lies (about what happened in the garden); he will punish severely.
The djinn tells Sadja to go to the watching pillar. He will appear and show the garden to Sadja.
Geron and Bryda: Geron could not understand what the djinn meant about the branch. Bryda explains.
Garden of Oblivion:
The Staff: Sadja talks to the Staff-Halef ben Jalif before she goes to the Garden of Oblivion. She explain her reason for taking him from the tomb - she wants an audience to impress. Sadja apologizes to the Staff. The Staff responds that he would have proposed to her. She is scared to go to the garden but she needs answers. She asked an air spirit to take the Staff to war and she will meet him there after the garden visit. The Staff tells Sadja that she better be there or he'll come and get her.
Monolith: Sadja stands by the watching monolith. The inventory has the mask, rope and Sadja's almandin ruby.
(Thanks, Bert Jamin!) Move the cursor to the left and see an inscription on the stone wall - another monolith. Click and enter the Cavern of Fail and see Harvey the rabbit and Huggins. Obtain the Seek and Ye shall find achievement. Find the Caverns of Fail. Exit.
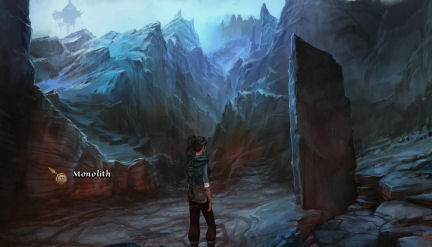
Go back out to the other monolith. Touch it and the seal appears on the ground. Touch the seal.
Symbols appear on the monolith. See a hole where the seal was before.
Use the rope on the monolith. Go down the hole to be in the Garden of Oblivion.
Mask: Sit on the rock stool. Sadja wears the mask. The djinn appears. Sadja dreams his name.
Kasim has the mask. He drops the ruby that he says is his on the ground. He says that his servant will say that the prince tortured Sadja to get the name. The name will be the truth once Satinav hears it. Kasim leaves with the rope.
Leave the garden: See that leaves sway with no wind around.
Click on the swaying leaves as it moves around the garden. The air spirit appears and takes Sadja up and out of the garden.
Servant of Kasim: A woman points a crossbow at Sadja and orders her to go back to the hole.
Talk to the street girl. She's afraid because she lied for Kasim. Satinav punishes the girl for lying.
Bryda and Geron:
There is something in the last page of the book but Bryda didn't have time to read it because of the noise outside.
Bryda comes back saying that the Tulamides have been seen in the forest. The townspeople as well as the army and academy are searching for them.
VI
Forest:
Obtain the Chapter Five complete achievement.
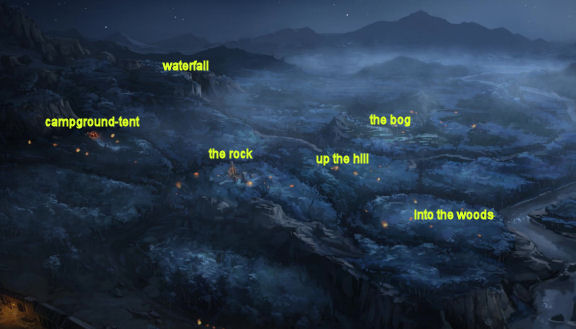
Waterfall: Nuri will search the forest from above and Geron will search the ground.
Forest: Go down to the forest. See the overhead view of the forest.
The lights are the torches of the search troops: army, students and townspeople.
Top left is the waterfall where Nuri and Geron were.
Left is the campground where Fahi's tent is located.
The rock at center is where the troops led by Sir Wrathling are stationed.
At right - into the woods is where another troops is located. It is led by a woman group leader with a young magician.
Up the hill at center near the rock at center is where another academy group leader is stationed.
At the bog at top of the forest area, there is a raft-tree trunk unattached to the brittle rope at other shore.
Moving light: See a moving light that goes from one station to another. That is the messenger.
Find out the deployment of the groups:
Campground-tent: Go to the campground-tent at left.
Bryda is given the responsibility of deploying the groups from one place to another in search of the Tulamides. The troops are halted. The lecturer allows Bryda to make the search decisions for a short while.
Talk to Bryda to learn that the orders comes only from the lecturer. The messenger runs from one camp to another carrying the order. The messenger carries an enchanted scroll visible in the dark only to mages. This identifies him as the messenger.
Geron is not allowed in the tent nor check the chest. Go back to the forest.
Find the Tulamides:
Sir Wrathling: Go to the rock at center of forest. Talk to Sir Wrathling and learn that the Tulamides were spotted east-west or west-east.
Go from one location to another and talk to the group leaders until Geron says that Nuri is back at the waterfall.
Waterfall: Go to the waterfall and talk to Nuri.
Send Nuri out on a route: Nuri search route should be what Sir Wrathling mentioned west-east. Start at the tent-campground; over the cliff-rock and to the river (bank).
Nuri flies back and says that she saw a little girl on a branch in a campsite where a woman is looking at a scroll by the river bank.
Tell Nuri to stay here.
Find a way to move the troop to another place.
In to the woods Group leader: Go to the forest and then into the woods at right where the woman group leader and young magician are positioned.
Talk to the group leader. She will not accept any orders unless the order comes from the messenger.
The messenger was here and gave order that the troop hold their position.
Find the messenger: Go back to the forest's overhead view. Look for the moving torch and then go to that camp.
Use the Odem Arcanum spell and see a magic glow. Click on magic glow.
Talk to the messenger and learn that he is very sleepy and tired. He says that he has been to all the groups. The magic scroll is blank; the orders are told to him and he relates those orders vocally.
Bog: Go to the bog at top of the forest area. See the tree trunk that is used as ferry from one side of the river to the other. The brittle rope is separated from the tree trunk.
Use the repair spell on brittle rope. Cross the tree trunk bridge to the other side.
Go right deeper into the bog and talk to the group leader. The mob is behind him. He is furious because the messenger has not given him any orders.
Go back to the left. Go to the left shore.
Use the destruct spell on the fixed rope. This separates the tree trunk bridge from the the right shore.
Find the messenger again: Go to the forest and look for the moving light.
Go there and use the Odem Arcanum spell to find the magic glow. Click on magic glow.
Talk to the very tired messenger. Send him on to the moor-bog.
Bog: Go to the bog to follow the messenger. See the messenger asleep.
Take the enchanted scroll beside him. Geron is now the messenger.
In to the woods Group leader: Go to the forest and then into the woods at right where the woman group leader and young magician are positioned again.
Now that Geron has the enchanted scroll; talk to the group leader and pass on new orders. The group leader orders the troop north to another woods area but left the young magician to guard.
Find Fahi's daughter:
Distract the young magician: Go back to Nuri at the waterfall. Tell her to distract the search party - young magician.
Nuri talks to the young magician and gets him to chase her.
Fahi's daughter: Go back to the - into the woods area again. Talk to the tree and Fahi's daughter drops down from branch.
Nuri says that the Fahi is already at the waterfall but the route from here to there is filled with troops.
Move the troops again:
Camp: Geron says to get help from Bryda and automatically go to the campground.
Enter the tent and learn that Bryda is the lecturer's successor. The lecturer is upset because of Bryda's delaying tactic.
Geron is kicked out of the tent.
Tell Bryda where to move the troops: Take the lantern left of the tent.
Go to the back of the tent. Use the knife on the tent wall to make a little tear. Look through the tent wall.
Bryda is given this last chance to redeem herself. Geron needs to tell Bryda where to move the troops.
Use the lantern on the map. Geron points a light on the map and Bryda understands. She moved the troops northward away from the waterfall.
The lecturer said there is now a gap in the area where someone can pass through undetected.
Bryda talks to Geron outside the tent. She was ordered to lead another search party close to the waterfall. She will take care of things. Bryda is excited.
Fahi and the demon:
At the waterfall, Fahi thanks Geron for bringing his daughter to him. They will leave Andergast. Fahi will not change Nuri back but his friend the demon will.
Demon: Talk to the demon. The demon is the Staff--Halef ben Jalif.
Owlrich was petrified because he stole his princess' ruby. The dreams are meant to fill-finish Sadja's story. They are the Staff's memories not Sadja's. The ruby is the key to the mask.
Nuri lost her memories now and flies away when Geron tells her that she will be turned back to fairy form.
The search party arrives. Geron begs the demon not to shed blood or make petrified attackers. To do what Geron asked, the demon changes Fahi and Geron into stone pillars.
VII
Obtain the Chapter Six complete achievement.
The Staff wakes Geron and make him dream of Sadja's final journey.
Armory:
Sadja enters from the passage to the armory. The fortress drops down in height after being hit and the passage is left above. The flying fortress is above the battlefield.
Sadja finds the Staff in a locked weapons cabinet.
Look down on the floor and see the floating crystal that holds the fortress up in air. A missile harmed it so they are now lower in altitude.
Find a way to open the locked cabinet:
Try to open the weapons cabinet holding the staff. This action drops the mace. Pick up the mace.
Check the weapons rack left of the cabinet. It can be pushed.
Vine: Take the vine between the rack and cabinet.
Use the vine on the locked cabinet door. Pick up the other end and place it on the weapons rack.
Try to push the tied weapons rack to the entrance but Sadja wants the weapons rack to be as heavy as she can make it.
Make the weapons rack heavy:
Collect items: Pick up the shuriken from the ground at left and the longsword from the rack.
Automatically the longsword is separated into scabbard and blunt longsword.
Go right and see a gap-place of impact on the stairs. There's a halberd and glasscase with a sword up the ledge.
Shield: See a shield hanging on the wall right of the stairs.
In inventory combine the blunt longsword and the shuriken. Use the longsword with shuriken on the shield.
Pick up the shield.
Makeshift bridge: Use the mace with the scabbard (from longsword) to make extended mace.
Use the extended mace on the gap-place of impact to make dangerous construction.
Place longsword with shuriken beside the extended mace to make rickety construction.
Use the shield over the 2 items on the gap to make bridge.
Glass case: Now, go up. Take the halberd.
Try to use the halberd on the glass case. Sadja can't swing it hard enough. Go back down.
Restructure the bridge: Take the shield and the extended mace from the makeshift bridge.
Put the halberd in place of the extended mace. Place the shield back over it. Climb up again.
Use the mace on the glass case. Take the heavy sword.
Weapons rack: Go back down. Take all the items laid on the gap.
Place the mace, heavy sword, shield, halberd and longsword on the weapons rack.
Sadja closes the weapons rack. Now that it is heavy enough for Sadja; push the vine tied weapons rack to the entrance.
Go to floatation chamber:
Staff: The weapons cabinet is now open. Take the Staff. The Staff is very happy to be with Sadja.
Sadja says that they have to get to the floatation chamber. The crystals that keeps the building in the air are kept in the chamber.
Kasim wants to get a crystal so that he can change it like her ruby and use the mask. He thinks he can get all the memories stored in the mask.
Rise to the passage: Look out at the entrance to learn that they are trapped here because they lost altitude.
Use the activate spell on the floating crystal on the floor. This raised the building. Go outside to the passage.
Floatation chamber: Enter the alcove to climb up to the top. See the building that has the floatation chamber.
Check the sky. Go right to walk to the chamber building.
Floatation chamber:
See the Admiral dead at the side of the hallway. Sadja is too late. Enter the chamber.
See Kasim already wearing the mask that is attached by tentacles to the main crystal at ceiling and the towers.
Friends: Talk to the wounded Ariarchos. He gives Sadja's dagger. They cannot bless the dagger; like the Gods refused to do it.
The Staff says that Sadja has to touch the prince to fight him because the combined power of the prince and crystals makes it difficult for the Staff to do magic.
Talk to Ariarchos. Give him piece of bandage.
Check the body of the Cleric of Praios at foreground to get the Praios scepter.
Check the body of the Cleric of Efferd at right to get the cleric's belt.
Search the body of the Cleric of Boron close to the tower 1's gate to get the cleric's quill.
Check the gate of the left tower. It is locked.
Magic shield: Pick up the stones at the rim of the ledge. Throw all 3 stones at Kasim. Kasim surrounds himself with a magic shield.
Talk to Ariarchos. He says that the shield is powered by the main crystal above Kasim and 5 floating crystals in the 3 towers.
If the crystals are turned off, the shield weakens. Ariarchos give the left tower gate key.
Towers: Study the towers from here. See that there are 3 towers. The tentacles weaves through them.
Between the towers are bridges - some are broken.
Between the towers 1 and 2 is a floating crystal at top level close to a ramp. A tentacle is wrapped around it; like it is feeding on the crystal.
Between towers 2 and 3 is another crystal also at top level. The bridges going to this crystal are broken. A tentacle is also feeding on it.
Deactivate Tower 1, Tower 2 and Bridge 1 crystals:
Left Tower 1:
Bottom level: Use the tower key on the gate. Enter and look around.
See 5 columns from left to right: empty, shield, statue, torch bracket and armor.
The shield has a panel on top that shows the location of this room marked red - bottom left.
Top level: Exit at right to go at top of tower 1.
See 5 columns from left to right: torch bracket, shield, armor, empty and statue.
Compared to the bottom level - The shield is at same position. The torch bracket and the empty column exchanged position. The armor and statue exchanged position.
Tower 1 crystal: See an active crystal on wall feeding tentacles. Touch the floating crystal and it gets deactivated. See that Kasim's shield flickers.
The tower lowers. Go down and try to exit. The exit is now blocked since the gate is underground.
Bridge 1:
Midlevel: Go back up to top level.
Exit tower 1 at right. Since the tower is lowered the midlevel bridge is accessible.
Pick up the ornamental head by the entry way.
Go right and see that the bridge to tower 2 is destroyed. Tentacles block the tower 2 entryway. Go back inside tower 1.
Tower 1 top level: Activate-touch the floating crystal. The tower rises.
Exit tower 1 at right and see the floating crystal beside the ramp.
Deactivate Bridge 1 floating crystal: Touch the floating crystal.
The deactivated bridge 1 crystal lowers to midlevel.
Tower 2:
Top level: Go right and enter tower 2.
See 5 columns from left to right: torch bracket, armor, shield, statue and empty.
Tower 2 crystal: See an active crystal on wall feeding tentacles. Do not touch it yet.
Bottom level: Go down to bottom level by entering the top left exit.
See that the tentacles formed a bridge over a hole.
See 5 columns from left to right: empty, statue, shield, armor and torch bracket.
Compared to the top level - The shield is at same position. The torch bracket and the empty column exchanged position. The armor and statue exchanged position.
Both exits at either side are blocked by tentacles. Go back up to tower 2 top level.
Deactivate Tower 2 floating crystal: Try to touch the floating crystal but cannot go near.
Use the ornamental head picked from tower midlevel bridge.
Pick up the crystal splinter from right.
Go left and note that the tentacles are attracted to the activated crystal splinter Sadja is carrying.
In inventory deactivate the crystal splinter to get sleeping splinter.
Access tower 2 from tower 1 using the midlevel bridge 1:
Climb the wooden ladder. Go left to tower 1.
Deactivate Tower 1 floating crystal. Go right and see the lowered crystal.
Use the belt on the crystal. Activate the lowered crystal to raise the pedestal but leave the crystal. The crystal is left here on midlevel bridge 1.
Activate the sleeping crystal splinter in inventory. Use the activated crystal splinter on the tentacle at tower 2 top level entryway.
The tentacle catches the thrown activated splinter. Then it goes to the active floating crystal of midlevel bridge 1. It formed a bridge to tower 2.
Deactivate bridge 1 crystal.
Now - Sadja has deactivated tower 1, tower 2 and bridge 1 floating crystals.
Deactivate Tower 3 and Bridge 2 crystals:
Bridge 2:
Go to tower 2 using the new bridge.
In tower 2, exit at right and see the tentacles on the wall that feeds on the floating crystal of bridge 2 at top level.
Touch the tentacles.
Tower 3:
Bottom level: Go right and be at tower 3 lower level.
See 5 columns from left to right: empty, statue, armor, shield and torch bracket.
Top level: Go upstairs and get a dark illusion sent by Kasim. The illusion is of 2 children: a boy and a girl.
The Staff advices to think of what this room should really look like.
Based on the items on the 5 columns at bottom level and know that the positions change in top and bottom level of a tower; deduce what are in the columns. The shield is at same position. The torch bracket and the empty column exchanged position. The armor and statue exchanged position.
Click on a column and select what should be there: torch bracket, armor, statue, shield and nothing-empty.
The illusion is removed.
Bridge 2:
Deactivate bridge 2 floating crystal: Go left to bridge 2 top level. The floating crystal is just out of reach.
Go down to bridge 2 midlevel and examine the 2 tentacles that holds the floating crystal.
Use the knife on the left tentacle to just have the right tentacle feeding on the crystal above.
Go back inside and upstairs. Exit to top level bridge 2.
Now that the crystal is closer; touch it to deactivate it.
Tower 3 crystal: Go inside and touch the floating crystal to deactivate it.
Now all 5 tower crystals are deactivated. The only one left is the main crystal in the ceiling.
Main crystal - Fight Kasim:
Exit through the window of the top level.
Use the knife that connects the shield to the main crystal above.
Sadja confronts Kasim. She tells him that it is not him that is the reason for this but to do great deeds that can go down in history.
Kasim throws tentacles with the mask and the tentacles hold Sadja.
Now he is touching Kasim. Deactivate the main crystal on the ceiling.
That destroys the connection to Kasim but also the crystal that holds the fortress up.
Battlefield:
The fortress falls on the field of battle.
Staff: Sadja is on the left and the Staff is at right. Check the Staff and Sadja stands up from the rubble.
See the casualties of war. Pick up the staff.
Amazon: Hear a cry for help. Go right.
See the young Amazon under a shield. Try to lift the shield off the Amazon.
Use the staff to pry off the shield.
Use the bandage on the young Amazon.
Monster: The monster behind Sadja moves. The staff is grabbed by the monster. The Staff tries to fight - his light flickers.
Xerxes: Xerxes arrives and extends his hand to Sadja.
For some moments, time stops; like Satinav played a prank and stopped time.
Xerxes does not realize that his hand scares Sadja more than anything because she has to face her ghastly failure.
As they fly away, the Staff can hear her screams: Leave me - take me back - I can't leave him behind.
Staff is back where he started but this time he remembers a princess. The Gorian Desert is filled with magic and astral lines cross there. For years, the Staff studied and learned and became powerful. After 400 years, he transformed his body and left the desert to go to Drakonia.
He wanted to find out what happened to his princess; a princess that entrusted her life to a shady magical staff.
VIII
Obtain the Chapter Seven complete achievement.
Bryda and the mask:
Alert Bryda: Bryda reads the book in front of Geron and Fahi's stone pillars.
Click on Geron and he tries to get Bryda's attention but he can't be heard.
Use the destruct spell on the power accumulator beside Bryda. The light of the power accumulator flickers.
Repair the ruby: Bryda talks to Geron pillar. She thinks she has solved the riddle. To complete the story and before she asks the demon to change him back; Bryda wants Geron to repair the ruby. The ruby has a crack.
Bryda places the mask on Geron. The ruby is on the mask.
Use the repair spell on the mask with the ruby. The ruby brightens.
Mask: Bryda recites the words written inside the mask while Geron is still wearing it.
See the Staff's first spell-activate spell is now learned by Geron. Bryda wants a sign.
Use the activate spell on the power accumulator. It brightens and Bryda gets excited. The vision spell is learned by Geron.
Reconstructed burial chamber: Bryda tells Geron that the Staff-demon made this place to resemble Malakkar's burial chamber; complete with the stone pillars in front of the tomb door.
The demon is back inside the cave and calls Bryda. Bryda enters the cave.
Return to normal form:
Call Nuri: Use the vision spell on Nuri's necklace.
Select the locations that will get Nuri to find them: mountain top, river and campfire. Nuri flies in.
Transform Geron back: Geron remembers how to do the petrify-depetrify spell.
Use the depetrify spell on Geron. He's too weak.
Send another vision to Nuri's necklace. Select Nuri the raven, power accumulator and Geron.
Nuri picks up the power accumulator and places it on the Geron pillar.
Use the depetrify spell on Geron again.
Geron and Fahi are back to their normal selves again. Geron asks Nuri to stay and wait for him.
Reason for the dreams and why Geron:
Enter the burial chamber.
See the demon-Staff sitting on a throne. He reproduced the burial chamber where 450 years ago he met a strange woman.
Geron asks for an explanation. The Staff explains his reason why he sent Geron memories.
The Staff wants to know if Sadja got what she wanted after they were separated. When the Staff left the Gorian Desert, he went to Drakonia where he read the journal written by the adept. He later joined with Fahi on the trail of Owlrich who stole Sadja's ruby. Owlrich wanted the mask to bring his dead wife back.
The Staff wants to understand what happened to Sadja. The Staff is terrible at riddles; so he went to look for experts.
The Staff wants Geron to tell what happened to Sadja - to determine her fate. Sadja went to the Garden of Oblivion so no one knows what happened there. Her fate that has never been told. The tale recited about what happened in the garden will be the truth; but if Satinav finds out that one lied, Satinav will punish the teller.
Talk to the Staff completely. The Staff thinks as opposed to Fahi's beliefs; that the riddle is insignificant because Sadja refused to translate-read it.
Bryda is here because she's a deserter and is hunted. She seeks refuge here. She wants to be the one to end the story.
Speculate on what happened to Sadja:
Place the mask on the bust of Malakkar right of throne. Tell Sadja's Story.
You can tell the story or not. If not, Bryda with nothing to lose says she will tell the story.
If Geron tells the story; Bryda takes over at the end of the story.
The Staff relates what happened to Sadja after she was brought back from the Desert. She was a shadow of herself; the only survivor of the war. Her great dream failed. She wanders the halls of Drakonia; a ghost of what she was.
On the 4th day, she was seen at the threshold and was told that it is cold in the mountains. She said: I am going to the garden to break my being.
They found the mask with Sadja's ruby beside it. The adept took the mask and ruby to Drakonia and hid them. For fear of Satinav, no one is to say anything about them.
Bryda finishes the story by saying that Sadja wore the mask; removed her memory and went to the deep part of the garden.
The Staff cries - My princess just died.
Djinn of Time:
Bryda says that Sadja's memories are now in the mask and she can learn the name of Djinn of Time. Bryda wears the mask and recites the words.
The Djinn of Time is awakened and asks Bryda what she wish. Bryda wishes for the glory of the past and her wish is granted.
The Djinn extinguishes the gray present and brings the past to to life.
It starts when the Staff-demon changes back to his old self - a staff. Black smoke comes out of the hole to slowly change the forest to that of the past Bryda wished for.
Fahi and the riddle:
Fahi calls Geron. Exit the tomb reproduction.
Talk to Fahi. The only way to stop what is happening is to prove that Bryda's ending - that Sadja removed her memories - is wrong.
Fahi wants Geron to go back to the tomb to find a crucial clue that will solve the riddle once and for all.
Go back inside the tomb. Pick up Sadja's ruby beside the bust.
Go outside and give the ruby to Fahi. One of Fahi's gift is he can read the past in items. Fahi sees the story of 2 children: Sadja and Kasim.
Ruby's memories: When the adept found the ruby by the mask; it had a crack and the reversal spell is gone. The adept reapplied the spell on the ruby and hid the mask and ruby.
Kasim shows gems to Sadja - one of them is a ruby. Kasim also brags about his tattoo; that shows his dynasty.
Kasim torments Sadja. Sadja tattoos herself to prove her own dynasty. Sadja was a poor girl from the street.
Fahi asks to recall what Sadja said outside the tomb when asked to read the riddle. Sadja didn't read the riddle over the tomb door.
Stop Bryda's wish:
Go back to the burial chamber.
Call Bryda from the black smoke coming from the hole on the floor. Bryda comes out of the hole.
Geron wants to tell the true story of Sadja.
Sadja sat down... pulled out the mask... looked into the mask... and despaired - in herself and her inability.
She could not read.
Satinav punishes Bryda.
Nuri:
Geron, Fahi and the demon-Staff are now outside.
The Staff says that he can now restore Nuri's body but not her memory.
Save game here! Choose to change Nuri or not.
Obtain the Finish line achievement if you choose to return Nuri back as a fairy. Make your decision. Nuri has no memory of what happened in the past.
Obtain the A gift called Freedom achievement if you choose to let Nuri be happy as a raven. Make your decision. Nuri flies away to go to the sea.
Obtain the Chapter Eight complete.
See how much Halef ben Jalif loves Sadja as he relates Sadja's story in the garden.
This document may not be distributed without express written permission of the author and the content may not be altered in any way.
For Questions or Comments on this Walkthrough,
Please write to: MaGtRoCopyright © September 2013 MaGtRo