The correct order of the solution to the riddles
The Dark Eye: Memoria
©
July 2013 Bert Jamin (www.gamesover.com)
This walkthrough, written by Bert Jamin, may not be sold and may not be used for
any commercial purposes. Neither is it permitted to publish this walkthrough in
any way without the written permission of the author Bert Jamin.
Feel free to place this walkthrough on your web site or on your home page, on
condition that no part of this walkthrough is changed and that the name of the
author (Bert Jamin), the URL of the owner of this site (www.gamesover.com)
and his E-mail address (bert@gamesover.com)
are mentioned unchanged. For the most up to date walkthroughs always visit www.gamesover.com.
If you have any suggestions to improve this walkthrough, let me know by sending
me an email: bert@gamesover.com
When you enter the Main Menu most things speak for themselves. There is one special entry though. It is called "Bonus". Click on it and notice that there are two entries. The one on top is called "Cinematics". Click on it and notice that you can watch the... uhhh... cinematics of the game that you have played so far. Click on "Achievements" and notice that there are several icons for some very special... achievements! At this moment all of these achievements are locked. To unlock an achievement you have to do a very special achievement. Of course I'll tell you all of these special achievements in this walkthrough.
Intro
Geron
Walk to the right one screen. Walk towards the clearing. Talk to the little girl. Try to enter the tent to the right. Open the chest. Take the glass bottle out of the chest. In your inventory cast your repair/destruct spell on the bottle. Try to repair the stick fortress of the girl. Cast your repair/destruct spell on the stick fortress. Use your glass shards with the stick fortress. Cast your repair/destruct spell on the stick fortress. Inside the tent talk to Fahi. Have a cup of tea with him. Save your game here!
If Fahi asks you if you like riddles tell him that you don't like riddles. Great... this is getting the job done! This ends the game but you will get your first achievement! Start the game and go to the Main Menu. Click on "Bonus" and click on "Achievements". Notice that the first achievement is unlocked now! After that load the game you just saved and this time tell him that you like riddles of course. When he asks you, tell him that you're ready.
Chapter I
Sadja
Talk to Rachwan, the warrior and to the magician. Exhaust all dialogs. Go down to the hall. Go to the right to the battle site. Pick up the dagger from the path in front of the monster. Use the dagger with Harun's bag. Notice that some stuff is falling down from the thorn bag. Go further down.
Pick up the bandage, the brush and the bottle of alcohol. Go back up. Go to the left to the hall. Go up the stairs to the tomb entrance. Use your horse brush with the tomb entrance. Examine the strange spot at the right side of the ornamental arch. It looks sticky and poisonous.
Use your dagger with that spot. Give your sticky dagger to the magician. Examine the hook at the left side of the room. Take the incense bowl from the hook. Use your bandage with the bloody hook. In your inventory put the bloody bandage into the incense bowl.
From the floor in in the center of the room pick up the silver platter. Put the dusty silver platter on the hook. In your inventory use the bandage with the bottle of alcohol. Use the alcohol-soaked bandage with the silver platter. In the darkness take the dusty silver platter from the hook. Put the bowl with bandage on the hook.
Use your incense stick with the glowing eyes on the floor. Use the smoldering stick with the incense bowl. Exhaust all dialogs with the spirit. Cast your activate/deactivate spell with the darkness at your right. Try to set the staff free. End the dialog.
Grab the hanging chain and put it through the ring at the column at the center of the room. Grab the metal ball at the end of the chain and drop in into the hole in the floor next to the column. Take the staff. Cast your activate/deactivate spell with the remains of the magician on the floor. Examine the magician to get his mask and Harun's dagger. Try to take the incense bowl from the hook.
Examine the brittle wall at the back side of the room. Cast your activate/deactivate spell with the braziers. Use your sticky dagger with the sliver of light. Look through the enlarged sliver of light. Use your staff with the guardian beneath your peeping hole. Cast your activate/deactivate spell on the guardian. Let him beat on the rock face until a brazier comes falling down. Let the guardian pick up the brazier and throw it over the colonnade at your left. Now let the guardian keep on knocking on the right and the left side wall until you get the message that it's causing tremors. This will get you your second achievement!
Click your right mouse button and go back inside. Cast your activate/deactivate spell wit the darkness. Look through the hole at the right side of the door. Notice that there is darkness in there too. Cast your activate/deactivate spell with the brazier on the floor. Cast your activate/deactivate spell on the guardian on the floor. Let him pick up his arm. Use the arm with the beetle leg on the floor in front of the tomb door.
Cast your activate/deactivate spell with the arm at the right side of the door. Use the arm with the ornamental arch. Click your right mouse button. In your inventory combine your bandage with the staff. Use the staff with bandage on the beetle leg. In your inventory use your sticky dagger with the beetle leg. Put the sticky leg into the beetle on the door. Look back inside.
Pick up the chain once more. Put the metal ball at the end of the chain through the left bottom hole of the door. Look through the right hole of the door. Cast your activate/deactivate spell on the arm next to the door and grab the metal ball. Cast your activate/deactivate spell on the guardian. Let him grab the metal ball. Cast your activate/deactivate spell on the guardian once more. Let him grab the metal ball and this time point it down to the hall.
Cast your activate/deactivate spell on the guardian on the hand down the hall and grab the metal ball. Click your right mouse button. Cast your activate/deactivate spell on the colossus. Let him grab the guardian on the hand. Exhaust all dialogs with Rachwan. Finally offer him the ruby.
Geron
Exhaust all dialogs with Fahi. From the little stool at the right side of the dresser take some whirlweed. Put it into the birdbath beneath the picture of your parents. Use your knife with the birdbath with whirlweed. Use your knife with the curtain at the left side of the room. Use your strip of fabric with the pot in the fire place in the left corner of the room to get some grease. Use your greasy rag with the birdbath with whirlweed juice. Use your salve with the bird Nuri to cure it's wounded wing. This not only ends the first chapter but also gives you your third achievement.
Chapter II
Exhaust every possible reminiscing with Nuri. Examine the rubble at the right side. Go down to the campground. Place Nuri behind the stone pillar next to Owlric. Tell Nuri to these answers to Owlric's questions: eleven to fifteen, crocus-colored brooch, from the north-east and finally to the north-west.
Go around the clearing to the right. Use your knife with the barrier. Go into the tent. From the table at the right side of the tent take the exotic cucumbers. Touch the hammock above the table. Carefully see if a key is falling down from the hammock. If yes pick it up. If not, move the pillow on the bench, the cushion near the circular table, open the small box on the square table or the cushion on the bed until you find that key!
Use your knife with the wall hanging at the very end of the tent. Go to the outside to the right. Examine the stone pillar at the back of the tent. Try to take the mask from the pillar. Walk towards the cart. Pick up the wedge from under the left wheel of the cart. Walk to the left and cross the wooden plank.
Walk towards the chest. Use the key with the lock on top of the chest. Open the chest. Take the chisel. Look at the bottle fortress. Leave the chest opened! Go around the clearing to the left. While standing near Owlric cast your repair/destruct spell with the bottle fortress inside the chest. Quickly take the hammer out of Owlric's bag.
Go around the clearing to the right. Cross the wooden plank to the right near the chest to end up at the back of the tent once more. In your inventory combine the hammer with the chisel. Use the hammer and chisel with the mask on the stone pillar. Walk back towards the chest. While talking to Bryda tell her that it is a powerful magic weapon, that it was behind the tent and finally that your real name is Geron. You might be boring by telling nothing but the truth but you do get the Honesty Is The Best Policy achievement! Exhaust all next dialogs with her.
Go down to the outside. Talk to the pigs. Examine the well. Have a look at Stocks. Go up to the marketplace. Talk to the merchant. Exhaust all dialogs. Enter the taproom. Talk to Jacomo who is sitting in front of the rotating pig. Exhaust all dialogs. Turn the pig on the grill. This will get you the Crispy achievement. Use your knife on the pork roast.
Talk to Hilda behind the bar. Exhaust all dialogs. Save your game here! Talk to the group of heroes. First confront directly. Question the Thorwalian. Further question him. Then question the lumberjack. Further question him too. Question the sleepyhead. Now express suspicion. Say that the Thorwalian is lying. Say that he isn't hungover. Oeps... he will kick you out but hey... you did get your Nosebleed achievement! Load the game you just saved.
Question all three guys once more. Then express suspicion. Say that the Thorwalian is lying. Say that he wasn't even here. This time you will not only be not kicked out but you also get your Master Detective achievement because you found out who of the adventury party lies at the first time! Now Hilda confesses that she has been the fifth person on the scene.
Exhaust all dialogs with Bryda. Be sure to tell her to count you in. When she has given you the odem/arcanum spell cast it once. Look at the magic glow. Walk to the right and enter the Academy courtyard. Tell the guard that you want to talk to Owlric Bodiak. Go up through the door to the right. Enter the dormitory to the right. Save your game here!
Notice the brittle floorboards next to the entrance. Step on them and the novice will tell you to go out. Re-enter the dormitory and repeat this twice. This will get you your Clumsy Oaf achievement. Load the game you just saved. This time from where you are standing cast your repair/destruct spell on the shards in front of the chests. Walk pass the red curtain. Go up between the upper and second bed from top. Walk towards the pot you repaired earlier. Simply take the strange blue artifact next to the novice.
Walk back towards the repaired pot. Stand between the first and second bed from top. Walk to the very left side of the room. Walk pass the red curtain and go to the hallway to the right. Go down the stairs. Go to the marketplace to the left. Walk pass the market booth and go to Geron's house. Go through the gate to the left into the forest. Give Bryda your blue power accumulator. Okay... okay... I admit... it is the wrong accumulator but this gets you your Baited achievement... right? Head all the way back to the Academy courtyard and into the dormitory once more.
This time your goal is to open the one but last chest to the right without stepping onto the brittle floorboards or the rotten floorboards! Walk pass the red curtain. Go up between the upper and second bed. Walk towards the one but last chest. Open that chest. Cast your odem/arcanum spell. Look at the magic glow to take the power accumulator out of the chest. Walk to the back side of the second bed from top. Walk to the left between the upper and second bed. Walk pass the left most bed. Go to the hallway to the right. You have made it... and not only that... you also have gotten your Masterful Sneaker achievement. Save your game once more!
Enter the library to the right. Talk to the shadow who is sitting between the bookcases to the right. Exhaust all dialogs with the shadow. Notice and remember his hardening spell!. Go back up to the hallway to the left. Enter the Magister's chamber. Exhaust all dialogs. Go down the stairs.
Go to the marketplace to the left. Enter the taproom. Talk to Hilda and ask her about the attacker. Go to the outside to the right. Walk pass the market booth. Go up to Geron's house. Go through the gate at the left into the forest. Examine Owlric's bag to find a magic seashell. Walk towards the pillar at the back side of the tent. Use the magic seashell with the pillar to finish the rough sketch. Walk back to the left. Show Bryda the good sketch. Give her the silver colored power accumulator. Walk to the left.
Go back to the town of Andergast. While standing in front of your house cast your odem/arcanum spell. Enter your house. Cast your odem/arcanum spell. Look at the magic glow. In your inventory combine the purple shards with the green shards. Cast your repair/destruct spell on the heap of shards. Go down to the outside.
Go up to the marketplace. Show your glass box to the merchant. Enter the taproom. Cast your repair/destruct spell on the wine barrel. Cast your repair/destruct spell on the heap of shards once more. Use your glass box with the leaky wine barrel. Use your wine jar with the leaky wine barrel. Give your bottle of red wine to Jacomo. Go to the right to the outside. Walk to the right. Go to the Academy courtyard.
Go back up through the door to the right. Enter the library to the right. Walk towards the shadow between the bookcases. Give him your glass wine bowl. Give him your strange cucumbers. Go back up to the hallway. Go down the stairs. Go to the marketplace. Go pass the market booth and up the Geron's house. Go pass Geron's house and into the forest through the gate to the left. Give Bryda the fake ruby.
Sadja
Don't give Rachwan your shiny silver platter. Pick up the wooden logs. Pick up the pelt and the rope. Go down the little stairs and take some dandelions. Pick up the stick that is laying on the ground in front of the tree. Put the dandelion on the flat stone beneath the tree. Take some more dandelion. Put it on the ground in front of the little hole to the very left. Go back up the little stairs.
Put your pelt on the flowery meadow. In your inventory use your dagger with the wooden logs. Stick the wooden stakes into the pelt. Remove the stakes from the pelt. Don't give your dagger to Rachwan. Use your rope with the pelt with holes. Put your stick under the tied-up pelt. Hide behind the bushes with the end of the rope... Great... you just earned your Firun's Disciple achievement by catching the rabbit at the first try!
Pick up the closed trap. Take the flints from Rachwan. Don't give him your staff. Put the wooden stakes on the fireplace. Use your flints with the wooden stakes... Oeps... go up the hill to the left. Well... the good thing is that you just received your Chapter Two Completed achievement!
Chapter III
In the woods you can get three achievements. First I'm going to tell you how to get two achievements which aren't necessary to finish the game but of course you want them anyhow. Well... here we go! First of all save your game here!!!
- The Phex Be With You achievement
Go up one screen to the right. Go up one screen to the left. Go up one screen to
the left. Go up one screen to the left. Great... here you will meet a fox. And
not only that... this gives you your Phex Be With You achievement. Load your
saved game.
- The Journey's Reward achievement
For this achievement I can't give you the correct way through the woods, because
it is different every time. The positive thing is that you only have to keep on
wandering through the forest until you get this achievement. Once you have
received that load your saved game.
- The Level Up achievement
Go one screen to the left. Put down some red berries on the path where you came
from. Go one screen up. Here you will see a huge tree with your dagger high up
in it. Put down some red berries on the path where you came from. Go up one
screen to the right. Put down some red berries on the path where you came from.
Go one screen up. Put down some red berries on the path where you came from. Go
one screen up. Put down some red berries on the path where you came from. Go one
screen up. Put down some red berries on the path where you came from. Go one
screen up. Put down some red berries on the path where you came from. Notice the
monolith in front of you. Pick up the rope on the ground in front of the
monolith.
Now you have to go back to the tree with your dagger in it. Simply (?) follow your way back via the red berries you dropped on the ground. Here is the correct way: go one screen to the left, one screen to the right, one screen to the left, one screen to the right and finally another screen to the right. Use your rope with the dagger high up in the tree. Pick up the dagger.
Go one screen up to the right, one screen up, one screen up, one screen up and one screen to the left. Notice the thorn bush and the little spider's web at the left side. Look at the dusty silver platter behind the spider's web. Right click on the dusty silver platter. Use your dagger on the thorn bush. Go one screen to the left.
Pick up the shrubs beneath the tree at the right side. In your inventory combine the rotten rope with the shrubs. Use your flints with the bundled-up shrubbery. Use the fire with the huge spider's web. Take the staff from the spider web. Now you receive the Level Up achievement. Go up one screen. Examine the dead horse, the campfire and the destroyed tent. Go up three screens and one screen to the upper left. Go down to the waterfall.
When you reach the place near the waterfall tell the truth twice to the young Amazon. Exhaust all dialogs with her. Look at the helmet and the shield. Notice the several rock paintings to the right. Pick up the stone to the right. Put the stone into the opening of the small waterfall besides the plank. Go up to the right. Walk to the left and use your dagger with the branch. Throw the branch into the large waterfall. Go back down to the right. Take the branch with the necklace out of the water.
Cast your send vision spell on Rachwan's
necklace. Then click on the young Amazon, Rachwan and the rock painting (Campfire).
Cast your send vision spell on the piece of cloth from the Amazon. Click on the
rock painting (Fruit), Rachwan and the old Amazon.
Cast your send vision spell on the piece of cloth from the Amazon.
Click on the rock painting (Fruit), the old Amazon and the Amazon shield.
Cast your send vision spell on the piece of cloth from the Amazon.
Click on the rock painting (Fruit), Rachwan and the Amazon shield.
Use your dagger with Rachwan.
Geron
Exhaust all dialogs with Fahi. You will now get the Chapter III Complete achievement.
Chapter IV
Tell every reminiscing to Nuri. Try to go up through the door to the right. While facing the magister's house notice the shadow who is standing to the left. Talk to the shadow and exhaust all dialogs. Remember that you can find him here! Try to open the door of the house. Talk to the crows at the right side of the clothmaker's quarter. Exhaust all dialogs with Nuri. Be sure to tell her to enter the house!
Notice the lockpicks under the pile of books. Pick up the ruler and use it with the pile of books. Take the lockpicks. Use the lockpicks with the door. Enter the house. Take the candle from the shelves next to the door. From the table where the statue is standing take the honey. Touch the statue... This will get you your Doombringer achievement. Cast your repair/destruct spell on the heap of dust. Keep on doing this over and over again until you get the Sadist achievement! Touch the statue once more to change it to a heap of dust. Take the drawer.
Go up to the attic. Take the broom. Go back down. Use the broom with the heap of dust. Cast your repair/destruct spell on the heap of dust. Use your drawer with the heap of dust. Cast your repair/destruct spell on the heap of dust. Notice the key in the hand of the statue. Use your candle with that key. Cast your repair/destruct spell on the statue. Pick up the waxen imprint.
In your inventory use your honey with the waxen mold. Exit the house. Walk towards the shadow to the left and give him the waxen mold with honey. Talk to the shadow. Ask him about magister Bodiak. End the conversation. In your inventory use your knife with the enchanted waxen mold. Re-enter the house.
Go up to the attic. Use your key with the lock on the door. Open the door and enter Owlric's office. Look at the list on the desk at the right side of the office. Also look at the charcoal drawing next to it. Take the container from the shelf at the right side. Examine the drawing on the wall. Zoom in on the secret compartment. Look at the studies. Cast your repair/destruct spell on the petrified rat. Use your container with the heap of dust.
Notice the strange gleam in the floor in front of the wooden ladder. Use your container with dust with the strange gleam. Cast your repair/destruct spell on the strange gleam. Pick up the ruby...
Sadja
Exhaust all dialogs with your staff. Cast your new de/petrify spell on the plant on top of the rock twice. Put your branch on the fireplace. Cast your de/petrify spell on the thorn bush. Use your flints with the stick on the fireplace. Look at the large fire. Right click on the large fire. Cast your send vision spell on Rachwan's necklace. Click on the snow, the icicle on the statue above Rachwan and the icy glitter at the left side. Quickly cast your de/petrify spell on grass next to the fire. Put the mask on Rachwan's face.
When your staff tells you to repeat his words here is the correct order from top to the bottom: answer 2, answer 3, answer 2 and finally answer 1.
Geron
Go to the left to the attic. Now you have to solve the six riddles. Here are the correct answers:
The correct order of the solution to the riddles
Riddle 1: Fire
Riddle 2: Air
Riddle 3: Ice
Riddle 4: Water
Riddle 5: Earth
Riddle 6: Ore
Step towards the dragon and... this end chapter IV. Of course you will receive the Chapter IV Complete achievement.
Chapter V
Sadja
Exhaust all dialogs with the air adept. As soon as he asks for your mask, staff and dagger save your game! Don't give him those items, but simply toss your mask, staff and dagger into the abyss. This will get you your Renegade achievement. After you are left behind in your resting room, load your saved game. This time don't toss those items into the abyss, but give your mask, staff and dagger to the air adept. This will get you your Being Kind achievement.
Back in your guest room examine the plant. Go to the main hall to the right. Back again in your guest room examine the swaying plant. Talk to the air spirit. Tell it "Play with me!". Then tell it "Let's play hide and seek!". Finally tell it "You hide me from the magicians!" Great... not only you are able to float now but you also get your Knack For Spirits achievement. Go to the outside with the question marks.
Save your game here just in case. In the next scene you have to act very quickly or you will be caught by he researcher and you will be send back to your resting room. Enter the left window. Take the copper water kettle. Put it on the stove. Quickly go back to the outside and enter the right window. Quickly grab the dagger from the table and go back to the outside.
Go to the observatory. Touch the right most horn. Click with it on the sphere just above it. Touch the left most horn. Click with it on the smallest sphere just above it. Finally touch the center horn and click with it on the sphere above it too. This will get you your Big Brother achievement. As soon as you overheard the plans of the prince go to the outside.
Go to the room at the left side of the waterfall. Talk to the admiral. Exhaust all dialogs with him. Talk to him once more and again exhaust all dialogs. Give your dagger to him. Go into the dark corner to the right. Go to the main hall. Go up the slope path to the right. Touch the ice statue. Look at the stained glass window in front of the statue. Look at the center part. Remember that you can find it here. Zoom out. Go to the reading room.
Talk to Ariarchos. Exhaust all dialogs. Be sure to ask him about the three chambers! Examine each and every rune at the arch. Also look at the bookshelf. Go back to the main hall. Go down the stairs to the left. Talk to the ore adept. Exhaust all dialogs. Notice that he drops something on the floor. Pick up the goblet from the floor.
Talk to your staff which is chained to the table. Cast your send vision spell on the goblet of the ore adept. Click on the mask, the tea table and the ores. Talk to the ore adept. Talk to the staff once more. Cast your send vision spell on the goblet of the ore adept. Click on the strange orb (the white light with the question marks on the magic contraption), the tablet and the broom. Ask the ore adept about the reverse mask's magic twice. Give your ruby to the ore adept. Then pressure the researcher!
Cast your activate/deactivate spell on the magical contraption. Cast your send vision spell on the goblet of the ore adept. Click on the strange orb, the crystal and the whetstone. Cast your de/petrify spell on the ore adept. In your inventory combine the darkness with the enchanted ruby. Take the strange orb form the magic contraption.
Look at what is left of the researcher. Go to the main hall near the ladder. Go to the dragon hall. Go down into the council hall to the right. Use your strange orb with the lantern at your left side. Examine the seal to the right...
Sit down on the stool. Cast your de/petrify spell on some of the plants. As soon as the seal appears on the back wall cast your activate/deactivate spell on it. Go up to the stairs to the dragon hall. Go to the main hall. Go to the right to the underground lake. Use the strange orb with the lake. Just for fun yell three times to the monument at the opposite side of the water. Go back up to the main hall.
Go up the slope path to the to the right into the library. Go to the reading room. Use the strange orb with the bookshelf. Make a note of the order of the runes at the arch! Go down to the main hall. Go to the outside and go up onto the roof.
Use the strange orb with the garden beds. This will not only get you the fifth and final element but also your Elementalist achievement. Look down. Notice the hexagons down there. Also notice that the air elements is already in place... Now remember the correct order of the runes you saw earlier at the arch in the library. Of course this is the same order as the riddles up in the attic of Owlric Bodiak's house. With that in mind here is the correct order:
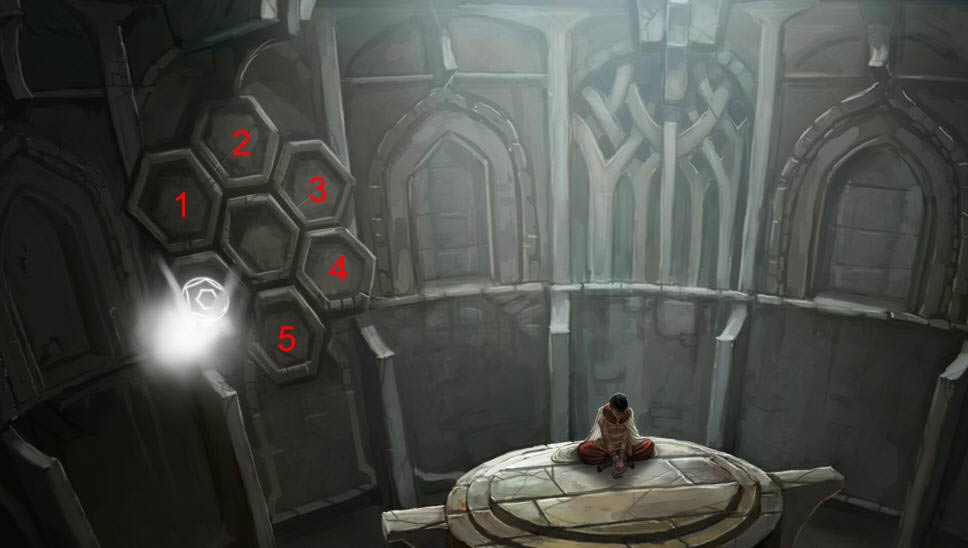
The correct order of placing the spirits
1 = ice
2 = water
3 = ore
4 = earth
5 = fire
When you have placed all spirits look at the seal at the center hexagon. Sit down on the stool once more. Cast your activate/deactivate spell on the seal at the back wall once more... Back on top of the roof look at the abyss. Talk to the prince and right click on him. Go back up.
Go down to the observatory to the left. Go down into the dragon hall to the right. Go to the main hall. Go up into the library. Step onto the stained glass window. Look at the stained glass window. Put your reversed light on the center part of it. Go to the reading room.
Talk to Ariarchos. Ask him about the Garden of Oblivion. the three chambers and Satinav. End that conversation and report on the signet chamber. End this conversation too and go down to the main hall. Go to the underground lake to the right. Put your drawing onto the ornament. Look at the ornament. Sit down on the stool once more. Cast your activate/deactivate spell on the seal again.
Bryda and Geron
Talk about the Garden of Oblivion and the mask. Finally tell Bryda that you understood everything.
Sadja
While standing in front of the monolith save your game. Notice the tiny square at the rocks at your back. Sneaky... sneaky... sneaky!
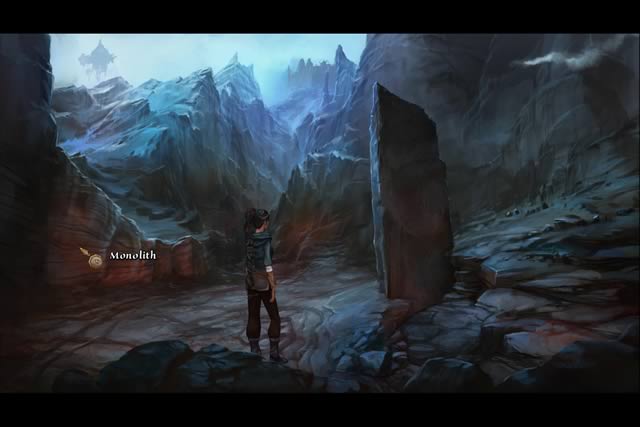
The entrance to uhhh... that very hard to find achievement
Click on that spot and another monolith will open. And not only that... you just received the very hard to find Seek And Ye Shall Find achievement. Look at Huggins... well... that is... what is left of him. Also notice good old Harvey sitting down. Exit these caverns of fail to the right.
Touch the huge monolith in front of you. Look at the seal that appeared on the ground. Tie your rope around the monolith and go down the hole. Enjoy this beautiful garden. Sit down at the little stool the center of the garden.
As soon as the prince has gone with your mask notice some swaying leaves at the left side. As soon as those leaves start swaying move your cursor over them. Finally do the same with the leaves to the right. Once you have made your way up an unpleasant surprise awaits you in the form of an Amazon with crossbow. Say what ever you want to tell to her. The outcome will be the same. This will get you the Chapter Five Complete achievement of course...
Chapter VI
Geron
Go down into the forest.. Go to the campground. Talk to the lecturer. Exhaust all dialogs. Talk to Bryda and ask her about the status of the search. Try to enter the tent twice to find out that the lecturer does speak more languages than one ;o)
Go into the forest to the left. Go into the bog. Try to use the tree trunk. Notice the brittle rope at the other side of the river. Cast your repair/destruct spell on the brittle rope. Cross the tree trunk. Go deeper into the blog to the right. Talk to the group leader. Exhaust all dialogs. Look at the mob behind the trees to the left. Head back to the bog entrance to the left. Cross the tree trunk. Cast your repair/destruct spell on the fixed rope. Go into the forest to the left.
Notice the little moving part in the forest. This is the messenger who is walking in the forest to get all parties updated. Go to the spot where he stops. This will probably will be with the messenger. Cast your odem/arcanum spell and look at the magic glow. This takes you to the messenger. Talk to him and exhaust all dialogs.
Go into the bog. Pick up the scroll next to the sleeping messenger. Go back into the forest to the left. You will now get the message that Nuri should be back right now. Go to the waterfall to meet her.
Talk to Nuri. Send her on a route. Tell her to start at the tent... over the cliff and... to the river. When she returns with the good news, tell her "No, stay here".
Go down into the forest. Go into the woods at the right side of the river once more. Talk to the group leader and pass on orders... Look at the tree. Talk to the young magician. Exhaust all dialogs. Go back into the forest to the left. Head back to the waterfall.
Talk to Nuri and tell her to distract the group. Go down into the forest one more time. Go into the woods at the right side once more. Talk to the tree.
Take the lamp in front of the tent. Enter the tent. Cross the wooden plank next to the chest.. Walk towards the tent wall. Use your knife with the tent wall. Look through the tent wall. Use your lamp with the map. Exhaust all dialogs with the spirit... This will end this chapter and of course you receive the Chapter Six Complete achievement.
Chapter VII
Sadja
Take the longsword from the weapons rack. Try to open the weapons cabinet. Pick up the mace. Pick up the vine. Tie one end of the vine to the door of the weapons cabinet. Pick up the vine and tie the other end on the weapons rack. Pick up the shuriken. In your inventory combine the shuriken with the longsword. Combine the mace with the scabbard.
Use your longsword with shuriken on the shield that's hanging on the wall. Pick up the shield. Use your extended mace with the place of impact. Do the same with the longsword with shuriken and with your shield. Go up and take the halberd. Try to smash the glass case with the halberd. Go down and use your halberd with the uhhh... bridge.
Go up once more. Smash the glass case with your extended mace. Take the heavy sword out of the glass case. Go back down. Take all off your stuff back from the bridge. Put the mace, the halberd, the longsword with shuriken, the heavy sword and the shield into the weapons rack. Grab the weapons rack and push it over the entrance. Take the staff out of the opened weapons cabinet. Cast your activate/deactivate spell on the floating crystal at the center of the room. Go to the outside.
Go up inside the tower. Go to the right to the floating chamber. Examine the admiral who is laying on the floor. Go forward into the floating chamber. Examine the cleric of Efferd. Talk to Ariarchos again. Examine the cleric of Praios. Pick up the stones.
Throw a stone to the prince. Repeat this twice. Talk to Ariarchos once more. Examine the cleric of Boron. Open the tower door with the tower key you just received from Ariarchos. Enter Tower I.
Go up Tower I to the right. Touch the crystal on the wall. Go to Bridge I to the right. Pick up the ornamental head. Go back into Tower I to the left. Go down to Tower I to the left. Try to go outside. Go back up Tower I to the right.
Touch the crystal on the wall. Go to Bridge I to the right. Notice the floating crystal above the little stairs high above. Go up those little stairs and touch the floating crystal. Right... you thought that you could grab it that easy!? Well... think again and notice that it is only going down.
Go back to Tower I to the left. Touch the crystal on the wall. Go to Bridge I to the right. Use your belt with the floating crystal to the right. Touch the floating crystal. Go back into Tower I to the left. Touch the crystal. Go to Bridge I to the right. Go to Tower II to the right.
Try to touch the floating crystal on the wall. Throw your ornamental head to the floating crystal. Pick up the crystal splinter from the floor. Go to Bridge II to the right. Use your dagger with the left(!) tentacle. Go into Tower III to the right.
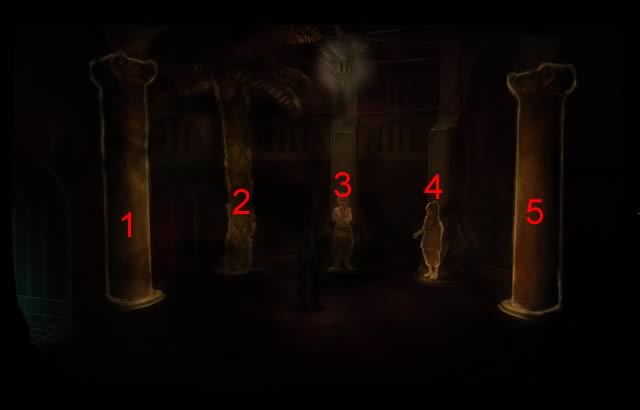
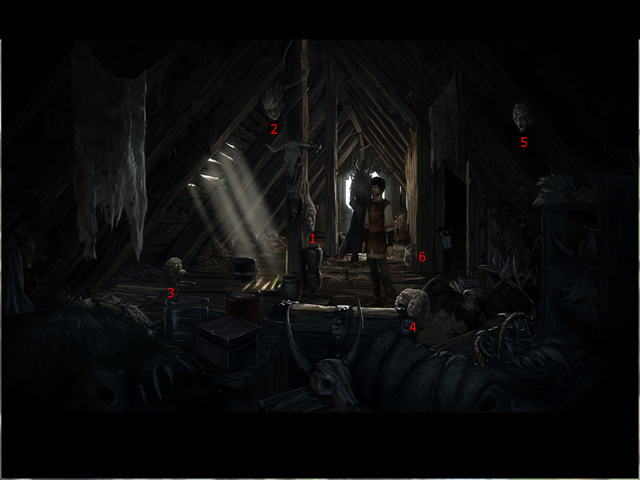
The numbering
Go up Tower III to the right. Number the columns and statues inside this room from 1 to 5 from the left to the right. When your staff asks you what's really there, click on 1 and answer "A torch bracket". Click on 2 and answer "Armor". Click on 3 and answer "A statue". Click on 4 and answer "Shield". Finally click on 5 and answer "Nothing".
Go to Bridge II to the left. Touch the floating crystal next to you. Go back into Tower III to the right. Go down Tower III to the left. Go to Bridge II to the left. Go into Tower II to the left. Cast your activate/deactivate spell on your floating splinter in your inventory. Go up the ladder. Go to Tower I to the left. Touch the crystal on the wall.
Go to Bridge I to the right. Cast your activate/deactivate spell on your sleeping splinter. Throw the floating splinter to the tentacle at the opposite side. Go into Tower II to the right across the tentacles. Go into Tower II to the right. Go to Bridge II to the right. Go into Tower III to the right. Go up Tower III to the right. Touch the floating crystal on the wall.
Go through the window to the right. Use your dagger on the tentacles above the prince. Cast your activate/deactivate spell on the main crystal above you...
Pick up your staff. Go further to the right. Talk to the young Amazon. Use your staff to remove the shield on top of the young Amazon. Use your bottle of alcohol with her. Finally use your bandage on her. This will end Chapter VII and rewards you with your Chapter VII Completed achievement.
Chapter VIII
Geron
Cast your repair/destruct spell on the power accumulator. Cast your repair/destruct spell on the mask. Cast your activate/deactivate spell on the power accumulator. Cast your send vision spell on Nuri's necklace. Click on the mountain top, the river and the campfire.
Cast your de/petrify spell on your pillar. Cast your send vision spell on Nuri's necklace once more. Click on Geron, Nuri and the power accumulator. Cast your de/petrify spell on Geron. Go into the burial chamber.
You can either choose for letting tell the spirit you everything or for keeping it short. It makes no difference for the game what you choose. Exhaust all dialogs. Put the mask on the bust at the right side of the spirit. Now say "yes I'm ready".
Next time choose "I'll do it". Back in the Garden of Oblivion say: "She set down. She pulled out the mask. She looked into the mask ...and read the spell". Back in the burial chamber go back to the outside.
After Fahi's story go back into the burial chamber. Pick up the ruby next to the bust. Go back to the outside. Give your ruby to Fahi. Tell Fahi that they where siblings, that she's being harangued for no reason and finally that you got it.
Back in the burial chamber examine the tomb. Back in the Garden of Oblivion say: "...and read the spell ...and spot your name ...and despaired ... she couldn't read".
Save your game! Choose "Change her back". This will give you your Finish Line achievement. Load your saved game. This time choose "Leave her as she is". This will give you your A Gift Called Freedom achievement.
This will end this very nice game. Of course you will also get the final Chapter Eight Complete achievement. So you not only finished the game but you also found all achievements! Congratulations on that! I hope those guys at Daedelic Entertainment are already working on another Dark Eye sequel... I hardly can't wait!!!