Notice the sign at the right side
Miskatonic, Part 1 - The Inhuman Stain
© December 2011 Bert Jamin
This walkthrough, written by Bert Jamin, may not be sold and may not be used for
any commercial purposes. Neither is it permitted to publish this walkthrough in
any way without the written permission of the author Dr. Hugh.
Feel free to place this walkthrough on your web site or on your home page, on
condition that no part of this walkthrough is changed and that the name of the
author (Dr. Hugh)are mentioned unchanged. For the most up to date walkthroughs always visit www.gamesover.com.
Foreword:
You can download a free demo for Miskatonic here!.
You can also buy the game there for only $ 9.95. Believe me... the game is worth
every penny! As you might know by now I only write a walkthrough for a game that
I love. Because this surely is one of those games I wrote a walkthrough for it!
So let's rumble!!!
Talk to the Dean who is
standing next to the Miskatonic University sign. Exhaust all dialogs. Remember
that he invites you to a party at the Deanery. Go to the right. Examine the
green maintenance car to get a spade. Go to the crossroads. Use the spade with
the tar on the ground at the right side of the path. Move your cursor to the
left side of your screen and follow the path.
Go to the lake. Go to the upper level. At the bottom left of your screen go to the Deanery. Enter the Deanery. Read Dean's message in your inventory. You now also have your nametag. Zoom out and walk to the back wall. Talk to the guy who is sitting on the couch. Be sure to exhaust all dialogs with him. Knock on the door. The guy at the door will not let you enter.
Go back and walk towards the stair. Go upstairs. Talk to the cheese sniffer. As soon as you have spoken to him for the first time, notice the speaking cloud that appears above his head. Keep talking to him until the speak cloud disappears. Dot he same with the other guy that is standing next to the exit to the balcony. Not only the speak cloud disappears but he will perform a rain dance as well. Go outside onto the balcony.
Back inside talk to the woman who is sitting on a chair at the left side of the room, Jill Novak. Hhhmmm... one thing is sure... she wants more booze! Go downstairs. Walk towards the table with the nametags. Take the nametag of Michael Wang. It's the only other nametag with the names on the Dean's message. Walk towards the doors at the back wall. Knock on the door once more.
When the man behind the door asks you who you are simply tell him: "Well, what does my nametag tell?" He still won't let you in but he does give you a nice bottle of gin! Head back upstairs. Give the bottle of gin to Jill Novak. Talk to her and exhaust all dialogs. After that the Dean will enter the room. After that you'll bee in the courtyard of the University. Enter the building to the right.
Go to Aurinda's office. Examine the ashes in the fireplace to get a burned scrap of paper. Go back to the Hallway. Return to the Pentacle and go through the gate. Follow the path to the left and go to the lake. Talk to Jill Novak who is sitting on the bench. Enter the woods to the left. Walk further to the right. Use the spadefull of tar with the old boat. Pick up the paddle. Enter the ferry to the left. Examine the padlock on the door of the steel locker. Go back to the dock. Go to the entrance of the Sanitarium.
Enter the Sanitarium. Talk to the receptionist. Look at the counter. Read the printed e-mails. Try to take the chewing gum. Go outside. Follow the path to the left. Talk to the guy in the wheel chair. Talk to the orderly. Exhaust all dialogs. Especially don't forget to tell him that he shouldn't call you sweety :o) Try to walk further to the right. Well... one thing is for sure... you won't be able to get any further while those two are standing there!
Go back to the front. Go to the back to the right. Take the rake that is standing against the wall. Walk further to the right. Examine the old lawn mower. Pick up the rusty mower blade. Remove the grey gas cap. Notice the gasoline that is dripping from the tank. Zoom out. Examine the lock of the gate. Notice the rusty link at the right upper part of the chain. Use the rusty mower blade with the rusty link. Go through the gate.
Use the rusty mower blade with the rearview mirror of the parked car. Go back through the gate. Go to the entrance. Follow the dirt track at the bottom left of your screen. Pick up the old coffee cup. Pick up the lighter from the cigarette butts. Use the rock against the wall to have a better look at the patient and his supervisor. Zoom out. Go back to the entrance and go to the back. Walk further to the right and examine the old lawn mower once more.
Use the old coffee cup with the dripping gasoline. Zoom out and go through the gate. Use the cup of gasoline with the truck engine. Use the lighter with the truck engine. Examine the truck engine to get a handy wrench. Go back through the gate and go to the entrance. Go back to the dock at the bottom center of your screen. Go to the Ferry. Examine the padlock of the steel locker. Use the wrench with the bolt to find a raincoat in the locker.
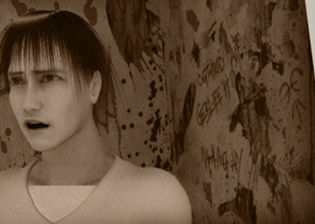
In your inventory use the mirror with the raincoat. Use the rake with the mirror + coat. Go back to the dock and go to the entrance. Follow the dirt track once more. Use the rake + mirror + coat with the terrace ledge. Go back to the entrance. Follow the path to the left. Walk further to the right and go inside. Examine the manila folder on the desk. Study the photos. Look very closely to the second photo from top. Notice the sign on the wall at the right side of the person.
Notice the sign at the right side
Zoom out. Look at the single paper on the left side on the desk to read some names of the supervisors. Remember the name of Parvati Heller. Zoom out. Look at the bulletin board. Read the bottom right notice about the new password policy. Close the notice and look at the calendar. Notice Parvati's birthday on August 9. Close the calendar and zoom out. Look at the keypad of the door. Great... it's a very good secured door! Now you have the last part of Parvati Heller's password (0809). Now you only have to find out the first six numbers of his university staff ID-number.
Remember you saw all the printed e-mails on the counter at the entrance of the sanitarium. So... go outside. Walk further to the left and go to the front. Go inside and look at the counter. Look at the upper print. Note Heller's ID 105327. So his complete password should be 1053270809!?!? Zoom out. Go back outside and follow the path to the left. Walk further to the right and go inside. Before you are going to open the door you have to do one thing.
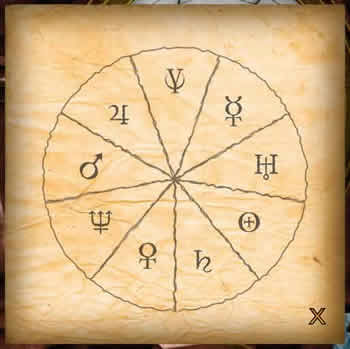
Look at the old statue in the bookcase. Notice the upper and the lower disk at the bottom of the statue. Believe me they can be turned but don't touch them yet!!! Also notice that you can press the right eye. Now remember the sign on the wall on the photo you saw earlier. Your goal is to turn those disks into the correct stand. Now you know what the goal is we are going to move the disks. May be it's good to save your game here just in case something goes wrong. Move the upper disk three times and press the right eye. Move the lower disk eight times and click on the right eye. The correct stand is this.
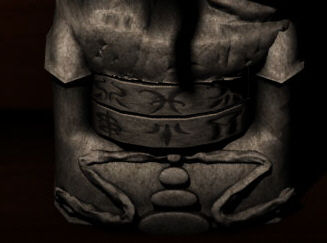
The correct position of the upper and the lower disk
Take the strange key from the upper left part of the statue. Zoom out. Look at the bottom left drawer of the desk. Use the strange key with the lock of the ancient wooden chest. Take the old book out of the chest. Read it in your inventory. The most important part you will find hidden inside the back cover of the book. Take the 'Vinca' Scrap out of the cover. Close the book and zoom out.
Now it's time to open the lock of the door. So look at the keypad of the door. Press the buttons on the keypad in this order: 1053270809 and finally press the Enter button. If you have done this wrong nothing happens and try again. If done correctly the green light will be lit to notice that the code has been accepted. Go through the door to enter the Hallway.
Take the clipboard from the wall. Look at it in your inventory. Notice the very important message 'Do not remove from this area.'! Try to talk to the Big Quiet Guy. Open the center cell door. You finally found Norden. Alas he is not in a very good shape. Talk to him. Show him the burnt paper. Look at the design on the floor in front of Norden. Hhhmmm... it turns out to be some kind of puzzle existing of 10 pieces. Great... now you have to find 10 pieces of paper to solve this puzzle.
Return to the Hallway. Walk towards the staff door to the right. Notice the little triangle shape on the door. Take it to get your 1st puzzle piece. Walk back to the left and switch on the lamp on the table. Look at the odd shadow on the wall above the lamp. Take that strange shadow to get your 2nd puzzle piece. Look under the table and take the 3rd puzzle piece from under the table, Look in between the cushions of the couch. Take the 4th puzzle piece from between the cushions. Look at the painting above the couch. Take your 5th puzzle piece from the collar of the shirt. Examine the left curtain of the right window to find the 6th puzzle piece. Do the same with the right curtain of the left window to find the 7th puzzle piece. Examine the shelf beneath the TV to find the 8th puzzle piece. Examine the water fountain to find the 9th puzzle piece.
Well... these are the easy puzzle pieces to be found. One more left to go. I must admit that the last one kept me off the streets for a couple of hours. To get a clue talk to the nurse who is sitting at the window sill. Ask her about the Big Quiet Guy. She answers you that he only opens his mouth when he eats. Now think hard to recall where you saw the one and only thing to eat. Yep... that's correct... is that chewing gum on the counter at the entrance of the sanitarium. Also remember that you took the clipboard from the wall that shouldn't leave the area!
So... head back to the entrance of the sanitarium and go inside. Give the clip board to the receptionist and off she goes to replace the clip board. After she has gone look at the counter and take the chewing gum. Now head back to the Big Quiet Guy. Give him the chewing Gum and voila... the 10th puzzle piece! Enter Nordon's Cell. Now you only have to solve the puzzle on the floor in front of good old Norden!? I must admit again that this one took me off the streets a couple of hours too! First of all have a good look at the 'Vinca' scrap and use the pieces of paper with the puzzle.
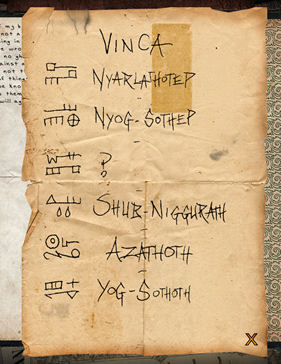
The 'Vinca' scrap...

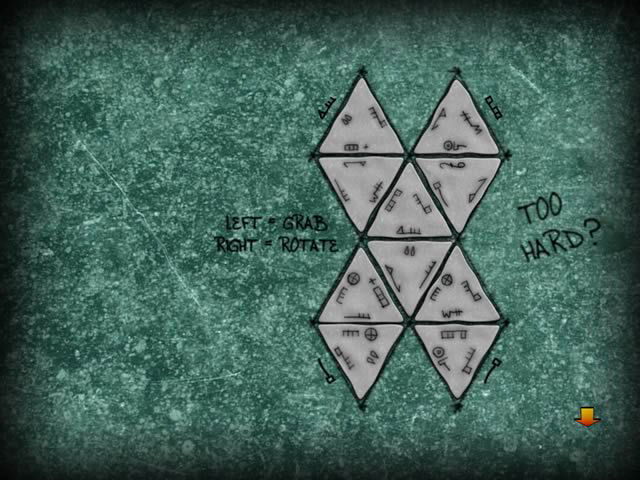
...and the unsolved puzzle
First notice that there are two symbols besides the upper two triangles and two symbols next to the bottom triangles. Than notice that there are similar symbols on the 'Vinca' scrap. Notice that the upper symbol on the 'Vinca' scrap exists of two combined symbols, one exists of a straight line with a square at the end, and the other one of a straight line with three strokes and with a square at the end. Notice that you see the symbol of the straight line with a square at the end at the bottom two triangles. Notice that the bottom right puzzle piece has the symbol of this straight line with three strokes and with a square at the end. So pick up that puzzle piece and place it on the left bottom triangle. Right click on it until the straight line with three strokes with the square at the end is facing the symbol with the straight line with the square at the end. Do the same with the second right puzzle piece from bottom.
Now let's do the two upper triangles. Pick up the third left puzzle piece from bottom and put it on the upper left triangle. Right click on it until the two drops are facing the symbol next to the triangle. Pick up the bottom left puzzle piece and place it on the right upper triangle. Right click on it until the w-shaped symbol is facing the symbol next to the triangle.
Now have a look at the fifth combination from top of the two symbols on the 'Vinca' scrap. Notice that the upper symbol of them corresponds with the bottom symbol on the upper right solved triangle. Also notice that the bottom symbol of them corresponds with the bottom symbol on the fourth right puzzle piece form bottom. So pick up that puzzle piece and place it on the second right triangle from top. Click on it until two correct symbols are facing each other.
Now have a look at the bottom combination of symbols on the 'Vinca' scrap. Notice that you see the upper symbol at the bottom of the right upper triangle. Pick up the upper right puzzle piece and place it on the second left triangle from top. Right click on it until the two combined symbols are facing each other. With these combinations of symbols on the 'Vinca' scrap place the other puzzle pieces and click on them until the two corresponding as shown on the 'Vinca' scrap are facing one and each other. That should result in the next solved puzzle. By the way with the 'Vinca' scrap in your pocket you can also cheat to solve this puzzle by clicking a few times on TOO HARD? But hey... why should you with this given solution?
The solved syzygy puzzle
After you solved the puzzle you end up in front of the rowboat. Use the rowboat to go back. As soon as you reach land you'll see Jill Novak laying on the ground and Chan helping her. While you are talking to Chan you will get the choice between two answers. Be sure to choose for 'Do you really want to know?'
Enter the Admin
Building to the right. Grab one book from the bookcase. From the desk take the
fork from the salad. Look at the painting with the tulips on the wall. Try to
straighten it up. Use the fork with the nails. Zoom out. Look at the door of
your boss' office. Return to the Courtyard. Use the fork with the sign. In your
inventory use the nails with the planks. Use the planks + nails with the cherry
tree. Use the hefty book with the planks. Climb the cherry tree to find out how
curiosity killed the cat :o)
Exhaust all dialogs with Chan.
Follow the upper path to the right. Try to open the door to the left. Go through the other side and go to the Dome. Look at the roof of the dome. Zoom out. Look at the door and make a note of the sign on the door. Zoom out and go behind the orrery. Pick up the beer bottle from the beer box. From the bike wheel take the inner tube. Notice the power outlet at the bottom of the lantern. Go back to the front. Return to the crossroads.
Notice the black smoke that is coming out of the woods between the Dome and the house. Go to that smoke. It seems that Steve is making a little campfire. Pick up some ashes from the fire. Return to the crossroads. Go to the house. Talk to the guy working at the tractor. Exhaust all dialogs with him. Go into the house.
From the table take the pruning shears. Out of the bird house take the garden fork. From the first aid kit get the sticky bandages. In your inventory se the sticky bandages with the rubber tire. Look at the box of Christmas decorations. Take the glass globes out of the box. Zoom out.
From the old canvas take the bug sprayer. Use the pruning shears with the old canvas. Notice the box of keys on top of the wardrobe. Use the patched tire with the wardrobe. Use the bug sprayer with the tire tube. Look at the fallen box of keys. Use the ashes with the right bottom envelope to find out which key tops and key bottoms belong together.
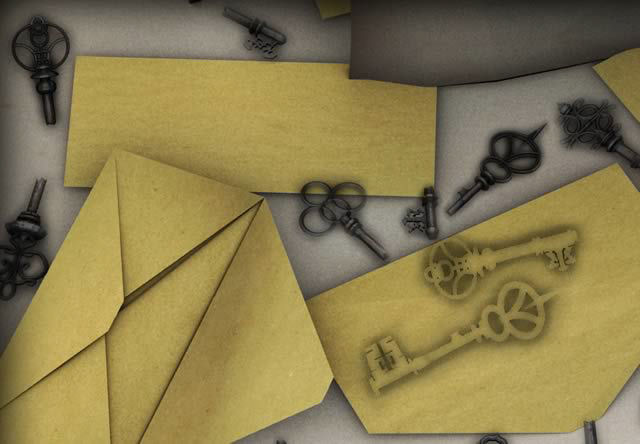
The prepared envelope
Take the upper left key top. Take the key bottom just above the envelope. In your inventory use the sticky bandages with the key top. Use the key bottom with the key top + bandage. Zoom out and go back outside. Return to the crossroads. Go to the Dome. Look at the door and use the key with the keyhole. Bingo! Go inside. Open the cabinet at the left side of the room. Take the notebook. Read it in your inventory. Zoom out.
Look at the batteries at the right side of the room. Look at the cabling at the upper left side of the batteries. Well... one thing is for sure... no power yet! And to be honest with you... getting power is easier said then done! Go back outside. Go behind the orrery. Use the pruning shears with the bike wheel to get a spoke. Go back to the front. Return to the crossroads. Follow the path to the left. Use the garden fork with the door to the left.
Enter the library. Talk to the librarian, called Monroe. Exhaust all dialogs with her. On the computer desk at the right side look at the calendar. Take the calendar. Try to use a computer terminal. Monroe won't allow that. Give the calendar to Monroe to remind her. Because of the damn slogan on it she just has to allow you to use the computers! So have another look at the computer terminal.
Push the enter button. In the Academic Journal Database Search type: pleromic syzygy and press the search button. Read the article about Henrikson, Lucius. On the last page read the article 3) which is telling that a professor predicted an earlier pleromic syzygy. Note the name of this professor called Hosea Washburne! Close the document and press the back button..
In the Periodical Database Search type the name of that professor: Hosea Washburne and press the search button. Read the bottom article called 'Shall we all be destroyed?' that was published in the Innsmouth Sunday Post of April 10, 1892. Notice that Washburne claims in the article that the next Tuesday the 12th will mark the zenith of this alignment. Because the newspaper is of April 10, 1892 this means that this alignment, or better called syzygy, would have taken place on April 12, 1892. Close the document and zoom out. Go back outside.
Go to the Dome. Go inside and climb up the ladder at the left side of the room. You now are facing the planetarium. Notice that there are 9 rings and you only have 8 glass globes!?!? Well... we come to that later!!! First of all study Capwell's Notes once more. On page 3 you can read that Capwell also mentions 9 bolts. On page 4 you read the order of the planets and that these cannot simply placed in order of distance. On page 5 you see that the planets Jupiter, Uranus and Yuggoth should be next to another. On page 6 you read that the same goes for Mercury and Chthon. Also notice the very important note that to avoid obstruction Saturn must be on bolt # 5. On that page you also learn that Uranus should be on a smaller (<) bolt than Mars and that Neptune must be fastened to an even numbered bolt. Last but not least learn that Venus must be on a bigger (>) bolt than Chthon and smaller (<) than Jupiter. With this knowledge in mind and after some puzzling and very hard thinking you come to the conclusion that the only correct order of the globes must be:
Bolt 1: Mercury
Bolt 2: Chthon
Bolt 3: Venus
Bolt 4: Neptune
Bolt 5: Saturn
Bolt 6: Jupiter
Bolt 7: Uranus
Bolt 8: Yuggoth
Bolt 9: Mars
So... place all the globes to these bolts. That is except the Uranus globe because you don't have that one... right? Wrong! In fact you are carrying the Uranus globe of some sort :o) Simply use the empty beer bottle as a replacement. So just stick the beer bottle on bolt 7. Be very very sure that you have them all lined up correctly! So make a final check that the Mercury is on bolt 1, Chthon is on bolt 2, Venus is on bolt 3, Neptune is on bolt 4, Saturn is on bolt 5, Jupiter is on bolt 6, the beer bottle is on bolt 7, Yuggoth is on bolt 8 and Mars in on bolt 9!
When you are absolutely sure that you placed the globes correctly, go back down. Look at the console at the right side of the astrolabe. Now remember the article you have read in the library about the alternative date of the syzygy of professor Hosea Washburne April 12, 1892. Punching in the date 04-12-1892 would be a little too easy of course. So keep in mind that you have to use the European date format! So... set the upper left spinner to 12 and the right one to 04. Set the bottom spinner to 01892. Flip down the BC/AC switch. Push the center button and... nothing! Because of all the problems with finding the correct order of the globes and finding the correct date for the console you totally forgot that there is no power yet!
First of all attach the wire to the cabling at the left side above the batteries. Look at the cabling. Zoom out and go back outside. Return to the crossroads. Go to the black smoke that is coming out of the woods once more. Talk to Steve. Ask him what he is looking at. Next tell him that you could use some energy. Return to the crossroads and go to the Dome. Look at the roof of the Dome. Notice the wolf tails that are hanging down from Steve. Zoom out and go behind the orrery.
Remember the power outlet you saw before... Grab the wolf tails that are dangling down at the left side... Well one thing is for sure the lightning rod or better said Steve worked fine :o). Enter the orrery for the very last time. Look at the console. Push the center button to get a orrery sketch. Zoom out and go back outside.
Use your map to go the lake. If you like, you can also walk to the lake but using the map makes it all easier. To do this open your inventory and use the hand symbol on the map and click on the lake. Close the map. Standing by the lake go to the upper level to your right. Use your canvas rag with the water of the fountain. Use your map once more and go to the pentangle. Close the map and enter the building to the right. Look at the clock that is standing against the back wall. Study the orrery sketch in your inventory and make a note of the positions of the planets.
The only one correct orrery sketch!
Your goal of course is to set the dials of the clock into the corresponding positions. May be it is a good idea to save your game here just in case something goes wrong! Well... here we go!
Press the Mercury
dial 1x
Press the Uranus dial 2x
Try to press the Earth dial. Great... that one is stuck! Lucky that you brought the greasy rag along! So use the greasy rag with the Earth dial.
Press the Earth
dial 3x
Press the Saturn dial 4x
Press the Venus dial 5x
Press the Neptune dial 6x
Press the Mars dial 7x
Press the Jupiter dial 8x
If done correctly the sign at the bottom of the clock opens and reveals a package. No need to say that you have to take the package.

The dials set correctly... Get the package and...
...end of Part 1! I hardly can't wait for part 2!!!