MOEBIUS: EMPIRE RISING
By Pinkerton Road Studio
Walkthrough by MaGtRo April 2014
Gameplay: This is a third
person point and click game.
A configuration screen is seen before the game
opens.
The graphics selection has screen resolution,
windowed and graphics quality.
The joystick, keyboard and mouse control can
be changed at the input frame.
The main menu has intro e-comic, play game, load
game, cutscenes, settings, credits and quit.
It is highly recommended to play the intro e-comic
to learn the background of Malachi Rector.
Settings have selections for gameplay, audio and
display.
Gameplay selections are for hints, subtitles,
tutorials, font size and language.
Audio has the volume slide bar for master,
music, sound fx and speech.
Display has the antialiasing selection.
At top left of screen a pull out bar shows: ingame
menu icon, cellphone, map and hotspots target icon.
Below the icons is the Chapter in play and the
gameplay score.
The ingame menu has return to game, how to
play, save game, load game, settings and subtitles.
The cellphone will show a green exclamation
point when there is new information. P key can also access the cellphone.
The cellphone dial is at bottom left.
The person icon shows the contact list.
The text balloon shows text messages.
The notepad icon shows game hints.
The folder shows project info.
Map shows the map for that chapter. M key can
also access the map.
The target icon shows all the hotspots in the
game screen. The space bar also accesses the hotspots and label in the
screen.
Move: Left click once on a
hotspot to move Malachi, double click to teleport.
Action: When the cursor hovers
over an active item or person, the cursor will highlight and show a label.
Click to select an action.
Eye icon identifies and describes the
character or item.
Gear icon is used to do an action on an item
or another character by the game character.
Envelope icon is used to combine or use one
item with another item.
Hand grab icon is used to take an item.
Brain icon is used to start analyzing a
character or item
Inventory is at top right of game screen.
Select an item and it will be placed in the
tab.
The eye icon identifies the item.
The magnifying glass will show items in the
game screen that can interact with the selected item.
The combine icon at bottom shows a colored
item that can be combined with the selected item on the tab.
In Win7, the saved games folder is located:
- for
other download sites in C:\Users\computer name\AppData\LocalLow\Phoenix
Online Studios\Moebius folder
- for Steam download at C:\Program
Files(x86)\Steam\userdata\68665703\264520\remote\moebius folder.
Thanks to Emily for the help in achievements and
alternative gameplays.
Intro e-comic:
South Africa, 1987: A young Kye is bored in
school. Malachi has an IQ of 175. His mother Isabel leaves Kye at home to have
an extramarital interlude. On her way back, Isabel is attacked by a lion. Kye
witness the attack as well as the destruction of the lion.
San Xoan, Spain September 2013: Malachi Rector
arrives at Pirez Villa. Rector examines and reports to his client on the
cellphone about a supposedly 1470 chest that is for sale. The chest is a
fake. On the way out of
the villa, Rector also valued the woman's necklace.
Rector is attacked by a gang of thugs in
retaliation for exposing the fraud.
CHAPTER 1: INTO YOUR HANDS
New York
Inventory has prescription pills, wallet,
smartphone and extra strength aspirin. Right click the items in inventory to
know about them.
Cellphone: Select the
cellphone with an exclamation point at top left. See a GPS map that shows
that Malachi is in Manhattan USA.
Rector Antiques, Manhattan, USA:
Gretchen Stern: Malachi talks to
Gretchen Stern the shop manager. Examine and talk to Gretchen.
Clients: Upcoming contracts are a supposedly
a Rembrandt in
Rome and 2 pieces in Egypt for Rutherford. Malachi says to accept the
contracts.
There's a new client. Talk about security. The new
client is Amble Dexter.
Store: Look around at the active spots in the screen.
Press spacebar or target icon at top left to show the active spots.
Check what is behind the to-be appraised screen
left of door.
Suitcase: Take the
passport from suitcase.
Office: Exit to office.
New client: Get a message
from Amble Dexter, the new client.
Open the cellphone at top left of screen. Select the web
search icon at right end.
Select Amble Dexter. No result. Strange.
Desk: Look around at the office. Check the desk.
Read the newspaper about the bleak economy.
Read the letter from Giuseppe Barozzi from Venice.
Barozzi has a statuette that he wants Malachi to examine.
Malachi takes his meds. Exit the office, store and
be at map.
FITA:
Select Dexter's address on the map to jump there.
FITA Logo: Click on the FITA
logo on the front board of the guard's desk.
Research: Open the
cellphone at top left. Select the web search icon at right end.
Future Intelligence Technology Agency. The
page is deleted while in view. Strange.
Analyze the logo:
Click on the logo again and select the brain icon.
Click on a small square and determine which
data point is applicable.
Starburst - deals with space.
Acronym - government agency.
Moebius strip - deals with infinity or
repetition.
Round logo - implies tie to NASA logo.
Click on finish. Analysis complete. If
correct, hear a beep; if not you are asked to redo.
Guard: Check and talk to
guard. Show the passport to the guard.
Amble Dexter: Dexter
introduces Michael Reichart. Dexter wants a simple exercise first.
Look around the office. Check the quote on the
clock on Dexter's desk. Those who cannot remember the past are condemned
to repeat it.
Examine Reichart.
Examine Amble Dexter.
Analyze Amble Dexter:
Sharp gaze - highly intelligent.
Steady hands - calm leader.
Runs agency from wheelchair - highly
determined. Click on finish.
Exercise: Talk to
Dexter about simple exercise.
See if the life of Giuseppe Montessero
resembles that of any historical figure:
Click on the folder on the desk.
Analyze the picture in folder. Malachi works
on his phone.
Read about Giuseppe Montessero. There are 7/7
data points.
How to analyze: Click analyze button.
See portraits of different
personalities.
Click on question mark to learn about the
personalities, minus sign to remove or plus sign to bring back.
Remove those that are not or least applicable to the data points
of Giuseppe.
Limit the choice to 3 personalities.
Giuseppe Montessero analysis:
The 3 closest ones are Bernini,
Michelangelo
and Raphael.
Select Raphael; he has 7/7 match on the
subject's data points. Solved.
Job: Malachi talks to
Dexter. Initially decline the job. Talk about The Entity. Accept the job.
A young woman named Bianca Cardolo was murdered in
Venice.
Find out who she was and her connection to a known
historical person.
The fee is 50K. Further info is classified.
Achievement received - performing monkey hat.
Venice
Talk to the guard to get plane tickets. Exit and
go to the airport.
Collect 13 data points:
Bianca Cardolo's dossier:
Read Bianca's dossier in the cellphone. There are 13 data points that needs to be checked.
Bridge - murder scene:
Paolo Brunetta: Use the
cellphone and call Brunetta the detective working on Bianca's case.
Go to bridge in map.
Analyze Brunetta (brain icon):
Red eyes - working long hours, little sleep.
Bloated stomach - stress-induced acid reflux.
Smoker - high stress job.
Well-worn coat - 20 years as a detective. Click on finish.
Examine and then talk to Brunetta. See a woman in
the house at background.
Ask about himself. Answer that you are not looking
for Bianca's killer.
Ask about orders. Answer that Cardolo didn't hire
you.
Learn that Bianca was named to be the most
beautiful woman in Venice - data point.
She was hanged from this bridge. Her pursed
dropped in canal. No witnesses came forward.
Achievement received - cooperate with authorities
(if Brunetta likes Malachi's answers).
Achievement received - stick it to the man (if Brunetta doesn't like Malachi's
answers to himself and orders).
House: Check the house
beside the bridge. It needs repaired. Check the window that looks directly to bridge.
Knock on house door.
Catarina Felone: Examine
the old woman.
Analyze Signora Felone:
Severe hair style - retired teacher.
Touches neck - lost or sold jewelry.
Threadbare clothes - low income.
Callused fingers - string musician. Click
finish.
Talk to Signora Felone. Compliment her house. She
doesn't want to talk about the murder. Goodbye.
Research Catarina Felone:
Open cellphone and do a web search on Signora Felone.
See a younger Catarina. She is wearing a
Venetian Murano glass necklace.
Canal: Look at the canal.
There's something at the bottom of the canal. It could have fallen from
Bianca's purse.
Exit to map.
Barozzi's antiques:
Jump to Barozzi's Antiques. Talk to Barozzi. Look
around the shop.
Malachi - Kye understandably do not like lions.
Examine and buy the collapsible boat pole
above the entryway.
Examine and buy the Murano necklace in the
necklace case.
Bianca's family: Talk to
Barozzi completely. Learn that Bianca's father is connected to the Savoys
and Capetians - royal family line - data point.
Dante Cardolo, Bianca's husband is is also from
the Capetian line - data point.
Dante has politics that is not well received -
data point.
Bianca is wealthy on both sides of her family -
data point.
Determine the authenticity of the antique figurine: Malachi
takes medicine again.
Analyze figurine:
Take the figurine from table.
Expression - scroll to Lewis chessman. Click
match.
Material - scroll to walrus ivory. Click
match.
Type - medieval chess pieces. Click match.
Finish.
Malachi congratulates Barozzi on the good
find.
Cardolo's home:
Dante: Talk to Dante
Cardolo. Bianca is his politically correct wife.
End conversation and do analysis.
Analyze Dante Cardolo:
Puffy red eyes - recently emotional.
Bright tie - narcissistic, likes attention.
Dark suit - grieving.
Shaking hands - anxious, feels violated.
Talk to Dante again. Bianca is a dancer - data
point.
Bianca got married at 18 to an older man of 43 -
data point.
Bianca had her first child, a son at 19 - data
point.
Living room: Look around.
Check the flowers and cards on top of the piano.
Take some florist putty from the flower
arrangement (if you have the boat pole already).
Bianca's bedroom: Enter
the door at back wall. Malachi takes another pill.
Look around. Check the dancer paintings.
Check the dresser. Open both drawers and see large
gloves. Check the photo.
Desk: Check the desk at
right. Examine items.
See a key slot at left end of the drawer panel.
Bridge - murder scene:
Signora Felone: Knock on
door of Signora Felone.
Give the Venetian necklace to Signora Felone. Compliment her house again.
Talk to Signora about the murder. Learn that there
were 2 men in black; their faces were covered in black.
Achievement received - charming young man.
Canal: Select the boat
pole in inventory. Click on combine icon and then click on the highlighted
florist putty.
With the boatpole with putty selected in
inventory, use the combine icon on the canal.
Click-hold-move the cursor-pole towards the item
in the canal. Get a brass hook.
Barozzi's antiques:
Someone was looking for Rector, an Asian woman of
middle age.
Cardolo's home:
Bianca's bedroom: Go to
the bedroom and then desk.
Use the brass hook on the key slot at left end of
drawer panel.
Secret drawer opens: Examine
the medical cream for plaque psoriasis. Take the keycard.
Examine Bianca's prepaid cellphone and get
Gabriella's phone number.
Gabriella Spira: Use the
cellphone's contact page to call Gabriella.
Malachi makes an appointment with Gabriella.
Doge Plaza:
Gabriella: Examine
Gabriella.
Analyze Gabriella Spira:
Hair and makeup highlight face - vain.
Touches her hair - highly conscious of social
image.
Lean and muscular - dancer.
Talk to Gabriella.
Bianca's mother was the daughter of a magistrate -
data point.
Bianca dances in the studio - La Compagnia Venezia.
Bianca is worried about her looks.
Bianca's dream is to be married to a powerful man
- data point.
Bianca is 3 months pregnant with a girl.
Dance Academy:
Use the keycard on the dance academy icon in the
map. Look around.
Try to use the ballet barre.
Bianca's portrait: Bianca's
picture shows her in Swan Lake.
See that her hands are overly large and reddened
with severe skin condition - data point.
Try to take the picture. Use the smartphone in inventory to take a picture
of Bianca's Swan Lake portrait.
Determine if Bianca Cardolo's life was similar to any
famous women in history:
Analyze Bianca Cardolo:
Study each historical figure and see if they
match Bianca's data point. Click on the question mark and read the blurb.
Narrow the candidates to 3 possible match:
Cleopatra, Livia Drusilla and Princess Victoria.
Select Livia Drusilla even though she doesn't
match: skin condition, dancer and being murdered.
After the investigation:
Hotel room: Malachi talks
to Gretchen on the phone. Malachi enter his hotel room and is attacked.
He wakes up and sees the men taking picture of his
passport.
He processes that his attackers are
the men that killed Bianca as described by Signora Felone.
They escape. Malachi takes a picture of a footprint.
Dexter: Back at the FITA
office, Dexter was surprised by the attack. The attackers are Chinese.
Malachi reports that there is no match but the
closest one is Livia Drusilla.
Dexter would not inform Malachi of reason for the
whole investigation. Malachi is not trusted. Yet.
Dexter says that what Malachi is doing will be of
service to the country - entire world. Malachi leaves.
Dexter reports to a senator that "they" might stop
looking for the girl if they think she is dead.
CHAPTER 2: THE WHEEL TURNS
Cairo
Bayahira Road, Cairo, Egypt: See
Malachi have car trouble in the middle of the desert in Egypt. There is no
cell phone service.
A backpacker walks down the road. Both men
evaluate one another. David Walker offers to take a look at his car. He has
experience in the military.
After Malachi points his gun at David, they get
into an understanding. David leaves before Malachi pays him.
Hotel room in Cairo:
Canopic Chest dossier: Malachi
says to review the notes on the Canopic chest to be evaluated.
Read the text message.
Open the projects folder. Select Canopic chest for
Rutherford. The contact here is Youssef Masri of Massri's Treasures.
Do a web search.
Read about Samuel Lessing who discovered the
canopic chest of Horemheb. Read about Horemheb and canopic jars.
Room: Look around. Check
the bed and chair.
Malachi says that this hotel was recommended by
Masri because it is close to his shop. Malachi says he will check the shop
tonight.
There's a hanger in the closet.
Take and then open the suitcase. Take the gun.
Exit The Seven Wonders Hotel.
Street outside hotel:
Look around. See that there is a container of
motor oil in the gutter.
Masri's Emporium: Check
Masri's Emporium across the street. The shop is closed.
Malachi wants to know more about Masri before the
meeting tomorrow.
Lady of the Dunes bar:
Go left pass the private residence. See the bar. Enter the bar. Look around.
Dartboard: Check the
dartboard. It's chilly standing here. Check the vent above Hasim.
Play darts. Shoot a dart and it goes to the right. Compensate
for the air from the vent.
Ammon the bartender: Talk to
the bartender completely.
He recommends to talk to the 2 men because Hasim
knows Masri well.
Hasim and Saa: Examine the 2
men on the couch.
Analyze Hasim and Saa.
Saa the bald guy:
Guarded resentful expression - dislikes
foreigners.
Overly muscular physique - lifts weights to be
tough.
Rough hands and scarred knuckles - frequently
gets in fights.
Hasim:
Sharp calculating eyes - intelligent, quick
thinker.
Mouth is always moving, smiling - he's a liar
and a conman.
Wearing a nice jacket in a dive bar -
considers himself important.
Flashy jewelry - greedy, likes to show off his
money.
Talk to the men. Hasim needs more convincing
before he will
give information.
Look at both men again. Try to talk to Hasim.
Malachi thinks to get him to talk involves money or humiliation.
Ammon: Check the
dartboard. Talk to bartender about
darts. He warns about Hasim. He's been playing darts for 20 years.
Bet on dart game: Talk to Hasim again. Ask him about darts. Play
darts.
Shoot a dart and it goes to the right. Compensate
for the air from the vent.
Malachi loses and pays Hasim.
Adjust the aim on the dartboard:
Alley: Exit the bar.
Enter the alley right of bar. Look around.
Check object on ground at back area.
Air vent: Check the air vent
at top of left wall. Try to use it. It's too high.
Check the crate at right. Use the crate. Malachi
pushes it under the air vent.
Try to climb up the crate but it's too dark to see
the vent.
Fix the light: Try the
light switch at left. That didn't work.
Check the loose wire at right wall where the crate
was previously.
Attach the bottom wires to the correct wires on top.
Use a bottom wire and then click on a wire above it. They
will be connected.
Connect the white with white wire. Use the blue wire
with white spot on top right wire. Use the other blue wire to top middle
wire.

Use the light switch at left wall.
The lamp is turned on. Pick up the loose brick
from the ground.
Check the ladder and fire escape behind the lamp.
Check the air vent: Climb the
crate and look at air vent.
Check the padlock. Use the brick on the padlock.
Check both switches: power and air flow. The dials
are too rusty to move.
Turn the dials: Go down
and exit to the street.
Pick up the motor oil can from the gutter
close to the hotel.
Go back to the alley and climb the crate.
Use the motor oil on any or both the dials of the
air vent.
Turn the power dial to off. It breaks.
Turn the airflow dial to out position.
Play darts and get information:
Go back to the bar.
Darts: Talk to Hasim and
play darts again.
Hasim loses. He doesn't want to pay cash.
Talk to Hasim again and ask him about Masri. Masri
is a mean man.
Ask about Masri again. Learn that if Masri goes
for the drawer, he will pull a gun.
SAVE GAME here.
Bodyguards: Hasim offers
the 2 thugs to be Malachi's bodyguards for 1k.
You can either hire the thugs or not. If you hire
them, you can fire them later or bring them with you to Masri's.
Fight in the alley:
Exit the bar and hear a fight in the alley.
Go to the alley and see 3 assassins attack David
Walker.
They will execute David by hanging him. Examine the assassins and David.
Save or not to save David:
Follow the path below based on your choice.
Choice - Save David:
Save David: Take the gun
from inventory. Try to use it on the guy at top of fire escape.
Move to the dumpster and then use gun on assassin
on fire escape. The assassins run away.
Another choice: Remove
the noose. Take David with you or leave him.
- If you take David, he will be unconscious on the
other hotel bed.
Achievement received - One good deed deserves
another.
- If you leave David, exit the alley and then come
back. Pick up the hostel card David left. Continue in "Do not save
David" below.
Achievement received - he'll walk it off.
If you took David to the Hotel
(more score points):
Malachi's room:
David Walker:
David is unconscious on the bed.
Analyze David:
Grown out crew cut - recently left the
military.
Even muscled physique - he had a physically
demanding job.
Callused palms and fingers - experienced
gunman.
Search David:
Check David's shirt to see the dog tags. He is
Captain David Walker. Black dog tags are used by Special Forces.
Check David's pockets. There is a hostel card.
Research David Walker:
Do a web search using the cellphone. There's too many David Walker.
Hostel: Exit the hotel
and go to right screen to the side street. Enter the Hostel (second door).
Layla: Examine Layla.
Then talk to her. Give her the Hostel card.
Achievement received - mingle with locals (Ammon,
Hasim, Saa and Layla).
David's room: Use the
light switch. No light. Check the lightbulb and see that it might have a
chain. It's too high.
Go back to Malachi's hotel room. Take the
hanger from the closet.
Go back to the hostel. In the room, use the hanger
on the light bulb.
Look around. See a pink cow on the bed post of the
bunk bed. Click on the cow. Moo!
Check David's backpack. See that there's big knife
and a hook.
Check David's passport and learn that his full
name is David Livingston Walker.
Web search: Do a web
search. Learn that Captain David Livingston Walker is a two time Medal of
Honor recipient.
David: Go back to the
hotel. David wakes up.
Talk to David. Tell David more about Malachi; like
he's from New York.
Offer David one time security work. Tell David the
business is antiques.
David accepts the job after Malachi is honest with him.
Malachi warns David about Masri's gun in the drawer.
Achievement received - the bodyguard.
If David doesn't get good response from Malachi
(like not explaining his business),
he will refuse the job.
They will meet tomorrow in front of hotel.
|
Choice - Do not save David (less score points):
David wakes up and fights the assassins. They all
leave the alley.
Pick up the hostel card that is left on the
ground.
Hostel: Go outside the
hotel. Go to right screen and be at the side street.
Enter the Hostel (second door).
Layla: Examine Layla.
Then talk to her. Give her the Hostel card.
Achievement received - mingle with locals (Ammon,
Hasim, Saa and Layla).
David's room: David is
unconscious on the bed.
Look around. See a pink cow on the bed post of the
bunk bed. Click on the cow. Moo!
Analyze David:
Grown out crew cut - recently left the
military.
Even muscled physique - he had a physically
demanding job.
Callused palms and fingers - experienced
gunman.
Search David:
Check David's shirt to see the dogtags. He is
Captain David Walker. Black dogtags are used by Special Forces.
Research David Walker:
Do a web search using the cellphone. There's too many David Walker.
Check David's backpack. See that there's big knife
and a hook.
Check David's passport and learn that his full
name is David Livingston Walker.
Web search: Do a web
search. Learn that Captain David Livingston Walker is a two time Medal of
Honor recipient.
David: Go back to
David. David wakes up.
Talk to David. Tell David more about Malachi like
he's from New York.
Offer David one time security work. Tell David the
business is antiques.
David accepts the job after Malachi is honest with him
but asks for the money up front.
Achievement received - the bodyguard.
If David doesn't get good response about Malachi,
he can refuse the job.
They will meet tomorrow in front of the hotel.
|
Masri's Emporium:
The next morning, exit the hotel.
Depending on the choice made - meet
David or Hasim-Saa in front of Masri's Emporium. If there is no bodyguard,
Malachi is alone.
Enter the shop.
Youssef Masri: Examine
Masri.
Analyze Masri:
Sweat on forehead - he's anxious about
something.
Tight jaw in his own office - has deep seated
rage.
Embroidered, expensive clothing - big ego,
projects the image of success.
Examine canopic chest
and documents for authenticity:
Examine the
jars.
Analyze the jars:
Figures - Tutankhamen jar stoppers. Press
match.
Handles - rope and ring handles. Press match.
Hieroglyphics - Tutankhamen cartouche. Press
match.
Marble - Egyptian calcite. Press match.
Gold border - canopic chest of Tutankhamen.
Press match.
Malachi reports to his client via cellphone
that the Canopic jars are authentic but they are not Horemheb's. They are
Tutankhamen's - the one that was stolen from the Cairo Museum in 1992.
Achievement received - it belongs in a museum.
Masrif is enraged. David stops Masri from pulling
his gun from the drawer.
If no bodyguard or if the bodyguards are Hasim and
Saa, Malachi will be killed by Masri. Go back to bar after
winning the dart game and replay from there.
Assassins:
Outside, David is exhilarated recalling what
happened at the shop.
The two are attacked by 4 assassins. Malachi has a
knife on his neck but saved by an assassin stating that it isn't him - it's
the other one. The assassins flee.
Malachi sees a footprint on the ground that
matches the one outside his hotel window in Venice.
Was the attack a setup or does David work for
Dexter or ? Wait!
CHAPTER 3: WHEN YOU KNOW WHO I AM
Manhattan, New York
Rector Antiques:
Malachi and David arrive at the store. Malachi
introduces David to Gretchen. Malachi tells David to stay in the spare room
in his apartment.
Gretchen brings the mail in the office.
Professor Reed: Use the
cellphone contact list to call Prof. Reed in Oxford England.
Prof. Reed say that Paramedes wrote something
about living an entire life that has occurred before but doesn't know
anything of that during the modern age.
Barozzi's mail: Use the desk
and read Barozzi's mail. Senator Markham a former general in the military was
scheduled to
meet Bianca in a charity event.
Note that there is a superglue tube on the desk.
Senator Stephen Markham:
Do a web search on Markham. A former 2 star general, retired at age 30 is now governor of Connecticut. He is campaigning for the presidency. There is a Markham rally at Bethesda Fountain
today.
Appraise the rifle for any notable details
and/or historical significance:
Exit to the store. Talk to Gretchen. There is an
urgent appraisal from Congresswoman Smythe. Look behind the screen on the
left.
Analyze rifle:
Type - lever action rifle. Click match.
Engravings - Teddy Roosevelt's model 1876
rifles. Click match.
Barrel - half round, half octagonal barrel.
Click match.
Manufacturer - Winchester repeating arms
company, circa 1860. Click match. Finish.
Talk to Gretchen about Congresswoman Smythe. Get
Cong. Smythe's phone number and it is entered at the contact list.
Outside Antique store:
Check the newspaper stand by the road. Malachi wants a newspaper but he
needs quarters.
Check the poster on the side of the newspaper
stand. It is about the rally.
Click on the pink cow on post of the left
newspaper stand. Moo!
Malachi's apartment:
Look around at the sterile modern apartment.
Check the kitchen and see a knife block. There's a
scissor here. Check the birthday card from father.
Check coat on stand, balcony, sofa and table.
Bedroom: Go upstairs to
Malachi's bedroom. Look around.
Check the nightstand. Take jar of coins to get
quarters.
See an old MP3 player in the drawer.
David: Go downstairs and
knock on door of spare room.
Talk to David. Gretchen invited David to meet at
Cherries. Learn about security here in the apartment.
Get entered in rally's VIP list:
Newspaper: Outside
Antiques store. Use the quarters on newspaper stand and get newspaper.
Click-Read about Senator Markham. Learn about
Douglas Wilde Carter, a billionaire backer.
Bethesda Square: Look
around. Check fountain, Markham and crowd.
Man with clipboard: Examine
the man with clipboard. Talk to man.
To enter the VIP tent, Malachi needs his name to
be on guest list and have a VIP
badge.
Congresswoman Smythe: Call
Cong. Smythe. Malachi will be added to the VIP guest list.
Get VIP badge:
Man on cellphone: Examine
man on cellphone.
Analyze man on cellphone:
Talking on cellphone - likes to appear
important.
Haughty, bored expression - arrogant
personality.
Badge on lanyard - VIP pass for rally.
Glitter on pants - sex addict: lap dance
before noon. Finish.
Teenage girl: Examine
girl dancing.
Analyze teenage girl:
Sullen, defensive expression - has an
attitude.
Old fashioned CD player - no money for
upgrade.
Torn, worn clothing - comes from poor family.
Finish.
Talk to girl. Try to pay (give wallet) the girl to
distract the man but that
doesn't work.
Malachi's apartment: Take
the scissors from the knife block in the kitchen.
Go to Malachi's bedroom and take the old MP3
player from nightstand.
Rector's Antiques: Take the
superglue from Malachi's desk.
Bethesda Square: Go back to
rally site.
Teenage girl: Give the
MP3 player to the teenage girl. She will distract the man with the badge.
She walks over and does her distracting.
Man with badge: Use the
scissors on man to cut the badge off. Malachi picks the cut up badge
up.
Meet Senator Markham:
Badge: Combine the
superglue and the badge to get a fixed up badge.
Enter the VIP tent: Talk to the
man with clipboard. Malachi's name is on the list and he is now wearing a
VIP badge.
Malachi shakes hands with Senator Markham.
See Senator Markham's face superimposed with
Augustus Caesar's.
Malachi is in pain.
As David:
Spare room: David is to meet
Gretchen. Look around the room.
Check the backpack and take the wallet.
Rest of house: Look
around at living room and kitchen. Check the balcony. See Malachi's private
balcony.
Flower shop: Jump to
Rector's Antiques. Cross the street.
Check the flower shop. Buy flowers. Talk to the
vendor. Pay the vendor for the red rose.
Cherries on top: Enter
the club. Look around.
See that there is a beer ready for David at
Gretchen's table.
Give the rose to Gretchen. Talk to Gretchen.
Gretchen has run the shop for 5 years.
Learn about Malachi. Gretchen warns David not to
fall in love with Malachi. Malachi never breaks his
rules.
Get to Malachi:
At the apartment, hear Malachi scream. Check his bedroom door.
Go to the balcony and examine Malachi's balcony.
It's too far.
Grapple: Go to David's
room. Check the backpack and take the grappling hook and knife.
Take the jump ropes right of mirror. Get 2 jump
ropes. Combine the 2 jump ropes in inventory.
Combine the grappling hook with the combined ropes
to get jump ropes and hook.
Get to top balcony: Go to
balcony and try to use the ropes with hook. David wants something to bridge
the gap.
Take the table from the living room. He can't.
Go back to balcony and use combine icon on Malachi's balcony.
David places the table as an incline to the top
balcony.
Save game here.
COMBINE the rope and hook with Malachi's balcony
to throw the grapple.
Use the balcony to climb it.
Climb the rope: Climb or lean
left or lean right to get to the top of the balcony.
Achievement received - the ultimate boy scout.
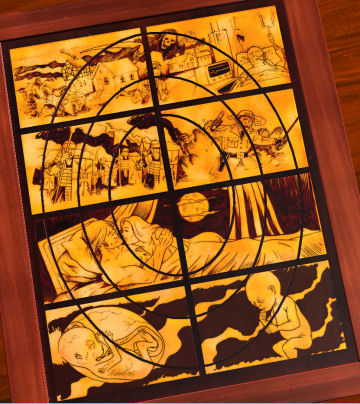
Malachi: See Malachi held
by the rings. He is separated from his body and is about to enter the bubble
at center of 3 rotating rings of the wheel.
Walker holds him down. Malachi returns to his
body. Malachi is very embarrassed and orders Walker out of the bedroom.
As Malachi:
Find answers:
Augustus Caesar: Read the
web search in cellphone.
Dexter at FITA: Text
Dexter. Malachi writes that he knows about Markham.
Dexter need to meet with Malachi and wants him to
bring his security.
David's questions: Go
down and talk to David. He threatens to leave.
If you do not tell him about the pills, he will
leave.
Achievement received - mind your own business.
Tell him about aspirin and Xanax. He stays.
Achievement received - medical needs.
FITA: Automatically be at
FITA. Talk to the guard.
If David is not here, call David on cellphone to come.
The Savant:
Amble Dexter: Dexter knows all
about David. Talk to Dexter.
Dexter wants Malachi and David to find the present
day Livia Drusilla. He will pay them 50K each.
Alone with Malachi, Dexter explains to Malachi
that he is the savant. He knows all about Malachi's life - Malachi's mother,
her infidelity, the lion attack and his mathematician father's estrangement.
There are 3 savants in history that has similar pattern as that of Malachi.
One of them is Benedict de Mont Froi.
FITA is here only to watch and not manipulate
events. Malachi hated nature because of the lion attack and turned to
history of men and objects. He doesn't trust.
Malachi's phone is now routed through a secure
government agency.
David Walker's part in this is to be explained
when Malachi identifies Livia Drusilla.
Senator Markham: Before
Malachi and David enter the plane, they are brought to the limo of Senator
Markham.
Markham wants a promise that the men will find and
protect his future wife. David promises; Malachi is silent.
While they are inside the limo, the driver
exchanges Malachi's pills. The men board the plane.
CHAPTER 4: DROWNING IN THE SEINE
Paris
La Belle Eiffel Hotel:
Malachi takes his meds. See that there is a coffee
shop here.
Dexter text: The woman in
Paris is Caroline Alfonse. The dossier and the Moebius article are sent.
Moebius Theory: Open the
folders and read about Moebius theory. The theory was elaborated by Benedict
Mont Froi a medieval monk. Dr. Wilhem Rarick is the founding father of the
modern science of Moebius.
Moebius theory is that history has defined
patterns which repeat themselves over and over. US, Britain, France,
Germany, Israel and Russia are part of the Moebius group; as well as other
rogue organizations.
Do a web search on Benedict de Mont Froi. No
information is seen.
Read the web search about Dr. Wilhelm Rarick. Not
much information is obtained.
David Walker's dossier:
Malachi starts a dossier on David and needs 11 data
points. There are already 4 data points obtained.
Talk to David to get more data.
David joined the army at 20 and served for 10
years - data point.
He studied Military History - data point.
David grew up in small town and didn't leave until
college - data point.
Give info or not about the present project.
David has a sister and the parents are still
living.
He has no wife or girlfriend.
Listen to all of David jokes.
Achievement received - knock-knock for listening
to all of David's jokes.
Caroline Alfonse dossier:
Read Caroline Alfonse's dossier.
Bibliotheque Nationale de France:
Librarian: Examine the
librarian.
Analyze the librarian:
Cold disinterested eyes - not attracted to me,
prefers blondes?
Orange lips - trying to draw attention to her
lips.
Tense shoulders - uptight person, rule
enforcer.
Bright passionate colors (shirt) - sexually
frustrated.
Slight hand tremor - coffee drinker, low on
caffeine.
Talk to the librarian. There are news clippings
about Caroline Alfonse. They will be sent to the public computer.
Benedict Mont Froi information are in archives.
She wishes for coffee. There is post it-paper on her
monitor.
Computer: Go to the
public computer on the table. Read the newspaper clippings about Caroline.
She was engaged to a 43 year old senator when she
was 19. Her parents divorced when she was young. The engagement was called
off by the senator.
Malachi takes pictures of the news clippings.
Archives: Check the
archives and see that it needs a password. There is post it-paper on the librarian's monitor.
Hmm...
Talk to David. Ask him twice if he will flirt with
the librarian. He wants a reason.
Get the coffee: Check the
trash can and see a coffee cup. Take the coffee cup.
Click on the pink cow drawn on paper. Moo!
Go back to the hotel and the cafe at the lobby.
Look at barista.
Analyze barista:
Modern style but worn eyeglasses - style
conscious but not well off, probably a student.
Skull Tattoo on his neck - symbol has meaning
to wearer.
Rough hands, small cuts - participates in
extreme sports.
Strong wiry muscles - gym rat. Finish.
Prepare the coffee: Buy
coffee from barista.
Achievement received - if you buy 3 or more coffee
and prepare them - caffeine addict.
Use the cream and sugar side. The bought coffee and used coffee cup are placed on the bench.
Taste the used coffee cup. It taste sweet. Examine it
to see that it is lighter in color than the bought coffee.
Use 2 packets of sugar.
Use one dose of cream.
Look at the prepared coffee. Malachi wants it
dressed up.
Use the heart cutter at right. Sweet! Exit.
Distract the librarian: Go back
to library.
Talk to David again and coffee. David gives the
coffee to the librarian.
Take the post it on the monitor.
Read the paper in inventory - Eiffel88.
Archives research:
Benedict de Mont Froi: Use computer.
Open archives folder. Select Eiffel88 as the password. Select Mont Froi for
search topic.
Go to the Archives book drop-slot at right wall.
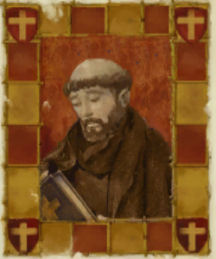
Read about Abbot Benedict de Mont Froi 1230-1280.
Learn that his intellect is beyond all men. He was plagued with headaches
and seizures.
He was burned at stake with his close associate
St. Armand. Malachi takes a picture of Mont Froi.
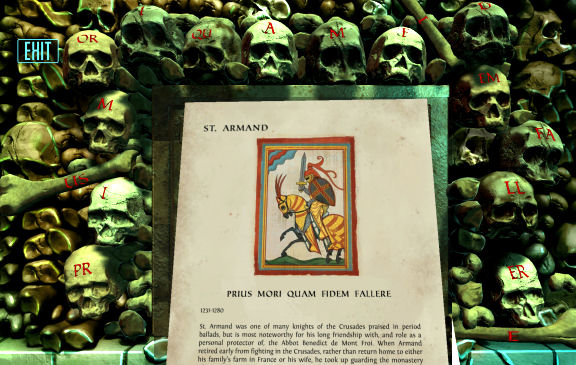
St Armand: Use the
computer again. Use the archives again. Select password and search topics.
Read about St Armand 1231-1280. St. Armand is the
personal protector of Mont Froi. His skeletal remains were found in the
Parisian catacombs.
Malachi takes a picture of St. Armand.
Talk to the librarian about St. Armand. St Armand
is known as the Knight of the Catacombs. There's a tourist brochure in
lobby. Most of the catacombs are off limits to the public. Also the maps of
the catacombs were removed from circulation.
Alfonse's home:
Caroline and her father are away this weekend.
Bret the butler is here.
Furniture: Look around at the
furniture. Analyze
the items.
The clock, books in bookcase, mirror above the
fireplace and small cabinet right of fireplace are authentic.
The mirror, vase by French door, statue close to
David, gold urn, globe and small clock above bookcase are fake.
Achievement received - an eye for antiques.
House manager - Butler:
Examine the butler.
Analyze the butler.
Sweat on brow - nervous.
Shifting eyes - something in the room is
distracting him.
Hands in pockets - subconscious tell, trying
to hide something in the room. Finish.
Talk to the butler. He did it for Madeleine the ex-wife. She got mostly nothing from the divorce. Caroline is aware of it.
To not give money to ex-wife, Henri made himself
look like he does not have money. Etienne is Henri's business partner.
Caroline went to a lover's rendezvous but it is
not a welcomed event.
Caroline's room: Look
around.
Check the bookcase and see a book on Parisian
catacombs.
Caroline has a degree in economics - data point.
Check the current events magazines on the table -
data point.
Safe: Check the head on
top of the dresser. It opens the door to a hidden safe. The safe needs 6 numbers.
Check the dates of the newspaper clipping photos
taken from library and see
which one will work. Enter dates European way.
Press 200808 - the date of the divorce of her
parents 20 August 2008. Press green button.
Turn the handle. Read the B&B brochure to learn
where Caroline is meeting Etienne.
Caroline has the accounting ledger of the
family - the finances do not look good.
Read the translated note from Caroline's ex-fiancée
concerning "practicalities".
Exit the room. David is impressed with Malachi.
Le Chateau Campagne:
Go to the rendezvous place. Look around.
Take the lantern from the low wall.
Caroline Alfonse: Examine
Caroline.
Analyze Caroline:
Sharp unfriendly expression - distrust men.
Straight tall posture - proud, regal.
Closed off posture - very private person.
Finish.
Talk to Caroline. Show the accounting ledger to
Caroline and she will open up. She admits that she will marry Etienne
because he will cover the family debts and more. Her father is addicted to
gambling. About the catacombs, she recommends to check with a cataphile - those that go to the
catacombs illegally.
Achievement received - follow the money.
Determine if Caroline's life pattern fits that of
Livia Drusilla:
Analyze Caroline:
Engagement - not a match.
Wealth - not a match.
Father's business - match.
Politics - match.
Degree in Economics - match
Broken engagement - match
Parent's divorce - not a match.
Beauty - match.
Prominent family - match.
Engaged at 19 to 43 year old politician
- match. Finish. Unsuitable match.
Malachi texts Dexter about Caroline. The next
candidate is Alessandra Lorraine In Zurich.
Malachi wants to check one more thing in Paris.
Catacombs:
Do a web search on Cataphiles. See the logo of the
cataphiles. We saw that symbol already.
Hotel: Go back to the
hotel.
David Walker's dossier: Talk
to David. Keep David informed.
David tells Malachi the last data point - he's
estranged from his parents. Ah...
Analyze David's dossier:
Select or delete historical characters that match David's data points.
Click on the question mark to learn about the
historical character.
Narrow the results to 3 closest candidates.
Then select the closest or matching one on all points.
The 3 closest ones are Captain Roderick
Butler, St Armand and St Martin of Tours.
But a lot of points are missing. Malachi wants
the info promised by Dexter after the completion of the assignment.
Achievement received - a mystery man.
Barista: Talk to the
barista. After being paid, the barista tells where to find
the skeleton of St. Armand.
Catacombs: Click on the icon in
the map. Use the icon to pull the manhole cover. David did the muscle work.
Combine the lantern on the icon.
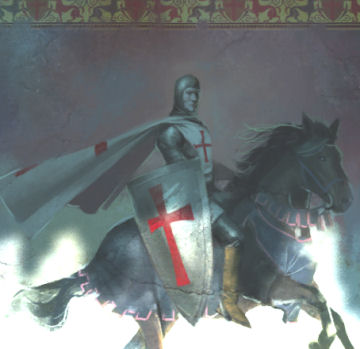
St. Armand: Examine St. Armand's
skeleton. Check the skulls.
Skulls and panels: Examine
the skulls and panel at right. The skulls have letters on them.
Use the skulls and panel. Look close at the
picture of St Armand in inventory.
See the Latin words of the motto of St.
Armand. PRIUS MORI QUAM FIDEM FALLERE (Yield to Death Rather than Betray
Trust).
Arrange the the letters to form the motto
starting at bottom left, over top and down at right side.
The compartment opens. See the picture of St.
Armand.
David: Pull back. Malachi
looks at David and see the superimposed figure of a knight.
Malachi suffers an attack. David takes him back to
the hotel.
Attack: David hears Malachi
scream. After a brief hesitation, he enters the room and sees Malachi
struggle.
Malachi falls at the center of the rotating wheel and
touches the pattern.
David brings him back. Malachi thanks David.
Message: Malachi texts
Dexter that he knows about the placebo. He warns Dexter not touch what belongs to him.
CHAPTER 5: THE ONE
Zurich
Lorraine mansion:
Read Alessandra Lorraine's dossier.
Gustav, the butler: Examine
Gustav.
Analyze Gustav:
Sultry gaze - sexually manipulative.
Unusually handsome - self-absorbed
personality.
Diamond tie pin - aspires above his station.
Overactive hands - subconscious gesture:
greedy personality.
Talk to Gustav. Learn that Alessandra's husband's
politics are not popular - data point.
Buffet room: Enter the door at
left.
Alessandra Lorraine:
Examine Alessandra.
Analyze Alessandra:
Keeps checking her hair - obsessed with her
appearance.
Keeps checking her cellphone - she's hoping to
hear from someone.
Gown has modern design, bright color - she
likes to be the center of attention.
Talk to Alessandra. She is not politically
motivated. She keeps on checking her cellphone.
Get the cellphone:
Distraction: Talk to
David. Malachi will distract Alessandra while David gets the phone.
Go to the wine table right of door. Now you can
get a wine glass.
Combine the wine with Alessandra. Malachi spills
the glass on her gown. David gets the cellphone. Alessandra leaves to change gown.
Cellphone: Examine
(magnifying lens) Alessandra's phone.
Read the message about meeting a person at
Aphrodite at 3 gongs.
Use the phone so that Malachi enters a response -
I'll meet you. Malachi needs to get Alessandra to meet this person.
Learn more about Alessandra:
Karl Lorraine: Exit to
the foyer. Go to the library left of Gustav.
Another blonde lady is here. Hear that Karl wants
a piece of cake. Look around.
Examine Karl.
Analyze Karl:
Sad haunted eyes - he's a lonely man.
Wrinkled ill-fitting tuxedo - is not really
interested or engaged in tonight's party.
Pale yellow skin - suffering from a long term
illness.
Talk to Karl. Karl has no energy to talk.
Maybe tomorrow.
Try to give Xanax. He hasn't eaten yet.
Go to the buffet and take a piece of cake.
Go back to the library and give Karl the cake.
Give Xanax.
Achievement received - it takes the edge off.
Take the calligraphy pen from the table.
Talk to Karl now. Learn about his politics.
3 gongs is when the clock strikes 3 times at the
half hour.
Alessandra was 22 when she had her son - data
point.
She did modeling and she wants to be a fashion
designer with her own line - data point.
Alessandra does not like politics - data point. She likes
flowers.
Get Alessandra's apology:
Stairs: Climb the stairs.
See a portrait of 2 women. The one on the left is
Alessandra. The other one is a relation.
Look closer and click twice at the portrait to get
a comment about
Jasmine flowers.
Pick up the blue ribbon from the floor. It
is Alessandra's.
David: Talk to David.
David asks about trigger.
Malachi says that it seems like there is something
that was locked up for a while that wants to come out.
David has always wanted to be a soldier and like
the idea of protecting people. He does not really have a particular liking
for medieval soldiers.
David knows there is something that Malachi is not
telling him.
Ask about jokes - all jokes. Malachi is now
laughing at the jokes.
Achievement received - comic relief.
Pick flowers: Go down,
then buffet room and out to the garden.
Go to bottom left hedges and then center of the
maze. Examine Hestia. Pick jasmine flowers.
Go to bottom right hedges and then to center of
the maze. Examine Hera. Pick hydrangea flowers.
Go to top left hedges and then center of the maze.
Examine Artemis. Pick peonies.
Go to bottom right hedges and then center of the
maze. Examine Aphrodite. Pick red roses.
Achievement received - trimming the hedges.
Bouquet: In inventory
combine the jasmine with blue ribbon.
Combine the bouquet with the calligraphy pen from
the library.
Malachi writes something on the ribbon.
Forgive me.
Place the bouquet on the bottom table in the
buffet room.
Rendezvous: See
Alessandra pick up the bouquet.
Hear the 3 gongs of the clock.
Go to the garden and then up to the top right
hedge-maze.
Malachi hides and sees the lovers meet. It is
Gustav the butler and Alessandra. Alessandra is jealous of the attention
Gustav gave to the caterer.
They go back to the party. Go back to the mansion.
Complete Alessandria's dossier:
Talk to Gustav at the foyer. Learn about Helene the younger sister of
Alessandra.
Determine if Alessandria's life pattern fits
that of Livia Drusilla:
Do the dossier analysis.
Sibling - match
Lover's flirtation - not match
Affair - not match
Fashion designer - match
Modeling - match
First son - match
Politics - not match
Out of public eye - match
Descended from Lorraines - match
Wealthy - match
Noble family - match
Married to 47 yo - match.
Solved. Alessandra is not Livia Drusilla.
Learn more about Helene:
Karl: Go to the library
and talk to Karl.
Helene is interested in politics.
Learn that he knows that he made a mistake
choosing Alessandra rather than Helene.
Helene Bernadotte: Climb
the stairs by the foyer. Helene is standing by the balcony.
Examine Helene.
Analyze Helene:
Elegant hairstyle - classic timeless style.
Regal air, guarded gaze - intelligent and
reserved.
Flattering dress, no accessories - serious,
not frivolous.
Sturdy physique - strong and disciplined,
mentally and physically.
Malachi says there is something more here - he
must touch Helene.
Talk to Helene. Malachi angers Helene by asking
about Alessandra sleeping with the help.
Touch Helene: Go downstairs.
Pick up the glove from the floor that Helene
dropped from the balcony.
Give-combine the glove to Helene.
Malachi apologizes. By being compassionate about
Karl's health, Helene touches Malachi.
Malachi sees Livia Drusilla superimposed over
Helene.
Malachi gets sick. Helene leaves. David is to
protect Helene.
Malachi texts Dexter about Helene. Malachi is to
get documentations.
Get more documentation on Helene:
Helene's bedroom: Climb upstairs
to the family quarters.
Trash can: Check the trash can
beside the desk. See a bouquet of flowers.
Take the flowers off and see a positive pregnancy
test.
Desk: See a magazine that is
important to Helene. Maybe she is interested in the summit. The magazine has
the French President and his wife on the cover.
Read the planner to see that she is to meet
Markham in the Euro 3 conference.
The post it note looks like coordinates. 3 months
notation
could relate to the pregnancy.
Cellphone: Examine and use the
cellphone. It needs a password. Go through possible passwords - didn't work.
Painting- star artwork: Check
the painting above the desk.
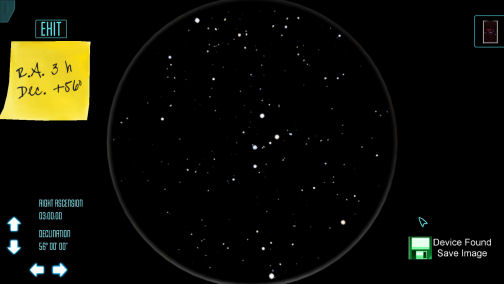
Telescope: Go outside to the
balcony.
See a telescope and USB cable.
Use the cellphone that is in inventory with the
USB cable.
Look through telescope.
Use the arrows at bottom left to show the
coordinates on the post it paper.
Click on the diskette at bottom right to take
a picture.
A constellation photo is now in inventory.
Identify the constellation: Go
to the library.
Combine the coordinates with the bookcase on
Natural Sciences at right side of the room.
The constellation is Cassiopeia.
Cellphone: Go back to Helene's
room. Use the cellphone on the desk.
Select Cassiopeia as the password.
Read the text messages. The man promises to leave
his wife and wants to marry
Helena.
There is a return number at top of the cellphone.
It can be traced.
Send a text message to Dexter to trace that number.
Dexter sends an answer back - it is Rene Corbeau,
President of France - last data point.
Check the magazine cover again - it is Rene
Corbeau.
Determine if Helene's life pattern fits that of
Livia Drusilla:
Analyze Helene Bernadotte.
All data
points match. Helene is Livia Drusilla.
Malachi sends a report to Dexter.
Achievement received - she's the one.
Abducted:
At the party, David drinks the drugged wine while watching
Helene. Helene is also drugged and taken outside.
David texts Malachi and collapses.
Malachi runs to the balcony and sees the van in
the driveway.
Helene was taken to a van. David tries to catch
the van but collapses and later also placed in the van.
CHAPTER 6: A TERRIBLE SILENCE
Manhattan & D.C.
Investigate FITA:
Malachi confronts Amble Dexter. There is a leak in the organization.
David Walker's dossier completed:
Learn about David
Walker, the Warrior.
The Warrior is paired with the Savant. To fulfill their
destiny, the Savant and the Warrior need each other.
The
Savant see patterns that others cannot. The Savant with the Warrior increase their abilities
or feel better in the presence of the Warrior.
The
Helene text sent by Malachi was seen only by Dexter, Reichart and Markham.
Learn about Reichart.
Malachi starts a dossier on Reichart.
Try
to analyze Dexter. Malachi is not getting any vibes from Dexter.
Reichart's office:
Exit Dexter's office. At the lobby click on the second door at top right -
second floor.
Bookcase:
Look around. Check the books and see that Reichart reads
Latin and French - data point.
Display case: Examine the wedding photo, baby girl and
baby boy pictures. Their birthdates are noted - data points.
Death, war, love and birth box:
Look close at the box left of the wedding
photo.
Arrange the pieces on the cover to form a
picture.
Click on a piece and then click on another
piece to swap them.
Take the data key inside.
Check the awards and certificate on wall. He graduated from Sorbonne - data
point.
Cryptology book: Read the cryptology book and click
on the page.
Learn about Caesar ciphers, Keyword ciphers and Null ciphers.
Malachi's assessment: Take Malachi's folder
on desk. Read Dr. Rosa Noriega's
assessment of Malachi. Note the comment about the part - that the Warrior provides
the Savant an emotional connection to the world.
Computer: Check the computer. It needs a password. The
password hint is encoded.
Rector Antiques:
Talk to Gretchen. Malachi wants a charter plane at his disposal.
Enter the office. Read the newspaper on the desk. Reichert's father is the
guest speaker at a neurologist conference in town.
Web
search: Check the web searches on the cellphone.
Learn that Marilyn Lewis married Michael Reichart and that they were co-workers - data point.
The
photo of Dr. Reichart with son Michael shows that Michael won an Olympic gold
medal in speed skating - data point.
Reichart's office:
Decode the computer password:
Use the magnifying glass on the cryptology
puzzle paper in inventory.
Select a cipher to work on at top left of
page. Choose Caesar cipher.
Select a possible key to use at top right of
page: Choose 1994 (Olympics).
Read the procedure on how to use the Caesar
cipher. Select a code letter and note the key # seen under it. Decode it
by adding that #'s position to the code letter.
For example L +1 = M.
Enter the solution at the bottom under
password hint. To enter the decoded letter, click on the chosen letter in the alphabet
sequence at center = Marilyn's maiden name.

From the web search, Marilyn's maiden name is Lewis.
To code the word Lewis; instead of adding as above, subtract the
position of the letters.
Select the letters that is in the
position subtracted from the known letter - KVNER.
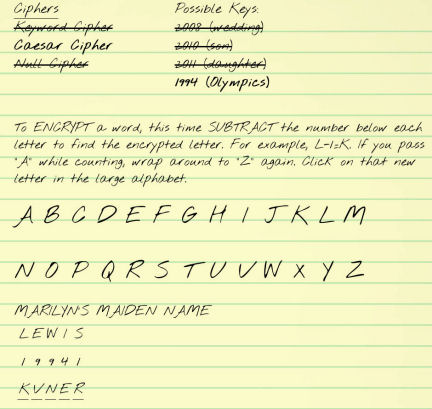
Computer: Use the computer.
Click on password frame and select KVNER. The
computer is empty.
Achievement received - codemaster.
Data key: Exit the computer. Combine the data key with
the computer.
Select the password - KVNER. Click on the USB icon at top right.
It
shows the FITA employees folder.
Open the MOLE document. It seems that Reichart suspects there is a mole.
Reichart might be innocent.
Dexter: Exit and use elevator to be at Dexter's
office. Talk to Dexter about Reichart.
Learn that Reichart is a former CIA decoder - last data point.
Determine if Reichart is the mole:
Reichart's dossier:
Analyze Reichart:
Compare data points with historical figures.
The 3 closest matches are Alan Turing, Alistair Denniston
and Sir Harry Hinsley.
Reichart is matched with Alistair Denniston.
Investigate Markham:
Malachi's apartment: Go home to apartment. Malachi gets a
panic attack.
Go
to the bedroom and use the rings.
Next day, unpack the suitcase. Go
to map and the airport.
Markham's office: Talk to Markham. Ask about Helene
e-mail.
Learn about the PA and the dumping of Dominique. Dominique was here after the
e-mail arrived and was alone in the office after the dumping.
Return to conversation and then ask about the e-mail again. Note that there
is a reflection on the window. Markham enters something in his computer.
Window: Click on the
window. Malachi states to cut the glare.
Click on the switch right of the window.
Malachi asks Markham to close the blinds.
Check the window now and see that the password
prompt is up.
Now ask about the Helene's email again. When
he uses the computer, do an analysis (brain icon) on the window and see
1470 entered.
Get Markham out of the office:
Use personal assistant question dialogue. Ask any question of the PA.
Computer: Once Markham leaves, use the computer. Enter
1470.
See
archives and mail. Open mail.
See
Dexter's mail - it's been forwarded.
Click on "sent". Read that the message states - They found Livia. You'll
need to move fast. It was sent to secure2014.
Exit and Markham comes in. He gives Dominique's address.
Gain
Dominique Freyre's trust:
Go
to Dominique's apartment. Get a text from Dexter stating that he is sending
2 men with Malachi.
Apartment: Look around. See a lot of mirrors. The
side table has photos and mails on it.
Dominique: Examine Dominique.
Analyze Dominique:
Flushed face, smiling - man hungry and finds
me attractive.
Genuine cameo necklace - thinks antique
jewelry makes her look classy.
Wears expensive clothing at home - has
expensive taste.
Talk to Dominique. After asking for a drink, she says that it is customary
to
bring the hostess a gift.
Say
goodbye and leave the place.
Get
gifts:
Go to the airport.
Rector's Antiques: Take the
cameo earrings on the table at left. Exit the store.
Cherries on Top bar: Cross the
street. Enter the bar.
Talk to the bartender at right. Get a whiskey.
Go to the airport and back to Dominique's.
Find out who she's working for:
Check the table at left:
Ask Dominique for a drink.
While she's getting the drink, use the table at left
wall.
Check the photo of young doctors.
Read the letters to see that a Dr. Angela Martin
filed a civil suit on Dominique claiming she tried to poison her.
See an old newspaper at left. It has a familiar
face on it. Hmm... like the one bought at newspaper stand several days ago.
Web search: After sitting
on the couch, do a web search on Dr. Angela Martin.
Save game here.
Talk to Dominique: Select
dialogues that shows that you are on her side. She will move close(r) to
Malachi if the dialogue chosen is correct.
Do not ask about e-mail. Talk about Markham.
Oh yes absolutely on sex. He's a fool or sue
him.
On hospital - I admire a woman with brains.
Ask about Angela Martin.
On parents - You're better off without them.
On college boyfriend - You must have been angry.
Check the mirrors on the walls and finish the analysis.
Analyze Dominique:
The 3 closest matches are Anne Boleyn, Lucretia Borgia and
Medea.
Dominique is Medea.
Get her to bedroom: Flirt a lot
with Dominique. Dominique brings Malachi to bedroom.
Lock the door.
Check the manicure set on the dresser. Take the
scissors.
If you kiss or do anything else - Dominique drugs
Malachi first. Game ends - replay.
Combine the scissors with Dominique.
Achievement received - ladies' man.
Douglas Wilde Carter:
Malachi reports to Dexter about Carter.
Malachi is again in DC.
Carter's home: Talk to Carter
about a proposition to be discussed in private.
Talk to Carter about working for him as a
Savant. Explain about identifying patterns.
Carter wants a demo. Malachi will do it on Carter.
Room: Check the room.
Look close at wedding pictures left of door.
Analyze it to see that there are 2 daughters and the young one is unattached
- data point.
Look close at photos by window. Analyze the
political pictures - data point.
Analyze the army pictures. Carter was a 2 star - Major
general - data point.
Check the web search on Carter and then his
daughter. Learn that the daughter married a media mogul - data point.
Analyze Carter:
Unwavering confident expression - proud and
intelligent man.
Strong easy posture - accustomed to
having command of a room.
Practicing pool in his own game room - pool is
a metaphor: he doesn't want to lose.
Dossier on Carter: Select
the 3 possible candidates - Benedict Arnold, Godwin Earl of Essex and
Richard Neville.
Carter is Richard Neville, 16th Earl of
Warwick - the Kingmaker. The Earl had one of his daughter marry a future
king.
Malachi tells Carter that he is the Kingmaker and
he wants his daughter married to Markham. That is why he's been killing the
possible Livia's.
Name the terms: I want
Captain Walker released, unscathed. (Walker and money will get less
points. Money only will end the game and get a retry).
Carter wants proof that Malachi switched sides.
Give Carter the data key.
Achievement received - by any means necessary.
Carter sends a text message on his cellphone.
Malachi takes the cell phone and sees where the captives are kept. Malachi
sends the location to Dexter.
Carter wants the Savant but was not sure if Walker
can be controlled. He wants Malachi's moral compass removed.
To prevent the countermanding of Carter's orders,
Malachi swallowed the sim card of Carter's phone.
CHAPTER 7: FINDING THE LIGHT
Qatar
Outside The Great Stone Fortress:
Malachi is with the commandos outside the fortress
of Qatar.
Is Walker expendable? Get a text from Dexter about
Carter.
Read the web search about the Great Stone
Fortress. There is an extensive tunnel system that stretches for miles
Truck with grenades: Look
around. Talk to the soldier at left guarding the grenades.
Use the truck to see the contents. Try to take a
grenade. Take a flashlight from side of truck. After talking to guard, get a
flashlight.
Surroundings: Check the tent,
the far right truck and the closer unguarded truck.
Unguarded truck: Go to the truck
at right. It has supplies.
Use the truck to find out that it is dark.
Combine the flashlight on the unguarded truck.
Take a flashbang from the crates.
Look at the flashbang in inventory. It has a
timer.
Grate: Check the pile of
rocks behind the unguarded truck.
Combine the flashlight and the rocks. See that
there's a metal grate.
Use the grate and see that it cannot be moved.
Create a diversion and get grenade:
Get grenade: Combine the
flashbang with the tent. Use the timer and select the time of your choice:
10, 20 or 30 seconds.
The guard runs to the tent.
Look close at truck. Get grenade from the
crate in the left truck.
Check the grenade in inventory. It has a remote.
Open the grate: Place
grenade on grate behind the unguarded truck.
Get another flashbang from the unguarded truck at
right.
Combine the flashbang with the truck right of the
unguarded truck. Time it with seconds of your choice.
Click-press the button of the remote seen at left
side of screen at about the same time as the flashbang timer runs down.
The grate is now opened. Enter hole.
As David Walker.
Prison cell:
See David and Helene. Check the crack on the floor
to see a tunnel underneath.
Helene is in shock. Talk to Helene to bring her
back to her senses. Use the dialogues in sequence.
Talk to Helene again.
Escape the cell: Look at door
and guard. Talk to Helene about a diversion.
Click on door to get the guard inside.
Use the guard to get David attack the guard.
Look close at unconscious guard. Take the gun
and the keys.
Exit the cell. Combine the keys with cell door.
The door is locked.
Tunnels:
Gate: Check the grilled door.
Combine the keys and gate to unlock the grate door.
Helene climbs the ladder first.
Tunnel maze: Take the torch from
wall.
Move cursor around to see the labels of exits
and possible items. (Space bar and target icon do not work from here
on).
Exit up, left, left and up.
Big Dipper: Examine the big
dipper constellation on right wall. The end star of the dipper points to
the north.
Achievement received - astronavigation.
From now on - follow where the North Star points to.
Exit left. See big dipper.
Go up. Take rope.
Go up. See big dipper.
Go left and then up. A guard arrives. David
shoots him. David wants to slow down the guards.
Go left and down. See a wooden support. Combine rope with wooden
support. David pulls down the ceiling and blocks the passage.
Go down. See big dipper.
Go down, down and left. See big dipper.
Go left, left, left. See big dipper.
Go up, up and up. See big dipper.
Go left and left. See big dipper.
Go up and up. David and Helene rest.
As Malachi.
Find David and Helene:
Go right, right, up, up and right. Take the pickaxe.
Go down, down and down. See a mine cart and an
opening at top of right wall.
Use the mine cart and Malachi pushes it to right wall.
Climb the cart. Combine the pickaxe with wall.
Exit through the tight hole and down the other
side of the wall. They can't come back this way.
Go down, down, and right.
See big dipper. From now on, follow the reverse of
where the big dipper points to since we're trying to get to the fortress not
the exit.
Go right, right down and down. See big dipper.
Go right, up. See big dipper.
Go up, right and right. Meet David and Helene.
Achievement received - the gang's all here.
Water Maze:
Since Helene and David came from right and Malachi
came from left; go to up exit.
Go up, up and right. The tide is coming in.
Find the exit: To find the
exit, Malachi wants to go into a trance like in Paris. David grounds Malachi.
Wheel: See the
wheel. Malachi falls inside the bubble at center of wheel.
See pictures inside the wheel.
Click on pictures that show the fortress,
tunnel and
escape.
Once a picture is clicked on it is enlarged.
If the picture is correct, it is added to the
group. There are 6 correct pictures.
Maze: Now that
Malachi has the pattern, see the maze map at top right.
Click on a tunnel exit to move them to a
square.
Follow the connecting squares until you reach
the top left square.
See the water rise until the place is flooded.

As David:
Reach the cover at ceiling:
Take the ladder on the water.
They climb to the top shelf. See a stone hatch
above the swift water.
Give the rope to Malachi.
Achievement received - prime asset.
See what happens.
Achievement received - Elementary my dear Watson
(for not using hints).
Watch the credits and click on David cuddling
the pink cow.
Achievement received - Muuuubus - if you clicked on
all pink cows.
Malachi and David are tagged as "Code Red" but now
secured.
This document may not be
distributed without express written permission of the author and the content
may not be altered in any way.
For Questions or
Comments on this Walkthrough,
Please write to:
MaGtRo
Copyright © 04/2014
MaGtRo
 GameBoomers
Walkthroughs and Solutions
GameBoomers
Walkthroughs and Solutions