![]()
After the opening cutscene (Eeek!) Nancy starts out in her bedroom. Look all
around, and find several items: To the left of the suitcase is the fireplace.
Look at the Coat-of-Arms above the mantel.
"Ludi sine gaudio ludi non sunt." I would translate that as "Games that aren't
fun are not games."
Notice the five moons; North is full red, East is waning gibbous red, South is
first quarter green, West is waxing gibbous blue, and center is new moon.
Back away from the fireplace and step into the corner to the left. Find a book
on the Mantel by John Penvellyn - a story about Grenny the Frog.
Included in the book is a slip of paper with symbols for
Water, Earth, Fire, and Air.
Sitting on the chair is a puzzle-box. It can be rotated to
reveal five sides in all. Opening a side allows the player to change the
background color and the phase of the Moon. The moons on the
coat-of arms are part of the solution. Another clue is required to solve the
box.
Atop the small bookcase is a pendulum toy. Unimportant, just for fun.
Back away from the corner, and this time turn right, past the fireplace and the
suitcase.
Look at the Window-Seat. Down near the floor is a strange area. (Wonder what
goes there?)
Look further right, and examine the Artwork above the table. The star
charts are given for the four primary seasonal turning points. Spring
and Autumn equinox, and Summer and Winter solstice (Bruma.) The
last page contains the same five animals that are found on the
box. It shows Draco at the north, Leo at the East, Lepus at the South, and
Pisces at the west. Lynx is in the center.
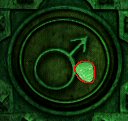
The puzzle box could be opened now, if you like. Or you could
wait until much later.
Lynx is new moon, (all vanes closed - any color.)
The Rabbit (South) is green, with the right half exposed.
The Dragon (North) is red, fully open.
The Lion (East) is red, with one vane obscuring the right edge.
The Fist (West) is blue, with one vane obscuring the left edge.
The box pops open, revealing a paper diagram of a telescope, and a lens.
Looking further to the right of the star charts is what appears
to be a Telescope Tripod.
Further right, is Nancy's bed, with telephone and alarm clock
on the side-table.
Continuing to the right, is a large mural depicting a chariot
pulled by four white horses.
Finally, to the right of the mural is the exit to the hallway.
Go into the hallway. As you pass Jane's room, you can hear Jane
with her tutor, Emily.
Then, as you pass Linda's room, you overhear her in an angry phone call with her
husband.
You can visit Linda and talk with her briefly, but soon she clams up and refuses
to say more.
Pick up on the clue that she is drowsy, and her mouth is dry.
Go down the staircase to the Main Hall. You should receive a
phone call from Mrs. Petrov.
After talking with her, finish going down the stairs, and turn left. The grey
door leads to the Conservatory.
At the lower level, you can examine an award from 1912, and the
Fountain, which has no water in it.
Continue into the Conservatory, and see the large carnivorous plant devour a
hapless fly.
Talk with Mrs. Drake. She certainly is no-nonsense, all right.
As you leave her, look at the little table with seedlings and a wooden flat.
Examine the pill bottle.
She tells Nancy the medication makes her feel drifty, and there are some
precautions on the label.
Go to the Library, the large door opposite the Conservatory.
Talk to Nigel.
Be sure to examine the statue of Mercury, in front of his desk.
There are other things to see in the Library, but nothing important for now.
In the Main Hall, notice that the six columns each have a
little part missing.
Your primary quest in this game is to gain possession of those six items.
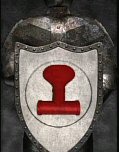
Also look at the various Coats-of Arms. Each one has a characteristic
symbol, such as snake, rainbow, lips, lion, whatever. Also notice that
many of the Latin quotes are flanked by little graphical symbols.
Since they vary, they must be important clues. Make the
connection between the pictures and the black symbols.
Extra: Any time you are in the Mail Hall, you can play the "Go Fish" automaton game near the library. Until it gets disabled, that is. It's a good idea to play it once, so that you will recognize the symbols it uses.
Let's see if Jane is done with her lessons. Maybe she will be
willing to talk.
Jane wants to play a game. Refuse for now; each game will come with a reward in
time, and there's no productive reason to play them yet. Look on the Window
seat, and find the Family Tree.
You can ask Jane about the various family members, helpful, but it's not
essential.
In the bookcase, find the paper that deciphers Runes. You can't
take it with you, so if you need to translate some Runes later on, you might
need to return here.
There is a book on Monsters. Read the book. Important: At the
lower-right of the last page, click on the phone number for Paliki Vadas,
the author and presumed expert on Lycanthropy.
To the right of the bookcase is an area containing a toy oven,
and several ingredients.
Continue to the right, and look on the dressing-table.
There is a photo of Jane's "real" Mum.
Important: Read the book, "Mutus Liber." It
contains valuable clues to the major tasks in the game.
Look to the right, and examine the tapestry in the corner,
created by Charles in the 1500's
Look to the right of the door, on the desk. Find the lesson plans. Notice the
time of day the lessons are conducted - they end at 2 p.m.
Talk to Jane again. (If you opened the puzzle box and have the lens,
ask her about the telescope.)
She will return it, if you play a game. This one's a jigsaw puzzle, and it's
timed (five minutes.)
I suggest dragging most of the pieces out to the perimeter, and begin with the
corners and edges.
Once a piece is in the correct spot, it locks in place. Finish the jigsaw in
time, and Jane promises to return the telescope.
(Several of the games that you play are "rigged" to get easier if you lose several times. To the best of my knowledge, the Jigsaw is not one of these. You must simply solve it.)
Exit Jane's room, and go left, past the staircase, to that strange object in
the corner, draped with a blanket.
Oooooooouuuuu! What in the world is that sound? Pull the blanket down, to
discover a Parrot in a cage.
Loulou will translate Latin to English, but only once. Be choosy what you want
translated. The more Latin phrases you have seen, the more choices you will
have. (If you are curious about more Latin phrases, you could save your game
BEFORE ever asking Loulou to translate a phrase, then replay it with different
phrases. She will only give you one at a time.)
While you were out, Jane returned the telescope. Go to your bedroom, and look
through the scope.
It seems to be looking at the mural with the horses.
Exit the view, and put the eyepiece on the telescope. Aha! You see five
numbered items:
1. Tragic Mask 2. Bird 3. Lyre 4. Doppelflaute (two flutes) 5. Comic Mask
Write that down, intrepid detective - the knowledge might just come in handy.
If you played the game in the Main Hall, you recognize the items.
Whether or not you have played the game, it will be disabled, now that you have
seen the clue.
Back away from the telescope, and the lens returns to inventory.
Check out the area under the Window-Seat. Yes; the lens fits into the round
slot.
Give it a turn, and Oh-No! A puzzle is revealed, with twelve Zodiac symbols.
If you need a nudge in the right direction, use your phone to browse the web.
Search for something about stars. Fortunately, there is information on the
Zodiac. Press the symbols in the same order as the web page gives, starting with
Aries, and ending with Pisces. They are in the traditional sequence. Really
can't figure it out?
Click
here.
Isn't that gorgeous? You have just solved the first of six major puzzles. You have the Moon Key.
![]()
It's time for Nancy to have a good night's sleep. Click on the alarm clock,
then on the Alarm button.
Click on the Up-arrow, until 8:00 a.m. appears, then press the Set button.
Uh-Oh. Nancy's dreams are interrupted by strange chanting.
If you look around you will not find much. It's 3:15 a.m. Look in the hallway,
just in case.
(If you are strictly following this walkthrough, you might just see a
black-robed figure disappearing down the hallway.
If you do, examine and take the glasses.) If she's not there now, she will
appear later.
You will be wanting to talk to Jane again, and she will be occupied with
lessons until 2 p.m.
Set the alarm clock for 2 p.m. (You might hear strange noises in the night.)
Go all the way down the hallway, past the parrot cage, turn right, and knock
on the door with the coat-of-arms.
It is locked, and you need the key. Jane has it, go ask her for the key.
If the option to ask about the key does not appear, let's do something else.
Ask her if she wants to play a game. Looking in the Chest, you can see
several games.
Choose the one that looks like a small deck of cards, near the back of the
chest.
It's Concentration, where you find and match pairs. I needed to use pencil and
paper to beat this one, since you must finish in 25 tries or less. Fortunately,
the constellations all have names, so you don't have to draw the pictures.
Go to the Library, and examine the computer in the far back of the room.
Go to Jane's room and ask her about the password. You will need to defeat her at
"Skull and Bones"
It's a "Go-Fish" game. When you win, you learn that the password is on Alan's
coat-of-arms.
That's in the main hall; the most recent one.
The Latin words are "Purgamentum Exit." Actually, just purgamentum is enough.
That opens the computer, and he tells you about the Ghost Hunt.
Not only must it be conducted late at night, but it's timed. Play it
later.
Important: Use the Cell Phone to call Paliki Vadas,
the expert on Lycanthropy.
Then talk to Linda. Ask about secret passages, and about Jane.
Now Jane will talk to you about secret passageways and the key. You will need to
win another game.
Play BUL, the ancient Mayan game. I remember playing this same game before.
Actually it was in Nancy Drew; Secret of the Scarlet Hand.
She gives you the key to the East Hall.
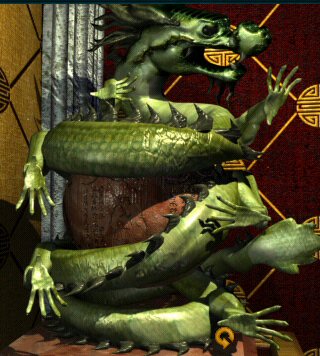
![]()
|
Enter the door in the East Hall. The secret passageway can be opened by correctly setting the hands on the dragon. The clue to the setting is the coat of arms on the door. Starting from the Dragon's head, and zig-zagging down toward the tail, set the hands as shown here: Right, Up, Down, Left, Down, Right. When the settings are correct, the dragon's eyes glow, and he growls. (It sounds more like an eighth-grader belching when the teacher's back is turned than a dragon growling!) Look in the passage, discovering that it is too dark. You will need a source of light. |
Go to Jane and ask for a flashlight - er - torch. She doesn't
have one, but you can have a Glow-Stick, provided you can beat the previous high
score of 2500 (easy game) or 5000 (hard game.)
There's nothing easy about this game, since it's tightly timed.
Don't dawdle staring at the puzzle - if you don't see a good combination,
Shuffle!
Use that shuffle function agressively. That makes it relatively painless.
Look for the opportunity to create rows of four, whenever possible. Remember to
make four in a row, you need to place two together, leave a space, place the
third one beyond the space, then the fourth one in between. Occasionally you can
get five (two-space-two) and fill in that one for more extra time.
Each time you go into the passageway guarded by the mechanical dragon, you will need to re-set the hands.
It's not a maze, just keep going all the way to the bottom, and
examine the puzzle on the doorway.
It depicts a word game, and a parrot. It won't function until you trigger it.
Return upstairs and ask Loulou about it.
She wants the "Magic Word."
Ask Mrs. Drake about the magic word. "Loulou is a very clever
and beautiful bird."
Tell Loulou that, and she gives you the word associated with a barber - "LEECH."
Go down into the secret passage again, and change the tumblers so they spell
LEECH.
Now it says "PICTURE." Here you have a choice. You can go back
to Loulou, and ask for the next word.
Loulou is probably getting hungry and wants a "cake."
Go to Jane's room, and bake a cake. Be sure to use the cell phone first, to
search the web for nutritional requirements for parrots. There are some things
that will harm the bird. (I didn't make a 'bad' cake and feed it to Loulou, but
I suspect she will croak, and Nancy will need a Second Chance.
Anyway, after feeding Loulou, she will continue to cooperate,
providing the word associations.
However, the Glow Stick has a limited life span and guess what? You will need to
play that Petroglyph game again. And again. Fine, if you enjoy that sort of
thing. If you would rather cheat, drag your cursor across the following box, to
highlight the answers:
| Barber - Leech Picture - Book Baby Bonnet Hour - Glass Ant - Hill |
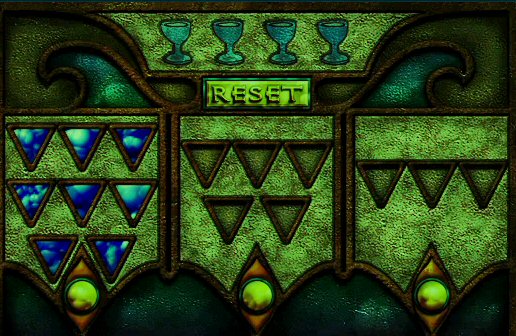
Once you solve all the words, the door the puzzle is mounted on unlocks. Go inside, only to find another puzzle. Half a puzzle, that is, The rest of it is on the other side of the door, which you must access through another passageway altogether. Turn all the triangles right-side up. There is nothing more to do here, until you get to the other side. Back away, turn around, and go upstairs. In all likelihood, the glow-stick will expire on the way up. If it goes completely dark, don't worry - just continue until you come to the exit.
You will probably encounter Ethel as you exit the room. Talk to her about all subjects.
Go to Linda's room and talk to her about the passageways. She describes
turning a gargoyle; so she was referring to a different passage.
As you exit her room, inspect the stone gargoyle in the corner of the hall. Try
turning it.
Go to the Main Hall, and find the portrait of Corbin Penvellyn. It's one without
an accompanying coat-of-arms, and depicts a gargoyle. Inspect it close-up.

Now you can go to the Library and ask Nigel for some information. He wants help typing, and you must prove that you are fast enough. I think this is a fairly difficult test.
You are still inside Nigel's Computer. Read his notes. Exit the laptop, and take the paper he left for you, depicting Corbin's coat-of-arms. It is the solution to opening the passage guarded by the gargoyle. (You can always re-enter his computer any time he is not in the Library.) Exit the Library.
Oh! You witness a strange ritual conducted by Ethel and Jane. They chant "No key without toil, no fire without oil." Jane pours oil into the chamber underneath the floor.
Time for bed. Set the alarm for something like 9 a.m. and go into the hallway. You can overhear the lessons, with Jane being a tad precocious.
If you have not tried the automaton game in the Main Hall and found it
disabled, do it now.
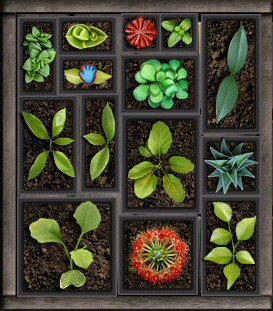
Go to the conservatory and talk with Mrs. Drake. She has the crank to the
machine, and will return it to you if you solve the problem she has with her
little plants. There are many solutions; here is one:
She will have gone to look for the crank when you finish; you
will need to depart and return to get it.
Look to the right, beyond where she was standing. You will see a document on the
small table.
Unfortunately, it is guarded by a carnivorous plant. It won't eat one of
Loulou's cakes, but it's carnivorous, remember? If you get something from the
kitchen that has meat on the menu, Nancy can take some of the meat with her, and
tame the plant. Now the document is available. (Thanks Angi, for the tip!)
Use the crank to activate the automaton game in the Main Hall.
The game won't start until you select the correct five symbols, and in the
correct sequence.
1. Melpomene 2. Erato 3. Terpsichore 4. Euterpe 5. Thalia - Then press the red
button to begin.
She wagers the Venus Key. Play the game to get the key.
Before you can go into that other secret passage, you will (shudder) need to
win another glow-stick.
Go see Jane and play that dratted game again.
While you are there, ask Jane about the ritual you observed. Seems like Jane finds it easy to be untruthful.
Okay, time to explore that other passage. Go to the Gargoyle in the hall, and refresh your memory as to the method of turning it:
Start at the top. See the two comets (?) at the upper right - that means turn
the gargoyle right two times.
The whole sequence is Right, Right, Left, Right, Left, Left, Right. (R2, L, R,
L2, R)
Might as well write that down, you will need it again.
Enter the passage. Two or three steps in, explore with the glow stick, and find a large Scarab carving on the right. Look at it closely, and it turns out to be a peephole into Linda's room! Eeek! Her hand is all hairy.
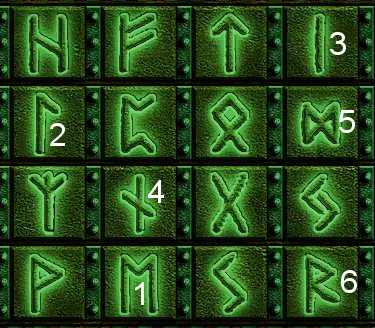
Continue down the stairs. You find a door locked with a Runes Puzzle. Remember whose corridor this was? You need to spell out the name "Elinor" in the runes. Refer to your notes, or refresh your memory by going to Jane's bedroom and review the sheet of Runes, or Click Here for the solution. Open the Runes door and continue to the bottom.
At the bottom, find the other side of the triangles (Fire Symbol) puzzle. Turn them all upright. Unfortunately, this seems to rotate some of the ones on the back side of the door, making it necessary to climb up to the hallway, go into the East Hall, turn the dragon's hands, and return to the bottom of the original passage. Fix the triangles again, and the door unlocks. Wow! Finally you have a permanent source of light.
Here's some help graciously provided by Christy. Thanks, Christy!!
She writes:
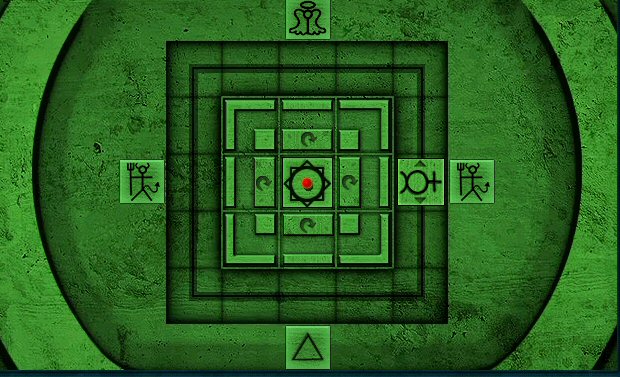
"In the moving rooms on the way to the alchemy room, If you go through the Mars door when you open it, and then open and close the moon door once, open it again and you see a pedestal in the middle of the room. It almost looks like a bird bath, if you collect the item from the center of it, its a map of the revolving rooms, and you are shown on it as a red dot. It shows you when the path is clear to get to wherever you need to go. The 2 devil pictures are the traps, the triangle is the way back to the tunnels to get out, and the Angel symbol is the way to the alchemy lab."
You can wander through the maze and check the map device in your inventory each time you change rooms, or make them rotate without entering. The red dot (you) is updated each time the rooms turn. This is what the maze map looks like when you first find it. What it doesn't show are all the potential symbols. The Moon room is obviously the center of the maze, since that's where you are standing when you find this thing. The Angel is the alchemy room, where you want to go. The Mercury symbol is the room that connects to the outside
The first door you come to has the Mars symbol on it.
Do this: Click once on the door to open it, but DO NOT enter
the room.
Close the door by clicking on either the far right or far left
edge. It rotates.
Open the Mars door again, and again DO NOT enter; close it again.
Now turn around. You should see the Mercury door on the far side of the room.
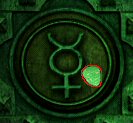
Open the Mercury door and enter the room. You find another
puzzle-lock on the next door.
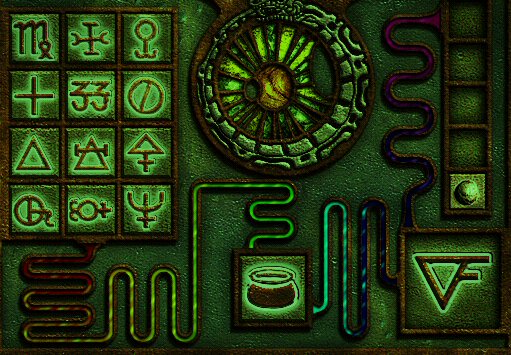
The symbols are from the science of Alchemy. Important: Click on the circular
snake symbol at the top-center of the puzzle. You will need to enable this
puzzle by talking to Nigel and learning about Alchemy from the Web. Go to the
Library, ask Nigel about the snake (Ouroboros; actually
Ouroboros,) then browse the web to get the
meaning of the symbols.
Careful! To exit efficiently, use the same process. Open and close the Mars door TWICE without stepping through it. Turn around and exit through the Mercury door into the passage. (If you find yourself in another room instead, it's easier to revert to a saved game than to negotiate the maze.) It's possible to get hopelessly lost in the rotating rooms. Ask me how I know!
You need to return downstairs to the Alchemy puzzle. The symbol at the lower right suggests that you are to create some Aqua Fortis. The button and the empty squares above that suggest that this is the first of five recipes you will need to accomplish. The twelve buttons on the left are the ingredients to be chosen, and the cauldron at the bottom center is where they will be mixed together. Use the cell phone to learn the symbols and formulae. If you aren't into solving it yourself, click here to see the solutions. You will be making Aqua Fortis, Aqua Regia, Mercury, Distilled Vinegar, and Liquor Hepatis.
You have entered the Alchemy Laboratory. Straight ahead is the Forge. You will eventually get it going by providing Air, Water, and Oil. That comes later. To the left are some pieces of lab equipment, and to the right is a work-table. Go to the table. You can see two documents, one on the left is a page from a journal, and on the right is a letter from Penelope Penvellyn. Read them both. Between the documents are two books. The book in front describes Aeolus, the god of winds. Read how he captures the four winds. Especially read how he is strong, and can lift heavy things. Keep that in mind for much later.
Important: Find and read the book behind the first one. It is dark in the lab, and it would be easy to miss seeing that book. Read the clues: There is a key hidden in the Singing Stairs. Also a devious lock will restore water to the well. (Thomas) Mercury's Wand can be released by moving the hands that protect the house. (Elinor) Tame the Master Gargoyle and his two companions with the wand; and apply the wand to the depository (C. 1703) Playful device hides Venus' arrowhead , and Aeolus puzzle is in this room (Penny) Telescope, lens etc. (Brigitte) A passage hides its key behind a target (Edward) Help the frog cross the pond (John) The computer will help find the Saturn Key, and the clue to cutting through the rotating rooms. (Alan)
Finally, there is another scrap of a document on the shelf above
the table. (Unimportant.)
You can examine the Forge if you like: "Looks like a Forge; Looks like a chunk
of metal; Looks like some kind of ancient mold. If you looked at the mold, it
went into your inventory. Keep it; it's for the very end of the game.
To the left of the Forge is a work area. Find the scrap of paper on the
grindstone, and another set of two papers and a book on the little table.
Important: Look at the second paper, hidden behind the first one. It contains a
clue to the Mercury Statue's controls.
Did you see Aeolus, the big metal dude in the opposite corner? From the work area, turn further left. See the keyhole in the wall, then the niche containing the Aeolus Puzzle. Press the blue button to begin the challenge. The object is to maneuver Aeolus in such a way as to capture each of the four winds, and avoid either stepping into a pit, or being blown into a pit by one of the winds. The direction arrows let you move either one space or two. Nancy may comment that "Some winds are stronger than others."
You should plan on getting to the top row, and capture the North Wind from above. Try to remain in the second and fourth columns, so the South Wind can't blow you into a pit. Go for the East and West Winds, saving the South for last. You will be able to come down the fourth row, using one and two-step moves, until you can get onto the bottom row, making the South Wind available for capture. Catching all four winds will supply air to the Forge.
Exit the Lab. Remember: Mars Door twice, then turn around and exit via the Mercury door. Immediately go left, and ahead to find the lock to the Well Room.
 |
 |
You are trying to create a group of four. Use the yellow buttons
to select and transfer the units of water between panels. Call the 8-unit panel
"1", the middle panel "2" and the 3-unit panel "3".
Click on them in this order:
1 - 2 - 2 - 3 - 3 - 1 - 2 - 3 - 1 - 2 - 2 - 3
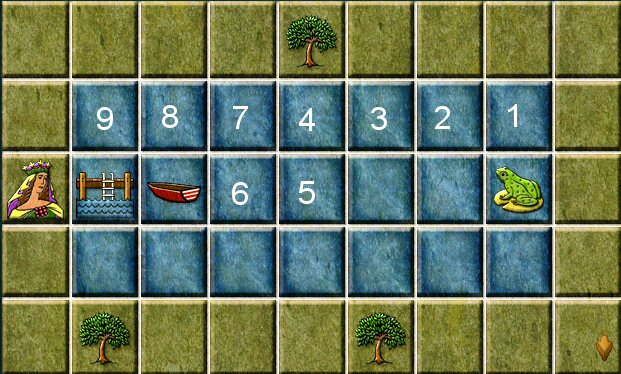
Water is not only supplied to the Forge, but guess what? Also to
the frog-pond in the Conservatory.
Go back to the entrance of the Rotating rooms, and standing with your back to
the door, go forward once. You should find a place where you can go either left
or right. Go right.
This takes you up toward the Upper Hall. Partway up, find a landing where you can either go right to a rising staircase, or straight ahead to a new doorway. Go that way, to find the puzzle that controls the Mercury Statue. Looks like gloves from a suit of armor. Try the pink crystalline button at the center. It should be extended (glowing) not pushed in (dark.) Then click on the index finger of the right hand. That's the hand at the left side of the screen. You should hear Nigel say something. Then click on the middle finger of the left hand. (The hand at the right side of the screen.) Nigel screams. The Mercury statue has rotated.
Continue up the stairs, and exit into the hallway. The cell phone may ring, and it's Ned. Talk with him about everything. He suggests the coats-of-arms images and symbols are important clues.
Let's go to the Library and check out the Mercury Statue. Sure enough, it has turned. Now you can take the Mercury Wand from his grasp. That's the third key; three more to go.
Did we refuse to play the Ghost Hunt with Alan's computer before? Maybe this is a good time to do that. Open the old computer again (the password is purgamentum) and accept the offer to play the game. Whoops, if it's not after midnight, the ghosts won't appear. How about going to the Conservatory instead. I suggest the route shown here, to get the Frog to the Princess. You may get ambushed by an alligator, and you may not, but keep trying this path, and it will work.
No Prince Charming, sorry, but you do get the Mars Key.
Go upstairs, into the upper hall. Find the staircase between Jane's room and your room. As you climb, each step makes a unique sound. According to the captions, they are in order: Bling, Whoop, Waah, BlaDing, Whoop, Waah, Bang, Bang. That's five different sounds for eight steps. At the top, you discover a set of seven levers. Pulling the levers reveals that the first five are the sounds you heard, and the last two are not part of the staircase sequence. You need to pull the levers in the same order that the sounds appeared. This is the solution: B-A-D-C-A-D-E-E. The panel opens. Take the key.
When you reach the bottom of the steps, you might overhear Mrs. Drake talking to Linda, and watch her place some sort of Charm over Linda's door. You have just acquired a key. Wonder where it goes? Try it in the keyhole next to Jane's door. It fits alright, but need lubrication.
Go to your bedroom, and use the house phone to call the Cook. Egad! He speaks Cockney! What's that all about. Order something, and be sure to ask for Uncle Fred and Johnny Rutter (Bread and Butter.) If the Cockney jargon gets too confusing, you can go to Mrs. Drake and ask for some clarification. Then a website will be available on the cell phone. You need to leave your room anyway, so they can deliver the meal. If you haven't talked to Jane in a while, do that. She shows you a dire message, and talks about her lack of trust in anyone. If you return to your bedroom, the food will be there.
Eat the meal, and be sure to take the butter with you. Return to the hallway, and use the butter to lubricate the keyhole. Now the key will work, and what happens? Some wooden beams slide out, allowing you to see the panel above the door. The Latin says "Ludes, ergo es." I suspect that is a play on words. Remember "Cogito ergo sum?" I think, therefore I am. This would say, roughly, "You play, therefore you are." Good philosophy for an adventure gamer. Anyhow, what you have here is simple in appearance, but it's a slider puzzle, and the only one I have not been able to solve. I cannot give you a solution, rather I can provide a way to beat it. First of all, the sequence is suggested by the Tapestry in Jane's room.
Looking at the tiles, start at the bottom left, and proceed across the top,
then down to the right.
Call them Charity, Sun, Moon, Strength, Father Time, Toast, Folly, Angel,
Geometer, Knight.
It's your job to arrange them in the order found in the tapestry.
Maybe somebody can solve this one legitimately, but here's what you have to do.
Move a tile or two, then give up and back away. Restart the puzzle. Repeat
several times.
Be on the lookout for a new arrangement of the tiles, which is almost perfect
except for two tiles.
Then it's easy to switch those two, and claim the prize. Watch for this
arrangement. (One time it appeared after eight repetitions, another after ten,
another time after eleven. Keep your eyes open!

In this case, only the juggler and the compass need to be interchanged. Not tricky; just move Father Time up, Compass up, Juggler right and down, Compass down and left, and Father Time down. You receive the Jupiter key, a lightning bolt.
We should find out what time it is. Go to Nancy's room, and set the clock for the middle of the night - something like 4 a.m. You might witness a nightmare, depending on which night this is. If you do, the time is reset to 3:15 a.m., and it's a good time to go on the ghost hunt, as suggested by the computer in the Library. If you don't get the nightmare, and it's still the middle of the night, do the ghost thing. If Nancy whines about needing some sleep, set the clock for the next day, then set it again for the following early a.m.
Give the computer the password - purgamentum. Tell it you're ready for the hunt. Don't get fooled into giving the computer the password as you back away, just back away and go look for ghosts.
Ghost locations: Main Hall 4; Lower Hall 3; Upper Hall 3; top of noisy stairs 1; Conservatory 2.
The ones in the Main Hall are found by the right-hand entrance to the lower hall, at the foot of the stairs, at the base of a column near the Conservatory, and next to the Library door. I suggest the following sequence, because the puzzle is tightly timed, and you must finish at the computer.
1. Main Hall, by the entrance to Lower Hall
2. All three in the lower hall. They are somewhat hard to see. Go to the ends
and turn around. Start with the right end and exit the other side.
3. Main Hall, foot of stairs
4. All three in the Upper Hall. Start with the one near the East Hall around the
corner from Loulou.l
5. Top of the blinging stairs
6. Two in the Conservatory. Go downstairs first, see the one on the Award. Go
upstairs and see the one next to the exit.
7. Main hall, base of column and Library door.
The computer suggested something about the Green Dragon. Go to the East Hall, and turn left upon entering. Press the hotspot on the right side of the shelf. A panel opens, and Whee! You can slide down to the Main Hall.
Expect a nasty confrontation with Ethel when you arrive at the bottom.
You saw a Bulls-Eye target on the way down. You need to throw an object at the target. Feeling stuck? Can't figure out what to throw? If there was ever a legitimate clue, I missed it. I just had to ransack the house until I found it, and that took a while, believe me. Click here to find out what you are looking for.
[Edit - a reader named Christy found the clue. After you have gone down the slide once, talk to Loulou. She will tell you what to do. Thanks again, Christy.]
If you find it difficult to hit the target, don't fret - just keep repeating the slide. It will automatically work on the 10th or 11th try. You have the Saturn Key.
If you're following the sequence of this walkthrough, then that's the sixth and final key. Time to put them to use. Do you remember where there are some things missing? In six places, that is? That's right, the six columns in the Main Hall each have a part missing. Using the keys, open each column and rotate the pipes to form a large rectangle. The corners are obvious; the middle one near the Library (Jupiter) should be turned so the pipe connects with the center; and the middle column near the Conservatory should be turned so it connects with the Oil Reservoir.
Then, having restored Oil to the Forge, it must be lighted. The clue to this comes from Corbin's instructions found in the Lab. He said something like "Tame the Master Gargoyle and his two companions with the wand; and apply the wand to the depository." Here's what to do. Go to the Master Gargoyle. That's the one upstairs, between Jane's and Linda's rooms. Go close to it, and wave the Mercury Wand over its head until you see its eyes glow red. Go next to the gargoyle in the East Hall (turn right upon entering the room) and wave the wand, causing its eyes to glow. Here's the trick - turn around and open the panel, and slide down to the Main Hall. If you don't use the slide, the time will run out. As you hit the bottom, turn left and wave the wand at the third gargoyle. As soon as its eyes glow, go to the center of the room and looking down, wave the wand at the hole where Jane poured the oil. If you are fast enough, the forge will be operational.
Make your way down into the Alchemy Lab once more. Use either the Dragon entrance or the Gargoyle entrance; it doesn't matter. If you didn't take the Key-Mold from the forge before, do it now, and look at it close-up in inventory. You must set each segment according to the following instructions. The clues came from the various coats of arms, and the little symbols flanking the Latin texts. Additional help came from the Mutus Liber.
|
Set the bars correctly on the mold, and go to the Forge, clicking on the "Wow, Molten Metal!" If the mold is correct, Nancy says it looks right. Take the key. Insert it into the keyhole on the left wall. Guess what? Little-Miss-Nasty-Pants shows up and takes the Meteorite, causing the trap to fall. Nancy better step back before she, too is trapped. Now it's time to save the little pain in the butt. Go to the Aeolus puzzle, and use the arrows to maneuver him to the big box on the left. He lifts it, and all is saved! Well done, Detective Drew!
See you in "The Secret of the Old Clock."
Go into the Lower Hall, and take the Cricket Ball from the trophy at the left end.
Click on the Zodiac items in this sequence to get the Moon Key:
| 11 | 1 | 4 | 10 |
| 3 | 5 | 7 | 12 |
| 9 | 8 | 2 | 6 |
This document was provided to GameBoomers.com and may not be distributed without express written permission of the author and the content may not be altered in any way.