|
|
|
|
Junior |
Senior |
Nancy Drew 24: The Captive Curse
by Her Interactive
Walkthrough by MaGtRo June 2011
Gameplay: This is a point and click game. Nancy shows the desk in her bedroom. This is where the 'How to be a Detective Book' that shows the game manipulations can be accessed. The Scrapbook has past Nancy Drew games information.
Read the Case Files to learn about the present mystery case. Once you are ready to play the game, click on the plane ticket to go to the new case location.
Select to play either Junior or Senior detective.
The main screen has pictures at the bottom of the page.
The bag at left is the inventory link. The journal shows Nancy's notes about the present case. The task list shows the junior gamer what needs to be done or was done to progress in the game. The cell phone is on the next slot.
The cell phone has: the phone, camera, game, settings (wallpaper and ring tone selection) and information (hint hotline and money).
The gear icon shows the options. Here the voice, effects and music volume can be adjusted. Also, the bottom background can be changed. Closed captioning, text size and screen size selection are also in this page.
The load folder has the list of the saved games that can be replayed. The diskette is used to save the game. The rightmost icon closes the game.
Phone charms are found only on special edition of the game (Thanks, LadyLinda).
The game is non-linear. The walkthrough below is just one way to get through the game.
For centuries, a fearsome monster has been stalking Castle Finster. Markus Boehm has called Nancy to Castle Finster to help him scare out the truth about the monster.
Germany, a long time ago: Watch a young girl pick mushrooms in a forest. The monster arrives and she runs away. The young girl wears a medallion. She arrives at the closed castle gate. The monster closes in.
Arrival:
Nancy arrives at the closed castle gate. Ring the doorbell at right side of the gate.
Lukas answers from above. He will let you in if you solve the match game in the bucket he lowers down.
Take the paper inside the lowered bucket.
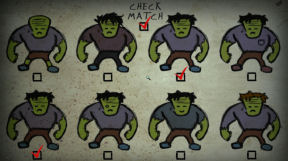
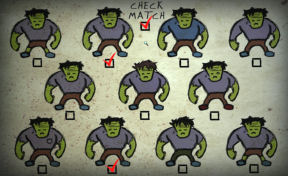
Match game: Find the matching monster. Click on the square of the 2 matching monster.
When sure of the selection - click on square of the Check Match at top of the page. I got it!
|
|
|
|
Junior |
Senior |
Karl appears and raises the caste gate. He wants you to come meet him in his office at the second floor.
Courtyard:
Look around at the courtyard. See shops at left and a well.
There are private homes at top level of the buildings.
Burg (Castle) Finster:
Enter the ornate double door ahead. Face the stairs at right.
Euros - Coins: See a coin flash on the banister of the stairs to the mezzanine. Take the coin. If you collect enough coins, you might get an award.
There are 20 Euros at top left of the screen. Coins picked up during the game will be added to the total. Buying items will decrease the total amount of coins. Not all the coins that are in the game are noted in this walkthrough.
Climb the stairs to the mezzanine. Go forward to the small table with the candlestick. See the coins flash. Take coins from the table.
Ned: Enter through the doors. The phone rings.
Automatically answers the call from Ned. The reception of the cell phone is bad. An argument with Ned ensues.
Go forward to the wide landing.
Nancy's room:
Find the room with my name on the door: Climb the stairs on either side of the wide landing. Go forward to the balcony at other side.
See a door with Nancy's name on it. Enter and look around.
Check the mantle of the fireplace and read the Die Ungeheuerlichkeit Nacht Festival schedule.
Open the armoire and see a shelf for gift shop purchases.
Phone: Go to other side of the bed and see the cuckoo clock phone on the desk.
You can use the landline phone by clicking on the postit list of the phone numbers or manually dialing by zooming and click in the numbers.
Call Frank to check in: After a while (time varies); get a call from Frank Hardy about Ned.
Use the landline phone and call Frank. Call Ned but get a recording.
Find something to help translate some signs here: Look at the side table beside the bed. Take the German English dictionary. Exit the room.
Karl's office:
Phone charm: (Special edition game only) From Nancy's room, use left stairs to go back to the landing at other side of the balcony.
Pick up the blue-white phone charm on the right side railing close to the landing (not balcony).
Find Karl's office: At the landing, turn right or left to the side hallways (not the stairs).
There are 2 side alcoves with chairs and table:
One alcove has a book about History of Castle Finster. Read the book and learn about Freiherr Amsel and his daughter Else.
The other alcove has a puzzle box with colored glass tiles on it. It is missing glass pieces.
Check in with Karl: Enter the Bürgermeister room at middle of the hallway. See Karl Weschler, the Bürgermeister playing with dolls.
Talk to Karl. Learn about his feeling about the monster, newspaper (Castle Cryer), lederhosen, tourists and his game.
Play a game of Raid with Karl: Play Raid game. Choose Easy first until you learn the mechanics of the game.
Read the Game Rules book at bottom right.
You have 2 opponents seen at sides of the board.
A player turns the spinner at bottom left and moves on the board based on the number obtained.
The color of the square the player lands on determines what challenge is to be done by the player.
The card selected shows the character stat of that player's hand.
So if the opponent (or you) lands on a red square, select your card with the strongest red attribute to fight with.
Select an opponent with less cards to choose from.
The winner is the one that gets to the castle at center of the board first.
Win or lose get 15 Euros from Karl for testing his game. If you test Karl's game often enough, you might get an award and lots of money.
Continue to talk to Karl. Learn about Lukas, the head of security's son.
Explore Karl's office:
Look around Karl's office.
Cabinet: Check the cabinet left of Karl and see that the bottom drawer is active.
Open the panel at right to see a keypad. Uh oh. We'll check that later.
Raid board game: See a board game on the table. If you need money, play this board game or ask Karl.
Sparrow painting: Go forward and turn around. Look left and close at the sparrow painting on the wall
Raid: Turn right to the right wall.
Read the game guide in Karl's study: Read the Raid Game Guide at bottom shelf.
See that the characters are taken from Grimm's fairy tales. They are either: heroes, monsters or magicians.
Professor Sparrow is the one on the painting on the wall. There's a key icon on the description.
The last page waits for a new design.
Fix the cards I knocked down in Karl's office: Look at top shelf.
Take note of the scales with cards on it. There are 3 scales with 3 cards on them. They are not evenly balanced.
Touch the scales and they all fall down. Karl says to put back the cards the way it was.
Remember that the scales were not even before. The middle scale is highest and the right scale is lower than the rest.
Arrange the cards to weigh the same way (or original level) before you touched them.
Each scale has a monster, hero and magic.
Left pan: Sailor RedBraid, The Donkey King and Fairy Trigger.
Middle pan: Fenarius Wolf, Professor Sparrow and Enchanted Mirror.
Right pan: The Robber, Bonaparte and The Golden Hunter. Got it!
See a paper fall off from the scale.
Take the German note. Use the dictionary on the paper. Read the note from Markus to Karl.
Karl's game: Talk to Karl again. Learn that his game is being submitted to the International Board, Card Association for review.
He asks for help in making a new character. Select any information of your choice about the character.
Meet everyone in the castle.
Banquet room:
Go around to the large landing using either side hallway.
Go forward to the white tiled solarium. See Nancy's room above by the balcony and a double door on lower floor.
Enter the double doors.
Glass window: Look at the stained glass window that shows the castle and a woman. Look close at the window.
Take the blue tile at bottom right.
Castle Cryer: Back up and turn left. Go forward to the hutch at end of the room.
Look close and read the castle newspaper - Castle Cryer. Read about the monster, Karl and festival.
Note the vocabulary article. sun (sonne), comet (komet) and moon (mond) are some of the translated words.
Take the coin at right end of the counter.
Renate: Turn around and talk to the old woman sitting by the fireplace.
She knows Nancy. The monster is here for Nancy. Learn that Karl never leaves the castle. She loves food; one of her favorites is Black Forest cake.
Hear a story about the young girl in the forest who lost a scarf with a row of elephants. Renate doesn't want you here.
Note that she has her bag beside her. Exit the banquet room.
Side rooms:
After leaving the banquet room, go up to the solarium.
There are 2 side solariums - rooms. One leads to the foyer and the other leads to the gift shop and furnace room.
Go to the left side room with the banquet room on your back. At the side room, go down the stairs.
Check the door of the locked furnace room ahead. Turn back and go to the side hallway. Be at the gift shop.
Gift shop:
Meet Anja: Talk to Anja Mittelmeier, the castellan of the castle. She also warns Nancy. She talks about the monster situation, Renate and Karl. Learn about the coins found around the castle and Karl's game.
Explore the shop: If you looked at an item in the store and click again with the $cursor - you buy it. So choose which one you want. Pull out of the screen if you do not want to buy the item. Items bought are placed in the armoire in your room. If you bought every souvenir in the shop, you might get an award.
Cuckoo clocks: Check the clocks on the wall.
Glass: Pan right and read The Art of Glass book above the glass case.
Inside is a paper with drawn sun, moon and comet. There's a code at the bottom. Take coded message 1.
Postcards: Look close at the postcards right of the entryway to the side stairs.
Snack server: Look at the mini chalet right of the postcards.
You can buy snacks here (pretzels, hotdog, German chocolate cake and turnover) by selecting the picture of the snack. Then click on the slot at right to enter the coins. See the cuckoo and the delivery of the food.
To save time, order German chocolate cake (top right) that Renate loves. The cake is placed in a cardboard box in inventory.
Grimm's Baddies: Check the bookcase right of Anja. Read the book - Grimm's Baddies. Read the titles of the other books. :)
Monsters What and Why: Check the book beside the monster at the corner. Learn about the different monsters.
Open the base of the monster. Select your language and press the different buttons. Try the other language. LOL.
Anja again: Talk to her again and talk about Ned. Learn she had a boyfriend when she was young.
Learn about the glass display. Learn about the glassblowing here at the castle. Only Karl and Anja have the key to the glassblowing room-furnace.
Exit through the glass door beside Anja.
Explore the foyer part 1:
Lukas: Talk to Lukas Mittelmeier.
Monster game: Play Monster with Lukas.
The farmer player places cows on the board.
The opponent places the 3 monsters from top left on the board by clicking on some selected cows. The cows change to monsters. Then click on the done square at bottom of the screen.
Select-click on any cows that you want to kill as long as they are connected to the monsters. The available cows are highlighted.
Move the scared wide-eyed cows and the monster to new location on the board. Select a scared cow or monster and then click the location anywhere on the board that you want to move it to.
The farmer player then guesses where the monsters are located.
The monster chooser's aim is to kill as many cows and hide the monsters; if so the farmer loses.
The farmer player's aim is to deduce the locations of the 3 hidden monsters; the monster chooser then loses the game.
Play a round of Monster with Lukas: You have to play as monster and farmer to finish a round.
Get Raid cards if you win. Pull back to stop playing. If you get a full deck of Raid cards, you might get an award.
Talk to Lukas again. Learn that Anja and Karl always fight.
Learn that if Renate is given food; she goes to sleep. Learn also about secret passages. Lukas saw something there that might be a monster.
Coffee table: Check the coffee table.
Read The Brothers Grimm book. Pick up the 3 pronged control key from the table.
Take the coin from the top shelf of the side table.
Glockenspiel - Clock: Check the clock at the corner.
Take the coin from the left bell tower.
Open the bottom drawer and see the glockenspiel. There must be a specific order to play them in.
Call Markus back on the phone in my room:
Markus: (Can happen anytime outside the Gift shop). Get a call from Markus, the man that hired Nancy. He wants to Nancy to call back using the land line.
Phone charm: (Special edition game only) Enter the other side door {opposite the stairs) and climb the stairs to the white tiles solarium.
Before climbing to the central solarium, take the eagle phone charm from the wall by right stairs railing.
Ned: (Can happen anytime outside the Gift shop). Get a call from Ned.
Go back to Nancy's room by using one of the side stairs on the floor above.
Markus: Use the cuckoo clock phone and select or dial Markus' number.
Talk to Markus. He's bringing foreign investors tomorrow.
Learn that he and Anja used to date. Markus broke up with her.
Ned and Frank: Call Ned back.
Then call Frank or get a call from Frank himself.
Explore the courtyard:
Monster sighting: After the phone calls, Karl knocks on the door. Open the door and he say the monster is in the courtyard.
Automatically be at the courtyard. See the plant is burning. The door on the left has claw marks.
Fire: Turn around and click on the well at left.
Click on bucket and it will automatically get water from the well.
Take the bucket of water and use it on the fire.
Destroyed door: Check the destroyed door of the florist shop.
Look close at the bottom part and take a burr.
Move towards well and turn around to see the doors of the shop beside the well.
Use the dictionary on the signs: florist, herbalist and antiques.
Knock on doors and see that no one wants to open the door.
Well: Turn back to the well. Use the bucket again and get coins, other items from Nancy's past games and-or foreign coins. If you use the bucket often enough, you might get an award.
Look close-click inside well to check the well. See that it is dark. That well needs exploring.
Musical note paper: Turn around from the well or the shops.
Go across to the door below the street level. Turn around and see a paper on the steps.
Study the paper and see musical notes quiz. Learn the notes. This will be helpful in playing the glockenspiel.
Coins: Check the seat of the buggy left of the gate and get a coin.
Check the circular planter with a tree (beside the left bench-lamppost) on the courtyard and get a coin.
Take the coin under the peddler's cart left of the shop.
Stairs: Climb the stairs left of the Burg (Castle) Finster door. Go forward and pick up the dull shears outside the locked door.
Go down the stairs and take the coin on the window sill below the stairs.
Ask about the costume:
Markus: Sometime, get another call from Markus. He wants you to call him back on the landline.
Get wet: Go back to your room. After opening the door, a bucket of water drops down on Nancy. Learn that her suitcase is lost.
Check the bed and see a costume. Read the note attached to the costume.
Click to change to the Bavarian costume. Nancy's clothes are left on bed.
Use the phone to call Markus.
Lukas: Go downstairs and talk to Lukas about the costume and the bucket of water.
Anja: Go to the gift shop and talk to Anja. Learn about Markus and the costume. The costume looks familiar to Anja.
Karl (Ask around for a key to the glass shop): Go to Karl's office. Talk to Karl about the burr. It is from the woods. Take burr back.
He allows Nancy to enter the glass shop but keep away from the furnace. Take the glass shop key.
Learn that Anja wants Renate to go. Learn about the history of the monster and the Freiherr's daughter.
Renate: Go to the banquet room. Talk to Renate. Renate wants you to take off the costume. She is upset.
Nancy's clothes: Go to Nancy's room. Check the bed and see that Nancy's clothes are in shreds.
Legend clue page 17: Look by the fireplace. Take the legend clue page 17 from the floor. See that it has TK at bottom right and has a picture of the well.
Find a way to look at everything in Renate's bag:
Renate: Go to the banquet room. Talk to Renate and tell her you can't change clothes since they are shredded.
Talk to her over and over until the dialogues are completed. Leave the dialogue about giving her food last.
Take the cake from the box. Automatically give her the black forest cake. Remember what Lukas said - she falls asleep after eating. If you give Renate enough food, you might get an award.
Save game here.
Renate's bag: Look close at Renate's bag beside her chair.
Open the main flap of the bag. See the contents of the bag.
Book: Read The Owl book first.
Take the legend clue page 25 from inside the book. See that it has N at bottom right and a picture of an opened trap door.
Box: Take the box with metal balls-buttons on the lid.
The aim of the puzzle is to get to the box at bottom right without waking Renate up.
Left click to pick up and release an item. Right click to turn the item
Place them as close as possible where you want that item and then left click to release it.
Take the box.
|
|
Two possible solutions to the Junior puzzle. |
||
|
|
|
|
|
|
|
|
||
|
Senior |
|||
|
|
|
||
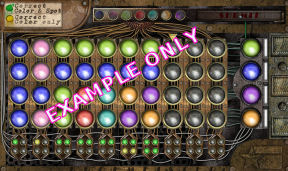
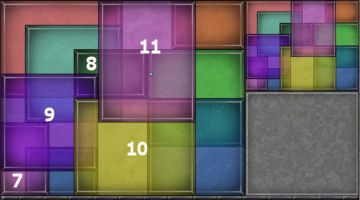
Color code of the box in Renate's bag:
Look close at box a see that you need to know the correct color code.
This is a random puzzle. There are 10 chances to deduce the correct color.
Deduce the correct color based on the result of selecting and placing the colors.
Concentrate on getting correct colors first and then the placements of those correct colors.
I enter one color on the first column and depending on the result, would proceed on finding out the next color and/or the correct placement of a detected color on the next column.
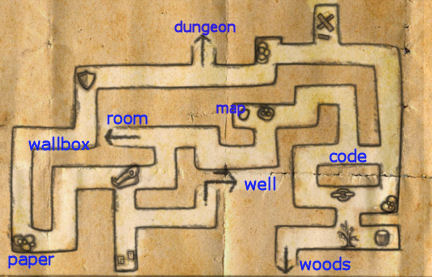
Take Renate's map of the castle and woods. See that there's a dungeon.
| The aim of the puzzle is to place 4 colors
from the very top bar on the column
below. You are given 10 chances (columns) to place the correct color at the correct slot. The box below the column has 4 lights. It will show the result of the balls placed on the column above it. If green - one ball is the correct color and is placed in the correct slot. If orange - the ball is the correct color but placed in the wrong slot. If black - wrong color.
Get all 4 small lights at bottom of the column to be
green. |
Column 1 - I placed 4 blue balls. The result
below showed that ONE of those 4 blue balls is the correct color at the
correct place. Column 2 - I then started positioning one blue ball and check another color (pink) to see if it is the correct color. As shown by the lights below - pink is a wrong color and the solitary blue I positioned is in the wrong slot. Column 3 - I check green now and moved the blue ball to another slot. The lights below showed that I correctly placed the blue ball and one of the green balls is a correct color in a correct slot. Column 4 - I now kept the blue ball where it is correctly placed; worked on finding which green ball is correct and also check the red ball. The red ball is not one of the correct color and I placed the green ball correctly. That's 2 down. Column 5 - Checked the light blue ball with blue and green correctly placed. The light blue ball is not correct color. Column 6 - Check purple and orange this time. Both colors are correct but wrongly placed. Column 7 - Placed all correct colors at correct slots. |
Explore the glass shop:
Furnace room: Go to the locked furnace room now that you have the key from Karl.
From the banquet room, take the left side stairs down to the end.
Use the dictionary on the sign on the door -Danger Fire Hazards.
Use the glass key on the locked door. Look around.
See the furnace at right. Don't open the door yet.
Find the missing tile: Check the cabinet-oven ahead, left of the furnace Take the green glass tile.
Workbench: Turn left across the furnace. Take the small shovel, prybar and tongs.
Sand buckets: Check the sand buckets right of the door.
Take the coin on the floor beside the right bucket.
Open the buckets. Get a necklace phone charm from middle bucket (Special edition game only) .
The third bucket has a Lukas' practical joke.
Find a way to sharpen the shears. Look close at the machine left of the door.
Take the coin from the trash can at left.
Plug the machine cord on the wall socket.
Look close at machine. Press the red button.
Use the dull shears on the rotating sander to get sharp shears. Press the red button to stop the sander.
Find a way into the castle's dungeon:
Furnace: Face the furnace. Do not open the furnace door without protection.
Use the dictionary on the sign at left.
Click on that metal door with the sign to slide it in front of the glowing window of the furnace.
Now click on the furnace door at right while the metal door is in front of you.
See a lever under the letter A. It is hot.
Use the tongs taken from the workbench on the lever. That raised the lever. A secret door left of the oven opens.
Explore the dungeon: Go through the door.
Pick up the game card phone charm on the stairs (Special edition game only). Continue down the stairs.
Look around. Check the first cell on the left. It looks like a cave-in happened here.
Take the legend clue page 19 from under the door of the cell ahead. See that it has OM at bottom right and a picture of a shield in a corner.
Relief: Turn the corner. Look close at a circular decorated relief on the wall. Something could fit in here.
See a trap door on the floor in front of that circular relief.
Check the cell on left wall.
Turn around and go back to the furnace room.
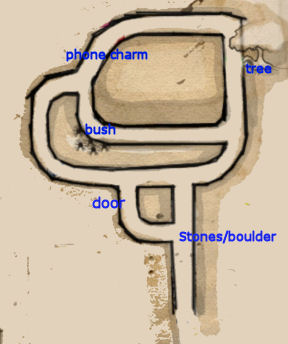
Woods:
Time to check the woods. Go outside to the courtyard.
Gate: Look close at the sign left of the archway. Use the dictionary on the sign below the lever - Warning. Do not pull lever. You will be pierced by the gate spikes if you do.
Woods: Exit the castle courtyard.
Go left after the stone bridge. See the mist covered woods. If you go to the woods often enough, you might get an award.
Go forward. See arranged stones on the ground. Take note that there is a large stone boulder at right. There is a path going to the left also.
Go forward. See path going right and left.
Go right and see a small boulder on the right.
Go curved forward and see big tree on the right.
Go forward and turn right to the tree. Take coins from the base of the tree.
Turn right to face where you came from.
Find out where the strange burr came from:
Go right. Forward and see a pinkish thorny bush on the left.
Look close at the bush in front of a big boulder. It is the same kind of burr found on the destroyed door.
Find a way to clear a path through the forest:
Use the sharp shears on the thorny bush.
See a camp. Take the flashlight from the tent at left.
Pick up a hexagon with etched icons from the ground by the fire ring.
Turn around; pick up flashing coin under the fern ahead.
Go left. The path goes left and right.
Go right and forward twice. Pick up a cow phone charm (Special edition game only).
Go forward and pass the tree with coins on your left.
Go forward pass the side path at right.
Take the coin from the under the fern at left.
Go curved forward. There is a path to the left and ahead.
Take the path to the left. See the big boulder and the arranged stones on the ground.
Go forward and be at the castle gate.
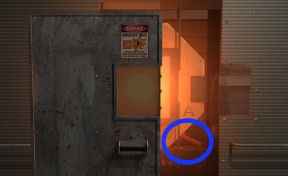
Explore the well:
Go forward to the well. Look close at the well. It is dark down there.
Find a light to see down the well: Use the flashlight on the hook of the rope.
The flashlight is lowered. See more hexagons down the well. Go down.
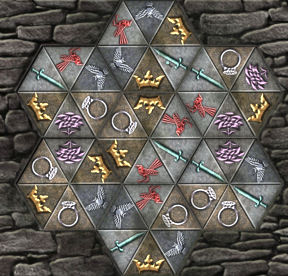
Find a way into the passages.
Hexagons: The hexagon found at the campsite is automatically added to the other hexagons.
All the edges that are touching needs to match up.
Junior: The top left hexagon is stationary. Start matching sides with that hexagon.
Senior: The central hexagon is stationary . Start matching sides with that hexagon.
Click at the center of the hexagons to pick it up. Turn the hexagons clockwise or counterclockwise using the arrows seen when the cursor is off center.
Take a hexagon and click it on another to exchange them.
A door opens at left. Go through the door. Nancy takes back the hexagon tile.
Explore the hidden passages part 1:
Castle Cryer: Go forward until an intersection with boards on the floor.
Turn left and look close at 2 old issues of Castle Cryer. Read the newspapers and comments about Karl, his policy and the monster.
The other newspaper mentions an accident involving Karl.
One shows German vocabulary: mouse (maus) and bat (fledermaus).
The other newspaper has: knight (ritter), dragon (drache), unicorn (einhorn) and castle (burg).
Take the coin from the stacked newspaper at back center.
Turn around and forward to the animal skull on the wall.
Legend clue page 11: Turn left from animal skull and forward until 3 big stones and 3 small stones at the corner.
Take the legend clue page 11 from top of one big stone. It is a page of the legend about the monster and missing girl. It is page 11 with letters ME at bottom right. The picture shows the boulder of the campsite seen in the woods. It states that the boulder stands guard over a buried secret. Ah!
Wall box: Go forward until a wall box is seen on the wall. It needs 2 keys.
Shield: Go forward and see a shield at the corner. The shield in the other legend clue page.
Dungeon exit: 2 forwards from the shield, turn left. See an exit. Do NOT exit yet. It goes out to the dungeon and you can't get back in the passages.
Dead ends: Turn around and go left. Go forward and see 5 large stones at left. Ahead is a dead end.
Take the path in front of the stones at right. Go forward and left to another dead end. This one has boards on the floor. Take the coin at far right of the boards.
Turn around and go back to the path. Go left to continue.
Ahead see large stones and farther down another path to the right.
Code: Go right at middle of hallway. See a red box on the wall. There's another code.
Take coded message 2. It has drawn bat, castle and knight.
Go left to go back to the hallway. Now go forward to the stones at the corner.
Go right and see the chains on the wall.
Tree: Go left across the chains and see a tree painted on the wall.
Go left and see another dead end. Pick up a coin from the floor close to wall.
Exit to woods: Turn around and go forward until the white door.
Open the door and see that it is the woods.
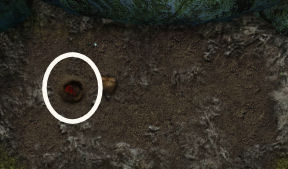
Search for a boulder similar to the image I found:
Go left, then right and right again. See the campsite ahead.
Nancy recognizes the boulder in the picture.
Look at the ground and Nancy wants to know what the missing girl hid.
Find some sort of shovel or scoop for digging.
Use the small shovel on the ground until you get a necklace.
Turn around from the campsite.
Go back to the white door. Go left, left, left and then forward to the white door.
Go back inside. Go back to the tree on the wall. Go left and see the chains.
Go left of the chains. Go forward until the red box on the wall where we got the code.
Go left or across the red box.
Map: Go forward pass a pile of stones until a single large stone in an alcove is seen. Look close at the large stone.
Take the secret passage map.
Exit to room: Go left and then forward until stairs are seen. Note that there is a red arrow on the wall at right.
Climb the stairs. Open the wood door and be in Nancy's room.
The wood fireplace moved back. So that is how the monster got in Nancy's room.
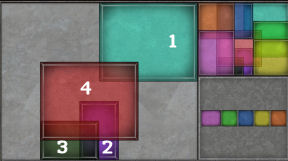
Open the box with glass tiles:
Go to the alcove with the box at the hallway by Karl's office.
Now that the 2 missing tiles are found from the (blue glass) stained glass window and the (green glass) oven in the furnace, open the box.
Look close at the box. See the glass pattern at top right.
The glass tiles are at bottom right.
Left click to pick up a tile and right click to turn it.
The object of the puzzle is to duplicate the pattern at top right using the glass tiles.
Note that the glass tiles are arranged by layers.
Junior
Place tiles in order shown:
1. Aquamarine
2. Turn purple
3. Dark green
4. Red
5. Light green
6. Yellow
7. Blue
8. Orange
9. Turn lavender
Take rotor 1.
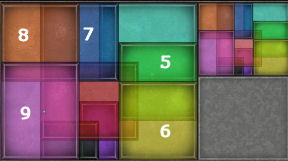
|
Senior Place tiles in order show: 1. Large orange 2. Aquamarine 3. Small orange 4. Large green 5. Large blue 6. Small blue 7. Turn small pink 8. Small green 9. Purple 10. Yellow 11. Turn large pink Take rotor 1. |
|
|
|
See if anyone knows anything about the necklace I found:
Renate: Go to the banquet room.
Ask Renate about the necklace from the woods. She wants Nancy to get rid of the necklace. Learn about what the festival is about.
Karl: Go to Karl's office and talk to him. Talk to Karl about the accident as mentioned by the Cryer. Learn about the collapse of the cell in the dungeon. It happened when he showed it to the tourists. He thinks he's bad luck because he met his doppelganger when he was a boy. That is the reason he hides himself from the world. Learn about the festival and missing girls.
Lukas: Go down to the foyer and Lukas calls Nancy.
He wants Nancy to distract Karl. Talk to Lukas again.
Anja: Talk to Anja at the gift shop. Learn more about the festival and the necklace. It might be the original one.
Find something to activate the relief in the dungeon:
Go back to the glass shop - furnace room.
Open secret door: Face the furnace. Slide the metal door for protection again.
Open the furnace door at right. Use the tongs to move the lever up.
Enter the secret door and go forward until the relief on the wall.
Relief: Use the old necklace on the relief.
Turn the relief clockwise using the turn arrow cursor. The trap door on the floor opens.
Turn around back to the relief. Do not go down or forward or game ends when you fall through the trap door.
Turn the relief counterclockwise to original position to close the trap door.
Place the necklace back on the relief and turn it counterclockwise. See it opens a door to the secret passage.
Go back to the dungeon. Exit the dungeon and the furnace room.
Explore the foyer part 2:
Get Lukas out of the foyer: Since Lukas asked to distract Karl, go to Karl in his office and ask that he stay in here.
Go back to Lukas and talk to him. When Lukas leaves, pick up the paper under the chair.
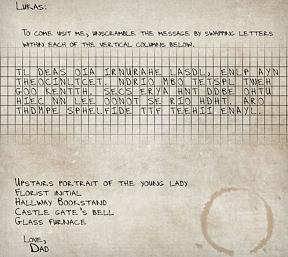
Security code clue: It is a code written by Lukas' father to gain access to the security room.
See the letters are in columns. Move the letters in a column to decode the letter.
Click on a letter and then click on the letter you want to replace. The correct word becomes unhighlighted and cannot be moved anymore.
Find the notes hidden throughout the castle: Even if you saw them before, go to the locations stated in the letter and click on them. Nancy will verify that they are the ones in the letter.
Upstairs portrait of the young lady: Go to the left side stairs going to Nancy's room
Check the painting on the wall. See the letter G.
Use the dictionary on the plaque. It is Else, the Freiherr's daughter. The painting was damaged in a fire.
Florist Initial: Go to the courtyard. Face the shops behind the well. Use the dictionary on the signs.
Look close at the florist's door. See the letter D.
Hallway bookstand: Go to the hallway across Karl's office.
Look at the table in the alcove at right. See the letter B.
Castle gate's bell: Go outside to the courtyard and look at the doorbell. See the letter G.
Glass furnace: Go to the furnace room and face the furnace.
Slide the metal door to the right and then open the furnace door. See the letter A.
The notes are: GDBGA.
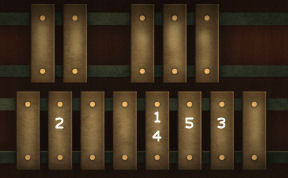
Play the notes: To review where the notes are located, go to the courtyard.
Go to the door left of the buggy. Turn around and review the paper on the stairs. Remember where the notes are located on the keys.
Go back to the foyer and the clock. Open the cabinet below the clock.
Play the notes GDBGA or click on (from left to right at bottom row): 5, 2, 7, 5, 6 or hit the keys 1-5 as shown in the picture below.
See the clock play and a button on the left wall pops out.
Security Room: Press the button and enter the security room. See a chair, desk, monitors and machines.
Take the coin from the pipe on the wall right of the chair. Click on chair to face the desk.
Find a way to tap into the castle's security system:
See Lukas' picture on the shelf.
Take the coin from the stand at extreme right of the desk.
Cell phone alert: Look close at the red phone on the left.
Use the dictionary to translate the note on the cell phone holder. It is to activate the cell phone to get alerts.
Click on the empty holder to automatically place Nancy's cell phone.
Take the cell phone.
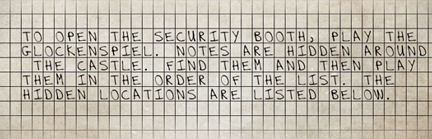
CCTV activation: To activate the CCTVs-monitors, read the booklet above the phone.
Look close at the metal cover at middle of the desk.
At the bottom of the metal cover, take the bird phone charm (Special edition game only) partly hidden by a roll of yellow paper.
Insert the power-control key found on the coffee table at the foyer on the plug at right.
Turn the power key to ON.
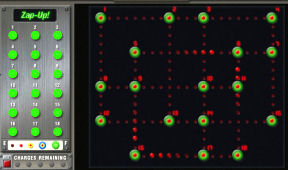
Open the cover. See the Zap Up. The manual states to have all the points-numbers be green.
When one of the higher charged points are clicked on, it zaps any adjoining points (shown by the numbers).
There are only 5 chances to zap or get all the points green. There is a reset button at bottom left.
Click on these numbers on the panel at left:
Junior - 10, 8, 2, 7 and 6.
Senior - 9 and 15.
Find out what Renate was up to with the clock in the shop.
See the live CCTVs. The camera at the shop picks up Renate doing something to the third from left cuckoo clock.
CCTVs: Press all the buttons under the monitors. See the different locations where the cameras are placed: courtyard, foyer, shop, hallway, banquet room, Karl's office, furnace room and dungeon.
Go left to exit the security room.
Shop: Go to the shop and check the cuckoo clock.
Pull back and take the blue note on the mugs. It is a cutout with the word Else Castle Finster at bottom left.
Exit the shop and go to the hallway across Karl's office. (The alert of a monster sighting might happen here.)
Castle Finster book: Go to the alcove with the History of Castle Finster book at the hallway by Karl's office.
Read the book again. The daughter's name is Else. Use the cutout on the opened page.
See "Third clock from left. Nineteen twenty one". We need to get to that clock.
Renate: Go to Renate at the banquet room and talk to her completely.
The monster is sighted (can happen during or after the above sequence):
Alert: The cell phone rings. It is an alert that the monster is sighted.
Security room: Go to the security room and see that the monster is in the courtyard.
Exit the security room and go to the courtyard. Nancy sees the monster and automatically follows it to the gate.
The gates drop trapping Nancy. The monster tries to get to Nancy.
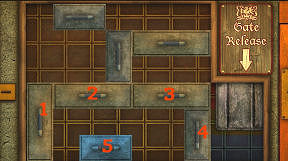
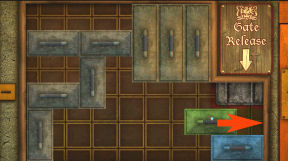
Raise the gates: Turn to left wall and see a padlocked cabinet.
Pull the brick on top of the cabinet and take the panel key.
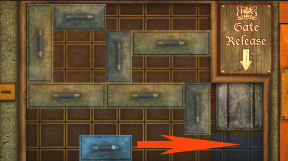
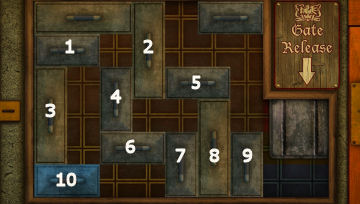
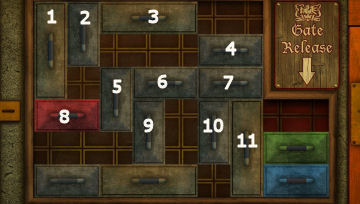
Use the panel key on the padlock. See bars that need to be moved so that the blue colored bar be moved to the right side under the gate release.
To reset the puzzle, click on door at right to close the cabinet.
The gates rise. Check the piece of cloth caught on the gate.
|
Junior Panel slider 1: Move bars 1 2 3 4 5.
|
|
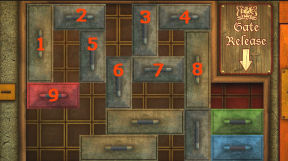
| Junior Panel slider 2: 1. Move 5 up. 2. Move green 9 to right one space. 3. Move 1 down completely. 4. Move 2 to the left completely. 5. Move 5 up. 6. Move 6 to the left. 7. Move 5 down. 8. Move 3 down. 9. Move 4 to the left. 10. Move 3, 7 and 8 up 11. Move green 9 to the right. |
|
|
|
|
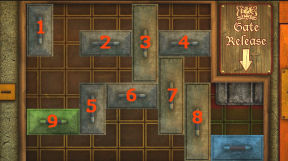
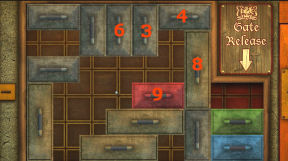
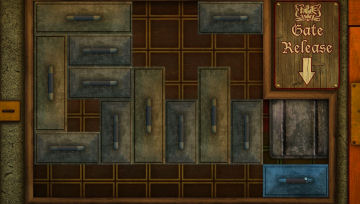
Junior Panel slider 3: 1. Move 6 up. 2. Move 9 right. 3. Move 1 down. 4. Move 2 left. 5. Move 5 up. 6. Move 7 left
|
|
|
7. Move 6 down 8. Move 3 down. 9. Move 4 left. 10. Move 8 up. 11. Move 9 right.
|
|
|
|
|
|
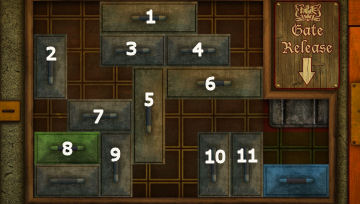
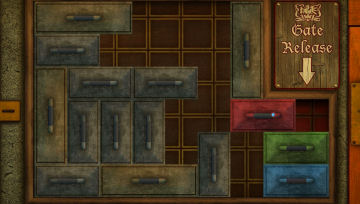
Senior Panel slider 1 1. Move 10 right one space. 2. Move 3 down. 3. Move 6 left. 4. Move 2 down. 5. Move 1 right one space. 6. Move 3 up. 7. Move 6 left. 8. Move 4 down. 9. Move 5 left. 10. Move 2, 7, 8, 9 up. 11. Move 10 right. |
|
|
|
|
|
|
|
|
|
|
|
Senior Panel slider 2 1. Move 1 right. 2. Move 2 down. 3. Move 3 left. 4. Move 5 up. 5. Move 7 right. 6. Move 9 up. 7. Move 8 right one space. 8. Move 2 down. 9. Move 7 left. 10. Move 5 down. 11. Move 6 left. 12. Move 5 up. 13. Move 10 and 11 up. 14. Move 8 right. |
|
|
|
|
|
|
|
|
|
|
|
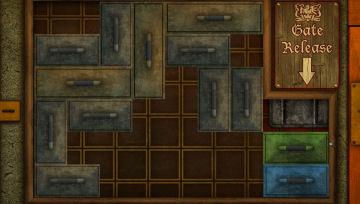
Senior Panel slider 3 1. Move 3 right. 2. Move 5 up. 3. Move 6 left. 4. Move 9 up. 5. Move 10 down. 6. Move 8 right. 7. Move 1 down. 8. Move 9 down. 9. Move 6 right. 10. Move 2 and 5 down. 11. Move 3, 4, 6 and 7 left. 12. Move 11 up. 13. Move 8 right. |
|
|
|
|
|
|
Explore the foyer part 3:
Go back to the foyer. Go around to the clock at the corner.
See stilts on the floor. Yes - what was Lukas doing with this?
Lukas: Talk to Lukas about the castle gates and other things.
Find a way to get Karl out of his office and see what he's hiding anything part 1.
Enter the security room by pressing the wall button.
Check the CCTVs. If you check the different scenes on the CCTVs often enough, you might get an award.
Check what Karl is doing in his office. He's still playing with his dolls.
Alarm buttons: Look close again at the red phone alarm panel at left.
Let's check Karl's office while he's gone. Press the Karl button. Check the rightmost CCTV and see that he is not in his office anymore.
Karl's office: Go to Karl's office. You have to check the room fast, he might come back soon.
Professor Sparrow (Find a way to open Karl's locked drawer.): Check the sparrow painting on the left wall.
Take the antique key from the back of the painting.
Drawer: Go to the left side of Karl's desk. Use the key on the locked drawer.
Check the dayplanner with a combination lock.
Read the letter behind the dayplanner. It's an unsent letter to Mildred, a former guest from Alberta, Canada.
Check the pen set. Take the drawer key over Anja's name. It must be the gift shop drawer key.
Pull back. Take the coin under the monitor at left side.
Look close at calendar. Use the dictionary on the calendar - The Monstrosity Night Festival Eve. (Optional)
Read the Festival Planning for Beginners leaflet sent out by Castle Cast. (Optional)
Exit the office.
Find a way to snoop behind Anja's desk, search the area for hidden clues.
Go back to the security room. Check the CCTV for the shop. See that Anja is there.
This time press Anja's alarm button. If you press the alarm button often enough, you might get an award.
Check the monitor and see that she is not at the shop anymore.
Gift shop drawer: Go to the gift shop. Go behind the counter by standing facing the book case and click on the curved cursor.
Use the drawer key on the drawer. :)
Search the shop for something to wind the clocks.
See an E-mail guide sent out by Castle Cast in the drawer.
Read the e-mails from Markus. Click on the e-mails to see another one behind it.
Take the clock winding key.
Clock: Look close at the third from left cuckoo clock.
Use the clock key on the clock. Change the time to 7:21 (nineteen twenty one clue from the cutout).
The secret compartment opens at bottom of the clock. Take rotor 2.
Enigma - Decode:
Go back to the security room.
Decoder: Look close at the panel at right end of the desk.
Read the paper above the panel - Enigma Operating Procedure.
3 rotors are needed. Starting letters for the code is to be entered on each rotor.
Slide the red button up to open the panel. Open the lid on the wheel above.
See that the Krolmeister decoder is missing 2 rotors.
Use the 2 rotors take from the glass tile puzzle box and the cuckoo clock on the panel.
Close the rotor lid.
Decode the paper with the picture of the sun:
Click on the Enigma machine and see the close up. The coded messages are at top right.
Check the coded message with the sun. See that the icons are sun, moon and comet.
Remember the German vocabulary article of the Castle Cryer: Sun (Sonne), moon (mond) and comet (komet).
Enter the S, M and K on the 3 squares beside the rotor wheel at top of the panel. Turn the wheel to change letters.
Using either the computer keyboard or your own keyboard, type in the letters only as seen on the coded message.
Click on the tape to reset the puzzle.
Click on the decoded tape: Karls dayplanner eight two six one.
Take the tape. I cracked the code.
Decode the paper with the picture of the bat:
Click on the code at top right to see the next code.
See that the icons are bat, castle and knight.
Remember the German vocabulary article of the Castle Cryer: bat (fledermaus), castle (burg) and knight (ritter).
Enter the F, B and R on the 3 squares beside the rotor wheel at top of the panel. Turn the wheel to change letters.
Using either the computer keyboard or your own keyboard; type in the letters only as seen on the coded message.
Click on the tape to reset the puzzle.
Click on the decoded tape: The Freiherr's daughter is step one.
Take the tape.
Look for something dealing with the Freiherr's daughter:
Portrait: Check the portrait again at the corner of the balcony by Nancy's room.
Translate the plaque if you haven't yet. See the necklace she is wearing.
Nancy noted that something might not be present in the restored painting that is in the original.
Postcard: Go to the Gift shop. Look at the postcards left of the snack server.
Buy the postcard with the Freiherr's Daughter's painting featured on it.
In inventory, look at the postcard. Remove the price tag and see *EN written at bottom right.
Anja: Talk to Anja about the gate and the monster.
Find a way to get Karl out of his office and see what he's hiding anything part 2:
Security room: Now that we have Karl's dayplanner's code, let's open it.
Go back to the security room. See that Karl is back in his office still playing with his dolls - sorry - avatars.
Press the Karl alarm button at left side of the desk.
Immediately go up to Karl's office. Go around the desk and use the antique key on the top drawer.
Dayplanner: Take the dayplanner and enter 8261.
The dayplanner is written in German. Use the dictionary on the page.
See that the notations of fairy tale characters' names are in color.
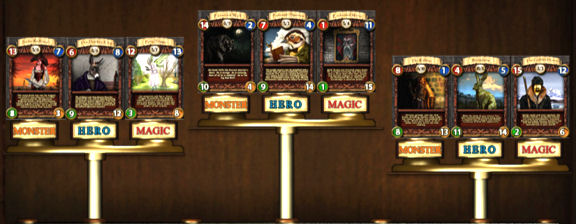
Figure out what the color coded entries mean: Pull back, forward and go left to the wall with the Raid cards on the scales.
Read the Raid Game Guide book. Check each character to see where the written fairy tale characters can be found. Note the number in respective color of the written characters. Then arrange them in order.
1. Sea hare is found in Bonaparte card and has blue magic of 5.
2. Rumpeltstiltskin is found in Goldthumb card and has gold wisdom of 13.
3. Gold children is found in Golden Hunter card and has red strength of 15.
4. Lil snow white is found in Enchanted Mirror card and has blue magic of 11.
5. Donkey is found in Donkey King card and has green health of 9.
Cabinet: Go to the cabinet left of the desk.
Look close at the base of the cabinet. Open the panel at right and see the keypad.
Select: 5 - enter; 13 - enter; 15 - enter; 11 - enter; 9 - enter. See that the red light turns green for a correct entry.
If the Raid Game Guide is not read completely, the entries will not be accepted.
Employee files: Check the employee files.
Read Anja's resume. She has an impressive college degree and work history.
The reference letter is from Castle Cast. Nancy noted the phone number.
Call Castle Cast:
Go to Nancy's room and use the phone. Call Castle Cast. The request for information was denied.
Find a way to convince Castle Cast to release information about the castle:
Call Markus and talk to him. He says he's rich and the e-mails are not correct.
Ask for his help about Castle Cast. He will call Castle Cast to clear Nancy.
Follow up with Castle Cast:
Call Castle Cast again.
Learn about Anja. They love her so much. She delivers the mail there.
Anja: Go to the gift shop and talk to Anja about Castle Cast.
Exit the gift shop.
Security: Go to security room.
See Anja leave the castle (time varies). Go to courtyard to try to follow her.
Monster sighting again:
Get a cell phone alert that the monster is in the castle (time varies).
Go to security and see that the monster is in the furnace room (right monitor).
Furnace room: Go to the furnace room. No one is here.
Face the door and see one of the sand buckets is turned over.
Look close and see odd footprints in front of the door.
Side room: Exit and follow the tracks. Climb the stairs and see the monster at the side solarium.
Go up the stairs. See Lukas. Check the window. See the monster.
Karl: Go to Karl's office.
Talk to Karl about Anja, Lukas dressed as monster and the real monster.
Ask about the letters. We need proof of the monster.
Find the monster:
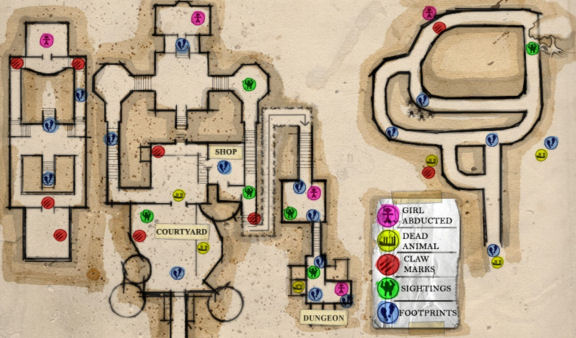
Examine Renate's map in inventory. Nancy should say that she "should check all the sites out".
Check all the green icons of the monster sightings.
The monster has been seen at the courtyard, side solarium and furnace room.
He was also seen at the dungeon and by the big tree in the forest.
Dungeon: Go down to the furnace room.
Open the secret door by facing the furnace; move the metal panel, open the furnace and use the tongs on the lever.
Enter and look around at the dungeon. No monster.
Relief: Use the necklace on the relief. Turn the relief counterclockwise to open the door to the secret passage.
Secret Passage: Go through, go forward, right and see the shield marker ahead.
Easter egg: Go forward to the shield. Go forward until the metal box on the wall that needs 2 keys.
Use the antique key first on the left keyhole and the drawer key on the right keyhole.
Click on the panel to open. See a beautiful yellow egg. Take the yellow Under cover/over easy egg. Cluck cluck cluck.
Find the tree painting: Go back to the shield marker by turning around from the metal box (seen at left) and forward.
Go forward until the pile of stone at left. Go right to the path across the pile of stone.
Scarf: Go forward once and then turn left to an alcove with a pile of boards.
Take the scarf. This is the scarf mentioned by Renate.
Turn around and go left back to the hallway.
Continue forward until the chains on the wall.
Take the path (at left) across the chains. See the tree on the wall.
Find something to help open the wooden barrel: Go left from the tree and see a barrel.
Use the prybar to open the barrel. See the same cloth worn by the monster.
Turn around and forward until the white door.
Tree: Exit through white door.
Go left, right, left, right, forward, curved forward and forward.
Turn left to tree. Click on left big root of the tree and be behind it.
Take the third coded message that has mouse, dragon and unicorn drawn on it.
Monster: See the monster walk back and forth in front of the tree.
Use the cell phone to take picture of the monster.
Zoom in or out and center the monster on the circle. Click on take picture button.
Take as many or as few as you want. Then exit and go back to the castle. The monster won't bother you.
Back to castle: Turn right from facing tree, forward, curved forward, left and forward pass the stones on the ground.
Security room:
Decode the paper with the picture of the mouse:
Look close at the decoder. Slide the red button up to open the panel.
Look close at the wheels. See the coded message at top right.
Remember the vocabulary seen on Castle Cryer. It shows: mouse (maus), dragon (drache) and unicorn (einhorn).
Enter the M, D and E on the 3 squares beside the rotor wheel at top of the panel. Turn the wheel to change letters.
Using either the computer keyboard or your own keyboard; type in the letters only as seen on the coded message.
Click on the tape to reset the puzzle.
Click on the decoded tape - Legend ending: Find young woman to cast as the victim.
Click to take the tape.
Return the scarf:
Renate: Go to the banquet room. Talk to Renate.
Learn about the history of the scarf and her reason for being here during monster sightings.
Get proof to show to Karl that the monster is still around.
Go to Karl's office. Talk to Karl about Anja and the monster pictures.
Take the cell phone back.
If you finished helping Karl on his new character (optional), Karl gives you the new card.
Exit the office and get a call from Karl (time varies and if all previous dialogues with all characters are done).
Find Lukas:
Go back to the office. Lukas is missing.
Foyer: Go down to the foyer and look at the area where he usually stays.
Nancy noted that Lukas was dragged off. See sand on the floor by the chairs.
Gift shop: Enter the gift shop. Talk to Anja.
Exit through the side hallway and go to the furnace room.
Furnace room: Look close at the oven.
Pick up one of the cows, a monster game piece on the floor left of the oven. It is by the entrance to the dungeon.
Dungeon: Open the dungeon and go through. Check all the cells.
Lukas: See Lukas at the cell left of the relief on the wall.
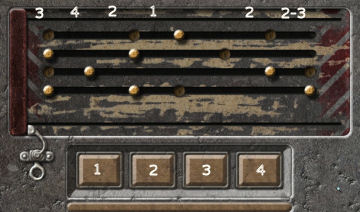
Cell lock: Open the lock and see knobs and buttons.
A clasp holds the bar on the left.
The aim of the puzzle is to let the released bar on the left move to the right without touching any of the knobs.
There are 4 buttons at the bottom that depresses the knobs.
Release the bar by flipping the clasp. The bar moves.
Press the correct button below to depress the knob that is in the way of the bar.
Be sure that the bar is clear of knobs behind it before pressing the button to depress the ones in front of it.
From left to right, press buttons: 3, 4, 2, 1, wait, 2, 2 and immediately 3.
Lukas is freed but Nancy is trapped inside the dungeon. Lukas will get help.
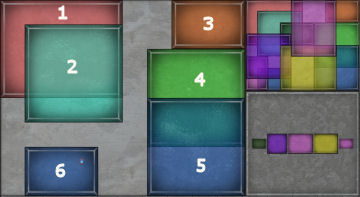
Imprisoned:
Go back to the other side of the cell to see if we can open the passage door.
Turn the corner and someone hits Nancy.
Nancy wakes up in the cell under the trap door of the dungeon. Nancy turns on the flashlight.
Check the wall at right. See a bricked door.
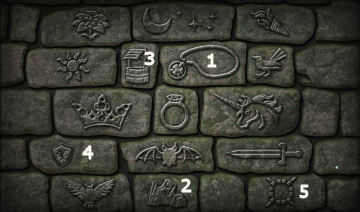
Legend images: The bricks have images. Nancy says the legend pages might help.
Check the postcard and legend clue-pages in inventory.
Note dawn the letters at bottom right, the page numbers and the corresponding pictures.
|
Press the images in the order shown by the Legend page numbers. 1. Necklace - postcard - EN. 2. Boulder - page 11 - ME 3. Well - page 17 - TK 4. Shield - page 19 - OM 5. Trap door - page 25 - N The door slides open. |
|
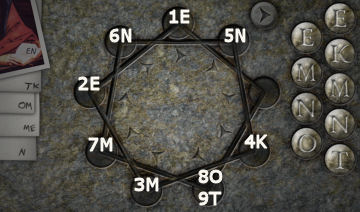
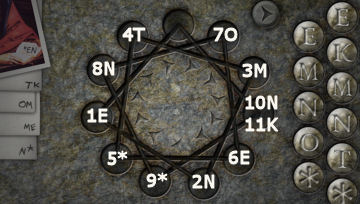
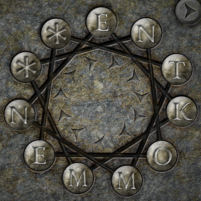
Legend letters: See another puzzle. Nancy says it forms a word and can start anywhere.
ENTKOMMEN is German for "to escape".
Place the letters in the circles to form the word ENTKOMMEN.
In your scratch pad, make a drawing of the pattern. Enter the letters on the circles. Then enter the numbers following the line (not the letters).
When a letter is placed on a circle, it moves to the next circle.
The door slides open.
Junior
Senior
Explore the hidden passages:
Exit and see that you are in the secret passages. You came out at one of the dead ends.
Go forward until you see the shield at end of the hallway.
Turn right midway the hallway and see the exit to the dungeon.
Search for evidence in the passages:
Check the bag that was not there before.
See spare monster pieces. Nancy says it belongs to the castle's "monster".
Read the Captive Curse.
Read the letter behind the book. It's another e-mail supposedly from Markus about a spectacle for the press and investors tomorrow.
The Monster:
Go up the stairs to the dungeon.
The monster arrives.
Call out the name of the monster impersonator. If the wrong name is called, game ends.
Listen to the baddie.
When the time is right, place the necklace on the relief.
Turn the relief clockwise to open the trap door.
Watch what happens.
Auf Wiedersehen, Nancy!
Watch the outtakes at end of the Credits.
Save Nancy in Alibi in Ashes.
This document may not be distributed without express written permission of the author and the content may not be altered in any way.
For Questions or Comments on this Walkthrough,
Please write to: MaGtRoCopyright © 6/2011 MaGtRo