Nancy Drew 25: Alibi in Ashes
by Her Interactive
Walkthrough by MaGtRo October 2011
Gameplay: This is a point and
click game. Nancy shows the desk in her bedroom. This is where the 'How to be a
Detective Book' that shows the game manipulations can be accessed. The Scrapbook
has past Nancy Drew games information.
Read the Case Files to learn about the present mystery
case. Once you are ready to play the game, click on the note at right.
Select to play either Junior or Senior detective.
The main screen has icons at the bottom of the
page.
The bag at left is the inventory link. The journal
shows Nancy's notes about the present case. The task list shows the junior
gamer what needs to be done or was done to progress in the game. The cell
phone is on the next slot.
The cell phone has: the phone, camera, game,
settings (wallpaper and ring tone selection), hint and
journal.
The gear icon shows the options. Here the voice,
effects and music volume can be adjusted. Also, the bottom background can be
changed. Closed captioning, text size and screen size selection are also in
this page.
The load folder has the list of the saved games that
can be replayed. The diskette is used to save the game. The rightmost icon
closes the game.
The game is non-linear. The walkthrough below is
just one way to get through the game.
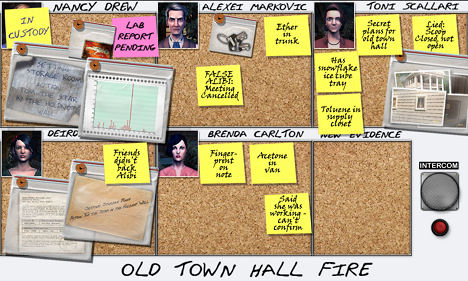
The case file shows that Nancy and her team - Team
Danger made up of Ned, Bess and George are competing in the annual The Clues
Challenge contest. They are given clues to deduce to find the place
that hides the Clues Challenge medallion.
The note at right of the case file has an anagram that
states that Nancy checks the thermostat at the old Town Hall.
Town Hall:
See the display of the last piece of iron nugget
used to create River Heights' first anvil.
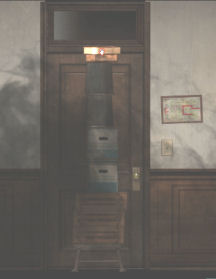
Enter the storage room. Hear a click and the door
behind slams shut. Turn around to check that the door is locked.
Look at the Emergency procedure route right of
the door.
Thermostat: Turn around and
check the thermostat on the wall.
See an ice cube in the shape of a snowflake on top
of the thermostat. The wiring explodes and fire starts.
Turn around and go to the door.
Escape the room: Pile the boxes,
pails and crates from the floor in front of the door so that you can reach the
window above.
Right click to turn the items. When all are piled
high; click on window to be on the other side of the door.
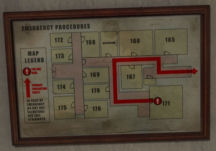
Escape the building: Follow
the route of the emergency plan poster seen earlier.
Forward until the end of the hallway.
Turn right and forward to the end of the hallway.
Turn right and forward midway the hallway.
Turn right. Turn left and forward to exit through
the double doors.
Interview: See Alexei
Markovic, Deirdre Shannon and Toni Scallari watching the fire.
Brenda Carlton interviews Nancy and accuses her of
setting the fire. A policeman yells to halt the interview.
Chief McGinnis interrogates Nancy.
Nancy is locked in the room; following a lead for
the Clues Challenge.
The fire started really quickly. The smoke is black.
There was a snowflake ice cube on the thermostat.
Deirdre, Alexei, Toni and Brenda were there before
the emergency crews arrived. Nancy believes that the fire was intentional but she
doesn't know who.
Brenda continues with the broadcast of Nancy as the arsonist.
Get help from your friends:
Arrest: Nancy is arrested by
Chief McGinnis at her home.
At the jail cell, the Chief says that Nancy can call
out.
Go to the phone; pick up the receiver and dial or
click on Dad's number. Nancy leaves a message.
Call any one of your friends. They will use the
wiki (journal) on the cell phone to stay in contact.
George is staying at
Nancy's house and George's mom is taking care of Togo.
If you do an emergency call, you might get
an award.
|
All of the group will know what
the other friend finds out.
Some of the main characters can
interview other suspects better than others.
Inventories are not transferable
between characters.
To change character:
Call Nancy
and give the case to her. Then she calls another team member to take over the
case.
If you get all characters involved in the game,
you might get an award. |
Find the note that
Nancy needs and put it in the drop box:
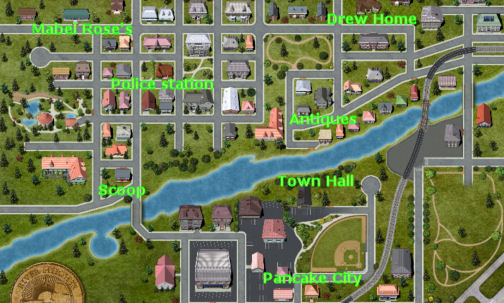
Map:
Transfer to another team member.
As another member of the team; leave the location to see
the map.
The map can be pulled
down to see more of the city.
Move the cursor over the
buildings and see the name of some of the businesses.
At the Scoop Ice Cream Parlor, there is a map of the
city with legend of the businesses in town.
If you drive and stop
at enough labeled locations in the map, you might win an award.
Town Hall:
Click on the Town Hall building that is located at bottom of the map above the
Riverfront Park.
Pick up the piece of
paper on the parking lot to get charred note.
Police station:
Drive to the brown roofed police station located at left of the map close
to the Zoo.
Open the package drop
right of the station door and place the charred note inside. Call Nancy to transfer
the case to her.
Free run of the
Police Station:
The Chief tells Nancy
that she can continue her investigation as long as he doesn't catch her. There
is a board where she can compile evidence and he will look at it when
Nancy has enough compelling evidence.
Exit the cell and look
around.
See a box of goodies on the table at left. Hannah left power snacks to
energize Nancy. If you eat enough goodies from the box you might win an
award.
Check the desk on the
left and see the fingerprint scanner left of the monitor. Check to see that the computer needs a password. Read the
"Investigating Arson" book.
Check the desk of DK
Daughters and see a media player with no card.
Check the evidence
locker right of the large seal on the wall. Locker 205 needs a key.
Check the Suspect
Profiles board. The charred note is automatically added on Nancy's board.
Check the Forensic lab.
It has a gas chromatograph machine.
Find Detective Ryan's
key:
Go near the Chief's
office door and eavesdrop on the call. It seems that Detective Ryan lost the evidence
locker key. He thinks he lost it at Pancake City.
Go back to your cell and
use the phone. Call Ned or George to ask help finding the key. Transfer the case.
George or Ned:
Follow Detective
Ryan's trail: Exit the area and be at map. Go to the places Detective Ryan visited.
Pancake City is
below the Riverfront Park at bottom of the map. Mabel Rose's is close to
top left of the map.
The Antiques Shop is at
middle of the map above the river.
Wardenclyffe
Antiques: Read the August 18 newspaper on the stand in front of the
antique store. Learn that the Time Capsule talk was rescheduled because of
electrical problem.
Enter the shop. If Bess
is sent here, she will break a vase and eventually be kicked out.
Talk to Alexei who is cleaning
a telescope. Detective Ryan was here and left an item at the new arrival shelf.
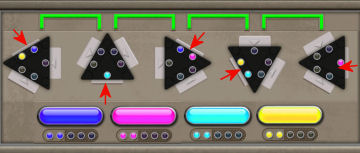
Get the key:
Turn around and go forward to the shelving right of the desk. Look close at the
item with black and white striped leaves. There's a key under there.
The aim of the puzzle is
to retract all the bars at the center to access the key underneath.
Press the buttons to see
which bars retract. Pulling back resets the puzzle.
Junior: Numbering the buttons
from top right clockwise: click on 3, 5 and 1.
Senior: Numbering the buttons
from top going clockwise: click on 1, 2, 5 and 6.
Take the evidence
locker 205 key.
Drive to the police station and drop the evidence
locker key in the package drop. Call Nancy and transfer the case.
Find a way to open
locker 205:
As Nancy:
Go to the hallway left
of the Chief's office to be at the front desk. Do NOT exit the building.
Open the Items Received
compartment on the wall. Take the evidence locker 205 key that was dropped
off.
Go to the evidence
locker and use the key on locker 205.
Open the top drawer and
read the computer password paper. Take the suspects interrogation disk. Study the Krolmeister locking system manual.
Open the bottom drawer and take Nancy's things: cell phone, house keys and the
lock
pick kit.
Unlock the middle
drawer: Read the Krolmeister manual that is at top
drawer.
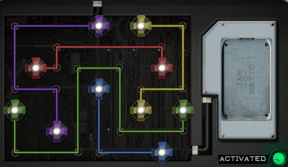
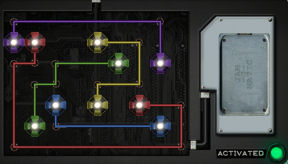
The aim of the puzzle is
to light up the colored status bars at the bottom and have the connection indicator lines on top to be all green.
Click on the tabs
outside the triangles to see which tab makes active green connections.
Press in tabs (l-r): top left, bottom, top right,
bottom left and right.
Read Nancy's booking
report. Learn that they found that Nancy's clothes taken during the home search
have gasoline, an accelerant. Nancy wants to know what really started the fire.
Read that Toni Scallari
reported the fire. The detector-alarm
failed to operate due to unknown reason.
Dad-Carson Drew:
Use the cell phone and call Dad.
Figure out the
computer's password in the police station:
Go to the computer left
of the microwave and Hannah's goodies. Click on the monitor and
it asks for a password.
The paper seen on top
drawer of locker 205 states: Each row and column must
have one number and only one selected, can't use same number twice.
Select one number that
is not repeated in other rows or columns. Pull back resets the puzzle.
Junior - Top row going down:
press 3, 2, 4 and 1. The computer can now be used for later.
Senior - Top row going down:
press 3, 5, 4 1 and 2. The computer can now be used for later.
Find a way to listen
to the suspect interviews on the police tapes:
Go to the desk of DK
Daughter across the computer.
Use the suspect
interviews disk on the MP3 player.
Click to select and then
listen to all interviews. Press the play single arrow to start.
If you listened carefully to the questioning, you
might win an award.
Check accelerant sample:
Ask either George or Ned
to get a sample as close to the point of origin from Town Hall fire. It should
be collected in a glass sample container.
Nancy also wants a check
on the Town Hall alarm. Transfer case to the other character.
George or Ned:
Antiques Shop:
Go to the antiques shop.
Check the display on the table across from the New Arrivals shelf. Take the free glass
vial.
Number Punch: Look close at
the wooden puzzle box.
This is a random puzzle.
The aim of the puzzle is to press numbers 1 to 41 as fast as you can and beating the best time.
The best time is 1:52
for junior and 1:26 or senior gameplay.
Press the start button
to open the puzzle and time starts. Pull back to reset the puzzle.
Concentrate on the numbers
that are still golden in color.
After 3 completed failed tries, the puzzle timer stops one minute
before the best time and allows the gamer to win the game.
If you play this number puzzle enough times, you
might win an award.
Take the trunk key
from the secret compartment.
After winning the game, click on prime numbers
from 2 to 41. Get an Easter egg. (Thanks,phoenixtear!)
Trunk: Check the trunk at
the corner left of the counter at the back of the room. Alexei is here and we can't
work on the trunk.
Look close at trunk and pick up
the alarm keys on the floor right of the trunk. Exit the shop.
Town Hall:
Drive to Town Hall. Go to the side of the
building. Do not enter through the taped area or you will be caught by the
police.
Face the burned window.
Take the shutter at right and automatically prop it on the window.
Climb into the building.
Go forward and then right to the storage room.
Alarm:
At the entrance, check the fire alarm left of the entrance. See
that the alarm has been turned off.
Fire sample:
Go to the thermostat at far wall. The point of origin must be found and stated
by the character.
Use the glass
vial-sample container taken from the antique store on thermostat to get Town
Hall sample.
Exit the room, go left
and out through the window.
Go to police station and
leave the alarm key and sample at the package drop.
Call Nancy and tell her about the alarm. Transfer the case.
Find a way to analyze
the fire sample:
As Nancy:
Go to the Items Received
cabinet at front door. Take the Town Hall sample and the alarm
keys.
Go to the Forensic Lab.
Look close at the Gas chromatograph machine.
Insert the Town Hall
sample in the slot on the top of the machine.
Press Analyze button.
Take the printout and see that the graph pattern 45 spiked to 100%.
Nancy wants to know which accelerant matches this
figure.
Call Dad about
chromatograph data and security system:
Dad-Carson Drew:
Call Dad.
Ask about interpreting
the gas chromatograph. It will be delivered to the house and placed by the fireplace.
Ask about the alarm
system being shut down.
The suspects.
Toni Scallari:
As Bess:
Call Bess and transfer
the case to her. Bess is at the Scoop Ice Cream Parlor.
Enter the Ice Cream shop
and talk to Toni. Toni doesn't believe that Nancy is innocent.
Deirdre Shannon:
Talk to Deirdre outside. That talk is not productive.
Go back inside Scoop. Call Nancy to get Ned to talk to
Deirdre. Transfer the case.
As Nancy, call Ned.
As Ned:
Talk to Deirdre at Scoop.
Learn that Alexei was
accused of a crime and that Deirdre was following Nancy. She intercepted a note
for Nancy.
She gives the Deirdre's note.
Brenda Carlson - Meet the reporter
from the night of the fire:
Drive to Antiques shop. See a van parked outside
the antique shop. Knock on the van door.
Talk to Brenda Carlson.
Brenda doesn't want to help Nancy and is very good at twisting information.
Learn that Toni wanted an early arrest on the Town
Hall fire.
Alexei Markovic:
Talk to Alexei at the antiques shop about everything
except the alarm key (do so at end of dialogue).
Brenda was here earlier. He was once a chipper
person. Learn about his career when he was young. He was accused
by Bennington of taking a priceless antique magnifying lens. At the end of the dialogue, ask about
the alarm key and you will be thrown out.
As Nancy:
Call Nancy about Deirdre's note. She will leave her
house key at the drop box so you can get a fingerprint dusting kit.
Transfer to Nancy. Place the house key at the drop
box.
Dad: Call Dad. Learn about
Alexei, the Magnificent Markovic.
Learn about the alarm system being disabled on site
at
2:17 PM.
Call Ned or other characters. Nancy wants them
to check the suspects alibi.
Change to Ned.
Explore the Drew
House:
As Ned:
Drive to the police
station and take the house keys from the drop box.
Living room:
Go to the living room at left.
Read the newspaper.
Learn about all the road construction being done in town.
Also read the article
that Scoop was closed yesterday for one hour and opened at 2: 45 PM.
Upstairs parlor:
Climb upstairs.
Look at the bookcase at left and see George and Bess' picture.
Read the newspaper
article beside the picture. It states that Nancy exposed the Antiquities
Exhibit fraud.
Turn around from the
bookcases and forward to the bedroom.
Nancy's bedroom:
Enter Nancy's bedroom. Look around.
Check the cabinet on the
left beside the mirror dresser (one click forward from door) and see Nancy's
memento from her past cases.
Go to the desk. Open the
top left drawer and read her to do list.
Open the bottom drawer
and see the lock pick codes.
Go to the small cabinet
across the bed. Read the book "On the Case" on top of the cabinet. It
lists the possible accelerants. If you find all possible accelerants seen in
the game, you might get an award.
Find a way to dust
Deirdre's note for print and find my own fingerprinting kit:
Use the key on the
corner cabinet. Open the cabinet and help yourself to some Koko Kringle
chocolates.
Take fingerprint
dusting kit.
Take print:
Go to the desk. Take Deirdre's note from inventory to automatically place it on the desk.
Take the brush from the
kit and dab it in the powder. Use the brush with powder on note.
Drop the brush back in the case.
Take a piece of tape and use it
on the heavy print at bottom right of the note to get partial fingerprint.
Drive to police station
and place the partial fingerprint and Deirdre's note at the drop box. Change to Nancy.
Run the print from
note:
As Nancy:
Take the partial
print and Deirdre's note from the drop box.
Now that the computer is
accessible, go to the corner computer.
Insert the partial print
on the print scanner left of the monitor.
Look close at monitor.
Click on PrintSync icon.
Click on Load Sample.
Click on Search button. No matches found.
Call Bess and ask her to get fingerprints from the
other suspects. Change to Bess.
Get fingerprints from and check the alibis of
the suspects:
As Bess:
Drive to
Nancy's house and get a fingerprint dusting kit from Nancy's cabinet at the
bedroom.
Toni: Drive to Scoop.
Talk to Toni about where she was at 2:17 yesterday and
about Nancy and Brenda.
Sometime, the delivery
truck arrives and Toni leaves.
Go to the far end of the
counter and go behind the counter.
Look down at the floor
and take the Town Hall pictures on the floor under the counter.
Open the cabinet and click on the
snowflake shaped ice cube trays.
Take the closet key
on the lower shelf. Exit the shop.
Deirdre: Talk to Deirdre. Learn that she doesn't like Brenda and that
Brenda dressed up like Nancy once before.
Deirdre gives 2 friends phone numbers to verify where she
was at 2:17. Go back inside the shop.
Call the 2 numbers given by Deirdre. Talk to Holly and
Jessica. Jessica says that Deirdre was not with them until later while Holly says
Deirdre was with them.
Toni: If you haven't finished
talking to Toni continue to do so now.
Learn about Brenda and the Antiquities fraud exposure.
Learn that Deirdre told
Toni about the snowflake ice cube tray. Find out about her alibi and why she closed the shop
yesterday. Learn about Alexei.
Order an ice cream. Make
a selection from the board. If you order all ice cream flavors, you might get an
award.
Take the ice cream and
dust it for Toni's prints.
Deirdre: Exit the store and
talk to Deirdre again about the novelty shop and her alibi.
Deliver the prints and Town Hall photo to
the police station's drop box. Transfer the case to Nancy.
Alexei:
Transfer the case to the other character that has the trunk key. Be sure that
this character has a fingerprint dusting kit from Nancy's cabinet.
Go to the antique shop. Talk to Alexei about his
alibi. Having read the newspaper outside, know that his talk was cancelled.
He was at the Town Hall because he was trying to open
the time capsule.
If you get thrown out, go to a business in the map and then come
back later.
At the end of dialogue -
Ask for a gift for an
uncle who is a train buff or another excuse to get him to leave the room. Alexei goes to the backroom to look for one.
Hastily, dust the
telescope. There are no prints.
Dust the metal polish at
back of table to get Alexei's print.
Take a good look around the antique shop - trunk: Immediately, go to the
trunk at other corner.
Use the key taken from the Number Punch puzzle box on the
trunk.
Read the newspaper and
learn about the accusation by Bennington that Alexei, amateur detective stole
his priceless antique lens.
See an ether bottle.
Read the diary of past
cases solved by Alexei. If caught, get the fingerprint then come back here later for the trunk inspection.
Exit the store and then
go back in. Talk to him about everything except alarm key and gift.
Learn that Brenda was
here earlier. Ask all about his past. Then ask about the alarm key at the
end of the dialogue. Alexei throws you out.
Brenda:
Exit the antique store and enter Brenda's van.
Talk to Brenda about her
grudge, impersonating Nancy and Toni's push for any arrest.
Brenda says she was working at 2:17 yesterday.
Deliver Alexei's print
to the station's drop box. Call
Nancy and tell her about Alexei's alibi and the ether. Transfer the case to Nancy.
As Ned:
As Nancy, call Ned and ask him for help in distracting Deirdre to get her
prints. Change to Ned.
Deirdre:
Drive to Scoop. Talk to Deirdre.
Ned invites Deirdre to
have a bite to eat. Deirdre leaves to get ready.
Dust the cup Deirdre
drank from for prints to get Deirdre's print.
Deliver Deirdre's print
to the station's drop box.
Find a way to examine
Toni's supply closet:
Change to the character
that has the key taken from behind the Scoop bar. In this game, it is Bess.
To get Toni out of the
shop, play the Swap A Lot machine at the back wall. Eventually, the delivery
truck will arrive and Toni will leave. Check the bottom text on the screen to
see (and hear) the truck honks the horn.
Swap A Lot:
The object of the game is to move the letters in one column to form words that
make a quote.
If the correct word is
formed, it cannot be moved anymore and are lighter in color.
Do the shorter words
first. If you successfully
finish enough swapping puzzles, you might win an award.
When Toni leaves, go to
the door behind the bar.
Use the key taken from
the bar cabinet on the lock. Enter and look around.
Check the toluene bottle and paints on the left shelving.
Check the file cabinet
at right. See that it is locked.
Exit the room and call
Nancy. She will leave her lock pick tool at the drop box. Tell her about the
Toluene.
Pass the case to Nancy.
As Nancy:
Suspect board: Pick up the items from the Items Received cabinet.
Place the lock pick tool in the drop box.
Go to suspect board and place the new evidence taken
on their respective suspect's board.
Change to Bess or
whoever is at Scoop. Take the lock pick tool at the drop box at the station.
Review the lock pick
book: If you haven't read the lock pick book; go to
Nancy's desk in her bedroom. Open the bottom drawer and review the lock pick
codes.
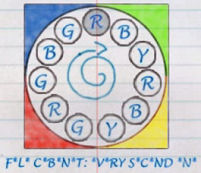
Decode the picture label
at bottom left. The asterisks are vowels.
It states: File cabinet:
Every second one.
Note that the code-picture starts with the R(ed) and goes
clockwise.
Go back to Scoop. Play
Swap A Lot until the delivery truck honks and Toni leaves the counter.
Use the key on the
supply room door. Enter and look close at the file cabinet.
Lock pick the file
cabinet: Use the lock pick tool on the cabinet to see the
case
open beside the lock.
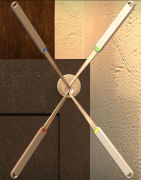
Place the colored picks
in the correct order shown by the lock pick book for file cabinets. The lock
pick first inserted is the one at bottom right, going clockwise.
The picture shows yellow
at bottom right; red at bottom left, blue at top left and green at top right.
If a pick needs to be
removed, right click it and replace with the correct one.
The "every second one" code stated by the
book is: R - Y - B - G - G - G - B - R - Y - R - B.
R is red; Y is yellow; B
is blue and G is green.
Click each of the picks
in order stated.
The file cabinet opens.
Read the R-17 and Clean up folders.
Toni has litigation
for the land use of a historic building - the town hall. She (The Heights
Development) wants to replace the existing historic building with a 7 story
mixed use complex. Check the letter and the picture of the building behind the
front papers.
The Clean up folder has
all her notes about Nancy's and her "cohorts" activities that resulted in
the lowering of the city's approval rating and increased expenditures.
Exit the storage room.
As Nancy:
Call Nancy and tell her
what was found. Change to Nancy.
Call Dad about Toni.
Change to George or Ned
or Bess.
Get fingerprints from Brenda and explore her van:
Go to antiques store and
enter Brenda's van. Talk to Brenda.
Ask how you can get in
touch with her.
She will tell you to
pick up one of her cards. Take Brenda's card from the box.
Exit the van. Call
Brenda. Answer the recording - yes for reporting breaking news.
Enter the van again and
see that Brenda is gone. Hmm...
Look around. Go to the
counter below the monitor.
Use the fingerprint kit
on the Heights 9 microphone on the counter to get Brenda's print.
Check the makeup case on the left counter. Open the
case and look close to see nail polish remover. Acetone is an accelerant.
If you open and close the make up case 3 times, see
an Easter Egg. (Thanks, Stefanie!)
Deliver Brenda's print
to the station's drop box. Change to Nancy.
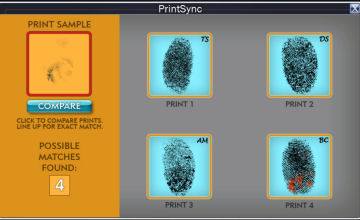
As Nancy:
Take the items from the drop box.
Fingerprint analysis: Scan all 4 suspects' prints on the print
scanner.
Look close at monitor.
Click on PrintSync icon.
The partial print is already on the left of the
screen.
Click on search button. See 4 possible matches come
up.
Click on compare button. The partial print is now the
cursor.
Overlay the partial print onto the 4 prints at right
to find out which one matches.
Click after overlaying the lines of the prints to see
if it is a match. It's a match for BC - Brenda Carlson.
Dad: Call Dad.
Suspects again:
As Bess:
Change to Bess.
Talk to Toni at Scoop about paint and lawsuits. Toni
gets angry.
As Ned:
Ask Ned to distract Deirdre again. Change to Ned.
Go to Scoop and ask Deirdre to go out for lunch.
Nancy calls Ned. Call Bess to check Deirdre's things.
As Bess:
Change to Bess.
Check Deirdre's notebook. Turn the page and take
traffic ticket RH627E401.
Deliver traffic ticket to the station's drop box.
Change to Nancy.
As Nancy:
Take the ticket from the drop box. Go to the computer at
the corner.
Click on TicketShark
icon. Using your own keyboard, type in RH627E401 in the citation number frame. Click "find" button.
It shows that Deirdre ran a red light by Town Hall
close to the time the alarm was switched off.
As Bess:
Change to Bess. Talk to Deirdre about the ticket.
As George:
Change to George.
Talk to Alexei about any possible dialogue.
Go to Nancy's house and go to the living room at left.
Check the shelf left of the fireplace. Take the
accelerant chromatograph chart.
Deliver chromatograph chart to the station's drop box.
Change to Nancy.
As Nancy: Pick up the items at the drop box.
Chromatograph result:
Nancy takes the chromatograph chart and compares it to the accelerant result.
Click on 45 under Isopropyl alcohol.
Organize all of the evidence on the police board
according to suspect:
Update the Suspect Profiles:
Go to suspect board and place the new evidence taken on their respective
suspect's board.
These are everything Nancy needs. When you think all
evidence are correctly placed; press the intercom button to call Chief McGinnis.
Get out of jail:
Chief McGinnis checks the suspects board and releases
Nancy.
Leave the police station.
Visit the suspects:
Alexei: Enter the antique
shop and talk to Alexei. Oh my - he's nice. Learn that he entered the town hall
to look for the time capsule. Bennington told him that he won't find the lens
for years and years.
Brenda: Enter the van and
talk to Brenda about her van. Get Brenda's card. Exit the van.
Dad: Call Carson and ask
about Toni's land deal and Alexei.
Deirdre: Go to Scoop and talk
to Deirdre.
Toni: Enter the shop and talk
to Toni about the litigation concerning the Town Hall. If you do this,
you might get an award.
Explore the van:
Call Brenda. Answer the
recording - yes for reporting breaking news.
Go to the antique shop.
Enter the van and see that Brenda is gone.
Check the isopropyl alcohol beside the microphone on
the counter.
Bess' interview:
Look close at the monitor and play (press green arrow) Bess' interview.
That's nasty! See
Deirdre at background talking on her cell phone.
Find out what Deirdre
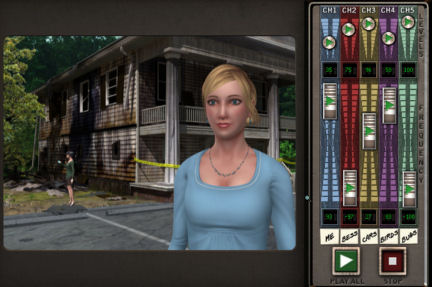
is saying on the tape: See the audio panel at right of the
monitor.
There are 5 channels and
they are labeled on top for the levels and the bottom is for frequency.
Adjust each channel's sound frequency and level so that
Deirdre's voice is isolated and the others
are removed.
Move the buttons on each channel. Listen to find where
Deirdre's voice is the loudest and the main sound as shown by label - me,
Bess... is the least heard.
Do one channel at a time
to blank out the other sounds.
Once the adjustment is
correct the slider arrow cannot be moved anymore and the numbers turns green.
When all are adjusted; press the play button.
Hear that Deirdre couldn't find something; she knows it is here.
|
Channel 1 level = ~ 35.
Channel 2 level = ~75.
Channel 3 level = ~96 to
100.
Channel 4 level = ~50.
Channel 5 level = ~100.
Me frequency = ~93
Bess frequency = -87 to
-99
Cars frequency = ~27.
Birds frequency = -73 to
83.
Bugs frequency = -100.
|
 |
Brenda's schedule: Check the clipboard hanging at top
right side beside the monitor.
Take the key. Nancy remarks that it doesn't make sense how Brenda can
make all those appointments.
Metal cabinet: Turn right and use
the taken key on the metal cabinet on the counter at right.
Read the refusal letter from a major broadcasting studio about
her coverage of the Antiquities fraud.
Talk to Deirdre about what she said on the
interview tape:
Deirdre: Talk to Deirdre at
Scoop.
Learn that the note was not the first one Deirdre intercepted. She
followed the first note but Nancy was not there.
She sent the next note through and followed Nancy to
Town Hall.
Bess: Talk to Bess
about Brenda and traffic. Ask about ice cream. :D
Toni: Talk to Toni and learn
about tunnels under the city.
Search for something that will help me get into the
town's tunnels:
Alexei: Go to Alexei at the
antique shop. Talk to him and ask for advice.
Learn more about the tunnels. Alexei's clue is a
book on the shelf that should be read cover to cover.
Dust and Dirt book: Turn
around from Alexei and forward to the shelf left of the trunk.
Take and read the Dust and Dirt book. Turn to the back
of the book and examine the 2 sheets of paper.
There's a hidden entrance in front of the antique
shop. Aha!
Shape puzzle:
See a sequence of 6 shapes in 5 frames.
The 6th frame is one of the 3 frames below. Which one
is it?
Choose the correct letter and then follow the rules of
the selected letter in the next page to navigate the tunnels.
The 6th frame is C (junior); B (senior). Thanks,
LadyLinda.
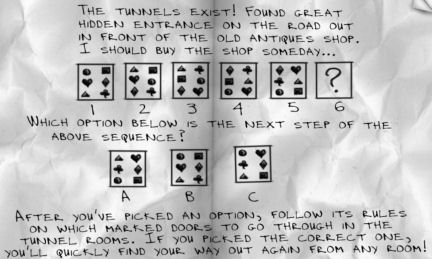
Tunnel navigation clues:
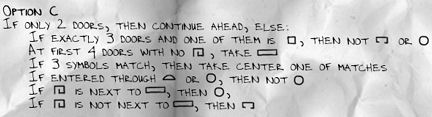
Check the next page and see that Option C (junior) or B (senior) show several criteria.
Study or write down the criteria for the tunnel door
selection. You will definitely need it later!!!
Exit the shop.
Catch the culprit:
Talk to Brenda inside the van.
Nancy confronts Brenda. She will destroy Nancy by
using media tactics.
Find a way to stop Brenda:
Go home to Drew house. Talk to George at the living room.
She needs a battery for something that can stop Brenda's broadcast.
Go upstairs to Nancy's bedroom.
Take the battery left of the false teeth from the top drawer of the desk.
Go back down to the living room.
A stone was thrown and breaks the window. It has a nasty note about arsonists. The townspeople
are beginning to rise against Nancy.
Jammer connection: Nancy gives the battery to George.
George wants Nancy to complete the connections of the jammer.
See the battery at lower left. Connect the lines to light up all the lines.
All
lines should be connected (no open lines). Turn the lines by clicking on it.
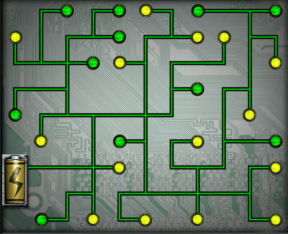 |
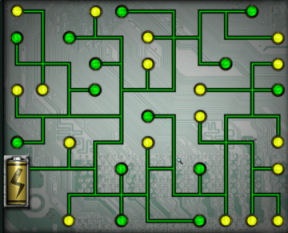 |
| Junior |
Senior |
Take the completed jammer from the table. Nancy has to attach it to the
antenna.
Go to the antiques store and enter the van.
Go forward once and turn right to see the antenna box on the right wall.
Open the antenna box.
Hook the jammer to Brenda's van:
Antenna colored wires connection: Place the jammer at
right slot.
Connect the wheels of the same color without the wires crossing another wire.
Click on a colored wheel. Move the cursor with lit wire on the path you want the
wire to go through. Once the wire reaches the other similarly colored wheel - do
not click - leave the lit wire there and work on another wheel.
When the wires are connected and all lit up; press the activated button at
bottom right.
The broadcast is jammed.
A key falls out. Take the key that has a label 5C21B.
 |
 |
| Junior |
Senior |
Find a way into the tunnels:
Face the back of the van. See an active spot
on the floor.
Open the floor tile and see a hatch. Open the hatch and go down.
Turn around, forward and go left. Check each door on the left and see that they are
labeled.
Go to the end of the tunnel and climb the metal ladder, you will come out to the Town Hall
parking lot.
While standing at the edge of the parking lot facing
the burned Town Hall pan left and see the metal
hatch of the tunnel.
Go back down.
Discover what Brenda's keys opens:
5C21B door: The door marked 5C21B is the third door
from the metal ladder by the van or the town hall. It is the middle one of
the 5 doors.
Use the key on the door. Enter and look around.
See a box on the left full of isopropyl alcohol; the town hall fire accelerant.
Take the screwdriver from top of the far box.
Check to take the bag full of evidence on the chair. It has bottle of
alcohol, snowflake, ice cube trays and matchbox.
The baddie arrives. She throws the jammer on the floor. She confronts
Nancy and then locks her in.
See a target with Nancy's silhouette right of the door.
Look for another way out:
The timer starts. You can save throughout the tunnel
part of the game and it will stop the timer.
Turn around from door. See a pile of carton boxes right of desk.
Move the boxes out of the way to reveal a rusted door.
Use the screwdriver taken from the alcohol boxes on the hinges of the rusted
door.
Exit.
Tunnel maze:
See the start of the tunnel maze.
Follow Option C clues from the Dust and Dirt book to select which is the correct
door to go through next.
Remember which door you came out of and then turn right or left to check the
icons and number of doors in that room.
Then use the rules of option C. Good
luck.
This chart goes left to right. Go to the door with the
shown icon and then go through that door to the next room.
|
Turn left
to
 |
--- |
Forward to
 |
--- |
Forward to
 |
--- |
Right to
 |
--- |
Forward to
 |
| |
|
|
|
|
|
|
|
|
|
Forward to
|
--- |
Forward to
 |
--- |
Forward to
|
--- |
Forward to
|
--- |
Right to
|
| |
|
|
|
|
|
|
|
|
|
Right to
|
--- |
Left to
|
--- |
Forward to
|
--- |
Right to
|
--- |
Forward to
|
Go forward and climb the metal ladder. Go up on another metal ladder to the
hatch cover.
Take The Clues Challenge medallion hanging from the hatch. Exit.
Enter the Police Station. Nancy reports to Chief McGinnis.
Watch the live broadcast from the burned Town Hall.
See you at the Tomb of the Lost Queen.
This document may not be
distributed without express written permission of the author and the content may
not be altered in any way.
For
Questions or Comments on this Walkthrough,
Please write to:
MaGtRo
Copyright © 10/2011
MaGtRo
 GameBoomers
Walkthroughs and Solutions
GameBoomers
Walkthroughs and Solutions