Nancy Drew 28: Ghost of Thornton Hall
By Her Interactive
Walkthrough by MaGtRo May 2013
Gameplay: This is a first
person point and click game.
The main menu has new game, load game, options,
help, extras, more ND and quit selections.
The options menu has voice, effects and music
volume adjustments. Full screen and windowed game screen selection is here
also.
Help shows the different cursors and navigation
arrows used in the game. The interface description is shown at bottom of
screen.
Extras have awards, credits, outtakes and teaser. Outtakes
and teaser are locked until the end of the game.
More ND shows the other Nancy Drew casual and
adventure games released by Her Interactive; as well as links to Facebook,
twitter, You Tube and Pinterest.
Select to play either Amateur or Master Sleuth
difficulty mode.
Amateur Sleuth has regular puzzles; hints available and detailed task list.
Master Sleuth has more challenging puzzles; no hints and basic task list.
The game screen has menu at bottom left of the
page. It has main menu, save game, load game, options, help and resume game
links.
The main menu frame has a trophy cup icon at
right side. Clicking it will show the trophies that can be achieved in doing
certain actions in the game.
The cell phone is beside the menu link. It has
phone, camera, settings and hints.
The phone has pictures and names of available
characters that can be called. Click on the name or picture to get
another frame that has a "call" button.
The camera can take 30 shots. Photos that are
taken can be viewed. The focus can be zoomed in-out.
There are 6 games installed on the phone.
Settings have wallpaper selections as well as
ring back and message sound tones selections.
The power button closes the cell phone.
At the center of the bottom bar is where the items
collected are seen. Use the slider tab at top of the bar to go through the
items.
The frames for Tasks and Journal are right of the inventory bar.
The tasks list has the to do things in the
game. The question mark beside the task gives hints to help the gamer
fulfill the task. If you do not use the hint system, you will get an
award.
The journal has observations and suspects.
The game is non-linear. The walkthrough below is just
one way to get through the game.
Phone charms are only for the games with bonus. The
notes about them are in parentheses.
Nancy's cell phone is ringing. Pick the cell phone.
Savannah Woodham (Shadow at Water's Edge) is on the other line. Savannah has a
case for Nancy. Jessalyn has been kidnapped at Thornton Hall. Savannah selected
Nancy because she's a skeptic about ghosts.
Nancy arrives at the Blackrock Island dock in front of Thornton
Hall gate. The Ferryman warns Nancy about Wade, Harper and the ghost Charlotte.
Explore the Island:
Gate: Enter through gate.
Turn left and see a T stone marker.
Pick up the Scavenger List. (Pick up a yellow tree phone charm left of
the T marker. If you find all 7 charms, you will get an award).
Colton: Go forward to the
house. Talk to Colton, Jessalyn's fiancé at the porch.
Colton gives Jessalyn's cell phone. The
phone has no charge.
Turn around from Colton and go forward towards the
swing.
Turn around from swing and pick up the hammer
on base of the column at left.
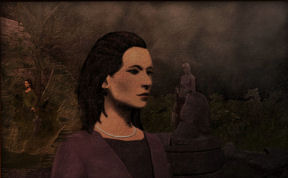
Clara: Enter through the
front door. Turn right and enter the parlor.
Talk to Clara, Jessalyn's mom completely. Learn
that Addison was with Jessalyn when she disappeared.
Pick up Addison Hammond's phone number. It will automatically
be entered on Nancy's cell phone.
Learn that Colton has family issues and that
company people are out looking for Jessalyn. If you learn a lot about the
Thornton family by asking the different characters, you might win an award.
Parlor:
Look around the parlor. Note that there is a briefcase on the floor beside
the desk. We can't check it yet.
Look close at the portrait of Hiriam Thornton
on the wall.
Turn left and look close at the portrait of Jeb
and Sarah Thornton above the fireplace.
Read the "Espionage in a Bonnet" book on the
fireplace mantel. Learn about the women that helped in the war.
Read the diary at right side of the mantel. Learn
about Sarah and Jeb and the factory accident. Learn about the 2
sides-attitudes of the Thornton family about the family business. Sarah is
called Nana by her employees.
Tea set: Go to the tea
set left of door. Note that there is a new plank on the floor in front of
the table.
Take oranges from the fruit bowl. Look
close at tea set. Take a napkin from top left of the tray.
Prepare tea by pouring tea from pot onto cup. Add
lemon, mint or sugar if you want. If you make enough tea, you might win
an award.
Charge Jessalyn's phone:
Hallway: Exit the parlor
and turn right.
Look at the portrait of Beauregard Thornton on the
wall.
Workshop: Enter the door
under the stairs. Look around.
Worktable: Look close at
worktable and read the Electricity Manual. Learn the different ways to make
electricity.
There are 3 main components to making electricity:
anode (+), cathode (-) and electrolyte.
Use the hammer taken from porch on the nails
on the wall left of the worktable.
Turn around. Take the turpentine can-paint
thinner on top of crate at right.
Check the scale at right end of the worktable.
Pick up the canvas right of the scale.
Turn right and look close at the cotton gin machine
at right.
Look close at the projector at left side of aisle.
Click to place the projector upright.
Take coins from the jar right of the
projector.
Continue one step to the door. Take the picker
from the barrel at left side. Take the spade at top of right side
beam.
Look close at scale right of door. Hmm...
Read the plaque on the door. It states that this
is the Thornton Family Cotton Processing area. Do not try the door twice or
Nancy will regret it.
Recharge the battery: Go back
to the worktable. Look close. Nancy will say it is time to recharge the
battery now that you have all items.
Place the oranges on the table.
Use the nails from wall on the oranges.
Use the coins from the jar on the oranges.
Take the wires from the jar at left and
automatically use them on the orange set-up. Jessalyn's cell phone is being
recharged. This will take time so do other things.
See if Addison remembers anything from her night at
Thornton Hall:
Use Nancy's cell phone left of the inventory bar.
Select phone.
Select and call Addison Hammond. Talk to Addison
completely. Learn about what happened that night.
Jessalyn disappeared that night and when she came
back started acting strange.
Addison started feeling fuzzy; heard another voice
and Jess was gone in the morning.
Exit the workshop. You might see a ghost go from
right to left as you exit through the door. You might win an award if you
see enough ghosts.
Find the missing portrait:
Right hallway: Climb
upstairs. See an empty frame at right wall of the hallway. Use the canvas
taken from workshop on the frame and see Franklin Thornton.
Pick up the bag of cotton from the table at
left side of hallway. (Take the sickle
phone charm hanging on the blue dresser in the hallway).
Windows: Go forward to
the sitting room. See a sleeping bag and a table.
Turn around and check the book on the covered
sofa. Read the book - The Thorntons of Blackrock Island.
Learn about Roger-Dodge and Karenina-Marianna's
life and their death due to a plane crash.
Look close at Jackson Thornton's portrait
above the covered sofa.
Note that there are 2 hallways; left and right of
the sofa. The right one leads to the stairs and the left one leads to a
locked door.
Left hallway: Go to left
hallway.
Look close at Marianna Thornton's portrait.
Find out what the smudge on Clara's portrait is
hiding:
Clara Thornton's portrait:
Look close at the next portrait and Nancy comments about a smudge.
In inventory click on the napkin from the tea set.
Then take the paint thinner taken from workshop and use it on the napkin to
get cleaner-soaked napkin.
Use the cleaner soaked napkin on the smudge left
of Clara 4 times. See graves in the painting.
Charlotte's bedroom:
Check the locked door at end of hallway.
Go downstairs via the right hallway.
Clara: Enter the parlor
and talk to Clara again.
Find the tombstones that were uncovered in Clara's
portrait:
Exit the house.
Colton: Talk to Colton
twice.
Go forward towards the gate and turn left.
Cemetery: Enter the cemetery.
Wade: Talk to Wade. Learn
that Savannah and Wade have a history between them. Savannah sent a package
for Nancy.
Learn that Clara is Harper and Charlotte's cousin.
Talk to Wade again and he'll let you listen to his
EMF to hear ghosts. If you listen to ghost recording often enough, you
might win an award.
Complete the epitaph hunt Jessalyn and Addison were
working on:
Tombstones beside Wade:
Rosalie Thornton May she rest always at peace.
Check the tombstone left of Wade. Wade says this is Clara's mother. They
don't know who her father is.
Ruby Newton A spark at birth. A flame in life.
A quiet ember in the night. Check the tombstone right of Wade.
Tombstones left side close to stairs: If
you checked all tombstones, you might get an award.
??? May Newton Died January 13, 1933.
Harper Thornton Lost and dearly missed.
Harper disappeared when Charlotte died and later came back.
Blank Tombstone: The Gray
Lady is the one that helped the confederacy during the war.
Go towards the gate and then turn around.
Tombstones at right close to gate:
Lee Thornton 1915-1975
Virginia Thornton Gone never forgotten.
Virginia is Wade's momma.
Luther Atchison So it goes. Luther is
Wade's daddy.
Tombstones at left close to gate:
Charlotte Thornton 1968-1989 Dear sweet Charlotte
Please come back.
Sarah Emma Thornton 1842-1887 May she find her
voice once more.
Beauregard Thornton B: 1896 D: 1935. Wade
says he's a mean old codger. There are 4 squares at bottom of the tombstone.
Statue:
Climb the steps and look close at plaque of
statue.
Thornton cemetery Est 1866. This plaque honors
those who found their final rest beyond the family grounds including
Franklin Thornton b. May 4 1895, D. October 25, 1917 defending his
nation. Dedicated January 15 1918.
Tombstone left of statue:
Roger Drummonds Thornton B.1943 D. 1984 Side by
side from the day they married
Marianna Thornton B. 1945 D: 1984 To the day
they died. Roger and Marie are Charlotte and Harper's parents. They are
the ones mentioned in the book upstairs.
Crypt: Go to the crypt up
the steps and see that it is locked.
Look at the statue-gargoyle on top of the door and
if you're lucky, see the left hand move to point to the sky.
Fountain: Go to the other
side of the statue and see the fountain. (Take the tombstone phone charm
from the rim of the fountain).
Tombstones left of the fountain:
Check the ivy covered area left of the fountain.
Click it again to see 2 tombstones. One is blank.
The right one is Fifty Four Souls.
Wade: Go back to Wade and talk
to him again.
He explains about the blank tombstone. Learn about the accident
at the first factory here. It is also mentioned in the diary on the
fireplace.
Learn why Wade was jailed.
Find the package Savannah sent:
House: Go back to house
and talk to Colton on the porch.
Enter the parlor and talk to Clara.
Sitting room: Climb upstairs and
go to the sitting room. Look close at the table.
Open the package marked Nancy. Take the EMF
reader.
Read the book - The Ghost of Thornton Hall by
Savannah Woodham. Learn about Savannah's encounter with Charlotte.
Savannah: Use the cell phone and
call Savannah.
Ghost: Turn to the left
hallway and see a lady wearing a red period gown.
Go downstairs via right hallway.
Figure out Jessalyn's phone password:
Jessalyn's phone: Go to
workshop and take the now charged cell phone. It wants a password.
Call Addison using Nancy's cell phone. Addison
says that Jessalyn left clues in the gravestone part of the scavenger hunt.
This was in case something happened to Jessalyn.
Gravestone epitaph! (W, L): W means the
word and L means the letter.
Amateur:
Nana 8,1: From the diary
on the fireplace mantel, Sarah is called Nana by everyone.
Sarah Emma Thornton 1842-1887 May she find her
voice once more. 8th word is voice and V is the first letter.
Grandma 6, 3: Wade said that Rosalie
is Clara's mother and Jessalyn's grandmother.
Rosalie Thornton May she rest always at peace.
Always is the 6th word and W is the third letter in that word.
Ghost 5, 4: Charlotte is the
ghost.
Charlotte Thornton 1968-1989 Dear sweet
Charlotte Please come back. Charlotte is the 5th word and R is the 4th
letter in that word.
Dodge 2, 5: From the book
upstairs in the sitting room, learn that Dodge is Roger.
Roger Drummonds Thornton B.1943 D. 1984 Side by
side from the day they married. Drummonds is the second word and M is
the 5th letter.
HT 5, 6: The only HT is Harper.
Harper Thornton Lost and dearly missed. The
5th word is dearly and the 6th letter is Y.
VT 5, 1: The only VT is
Virginia.
Virginia Thornton Gone never forgotten. The
5th word is forgotten and the first letter is F.
Karenina 7, 2: From the book
at the sitting room, Karenina is Marianna.
Marianna Thornton B. 1945 D: 1984 To the day
they died. The 7th word is died and the second letter is I.
Factory accident victims 1, 4:
This is the 54 lost souls.
Fifty Four Souls. First word is
fifty and the 4th letter is T.
LA 5, 4: The only LA is Luther.
Luther Atchison So it goes. The 5th word is
goes and the 4th letter is S.
Combine the letters in sequence and the get the
password - VWRMYFITS.
Enter the password on the cell phone. Press enter
button.
Master:
Granma 8, 1: Wade said that Rosalie
is Clara's mother and Jessalyn's grandmother.
Rosalie Thornton May she rest always at peace.
Peace is the 8th word and P is the first letter in that word.
RN 13, 5: The only RN
headstone is Ruby Newton's.
Ruby Newton A spark at birth. A flame in life.
A quiet ember in the night. The 13th word is Ember and the 5th letter is
R.
Dodge 6, 3: From the book
upstairs in the sitting room, learn that Dodge is Roger.
Roger Drummonds Thornton B.1943 D. 1984 Side by
side from the day they married. Side is the 6th word and D is
the 3rd letter.
VT 2, 4: Virginia Thornton
is the only VT headstone.
Virginia Thornton Gone never forgotten.
The second word is Thornton and R is the 4th letter.
Factory Accident Victims 1,5:
Fifty Four Souls. First word is
fifty and the 5th letter is Y.
Nana 7, 3: From the diary
on the fireplace mantel, Sarah is called Nana by everyone.
Sarah Emma Thornton 1842-1887 May she find her
voice once more. 7th word is her and R is the third letter.
LA 2, 5: Luther is the
only LA headstone.
Luther Atchison So it goes. Atchison is the
second word and I is the 5th letter.
Ghost 4, 2: Charlotte is the
ghost.
Charlotte Thornton 1968-1989 Dear sweet
Charlotte Please come back. Sweet is the 4th word and W is the 2nd
letter in that word.
Combine the letters in sequence and the get the
password - PRDRYRIW.
Enter the password on the cell phone. Press enter
button.
Listen to the recordings on Jessalyn's phone:
Journal: Listen to the
journal entries-tracks. Click on a date-time and then the single arrow
pointing right to play the tracks.
The 2nd track mentions a rhyme to call Charlotte.
The 3rd track mentions spider and something dropped down a
floorboard.
The 4th track mentions that Jessalyn wants to find
where Charlotte died.
The 5th track mentions there is message in the
window of the crypt.
The 6th track is when Jessalyn disappeared.
The 7th track is when Jessalyn changed.
Messages: Read the
messages from Addison, Clara and Colton.
Locate what Addison and Jessalyn dropped down the floor
board:
Parlor: Enter the parlor
and see a haziness in the room.
Floorboard: Look close at the
now active white-new floorboard in front of the tea table.
Move the floor board and see the spider that
scared Addison.
Take the coded note.
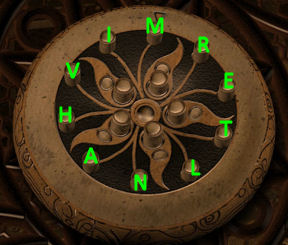
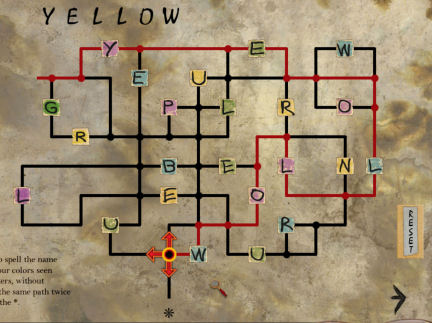
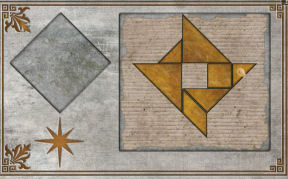
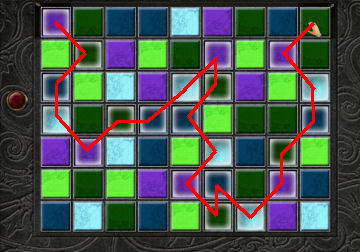
Find out the message hidden in the coded note:
Draw a path to spell the name of one of the four
colors seen behind the letter without drawing over the same path twice. You
must end at *.
The only color possible is yellow. Blue, green and
purple are blocked.
Click on arrows to move forward. Follow the red
lines in the picture.
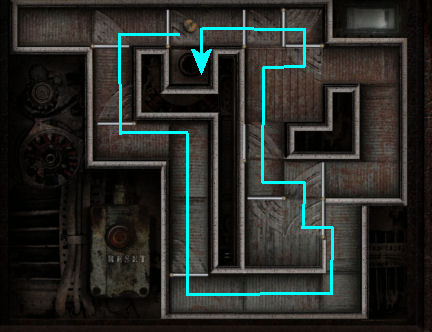
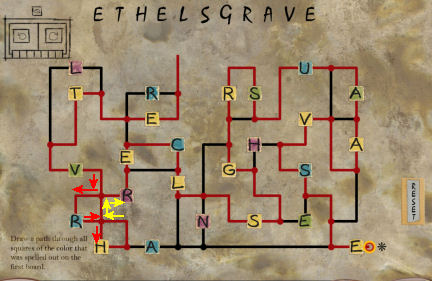
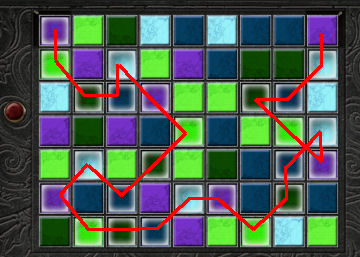
Find Ethel's grave:
See another puzzle. Click on arrow to draw a path
through all the yellow squares.
Nancy notes that Ethel's grave must be connected
to the square at top left of the paper.
Follow the instructions in the note to meet ghost:
Wade: Go to the cemetery
and talk to Wade.
Wade recites the rhyme to call Charlotte. Fire
so red, night so dark, dear sweet Charlotte please come back.
Note: Go back to the
house.
Upon entering, hear eerie singing. Nancy says the
singing is coming from upstairs.
Climb up and go to the sitting room. Check the
table.
Open the letter with Nancy's name on it.
Blindfold: Go to the
parlor and take a clean napkin from the tea table.
Find where the EMF is at its peak:
Use the EMF meter at different places to find the location that moves the
meter arrow to the red area.
Go to the Cotton Processing door in the workshop.
Use the EMF and see that the arrow is at the red
area. Nancy says this must be the place.
Click on the clean napkin in inventory and Nancy
automatically blindfolds herself.
Select the correct rhyme (mentioned by Wade) to
call Charlotte. Fire so red, night so dark, dear sweet Charlotte please
come back.
Meet Harper: Nancy is dragged
somewhere by someone. Answer anyway you like.
Talk to Harper. Take the note.
After being dismissed by Harper, read the note.
Solve the riddle in the note to find Harper again:
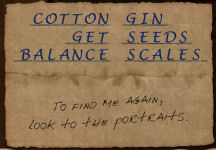
Read the portrait note:
To find me again, look to the portraits.
Turn around from the door and the deadly sickle
falls to the floor.
Ancestor portraits: Go to
the different portraits and use the cleaner soaked napkin on them.
- Exit the workshop and look close-click at
Beauregard T. Use the cleaner soaked napkin on portrait. See letters that is
automatically entered on the note.
- Go to parlor and look close-click at Jeb T above
the fireplace. Use the cleaner soaked napkin on portrait. See letters that
is automatically entered on the note.
- Click on Sarah Emma Wakeman above the fireplace.
Use the cleaner soaked napkin on portrait. See letters that is automatically
entered on the note.
- Look close-click at Hiriam T on wall. Use the
cleaner soaked napkin on portrait. See letters that is automatically entered
on the note.
- Go upstairs and click on Franklin T (one that
was inserted on blank frame). Use the cleaner soaked napkin on portrait. See
letters that is automatically entered on the note.
- Go to sitting room and click on Jackson T above
the covered sofa. Use the cleaner soaked napkin on portrait. See letters
that is automatically entered on the note.
- Go to left hallway and click on Marianna T. Use
the cleaner soaked napkin on portrait. See letters that is automatically
entered on the note.
Decode the note:
Click-hold a letter and slide it on the other letter you want replaced.
Each line is one word.

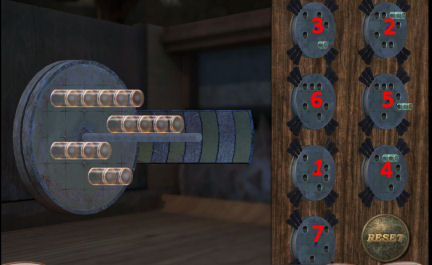
Fix the cotton gin:
Go to the cotton gin at workshop. It is now
active.
See discs with holes. Place the discs on the
rods at left in the correct order so that all fits.
Slide the disc to the left end of the rods and
then release it. Note that some discs add plastic rods on the holes.
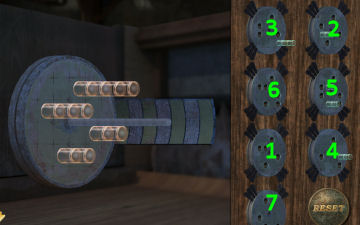
Insert discs 1-7.
Fixed it!
If you run the cotton gin often enough, you might
get an award.
|
Amateur: |
|
Master: |
 |
|
 |
Find some cotton seeds:
If you haven't yet, take the bag of cotton from
the right hallway upstairs.
Place the bag of cotton on the bin of the cotton
gin.
Take the cotton seeds from the slot at right of
the gin. Done, that's all of the seeds.
Using all of the cotton seeds, find a way to balance
the scales:
Go to the scale right of the Cotton Processing
door.
The cotton seeds are automatically placed on the
bin below the scales.
Place seeds on the 4 scale platforms to balance
the scale.
Amateur: At left arm of the scale; place 1 seed pan 5, 3
seeds in pan 2 and 1 seed in pan 1.
At right arm of scale; place 3 seeds in pan 6.
Master: At left arm of the scale; place
3 seeds pan 6, 2
seeds in pan 3 and 4 seeds in pan 1.
At right arm of scale; place 2 seeds in pan 2,
2 seeds in pan 5 and 2 seeds in pan 7.
Find a way back into the room where Harper was hiding:
The door rise up to show a hole on the wall.
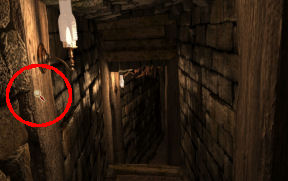
Easter egg (Thanks, Marian): Enter and go
forward. If you find an Easter egg, you will get an award.
Use the EMF until the first lamp at the corner.
Hide the EMF.
Check the lamp at left to get a close up. Pull the
brick left of lamp and take the Phantomlete egg.
Search the tunnel leading to the workshop:
Backpack: Go to the end.
See a blue backpack.
Open the backpack and read the brown wedding notes
behind the denim jeans. Colton's response to Jessalyn is in red. Click the
bottom to see the rest of the notes.
Take-eat the Koko Kringle chocolate.
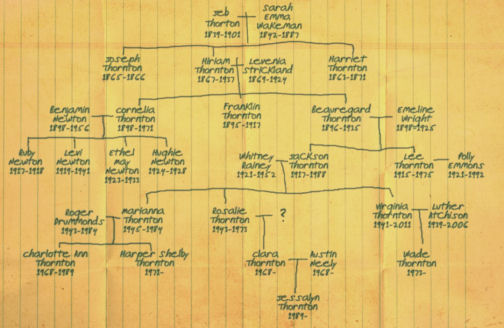
Take the rolled paper to see the Thornton
family tree. Examine the family tree.
Take the key part at side of the backpack.
Explore the cellar:
Go through door and see Harper at the cellar.
Harper: Talk to Harper.
Cellar: Look around the
cellar. Pan going left and see a small rail cart on a table.
Left of the door to the workroom are 2 armchairs.
Look close at book shelf.
Read the notes in the green book. It mentions a
Jackson. Charlotte is obsessed with Jackson who is dead.
Check the family tree and note that there is a
Jackson that died 1988. He is Charlotte's grandfather.
Wine rack: Pan left and
see a wine rack at the corner. Look close and take the colored tiles
at bottom right pigeon hole.
(Pan left and take a barrel phone charm at
right corner of the second from top middle barrel).
Tunnel: Continue to pan
left and enter the tunnel.
Note the etched icons on the wall.
Examine the metal door at end of the tunnel. Open
the panel and see that it is missing a piece (#6).
Exit through the wood door and walk back to the
workshop.
Charlotte and Harper information:
Clara: Go to the parlor
and talk to Clara. Tell Clara about the "strange woman" in the basement.
Wade and Clara check the basement but Harper is
not there. Clara gets upset at Nancy.
Go back to the parlor and talk to Clara again.
Harper supposedly thinks that Clara took half of
Charlotte's locket and also she pushed Clara off the widow's walk.
Wade: Go to the cemetery and
talk to Wade. Wade gives Charlotte's note.
Learn that Charlotte went to what is now the
ruins just before her 21st birthday ball.
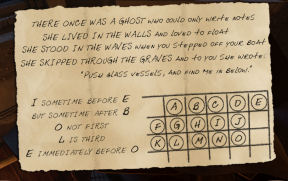
Follow the instructions from the note that mentions
glass vessels:
Ghost note: Go back to
the house and hear that eerie singing again.
Climb upstairs and go to the sitting room. Read
the ghost note left on the table. Push glass vessels and find me
below.
Charlotte's bedroom: Go to
left hallway and see that Charlotte's bedroom is ajar. See if
you can take a picture using the cell phone. The door is slammed shut.
Go to the door and see if the key part taken from
Jessalyn's backpack works on the lock. It fits but it is broken. If you
use the partial key on the bedroom door often enough, you might get an
award.
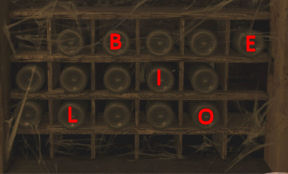
Wine rack: The graph on the
ghost note looks familiar.
Go to the cellar and turn right. Go forward to the
wine rack at the corner.
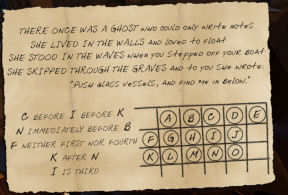
Decode the ghost clue: Study
the clue on the ghost note.
Amateur: E immediately before O - EO.
L is third. I sometime before E but sometime after
B - BILEO .
Using the graph on the note press the bottles
marked BILEO. If you play with the wine bottles often enough, you might
get an award.
:
Master: C before I before K;
I is third; N immediately before B and K after N - makes K
last.
F neither first
nor fourth - makes C first and F second.
Solution - C F I N B K
Explore the tunnel opened by the bottles:
A secret passage opens right of the wine bottle
rack. Go forward until a small window. Hear Colton get upset at Lexie.
Check out the photos on the camera:
Turn around and pick up the pink camera.
Press the right arrow to cycle the pictures taken.
See the house; Hiriam T's portrait, dirt floor,
coffin with bird plate, barrels, column markings and the T stone marker with
opening on the shrubbery.
Check the odd dirt floor from camera picture:
Turn around and check the dirt floor in front of
the grilled window. It is the one seen on the camera pictures.
Use the spade taken from the workshop on the soil.
A box is exposed. It needs a key.
Nancy's rest:
Exit the tunnel and Nancy gets dizzy. Nancy wakes
up at the sitting room and is talking to Ned and Bess on the phone.
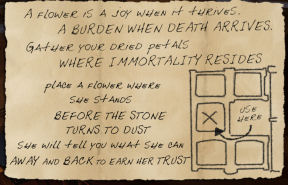
Flower note: Pick up the
flower note on the table. It mentions placing a flower where she stands.
Check the barrels from camera picture:
Go down to the workshop. (Place an Easter egg on
the scale right side of the worktable. Take the tractor phone charm
exposed by the scale. Take the egg again. Thanks, Marian.)
Continue to the cellar and then turn right to the
barrels.
Look close at barrels. Pull the handle on the post
to reveal another secret passage. (If you turn around from here see a
ghost).
Enter the secret passage. Climb the spiral stairs
until the top.
See a plank wall. (Take the fish phone charm
from the left lamp. Thanks, family.)
Go through and be at second
floor right hallway by Charlotte's bedroom door.
Check out the column from camera picture:
Clara: Go down to front
door and t on parlor door. Overhear a very upset Clara.
Enter the parlor and talk to Clara. Learn that
Clara doesn't know who her daddy was. Learn also what her momma told her about ghosts.
Colton: Open the front
door to try to exit and overhear Colton talking to Lexie.
Talk to Colton. Colton admits that he is in love
with Lexie. His parents pushed Lexie away from Colton. Learn more about
Lexie.
Talk to him repeatedly until all topics are
exhausted.
Column: Turn around from
Colton and go forward to the swing.
Look close at the ivy covered column in front of
the swing. Remove the ivies.
Nancy made a snake sketch. The words state
first of its kind across the bottom.
Check out the stone marker from camera:
Go forward to the gate and turn right to the T
stone marker.
Find the ruins where Charlotte died.
Click on the shrubbery to make an opening to the
ruins.
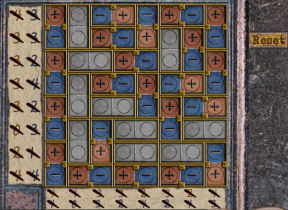
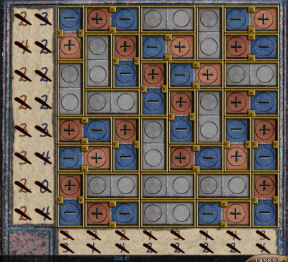
Open the odd tiled panel on the fountain:
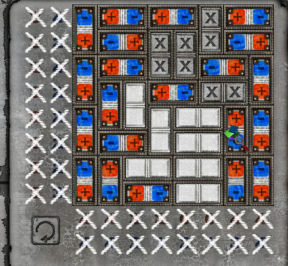
Colored tile puzzle by ruin's fountain:
Look close at the panel on fountain edge.
See orange and blue colored numbers at left and
right. This is a nonogram variant.
Read Charlotte's paper that she gave to Wade.
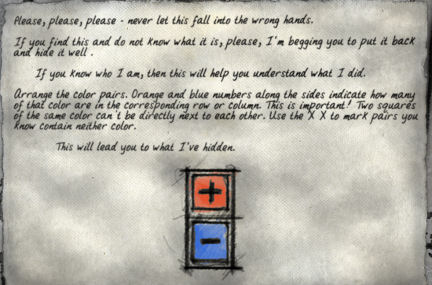
The numbers shows the amount present of that colored tile
in that row or column.
Use the colored tiles taken from the barrels at
the cellars on the squares. See that they are entered in those colors:
orange and blue.
The place to enter those 2 colors can be
horizontal or vertical.
No 2 adjacent tiles should be of the same colors.
Click on the placed tiles to cycle them to rotate
colors, be blank or have an X on them.
The blank or X means that it is not of either
color. The arrow resets the puzzle.
| Amateur |
|
Master |
 |
|
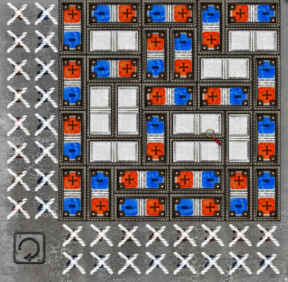 |
Take the snake plate and Charlotte's
sketch from the opened secret compartment.
Explore the ruins:
Enter the burned house where Charlotte died. See
Charlotte in her red masquerade ball gown going down the spiral staircase.
Look down the staircase. See a key down there.
Use the picker taken from workshop on the key.
Take the crypt key.
Look around. Take the film reel from the
table.
Find a way to watch the movie on the film reel:
Go back to the workshop in the house.
Use the film reel on the projector right of the
work table.
See a mix of Charlotte's birthday clips and
the ruined house.
Clara gets very upset. Talk to Clara again.
Follow up on the images that were spliced into the
movie:
Watch the movie again in the workshop to see a
masked Charlotte.
Go back to the ruins and see Charlotte. Nancy
faints.
Look at the wall seen in the movie.
Stacking puzzle: See
rectangular, square, octagonal and triangular items at top left.
Stack these items to reach the drawing hidden on
the top floor.
Be sure to center the placed items so that they
are balanced.
There are several of these items. Use the wooden
rectangular plank first on the center post.
Then stack the other items on top. Click on the
drawing to see it close.
Below is just one way to do this puzzle.
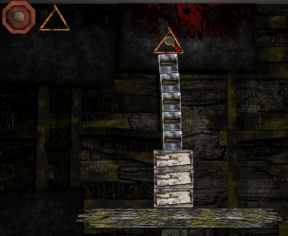
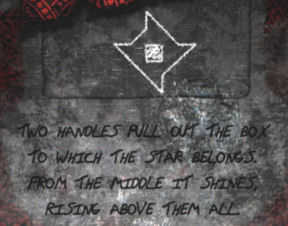
Clean the wall and see the star clue. Two
handles pull out the box to which the star belongs. From the middle it
shines, rising above them all.
Nancy makes a star sketch.
Immediately pull back when the ceiling cracks or
game over. There is always a second chance.
Find a way to the crypt:
Wade: Talk to Wade at the
cemetery. Learn about Charlotte and Savannah.
Crypt: Go to the locked
crypt. Use the crypt key from the ruin on the lock. Enter the crypt.
See Harper climb through the vent. Try to do anything in the crypt and Harper will
stop you.
To get rid of Harper either leave and then come
back or talk to her and threaten to get her to be found.
Right wall: Face the
right wall and take the bird sketch from middle row.
Newspaper: Read the
newspaper Nov 11, 1989. Learn about Charlotte's funeral and that Harper
caused thousands of dollars of damage and few minor injuries. Read the
article about the shakeup at Thornton Industries.
Find the window mentioned in the recording of Jessalyn
and Addison:
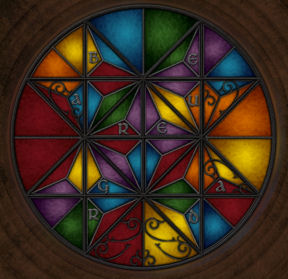
Figure out what's hiding in the stained glass window:
Take a wilted rose from the ledge under the
stained glass window.
Click on the stained glass window and Nancy states
to place similar colored glasses adjacent to one another.
There are unmovable colored glasses already. Use
them as starting point.
Pick a colored glass and click it on another glass
you want replaced. Beauregard!
| Amateur |
Master |
 |
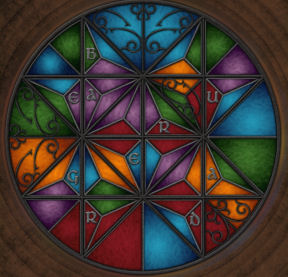 |
Figure out how to open the coffins in the crypt:
Look at the coffins on the other wall.
Check the pink camera and study the picture of the
coffin. The coffin has a bird plaque on it and has rounded corners.
Look for the coffin that resembles the picture.
Pull out the leftmost middle row coffin.
See that the bird plate on the metal frame is
already on it.
The square button is used to pop out the plate on
the frame.
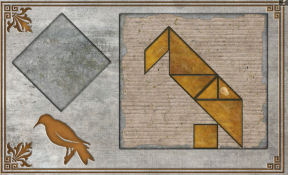
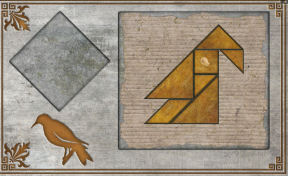
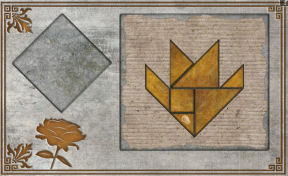
Find a way to use the bird design:
Look close at the bird plate. The bird sketch is
automatically placed on the square at right.
See geometric shapes at left above the bird icon.
This is a tangram puzzle. Arrange the geometric
shapes inside the bird sketch.
Pick up a shape from left and drop it inside the
shape on the sketch at right.
Right click to rotate or turn the shape.
The coffin opens. Pick up numbers that look
like the ones at side of the nonogram colored tile variants (like the one at
the fountain in the ruins).
Easter egg 2: Open and
close the bird coffin 5 times. Take the reverse chicken ghost egg
from left socket of the skull. Thanks, family!
| Amateur |
Master |
 |
 |
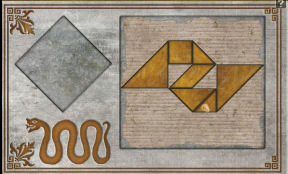
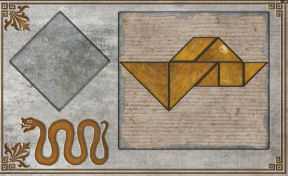
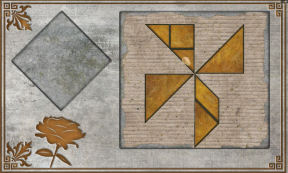
Find a way to use the snake design:
Recall the clue left under the snake sketch on the
ivy covered column: first of its kind across the bottom.
Pull out the coffin at second from left bottom
row. Place the snake plate on metal frame.
Look close at the snake plate. The snake sketch
from column is automatically placed on the square at right.
See geometric shapes at left above the snake icon.
This is a tangram puzzle. Arrange the geometric
shapes inside the snake sketch.
Pick up a shape from left and drop it inside the
shape on the sketch at right.
Right click to rotate or turn the shape.
The coffin opens. Pick up a key part to
automatically join with the broken key to make a repaired key.
| Amateur |
Master |
 |
 |
Find a way to use the star design (Explore the crypt):
Plate: Examine the
coffins.
See that bottom row second from right has a star
plate. Press the square button to take the star plate.
Coffin: Recall the clue
seen after the stacking puzzle at the ruins. Two handles pull out the box
to which the star belongs. From the middle it shines, rising above them all.
From the clue, the coffin should be on top row and
has 2 handles in front.
Pull out second from left top row coffin. Place
the star plate on the frame.
Look close at the star plate. The star sketch from
the ruins is automatically placed over the square at right.
Star tangram: This is a
tangram puzzle. Arrange the geometric shapes inside the bird sketch.
Pick up a shape from left and drop it inside the
shape on the sketch at right.
Right click to rotate or turn the shape.
The coffin opens. Take a part of a locket.
| Amateur |
Master |
 |
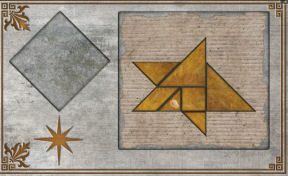 |
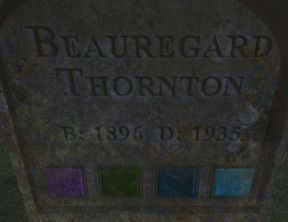
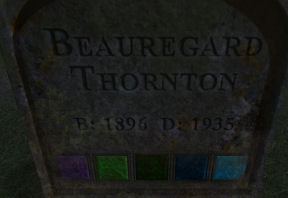
Figure out the importance of the name Beauregard:
Exit the crypt and look for the headstone of
Beauregard Thornton.
Beauregard is at left end of Charlotte's headstone
row. Left closest to gate when facing the statue.
See the 4 squares at bottom part of headstone. Use
the colored tiles on the squares to get a sequence of colors:
Amateur: purple, green,
dark blue and light blue.
Master: purple, light green, dark green, dark blue
and light blue.
| Amateur |
Master |
 |
 |
Find a way to enter the room at end of the hall:
Colton: Talk to Colton on
the way to the house.
Clara: Enter the parlor and hear
Clara shriek. Talk to Clara.
Charlotte's bedroom: Go
to Charlotte's bedroom. Use the repaired key on the lock.
Colored tiled puzzle on lock: The
numbers taken from the bird coffin tangram is automatically placed on the
sides.
Review Charlotte's note given to Wade to solve
this puzzle (similar to the one at the fountain).
| Amateur |
Master |
 |
 |
Explore Charlotte's bedroom:
Look around. Turn left and look close at the
writing table left of bed.
Diary: Read the leather
bound diary right side of writing table. Learn that Charlotte is worried
about someone close to slipping off the edge (maybe Harper). Charlotte kept
her papers in a safe place. The first door of that safe place is opened by a
clue from Franklin's Memorial.
Amateur: Each of the 4 edges is equal to the plaque's
first and seventh numbers side by side
Master: The top and
bottom edges are equal to the day of his death, the day of his
dedication equal to either side.
(Take the clock phone charm hanging on the
candlestick.)
Jewelry box: Open the top of
the jewelry box.
Invitation: Read the
Masquerade Ball invitation. Charlotte's 21 years old birthday party is to be
held on 30th of October.
Check the menu at the other side of the
invitation. Yum... Grilled shrimps, fried chicken and pork tenderloin.
Take the small key.
Panel: Look close-click
at the panel in front of the box at left side of the writing desk. Something
is missing.
Use colored tile on the tile puzzle. Nancy says to
trace a path from top left corner to top right corner.
Easter egg 3: (Thanks
family & Marian). After adding the tiles and before doing the puzzle itself; click in order on all the tiles at left column,
bottom row and right column until you end up at the green tile at top right
corner (all periphery tiles except for the ones on top). Take the spooky
side up egg from opened drawer.
Remember the sequence of the colored tiles on
Beauregard's headstone.
Amateur: Click on the colored tiles in sequence: purple,
green, dark blue and light blue and make a path from top left to top right.
Master: Click on the
colored tiles in sequence: purple, light green, dark green, dark blue
and light blue.
| Amateur |
Master |
 |
 |
A secret compartment opens. Read the note: The
passages are no longer safe. It becomes necessary to hide them. Unlock the
clocks and strike 12 on all five together.
Clocks: Look at the
clocks. It needs a key to unlock them.
Check the painting on right wall.
Easter egg cabinet:
(Thanks, family). Check the round cabinet
on the table. The box can hold eggs. Place all 3 Easter Eggs found in the
cabinet. Read the note that invites you to join the ghosts as a guest at
Thornton Hall.
Exit the room.
Savannah: Call Savannah
on the cell phone.
Find the secret in Franklin's memorial:
Go to the cemetery.
Ethel's grave: Look at the
rightmost headstone on the left side when facing the statue. Nancy will say
this must be Ethel's grave.
Amateur:--- May Newton, Died: January 13, 1933.
Master: --- May Newton Died March 14, 1933
Franklin memorial: Go to
statue. Read the plaque below the statue.
Note that the first number is 1 and the seventh
number is 8. Together the number on the clue is 18.
Figure what is inside the buried box:
Go down to the cellar and enter through the secret
passage right of the wine rack. Go under the porch.
Use the small key from the jewelry box on the box
in the soil.
The box opens to show arrows similar to Ethel's
grave drawing. It needs numbers to unlock.
Amateur: Remember that Ethel died: January 13, 1933.
Move the numbers to form: 1131933.
Click arrows: left, right, left, right, left,
right, left, right.
Master: Remember that Ethel died:
March 14, 1933.
Move the numbers to form: 3141933.
Click arrows: right, right, right, left,
right, left, left.
Take the flower plate. Go back to cellar.
Nancy needs rest and wakes up later. Nancy talks
to Ned.
Follow the instructions on the flower note:
Go to the cemetery. Review the flower note in inventory.
Place the
rose taken from the crypt on the statue. It lies left of plaque.
The drawing on the flower note looks like the
coffin slots.
Go back to the crypt and then exit again.
Take a look where the rose was place. The flower
is replaced by a
paper. Take the flower sketch.
Flower tangram: Go back
to the crypt.
Using the drawing on the flower note as guide,
click on the second from right middle row coffin.
Place the flower plate from soil box on the coffin
frame. Look close and see that the flower sketch is automatically placed.
Do the tangram. Take the #6 button.
| Amateur |
Master |
 |
 |
House: Go back to the
house and hear another eerie singing.
Climb the stairs and check the table at sitting
room for a new note.
Read the spy note. It mentions a sneak.
Follow the direction of the spy note:
Go down to the cellar. Open the secret passage
using the handle of the barrel stands.
Climb the spiral staircase and look through the
slats.
See what Wade is up to:
Hear someone trying to open a door. Look through slats and see Wade trying
to open Charlotte's bedroom.
He hears something and runs away. He drops
something. Exit through slat panel.
Pick up the antique key Wade dropped.
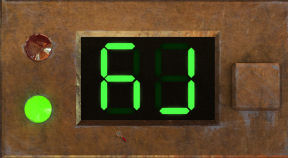
Figure out the code within the clocks in Charlotte's
bedroom:
Enter Charlotte's bedroom.
Go to the fireplace and use the antique key
dropped by Wade on the lock at right side under the mantel. This unlocks the
clocks.
Press the lever that is at middle of fireplace.
See that all 5 clocks turns in different speed.
The clue from the jewelry box states to get them
to stop all at the same time at 12 o'clock.
Save game before doing the puzzle.
Find out how fast each clock runs.
- Set all to 12:00. Then pull lever. When the
clocks
stop; note how much time they moved from 12 and adjust for it.
Numbering left to right 1-5:
#1 & #4 clocks stopped at 6 (so they took 6
rotations before they stopped or 1/2 the time compared to #2).
#2 clock stopped at 12:00 (takes 12
rotations).
#3 and #5 clocks stopped at 3:00 (so they took 3
rotations before they stopped or 1/4th the time compared to #2).
There are 2 ways that you can solve this
puzzle:
1. Continue from the testing of the clocks
above and adjust the difference.
Set the clock from left to right: 6:00, no
adjustment, 9:00, 6:00 and 9:00.
2. Go back to a saved game prior to touching
the puzzle and now know how fast the clocks move.
Set the clock from left to right: 10:00, 8:00,
11:00, 10:00 and 11:00.
Pull the lever. See that the large painting at
right wall swing opens.
Explore the passage opened:
Go through the passage. Check the eye slot on the
wall.
See that it looks into the parlor. See Clara and
hear something about not her son and might never be. Hmm... Maybe Colton.
Close the eye panel. This must be Hiriam's
portrait-eyes.
Go back to bedroom.
Clara: Talk to Clara in
the parlor.
Colton: Talk to Colton.
Harper: Talk to Harper at
cellar several times.
Find a way to unlock the door in the tunnels:
At the cellar, enter the tunnel right of Harper
and left of the generator.
Open the panel of the metal door.
Use the #6 button taken from the flower coffin at the
crypt on the panel.
|
Amateur: Each of the 4 edges is equal to the plaque's
first and seventh numbers side by side
Using the clue on Franklin's memorial, arrange the
numbers to add up to 18 on all sides.
|
 |
|
|
|
|
Master: The
top and bottom edges are equal to the day of Franklin's death,
the day of his dedication equal to either side.
Franklin died on the 25th and the
dedication was on the 15th. |
 |
Find Jessalyn:
Enter through metal door and see Jessalyn. Talk to
Jessalyn. Help Jessalyn.
Find a way to help Jessalyn:
Jessalyn explains her need for proof about her
mother. She needs the necklace that Clara hides in her briefcase.
Jessalyn gives the briefcase clue.
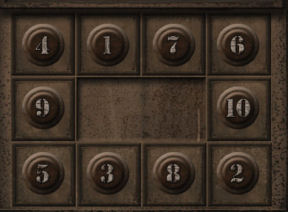
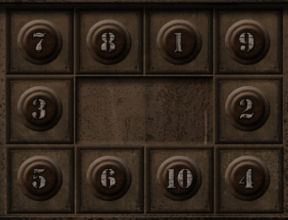
Unlock Clara's briefcase before she returns:
 |
|
Amateur
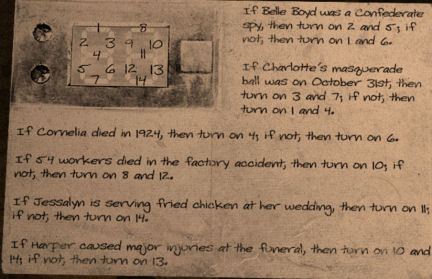
Study the briefcase clue:
- Belle Boyd is a confederate spy based on the
book on the mantle at the parlor. Turn 2 and 5.
- Based on invitation; Charlotte's party is on
October 30th not 31st. Turn 1 and 4.
- Based on family tree; Cornelia died 1971 not
1924. Turn 6.
- There are 54 souls that perished in the
accident. Turn 10.
- Jessalyn is not serving fried chicken at her
wedding based on the note in her backpack. Turn 14.
- Based on the newspaper in the crypt; Harper
caused minor injuries at the funeral. Turn 13.
|
| |
|
|
|
 |
|
Master
- Belle Boyd is a confederate spy based on the
book on the mantle at the parlor. Turn 3 and 5.
- Based on invitation; Charlotte's party is on
October 30th not 31st. Turn 2.
- Based on family tree; Cornelia died 1971 not
1924. Turn 4.
- There are 54 souls that perished in the
accident. Turn 9 and 13.
- Jessalyn is not serving fried chicken at her
wedding based on the note in her backpack. Turn 11.
- Based on the newspaper in the crypt; Harper
caused minor injuries at the funeral. Turn 14.
|
Go to the parlor via the secret passage in
Charlotte's bedroom.
Go down to the eye slot panel and hear the eerie
singing. This scared Clara enough to leave the parlor.
Go through the panel to the parlor.
Open the briefcase:
Using the deduced clues above:
Amateur: turn on 2, 5, 1, 4 and
6 on the left digit. Turn on 10, 14 and 13 on the right digit.
Master: turn on 3, 5, 2 and 4 on the
left digit. Turn on 9, 13, 11 and 14 on the right digit.
The briefcase opens. Take the necklace.
Find the necklace Jessalyn needs:
Go back to Jessalyn at the cellar and talk to her
to give the necklace.
Tell Jessalyn about the locket found in the star coffin at
the crypt.
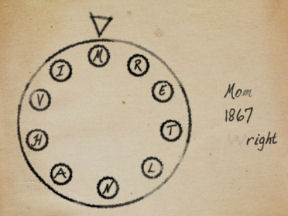
Find a way to open the locket:
Study Charlotte's sketch. It has a label for the
buttons on the perimeter of the locket.
The clues are Mom, 1867 and -right.
Charlotte's mother is Marianna.
The pink camera and the family tree show that
Hiriam T was born the year 1867.
-right looks like Wright. The only Wright in the
family tree is Emeline.
Enter the 3 names in order using Charlotte's
sketch as guide for the alphabets of the buttons.
Enter Marianna, Hiriam, Emeline. After each
correct entry of the names, some central buttons are depressed.
That's it. The locket opens. Jessalyn reads the
note inside and said that she will talk to her mom.
Find the missing symbol:
Pick up the paper on the wheel of the generator.
Read the locket note.
Go upstairs. The parlor is empty. Go outside and
talk to Colton.
Colton said that he saw Charlotte coming out the
crypt. She gave him a hug and a message.
Take the symbol message.
Study the symbols and see that they are similar to
the ones etched on the wall of the tunnel.
Go back down to the cellar and then the tunnel
left of the generator.
Go through the metal door and see that it is very
dark.
Get the generator working:
Check the generator that Jessalyn was working on.
The aim is to get the ball bearing to enter the
hole-shaft at top middle area.
The gates swings several ways depending on the way
it is hit.
The first step is to open the gate of the
hole-shaft. Then bring the ball bearing to the shaft.
Move the ball using either mouse or keyboard
arrows.
There is a reset button at bottom left.
Move: 7 rights, 1 down, 1 left, 5 down, 1 right, 1
up, 1 down (open gate), 1 left, 2 up, 1 right, 1 down, 1 right, 2 down, 4
left, 4 up, 2 left, 3 up, 2 right, 2 left (open gate), 3 down, 2 right, 4
down, 4 right, 2 up, 1 left, 1 up, 1 left, 2 up, 1 right, 2 up, 3 left, down
to hole.
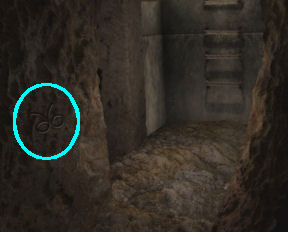
Missing symbol:
Go back to the tunnel and through metal door. See
that there is light there now.
Look for the missing symbol.
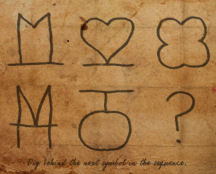
Study the paper given by Colton. Take note that it
is a sequence of mirror imaged numbers: 1 2 3 are on top row and 4 and
5 are at bottom row.
Look for a mirror imaged 6.
Go to the end of the tunnel and see the handhold
on wall. Do not climb up because it leads to the crypt and you cannot come
back here through the grate.
See the mirror imaged 6 at bottom
left wall. Use the spade on the symbol to reveal a safe.
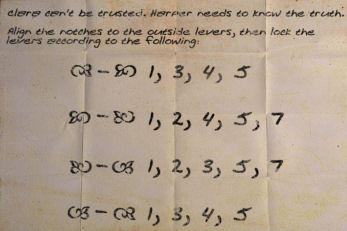
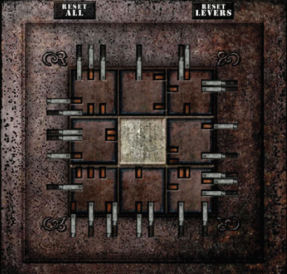
Open the safe:
Remove the panel to show a slider puzzle. Study the contents of the paper from the locket.
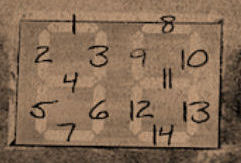
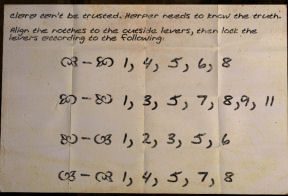
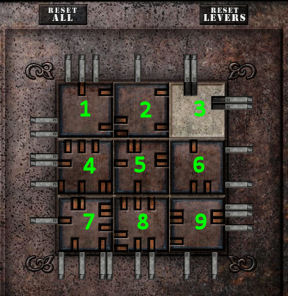
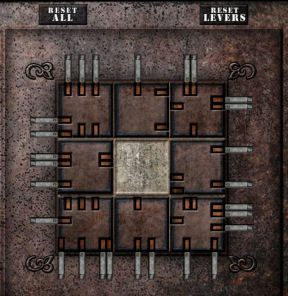
Align the notches to the outside levers:
The tiles should be placed so that the levers shown
by the clue can be attached.
The notches of the tiles should match to the
levers
only on the periphery.
The numbers on the picture below are that of
the squares-location NOT the tiles. Follow the solution by clicking on the squares-location
itself.
Amateur: Click on: 2 5 8 7 4 5 6 3 2 1 4 7 8 9 6 5 8 7 4 5
6 9 8 5.
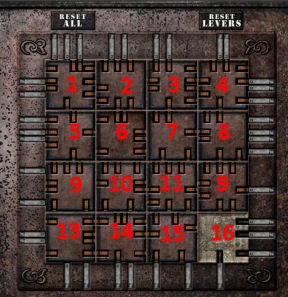
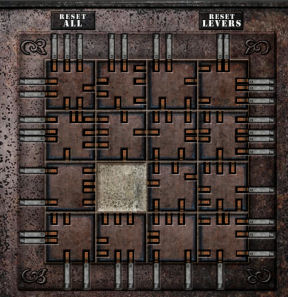
Master: (There may be
a shorter solution. You can save anytime during the puzzle.)
Click on: 15 14 13 9 10 11 12 8 7 11 10 9 5 6
7 8 4 3 2 6 5 1 2 6 7 3 2 6 7 8 4 3 2 1 5 6 7 3 4 8 7 6 5 1 2 6 7 8 4 3
7 8 4 3 2 6 7 3 4 8 7 6 10 11 12 8 7
11 10 14 15 16 12 11 7 6 10 11 7 6 5 9 10 14
13 9 5 6 7 11 10 6 7 8 12 11 15 16 12 8 7 11 15 14 10 11 12 16 15 14 10
9 13 14 15 16 12 11 10 14 13 9 10.`
Discover the secret of the locket's contents:
Now push-click the levers in place based on the
paper found in the locket.
The symbols on the paper go clockwise. The top set
is left to right; then up to down at right side; bottom is right to left and
the left side is down going up.
The safe is opened. Read and then take the
Codicil to Last Will and Testament of Charlotte. Charlotte changed her
will to make Harper her heir.
Escape the burning building:
Close the safe and see that the place is full of
smoke.
Go back to the cellar (if you want to help) or up
the crypt to save yourself.
See that Harper is hurt. Jessalyn asks Nancy if
she will help or not. Help.
Help Jessalyn get Harper out safely:
Nancy says to use the small rail cart as a
makeshift wheelbarrow.
Collect items from the cellar to fix the rail
cart.
Pan right and take wheel 2 on the brick shelving.
Pan right pass the generator and take the
handle from the floor right of a large rail car.
Pan right to Harper and Jessalyn.
Take the bolts from top shelf and wheel
1 from the right armchair.
Look close at the small rail car again.
Attach the 2 wheels on rods at bottom of the cart.
Attach the handle at top right of cart.
Use bolts on wheels and automatically the
wheelbarrow is made.
Rescue Clara:
Jessalyn asks Nancy to decide to save her mom or
not. Clara is in Charlotte's bedroom.
Agree to help.
Automatically be in Charlotte's bedroom.
Talk to a hysterical-angry Clara.
The clocks were reset and the secret passage is
closed.
Take the antique key from right side of the
mantle and insert into lock under the mantle.
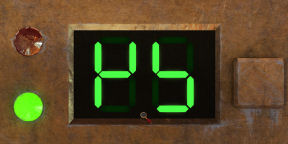
Turn the 5 clocks to stop at 12 o'clock at the
same time.
Save game before doing the puzzle.
Find out how fast each clock runs.
- Set all to 12:00. Then pull lever. When the
clocks
stop; note how much time they moved from 12 and adjust for it.
Numbering left to right 1-5:
#5 stopped at 12:00.
#1 stopped at 3:00.
#2 clock stopped at 7:30.
#3 clock stopped at 4:30.
#4 clock stopped at 6:00.
There are 2 ways that you can solve this
puzzle:
1. Continue from the testing of the clocks
above and adjust the difference.
Set the clock from left to right: 9:00, 4:30,
7:30, 6:00 (as is) and no change.
2. Go back to a saved game prior to touching
the puzzle and now know how fast the clocks move.
Set the clock from left to right: 11:00, 9:30,
10:30, 10:00 and 8:00.
Pull the lever. See that the large painting at
right wall swing opens. Just in time!
Next Nancy Drew: The Silent Spy
This document may not be
distributed without express written permission of the author and the content may
not be altered in any way.
For Questions or Comments
on this Walkthrough,
Please write to:
MaGtRo
Copyright © 05/2013
MaGtRo
 GameBoomers
Walkthroughs and Solutions
GameBoomers
Walkthroughs and Solutions