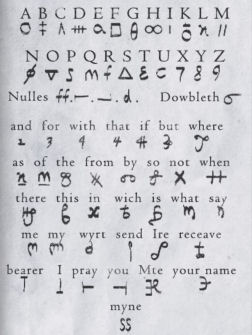
Nancy Drew 29: The Silent Spy
By Her Interactive
Walkthrough by MaGtRo October 2013
Gameplay: This is a first person point and
click game.
The main menu has new game, load game, options,
help, extras, more ND and quit selections.
The options menu has voice, effects and music
volume adjustments. Full screen and windowed game screen selection and
Fast convo selection are here also.
Help shows the different cursors and navigation
arrows used in the game. The interface description is shown at bottom of
screen.
Extras have awards, credits, outtakes and teaser.
Outtakes and teaser are locked until the end of the game.
More ND shows the other Nancy Drew casual and
adventure games released by Her Interactive; as well as links to Facebook,
twitter, You Tube and Pinterest.
Select to play either Amateur or Master Sleuth
difficulty mode. Amateur Sleuth has regular puzzles; hints available and
detailed task list. Master Sleuth has more challenging puzzles; no hints and
has
basic task list.
The game screen has menu at bottom left of the
page. It has main menu, save game, load game, options, help and resume game
links.
The main menu frame has a trophy cup icon at right
side. Clicking it will show the trophies that can be achieved in doing
certain actions in the game.
The cell phone is beside the menu link. It has
phone, camera, games, settings and hints.
The phone has pictures and names of available
characters that can be called. Click on the name or picture to get
another frame that has a "call" button.
The camera can take 30 shots. Photos that are
taken can be viewed. The focus can be zoomed in-out.
There are 7 games installed on the phone.
Settings have wallpaper selections as well as
ring back and message sound tones selections.
The envelope icon show messages received.
The power button closes the cell phone.
At the center of the bottom bar is where the items
collected are seen. Use the slider tab at top of the bar to go through the
items.
The frames for Tasks and Journal are right of the
inventory bar.
The tasks list has the to do things in the
game. The question mark beside the task gives hints to help the gamer
fulfill the task. If you do not use the hint system, you will get an
award.
The journal has observations and suspects.
The dialogue frame has a double arrow at right; it
is used to hasten the dialogue.
The game is non-linear. The walkthrough below is just
one way to get through the game.
Phone charms are only for the games with bonus. The
notes about them are in parentheses.
Read the papers on Nancy's desk - letter, ticket,
The Glaucus Lodge keycard and Kate's picture.
Nancy receives a letter from Security Service
branch of the MI-5, Cathedral. The Office of International Affairs - MI5
asks Nancy for help in solving the mysterious death in a single automobile
crash of her mother, Kate Drew. They believe that she was killed by the
group she was investigating in Glasgow.
Looking at Kate Drew's picture at a train station invokes a memory of seeing her mom answer the phone call from a
certain Moira in the living room of their home.
Wyvern Gate Station:
Someone steals Nancy's suitcase. Alec Fell, a skiptracer tries to
catch the thief but fails. Nancy has a lot of important papers
about her mom in that suitcase.
The Glaucus Lodge:
Use the hotel keycard to open Nancy's hotel room 727 door.
Answer the cell phone call from Ewan MacLeod, the
Cathedral contact.
Look around the room. There is a power cord on the mirrored table and a safe in the closet.
Look out the window to see rooms across the
courtyard.
Find the case file:
Open the left side table drawer. Take 21 coins.
Pick up any coins seen. If you find 25 coins, you might get an achievement.
Additional coin locations not mentioned in the
walkthrough - Thanks to Holomorph.
There are coins in the following places:
1) At Moira's house, in the bookcase -- upper right corner above the
books.
2) Between two yellow stickies on tray in building beside safe house.
3) Building beside safe house, facing dummy, upper right corner of
window in the V.
4) Building beside safe house, above bow in case, there are towels with
coins in between.
5) At right most monitor of Ewan's desk.
6) In Moira's kitchen where toaster and coffee pot plug in.
Read the "eyes only" case file. Learn that Nancy
w as brought here under false pretense. Learn that Kate stopped the Revenant
cell that planned to attack Glasgow. The plot was called Colony Operation.
Revenant is planning to mount another attack and maybe instrumental in
bringing Nancy here for unknown reasons. Moira Chisholm is a reporter and a
person of interest.
Cathedral is an organization under MI5 that
protects Glasgow and surrounding areas. Colony Operation was a non-lethal
biological attack. Kate supposedly destroyed the formula of the difficult to
produce biological element. Revenant is believed to be behind terrorist and
counterterrorist activities around the globe. (Pick up the dinosaur cell
phone charm behind the lamp. If you find all
the charms in the bonus version of the game, you might get an achievement.)
Go to the round table. Click on the flowers on the
vase to get
10 coins.
Bridget: Exit the
room and meet Bridget. She wants to meet Nancy outside.
Turn right and click on lamp at left to get 10
coins. (Click on right lamp to get unicorn horn charm.)
Turn left from room and forward. Click on plant across from
elevator to get 2 coins.
Enter the elevator and go to ground floor (G).
Exit the hotel.
Talk to Bridget:
In front of lodge, click on the right plant on
second floor balcony to get 20 coins.
Bridget Shaw: Go towards
the deli or Bridget. Talk to Bridget. Bridget left to get the Scotland tour
book from her room.
Explore the hotel courtyard:
Newspaper: Read the Glasgow
Daily Standard newspaper.
Learn about the Colony Operation virus. At right,
read what happened the day the attack was thwarted at the last minute. The
sirens blared; the Revenant logo took over the TV broadcast and the chemical
bomb-propellant was pulled offline at the last second.
Get coins from seat of the table with
newspaper.
Plaque: Read the Robert Burns
plaque on the
bench. (Pick up owl phone charm from left leg of the bench beside Bridget.)
Trash bin: Go to trash
bin at left. In close up, take 5 coins right of the trash bin.
Deli Shuss:
Look around the deli.
Buy any of the local items on the case. If you
tried all the snacks, you might get an achievement.
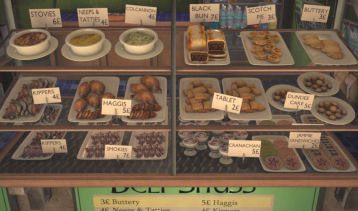
Click on the yellow thing on the pipe at back wall
to get 5 coins.
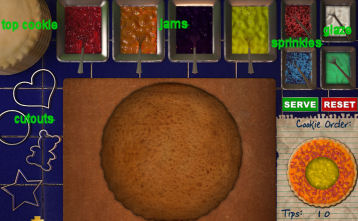
Make a Cookie: Click on the "help wanted" sign to start
to
make cookies. Earn coins in tips.
If you ever need money during the game, make
cookies or look for coins.
Make a cookie by following the makings of the
cookie at right.
The serve and reset button is above the cookie
design.
Start from the base to the top decoration. The
base is already on the working tray.
There are 4 jams at top of prep area. Check the color of
the jam on the design.
There are 4 sprinkles and glazes at top right. Check the
color of the sprinkles or glazes of the design.
Study the design to see if there are any jam,
top cookie, cutout or none.
When complete, click on "serve".
If error is made press reset but doing this lowers
the tip given.
If correctly done and in time; Nancy will make
a favorable comment.
Explore the train station:
Go right in front of the hotel to be at the train
station.
Souvenirs: Check the
souvenirs at left. Buy any souvenir that strikes your fancy. If you
buy all the souvenirs, you might earn an achievement.
Station: Look at right and see
the different side doors to the train platforms.
2 exits for Loch Lomond and 2 for Giffnock are at left
and 4 exits for Bearsden are at right.
At far end under the clock and planked by 2 yellow
with red wyvern flags are the storage lockers.
See Alec at right.
Tickets: Turn around and
see the ticket counter.
Check the leaflets for the Scotland Rail, Glaucus
Lodge and Scotland Wild Side (Loch Lomond and Ness).
You can buy train tickets on the automated machine
at left.
Get 2 coins from under the left chair on
the first Bearsden door.
Alec: Talk to Alec. Ask him to
find Moira Chisolm.
Alec leaves. An "occupied" sign is on the chair.
His bag is gone also.
Storage lockers: Go right from
Alec's location and
check the 2 walls of storage lockers.
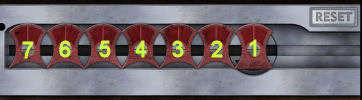
Open locker 33 (cost 2 coins) to get 2 coins.
Open all the lockers and you might get an achievement.
Open locker 44 3 times to get the Scotch Easter
Egg. If you find the Easters egg, you get an award.
Maintenance room: Go through the
double doors and check out the maintenance room.
Drop off the envelope as instructed:
Mysterious phone call: Go
back to the front and get a phone call from a mysterious caller with the R
and claw logo.
Answer the cell phone. Nancy is given a test. She
is to open locker 49; get an envelope and deliver it to the Ten Raven pub in
Giffnock.
Locker 49: Open locker 49
and take the envelope.
Open the envelope to see a - save the date
- invitation for July14th.
Go to the other end and buy ticket from the
automated wall machine. You can always buy more if you need them. 15 tickets
were enough for this gameplay.
Giffnock mail box: Exit
through Giffnock platform door.
See a
mailbox in front of the Ten Raven pub. Place the save a date envelope in the
red mailbox.
Get a phone call that is pleased you passed.
Listen to Kate's recording about her being followed by Revenant. She left
clues - there is a pattern to her travels. Card is for Cathedral.
Take the shears right of the mailbox.
Check the door of the pub. Take a menu from
right of door and the screwdriver on the window shelf.
Get coins from top of the window.
Track down Moira Chisolm:
Go to the train station and automatically be at the
Glasgow train station.
Alec: Talk to Alec. He
found Moira at Bearsden. Moira hit him.
Talk to Alec again and exchange information. He
would not admit to shadowing Nancy.
Talk to him again and after learning about Nancy's
mom; he stopped talking.
Bearsden: Go to
Bearsden train platform and ride the train again.
Moira's cottage: Knock on
door. Recognizing Nancy's accent; Moira wants food. Moira gives the American
description of what she wants - oatmeal parfait, turnip and potatoes, haddock and fudge.
Find and deliver food that Moira wanted:
We saw those food items at the deli. Go back to
the train station.
Carson Drew: Exit the
train station. Get a phone call from dad. He is scared and wants Nancy to
come home.
He shredded Kate's papers when Nancy picked the
locked of his cabinet.
Bridget: Talk to Bridget
in front of hotel.
Get the Scotland: A Traveler's Guide book. Read the book.
Deli: Look close at the
display case.
Study the menu taken from the Ten Raven pub
for clues.
Haddocks are Smokies.
Turnip and potatoes are Neeps and Tatties.
Oatmeal parfait is Cranachan.
Fudge is Tablet.
Buy the food delivery requested. If you
need money, make more cookies.
Moira: Go back to the
train station and travel to Bearsden.
Knock on door and meet Moira. Learn that Moira and
Kate were both reporters and that Nancy was a terror when she was a child.
Nancy gleefully broke all the teacups; only the teapot remained.
A knock is heard. Moira tells Nancy to hide.
Hide in the closet right of the refrigerator in
the kitchen.
Moira tells about the safe under the breaker and gives directions for getting to a safe
house. Hear Moira greet the gentlemen that abduct her.
Follow Moira's instructions to escape to the safe
house:
Living room: Moira says
there's a safe under the breakers. Exit the closet. Look around the house.
Go to the living room and with back to door; turn
to right to see the table. Take the Tartan book.
Turn to the left and look close at book shelves.
Check Kate and baby Nancy's picture.
Check the teapot and see 185 (amateur) or 164
(Master) taped at bottom of
the teapot.
You can play records to hear various theme. (Look close at fireplace mantel to get Celtic
symbol phone charm from the vase at right side of mantel.)
Wardrobe: Open the
wardrobe left of the couch. Take clips under the top folded clothes.
Closet: Go back to the
closet where Nancy hid.
Check the fuse box behind the hanging clothes.
Open the Fuse box:
Nancy says to place the fuses to equal the number seen under the teapot
- 185.
Amateur: Flip a switch and see numbers. From left to right: 85 - 75 - 10 - less 30 -
40 - less 60 - 15 - 55 - less 20 - less 10 - 70. The rightmost is a
reset switch.
Flip switches in order to end up 185.
Master: Flip a switch and see numbers. From left to right:
28 - 33 - less 18 - 75 -
less 53 - less 22 - 43 - 66 - less 30 - 47 - 35. The rightmost is a
reset switch.
Flip switches in any order to end up 164.
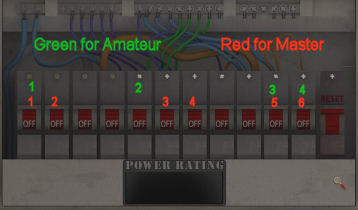
A secret compartment opens. Take the safehouse
key to the Loch Lomond retreat.
Letters: Read the folder
that has Kate's
letters to Moira. Learn that Kate brought Moira into
"that life" and that Carson is not pleased with Moira.
Kate left her notes at the safehouse. Pattern?
Date? R?
There is a TV drawn at last page - "Tune in to the
Declaration of Arbroath" (Amateur) or "Tune in to the Acts of
Union" (Master).
Locked box: See a box with
letters A - G and 3 green bulbs. There
is not enough clues to solve this yet.
Cell phone: Call Carson
Drew on the phone and find out that his passport was blocked and he can't
travel to Scotland.
Call Ned and he is worried. Learn that inside
Nancy's suitcase is Kate's Jabberwocky poem. It has notations on it.
Exit the house and go to the train station.
Loch Lomond:
Go through the Loch Lomond platform door.
On the way, Nancy recalls an argument between
Carson and Kate before Kate left for Scotland.
Explore the cabin:
Safehouse: Go to the
house at left. Use the key from the fuse box to unlock the door.
Upon entering, check the top bunk at left to get
5 coins.
Check the fireplace.
Turn right and check the wall cabinet above the
dining room table to get 5 coins.
TV corner: Turn to the corner
where the TV is located.
Check the Mary Queen of Scots history book. Read the book and see the ciphers used as codes by Mary and
her conspirators. A written notation states Fireplace - plastic (amateur) or
Fireplace - observant (master).
Get coins from left side where you got
Queen Mary's book.
TV: This looks like the
drawing in Moira's folder - "Tune in to the Declaration of Arbroath"
(Amateur) or "Tune in to the Acts of Union" (Master).
Read the Scotland Travel book given by
Bridget. At the last page see that the Declaration of Arbroath was in
April 1320 (Amateur) or Acts of Union was in May 1707 (Master).
On the keypad of the TV press 041320 for
Amateur or 051707. WOW! See the dining area change to space age
workstation.
Check out the cabin's secret computer:
Computer: Click on the
monitor across from the chair and get the Cathedral insignia.
The phone rings. Answer the phone to hear Ewan say
that he placed a keycard in Nancy's room safe. The password is the room
number multiplied by the price of haggis at the deli.
The cell phone flashes again. Check the text
message sent by Moira - she's safe at home now. If you haven't yet; read the
text message sent by Bridget - she knows your phone number now.
Check the computer.
Folder: Click on the
folder at top left and see Kate's notes. Learn that the Jabberwock poem is
important. Kate is trying to solve the name Colony.
Learn that the biological weapon has the ability
to make groups of strangers react in predictable manner.
The last note states that Kate placed the
scientist and family on plane and she's on the run. She states to play the
pipes and read the
letters as they appear - left to right. She was at the cafe that Moira hates
and says: Live or Die, this is goodbye.
Cell phone: Call Ned on
the cell phone. Talk to him completely. Be sure to ask him to get the
original color coded Jabberwocky poem, scan it and send it to her.
Figure out how to use mom's note in the Queen Mary's
book:
Look close at the fireplace. Remember the notation
on the Mary Queen of Scot book: fireplace - plastic (amateur) or Fireplace -
observant (master).
Use the fireplace drawing seen in the letters of
Kate to Moira. See that the stones have letters on them
Click on the stones to spell plastic (amateur) or
Fireplace - observant (master).
A vault rises. We need a password for this.
 |
 |
| Amateur |
Master |
Explore the training building - Brae Arena:
Exit and then turn around. Go to the building at
right. (Check the Brae Arena sign left of door to get a bow and arrow phone
charm.)
Enter and turn around.
Information: Check the
information desk.
Read the Mastering the Bow book to learn the 3 bow
types: longbow, recurve and compound. The longbow is for target practice,
the recurve is for target shooting events because of its improved accuracy.
The compound is used for hunting or bowfishing.
Read the Great Highland Bagpipe book. Learn
the parts of the bagpipe and the 9 notes commonly played on the chanter. The
drones produce continuous note while the chanter provides the melody.
Target practice: Turn right and
see stacked of hay at back of room.
There's a locked compound bow at left. Take
the 5 coins under the table with arrows on top.
See the high score black frame. It has scores
made by Kate and Moira based on variations of Kate and Moira Chilsom's name.
Bagpipe: Turn to the
right under the windows and see a bagpipe that is missing a part.
Punching bag: Hit the human
training punching bag at right. See training swords left of the punching
bag.
Archery: Turn around to
face the stacks of hay. Go to the right corner to start the archery practice.
Click-hold the left mouse button to pull
the bow.
Position the crosshair right of the target based on the speed and size of the moving target and
then release.
The aim is to get the highest score. The
high score is 37 (amateur) or 55 (master).
When done, the bow case is opened. Take the
compound bow from the case.
If you play the archery puzzle often
enough, you might get an award.
Get the key from room and check with Ewan:
Exit the training building and go to the station.
(Upon exiting the Loch Lomond platform, take the dragon phone charm from the
chair at right.)
Deli: Exit the station
and check the deli. Look at the display case to find out that a haggis
cost 5 pounds.
Talk to Bridget. She thinks Nancy was with Alec at
the cabin.
Nancy's room: Enter the
hotel.
Get a phone call from Ned and Carson. Ned was
caught burgling Nancy's house. After some conversation. Carson understands
the situation and tells Ned where the poem is located.
Be at the elevator. Press 7 for Nancy's floor.
Enter room 727 at left hallway.
Luggage: Go to the
closet. See Nancy's luggage. Nancy sees that mom's stuff is gone. Best
to ask Alec.
Get coins from the shiny circle at right
side of suitcase.
Safe: Open the safe using
the room number 727 multiplied by the price of a haggis 5 = 3635.
Take the Glaucus Lodge - Cathedral keycard.
Face the mirror on the table and see a bright
reflection.
Nancy checks the window to see Bridget acting
weird. Nancy wants to check her room.
Elevator: Go to the
elevator and use the Cathedral keycard on the slot on the panel.
Press the large button above
the slot on the panel.
Ewan: Enter the Cathedral
command center. Talk to Ewan. He will check Alec Fell.
Ewan gives a zipline and arrow to go with the bow
taken at the Brae Arena. This will get Nancy to Bridget's room across the hotel courtyard.
Learn about Revenant. Nancy is given basic
clearance to work in the computer.
Track down more information about mom's past with
cathedral:
Cathedral Archives: Climb the
steps and go right.
Turn right again. Get coins from the case
at end of the aisle. Look close at the monitor computer. It is
Nancy's personal portal to the archives.
Green cards: Read the file on
Kate Drew-Katherine Austin. Learn that her internal name is harrier; Moira
is lark, Carson is condor and Nancy is kestrel.
See the records of George - swift, Bess - magpie
and Ned - robin. Joe and Frank Hardy are trusted operative but their records
are mostly blanked out.
Read Nancy's record. Learn that Moira was
dishonorably discharged.
White papers: Read about
Kate's non-standard hire practice. Kate was believed to have run the Colony
operation off-line on her last visit to Scotland. Read about Colony
operations. Learn about the Colony scientists.
Other papers: See 3
brown files and 2 green files that need passwords to unlock. The Revenant symbol is a
red R and a bird claw.
Symbols: Look at the
paper with 6 sets of symbols. Take a picture of this with your camera.
Explore the Cathedral's field agent command center:
Face the corner and take the coins on the
floor between the 2 machines.
Spy gears: Look around. Go to the corner glass case. Check
the locked spy gears in the case. The keypad is on the left. It is offline.
Go around to the other side.
Firewall controls: Before
entering the server room; check the firewall control box at right wall. From
left to right: B4, B3, B2 and B1 buttons.
Server room: Enter the back
room and see banks of servers. Each servers are labeled with a tartan. There
are 5 sets of labeled servers on 3 aisles.
The main computer server is on the right wall of the
front right aisle - B1.
Get coins from the vent at top of wall at
right corner of room - B2.
Go to the left corner at B3 and see the thermostat
control which is presently at 69.
Firewall controls + aisle:
Open the firewall control panel.
Press B1 and see that the front aisle on the left
has a physical firewall dropped to block entry.
B2 is for the far right aisle. B3 is for the back
left aisle and B4 is for the front left aisle.
Another Revenant test:
Exit the Cathedral center and go down to the
ground floor.
Outside the hotel, get another call from the
mysterious caller. Nancy gets another test - cut the lines the trash
compactor at station.
Go to the station and go to the maintenance room
at end of the hallway.
Use the shears taken from Giffnock on the red tube
hanging on top of the trash compactor.
Go to the door and answer the phone. Hear Kate's
voice again. She wants a message sent to her family but the recording was
cut off.
Alec: Talk to Alec twice. He
didn't find the poem in the luggage. Nancy tells him that the poem has
notations on it.
Bridget: Exit the station
and talk to Bridget.
Track down a color copy of the Jabberwocky poem:
Go back to the room 727. See an envelope on the
door. Get the colored copy of mom's poem - the Jabberwocky that Ned
sent.
Find a way to cross the courtyard over to Bridget's
room:
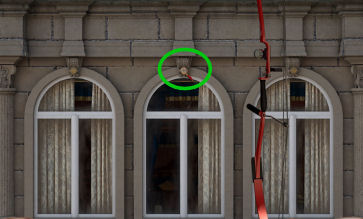
Shoot the bow and arrow with zipline:
Go to the window. Use the bow and arrow
on Bridget's room.
See the circle crosshair. The aim is to hit the
small circle on top of the middle arched window.
Do as practiced at the Brae Arena. Click hold the
left mouse button.
Place the crosshair on or right of the target, wait just
before the spinning disk stops (slows down) and release.
Nancy zips across the courtyard and enters
Bridget's room. If you use the zipline a lot, you might get an
achievement.
Search Bridget's room:
Read the notebook on left side table. Bridget is
tracking Nancy's movements. There's a MacLorthen noted on the side of the
page.
(Take the crown phone charm from the armrest of
the blue chair at left).
Check the painting left of the blue chair. There's
nothing behind it.
Check the flowers at center of the coffee table.
Hmm...
Cell phone: Pick up the
cell phone from the yellow ceramic on table at back of the couch.
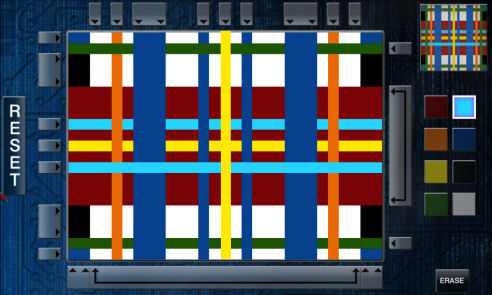
Tartan: See a tartan
at top right. It is the MacLorthen plaid as shown in Bridget's notebook
and Moira's Tartan book.
The aim is to copy the tartan colored lines.
Begin by coloring from the bottom - up.
The gray arrows at sides of the frame are
locations of lines.
The colors are the squares at right of frames.
Select-click a color and then click on the
gray arrow(s) where you want it placed.
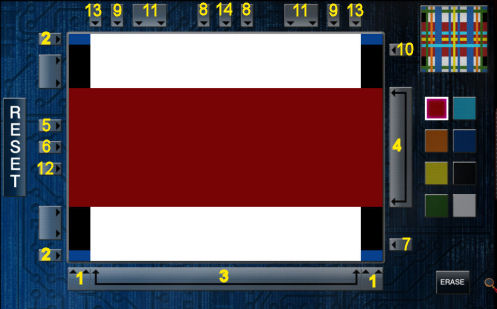
|
Color and number of lines |
Location placed
shown in picture |
|
2 black |
1 |
|
2 dark blue |
2 |
|
white |
3 |
|
red |
4 |
|
light blue |
5 |
|
yellow |
6 |
|
green |
7 |
|
2 dark blue |
8 |
|
2 orange |
9 |
|
green |
10 |
|
2 dark blue |
11 |
|
light blue |
12 |
|
2 green |
13 |
|
yellow |
14 |
Read the text messages that shows that Bridget is
following her around and knows about the Cathedral connection. She is being
paid by Owl eyes and the next order is behind the Burns words on the plaque
at the front of the hotel.
Exit through the window to zip line back to
Nancy's hotel room.
Open the compartment hidden in the bench by the deli:
Go outside of hotel. Talk to Bridget. She says
she's been robbed. They took money. Nancy diverts her with story of spies
going to her room.
Bridget leaves.
Check the plaque on the bench. Use the screwdriver
taken from the pub in Giffnock on the screws.
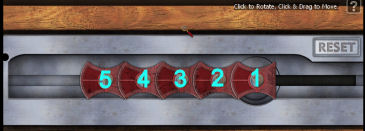
5 sliding plates: The aim
is to slide the 5 plates out at right side.
Click to rotate and click-drag to move the
plates.
|
Slide |
Turn plate # |
Slide |
Turn plate # |
Slide |
Turn plate # |
Slide |
Turn plate # |
|
The label is from right to
left. |
|
- |
1 |
right |
7 |
right |
4 |
right |
5 |
|
right |
3 |
left |
1 |
left |
1 |
left |
1 |
|
left |
1 |
right |
2 |
right |
2 |
right |
2 |
|
right |
2 |
left |
1 |
left |
1 |
left |
1 |
|
left |
1 |
right |
3 |
right |
3 |
right |
3 |
|
right |
5 |
left |
1 |
left |
1 |
left |
1 |
|
left |
1 |
right |
2 |
right |
2 |
right |
2 |
|
right |
2 |
left |
1 |
left |
1 |
left |
1 |
|
left |
1 |
right |
4 |
right |
6 |
right |
4 |
|
right |
3 |
left |
1 |
left |
1 |
left |
1 |
|
left |
1 |
right |
2 |
right |
2 |
right |
2 |
|
right |
2 |
left |
1 |
left |
1 |
left |
1 |
|
left |
1 |
right |
3 |
right |
3 |
right |
3 |
|
right |
4 |
left |
1 |
left |
1 |
left |
1 |
|
left |
1 |
right |
2 |
right |
2 |
right |
2 |
|
right |
2 |
left |
1 |
left |
1 |
left |
1 |
|
left |
1 |
right |
5 |
right |
4 |
right |
Slide out for Master |
|
right |
3 |
left |
1 |
left |
1 |
|
|
|
left |
1 |
right |
2 |
right |
2 |
|
|
|
right |
2 |
left |
1 |
left |
1 |
|
|
|
left |
1 |
right |
3 |
right |
3 |
|
|
|
right |
Slide out for Amateur |
left |
1 |
left |
1 |
|
|
|
|
Continue on for Master |
right |
2 |
right |
2 |
|
|
| left |
1 |
left |
1 |
|
|
Turn the knob and read the message: "Fill a blue
bag with the final payment of 35 pounds. Place the bag inside the trash bin next
to this bench. Exit the area and return later. Your equipment will be
waiting for you in the trash bin".
Nancy screws the plate back to original position.
Check the trash bin left of the bench. Nancy
needs a bag.
Find out what Alec is hiding:
Go to train station and check the place where Alec
usually stands. He's not here and has the occupied sign up.
Turn around and see a blue paper on the plants
across the aisle.
Take the paper and read it. It states "---erneath occupied seat cushion --only to be
used as last resort in case I am caught by th---."
Chair: Look on the seat
cushion of the chair with occupied sign.
Colored circle: See circles
partitioned into blue, red and yellow.
The aim is to place the same colors inside the
similar colored rings: Top is yellow, bottom right is blue and bottom
left is red.
|
Turn #3 once.
Turn #4 once.
Turn #3 once.
Turn #4 once.
Turn #2 once.
Turn #4 once.
Turn #1 twice.
Turn #4 twice.
|
 |
 |
See a note: "We have eyes and ears on you in
the station. Stand by for our call. Her life depends on it." Someone is threatening Alec.
Follow through on the instructions from Bridget's
texts:
Souvenir shop at train station:
The instruction states to place money inside a blue bag.
Go to the train station's souvenir shop. Buy the blue bag at
bottom right display for 12 coins. If you need money, make cookies at the deli again.
Get a text message from Bess. Read other unread
messages. Get 20 coins from the ticket window.
Bridget: Go to the deli
and see Bridget standing there. Talk to Bridget. She asks Nancy's phone and
hid what she's doing to it.
Nancy confronts Bridget. After the confrontation, Bridget loses her accent
and leaves.
Trash Can: Place the blue bag
in the trash can left of the bench. The money is automatically placed in
there. If you need money, make cookies at the deli again.
Leave as the instruction stated.
Ewan at Cathedral: Go to Ewan at
the Cathedral control room. Enter the elevator and push the large button on
the bottom of panel.
Talk to Ewan completely to learn about Alec, the attack,
Colony and Revenant. If Revenant has the correct formula and the people to
make it the attack; it will happen instantaneously. The glass case is offline
and the lock is half fixed only.
Spy glasses: Go back to
the trash can by the deli. Pick up the odd glasses.
See that it was made for Zoe Wolfe.
Go back to Ewan at the Cathedral control room.
Give the glasses to Ewan. They are augmented
reality glasses.
Zoe Wolfe: Go to front of
hotel. Talk to Zoe aka Bridget. She knows that Nancy has the glasses but she
remote wiped the drive already.
Nancy has to trust only Zoe; no one else. She
knows about Carson's passport. Zoe warns Nancy about the danger.
Carson Drew: Use the cell
phone to call dad-Carson. Nancy and Carson start opening up about Kate. Kate
threw a wrench in the Colony attack by looking for the scientist that worked
the formula. Based on Carson's sources, Zoe might be the real deal.
Ned Nickerson: Call Ned
on the cell phone. Nancy asks Ned to get all info about Revenant.
Call Ned again after a while to learn about
Revenant. Learn that Revenant is thought of as a parent.
Open fireplace using clues in journal.
Moira: Go to train
station and then Bearsden. Talk to Moira twice. Learn about her relationship
with Kate, Carson and Cathedral. Get Kate's case book.
The people that wants Kate's secret wants Nancy
here to see if she can find out what Kate hid. She admits that she got Kate
to come here and lead her to her death all because of a lie.
Kate's case book: Read Kate's
case book completely. Learn about her theory that Glasgow was a test run.
People all around the country were primed to do one thing like standing on Tuesday noon in large groups at the city centers.
Kate: Go to train
station. On the way, another mom memory is triggered. Child Nancy is upset
at her mom. Nancy doesn't understand why she has to leave. Nancy refuses to
practice piano with Kate.
Safehouse: Go to Loch
Lomond safehouse.
Vault in fireplace:
Look close at the vault that was exposed earlier using the pattern on
the fireplace stones.
Review the white paper inside Kate's case
book.
Amateur clues: If you're
doing this puzzle by the clues below, the letters-numbers can be entered
as the clues are decoded.
Enter the numbers using the arrows left or
right of each alphabet or number.
Alphabets and numbers to enter: A to J (no I)
and 1-9
No letter or number appears more than once.
The top row contains BEF in that order. (Therefore
enter BEF on top row.)
The vowels are in the middle column in the top 2
rows. (Therefore 2nd row is -A-.)
In the same column, E is above H which is above 6.
(Therefore - EH6 are in the middle column in certain order)
In the same column, J is above D, which is
directly above 3, which is above 1. (Therefore - JD31 are in rows 2-5.)
The fifth row contains 1, 2 and 9 in some order.
8 is before 6 in one row and 2 is after 9 in
another. (So 86 and 92 in 2 rows.)
In one column G is directly below C and above 2.
CG2. So 2 is at right column.
(So - JD31 of rows 2-5 are in left column and
the order of row 5 is 192. H is third row middle column. C and G are in
rows 2 and 3 at right column.)
The fourth row contains only odd numbers. (So
- 357 in some order).
7 is before 5 in one row.
(So fourth row is 375 and 6 is middle column
at bottom row. The bottom row is then 864.)
The vault opens.
When the vault opens, a text message from Ned
arrives.
 |
 |
| Amateur |
Master |
Master clues: Enter the numbers using the arrows left or
right of each alphabet or number.
Alphabets and numbers to enter: A to J (no I)
and 1-9
No letter or number appears more than once
C is below A and above H in the same column.
(Therefore ACH.)
E is above D and immediately next to J.
3 is next to 4 and below G which is below D.
(Therefore EDG.)
In one column, B is immediately below J and above
4 which is immediately above 6. (Therefore JBF and 46).
All three columns contain three consecutive
numbers in some order (1-3, 4-6, 7-9 in some order).
The fifth row contains only even numbers, in
decreasing value from left to right. (Therefore 862 is in the 5th row; and 4
and JBF are in the middle column. 4 is at 4th row with 3 at right of 4).
7 is to the left of 1. (Last row 751 and 4th row
943).
Enter the rest of the known clues above.
The vault opens.
When the vault opens, a text message from Ned
arrives.
Discover what's hidden within the vault in the cabin:
Box: Examine the box of
Agent 379237. Get fly bug, MP3 player with dead battery and
fake diary.
Fake Diary: Read the fake
diary. Moira asks Kate to watch Royal Institute of Health staff.
Turn the pages to torn note for Nancy.
Moira wrote at last page after Kate was killed.
Cipher wheel: Check the
cipher wheel; it is missing a disk.
Find a way to fix the glasses from the dead drop:
Travel back to Glasgow.
Zoe: Exit station
and talk to Zoe. Zoe threatens to have Nancy picked up and send home
forcibly.
Spy glass: Go to Ewan at
the Cathedral control room at the hotel.
Pick up the spy glass.
Ewan raises the security on the lift. Nancy might
not get there anymore using the elevator.
Click on spy glass and see that it scans the
surroundings. Click on the glasses in inventory to take the glasses off.
If you use the spy glass often enough, you
might get an award.
Find a way to listen to Alec's phone call:
Go back to the station, look close at Alec's bag.
Place the fly bug on a pen holder inside Alec's bag (can be done earlier).
Note the pen and the logo.
Go to Loch Lomond safehouse.
Use the computer monitor on the table. Click on
the bug icon at top right.
Click on arrow to listen to phone. Hear Alec talk
about Nancy figuring it out herself and a bag in the locker.
Go back to train station.
Talk to Alec twice to learn that his sister is
held by the people that want Alec to watch Nancy.
Listen to Mom's old MP3 player:
Talk to Zoe in front of hotel.
MP3 player: Go to Nancy's room.
Look close at the plug right side of the mirrored desk.
Use the mp3 player on the plug or wire. It is not
working.
Click on the outlet and see that there is a bug.
Someone was listening to Nancy. After a few seconds the bug self-destructs.
Kate's recording: Listen to
the mp3 player. She talks about following the raven at the archives and
about the scientist being told to run.
Get pass Ewan's increased security in the elevator:
Archives? Go down to the Cathedral control center.
At the elevator, realize that you can't go down by
pressing the large button since Ewan changed the security.
Use the spy glasses and see the panel with
green hexagon around 6 numbers.
Press the green lit numbers from the largest
size to smallest: 4 2 6 1 3 5.
Zoe: Enter the
control center and see that Ewan is not here.
Hear glass breaking. See Zoe breaking in the spy
item case. She takes things and waves at Nancy.
Ewan arrives and is not pleased about Zoe. Zoe
took one of a kind drone bugs.
Talk to Ewan about Alec.
Search the display case Zoe broke into in the command
center:
|
 |
|
Amateur: Look close at panel left of the spy item glass
case.
See group of colored squares. Nancy says to group
the colors to clear the board.
Only 2 or more colored squares can be removed at a
time.
1-2. Click to remove blue squares.
3-4. Click to remove orange squares.
5. Click to remove yellow squares.
|
|
 |
 |
|
6. Click to remove orange squares.
7-8. Click to remove green squares.
|
9-10-11. Click to remove pink squares.
12. Click to remove combined red squares.
|
|
 |
 |
|
13. Click to remove pink squares.
|
14. Click to remove green squares.
15. Click to remove combined red squares.
16. Click to remove combined pink squares.
17. Click to remove combined orange
squares.
|
|
Master: Click on the numbered squares
in sequence. |
 |
 |
|
|
|
 |
 |
|
|
|
 |
 |
Case open. Take cipher wheel and drone bug on the
boots.
Get a text message from Zoe.
Examine the coin collection folder. Check the
coins.
Take 10 coins from bottom shelf.
Track down the passwords for the locked entries in the
archives:
Following mom's comment about raven and archive; go
to the archives computer at right.
Select a green locked file.
Type in RAVEN for password and then press "enter".
Read all 3 green locked files.
Learn the activities of Revenant in UK, US, ES and
FR. See a picture of Kate.
The note for Moira states to listen to the record
to find out where Kate hid" him". It will show the letters to use for the
poem copy. Transfer those letters in order they appear to another sheet for
the encrypted text. Crack the code for the contact.
The password doesn't work on the brown locked
files.
Talk to Ewan. He said to watch Zoe.
Find a way to listen in on what Zoe is up to part 1:
Revenant: Go to the
elevator to go back up to 7th floor-room.
Get another call from Revenant mysterious caller.
It says that Ewan has proven unreliable and wants Nancy to wire tap his
computer.
Zoe's room: Go to room
727 and then window.
Use the bow and arrow on Zoe's window and
automatically be in Zoe's room.
Plant the drone bug on the flower vase on the
coffee table.
Zipline back to Nancy's room.
Place a wiretap on Ewan's computer:
Go to Cathedral control room.
Thermostat: Go to the
server. Go to the back left aisle - B3. See the thermostat.
Raise or lower the temperature by using the
arrows at right of the readout until an alarm is heard.
Hear Ewan get upset. Learn that Ewan has to reset
the thermostat himself and be away from his desk.
Hiding place: Go back to
the server room and look for a place to hide.
Enter the first aisle at left while facing the
exit - B1. See the main
computer server which is placed in a recess.
Divert Ewan: Time to get
Ewan away from his desk.
Raise or lower the temperature until an alarm
sounds.
Back up, back up, turn left, forward, left to enter the first aisle
on the left and go curved right into the recess.
Find the computer main drive:
Once Ewan enters and passes by - exit the server room and go to Ewan's desk.
Open the drawer left of his chair and see the
computer.
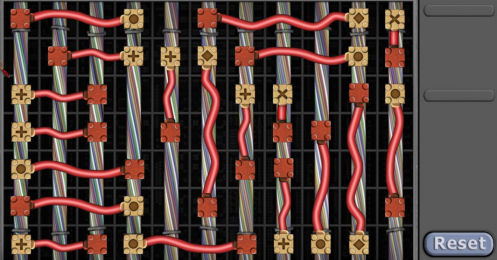
Wiretap: Use the spy
glass and see symbols on the wires.
The clips taken from Moira's safe box is at
right. The clip has a red end and the other end has a symbol.
The aim of the puzzle is to place the clip's
red end on a symbol that is similar to the clip's other end.
The clip
should not cross another clip.
Right click to turn the clip and left click to
place it on the wire symbol.
I'd recommend to place the clips by size from
largest to smallest.
Exit the control room as soon as the wiretap is
correctly done.
|
 |
 |
|
Amateur |
Master |
Find a way to listen in on what Zoe is up to part 2:
Revenant call: Go to the train
station. Get a call from Revenant and the caller sounds surprised that Nancy
succeeded on the test. Hear Kate
say she's followed by 2 black cars and the men do not realize that it's all
over. Kate realizes that lark (Moira) lied - there was no back up.
Safehouse: Go to the safehouse
at Loch Lomond.
Go to the computer. Select the bug icon at top
right. Select the drone bug at right.
Hear Zoe quote: "From where I come, there I go."
Check out the results from tapping Ewan's computer:
Click on the wiretap icon at top left.
"The scientist is alive. Will he speak." There's
an image of Harrier-Kate that was salvaged. It is expected to contain coded
information about the scientist that is hiding.
Enhance the image Ewan sent over his computer:
Click the enhance icon at top right to see Kate's
picture in disordered pieces.
Swap the pieces of Kate's picture to form a whole.
Find and replace the missing disk from the cipher
wheel:
Go to the vault in the fireplace. Open it and take
the cipher wheel.
Place the cipher wheel taken from the control room
glass case on the cipher. We'll continue this puzzle later.
Find out what Zoe locked away with her special phrase:
Go back to the hotel. Talk to Zoe outside the
hotel.
Go to room and zipline to Zoe room across the
courtyard.
You might need to go back to Nancy's room sometime to not
be caught by Zoe.
Painting: Use the
spyglass and see prints on the wall painting. Swing the painting open and
see familiar symbols.
Find the code: The symbols
are familiar. Open the Queen Mary book and see similar symbols.
Find the symbols for the quote Zoe said on the
bug - (Amateur)" From where I come, there I go" or (Master) This is the
game I am in."
Safe: The safe opens.
Check the contents and see a brown tracking
note with code. This needs to be decoded. Nancy says there must be
things around that would help.
There's a deck of cards.
Check the different passports and wig.
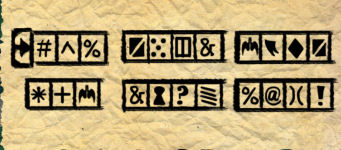
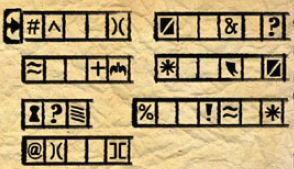
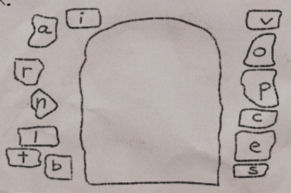
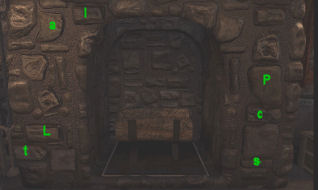
Find code pieces: Look
around the room to find the cutouts that will help decode the letters in
the paper.
| Amateur:
- under the edge of the carpet in front of the
wall painting.
- left of the left pillow on bed.
- right of vase on coffee table.
- on the dining table.
- bottom left corner of the large mirror by
wall close to door.
- on the seat of left chair of the
dining table.
- on the left side of the books on top of the
table with the cell phone.
|
|
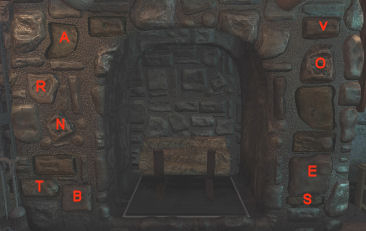
Master:
- on top of the lampshade right of the
wall painting.
- top of the plant right of the blue chair.
- top of the pillow on sofa.
- side of the yellow ceramic that has the cell
phone.
- left corner close to exit door.
- left of the phone at right side table of
bed.
- with the mirror dresser at left and facing
the room, look at top right corner of ceiling (close to right window).
|
Decrypt the hidden code in Zoe's notes:
Go back to Nancy's room.
Arrange the cutouts on the letter grid to fit
entirely with none overlapping.
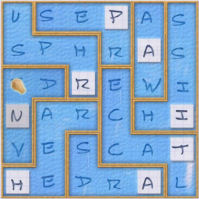 |
 |
| Amateur |
Master (solution
sent by Sahin Tokgoz) |
Track down passwords for the locked entries in the
archives:
Nancy says Parnitha (amateur) or Orchidaceous
(Master) and wonders if there is
something at archives.
Go to Cathedral control room.
Talk to Ewan. Ewan says Alec is an only child.
Nancy shows the cards to Ewan. He counts them and
says the deck is missing one card.
Go to the computer.
Select the 3 brown locked files. Enter as password
- Parnitha.
Read about the return of Colony and that
Nancy-kestrel was brought in because of that. Kate's code might be in plain
sight. Read the last communication of Kate before her death. She states the
formula is obtained and is hidden in the cards. They must be soaked in
water. The location of the scientist is known. She is still looking for
cards.
Get a text message from Zoe about zipping to her
room.
Find the deck and soak it in water:
Go back to the room and use the cards on the
flower vase
on the table. The cards need time to soak.
Zoe: Go outside and talk
to Zoe. Learn more things about her and Colony.
Alec: Go to the station
and talk to Alec. He says he does have a sister and whoever said that he
doesn't is a liar.
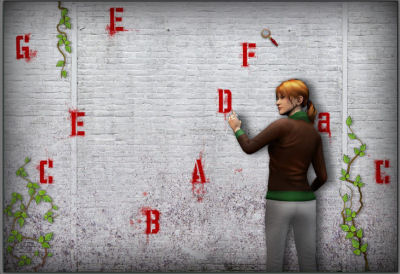
Figure out the secret of the letters mom spray
painted.
Since the locked archive file stated that Kate
codes are in plain sight; remember Kate's picture that shows Kate and spray
painted letter.
The letters are G C E E B A D F a C; read left to
right as she stated in one of her documents.
Chanter: The only document we
have that has those letters are in the bagpipe book.
The bagpipe in the arena is missing a chanter.
Go to the souvenir wall in the station. Buy a
chanter.
Bagpipe: Travel to the Loch
Lomond and enter the arena.

Use the chanter on the bagpipe.
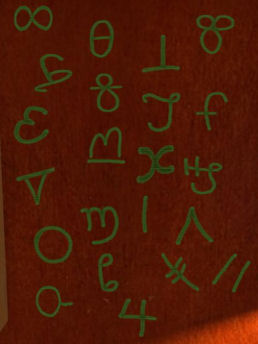
Review the bagpipe book. See the holes on the
chanter that need to be covered for the musical notes.
Play the notes Kate spray painted on the wall:
G C E E B A D F a C.
Chanter holes - 1 234 5678
Closed holes are light blue and open holes are
black.
G - Click on all holes - all holes should be
light blue. Click on music sheet.
C - Open holes 67. Click on music sheet.
E E - Open holes 48, all others should be
closed. Click on music sheet - TWICE.
B - Open holes 78; all others should be
closed. Click on music sheet.
A - Open hole 8; all others should be closed.
Click on music sheet.
D - Open holes 567; all others should be
closed. Click on music sheet.
F - Open holes 348; all others should be
closed. Click on music sheet.
a - Open 1238; all others should closed. Click
on music sheet.
C - Open holes 67. Click on music sheet.
The vent opens. Take the record.
If you play the bagpipe often enough, you
might get an award.
Easter Egg (Thanks, Marjo of
adventurespel.nl): Play the bagpipe again: F D C E C A B E E F.
Break the code of the cipher wheel:
Go to the safehouse next door.
Review the picture taken of the 6 sets of symbols
in the archives of Cathedral control center and the symbols at bottom of the
paper in Kate's case notes.
Study cipher wheel from the vault. If you haven't
yet, place the cipher wheel taken from the Cathedral control center glass case.
Archive symbols: The
archive symbols have 6 sets of 22 symbols total. The cipher wheel has only 5
sets of 20 symbols total. The numbers of symbols do not match.
Note that some of the sets have ending symbols
that are the beginning symbols of another set. For example; the top left set
ends with % and bottom right set starts with %.
Arrange the symbols:
Enter the symbols of the archive paper on the cipher wheel. The duplicated
symbols that are the end of one set and beginning of another are entered
only once. This is the clue to show the sequence of the sets.
The added clue to the sequence is the set of
symbols drawn on Kate's case notes. It shows what is next after the
exclamation mark symbol.
The starting symbol-set is shown by an arrow (the
top left set).
Click hold a symbol-wheel and drag it to the place
you want it positioned.
When all symbols are correctly placed, the top and
bottom arrows are released. 4 symbols are locked as a set making 5 sets.
The notation in Kate's case notes shows x8 x3 x6
x4 x7.
Turn the wheels or click the top arrows the number
of times noted in Kate's case notes. From left to right: x8 x3 x6 x4 x7.
See the decoded message:" Music themes reveal
ace."
Get help finding sheet music for mom's song part 1:
Nancy says it might be Mom's song and her dad
might help.
Call Carson on the cell phone. Discuss everything.
Listen to the record:
Go to Moira at Bearsden; she has a record player.
Talk to Moira. Learn that the locked box behind
the fuse box is Kate's.
Record: Play the record
taken after the bagpipe musicale on the turntable.
Hear Kate say: "Beware of the Jabberwock, my son! Take the first of green, second orange, third
purple, fourth red, fifth blue, sixth brown, seventh aqua, eighth pink."
Encrypted text: Look at
mom's poem - Jabberwocky.
Remember Kate's message for Moira that was read in
the control center: The note for Moira states to listen to the record
to find out where Kate hid" him". It will show the letters to use for the
poem copy. Transfer those letters in order they appear to another sheet for
the encrypted text. Crack the code for the contact.
Nancy says that by finding the letters Kate
indicated, she can find the encrypted text.
Automatically, see the encrypted text. Decode the
encrypted text.
Cryptogram - Replace the encrypted text with the
correct letters.
Click on a letter on the text in the puzzle and
then click on the alphabet you think-deduce it to be.
For starter - click on the D after the apostrophe.
Then click S from the alphabets at top of puzzle.
In case of error, there is an erase at top right.
Contact the scientist:
Travel to Loch Lomond's safehouse.
Use the computer. Click on the keyboard.
Type in the code word mentioned on the encrypted
text - caretakers. Press enter key.
Call the scientist on the cell phone. The call
number is blocked.
The
scientist refuses to be helped and will leave his formula for Revenant to
find. He will leave and hide his family.
Get help finding sheet music for mom's song:
Memory: Go back to
Glasgow.
During the trip, Nancy recalls another memory.
Mom is playing the piano and calls Nancy. Kate
plays the song she wrote. There are notes in her song that represent Nancy,
Carson and herself.
Revenant's final test:
Go back to hotel.
Get another call from Revenant. This is Nancy's final test. They want the
scientist's number. The inducement is Kate's last message.
Hear a recording of Nancy's call to the scientist.
"You will not escape, you will not survive."
Nancy's room: Go to room
at 7th floor. Enter and see that the room is ransacked.
Alec follows her in. See red lights moving in the
room and stops on Nancy's head; as mentioned by Alec. Shots are heard. Alec pushes Nancy out the
door.
Ewan: Go down to the
Cathedral control room.
Ewan is not in his desk. Hear some muffled sound.
Go to the server room.
Look at back left aisle where the thermostat is
located.
See Ewan tied up. Click to untie Ewan.
Talk to Ewan at the control room. He made a comment
about hard months - keeping family,
friends alive.
Music sheet: Go back to
Nancy's room. Take the music sheet sent by Carson from the door.
Get a text message from Ned about his burglarizing
at Nancy's home.
Search my room for clues as to who ransacked it:
Enter the room. See that the soaking cards are
gone from the vase.
Check the window sill and see a laser pointer.
Note the familiar yellow symbol. This looks like the pen in Alec's bag seen
when Nancy planted the bug.
Alec: Confront Alec at
the train station.
Read threatening note sent to Alec. They want
Nancy's cards and to place them in locker 36.
Read Alex' note written in case something
happened to him. He was a PI that investigated a car accident several years
ago, from there he got involved. His sister Grace Reid disappeared and that
is the hold they have to force him to do things. Alec leaves.
Cards: Open locker 36. Get
the cards.
Open the locked box in Moira's safe:
Find the missing ace from the deck:
Go to Moira in Bearsden.
Music sheet: Study the
music sheet sent by Carson.
See Nancy, Carson and Kate's notes.
Using the music scale in the bagpipe book;
identify the notes.
Kate's locked box: Go to
the closet and look close at the locked box in the secret compartment.
See that the locked box has buttons A B C D E
F G and 3 lights at top right.
Press the notes identified from Kate's song in
the music sheet. If done correctly one of the lights at top right will
be bright green.
Nancy's notes are E F G G F E F E D E.
Carson's notes are G F D B G F D B A.
Kate's notes are D A A A E B B B B.
Get ace of cards.
Get a text message from Ned.
Easter egg (Thanks, Marjo of
adventurespel.nl!): Open the safe in Nancy's room again, but now
with 4133 (Nancy's case number in jail, in Alibi in Ashes).
Find the stolen cards and reveal the formula:
Call Carson and talk to him.
Cards: Go back to hotel room.
Place the ace in the vase. Add the rest of the
cards.
Immediately get the cards with the formula.
Get another text message from Ned
Rearrange the cards to recreate the formula:
Arrange the cards to form the formula. Use the
colors, shapes and lines as guides.
Right click to turn the cards.
Once 2 cards are correctly connected, the cards
are locked.
 |
 |
| Amateur |
Master |
Find a safe place for the formula:
Exit the room and go to the elevator.
Zoe comes out and takes the cards from Nancy. She
says it belongs to the government.
Inside the elevator, the cage is filled with gas.
Nancy in her unconscious state dreams of Kate
playing the piano and giving her good advice. Recall memories of Zoe's
threats, hear shots fired and Alec telling her to run.
Escape the trash compactor:
Zoe wakes Nancy up inside a working trash
compactor. Zoe already undid one lock and tells Nancy to do the other.
Look close at lock at top right of compactor.
Nancy says the orange release is trapped at left.
See a slider lock. The orange square-release at left
should be moved to the exit at right.
|
Amateur |
Master |
|
 |
 |
|
Move the labeled bars: R- right; L- left, U - up and D - down |
Move the labeled bars: R- right; L- left, U - up and D - down |
|
6R - 2D - AR - 1D - 3L - 4U - 7D - 8L -
13R - 12U - 6R - 7D -
11U - 10R - 9D - AR - 7U - 9U - 10L - 6L -
11D - 12D - AR out. |
1R - 4/5/6/U - 7L - 8R - 12U - 18/19R - 9D
- AR -
9/17U - 15L - 18/19L - 11/12D - 6D -
1/7/8L - 13U - AR out |
Zoe orders Nancy to tap Ewan's computer again.
Take the leads.
Get a text message from Moira. She has gone
underground again because the men came back.
Retap Ewan's computer and see what he's up to:
Zoe: Talk to Zoe outside.
Go back to the Cathedral control room. See that
Ewan is not here.
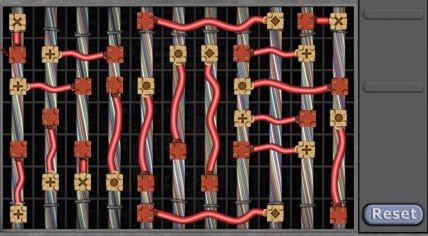
Tap computer again: Use
the spy glass. Open the drawer of Ewan's desk.
The aim of the puzzle is to place the lead's
red end on a symbol that is similar to the clip's other end. The clip
should not cross another clip.
Right click to turn the clip and left click to
place it on the wire symbol.
I'd recommend to place the clips by size from
large to smallest.
 |
 |
| Amateur |
Master |
Listen to wiretap: Go to
safehouse in Loch Lomond.
Use the computer and click on the wiretap icon.
See that he got hold of the scientist's number and
later found out that the scientist fled. The documents left behind have the
formula.
Learn also the update on Nancy, Alec and Zoe.
He will release the vaccines made on schedule.
Ewan's key to locker 42 is a coin with a two toned
animal.
Find out what Ewan's hiding in his secret lair:
Get the coin key: Go back to
the control room.
Look at the spyglass case. Take the coin folder
and look for the coin with a two toned animal.
The coin is in the middle of the second from
bottom row. Take coin.
Locker 42: Go to the train
station and the lockers.
Use the coin on locker 42. The back opens to
Ewan's lair.
Go down and look around.
At left, check behind the hanging turf to see the
Revenant logo and his acceptance to the club.
Ewan's plans: Pan right
and see items in preparation for the attack.
Check the papers under the map of Wyvern's Gate.
See that Ewan practiced what to say to Nancy to get her here.
See the last report of Kate. She diffused the
bombs, destroyed all sources of the biological agent and has the lead
scientist. She plans to destroy the formula. See Ewan's notation to look for
the scientist.
Read the printout sent by Revenant to Ewan. It
shows the timeline of the events. Sean Kent Davis is Ewan's real name.
See Ewan's code on a reprimand by Director Wright
of Cathedral.
Kate's message for Nancy: Pan
right again and see papers on wooden bench.
Read Kate's last letter to Nancy. Oh my!
Read Kate's last transmission. She's still looking
for the backup. "If operation goes sideways - go to where I stood awhile in
thought and listen - Harrier."
Confront Ewan:
Zoe: Go back to hotel. Zoe beckons to Nancy.
Zoe
wants Nancy to neutralize Ewan while she gets people to scour the city for
bombs.
Take the spyglass that Zoe modified to be able to talk to Nancy.
Neutralize Ewan: Go to Cathedral control center.
Zoe
tells Nancy through the modified spy glass that Alec and Moira are in the loop.
They are helping to look for the bombs.
There are 4 bombs. The 4 bombs have to be found first before being
neutralized since if one is turned off it will trigger the others.
Zoe
wants Nancy to take Ewan out.
Thermostat: Go to the
thermostat at server room again. Let's trap Ewan.
Go to the thermostat and see that it is now
password protected. Remember Ewan's code on the paper in Ewan's lair.
Press the buttons to unlock the thermostat
controls.
Save game. Practice the route to the
hiding place we did earlier: from the thermostat, back, back, left,
forward, left and right to the main computer server recess.
For the real action:
Turn the temperature higher or lower until the alarm sounds.
Immediately hide doing the route practiced on
- back up, back up, left to exit, forward, left to first aisle (B1) and right
to main computer server recess.
Lock Ewan: Once Nancy
says to continue - go to the fire wall panel left of the entrance to the
server room.
Open the cabinet and press button B3 (second
from left). This drops the firewall on aisle 3 and locks Ewan inside.
Ewan: Ewan says it won't
stop him and that he already won.
Grab
the necessary USBs and get the servers online:
Zoe
tells Nancy to collect USBs from the servers. The bombs
are controlled from the computers here.
The
USBs have to be collected in order.
Review the server locations:
B1
is the area where the main computer server is located - from exit; first
aisle at right. There are servers on the left when facing that aisle.
B2
is the area at back aisle at right. There are servers left wall and right
wall when facing that aisle.
B3
is the area where Ewan is locked in and has the thermostat.
B4
is the area first aisle at left. There are servers left wall and right wall
when facing that aisle.
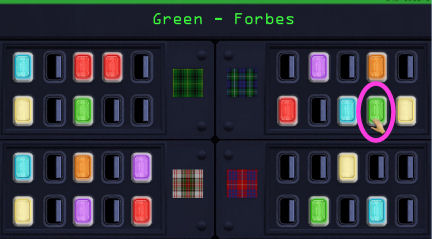
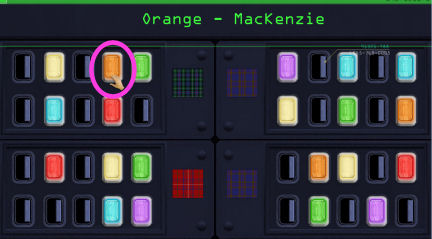
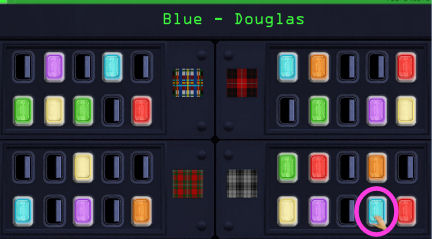
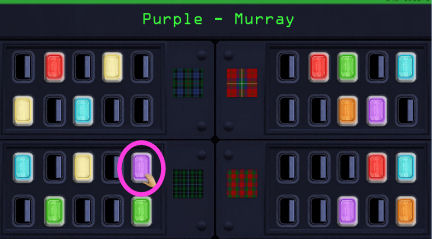
Find the correct server: Zoe will mention the color of
the USB and the clan of the tartan on the server.
|
Collect USB:
Check the tartan book to recognize the tartan of that clan.
Then look for
the server that has that tartan.
Check the mentioned color of the USBs in
that server to see if it is the right one.
|
|
Amateur |
|
 Red USB - Forbes tartan - B2, left
server. Red USB - Forbes tartan - B2, left
server.
|
|
|
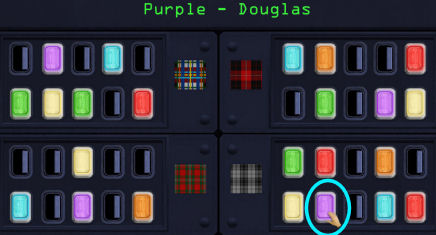
 Green USB - Cameron tartan - B4 right server Green USB - Cameron tartan - B4 right server
|
|
|
 Blue USB - Hay tartan - B2 left server Blue USB - Hay tartan - B2 left server |
 |
|
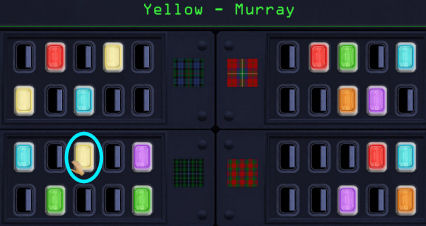
 Yellow USB - Murray - B1 left server Yellow USB - Murray - B1 left server |
 |
|
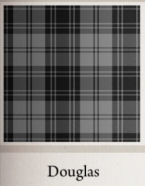 Purple USB - Douglas - B4 left server Purple USB - Douglas - B4 left server |
 |
|
Master |
|
Yellow
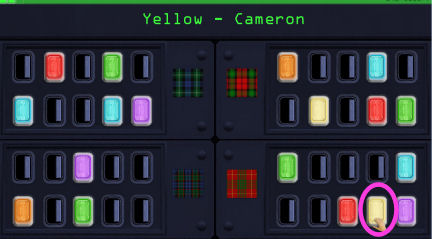
USB - Cameron - B4 right server |
 |
|
Green
USB - Forbes - B2 left server |
 |
|
 Orange USB
- MacKenzie - B2 right server Orange USB
- MacKenzie - B2 right server |
 |
|
Blue USB
- Douglas - B4 left server |
 |
|
Purple USB
- Murray - B1 left server |
 |
|
Red USB - Hay
- B2 left server |
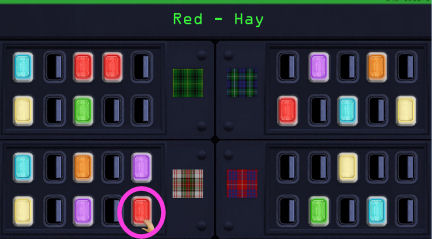 |
Insert the USB to the correct ports:
Zoe
says to go to the main computer server. This is the recessed area where you
hid - B1 right side.
Look close at the USB ports. Zoe says to place the USBs collected on the
ports.
The ports are arranged by groups. The groups
are those slots connected by a line.
The USBs should be placed with no repeated
colors horizontally, vertically; as well as in a group.
If the horizontal or vertical USBs have no
repeated color; the bulb on the edges lights up.
I did it!
 |
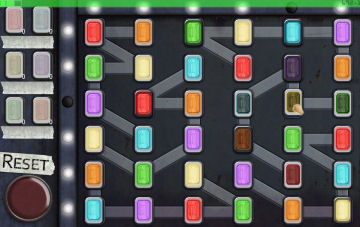 |
| Amateur |
Master |
Diffuse the bomb:
Ewan opens the hidden bomb door.
Look close at the bomb control.
A set of buttons has to be pressed: small,
small, medium and large. The large square is numbered.
The numbered square has to be removed in
consecutive order.
Each square removed must be touching the
previously removed square.
All the squares must be removed.
This is timed. There is a reset button but
starting over will cause loss of time. Best to save the game before
doing the puzzle and go from there.
If you disarm the bomb with ample time
left, you might get an award.
Conclusion:
See
what happened.
Listen to Nancy's letter to her mom.
Listen to Carson and Nancy's conversation.
Be
sure to watch the outtakes after the credits.
The next adventure:
Nancy Drew: The Shattered Medallion
This document may not be
distributed without express written permission of the author and the content may
not be altered in any way.
For Questions or Comments
on this Walkthrough,
Please write to:
MaGtRo
Copyright © 10/2013
MaGtRo
 GameBoomers
Walkthroughs and Solutions
GameBoomers
Walkthroughs and Solutions