Nancy Drew 30: The Shattered Medallion
By Her Interactive
Walkthrough by MaGtRo May 2014
Gameplay: This is a first person point and
click game.
The main menu has new game, load game, options,
help, extras, more ND and quit selections.
The options menu has voice, effects and music
volume adjustments. Full screen and windowed game screen selection and Fast
convo selection are here also.
Help shows the different cursors and navigation
arrows used in the game. The interface description is shown at bottom of
screen.
Extras have awards, credits, teaser and bonus art.
Bonus art and teaser are locked until the end of the game.
More ND shows the other Nancy Drew casual and
adventure games released by Her Interactive; as well as links to Facebook,
twitter, You Tube and Pinterest.
Select to play either Amateur or Master Sleuth
difficulty mode. Amateur Sleuth has regular puzzles; hints available and
detailed task list. Master Sleuth has more challenging puzzles; no hints and
has basic task list.
The game screen has menu at bottom left of the
page. It has main menu, save game, load game, options, help and resume game
links.
The main menu frame has a trophy cup icon at right
side. Clicking it will show the trophies that can be achieved in doing
certain actions in the game.
The cell phone is beside the menu link. It has
phone, camera, games, settings and hints.
The phone has pictures and names of available
characters that can be called. Click on the name or picture to get
another frame that has a "call" button.
The camera can take 30 shots. Photos that are
taken can be viewed. The focus can be zoomed in-out.
There are 8 games installed on the phone.
Settings have wallpaper selections as well as
ring back, ring tone and message sound selections.
The envelope icon show messages received.
My Diary has Nancy's notes on the game's activities.
The power button closes the cell phone.
At the center of the bottom bar is where the items
collected are seen. Use the slider tab at top of the bar to go through the
items.
The frames for Tasks and Journal are right of the
inventory bar.
The tasks list has the to do things in the
game. The question mark beside the task gives hints to help the gamer
fulfill the task. If you did not use a spoiler, you will get an
award.
The journal has observations and suspects.
The dialogue frame has a double arrow at right; it
is used to hasten the dialogue.
The game is non-linear. The walkthrough below is just
one way to get through the game.
Phone charms are only for the games with bonus.
Saved game folder in Win7 is located in My Documents
folder or C:\Users\computer name\Documents\The Shattered Medallion.
Read Bess' letter to Nancy. Bess got George and Nancy; a spot in
this season's Pacific Run in New Zealand.
Meet the competitors. Nancy and George are Team Tui.
Listen to Sonny Joon, the producer of the show give instructions.
-
Keep an eye on your phone for announcer
updates.
-
Bring back the medallion pieces to the stand.
-
Producer areas are off limits.
-
Read the rulebook in your tent.
-
The first team to finish a stage gets the
highest score.
-
The second team to finish gets the next
highest score.
-
Keep an eye for extra missions to earn perks.
See
a blue disk on the monitor that has a note: Find the team, get the rest.
Looks like this was not supposed to be seen.
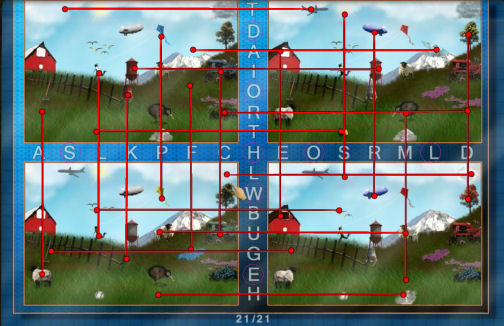
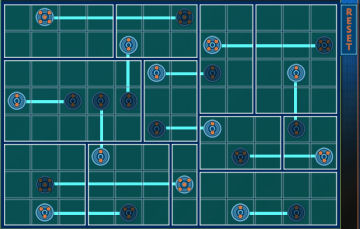
Rebuild the train tracks:
Get
the team's Pacific Run chip when you win this puzzle.
Look close at the puzzle and see miniature train tracks in squares.
The
aim of the puzzle is to put together all the rails to make a continuous path
from start at top left to end at top right.
Click on a square and then click on the square you want to place it on.
Take the Pacific Run data chip from the train that run the rails.

STAGE 1:
Explore the playing field:
Plant challenge: Read the message on the cellphone.
Use
the chip to access other locations and find the 5 plants:
Mt. Cook lily, waterfall fern, pikao, kakabeak and spider orchid.
Place the plants in the correct vase on your team's plant stand.
Check the playing field: Pull back and turn around to face
the playing field.
You
are standing by the Stage 1 - train area.
Other test area: Across the field is a blocked access to
another test area.
Platform: Go to the center platform and turn around to see
the whole field.
Dining tent: Go to the tent right of the blocked
test
area. See dining tables.
Sheep book:
Pick up the New Zealand Sheep Farming book from the dining table at
right. Read about the history of sheep
farming in New Zealand and the characteristics of wool.
The
last page shows the different sheep breeds.
Above this page is written: 20 in each row and column unlock the blades.
Auction House: Go to the auction house beside the dining
tent.
See
items that can be bought by points won during the games. There is a minimum
of 50 points to be able to buy anything.
Team Tui has 20 points as of right now.
Win an award if all items are bought during the game.
Exit gate: Go to the arched gate with Tiki posts.
Examine the map stand that is activated by the chip won at the train puzzle.
Puzzle palace: Enter the building right of the exit gate.
Look around. Check the Raid game right of the exit door, a large machine,
Monster game, and flower decors at left side.
There is a large monitor at center wall.
Examine the natural disasters that occurs here at New Zealand:
Earthquakes (Alpine fault and Kermadec trench), landslides, tsunamis (wave
troughs) and volcanoes (cone, volcanic fields and calderas).
Red
Tiki phone charm (bonus game only): Check the
topographical display of earthquakes. Take the red tiki phone charm at top
left of the table.
If you find all 7 charms, you win an award.
Read the explanations on the monitors. Press the button on the panel below
the monitor and see the event occur on a topographical map.
Enter the Quake shack. Press the button on left wall to experience the
shaking during an earthquake.
Exit through door at right. Exit the puzzle palace.
Explore
the base camp:
Go
through the Base Camp arch right of the stage 1 train puzzle area.
Patrick Dowsett: Turn left and talk to the competitor
sitting on a boulder left of the green Team Kea tent (green-red bird).
George Fayne: Go to George sitting by the blue Team Tui
tent (blue bird).
Team Tui
Tent: Enter the Tui tent and read the Show Rules pamphlet.
Learn the do and don'ts and also know the other competitors.
Flower book:
Read the Native Flora of New Zealand book. Note the pictures of the
plants to be located and where they can be found.
Mount Cook Lily is found in the mountains of
the South Islands.
Spider Orchid favors damp shady sites in the
forest floors.
Waterfall fern grows in wet forests throughout
the country.
Pikao grows in sand dunes.
Kakabeak is a popular ornamental plant in
gardens or planters.
Confession booth: See the confession booth right of George.
Medallion stand: Check the wood medallion stand right of
the confession booth. This where the medallion pieces won are to be
placed.
Team standing board: Right of the medallion stand is
where the
team scores are posted.
Team Tui has 30 points posted.
Crew area: This area is off limits.
Other team tents: You cannot look inside the team Kea tent
right now.
Tiki phone charm (bonus game only): Enter the Team
Tawaki tent left of Patrick and take another Tiki phone charm on the blue
sleeping bag.
Unlock map location for plant challenge and check Puzzle Palace:
Exit the camp.
Phone charm (bonus game only): On the path between
the base camp and playing field, take the Team Tui phone charm on the side of
the ivied rock wall at right.
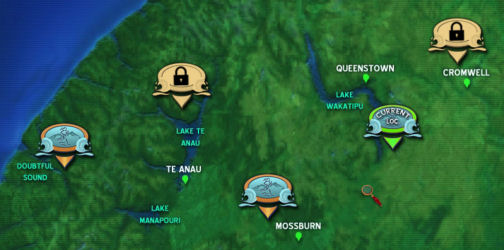
Exit gate: Go to the gate.
Use
the chip won at the train puzzle on the map stand. See a map of the area
outside the field.
Message from Pacific Run: Get
a text message on the cellphone. It says that passwords are needed to unlock
the areas in the map with padlocks.
The
first one - password is at the Puzzle Palace.
Puzzle Palace: Enter the Puzzle Palace.
Take the top plant - Kakabeak from the plant display left of the large
monitor.
Find the difference puzzle: Click on the large monitor and
see a find the difference puzzle.
Click on the difference between the top right and top left pictures, top left
and bottom left pictures, top right and bottom right pictures and bottom
left and bottom right pictures.
A
selected item cannot be selected anymore for other pictures.
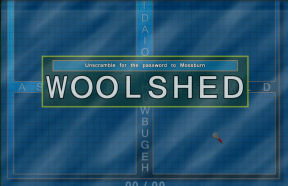
Unscramble the password to Mossburn: See that there
are letters that are not "crossed off" in between the difference
pictures.
See an unscramble puzzle.
Grab a letter - hold it and move it to the position you want to form a word.
Start looking for plants:
The
playing field and base camp are at the shores of Lake Wakatipu.
Unlock Mossburn: Click on the map monitor and click on
the locked Mossburn location in the map.
Select the letters to form Woolshed. Press enter and Mossburn location is
unlocked.
Doubtful Sound:
Doubtful Sound: Click on Doubtful Sound location to jump
there.
See
a pier with kayaks at the end. There is a map stand at right. See that
current location is now at Doubtful Sound.
Check the stand on the left. It has a button for a challenge later on.
Which boat is the one for Nancy? There's a red, yellow and blue kayak. It
really doesn't matter, you can ride any kayak.
Pikao at sandy beach: See the island ahead. It
has sandy beach at right. Go there.
Turn right, forward to yellow buoy, forward and left to the sandy beach.
Pick up some Pikao.
Cement structure with hatch: Go around the island and forward
to the red buoy. Go forward to the cement structure with a light on top and
hatch.
See
a closed hatch and a monitor that needs a password.
Go
back to the kayak, forward to blue buoy and to the pier at right.
If you take out the kayak 12 or more times, you win an award.
Trail
by Doubtful Sound:
Lily: Go forward pass the stands at start of pier to be on
the trail.
Go
forward to the end of the trail. Pick up Woodland Lily on the ground at end of
trail.
Note: Turn around and forward. Hear a man and a woman
quarrel.
Go
forward and pick up the paper of the trail.
Read the exchange between Leena and Patrick of Team Kea. Leena wants Patrick
to get Sonny's show rules that would lead a competitor to be expelled
from the show.
Read the last paragraph written by Leena for within game rules that can
cause expulsions: remove medals, non-cancellation of deduct cards, card
creation not specified, and seen beyond bounds.
See
a code on 3 squares besides a backpack drawing at top right of the note.
Mossburn:
Go
back to map stand. Click on Mossburn.
Check the woolshed. It is locked.
Continue down the trail pass the wind generator.
At
the end of the walkway, pick up Spider Orchid.
There's ladder ahead and trail to the right.
The
trail to right ends in a small cave blocked by roots of a dead tree.
Go
back and climb the ladder. Go forward.
Rope bridge: See a rope bridge and waterfall ahead.
George walks ahead of Nancy on the rope bridge. The rope bridge breaks.
George,
Bess and other competitors:
George broke her leg and is in the infirmary. She has producer feed while in
bed so she can watch the show.
She
gives a key to the producer area. She thinks there's something odd going on.
Bess Marvin: Bess supposedly volunteered to take George's place. Hahahahah.
Turn right at the camp and talk to a worried Bess.
Leena Patel: Pan left and talk to the girl in green of
Team Kea.
Patrick: Talk to Patrick. Learn that he doesn't know how
to swim.
Leena and Patrick were near the bridge when the accident occurred.
Team standing board: See that Team Tui and team Matata are
at the bottom of the standings.
If you reach 700 or over points, you might win an award.
Kiri Nind: Go
to playing field and towards the gate. Kiri by the dining area calls to
Nancy.
Talk to Kiri. Learn that Erin her partner tried to save George at the
bridge and is now hurt. She is continuing the competition alone.
She
wants an alliance so that she can stay till end of the show. She promised
her agent that she will get air time.
She
says that Sonny Joon was not supposed to be here. He trashed the travel
papers of the real crew.
Learn more about Kiri and her need to burn off her energy.
Sonny Joon: Talk to Sonny left of dining tent.
Sonny admitted that he was the cause of the real crews not being here.
The
bridge footage was destroyed. Hmm...
Fix the bridge:
Go
to the exit map stand and jump to Mossburn. Go
forward to the waterfall.
Rope bridge: See a new rope bridge.
Read the note tacked on the right post. The new bridge needs to be tested
for the strength in design.
Start at blue square; step on each square
until the end.
You can step forward or back up for a distance of
one or two squares per step.
Go
forward to the end of the bridge. Pick up the Waterfall fern.
Amateur
Master
Message from Pacific Run: Read the message on the cellphone. Team Tui
finished stage 1.
Learn also that Sonny bent the rules and allowed Team Tui to stay in the
competition while the other team - Team Matata at the bottom of the standing
is eliminated.
Team Kea and Team Amokura have placed the medallion pieces on the stand.
Team Kea won this stage.
Message from Pacific Run:: Get
another message on the cellphone.
The
next trial for stage 2 is to get a bag, shear a sheep and drop the bag of
wool in the bin in the woolshed.
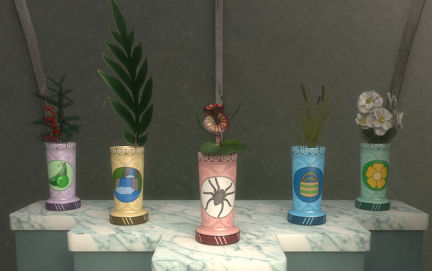
Place the plants on the vases:
Go to the playing field.
Enter the stage 1 flower area.
Place the collected plant at the appropriate
vase.
Read the plant book for clues.
Place plant from left to right:
Kakabeak from pea family on pea vase.
Waterfall fern on waterfall vase.
Spider orchid that resembles spider on spider vase.
Pikao used in Maori weaving crafts on basket
vase
Mount Cook Lily is not a lily but a buttercup
on flower vase.
Take the stage 1 medallion piece.
|
 |
Complete the plant challenge:
Go
back to the base camp and the medallion stand.
Open the stand. Place the medallion piece under the Tui icon.
Check the team standing and see that Team Tui has now 80 points.
Talk to Patrick.
Bess
and Sonny:
Talk to Bess. She's interested in Sonny.
Nancy sends Bess to get info from Sonny and to look everywhere they saw
Sonny before.
Get
a message from Bess on the cellphone. The list is with George in her tablet.
Find
a way to visit George:
Go
to the Crew area entrance. See
a power box right of the entryway.
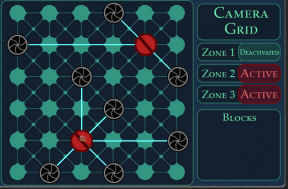
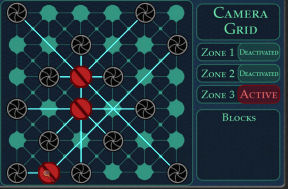
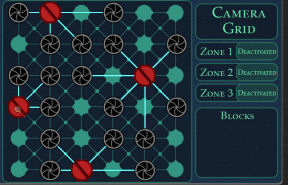
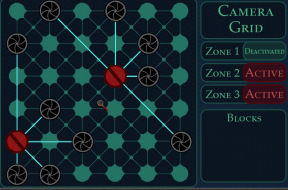
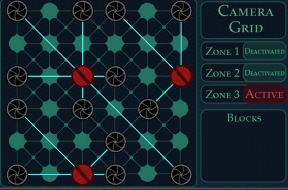
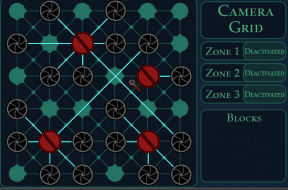
Use
the security key given by George on the lock of the power box.
The aim is to block all the cameras spread on
the grid.
Click on a light blue star to position a
block.
The block will affect the cameras that are on
the horizontal, diagonal and vertical.
Do this 3 times to block the cameras in zones
1 - 3.
Explore the crew side of the camp:
George: Go
to the white tent with the green - white cross ahead.
Talk to George. She wants Nancy to read everything in Sonny's tent.
If you visit George often enough, you might win an award.
Tablet: Check the tablet on the hospital table beside
a dozing George.
Read about the relics seen when Sonny was talking to the competitors.
George notes that they should check what Sonny accidentally played on the
video and she thinks someone may have cut the bridge.
Leena works on data encryption.
Read about all the Sonny sightings in Nancy's adventures.
Read the reports about the other competitors. Learn that Sonny's real
name is Seung Joon and he runs S.P.I.E.D. an organization started by his
grandfather.
Learn about Patrick, his retirement and his river talk.
Get
bonus points for winning Raid and Monster at the Puzzle Plaza.
If you play Raid or Monster 10 or more times, you might win an award.
Producer feed:
Look at the TV screen on the table in front of George.
See
Confessions that were taped.
Click on a confession to select it. Then click on the run - single right
arrow to play the confession.
Click Main Menu to go back to the list. Leena does not want to talk about
the bridge. She knows that Nancy teamed with Kiri.
The
team confessions are hilarious. Read the updates whenever possible.
If you listened to all team confessions, you might win an award.
Look
into Sonny:
Exit the infirmary and enter the producer tent at right.
Turn left and check the blue cabinet.
S.P.I.E.D.:
Read Jamila's (Tomb of the Lost Queen in Cairo) note on the S.P.I.E.D.
(Strange Phenomenon Inspectors: Extraterrestrial Division) pamphlet. Read
the pamphlet. Learn about the testers; the aliens that are allowed to enter a
sentient world.
Read the show rules again.
Jin's letter:
Take read the envelope at bottom shelf. It states that the "time" is now.
Sonny must go to New Zealand now to gather the Chosen and find the artifact.
They belong to a special organization called Annunaki. Their main mission is
to keep the world from exploding. The testers that taught and guided us
want us to prove that we learned enough for the next lesson. The artifacts
need to be assembled to send the beacon. Sonny's grandfather who wrote the
letter is following a lead in the Nordic countries while Sonny is here to
follow another lead. Instructions to the locations of the artifacts are
hidden in their "own way". Sonny is told to salvage what you can of the
comics. Sonny's grandfather is Jin Soo Seung.
Look right of the bed and pick up the comics of Tales of Laika and
Sonny Joon. It is signed by Sonny's grandfather. The comics is similar to
what happened to George at the bridge. There are symbols on the first frame.
Check the
blue chest that needs a code.
Exit the tent. See Sonny at end of path. He knows Nancy is in the restricted
area.
STAGE 2:
Get
item for stage 2 trial:
Get
bag: Go to the playing field and then the auction house.
Get
a bag for 10 points. If you need more points since the minimum amount to
have before being able to buy an item is 50, play the games at Puzzle Plaza.
Green Easter egg: If you open the curtain using an
Easter egg, get a green Easter egg. Thanks, July.
Raid: You can choose the level of difficulty: easy, medium
or hard. Read the game rules at bottom right. This game was played at The
Captive Curse.
Monster: You can also choose the level of difficulty. The
rules are at top right of the screen. This game was played at The Captive
Curse.
Easter Egg with stars: If you win either Raid or Monster
7 times
(doesn't have to be consecutive), you win an Easter Egg with stars. Thanks,
Isabelle and July.
Message: Get a message from George about a blueprint that
Sonny asked her to review.
Explore the woolshed:
Woolshed: Use the map stand by the exit to jump to
Mossburn.
Enter the now opened woolshed.
Message from Pacific Run: Read the new message about winning the
Puzzle
Palace's latest challenge and get phone access to outside and a map
password.
Sheep: Turn left and check the sheep display at left.
Take a key from the wool of Suffolk sheep with black head and legs at
top left.
Written names and places: See names and places written all
over the woolshed.
First stall at right: Check the first stall at right.
Take the flint on the right post of the gate.
Needle and thread phone charm (bonus game only): Open the
gate. Take the needle and thread charm from the hay.
Go
down the aisle and check the chest at left stall.
Sheep to shear: Check the sheep at right corner. It is the one that
needs to be sheared.
The
shed needs to be powered on and the blades of the shearing razor left of the
sheep need to be replaced.
Bin: Check the bin at left corner. The bag of wool is to
be placed here.
Stove: Check the stove opposite of the bin.
Sheep
Easter Egg: If you open and close the stove door 5 - 6
times, get a sheep Easter Egg. Thanks, Isabelle.

Turn
on the power in the woolshed:
Power box: Turn around and forward to the far end of the
room.
See
a power box right of window.
Use
the key taken from the display sheep on power box. There is power now in the
shed.
Replace
the blades on the shearing razor:
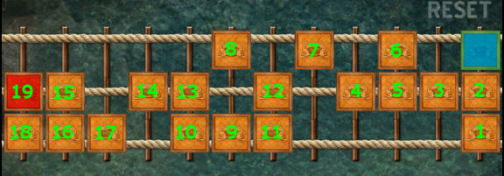
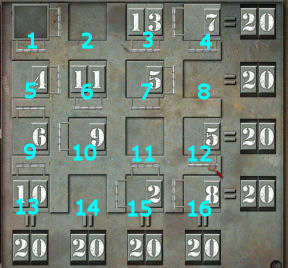
Unlock the shearing equipment stall: Turn left and check the last
stall.
Pull back resets the puzzle.
Remember the Sheep book states: 20 in each row
and column unlocks blades.
Flip - click the switches to remove or place numbers.
Open the stall and pick up the shearing blades.
|
Amateur
Click on squares
numbered:
1 - 2 - 3 - 4. |
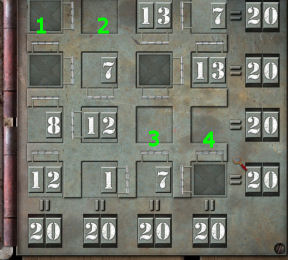 |
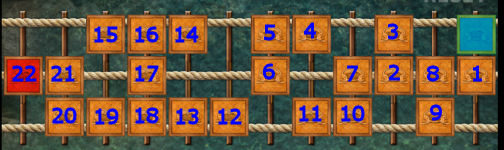
Master
Click on squares
numbered:
2 - 4 - 8 - 3 - 7 - 11
- 8 - 15 - 14 - 11 |
 |
Razor: Go back to the sheep at other end of the shed.
Use
the blades on the black razor behind - left of the sheep.
Turn it on and Nancy says the razor motor must be jammed.
Fix the
motor on the shearing machine:
Razor motor: Look at the red razor motor on the ceiling
above the sheep.
Nancy says the blades should be flat.
Clicking on a blade affects other blades.
The aim is to have all the blades flat.
Click in order the numbered blade seen on the
picture.
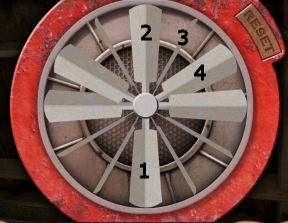 |
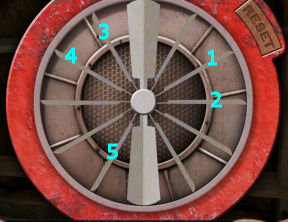 |
| Amateur |
Master |
Shear the sheep:
Look at sheep. Use
the black razor and automatically get sheared wool.
Take the sheared wool and automatically have it in the bag bought from the
Auction House.
Place the bag of wool in the bin at left corner.
The
medallion is gone from the opened Team Tui small compartment at
side of the bin.
Take fabric scrap that is in the compartment.
Message from Pacific Run: Get
a message that stage 2 is done. Someone has placed the medallion piece
already.
Team Kea won this stage.
Find
the stage 2 medallion:
Automatically be back at base camp.
Look at the team standing board. See that 3 teams are now eliminated and
Team Kea is leading.
Check the fabric scrap. It is green, red and white. Team Kea's logo is green
and red colors.
Leena: Talk to Leena.
She
mentions that she saw you at the out of bounds area.
She
wants a favor. She gives comic pages and wants Nancy to ask Sonny if
it means anything to him.
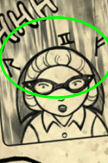
Read the comics signed by Sonny's grandfather. There are symbols on the first
frame of the girl with glasses. The other page shows an underground lake and
a statue of a man. She doesn't want Sonny to know that the comics came from
her.
Talk to Patrick. He tells a joke.
Bess: Talk to Bess by confession booth.
Learn about her progress with Sonny.
Ask her to distract Patrick.
Search Team Kea's tent:
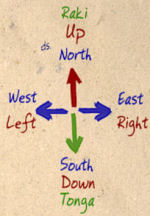
Take the clipboard with
compass. Note the 3 colored meanings of up arrow; right arrow, left arrow
and down arrow.
Pick up the deciphered Jin coded notes.
Open the backpack:
Take the Deduct 50 bonus score card. To
use the cards, click it on the Team name in the team standing tall post.
If 4 points cards are used during the game, you might win an award.
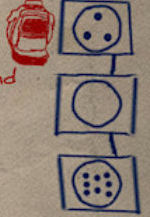
Take the coded colored arrows paper.
Review the paper picked up at Doubtful
Sound Trail.
Note the drawing of the backpack at top right.
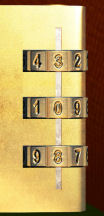
| Amateur
See 3 circles and dots: the top has 3 dots,
middle has no dots and the bottom circle has 8 dots.
Enter 3 0 8 on the padlock. Search the
backpack.
|
 |
 |
|
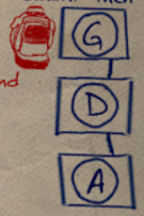
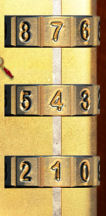
Master
G is the 7th letter in the
alphabet; D is the fourth and A is the first.
Enter 7 4 1 on the padlock
Search the backpack |
 |
 |
Message from Pacific Run: Check the message on the cellphone.
Stage 3 is now unlocked.
Follow the butterflies to find 5 pieces of the Hei Tiki hidden underwater.
Return the completed figurine to the Tiki Turn in.
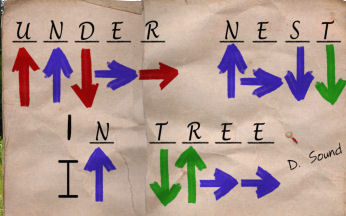
Decode the coded colored arrows paper from
backpack:
Using the 3 colored meanings of each of the
cardinal points arrows seen on the clipboard, decode the arrows paper.
Click the letter above the colored arrow to
change them to first letter of the meaning seen on the clipboard - UNDER
NEST IN TREE D. Sound.
George: Visit George at the infirmary at the crew
area. George falls asleep.
Read her tablet for new information. Learn about Sonny's crew and why Sonny
let us stay.
Learn about What Sonny asked George to make - a compass similar to the
Antikythera mechanism. Sonny is protective of the blueprint and stays with
George when she's working with it. He wants to know what it is for.
Kiri: Go to playing area and the dining area. Talk to
Kiri.
Learn that Sonny talks to animals and apologizes to them.
Sonny: Talk to Sonny. He makes contradictory
statements.
After showing and telling Sonny about Leena's comics; he gives another comic
page.
The
comic talks shows the charred tree and woman who spoke without words.
Sonny wanted Nancy to read Jin's letter and comics. Jin is Sony's hero but
the rest of the family is ashamed of him.
Complete the wool challenge:
Doubtful Sound: Jump to Doubtful Sound.
Turn around and walk the trail.
When a rockslide occurs, immediately back up to not get flattened by a
boulder. You can try again if that happens.
Nest: Walk to the end of the trail.
Check the nest on the tree. Take the stage 2 medallion piece.
Jump back to Lake Wakatipu - base camp.
Go
to base camp and place the medallion piece on the medallion stand.
STAGE 3:
Check
out the Puzzle Palace latest challenge:
Enter Puzzle Palace.
Quake: The earth moved. Immediately back up. The decor on
the ceiling falls down.
Enter the Quake Shack.
Hear Kiri talk to someone and gets something from the mystery person.
Exit the Quake Shack. Turn left and pick up the Birds of New Zealand
book from the floor.
Read the "keeping tabs on competition" notes made by Kiri Nind.
Read about George "interesting" and Nancy "strange".
Patrick's fear of swimming is well known. Leena is a codebreaker for
government.
Complete the phone challenge at Puzzle Palace:
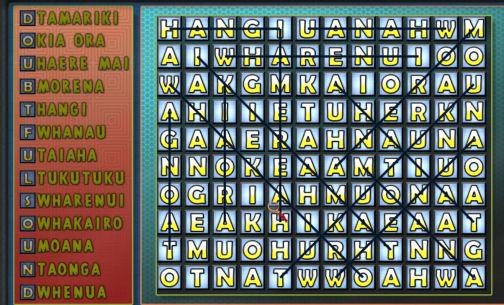
Word search: Click on the large monitor and see Find the
Word Puzzle.
The
words to look for are at left. Click-hold on the word at right to make a
line across that word.
A
padlocked letter is opened left of the found word - DOUBTFUL SOUND.
Check
out the phone reward:
Use the phone for outside call:
Pan
left from large monitor. See a phone that can be used to call outside. The
chance is won by finishing the find the word puzzle.
Call Jamila (Tomb of the Lost Queen). Her phone number was in the note of
the S.P.I.E.D. book.
Pick up the phone and press the dial of the phone and talk to the operator.
Nancy gives Jamila's number.
Jamila asks if Nancy is in danger. Hmm...
Jamila gives the clue to get the combination to Sonny's foot locker. It is
all in the S.P.I.E.D. booklets.
Sonny is following his grandfather's Jin's wishes. He might be looking for
an Annunaki artifact.
Sonny has put things moving "as the story demands". The comics?
Learn about the Annunaki. They are like a galactic parliament.
Find
out what's inside Sonny's locker:
Go
to base camp and producer's tent at the crew area.
Code:
Open Sonny's cabinet and read the S.P.I.E.D. Follow Jamila's instructions.
| Amateur |
Master |
|
Take the number in Chapter 2 - 6.
Take the lower number of the constellation
pamphlet - 5 (from #9X5Q).
Take the number from the UFO - 8 (on
spaceship).
Take the number referenced in Chapter 5 - 3
(chapter).
Open Sonny's chest-locker. Enter 6 5 8 3.
|
Take the number from the UFO (on spaceship): 8.
Sum of the constellation pamphlet
(from #9X5Q) 9+5 = 14
The number of stars that looks like a
hat (Chap.3) = 8
Then divide the number by the chapter
on testers: 8148/7 = 1164
Open Sonny's chest-locker. Enter 1 1 6 4.
|
Comics:
Take and read the comics. There are symbols on the first frame.
Jin
gives a medallion. He says - look to the stars.
Jin
says to find:
- a
man adrift, profound in simplicity.
-
an athlete strong with speed and ambition.
- a
mind overflowing with questions. Note the cartoon of the girl with
magnifying lens.
- a
linguist who fiddles with broken languages.
Team selected:
Take and read the manila folder. See
the ones are that Sonny chose that match Jin's criteria.
He
expects Nancy to ruin everything.
Take the Piano Lesson code from back wall of chest.
Find a
way to get the Piano Lesson decoded:
Go
to Leena at base camp.Talk to Leena completely and learn about Jin, what she thinks of the show
and her job.
Nancy gives the Piano Lesson code to Leena.
Bess: Talk to Bess about getting a Points Card for Leena.
Learn what Bess thinks of Patrick. He's calm, cow and had crackers.
Figure out the password to open the hatch:
Jump to Doubtful Sound. Get into a kayak and paddle to the cement buoy.
Enter the password obtained from the word search puzzle - DOUBTFULSOUND (no
space). Press enter.
The
hatch opens. Enter the elevator.
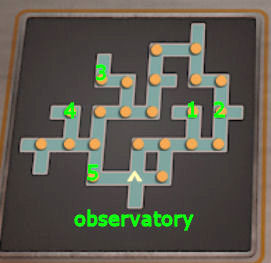
Explore the underwater observatory:
Leatherback phone charm (bonus game only): Go to the
windows at left. Take the leatherback phone charm at base of window.
Remember that stage 3 tasks are: Follow the butterflies to find 5 pieces of
the Hei Tiki hidden underwater. Return the completed figurine to the Tiki
Turn in.
Fish display:
Turn around to right wall and study the fishes pictured at Fishes of the
Fjordlands display. Remember what a butterfly perch looks like.
See
a fishbowl at center of the pictures.
Turn left and check the Tiki Turn In.
Dive rules: Read the dive rules left of the submarines.
The
retractable claw arm must be pressurized before use.
The
subs are equipped with critical failure warning system. Return immediately
to the observatory.
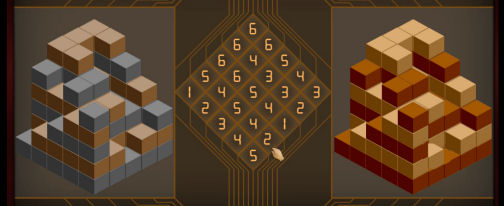
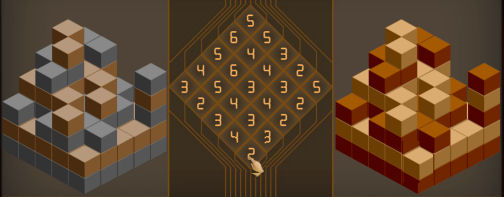
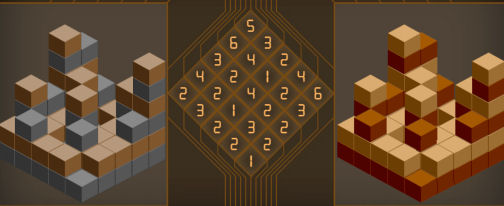
Charge the submarine claw:
Go
to the red stand left of the subs. Open the door and see the puzzle.
Match the figure on the left to show at right frame.
The
center has a grid similar to the 2 on the sides. Click on a square at center to place
a cube where you want it to be. A cube is then placed on the grid at right.
Right click to remove a cube.
The
light colored cubes at right match the brown cubes on the pattern at left.
The dark brown cubes at right matches the blue cubes on the pattern at left.
If
you so desire an easier pattern or just to play, pull back and click the
claw recharger again to change the pattern.
Get the
Hei Tiki parts:
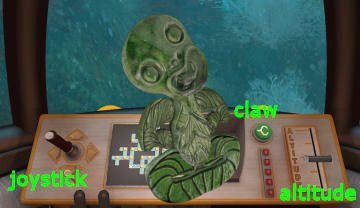
Enter the submarine.
Click the arrows to use the joystick at left to move forward, sides and
back.
Use
the latitude lever at right to raise and lower the sub.
Use
the claw to pick up the chests.
Locations of chests have butterfly perch tied on strings before the exact
square.
Go
to #1 in the picture. Face the arrow to the left. Move (click-hold-move) the
altitude lever on the right to lowest position. Use claw to get chest with
Tiki body.
Go
to #2 in the picture. Face the arrow to the right. Move the altitude lever
on the right to lowest position. Use claw to get chest with Tiki head.
Go
to #3 in the picture. Face the arrow to the top. Move the altitude lever on
the right to middle position. Use claw to get chest with Tiki legs.
Go
to #4 in the picture. Face the arrow to the right. Move the altitude lever
on the right to highest position. Use claw to get chest with Tiki arm.
Go
to #5 in the picture. Face the arrow to the bottom. Move the altitude lever
on the right to middle position. Use claw to get chest with Tiki arm.
Exit at middle bottom to the observatory.
If you dive 6 times on different occasion, you might win an award.
Tiki Turn In: Place the Tiki on the Tiki Turn in stand.
Message from Pacific Run: Check the cellphone for message.
For
a golden reward, post the best time in the kayak race. Touch the buoys in
order: blue - green - red - yellow - purple. Then return to dock.
Message from Pacific Run: To finish Stage 3, label the sheep display and
return Jock Stewart to the fish bowl for your next medallion.
Exit and use the kayak. Go back to the pier.
Complete the kayak race quest:
At
the pier, review the clipboard taken from Team Kea's tent. Read what Leena
wrote about the kayaks.
Leena notes that the Red Touring has speed, smooth turns.
Go
to the Kayak Race stand at right.
See
that the time to beat is 5:57 for amateur and 5:16 for Master. Thanks
July!
Start the race:
The order of the buoys to touch:
blue - green - red - yellow - purple.
Click fast.
Press the red button to start the race.
Use the red kayak.
Paddle:
Left - forward - click blue buoy.
Turn around - forward 6x - left - right - left
- forward - click green buoy.
Turn around - right - forward 3x - click red
buoy
Turn around - forward - right - forward 3x -
click yellow buoy.
Forward - right forward 2x - forward to blue -
right - forward 2x - click purple buoy.
Turn around - forward 2x - right at blue -
forward 3x - press stop button.
Time I got is 4:57.
Message from Pacific Run: Read the cellphone message.
Team Tui gets 50 points and get password to Cromwell - OTAGOMINES.
Label
the sheep display:
Jump to Mossburn. Enter the shed.
Message: Get a call from Bess.
Sonny gave them a side quest. The only clue is "turtle".
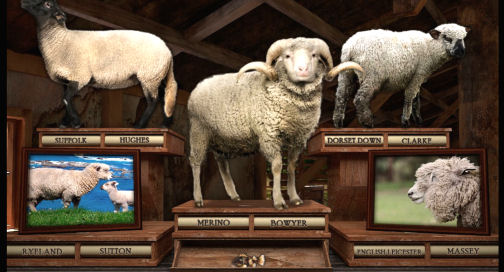
Get breeder names:
Face the sheep display.
Label the sheep by their breed and breeder
name.
Go around barn and check names written around.
Support bar at ceiling of the aisle facing
where the sheared sheep is located: Taylor - Cook.
Inside first stall at right: Instone -
Southland.
Post on stall at right: Cormack - Canterbury
Chest in stall at left: Sutton - Hereford.
Post back of sheared sheep - Clarke -
Canterbury.
Above the wool bin: Bowyer - Waimate North.
Back wall right of wool bin: Massey - Hawkes
Bay
Middle post at left while facing the windows
by power box: Rankin - Nelson.
Back is to main door see beam above the
shearing equipment stalls: Hughes - Marlborough.
Shearing equipment stall: Wadell - Fjordland
Identify breed:
Review the sheep book.
Change the label of the sheep according to
breed based on the book.
Check the region the sheep is commonly found.
Then match the names posted around the shed to
the region and find the last name of the breeder.
Match the sheep, location and breeder:
Top left: Suffolk
sheep found in Marlborough. Hughes is from Marlborough.
Bottom left: Ryeland
sheep
promoted by Breeders in Hereford, UK. Sutton is from Hereford.
Middle: Merino sheep first arrived
at Waimate North. Bowyer is from Waimate North.
Top right: Dorset Down sheep found
in Canterbury region. Clarke is from Canterbury
Bottom right: English
Leicester sheep raised in South Island. Massey is from Hawkes Bay.
Take Jock Stewart the fish from drawer below
the Merino.
Message from Pacific Run: Stage 3 is
completed. Learn that Team Tawaki - Kiri Nind won the
stage 3 competition.
Find
a way to have the Piano Lesson decoded:
Be back at base camp.
Message from Pacific Run: Stage 4 is
opened. Mine some gold to place on the tray outside
the golf mines to obtain next medallion.
Check the standings.
Bess: Talk to Bess. She's still pining for
Sonny. Take the Points card Bess got for you.
Leena: Talk to Leena.
Nancy gives the
Points card and get the
decoded Piano Lesson letter.
Read the
decoded Piano Lesson - Etude.
Some words are written in red: gold mine, lit
a lantern, mined, jagged, ankerite and hidden below.
Patrick: Talk to Patrick and
learn that his family belongs to an order and teaches how to not exist.
Bonus quest:
Kiri: Go to the playing area and then to dining area.
Talk to Kiri. Nancy gave Kiri the password to the mines.
In
return, Kiri gives her the Introduction to Maori Art book.
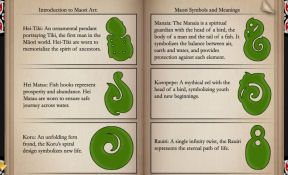
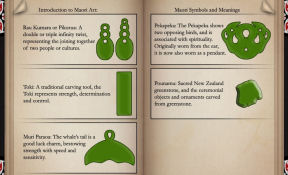
Maori Art: Read the book to learn about the different
shapes and meanings of Maori Art.
At
the back of the book are several Maori phrases.
Sonny: Talk to Sonny.
Learn where the name Sonny comes from. It came from his grandfather Jin who
founded S.P.I.E.D.
Nancy has been a member of S.P.I.E.D. for several years now.
The
bonus quest for Team Tui is to discover the secret life of the leatherback turtle.
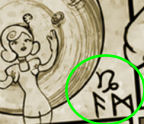
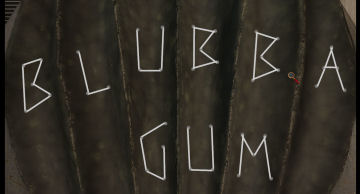
Comics:
Sonny gives more comics.
Read the comics. Whales like to chew Blubba Gum. The last frame with the
turtle has symbols.
He
also mentions to check the cellphone about special update about the show.
Message from Pacific Run: The individual side quest wins 70 points.
Complete the underwater challenge:
Jump to Doubtful Sound.
Use
a kayak to go to the cement structure and down the hatch,
Place Jock Stewart the fish on the fishbowl at center of the Fish display
Take the medallion piece.
Follow
the clues in the whale comic:
Review the whale comic again.
Leatherback turtle: Go to the turtle.
Look close at the turtle's back.
Connect the dots on the back of the turtle.
Right click to end the lines.
Follow
the turtle riddle:
Take the
note from the turtle's mouth.
It
reads: On the trail to what you seek,
Sends you to the water deep,
To
find the colony of Black and Red,
And
reach into the rocky steep.
Black and red colony: Go to the fish display.
Note the picture of the red coral and the black coral. Black coral is white
when alive and turns black when it dies.
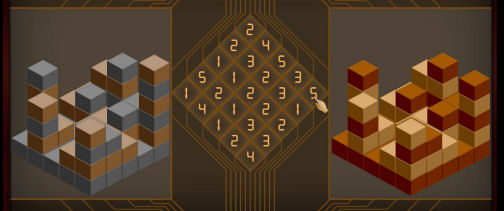
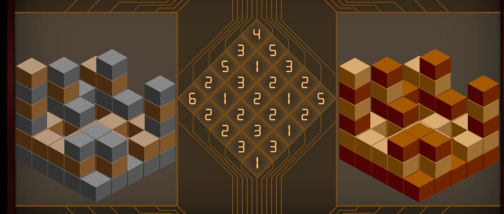
Charge the claw: It looks like we have to go underwater
again.
Go
to the red stand left of the subs. Open the door and see the puzzle.
Match the figure on the left to show at right frame.
The
center has a grid similar to the 2 on the sides. Click on a square to place
a cube where you want it to be.
Right click to remove a cube.
The
light colored cubes at right match the brown cubes on the pattern at left.
The dark brown cubes at right matches the blue cubes on the pattern at left.
Please refer to solutions at the first "charge the
claw" puzzle. The solutions maybe random.
Find the red and black colony: Use the sub.
Go
to the square marked in the picture. Face the arrow to the bottom. Move the
altitude lever on the right to middle position. Use claw to get a
chest in a cave.
Open the chest to see a purple and gold artifact - relic section. It is an old artifact and
looks like not part of the show.
Alarm:
Alarm goes off. Go
back to the observatory as fast as you can.
Complete the underwater challenge:
Go
back up to the kayak and the pier.
Jump back to the camp. Go
to base camp and the medallion stand.
Place the medallion piece on the stand.
George's progress:
George: Go
to infirmary and talk to George.
George wants Bess to keep talking to Patrick.
Eventually George goes back to sleep.
Read the tablet to get an update on Sonny's grandfather foray into the
concert hall.
Watch additional confessions on the monitor.
Listen to Patrick's confession 4 about Bess.
Bess: Go back to the camp and talk to Bess. Nancy asks her
to figure out Patrick.
Kiri: Talk to Kiri at the dining area. She is dissolving
the partnership.
Sonny: Talk to Sonny.
STAGE 4:
Get
items for stage 4:
Auction House: Go to the auction house and get a pan for
30 points.
Stage 4 Gold area: Go to the stage 4 gold area right of
the Base camp arch.
Get
a pick at the center container.
Get
the Golden Dreams book. Read the book to learn about panning for gold.
Go to
the mine:
Click on Cromwell on the map stand.
Enter the password OTAGOMINES on the map stand. Press enter.
Cromwell is unlocked.
Mine: Look around.
Check the scales used to weigh the gold on the table right of the mine
entrances.
There are 2 mine entrances, sluice and creek.
Maori totem phone charm (bonus game only): Take the Maori
totem phone arm from the wheel propped on the rock by the sluice.
Figure out the hidden meaning in the Piano Lesson:
Review the deciphered Etude.
Some words are written in red: gold mine, lit a lantern, mined, jagged, ankerite and hidden below.
Let's follow the clues:
Gold mine: Enter the mine at left up to the end. Turn
around and go left.
Lit
lantern: Look close at the lantern. Use the flint on the
lantern. The fire opens the lid of the lantern.
Take the old key.
Mined-
Jagged -
Ankerite - hidden below: Look at the wall at the back of the mine. See a
jagged pattern of an ore vein on the wall.
Use the pick on the rocks at bottom right of the ankerite ore wall. If the boulders fall on you, try again.
Take the journal that is hidden below the ankerite vein.
Journal: Read the journal written by Jin for Sonny.
Learn about the estrangement of Jin with Sonny's mother. Jin wants Sonny to
complete the tasks left by the testers.
Study the drawing of the medallion and the symbols.
Exit this mine.
Get
dirt:
Letters on wall: Go to the other mine at left. Enter and
forward. Go left to see a hole on a wall of boulders.
Look through the hole and see letters on the wall.
Pull back and take the Deduct 50 Points Bonus score card from the beam on
top left.
Continue deeper in the mine at left.
Message: Read Bess' message on the cellphone. Bess is
having an anxiety fit.
Dirt: At the end of the tunnel, see bare dirt on the wall that
might have gold.
Use
the pick on the wall. Get a bucket full of dirt.
Exit the tunnel.
Get
the sluice box running:
Sluice: Look close at the sluice. Place the bucket of dirt under the faucet.
Use
the tap on the faucet. No water.
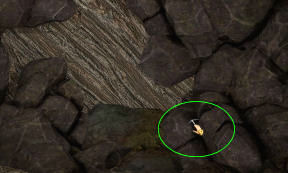
Fix
the fans: Check the box with screen cover right of
sluice.
See
fans with uneven number of blades.
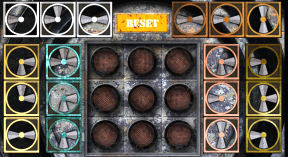
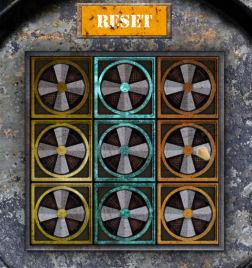
The aim of the puzzle is to have 4 blades
appear on the fan.
The blades can be superimposed on top of each
other.
Right click to turn the blades.
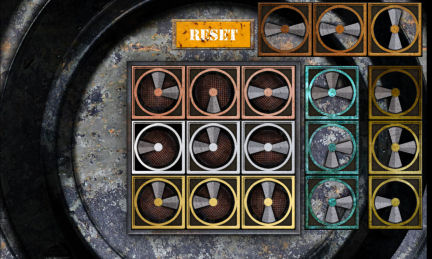
Arrange the pink, white and yellow fans in
horizontal position at empty center square.
Note the position of the blades.
Place in vertical position the yellow, blue
and brown fans over those horizontal fans.
Right click to turn the blades and check if 4
blades are now shown on each square.
Pan for
gold:
Turn the faucet on.
The water removes the large rocks to get a bucket of sand.
Go
to the stream at left.
Automatically have the pan on screen. Use
the bucket of sand on the pan.
Click on the pan on the water several times until the sand is washed off. Get gold
flakes.
Weigh gold: Go to the scales table.
Use
the gold flakes on the Team Tui scale.
Take the medallion piece.
Complete the gold challenge:
Go
back to base camp. Use
the medallion piece on the medallion stand.
Team Tui wins stage 4! Yay!
Message from Pacific Run: Stage 4 is finished.
Check the team standing. There's only Team Kea, Team Tawaki and Team Tui
left.
Message from Pacific Run: Final stage is unlocked.
Activate the symbols inside the caves at Lake Te Anau. The
password is Waitomo.
Bess: Talk to Bess.
Patrick:
Talk to Patrick about Bess.
Sonny: Talk to Sonny at dining area about Bess.
Follow the clues in the waterfall comic:
Review the waterfall comic again.
Jump to Mossburn.
Bridge and waterfall: Walk the path until the bridge and
then come back.
On
the way back, hear Sonny talk about the Mystic. He told the Mystic to pick a
spot and stand. Patrick?
Cave with roots: Walk the path and turn left after the
ladder.
Enter the cave that looks like the spot in the comics.
Unlock the carving behind the waterfall:
See
a panel that has a keyhole. Use
the key taken from the lantern in the mine.
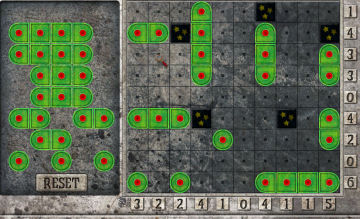
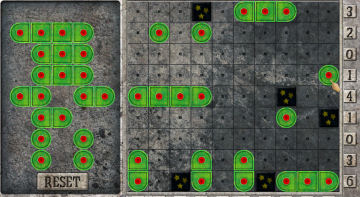
Solve the spaceship placement:
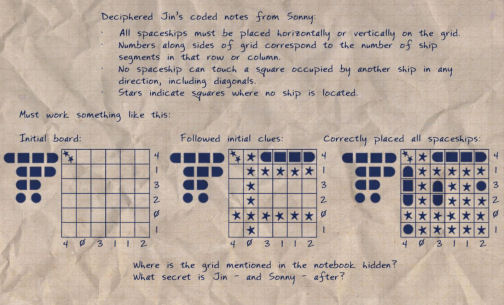
Read the rules in the deciphered Jin's coded note from Sonny that was taken from
Team Kea's tent.
All
spaceships must be placed horizontally or vertically on the grid.
Numbers along the sides of grid correspond to the number of ship segments in
that row or column.
No
spaceship can touch a square occupied by another ship in any direction
including diagonals.
Stars indicate squares where no ship is located.
The
ships are the green ones on the left. There 2 4-squares ships, 2 3-squares
ships, 3 2-squares ships and 3 single round ships.
Take the gold artifact - relic piece. It looks like the drawing in Jin's journal.
Turn around. Pick up the Award Bonus Score card for 50 points on the rock at
right. To use the cards, click it on the Team name in the team standing tall
post.
 |
 |
| Amateur |
Master |
STAGE 5:
Go
to Lake Te Anau:
Go
to the map stand. Unlock Lake TeAnau using the password Waitomo. Press
enter.
Jump to Lake Te Anau.
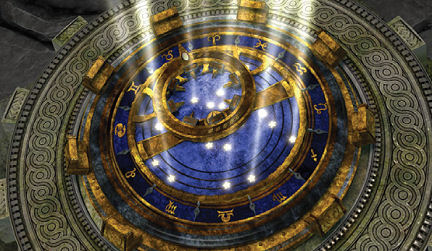
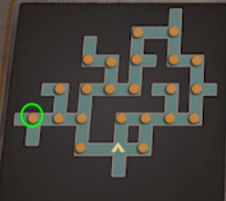
Turn
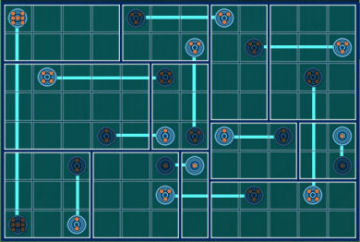
the lights on in the cave:
The
cave is too dark.
Check the power stand left of the cave entrance.
Light up all the grid sections.
See disks with a specific number of circles
inside. The number of circles indicates how many squares it can light up.
Click on a disk and select where you want it
to reach.
A grid lights up when the other end of the
disk reaches it.
 |
 |
| Amateur |
Master |
Explore the cave:
Enter the cave.
Go
down the path at left and be on a platform.
Ring phone charm (bonus game only) - take the ring phone charm on the floor
at left.
Turn around and take the Points Bonus Score Card for 100 points on the rock
wall at right.
Go
left and pick up a paper from floor.
Read a list of individual tasks given by Sonny to the competitors.
Climb the steps to the large monitor.
Pick up a comic page on the floor at left.
Light the fire: The monitor states to light the fire to
proceed.
Look close at the bowl.
Bird Easter egg: Before you light the fire, use an
Easter egg on the bowl to get an Easter egg with bird. Thanks, July!
Use the flint on the bowl to get fire..
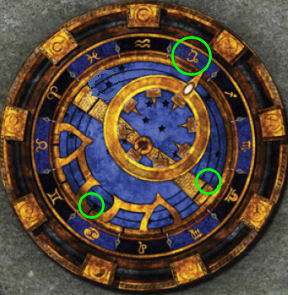
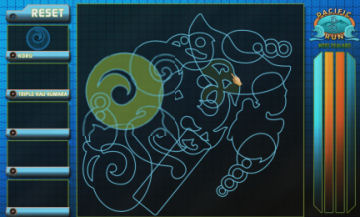
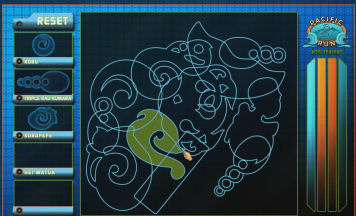
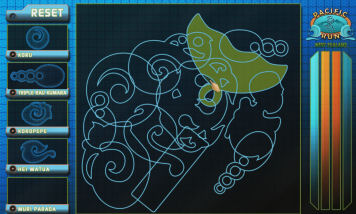
Fill
the symbols on the cave wall:
Activate the symbols inside the caves at Lake Te Anau:
See
shapes on the monitor.
Find the symbol listed on left in the shapes at center.
Review the Maori book given by Kiri.
Click on shapes until the shape is completely green.
The
secret compartment opens. Instead of the medallion, see and read the paper.
Sonny wuz here. No medallion.
|
 |
|
Koru |
|
 |
 |
|
Triple Rau Kumara |
Koropepe |
 |
 |
|
Hei Matau |
Muri Paraoa |
Follow the clues in the gold mine comic:
Jump back to the mine in Cromwell.
Right mine tunnel: Enter the mine tunnel at right. Go
forward and left to the hole on the wall.
Look through hole. See Kiri trying something on the letters on the wall.
The
ceiling caves in.
Left mine tunnel: Enter the left mine tunnel.
Go forward and see that the blocked
tunnel is now open. Go
through.
Sonny's quest note to Kiri: Pick up the note on the floor
at left.
Read Kiri's quest.
Letters on wall: Check the letters on the wall.
Nancy comments that it spells something out.
Click on a letter to turn it. Arrange the
letters to form words.
A compartment on the wall opens.
Take the artifact piece - relic fragment.
Exit the tunnel. Hear Kiri and Sonny argue.
Track down the missing Stage 5 medallion:
Jump back to the playing field - Lake Wakatipu.
Bess: Talk to Bess at base camp. Bess is gung ho in
winning. Learn that she needs to prove herself.
Leena: Talk to Leena.
Patrick is not here. Strange. Ah. Sonny's list.
George: Go to infirmary and see George is asleep.
Read the tablet and learn what Erin, Kiri's partner had to say. George was
not supposed to fall.
Kiri: Talk to Kiri at the dining area at the playing
field. Well!
Sonny: Talk to Sonny. He gives the last piece of the
medallion.
Take the medallion piece and go back to base camp.
Win
the tie breaker:
Go
to base camp. Kiri follows to get ahead and place her medallion first to win
stage 5.
Nancy throws the medallion piece to Bess and Bess places it on the stand. Kiri, at the same time places her medallion piece also.
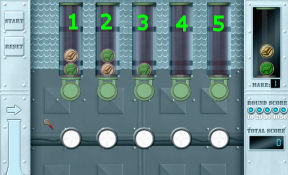
Sonny decides a sudden death contest (rules?).
The aim of the puzzle is to copy the pattern
of the discs with picture
seen at right in the correct order.
5 tubes at center has discs with pictures. The
tube can be opened or closed by clicking the cover at the bottom.
A tube will pass through under the tubes.
Depending on whether the tubes above it is open or closed, the tube will
collect discs and exit at right.
There are 5 sets in the puzzle. Each set
increases in number of patterns to be copied.
This is the big machine at Puzzle Palace.
 |
|
Amateur |
|
Master |
|
First set:
Close #3. Press start.
|
|
First set:
Close #3. Press start.
|
|
|
|
|
|
Second set:
Close #1.
Press start.
After first tube passes - open #1. Close #5.
Save game.
|
|
Second set:
Close #4.
Press start.
After first tube passes - close #2. Open #4.
Save game.
|
|
|
|
|
|
Third set:
Close #1 and #5.
Press start.
After the first tube passes close #2. Open
#5.
After the second tube passes, open #1 and #2.
Close #4 and #5.
Save game.
|
|
Third set:
Close #2 and #5.
Press start.
After the first tube passes open #2. Close
#4.
After the second tube passes, close #2.
Open #4 and #5.
Save game.
|
|
|
|
|
|
Fourth set:
Close #1 and #2.
Press start.
After first tube passes, open #1 and close #5.
After second tube passes, open #2 and close
#4.
After third tube passes, close #1 and #3. Open
#4 and #5.
Save game.
|
|
Fourth set:
Close #1 and #5.
Press start.
After first tube passes, close #2 and open #5.
After second tube passes, open #1 and #2 and close
#3 and #5.
After third tube passes, close #1. Open
#3.
Save game.
|
|
|
|
|
|
Fifth set:
Close #2 and #5.
Press start.
After first tube passes, open #2 and close #4.
After second tube passes, close #1 and #2.
Open #4 and #5.
After third tube passes, open #2 and close #3.
After fourth passes, open #3 and close #5.
|
|
Fifth set:
Close #1, #2 and #3.
Press start.
After first tube passes, open #2 and close #5.
After second tube passes, open #1.
Close #4.
After third tube passes, close #1 and open #5.
After fourth passes, open #4.
|
Team Tui wins. Yay! Sonny calls Team Tui.
Find
out what Sonny wants:
Talk to Sonny. Take rope from first dining table at right.
Automatically be at the cave at Lake Te Anau.
Go
left down to the platform.
Tie
the rope on Sonny's sign right of the platform. LOL.
Nancy climbs down the rope. Sonny follows.
Fill
the colors on the device:
See
a puzzle on the wall. Look at it.
This is why Sonny brought you here - to solve this puzzle.
Answer the cellphone. George solved the blueprints. She says top corners
green; bottom corners blue.
Start by clicking the top corners to green and bottom corners blue.
Fill in the others with colors that doesn't touch a similar color.

See
a lever. Pull the lever down.
The
water recedes and river tunnel is seen.
Kiri:
Kiri throws down the rope to strand Sonny and Nancy at the bottom of the
cave.
The
lights goes out. See sparkling fluorescent things on the wall.
Survive
the river:
Sonny says the way out is down in the river tunnel. Sonny pushes Nancy
into the raft.
When intersections-arrows at sides are seen - Go R L R R L.
Move the cursor to the intended place and when the arrow appears,
immediately click.
Nancy and Sonny climb to the edge of the river.
Escape
the river:
Sonny did not find what he is looking for and gets angry at Jin.
Patrick: Hear Patrick on the hole above; see Patrick jump down.
Patrick sees something at bottom of river. He decides that this is his river
since he sinks rather than float.
He
jumps into the river. Patrick stays down in the river for a while.
Sonny tells Nancy about his believing his grandfather that they are
Annunakis.
Water recedes. Hear Patrick. There are stairs going down.
Rebuild
the relic device.
See
the final piece of the relic.
Nancy is supposed to put it together to signal the testers.
Take the blue star chart sonny placed
on the relic.
Assemble the relic:
Look close at relic. Assemble all the other
pieces first.
Place the star chart.
Place the blue ring-relic section.
Place the relic piece.
Place the relic fragment.
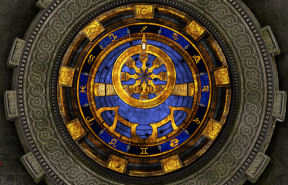
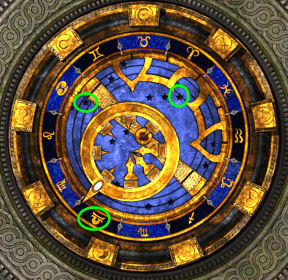
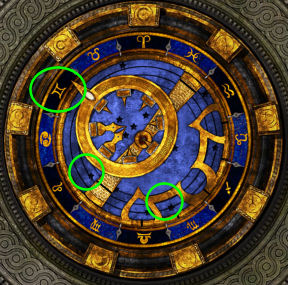
Unlock all the pins:
Review the comics and Jin's journal.
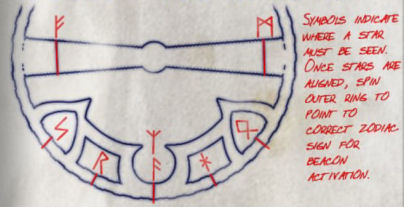
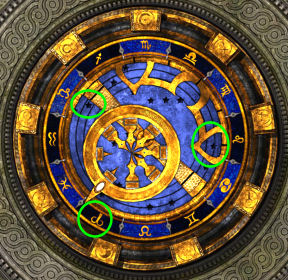
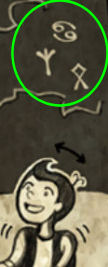
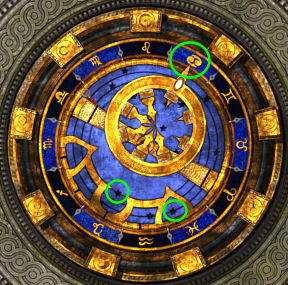
1.
Align the stars in the specific symbol areas - holes/lines for the symbols seen in the comics. Turn the
small central circle - relic fragment to position the holes/lines to get the
stars in/by them. Check Jin's journal above for those holes/lines.
If
the stars are to be positioned by the symbols on the middle bar with lines;
they should be at the position beside the line as noted on Jin's drawing.
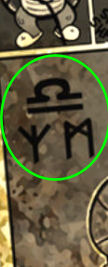
2.
Once the stars are aligned; click-hold-turn the outer circle - relic piece
to point at the specific zodiac sign seen in the comics.
If
done correctly, the pins inside the relic fragment at center pull out.
The
relic unlocks, spins and the stars light up. Jin is validated!
Bess enjoys her "save the day".
The Labyrinth of Lies is next.
This document may not be
distributed without express written permission of the author and the content may
not be altered in any way.
For Questions or Comments
on this Walkthrough,
Please write to:
MaGtRo
Copyright © 5/2014
MaGtRo
 GameBoomers
Walkthroughs and Solutions
GameBoomers
Walkthroughs and Solutions