Nancy Drew 32: Sea of Darkness
By Her Interactive
Walkthrough by MaGtRo May 2015
Gameplay: This is a first person point and
click game.
The main menu has new game, load game, tutorial,
settings, extras, more ND and quit selections.
Tutorial guides the gamer through the game
manipulations. The different cursors and navigation
arrows used in the game are shown. The interface description is shown at bottom of
screen.
The settings menu has voice, effects and music
volume adjustments. Full screen and windowed game screen selection and Fast convo selection are here also.
Extras have awards, credits, teaser and bonus art.
Bonus art and teaser are locked until the end of the game.
More ND shows the other Nancy Drew casual and
adventure games released by Her Interactive; as well as links to Facebook,
twitter, You Tube and Pinterest.
When new game is started; select to play either Amateur or Master Sleuth
difficulty mode. Amateur Sleuth has regular puzzles; hints available and
detailed task list. Master Sleuth has more challenging puzzles; no hints and
has basic task list.
The game screen has menu at bottom left of the
page. It has main menu, save game, load game, settings, help and resume game
links.
The gameplay menu frame has a trophy cup icon at right
side. Clicking it will show the trophies that can be achieved in doing
certain actions in the game.
The cell phone is beside the menu link. It has
phone, camera, games, settings and my diary.
The phone has pictures and names of available
characters that can be called. Click on the name or picture to get
another frame that has a "call" button.
The camera can take 30 shots. Photos that are
taken can be viewed. The focus can be zoomed in-out.
There are 9 games installed on the phone.
Settings have wallpaper selections as well as
ring back and ring tone sound selections.
My Diary has Nancy's notes on the game's
activities.
The button at bottom center closes the cell phone.
At the center of the bottom bar is where the items
collected are seen. Use the slider tab at top of the bar to go through the
items.
The frames for Tasks and Journal are right of the
inventory bar.
The tasks list has the to do things in the
game. The question mark beside the task gives hints to help the gamer
fulfill the task. If you did not use a spoiler, you will get an
award.
The journal has observations and suspects.
The dialogue frame has a double arrow at right; it
is used to hasten the dialogue.
Phone charms are only for the games with bonus.
Saved game folder in Win7 is located in My Documents
folder or C:\Users\computer name\Documents\Sea of Darkness.
The ship Heerlijkheid sails in and crashes the
dock at Skipbrot, Iceland.
New case:
Read the letter sent by Dagny Silva, a treasure
hunter. Learn that she and Magnus Kiljansson renovated the Heerlijkheid. The
Heerlijkheid is rumored to have a hidden treasure in it. Dagny wants Nancy
to find Magnus who disappeared. He was not in the Heerlijkheid that sailed
in dock.
Phone charm (bonus game only):
Pick up the Viking hat charm from the base of the lamp at right..
(Thanks, Marian.)
Back up and automatically arrive at Skipbrot, Iceland.
Dagny Silva:
Talk to Dagny completely. Learn about the
Heerlijkheid and Magnus. Learn that Elizabeth remove the gangplank of the
ship and hates Dagny. Dagny says to talk to Soren at the Cultural Center to
gain entry on the ship.
Explore the port:
Go forward and look around the port.
Ship: Go forward to the ship and
left of the crates to see that the gangway is not here.
Snowmobile: Turn around
and go left on the main
street. Check the snowmobiles at end of the street.
Fish cleaning station: Turn
around and go to the other end of the street. See a fish cleaning table at right.
Take the hook hanging at right.
Phone charm (bonus game only):
Pick up the white flower phone charm from the table.
Read a newsletter under the rock. Learn about
Gunnar Tonnisson the Ancestors' Festival troublemaker. Gunnar threw a bottle
at Soren Bergursson.
The Missti Skip: See the Missti
Skip at left on the end of this road. This is where Nancy is staying and it
has a pub. We
will check this place later.
Find a way to the ship:
Skipbrot Cultural Center: Go back to where you talked to Dagny - at the
Ancestors' Festival area.
Go forward to the other end under the archway and
see the crow's nest at center of yard.
Read the notice about renting a snowmobile from
Sno-Mo on the post at right.
Crow's nest: Go forward
and climb the crow's nest.
Look close and read the poster. Learn that this is
the original crow's nest of the ship and that Heerlijkheid means glory in
Dutch.
Climb out and see the view of the archway with the
Ancestors' Festival banner and the dock.
Go down the ladder and enter the cultural center.
Soren Bergursson: Talk to Soren behind the reception desk. He will
talk to Elisabet about the gangway.
Learn that he is disliked by the townspeople. The center
is where he researches Icelandic history and weapons.
Explore the Skipbrot Cultural Center:
Click on the gift at the reception desk. See that
there is
complimentary gift wrap available.
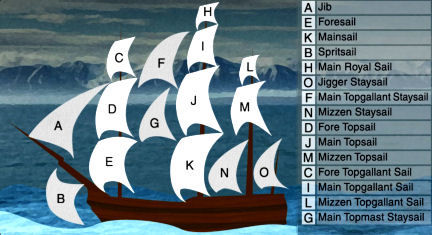
Match the sails to their name:
Click on the sign left of the desk to learn how to
speak like a sailor.
Click on touch screen and match the sails to the name. We need more info.
Model ship: Examine and press the buttons on the Heerlijkheid
replica at left of touch screen.
Mariners Tools: Pan left and examine the display case at left
corner. Read the legend of the items on display.
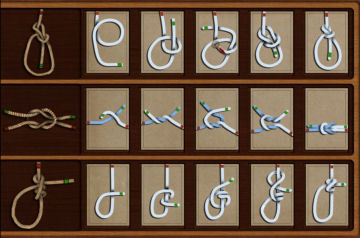
Knots display: Check the knot
display in front of the window.
Soren asks to arrange the images to show the
steps needed to create each knot.
Match knot: First place the pictures that are for that
particular knot on each row.
Then arrange the order of the pictures.
Examine the 75th Ancestor Festival card tucked at
right side of the knot display. At the back it states - gunpowder.
Weapons: Pan to the left
of the door and examine the weapons display.
Pictures: Look at the
picture display. Read the descriptions of the pictures.
James Lawrence, husband of Alda Jonsdottir is the
captain of the Heerlijkheid.
Ancestors' Festival display:
Look close at the festival display.
See another snowmobile poster. Further info can be
given by Elisabet at Missti Skip.
Read about schedule of events. A delay notice
states a postponement of the activities because of the ship's crash.
Take a look at the petition to stop the ship
project. Gunnar is the only signatory.
Gift shop: Look around at
the gift shop. Check the prices of all the items. You need to earn money.
Find a way onto the ship:
Go back outside and to the port. See that the
gangway is up. Climb up to the ship.
Elisabet Grimursdottir:
Talk to the angry Elisabet. She runs the Missti
Skip. She knows about Magnus.
Get a snowmobile key.
Explore the ship's deck:
Look around. Try to enter the closet door right of
Elisabet. She stops you.
Crow's nest: Climb the
steps left of Elisabet. Climb up, up - way up to the top and into the crow's
nest.
Take the sketch pieces under the "86"
etched on the post.
Pan around and look at the view of the town. See
aurora lights. There's an unlit lighthouse out on the sea.
Go back down to the deck.
If you climb the crow's nest enough times
(+11x), you will get an award.
Original wheel: Go forward
and climb the steps. Go around the wheel house and look at the view.
Look close and examine the original helm-wheel.
Nancy says that someone took some of the decorations.
Wheel house: Go inside the wheel house.
Read the Captain's log.
Magnus wrote the descriptions of the sails. These are clues to the Match the
Sails touch screen at Cultural Center.
Magnus and Dagny have the radio turnkeys. Turn the
wheel if you want.
Examine the chair and see gold button and
panel on armrest.
Check the new radio by the window. The key is
missing.
Look at the charts on the table at left.
Explore the Captain's quarters:
Captain's quarters: Exit
the wheelhouse and go down the first set of steps. Turn left and left to
center stairs. Go through
door.
Go forward and enter the doors at end of the
hallway to be at the captain's quarters. Look around.
Dog kennel: Look close at right of door and see a picture of
Magnus with his dog. Underneath is a picture of Magnus and Elisabet. There's
a dog bed-kennel at the corner.
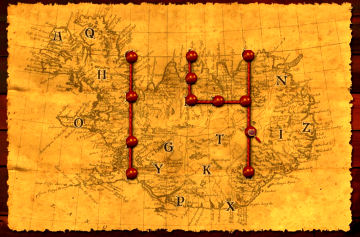
Map: See an antique map on the wall with bold alphabets on it.
Shelving: Look close at the shelves under the window.
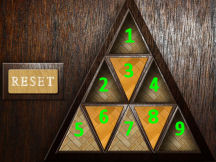
Easter egg: Examine
the box at bottom shelf. Get all the triangles raised (press 1 -7-2-8). Then press down
the 3 triangles at the center (3, 6, 8). Get a dark shiny egg.
(Thanks, Marian.)
More Easter eggs from Marian and July:
(Thanks, July and Marian).
Easter Egg 2: Press the alarm button in
the ship's wheelhouse 11 times
Easter Egg 3: In the caves - When you
break the ice wall, go forward, upward, forward 3 times. You will
see the location with the yellow stone and the red stone. Where the
yellow stone is, there is a branch to the left. You must go there.
When you reach the end of the tunnel, break the ice under the wall
and take the egg.
Easter Egg 4: In the kitchen at the
pub; you need look for an order with a picture of a black and white
bird "Lundi". Then you need fill all the squares of the order the
following image. You will hear the clucking. It is necessary to go
on stage and look at the cello.
Wooden box: Examine
the box at bottom shelf. Nancy says that all wooden sections-triangles
should be pressed down.
Press 6 - 4 - 3 - 1.
Read the letters inside the box. Magnus misses
Elisabet. Learn that Soren is protective of Elisabet. Magnus is writing a
Limerick book and misses Skipbrot, his dog and Elisabet. He wants to borrow
the Langspil from the Missti Skip. Elisabet refuses to lend the langspil, a
family heirloom to
Magnus. Tumi is the name of Magnus' dog.
Table:
Look close at the table at center. Pick up the locator and toy clues
from the table.
Captain's desk:
Look close at desk at right under the window.
Open the desk: Deduce
the clues to solve this puzzle.
Note that the completed row (no blank space)
add up to 9. So the empty squares must be numbers that will get a sum of
9.
Select the number at right and it will appear on the highlighted
empty square.
Note also that each row has 4 red squares and
3 yellow squares. So select the correct color from the right top part.

Diary: Read the diary.
Learn about the intruder on the ship and also Magnus is being followed.
Magnus has a small button that is a clue to the
treasure. Magnus has Elisabet's family's footlocker.
The lock combination is tied to the tidal depth
charts. The locator compass (from the table) when placed on the chart will
show 4 numbers. The 4 numbers in increasing order will open the lock.
One number is etched at top mast. (The one seen at
crow's nest - 86).
Magnus has half the locator and know the sum of
the 4 numbers that should be visible on the locator holes.
He still needs 2 numbers to know the locator
placement on the chart. One number is hidden in Lawrence's antique map on
the wall.
Figure out the code in Magnus' desk:
Take the holed paper at right.
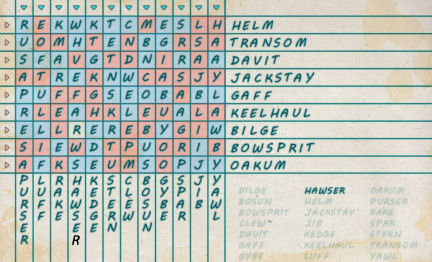
Word search: Find the words seen at bottom right.
Left click to select a letter from a row;
right click to select a letter from a column.
The letters are not in order and the completed
word is seen on the row at right or column below.
The color of the letters on a row are red and
blue for the column.
Click again to toggle an error and unselect
that letter. (Note the letter R for Hawser is not completed on the
picture).
The holed paper is automatically placed on the
page to show letters: EVFWMRCJDSUL.
Read the Santa Fe Gazette. Dagny doesn't want
treasure hunt publicity.
Take the lighthouse key from the desk.
Cabinet-cupboard: Pan
right and examine the cabinet. Take the can with pins.
Look at the round keyless lock at back of the
cabinet. This is the lock mentioned in Magnus diary that needs 2 more
numbers.
Bed: See the bed.
Phone charm (bonus game only):
Pick up the treasure chest charm from the table.
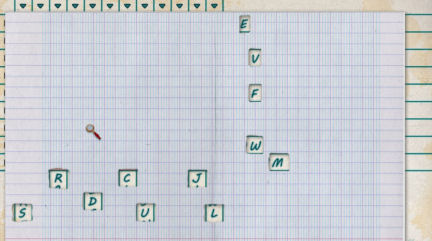
Figure out the meaning of letters from Magnus'
notebook: Go to
Lawrence's antique map at opposite wall and right of the dog bed.
Pins and map: Place
the pins from the cabinet to enter the code shown by the holed
paper - EVFWMRCJDSUL.
One of the sounding depth number - 14 is
revealed.
Explore the hold:
Exit and then go down the stairs at right. Enter
through door.
Barrels: Look close at
barrels. Examine the middle bottom barrel.
Read Dagny's note. Dagny left her suitcase
at cultural center. She also changed her cellphone password to
"Scuttlebutt".
Gunnar is using an old thing (drawn on note) as a
coaster. Gunnar calls Dagny - minke (type of whale).
Grate: Go right and down
another level. Look at the grate at center.
Open the grate and see a machine.
Flashlight: Go forward to
back of the room. Take the flashlight by the barrels. It needs
batteries.
Phone charm (bonus game only):
Pick up the cannon charm right of the flashlight.
Go to the bottom deck and then outside.
Finish exploring the ship:
Figurehead: Climb down
the steps and up the other stairs to the bow - front of ship.
Stand by right side of bowsprit (long pole
protruding from ship) and see the lion figurehead under it.
Look close at the puzzle at the figurehead's back.
It needs coin for the slots.
Elisabet: Go back to
Elisabet. Talk to her about Magnus. Learn that Magnus is obsessive and wants
the treasure so he can have a ship of his own.
Elisabet gives a paper that Magnus left at her
place. She doesn't want you to look inside the closet.
Dinghy:
Exit the ship. Go forward to the edge of the pier.
Go down the metal ladder and be on a dinghy.
Click on wheel to find out that the motor is
busted. Press the center of wheel-horn with a cat insignia. :)
Turn around and see the Mad Cat motor. Need more
info before it can be fixed.
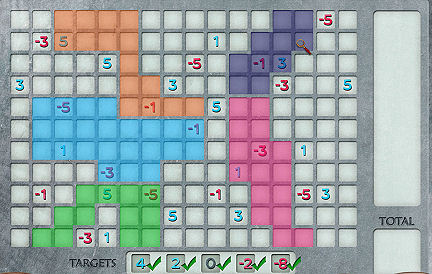
Fix the heater:
Go back to a freezing Dagny and talk to her. She
is watching her ship. Nancy offers to fix the heater.
Place the pieces at right so that each piece
covers the correct set of numbers to equal one of the five target
numbers at the bottom of the puzzle.
No overlap allowed. Below is one solution.
 |
 |
| Amateur |
Master |
Dagny mentions Magnus' cabin up the hills.
Elisabet has the key to the cabin in her bag. Get the radio key from
Dagny.
Cultural Center:
Match the sails to their name:
Go back to the cultural center.
Now that we have the clue from Captain's log at the wheel house - click on
touch screen and match the sails to the name.
When correctly done, see sailor vocabulary.
Soren: Talk to Soren. Get
a pamphlet from Soren that might help her in solving the case.
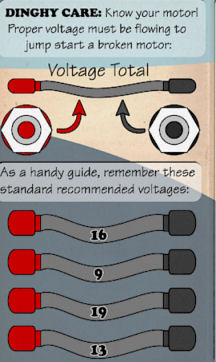
Dinged
Dinghies has dinghy care using the proper voltage total used to jump
start a broken motor.
Snowmobile:
Go to the snowmobile a right end of the road. Use
the snowmobile key given by Elisabet. It's out of gas.
Explore the Missti Skip:
Enter Missti Skip and look around.
Look right and read the Customize your Gear
book.
Look close at the Sleipnir metal sculpture on the
wall.
Sleep: If you want to
sleep, climb the stairs to the lodging floor and automatically wake up
later.
Tide sign: Left of the
stairs to the lodging is a sign that shows current tide. It is low at the
moment.
Change tide: If you want to
change the tide, go upstairs and sleep-rest. The next instant, the tide will
change and be at stairs.
If you change the tide often enough (14), you
will get an award.
Gunnar Tonnisson:
Pub: Go down to the
pub
across the Sleipnir wall sculpture. Talk to Gunnar. Do not use the "Don't
want to tell me" dialogue.
Hear a very long fish tale after asking about his
fingers. Learn about Elisabet, Magnus and Dagny - the minke.
Supply closet: Turn
around and enter the door with a "Employees Only" sign.
Take the gas canister. Hear Elisabet and
Gunnar talk outside. She will stay at the ship and not help serve at the
bar.
Take the yellow fish decoration from the
machine at right.
Phone charm (bonus game only):
Pick up the yellow car charm on the shelf.
Kitchen sign: Turn right after
exiting the closet. Try to enter the kitchen.
Read the letter of Elisabeth to Gunnar. It is a
list of do and don'ts. LOL.
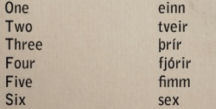
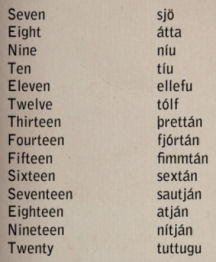
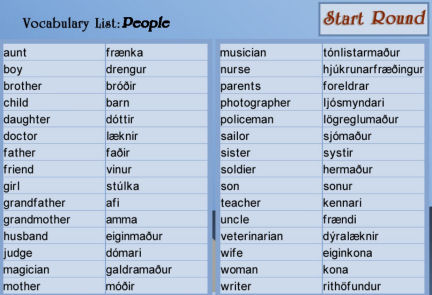
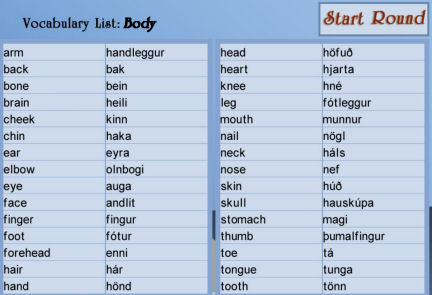
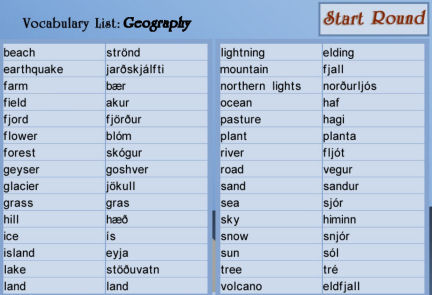
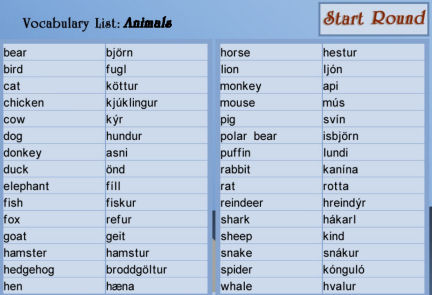
Earn some kronirs:
Learn Icelandic: Look close at
the machine on the bar counter.
Take the Icelandic word on the left and drop it
right of the correct English word. Press submit button.
There are 4 rounds per game. Earn 600 kronir to
buy things from the gift shop.
Check the purse at end of the inventory bar to see
how much money you have.
If you play enough vocabulary games, you will
get an award.
Below are some of the dictionary words.
Sonny Joon - Couch: Turn around and
take the notebook inserted at side of the couch closest to bar. It is the
Factually True Adventures of Sonny Joon and Cyborg Nancy.
Check the importance of the langspil:
Musical instruments: Turn
around and go forward. Look close at the musical instruments display across the exit
stairs.
Examine a card with picture of the instruments at
left panel.
Look at Elisabet's poster at the center display.
Langspil: Examine the
langspil left of poster. Remember that Magnus wrote to Elisabet about the
langspil.
Open the round case on the langspil and see
different pattern on each side of the decoration.
Find the difference between the 2 sides. Click
on difference on either side.
The differences are darker colors in the
picture.
The case opens. Take a carved star.
History of Skipbrot: Look
close at the Skipbrot machine. It needs 450 kr. for each part. There are 3
parts.
Earn enough money to play all 3 parts. Move the
knob under the part to be played.
Check the purse at end of the inventory bar to see
how much money you have.
Learn the tragedy and that Elisabet is the descendant of Anna and
James Lawrence.
Cultural center:
Ned: On the way to the
center, get a call from Ned. Nancy forgot about their anniversary.
Call him again and learn about Burt the new
roommate and pet chicken. Call him again to talk about the suspects.
Dagny: Talk to Dagny -
still out in the cold. Gunnar, Elisabet and Soren were not at the festival.
Batteries: Go to the
center and buy batteries on the postcard rack. Automatically place it in the
flashlight.
Soren: Talk to Soren. He
is still an outsider because he was born 10 miles from town.
Learn that Gunnar crashed his boat and he sank to
the bottom of the sea.
Soren was at the festival manning the audio at the
tower. Soren sold his exploration rights to the treasure
to Dagny.
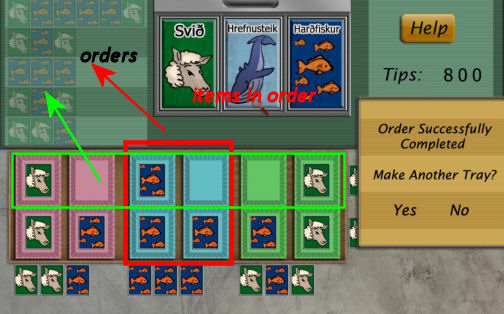
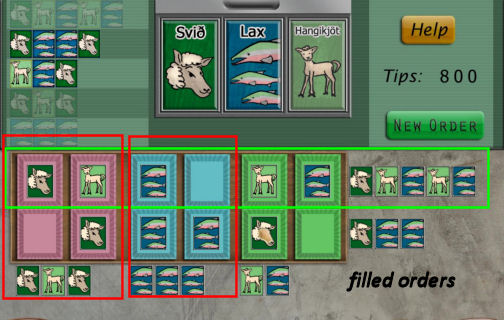
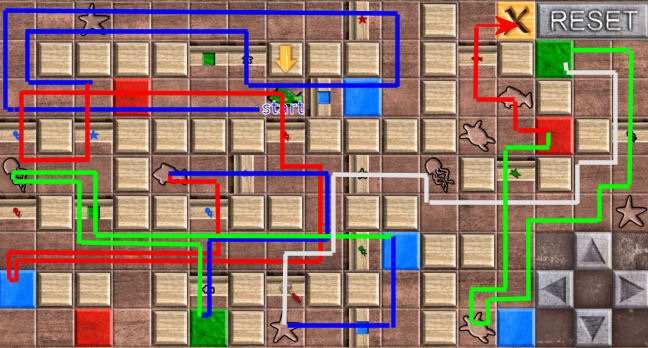
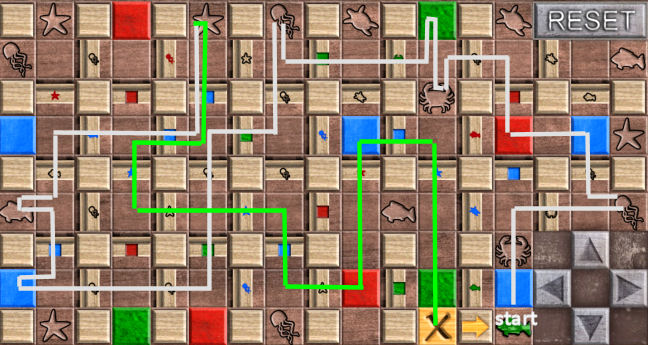
Kitchen orders:
Go back to the pub to earn more money but Gunnar
orders Nancy to go to the kitchen.
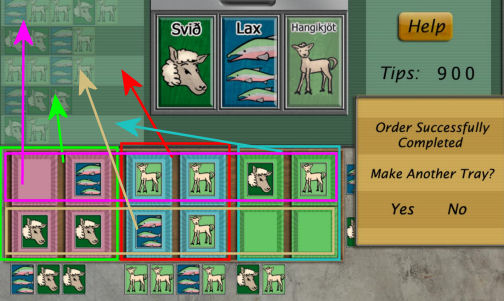
Read the tutorial. See an order screen.
Top left of the screen are the 5 orders to be
filled.
Orders can be filled in a row (pictured green) or in squares of
similar colors (pictured red).
The orders are to be filled in same order
shown at top left.
There can be empty spaces in a filled order.
A filled order at top left is grayed out.
If the order is difficult, make new order and
select an easier one.
If you fill enough food orders (15), you
will get an award.

Gunnar: Talk to Gunnar
about Soren being an outsider.
Cultural Center:
Now that you have money, buy the book "Iceland at
a Glance" at the gift shop.
Buy a gift for Ned that you can afford or get more
money at the pub.
Get the souvenir gift for Ned gift wrapped
at the counter.
If you buy one of each souvenir, you will get
an award.
Ship:
Go back to the ship.
Elisabet: Talk to
Elisabet again. Learn that she is here to watch the ship. The alarm cannot
be heard at the dock. Talk about Soren, Magnus and Elisabet's history.
There was no sound during the festival even though
Soren said he was manning the audio. Gunnar hates Magnus.
Try to contact outside help on the radio:
Go up to the wheel house. Use the radio key given
by Dagny on the radio keyhole.
Take the mike. Automatically Nancy uses it to call
out.
A voice is heard. It is control tower #32 manned
by Alex Trang.
Talk to Alex about the missing Magnus. Learn that
Magnus checked in at 6 am. Then she heard shouting, fighting and then
silence. She heard something about ship. Learn about Alex.
Alex will help Nancy to distract someone on the
ship so she can snoop in her bag. Before helping Nancy, Nancy has to fix the
lighthouse first.
Learn that Dagny is wanted because of skimming on
a treasure hunt that was done.
Learn that Magnus talked to Alex about Saeta-cutie
Elisabet.
Fix the dinghy motor:
Go back down to the dock and then go down the
metal ladder to the dinghy across the gangway.
Turn around and open the motor.
Place the spark plugs and connectors in their
correct locations.
Read the Dinged Dinghies leaflet for clues.
Note that the voltage total from top to bottom
are: 16, 9, 19 and 13.
Red is on the left and black is on the right.
Use the guidebook - Iceland at a Glance
translation to know the value of each sparkplug.
The connectors values are: Nitjan is 19. Niu
is 9. Brettan is 13. Sextan is 16.
The spark plug values are: Atta is 8. Niu is
9. Fjorir is 4. Sjo is 7.
Tolf is 12. Fimm is 5. Tiu is 10. Tveir is 2.
The spark plugs should equal the value of the
connector.
Insert the spark plugs (red on the left and
black on the right) and then insert the
connectors in the right order and value.
From top to bottom:
1. Tolf 12 and fjorir 4. Use connector sextan
16.
2. Tveir 2 and sjo 7. Use connector niu 9.
3. Tiu 10 and niu 9. Use connector nitjan 19.
4. Fimm 5 and atta 8. Use connector brettan
13.
The engine starts.
If you ride the dinghy often enough (+20x),
you will get an award.
Repair the lighthouse:
Click on the wheel to be automatically outside the
lighthouse.
Tide: If it is high tide,
you can reach the dock. If low tide, it is too high for Nancy. Go back to
Missti Fit and sleep-rest. The tide will change then.
Climb up to the door of the lighthouse. Use the
lighthouse key from Magnus' desk on the door lock.
Climb to the top of the
lighthouse.
See mosaic patterns under the windows. Click on
all the mosaics for closer look.
Use the cellphone and call Alex Trang.
Go to the control panel ahead.
Make white lights:
See a 4x4 circles with directional arrows at all sides of the enclosing
squares.
The aim is to get 5 white lights for amateur
and 7 lights for master level on the tower
at right side.
See the progression of colors at left side:
Blue to green to red to CMY (cyan magenta yellow) and then white.
To get the next color, 2 similarly colored
circles must be combined. Use the directional arrows to bump
2 similarly colored circles together.
2 blues make a green; 2 greens make a red; 2
reds make a CMY and 2 CMYs make a white circle.
When you see 2 similar colors,bring them side
by side and then combine them.
See lights come on and rotates.
When done, call Alex again. Alex says that there
is an alarm in Magnus chair at the wheelhouse.
Go to the hatch to exit and the remote access
alarm flashes and sounds. The windows are automatically opened. It's cold.
Click on the panel right of the hatch to start the
pyramid puzzle.
Numbers pyramid: See
a pyramid stack of squares.
Starting at top going down; place numbers on a
row that adds up to the number above it.
Each number above should be the sum of 2
numbers directly below it.
Click a number from the sides and then click
on an empty square.
The hatch opens. Nancy thinks that this is not
an accident.
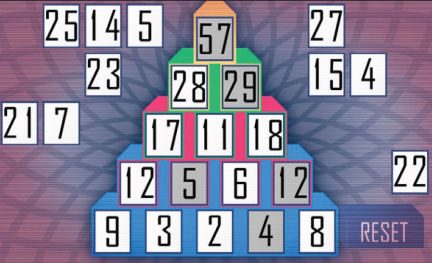 |
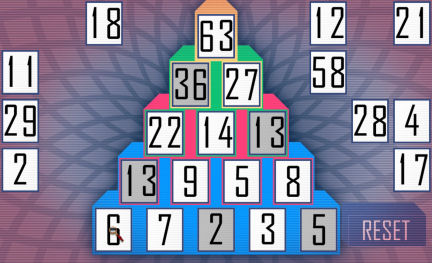 |
| Amateur |
Master |
Exit the lighthouse and go to the dingy. Go back
to Skipbrot and the ship.
Distract Elisabet:
Climb up the ship to the wheelhouse.
Captain's chair: Look
close at the closest armrest. See gold panel and circle.
Click on gold circle. That opens the panel.
Press the alarm button. You do not hear anything.
Exit the wheelhouse and hear footsteps.
Immediately go left, down the stairs and then
another stairs to the main deck.
Turn left and pan left to where Elisabet was
sitting. Her bag is unguarded.
Bag: Look in the bag.
Read Magnus' letter to Elisabet explaining where his anniversary gift
for her is located. The gift is really her family's.
Take the key to Magnus' cabin.
Closet: Pull back and try
the closet guarded by Elisabet. It is locked.
Take a snowmobile out of town:
Go to the snowmobile at left end of the town road.
Use the gas canister from the pub's closet on the
snowmobile. If the key is already on the snowmobile, click on it to
start the engine.
Check out Magnus' cabin:
Magnus' cabin: At start
on ice road, see the
road go straight or left. The back arrow goes back to town. Take the left road.
Ned: Get a call from Ned. Sounds
like something is wrong with Ned. Burt his roommate tries to get the phone.
Try to call Ned again. Recording answers.
Use the key from Elisabet's bag on the door lock
and enter the cabin. Look around.
Explore the cabin:
Table: Look close at
table at right. Read the Limerick book and the letter from the
publisher.
Take the 2 decoration disks from the plate.
Stove: Look left and open
the oven door. Take 2 more decoration disks.
Bed: Go to the bed at
right. Take 2 more decoration disks.
Look at pictures on the wall. There's 3 large
pictures of the ice cave.
TV: Turn around and check
the TV.
Take a decoration disk from the answering
machine.
Read the After the Laki Eruptions: A History
book. Read the notations about the crow's nest at Skipbrot. Solution is
to divide into groups of six, no group touching another.
Answering machine: Press
the right arrow on the red answering machine.
Elisabet calls several times. She threatened Magnus
at the end.
Dagny has something in her bag that she wants to
show Magnus.
Gracie, the publisher called about cutting down the
number of limericks and talk about publishing his book.
If you listen to all the messages, you will get
an award.
Table: Read Dagny's
letter from the table at right of dog bed. Tumi the dog must have eaten
Dagny's spare luggage key.
Take a decoration disk.
Dog bed: Check the dog
bed now that Dagny mentioned the key. Lift the dog bed and take the luggage key.
Arrange the toys puzzle:
Open the curtain behind the dog bed.
Read the clues on the left. Based on the clues
arrange, take a toy from top and place them on the appropriate squares.
Each row, column and diagonal has 2 of each
kind of toys.
| Amateur |
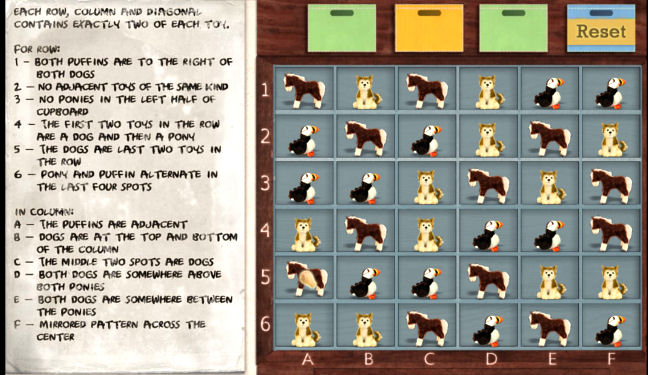 |
| Master |
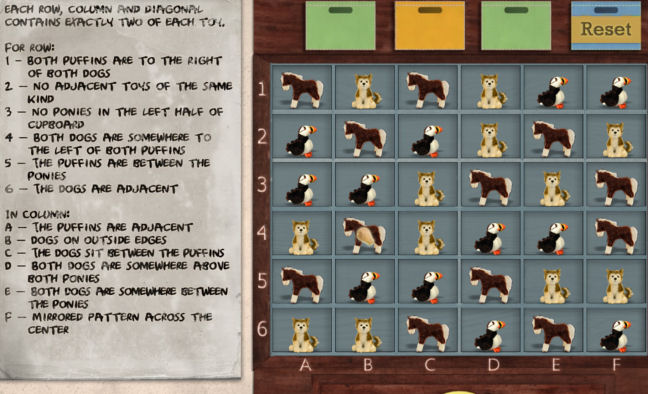 |
Take and read the messages between Dagny and
Magnus - threatening note.
The key to open the rawhide toy is under Tumi's
carrier in the ship.
Magnus needs a barnacle scraper to use on a driftwood.
This is connected to Captain Lawrence.
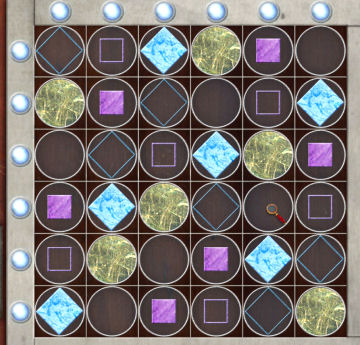
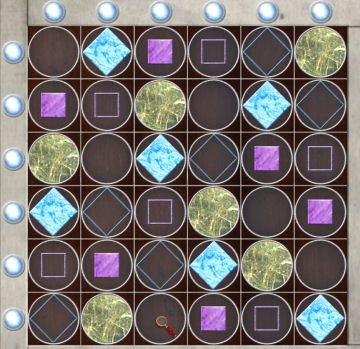
Discover the secret of the cabin crystals:
Cabinet: Turn right and
see a cabinet on the back wall. Open it to access the crystal collection
mentioned in Magnus' letter to Elisabet found in her bag.
Crystal collection:
Arrange the crystals as stated on the note.
There should be 4 colors of each (blue or yellow) crystal in
every row and column - with no more than 2 of the same color together.
Do the crystals between or beside the
permanently placed ones first.
Then enclose those similar crystals that are
side by sides already.
Then finish rows or columns that needs only
one crystal.
The numbers at the sides are counts of the
colored crystals.
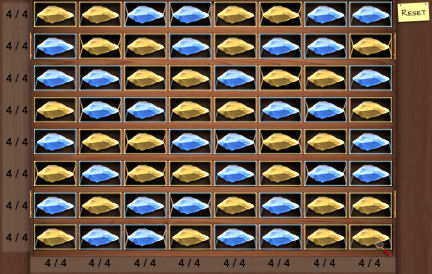 |
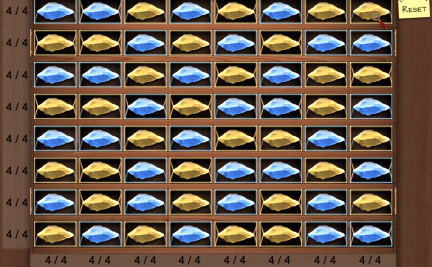 |
| Amateur |
Master |
Find out what is in the footlocker:
The chest is opened. Look inside.
Take the intricately carved small chest. It's a
music box.
Click on the handle to play the music box. Need
more info.
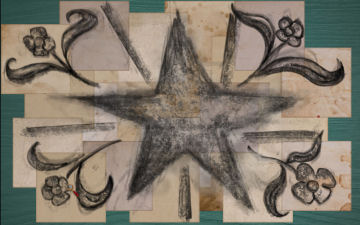
Sketch piece: Look at the
lid of the chest to see a taped sketch.
There are still some sketch pieces missing.
Door: Turn around to face
the door.
Take the decoration disk on the door frame.
You now have 10/10 disks.
Explore the ice cave:
Exit the cabin and use the snowmobile. This time go forward on the road.
Ice cave - Rikur Caverns: Go forward
inside the ice cave. With the flashlight already having batteries, look
around inside. This is the picture on the wall in Magnus' cabin.
Midway inside, see an Icebreaker glove on the left
side.
Go to the end of the path and click on the wall.
Nancy says she can break through the wall with a sharp tool.
Use the fishing hook taken from the fish cleaning
station on the wall.
Maze: After breaking the wall,
go forward 5 times. A split on the path left and forward is here.
Go forward 6 times. See a ladder going up and one
going down.
Take the ladder going down. Go forward once.
Phone charm (bonus game only):
Pick up the axe phone charm from the rock shelf.
Turn around and go up the ladder.
Take the other ladder going up this time.
There is a split to left and right. Take the right
path. Go forward 2 times.
Another split left and right is here. Take the
left path. Go forward and then down into a large hole.
Take the sketch pieces in a plastic bag. Go
back up twice.
Go right. Go forward 3 times until a split.
Take the left path. Go down the first ladder.
Turn around. Go forward (17x) until the exit.
If you have been to all the rooms in the
ice cave maze, you will get an award.
Go back to town. Gunnar with a large knife
pounces.
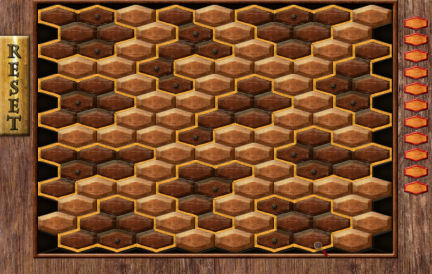
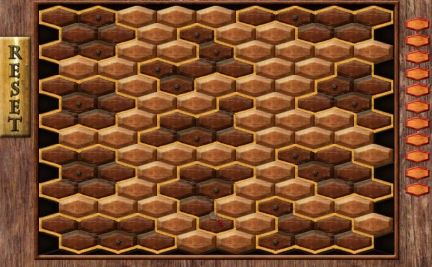
Discover the importance of the crow's nest:
Go to the crow's nest in front of the cultural
center. Dagny is not here.
Climb up the crow's nest. Click on the middle rail.
This the puzzle mentioned by Magnus in the
history book in inventory.
Solution is to divide into groups of six, no
group touching another.
Click on a shape until they are a group of 6.
They will be highlighted within yellow line.
See a wounded Soren pass by.
Take a wooden gear from the secret
compartment.
Cultural Center:
Soren: Talk to Soren at
the cultural center. Gunnar threw a bottle at Soren. It has happened twice
now.
As for the origin of the treasure - Dutch East
India Company does not have a route here at Iceland. Captain Lawrence is
English - not Dutch.
Dagny: Talk to Dagny at
the heater outside.
Get the item Gunnar is using as a coaster:
Go to the dock and Nancy notes that Gunnar went
out on the dinghy.
Pub: Go to the Missti
Split pub and take the coaster on Gunnar's table left of bar. It is a
metal disk.
Read the letter on the table. It's a letter from
Asa to Elisabeth. It mentions a festival demotion and financial trouble with
Soren. Read Elisabeth's answer to Asa.
Note that the sign outside the pub shows high
tide.
Snoop behind the culture center counter:
Soren: Go back to
cultural center and talk to Soren about Magnus' cabin and the vigilantes at
Skipbrot.
Tell Soren that someone took a sweater from the
gift shop.
Enter the counter through door at gift shop.
Phone charm (bonus game only):
Pick up the puffin charm from the top of the luggage at right.
Dagny's luggage: Use the
luggage key from under Tumi's bed at the cabin on Dagny's yellow luggage on
the table.
Read the Heroes of Land and Sea book. See Moira
Chilsolm's (Silent Spy) note to Dagny.
Get more sketch pieces.
Counter: Look close at the
counter.
Open the drawer and see the matching glove of the
one in the ice cave. Aha!
See a yellow postit that says: create volcanic
winter.
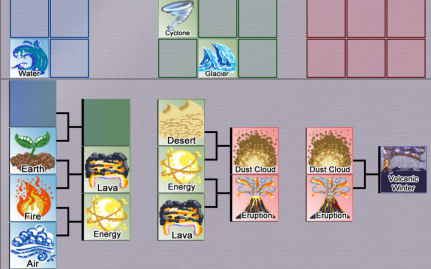
Unlock the tablet:
Create volcanic winter:
Click on the tablet at left.
Mix the elements to form volcanic winter.
Combine 2 elements to make a new one. Continue
combining for a progression of events that leads to a volcanic winter.
Blue squares: Take the
elements from top and place them on the squares below to make new elements
(place on green squares in top middle).
Earth + fire = lava
Air + earth = desert
Air + fire = energy
Middle squares: Take results
of the element combination from top green squares and combine them to make another climactic
change.
Desert + energy = dust cloud.
Energy + lava = eruption.
Red squares:
Dust cloud + eruption = Volcanic winter.
See what is on Soren's tablet:
Read the contents of Soren's tablet. Sonny Joon
was here.
Elisabet was demoted because she spent most of her
time with Magnus and ship. Learn the reason Elisabet was removed from
handling the finances of the festival.
Soren wrote: Five gears crank the wall of empty
wood; behold the curls in the proud lion's mane, facing upwards towards the
sky. Soren saw this on the hull before it was painted over. Learn the reason
of his leaving Harvard.
Read the archived mails. A Dr. Jardin thinks
there's a connection between the Heerlijkheid crashing here and D'Ormesson, the newly appointed finance comptroller of France
during the reign of King Louis before the French Revolution. The possible
use of the Dutch East India Company to move gold to the United States. What
is the Heerlijkheid doing in Iceland?
Search the fallen heater
for clues:
Go pass the crow's nest and see the heater on the
ground and signs of struggle.
Look close. See large footprints and blood on the
snow at left.
Dagny's cellphone: Pick
up Dagny's cellphone at right.
Enter the password learned from Dagny's note in
the barrel at ship's hold - scuttlebutt. Press enter.
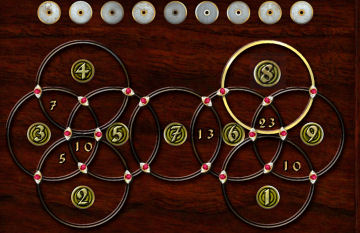
Read the messages.
Magnus - Learn about the bed frame on the ship.
The clues are magic circles, Venn diagram - overlapping sections. Magnus
says there are 5 pieces of the sketch. Magnus has one (now taken) and Dagny
has one.
Soren - Learn that Alicia DeSoto was formerly
Dagny's life partner.
Gildbank - Read about the deposits from Gulf Coast
Treasure Find, Mr. Fallon for Santa Fe Investigation results and from Louvre
for Petra Extraction. Wow!
Check the gallery. See pictures of the captain's
quarter, upper deck, main deck, street of Skipbrot, the ship, the main
square, the ship's hold and a blank wall at the ship's hold.
Discover the secret of the ship's wheel:
Go back to the dock and the ship.
Talk to Elisabet. She says she will fix what she did
about her festival financial problems. She is healing now.
Original wheel: Go to the
helm by the wheelhouse.
Look close at the wheel.
Wheel word match: Now
that all 10 decoration pieces are collected; do the wheel puzzle.
Match the images to create a single compound
word for each pair.
Turn the wheel and get
access to other words that will match the outer disks.
Move-click the matching disk close to the matched
word.
The sailor dictionary seen after finishing the
touch screen puzzle at the cultural center has some of the words.
The center part opens. Take the fixed
locator.
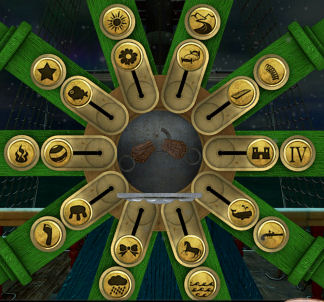
Figure out the sounding depths numbers:
From Magnus diary notes on his captain's desk, we
know that 86 from the crow's nest is the total number.
We need 4 numbers that will add to get 86. One of
them - 14 was seen after the pins-map puzzle at the captain's room.
Tide and barnacles:
Remember that Magnus made a comment that he needs something to remove
barnacles.
Go back to Missti Skip and check the tide. It is
high.
Go up the stairs to sleep and the next time, check
to see if the tide is low.
Look for barnacles: Go to
the dinghy at the dock.
See barnacles on the posts left of the dinghy.
Use the hook on the barnacles - 26.
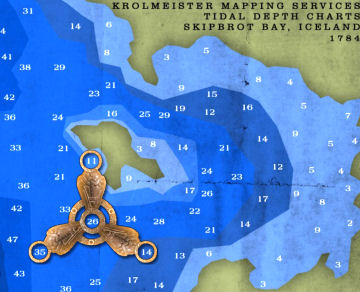
Tidal depth charts: Go
back up to the wheelhouse of the ship.
Look close at the left tidal chart for 1784.
Nancy says she has 2 numbers now: 14 and 26.
Need 2 more numbers to make 86.
Place the fixed locator on the chart.
Move it around to place 14 and 26 in 2 of the
circles. See if all 4 numbers in the circles total to 86.
The numbers are: 14, 26, 35 and 11.
Elisabet's song: Exit the
wheel house and hear Elisabet sing.
Talk to Elisabet about the song. It's an old
family song her mother sang to her.
Find out the importance of the captain's bed frame:
Go to the captain's quarters. Look close at and
click the bed frame.
Venn diagram: Place the
numbers so that the total shown in the overlapping sections is the sum
of those circles' individual numbers.
If correct, the rings are grayed out.
A drawer is pulled out. Take the sketch
pieces.
Dog bed-kennel: Remember
that Magnus commented about the dog kennel at the ship.
Examine the dog bed at the corner. Take the
tiny key under the cushion.
Figure out what the lock combination of the cupboard:
Open the cupboard-cabinet left of bed.
Look close at the numbered circle. Magnus
mentioned that they have to be from lowest to highest.
Enter the numbers of the 4 tidal sounding depths
learned from the chart - 11, 14, 26 and 35.
After each correct number, one of the triangles at
the center recesses. Hear a sound of something unlocked in the ship.
Find out what the lock in the cupboard opened:
Exit the room. Go right and down to the hold.
Cannon: Go down the next
set of stairs.
While on the steps to the lower hold, look at the cannon
at right of steps. See duct tape and other supplies needed to kidnap a full
grown man.
Go forward and see a room revealed at the back of
the room
Open the panel in the hidden room:
Secret room: Go to the
opened back wall. Enter and look close at the other door with a circle.
See a ringed circle with numbers.
Light up all the numbers by pressing the
correct sections.
There are 10 tries only - as shown by the
circles at left.
The numbers seen within the sections are
numbers that needs to be pressed adjacent to that numbered section.
Review Magnus' notes in inventory. It states:
at bottom left drawing that "numbers appear to show the number of
touching sections which have been filled".
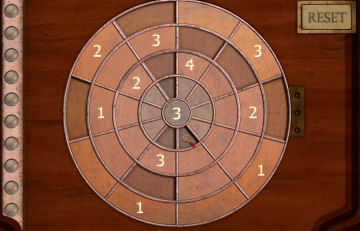 |
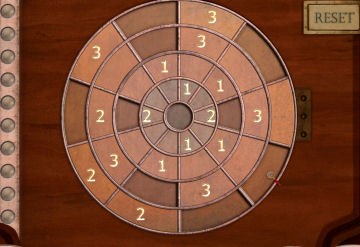 |
| Amateur |
Master |
Gear lock: The panel
opens. Some of the gears are missing.
Use the wooden gear taken from the crow's nest,
metal disk Gunnar uses as coaster and and carved star from the langspil on
the machinery.
More parts are needed.
Escape the bilge:
Exit the secret room. See the bilge cover is
opened. Look close at the bilge. You cannot move away from here.
Nancy is pushed down into the bilge and grate
closes. The water is rising.
Adjust the bilge pump:
Recreate the numbers written in the corner on
the big dial - 15-21-21 for amateur and 19-18-20 for master level.
Turn the dotted circles to change the numbers
in the corners. The sums are seen on the bottom dial.
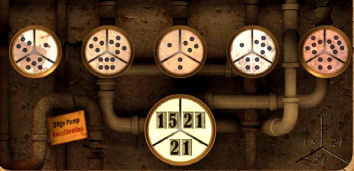 |
 |
| Amateur |
Master |
The pump took care of the water but the grill is
still down. Nancy cries help. Elisabet arrives and pulls her up.
At the deck, Elisabet says she heard a boat leave
but helped Nancy first.
She gives a metal crank that the person
dropped.
Talk to people:
Gunnar: Go the pub at Missti
Skip. Talk to Gunnar.
He doesn't know where Dagny is. He took the dinghy
out looking for the treasure.
Soren: Talk to Soren at cultural
center. He admits about the financial trouble and gave some excuse at to why
his glove is in the ice cave.
Gunnar: Go back to the Missti
Skip and see Elisabet throwing Gunnar out of the building.
Elisabet: Talk to Elisabet at
the ship. Gunnar says some hurtful things about Magnus and Elisabet.
Gunnar: Go back to the Missti
Skip. Talk to Gunnar standing in front of the pub entryway. He
wants a box from the pub.
Enter the pub and go to Gunnar's corner. Take the
box behind the large metal shield.
Open the red 1692 soap box. See a picture of a
young woman. Nancy says she looks like her.
Read the newspaper clipping inside the box. The
tragic drowning of Gunnar's wife Edda Snorisdottir and his daughter Edda is
reported. Gunnar was piloting the dinghy. Read the card sent by Edda
to Gunnar.
Give the box to Gunnar. He regrets what he has
done and will apologize to Elisabet. He wants you to return when the tide
changes and he will give you what he has.
Sleep: Check the tide on the
sign by the stairs. It's low. Go upstairs to rest. The tide is now high.
Gunnar: Go to the pub and talk
to Gunnar in his usual place. He gives the last of the sketch pieces.
Figure out what the sketches create:
Take the snowmobile to Magnus' cabin at left on
the road.
Ned: Get a cellphone call
from Ned. That was very sweet. Say "I love you too, Ned."
If you tell Ned you love him, you will get an
award.
Footlocker: Open the
footlocker and look close at the sketch taped on the lid.
Sketch pieces: Using
the sketch pieces seen at right and was taken from the crow's nest of
the ship; arrange the overlapping pieces to make a full image.
Nancy recognizes it as a mosaic at the
lighthouse.
Elisabet: Exit the cabin
and see Elisabet on a sled.
Follow up on the image created by the sketch pieces:
Go back to town. Take the dinghy to the
lighthouse. If it is low tide, the dock cannot be reached. Go back to the
Missti Skip and rest.
Climb up to the top of the lighthouse.
Find Dagny:
Hear footsteps. Dagny wants to explain her actions in town.
At the heater. Dagny describes why she faked the
footsteps and her disappearance. She wanted time to crack the case. The whole
ship is the map and she needs the key. She think Nancy knows the key. She
gives a lion token.
Closet:
Go back to the ship and Nancy decides to find out
what is in the closet beside Elisabet.
Open the closet even though Elisabet stops you.
Out comes Tumi, Magnus' dog.
She took Tumi during the festival so that Magnus
will look for the dog and also Elisabet.
She gives the sheet music of the family's
love song to the treasure.
Dog chew bone: Look
inside the closet and take the rawhide dog bone. It is a hiding place.
Use the tiny key taken from Tumi's kennel on the
hole. Turn the key.
Read Magnus' note about the chart. The
treasure is in the ice cave but needs Lawrence's journal to access it.
He describes the maze steps to do but need more.
Figure out what the token from Dagny is for:
Go to the figurehead at the bow of the ship. Look
close at the panel on its back.
Lion heads: Drop the
token in the slots to turn all the lion heads upright.
Insert the token on the slots at: left,
middle, middle, right middle, middle, middle.
Take the wooden wheel.
Rebuild the mechanical contraption in the hold:
Go back to the gear panel in the secret room.
Dagny: On the way get a
call from Dagny. She knows it is Nancy that took something from her luggage.
Place the wooden wheel on the gear panel at the
door of the secret room.
Use the metal crank on the left gear. A
compartment is raised up and reveals an ancient box.
Open the right side of the box:
Open the left side and see a sliding piece is
missing.
Open the right side and see a puzzle.
Box-shapes pattern puzzle:
Arrange the pieces so that every row and column has one of each design.
Review the clue at middle right in Magnus'
notes in inventory. "Intricate moving box pattern requires one of each
shape in each row and column with no shapes repeating. Can place
different pieces over board designs if the piece's design fully covers
the board design under it."
Place the symbols that are already shown on
the gameplay squares - one per row or column.
Then fill the large symbols with large pieces
to cover them. From there deduce the rest.
 |
 |
| Amateur |
Master |
Contents: Read the
letter-confession of Captain Lawrence to his daughter. Lawrence became a
pirate under John North. Later, he was North's navigator.
Click on the side of the last page to read a torn
page titled - The Words I Couldn't Keep.
Follow up on the image created by the sketch pieces
(continued):
Go back to the lighthouse and walk to the top.
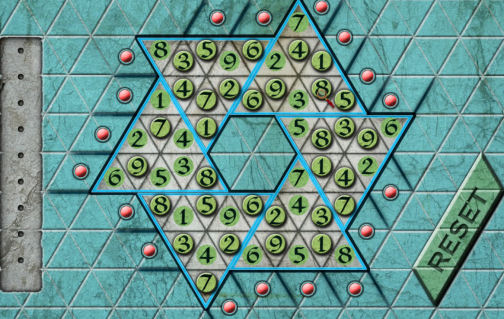
Star mosaic: Turn around
and look close at the star mosaic.
Numbers star puzzle: Place
the numbers so that one of each number is within each outlined large
triangle, horizontal row and diagonal row.
Review Magnus' note in inventory. It mentions
"lines continue across the gap".
Fill in the numbers missing in each triangle
that has the most preset numbers already.
Then work from there. This puzzle is similar
to sudoku.
Lights turns on at the end when that row is
correctly filled.
Take and read the journal page.
Discover the importance of the music box:
After reading the pages of the journal, go back to
town and ride the snowmobile to Magnus' cabin.
Now that Elisabet gave you the sheet music of the
family's love song, open the music box in the footlocker.
Use the sheet music on the box.
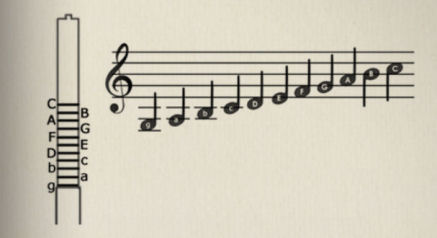
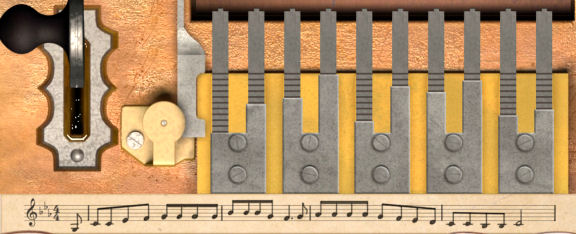
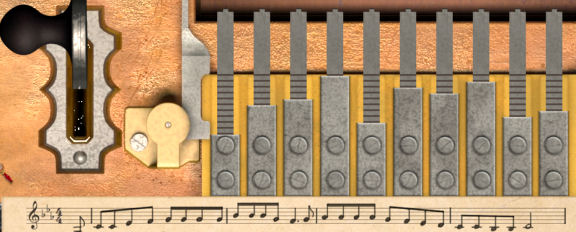
Review the Music Book taken from the lobby of
the Missti Skip.
Arrange the tines to correctly play the song.
Take a set of tines and move it to the correct place.
Make a trial run to see the sequence of the
tines played first and the number of bumps on the roller (for example G
is played 4 times). Then arrange the tines.
Pull the lever to start the music. If correctly done, the whole piece is played.
The drawer opens. Take the fish wooden tile
and journal pages. Read how Lawrence and North got the ship at
Cape Town. The pages are automatically added to Lawrence journal.
Open the left side of the captain's box:
Go back to the ship. Hear the alarm on. Elisabet
and Tumi are not here.
Look around and not find them.
Go down to the ship's hold and then to secret
room.
Captain's box: See that someone
used an axe to take the box from the wall. The box is damaged.
Open the left side of the captain's box.
Move the sliding shape to the treasure mark
yellow X at top right corner. Use mouse or keyboard arrows.
The sliding shape changes shapes and/or color
as it passes to certain tiles.
Note the markings on the tiles. The barriers
open for a similarly shaped and color of sliding shape.
| Amateur |
 |
| |
|
| Master |
 |
Captain's journal: Take
the pages from the box. The journal is now complete. It is Lawrence's legacy
to his daughter. Remember what happened to them in the end. The completed
song that was sang by Elisabet is at the back pages of the journal.
Track down the treasure's location:
Use the snowmobile and go to the ice cave. Follow
Magnus' directions.
Magnus' directions:
1. Enter the cave. (Start).
2. Turn right at the red pumice stones.
(Take 2 steps).
3. Walk forward to the high ledge with red stone.
(R; 4 steps).
4. Climb up and over.
5. Down past the yellow pumice stones.
6. Continue forward until the tunnel splits level.
(7 steps to ladder).
7. Go up. (2 times).
8. Turn right at the cluster of 5 stalagmites.
9. Continue forward to a large cavern. (2 steps;
cavern separates into left and right).
Lawrence's directions:
1. Head into the right tunnel. (The path splits
into left, right, forward).
2. Continue 2 steps. (Go forward and face an ice
wall. Use the hook on wall).
Magnus: Find Magnus. Talk
to him. He thinks it is his fault the culprit did this and he's sorry about
it.
Nancy calls Alex for help. The signal breaks up
after telling her about the ice cave and the culprit responsible for all of
this.
The ground shakes and ice falls separating Magnus
and Nancy. Magnus goes for
help but Nancy is alone.
Find treasure for the culprit:
The culprit carrying an axe faces Nancy. The
culprit threatens Nancy with Gudrun the axe. The culprit wants the treasure.
3. Turn left.
4. Take one step forward.
5. At left is the decoy treasure chest.
See an ice covered boulder at left. Use the hook
on the boulder.
The culprit takes the decoy chest and uses the axe
to cause ice to block the passage - trapping Nancy.
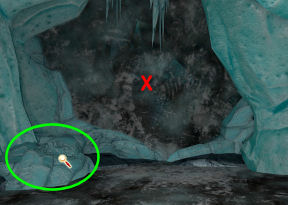
Find the real treasure:
True treasure directions:
1. From decoy treasure chest - go up at another
passage.
Turn around and face the place where the chest was
found. Use the hook on the wall ahead.
Go forward 3 times.
See the real treasure.
2. Press the images in the order they appear using
the words of the song.
Open the treasure chest:
See images on the chest.
Press the images in the correct order
according to Lawrence's final letter.
Use the song found in the back of the
captain's journal as clues.
|
1. Stormy seas - wave.
2. Cold wind.
3. Battered bow.
4. Stone walls.
5. Love.
6. Silent ice.
7. Grave.
8. Bones.
9. North
10. Broken heart.
11. Sails.
12 Blackened sky.
|
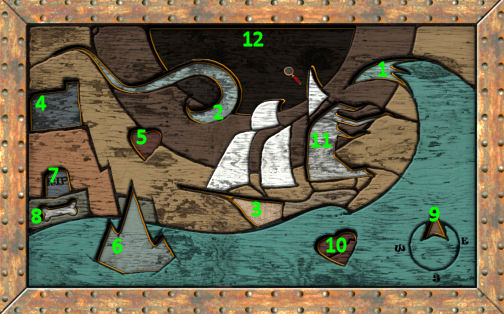 |
The treasure chest is full of gold. Magnus breaks
through the wall. Alex calls and says that the culprit is caught. Decide what
to with the culprit.
The next case is Midnight in Salem
This document may not be
distributed without express written permission of the author and the content may
not be altered in any way.
For Questions or Comments
on this Walkthrough,
Please write to:
MaGtRo
Copyright © 5/2015
MaGtRo
 GameBoomers
Walkthroughs and Solutions
GameBoomers
Walkthroughs and Solutions