Nancy Drew: The Captive Curse
Game by Her Interactive
Walkthrough by NancyDrewFan11
Junior Detective Mode
Copyright 2011 by NancyDrewFan11. This may be not be reproduced under any circumstances except for personal, private use. It may not be placed on any web site or otherwise distributed publicly without advance written permission. Use of this guide on any other web site or as a part of any public display is strictly prohibited, and a violation of copyright.
Notice: You only need to use the discs once, which is when you are installing the game. From then on you can just click the icon on the desktop, and your game will load! Nancy has a backpack, which stores important items, a journal, which provides clues and phone numbers, a task list, which helps you if you’re stuck on what to do next, and Nancy’s phone, which you can call Ned, Frank and Joe, Markus the castle owner, and Castle Cast (later on in the game). On the right hand side is a gear. Click it to change the volume, subtitles, windowed or fullscreen, and matte color. The folder lets you load a new game, the floppy disc lets you save, and the red power button is to exit the game.
Nancy’s Room: You start off in Nancy’s bedroom. You can read the ‘How to be a Detective’ book, Nancy’s scrapbook, and the case file. When you are ready to start the mystery, simply click on the plane ticket!
Starting the mystery: You start the game with a cutscene from centuries ago. It shows a girl in the forest, when suddenly a monster comes and attacks her!! After the cutscene, you will be in present day Germany. Press the glowing buzzer. Hear a voice from above. Lukas will not let you in unless you find the match of the monsters.
Nancy sends the bucket back up. See Karl, he apologizes about Lukas. He wants you to meet him in his study.
Welcome to Castle Finster: Go inside the courtyard and look around. Try knocking on people’s doors and hear them tell you to go away. Huh. Notice a well, and click on the bucket. When the bucket comes up, grab the five coins. Enter the double doors that say ‘Burg Finster’. Go over to the two sofas. Find a coin on the left one’s leg. Read The Brothers Grimm. Turn around and turn right to see a miniature castle clock. Open the mini doors and see a xylophone. Hmmm...
Gift Shop: Go into the Gift Shop located on the same floor. Make a sharp left and meet Anja, the castle’s castellan. Talk to her about a monster situation, what a castellan is, and the items in her shop. Look around the shop and read Grimm’s Baddies on the book shelf. See a replica of the monster. Click on the box below it and try the buttons. Read another book about Monsters: What and Why. and buy some items if you’d like. Exit where you came from then turn left, left again, a curved left, and up the stairs. Read the book on Fine Art Glass and take the coded paper.
Meet Karl: Go through double doors and just when you start up the next flight of stairs, your phone rings. Ned and Nancy get into a fight. Yikes! Go forward twice, then make a sharp left and another left. Continue down the hall until you see two red sofa chairs and a puzzle box on the coffee table. Click on it and Nancy will say she needs to match the glass pattern, but she is missing two pieces. Back out, go forward, and turn right at the Burgermeister’s door. See Karl playing with something. Go over to him and talk about his lederhosen, dolls, Lukas, and the monster sightings. He wants you to play a game of Raid with him.
Let’s play Raid: The directions are in the bottom right corner. To play, spin the spinner. Each space is a different symbol or color, associated with a different challenge. For example, let’s say you land on a heart space. You will then get a card from the deck, then follow the action of the color of the square, and gain a card. Let’s say the square is blue. For a blue square, you challenge your opponent using Magic. Look in the Game Rules booklet to learn how to challenge your opponent. Get it? If you are unsure of the other colors/symbols, be sure to check the direction book. Play easy if you want to win and get it over with!
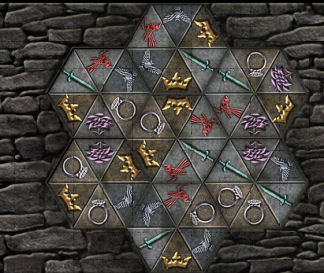
Karl will give you a bag of money once you finish. Talk to him about Lukas and the monster. Let’s explore Karl’s office. Go to the left of his desk and see the cabinet is locked. Back up and head towards the right wall and see a scale with Raid cards on it. Click on it and--oops!--all the cards fall down! Karl wants you to pick them all up! Examine the Raid Game Guide while you’re here. Make sure you see the page on Professor Sparrow.
Placing the Raid cards back in order: You’ll need to balance the levels and numbers of all the cards. It can be confusing, so here is the answer in picture form:
Once done correctly, a sheet of paper will fall. It says something in German, and is from Markus. Hmmm....
Take the paper and look in the corner of the room near Karl and see a portrait of a bird that looks just like the picture in the Raid guide. Nancy comments about how this must be important somehow. Click on it and take the key.
Talk to Karl again and he will tell you about his game being up for review. He wants you to help him design a character! He will ask you to pick if it is a Male or Female. Your choice.
Exit the office and receive a call from Frank and Markus. They both say reception is bad, so you’ll need to call them back in your room. Turn right, forward, and stop at the little alcove to see another set of chairs and a table, this time with what looks like the letter “B” carved into it and a book on Castle Finster. Read the book and continue to the right until you are in a room with staircases. Go up either side of the tall ones and see your room.
Your room: Enter and turn left to see the fireplace. Read the brochure on Die Ungeheuerlichkeit Nacht Festival (what a mouthful!). Look in the dresser and notice that any gift shop buys will be placed in here. Go back, turn right, to the other side of the room where your desk is. Click on the phone and call Ned back. No answer. Try Frank. After you and Frank have talked, call Markus. He tells you how he and Anya used to date. After his call, hear loud knocking and see Karl yelling frantically about how the monster is in the courtyard!
Helpful Hint: If you are tired of clicking the buttons on the phone, why not try your actual computer’s keyboard numbers to punch in the digits?
Fire!: See a fire in a plant and after Karl talks, quickly turn around, go to the well, take the bucket, and wait for it to fill up with water. Take the water, turn around, and put out the fire. Nancy sees something strange stuck in the door. Inspect it closer and take the burr. Go back inside the castle and see a little boy in the corner.
Meet Lukas: Lukas wants to play Monster with you. To play, one player starts as the “monster” and the other as the “farmer.” The farmer places all the cows on the board, and changes their places until satisfied. The monster gets to choose three “secret” monsters. Then, click a cow that is connected to one of your monsters. Once the cow is dead, you have to move any cows around the dead one to a new location. The farmer then guesses which of his cows is the “secret” monster. If you win, he will give you a set of Raid cards.
Talk to Lukas about the monster, Anya, Markus, Karl, and tourists. Go to the gift shop and talk to Anya. While you’re there, buy a piece of cake. You’ll need it later. Go back to the foyer and talk to Lukas some more.
Go upstairs, through the double doors, and Ned will call. Go back to your room and talk with him. Ned and Nancy make up! Make sure you take the German-English Pocket Dictionary located on your bedside dresser before you leave. Turn left out of your room, and go until you make a curved right. You should be facing the staircase down towards the white tile flooring. Go down the stairs after these and you should be facing two grey double doors. Enter and make a curved right to talk to an old woman in a chair in the corner.
Renate: After talking with her, turn back, turn around, and forward towards the porcelain armoire and read the Castle Cryer Newspaper. Note the German vocabulary. Go back, turn around, forward, and scroll left to see the stained glass window. Note the letter “A” on the red part of the tile. Exit the room and get a phone call from Markus. Go back to your room to call him.
Prank!: Enter your room and a bucket of water falls on your head! Too bad Nancy has no change of clothes...
Go to her bed and see a note that wants her to put on this costume.
Now, where were we? Ah yes, calling Markus. After speaking with him, head down to see Karl. Make sure you tell him about the burr, Markus, the glass shop, the monster, and his Raid card. He will give you the key to the glass room.
Talk to Lukas about Renate, the prank, and some other things. Then go over to Anja. After your chat, turn right twice and head down the hallway when you get to the split end, turn right.
Glass shop: Use your key on the locked door. Enter, turn left, and click on one of the cans to get a phone charm (if you have the bonus edition). Click on the rightmost can to see a snake pop out and almost hit you! It’s fake, of course. Turn around twice and see the glass cages. Take the green tile in the top left cage. Face the glass heating machine and turn around. Take the screwdriver, ladle, and tweezers. Turn back to face the machine. Remember to put the metal cover on before opening the door! Note the letter “A” on the side. Also see a sharpening machine in the corner.
Foyer: Look at the coffee table and see a weird shaped piece by The Brothers Grimm book. Take it.
Let’s head outside.
Courtyard: Go outside and see a well in the middle of the courtyard. Hmm..it’s too dark to see anything. Take the shears by going up the staircase to the left of the castle’s door. Too bad they’re not sharp. Wait a minute...why don’t we sharpen them in the glass shop?
Go down to the shop and sharpen your shears. After that, see Renate. She tells you to change right away. If only you could... Go to your room and see your clothes are ripped up!! Look over to the fireplace and take the article clipping. It has a TK on it. Interesting...
Snooping in Renate’s Bag: Talk to Renate and after all conversations are exhausted, give her the cake. She will fall asleep instantly and now you can snoop in her bag. You’ll need to get the Krolmesiter box without disturbing Renate. Click pieces to move. Right-click and hold to rotate. Here is the finished solution:
Box in Renate’s Bag: Click on the box and see it is similar to that of Secret of the Old Clock, at the mini golf place. You’ll need to figure out the color combination. This is all just guess and check, but it will tell you if a color is in the correct spot/color or if it is just the correct color. Be careful, though, you only get a certain amount of errors. Unfortunately, this puzzle is at random each time, but keep going and eventually you’ll get it!
Once you’ve solved it, see a map that shows where the monster has been. Renate’s been tracking the monster!
Be sure to also read “The Owl” book and take the article clipping. It has an N in the corner.
Exit the room and go to the furnace room (glass room). Open the oven machine again and pull the red lever with your tweezers/tongs. A secret compartment opens. Go forward and enter (if you dare!)
Dungeon: Now is a good place to save your game, so if you ever get lost in here, you can load it to this spot and start again. Go forward a few times and see a note on the floor. Take the article clipping. It has an OM in the corner. Make a curved left, go forward and look at the indentation. Go back and look at the ground. There is a trap door. Go back, slightly left, and look in the alcove. Exit the dungeon and head outside. Look at the gate and use your dictionary to translate the phrase. It says “Warning! Do not pull lever.” Let’s keep that in mind.
Forest: Walk out of the gate and turn left, then forward. You should see rocks in front of you. Go forward again. Now turn right. Take a curved forward, forward again, and then right. Take the coins. Turn right. Turn right again and forward. Click forward left to zoom in on the bush and see it is the same kind of burr found in the storefront.
Use your sharpened shears to cut the bush and notice a camp. Take the hexagonal stone and flashlight. Turn around and you might be able to pick up a glowing coin! Turn left, right, forward, and forward again. Pick up the cow phone charm (in Deluxe Edition game). Go forward three times and click on another glowing coin. Go forward, then left. Go forward twice and be at the castle again.
Well: Go to the middle of the courtyard and look down the well. Attach your flashlight to the end of the rope and click the arrow to go down.
Well puzzle: All the edges have to be the same symbol. For a cheat on this puzzle, note it starts with the top left piece because it cannot be moved. You can swap as well as rotate tiles. Here is the answer:
Now is a good place to save your game. Now proceed forward to the boards of wood. Turn left and examine the newspapers as well as the glowing coin. Turn around and go forward to the animal skull, then turn left. Go forward until you see the boulders. Take the paper. Notice ME on it. Go forward and see a lock box with two keyholes. Go forward for a while until finding the shield, continue, and turn left two paces after the shield. Don’t exit, just notice it is there. Turn around, left, and forward twice. Go right, forward, left. Take the coin, turn around, and go left. Go forward until middle of the hallway, then go right and see something red on the wall. Take the code paper. Go left, forward, right until the chains. Make a left. Go forward then another left and pick up the coin. Turn around, go forward until the white door. Welcome to the woods again.
Woods: Go left, right, right, and forward. Use your shovel on the ground to obtain a necklace. Turn around, go left, left, left, forward. Go to the tree on the wall mural and the chains. Turn left at the chains. Go forward to the red box. Go left. Go forward to a large rock, pick up the map. Go left and forward, up to the staircase.
Glass Tile Puzzle: Exit Nancy’s room, head over to the room Renate is usually in. Go straight back, to the stained glass mural, and pick up the dark blue tile. Now go to the
alcove in the hallway near Karl’s office. The goal is to match the top example. Left click to pick up and drop, right click to rotate. You can layer pieces.
1. Place turquoise tile in top right corner.
2. Rotate purple tile and place on bottom row, having the middle top edge of the piece line up with the turquoise left side edge.
3. Now for the dark green one, which should go on the bottom row, in the middle of the purple one on the left side.
4. The red tile should overlap the green and purple, lining up the dark green and red’s left side edges.
5. Light green goes halfway under turquoise.
6. Yellow goes in bottom right.
7. Dark blue goes right above red (overlapping), having their left side edges match up.
8. Orange goes in top left.
9. Turn lavender and place in bottom left corner.
Take the wheel.
Talk to Renate and Karl. Now go to the foyer and talk to Lukas. He wants you to distract Karl. Talk to him first and then go to Karl. Now go to Lukas, and when he leaves, grab the coded paper. Hmmm...click to swap letters. It should say:
Furnace Room:
Now go talk to Anja. When done, go to the furnace room and slide the door, and
use the tongs to pull the lever. Notice the letter “A” inside the burner,
relating to the letter. Go forward into the passageway and use the necklace on
the wall indent. Turn it counterclockwise to see the trap door open. Now look
back at the wall inden t
with the necklace and turn it clockwise, twice. A door opens. Go through. Notice
it is the underground passageways, then go back to the dungeon and out of the
furnace room.
t
with the necklace and turn it clockwise, twice. A door opens. Go through. Notice
it is the underground passageways, then go back to the dungeon and out of the
furnace room.
Lukas’s letter: Look at the painting near Nancy’s room, it is on the staircase. Observe the “G” on her jacket. Translate the caption using your dictionary.
Go outside, near the shops behind the well and look at the flower shop door. The letter “D” is there.
Look at the hallway alcove across from Karl’s. See the letter “B” on a table.
Look at the bell at the courtyard’s gate, and see the letter “G”.
We’ve already found “A” in the furnace room.
Now that we have all the notes, go to the foyer and to the corner wall near the blue couch. See a mini castle. Open the doors and keys are displayed. Order them as 1 being the top left key, 13 being the bottom right one. Play them as 10 7 12 10 11.
Enter the room and translate the note, which tells you that notifications will appear to get alerts. Put Nancy’s cell in the holder. Take out and notice you can alert Anja and Karl when you need to tell them something that is happening. Read the booklet on how to use the CCTV. Then use your three-slitted key in the power hole. Turn the machine on and open the box. The goal is to get all the charges green, and higher charges give power to other charges. Click on 10, 8, 2, 7, and 6.
See Renate in the souvenir shop. Strange...
Look at the other places in the cameras, then head to the shop and look at the cuckoo clocks. Look at the clocks and then the blue slip of paper below them.
Read the book near Karl’s office in the hallway, and use the cutout on it. It should read “Third clock from the left, nineteen twenty one.” This is how to open the clocks. Leggo! But first, get a call about a monster sighting. Go to the courtyard and see-nothing. Strange. Go to the security room and see it in the courtyard. The monster will try to get Nancy. Turn to the wall on the gate and see a locked cabinet, pull the top brick to take the key. Use the key and to complete the slider puzzle, click on A B C D E.
|
Another puzzle will appear. Move F up E right once A down all the way B left all the way Move F up G to left F down C down D left C up H up I up R right. |
|
|
Now another one: Move G up all the way I right all the way A down all the way B left E up H left all the way G down one C down one D left twice F up I right all the way |
|
Booth and clock: The gate opens. See a torn piece of cloth on the gate. Go back inside and talk to Renate. Go to the foyer and see stilts on the ground near the security room.
Talk to Karl, then go to the security room and set an alarm to get Karl out of his room. Quickly go in his room, look at the bird painting and take the key. Use it on his drawer, see the dayplanner, letter, and pen set. Take the drawer key. Translate the calendar with your dictionary, then read the flyer. Exit.
Go to the booth again, set Anja’s alarm. Use your key on her drawer. Read the letters from Markus. Also take the clock key. Look at the book she is reading. Now head to the clocks. Use the key on the third from left one. Set it to 7:21 and take the second wheel.
Go to the security booth, open up the cabinet on the right by sliding the red button. Place your two wheels into the machine. Once they’re in, notice your coded papers appear. Seems like we need to decode them. Hmm...the paper has a sun, moon, and comet. German words for these are sonne, mond, and komet. Enter S, M, and K onto the machine. Now start typing the message on your actual keyboard. It should say:
KARL’S DAY PLANNER- EIGHT, TWO, SIX, ONE.
The next one is a bat, castle, and a mouse. German words are fledermaus, burg, and ritter. Enter F, B, and R onto the machine. It should say: THE FREIHERRS DAUGHTER IS STEP ONE. Interesting... Let’s have a look at that painting near Nancy’s room. We need to find an exact replica of the painting...head over to the shop and buy the postcard. While you’re there, talk to Anja about the monster. Go back to the portrait, and examine your postcard. Remove the gift shop sticker and see “EN” on it.
Karl’s room snooping: Go to the security booth, get Karl out of his office with the alarm. Go into his drawer and enter 8 2 6 1 and the dayplanner opens. Use your dictionary to translate. Go to the Raid area and read the guide book.
The sea hare is the bonaparte, is color coded blue, and blue is a 5.
Rumpelstiltskin is RS goldthumb, is color coded yellow, and yellow is a 13.
The gold children is the golden hunter, red, and red is a 15.
Little snow white is the enchanted mirror, blue, and blue is an 11.
The donkey is the donkey king, green, and green is a 9.
Enter 5, 13, 15, 11, and 9 onto the locked cabinet. Make sure to press enter after each one. Read the files. Nancy says you should try giving Castle Cast a call. Go to her room and dial their number. The receptionist cannot give you information about staff members. Call Markus, he will let you speak with Castle Cast. Call Castle Cast back. Talk to Anja, then go to the security room and see Anja head into the forest. Follow her!When attempting, your phone will alarm about another monster sighting. Go back to the security room, the monster is in the furnace room. Or not. Turn forward and around to see footprints headed back into the castle. Follow the prints up the stairs and see -gasp- the monster. Oh wait--it’s Lukas! Then see the monster for real this time!
Talk to Karl now. Then examine your map from Renate to find the monster. The green sighting icons is where we want to look.
Find das monster!: Have a look in the dungeon. No one. Place the necklace on the indent and turn it clockwise. Go through the door. Go forward and right, towards the shield on the wall. Turn around once there, forward until you see the boulders on the left, and across from them. Go forward and left and take the scarf. Turn around and continue left. Go forward until you notice chains on the wall, to go left. Go left at the tree, forward, and use the prybar to open the barrel. See fabric from the monster.
Turn around and forward to the white door, leading to the forest. Make a left, right, left, right, forward, forward and forward. Turn left, see the sight where the monster was. Take the coded paper, and see the monster! Take a photo of it on your phone. To go back to the castle, back up, turn right, forward, forward, left, and forward twice.
Go talk to Karl and show him the picture, proving the monster is real. Now go to Renate and give her back the scarf.
Now go to the security booth and decode the paper. Set the wheels to M, D, and E. Take the tape. Nancy thinks she is the victim of the monster.
Talk to Lukas, Anja, and Karl. When you leave his office, get a call. Lukas is missing. Check the foyer. Then go to Karl. Look back at the foyer and see sand on the floor. Talk to Anja, then go to the glass shop. Go to the dungeon and hear Lukas in the distance.
Cell Puzzle: The goal is to get the slider across without touching any of the pegs. Number the brown square tiles 1 thru 4. Click on 3, 4, 2, 1. Wait, then 2, and then quickly 3 and 2.
Lukas goes to get help, you stay inside the cell. Turn around and you get whacked! Wake up and turn right. See a puzzle.
The stones should be pressed in sequence by the legend pages.
One is the necklace (EN).
Two is the boulder (ME).
Three is the well (TK).
Four is the shield (OM).
Five is the trap door (N).
Another puzzle appears, you need to make the word ENTKOMMEN.
Number the slots one as top slot, then go clockwise around.
-E goes on top
-N goes to the right
-K goes as number four
-O and T as five
-M as 6
-M as 7
-E as 8
-N as 9
As you place them in these slots, they will move to the next one. Don’t worry!
Exit and go forward towards the shield, stopping midway and making a sharp right at the stairs. Examine the bag. See a forged slip of paper. Someone has been writing Markus’s emails! Also read the monster book.
Go up the stairs and accuse the monster of who you think it is.
After hearing the criminal speak, place the necklace on the wall. Turn it counterclockwise.
Awards:
Beta Tester--for play testing games
Card Collector--for building the full deck
Easter Egg--finding a hidden surprise
Fearless Forester--Who’s afraid of a spooky forest? Not you!
Historic Preservationist--for returning a lost artifact
Keepsake Kitsch--for buying castle mementoes
Security Guard--keeping a constant eye on the castle
Subterranean Dweller--for fully exploring dark places
Take Away Deliverer--food porter extraordinaire
Treasure Hunter--seeking out the fallen euros
Wishing Well--for repeated viewings of the well’s contents
Wolf Cryer--for sounding false alarms
CONGRATULATIONS!
You have beat Nancy Drew #24: The Captive Curse!
Be sure to play the next Nancy Drew Game: Alibi in Ashes
Make sure you watch the bloopers at the end!
This document was provided to GameBoomers.com and may not be distributed without express written permission of the author and the content may not be altered in any way.