Ghost Dogs of Moon Lake
By Her Interactive
Walkthrough by Sara June 2010
This walkthrough is for playing on Junior Detective. During this game it is important that you exhaust all conversations. Remember that this walkthrough is only one way of gameplay. Enjoy the seventh installment of the interactive Nancy Drew adventure series! :)
Getting Started:
Sally’s House: Start the game in Sally McDonald’s house waiting for her to call. While you wait, explore the house. Head over to the table and pick of the water bottle to the left of the red cooler. Look at the sticky note. Hmm… The phone rings, head over to the telephone. Answer the phone and talk to Sally. The call keeps cutting out, from what you hear, she’s telling us to beware of Malone’s dogs. Once you hang up, hear some strange noises. Turn around and head out the door directly behind the telephone.
Meet Red Knott: When you walk out the door you meet the source of the strange noises. Meet Red Knott, a local birdwatcher. He will tell you about Malone’s ghost dogs.
Ghost Dogs: Go back inside. Hear noises coming from outside. Uh oh, look out the windows to see the ghost dogs attacking the house. Run upstairs and select A.M.
Finish Exploring the House: Wake up and go downstairs. Now is a good time to finish checking out the house. Go to the kitchen area and look in the sink. Take the rubber gloves. Now look at the sticky note above the sink. Sounds like Sally has a lot of work to do on the house. Open the cabinet above the sink and take the flashlight and map of the forest.
To the left of the sink is the note from Sally. Turn right and see a door. To the right of the door is a plaque. Zoom in and Nancy will read the poem out lout. Go over to the staircase. There is a sticky note on the side of the stairs. Go and read it. Uh oh, looks like the floorboards really are rotten. On the main menu, select second chance. Look above the couch now. There is a cabinet. Open the cabinet and see wood carvings of dogs, probably Malone’s. Each of the dogs can move except Iggy. Keep your eyes out for sandpaper. Turn around and see a door. To the right of the door there is some kind of clock. It looks like a coo-coo clock. Play around with it and see more dogs. Now look at the other door. You can snoop around more if you like or you can head outside.
Outside of Sally’s House:
Go out the door in the kitchen area. Once outside, turn right and see a water pump. Notice that this pump will not pump any water out! Look down and pick up the wooden bucket from under the pump. Turn left twice and see a path. Follow the path to find a shed.
Shed: Go into the shed then go forward and see a gnome. Click near the iron and the box to see a key. Hmm… wonder what that goes to? Look to the left and see a pump of some sort that makes Nancy cough. Turn right and see a box. Try using the key we just got to open the box. Ah darn, the key broke off! Look at the top of the box where the lock is screwed on. I gotta have some torque!
Motor Boat: Go back to the house and then out to the dock. Go over to the motor boat. Uh oh, it’s full of water. Good thing that we picked that bucket up from the pump. Use the bucket to pour all of the water out of the boat. At the bottom, pick up the screwdriver. Click on the engine box and pull the cord. Notice that the sparkplug is missing. Looks like we won’t be going anywhere until we get that fixed!
Turn around and let’s explore the opposite side of the house. See a stepping stone path that leads to a cellar door and a big blue tarp. Under the tarp find board 1. Take it and put the tarp back down. Now turn towards the locked cellar door. Look down and see a stepping stone with a compass rose.
Shed: Go back to the shed and try using the screwdriver that you found in the boat to unfasten the screws of the top of the wooden box to the right! Yay, it works. Open the box and take a hammer and some nails and a mask.
Talk to Red Knott: Let’s go see if Red can supply us with an extra sparkplug. Since he will only be on his platform at nighttime, go back to the house and go upstairs, changing the time to P.M. To find him, head towards the dock like you’re going to the boat, but slightly before you get there, turn right and follow another path. He will be up in his observation platform. Remember to always exhaust all conversations with everyone. Learn that Red has an extra sparkplug, but in exchange for it, you are going to have to take some pictures. He gives you a sparkplug, a camera, and a bird call tape. He will also tell you to get his cassette player from Em. Go back to the house and change the time to A.M. again.
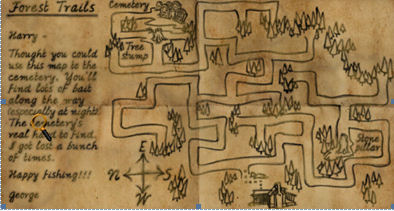
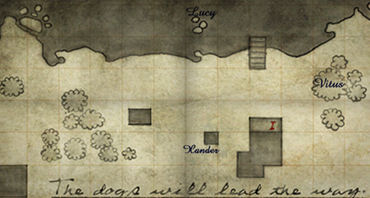
Take Bird Pictures: Go out the door in the kitchen area and go directly straight. This is the forest. If you need help navigating the forest you can use the map found in the kitchen. Go forward and take board 2 off a rock to the right. Now, let’s take some pictures. Explore the forest. When you see a bird get, out your camera and try to snap a picture. If you succeed, great job! But if the bird flies away then we will have to try back later…hmm… When you are in the forest, take a picture of a blue bird, a yellow bird, and a brown bird. If you have explored the whole forest, you have seen a few other birds that have flown away from you. Once you see a bird, Nancy will mark its location on the map of the forest. We should talk to Red about this and see what advice he has.
Cemetery: If you haven’t found the cemetery yet, you can follow the map found in the kitchen to the cemetery. Zoom in on the first tombstone on the left, it says WALDO. This may come in handy later in the game. Go forward and pick up board 3. Head over to the crypt and see the paw prints on the door. Go inside and see a rock coffin. Exit the forest and go back to the house.
Fix the Rotten Floorboards: Since we have found 3 boards and have plenty of nails and a hammer, let’s try to fix the boards. Head over the stairs and zoom in on the floor. Lay the 3 boards down and secure them with the nails and hammer. Now you can go across them! You can see the outline of a door…that’s strange. Change the time to P.M. and go talk to Red. He will tell you that you need camouflage. He recommends going to Em’s. Ask him about the water in Sally’s well also. It needs to be tested. Red says to ask Jeff Akers, the ranger, for a kit. Finally, he says to look for the birds early in the morning. Go back to the house and change the time to A.M.
Explore the Rest of Moon Lake:
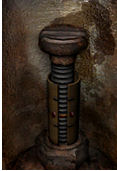
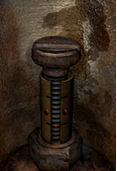
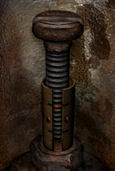
Fix the Boat: Wake up and head out to the motor boat. Put the spark plug in the engine. One the underside of the engine box lid, there are some instructions.
You need to tighten the screws according to the instructions. Use to screwdriver to tighten or loosen the screws accordingly.
|
|
|
|
|
|
top left |
top right |
bottom left |
bottom right |
That should do it! Make sure you grab your lifejacket! If you do not, you will die. Head over to Em’s Emporium first. Pull the line and the motor will start if you did it correctly.
Em’s Emporium: Talk to Em about needing a chainsaw. She says that she will call Tucker Davis, but warns you that he will get around to it when he does. Ask if she has Red Knott’s cassette player, she will give it to you. Ask her about the name Waldo Mathias and the cemetery, and then ask her about her antiques. Talk to Emily about the ranger too. Finally, tell her that you need some camouflage gear. She says that she’ll give you the gear in return for a dozen ‘little critters’. She will give you a box to put the critters in. Then ask her about the sandpaper as well. We will have to ask Red for some sandpaper later. While you’re here you can look around if you want, though there’s not too much to look at.
Ranger Station: Let’s meet Ranger Akers. Get back into the boat and head across the lake to the Ranger Station. Talk to Jeff Akers completely. He gives you a water testing kit. He can mail your letter for you too. Look around the ranger station and read everything that there is. Let’s head back to Sally’s and test the water.
Testing the Water: When you get back to the house, go over to the water pump and put the wooden bucket down. Oh no, the water pump still doesn’t work. Try putting a little bit of water from the water bottle in the top of the pump, maybe that will get things moving. Put the wooden bucket down below the pump. Sure enough it works, so fill up a bucket of water and put some of it in the water testing container. Be sure NOT to dump out the water! Just leave the bucket there! It may come in handy later!
Ranger Station: Go out to the boat and head out to the Ranger Station to return the water sample to Jeff. Head back to Sally’s place and take a quick rest. But before that, don’t forget to listen to the bird calls. Just get out the cassette player, insert the tape and listen. Now you can change the time to P.M.
Talk to Red Knott: Since Emily said that Red would have some sandpaper, go see if he will let us borrow any. Fortunately, he gives us some. Now let’s go back to the house and see if this will help us move the Iggy statue.
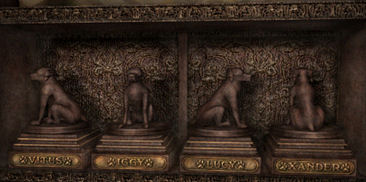
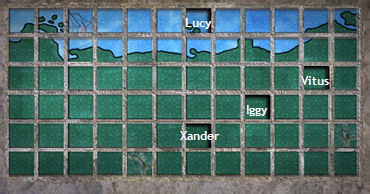
Dog Statues in Cabinet: Now all you have to do is figure out is which way to move each statue. You will have to use the poem and the clock. Try moving each of the statues and seeing what picture shows up in the coo-coo clock. Each of the pictures that show up on the clock symbolize a different season. So using the poem, you can deduce that the spring birth date is the fresh spring leaves, the summer is swans on shimmering blue, the fall is autumn or deer, and winter is birds take flight. So every direction that one of the dogs in moved, a different symbol appears in the space on the coo-coo clock. So if a dog is turned to the left, the birds should show on the clock, every direction has a corresponding image. So using these guidelines, the Vitus statue should be turned to the left, Iggy turned forward, Lucy turned right, and Xander turned backwards.
Hear a click and go towards the staircase. Cross the broken floorboards and see that you can now open the door. Using your flashlight, go down the steps and turn left. Take a framed picture off of the door and then continue on. It looks like we are in a cellar now. Turn left and hear squeaking. Click on the square in the wall to reveal a piece of paper, click again to reveal a safe. It sounds like there are mice behind the safe. Exit the room through a metal door. Be sure to notice a newspaper article sitting on the steps about William Akers. William Akers? I wonder if he’s related to Jeff Akers! You should be outside now. Let’s go back into the house and change to time to morning. There’s nothing like a good night’s sleep! Wake up refreshed and ready to talk to Jeff Akers.
Helping Out:
Ranger Station: Get in the boat and motor on over to the Ranger Station. Talk to Jeff about everything and meet his dog, Yogi. Show him the framed picture from the cellar. He says he will do some research. Offer to help him organize the filer by the computer. If you need to brush up on Roman Numerals, you can use the computer. To access the Roman Numerals files click on History of Moon Lake, then Creation of Moon Lake State Park, then Roman Numerals. You will arrange the files according to year in Roman Numerals. The envelope with the earliest date goes in the front of each column. Now, organize the files by the chunks of years, then by the exact years.
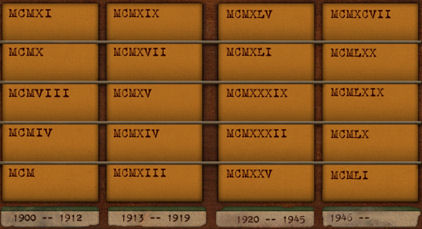
Be sure to read MCMXLI, MCMXXXII, MCMXXV, and MCMXCVII. Then go check back with Ranger Akers. He gives you a Jr. Ranger pin. That’s all you get for the hard work?
Exit the building and hop back into the boat.
Sally’s House: Go back to Sally’s and down to the cellar. Use the end of the pin in the tiny hole in the safe. Now all we need to do is figure out the combination. The rest of previous combos written on the paper are dates of bad things so try the date of Malone’s death. He died on January 29, 1932. So use the combination 012932. Each time that you rotate the dial to a different number, click the button to the right. The safe opens right up! Oops, you better not touch anything yet. Remember Ranger Akers telling you about the nasty diseases the mice can carry… Use the gloves and mask to look through the journal. Take the map of that says “The dogs will lead the way”. Sounds like Jeff are related to William Akers after all! Exit the cellar and head over to the Ranger Station.
Ranger Station: It turns out that Ranger Akers has been doing some research on our mystery woman! Her name is Vivian Whitmore and she can be reached 702-555-9137. Talk to Jeff about the water testing results. Find out that the water contains high levels of arsenic. Also ask him about the gold buried on Malone’s property.
Em’s Emporium: While you’re out, go and see what Emily is up to. Talk to her about everything.
Sally’s House: Go back to the house and call Sally. Be sure to mention the contaminated water. Talk to her completely.
Bug Catching: Time to get down and dirty! Emily said that we needed to catch her 12 critters. Start in the day time. You can catch up to 7 critters during the day and you can find the rest during the night. Be sure to check under every rock and tree you can find in the forest. Be quick though, the critters are fast! Make sure that you look under the rock with the compass rose on it by the blue tarp. You can also check under the rocks by the cemetery. Once you have found 12 bugs and have checked in the nighttime and daytime, change the time back to A.M. and give the bugs to Em. Take the camo gear and go finish taking Red’s pictures!
Finish the Bird Pictures: Head back to Sally’s and enter the forest. The map found in the kitchen should tell you where the birds are at. Just go towards the ones you still need and snap a photo! You should have 5 pictures; you should have a picture of the birds we were able to get without camouflage, plus an orange bird, and a red bird. But we’re still missing one, the Red-Tailed Hawk. Go talk to Red about that. Change the time to P.M. and visit him on his observing platform.
Red-Tailed Hawk: Red Knott suggests looking in the big tree just southwest of Sally’s house. Change the time to A.M. and go check it out. Well, there isn’t a tree but there used to be one. All that’s left is the tree stump. Hear a Red-Tailed Hawk in the distance, look around and see one perched on the roof! Quick, take a picture! Wait, what is the hawk perched on? Looks like a speaker…hmm… KLUNCK! You are knocked out!
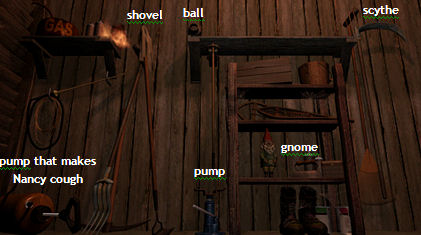
FIRE: When yWhen you awake, you find yourself in the burning shed! You can hardly move because you’re tied up, but you can kick with your feet. There are specific steps to getting out of the shed.
First, kick the gnome to land on top of the pump. Kick the shovel that’s standing to the in between the two shelves. Then, pump the pump in the corner that made Nancy cough earlier. This should set the end of the shovel on fire. Move the shovel back to its original position by clicking on it once. Now, you must click on the pump by the gnome twice to push a ball down the shelf and move the scythe to cut the ropes. Now that you are out of the shed, you should put the fire out. Run over to the pump and pick up the bucket of water you left filled up! Take it to the shed and splash it on. Whew! That was a close one. See Red come by and talk to him. He says that he needs to see you later tonight! Finally, talk to Sally on the telephone.
Talk to Red: So Red Knott mentioned that he needed to tell you something, so go upstairs for a quick nap. Change the time to P.M. and go see Red. Give him the camera with the 6 pictures. Head back to Sally’s house and then see a ladder leading up to the roof. That’s new? Climb up and notice that the speaker is gone! Change the time to A.M.
Call Vivian: Use the telephone in Sally’s house to call Vivian Whitmore. Tell her about the photo you found in the cellar and exhaust all conversation with her. She says that if you mail her the photo you found, she would give you a key to the speakeasy. She says that the regular way to enter the speakeasy was through the cemetery.
Ranger Station: Go up to the Ranger Station and ask Ranger Akers to mail the photo. Now, hop back into that boat and head home! Let’s take a quick nap.
Sally’s House: Change the time to P.M. and then back to A.M. again.
Ranger Station: Go to the Ranger Station to see if that package has arrived yet! It sure has, so take the key! Take the boat back to Sally’s place.
Finding Malone’s Treasure:
Graveyard: Make the trek through the forest to the graveyard. Go to the tombstone that says WALDO. At the top of the stone, see a keyhole. Insert Vivian’s key there and hear a clicking sound. You have to change the letters so that it says BALDO. First, click on the D two times, and then click on the W two times, as well as the U two times. Click on the E two times and the U two times. See the steps down to the speakeasy! Eek, it must be the secret entrance! Descend the stairs and pull out your trusty flashlight. Uh oh, it looks like the batteries are going dead. I’m sure Emily has some in her shop. Leave the graveyard and get into the boat.
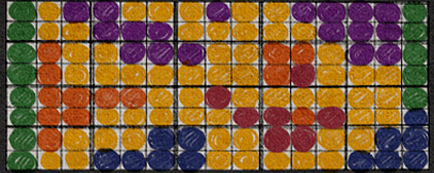
Em’s Emporium: Sure enough Em has some batteries in stock. To earn them you must help her set up a can display. So head over to the big cooler and make the cans look like the display paper that Emily gave you. Left click on the corner of any piece you wish to rotate.
Tah-dah! Go talk to Emily and get the flashlight batteries. Now your flashlight should work and you can go explore the speakeasy!
Speakeasy: Go back to Sally’s and go through the forest to the cemetery. Change WALDO to BALDO and then use your flashlight to go down the stairs. There are many ways to go so explore the whole set of tunnels. Remember where everything is in case we need it later in the game. To get to the speakeasy, go left when you get a chance, then right, then right again, until you come to a door. Open the door and step into the speakeasy. Wow! After entering, turn left and see a picture of Vitus. Nancy will mark the spot that Vitus used to sit under the trees on the map. Make sure that you notice the color of each dog’s collar. So Vitus’ collar color is BLUE. Make sure that you look at the picture of Lucy and of Xander. Lucy’s location should be marked on the maps and you should take note of the collar color. Lucy’s collar color is GREEN and Xander’s collar color is RED. When you zoom in on Xander’s picture, Nancy doesn’t record the location… that’s odd! You can find Iggy’s picture behind the bar. His collar color is YELLOW.
Spigots: After looking at her picture, turn left and see the spigots mentioned in William Aker’s journal. The spigots won’t move! There must be a way to unlock these spigots! Go over to the Roulette wheel and click on the thing in the center to reveal a button. Press the button once then go back to the unlocked spigots. The object of this puzzle is to arrange the numbers as X, V, I, L. X stands for Xander, V for Vitus, I for Iggy, and L for Lucy. The collar color corresponds with which spigot you need to be their letter. Since Lucy’s collar is green, the green spigot needs to say L. You must click on one spigot and press the red button. So, numbering the spigots from left to right, one through four, click on spigot 1 one time, then press the red button. Then do this 2 more times to make the letter read X. Click on spigot 2 one time and press the red button. Do this 2 more times to make the letter read V. Click on spigot 3 one time and press the red button. Do this 2 more times to make the letter read I.
Finally, click on spigot 4 one time and press the red button. Do this 2 more times to make the letter read L. If you have done this correctly, another passageway should open. If you are done looking around the speakeasy, go out through the way you came in.
New Passageway: Go forwards until you see a light, follow the light. See mosaics of each of the dogs and multiple maps. If you look closely at the mosaic of Xander, Nancy will note his location. Inspect the maps carefully and find that one that matches the map that all of the dog’s locations are on. It should be one directly to the right of Xander. Click the squares on the mosaic that match what you have on “The dogs will lead the way” map.
Ghost Dogs?: Voila! Yet another secret passage opens! Go forward and see a locked door. But, we don’t have a key! Exit the small passageway. Go past Xander’s mosaic and at the fork, turn right. There is another room. Go into the little room. Turn left and look at the cage. So you’re the ghost dogs? You look pretty real to me! Then go forward and see that someone has been spending a lot of time down here recently. Hmm… I wonder who… Go over to the desk and take the key. Read the journal as well. Antiques? ND knows about the gold? Whose journal is this? Anyway, go back to the passageway uncovered by press the mosaics and try the new key in that door. Yes! Well: You are in a room with some sort of well now. Walk through the door and turn around to pick up a well wheel. Don’t open the door to the big well, or a ton of water will spill out and you will have to use your second chance. Turn right and see a bunch of wheels. Also see a wheel missing. It must be the one you picked up by the door. Zoom put and put the wheel on. It’s too loose so use the screwdriver to secure it. Zoom in on it and stick the screwdriver into the small hole. Now that’s better! Turn the wheel on the far left first. Turn the wheel you just fixed, then turn the wheel on the far right. Check the water gauge, looks like the well is empty. Take the screwdriver and the wheel back and enter the well. Go down the ladder and turn to face the next puzzle. Save your game here!
End Game: This puzzle is about Roman Numerals. Each of Malone’s dogs’ first letter of their name is also a roman numeral. So I is 10, V is 5, X is 10, and L is 50. You will also need to use the collar colors again. If you don’t remember Iggy is YELLOW, Vitus is BLUE, Xander is RED, and Lucy is GREEN. Move the numbers on Lucy’s first and set it to 50. Then move Xander’s to 10. Now move Vitus’ to 05 and Iggy to 01. But one of Vitus’ numbers has changed! Just fix Vitus’ and Iggy’s and you should be all set! So left to right, it should read 50, 10, 05, 01. You will need to put the wheel in the door and turn it. The door opens to reveal Malone’s hidden gold! Turn to leave and start climbing up the ladder.
Your Getaway: Uh oh! Turn around and go into the room with the gold. Close the door behind you. Then, look down and climb though the grate in the floor. Then climb back up into the next grate. Turn around and see the culprit looking for you. Close the door then climb up the ladder and watch the ending. You, as Nancy Drew, have solved yet another case!
This document was provided to GameBoomers.com and may not be distributed without express written permission of the author and GameBoomers and the content may not be altered in any way.