Nancy Drew: Secrets Can Kill Remastered
Game by Her Interactive
Walkthrough by NancyDrewFan11
Junior Detective Mode
------------------------------------------------------------------------------
Copyright 2010 by NancyDrewFan11. Email me at nancydrewfan11@gmail.com.This may be not be reproduced under any circumstances except for personal, private use. It may not be placed on any web site or otherwise distributed publicly without advance written permission. Use of this guide on any other web site or as a part of any public display is strictly prohibited, and a violation of copyright.
------------------------------------------------------------------------------
Notice: You only need to use the discs once, which is when you are installing the game. From then on you can just click the icon on the desktop, and your game will load! Nancy has a backpack, which stores important items, a journal, which provides clues and phone numbers, a task list, which helps you if you’re stuck on what to do next, and Nancy’s phone, which you can call Ned and Mitch Dillon (you can call Mitch later on). Look for coins in the game to play barnacle blast, buy sodas, and play the jukebox machine! Have fun!
------------------------------------------------------------------------------------------------------------
Nancy’s Room: You start off in Nancy’s bedroom. You can read the ‘How to be a Detective’ book, Nancy’s scrapbook, and the case file. When you are ready to start the mystery, simply click on the plane ticket!
Starting the mystery: You start the game off with Nancy’s letter to dad. When she finishes reading it, click forward to read Aunt Eloise’s letter to Nancy. Open the rightmost drawer and notice the four symbols on top. Hmmm.... they look Greek to me! I wonder what they could mean.... Click back and forward towards the tapestry with the embroidered roses. Wow! This lock looks really similar to that letter with the Greek letters on them! Enter the combination.
![]()
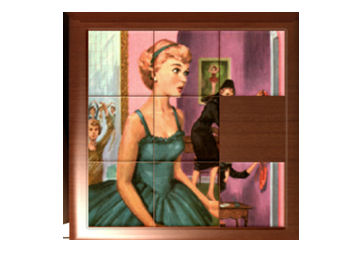
Tile Puzzle: Click on the tile puzzle box. This game is one of those sliding puzzles. Since it takes too long to write out the solution of the puzzle, here is a picture. From here, just move the bottom right piece up!
Look closely at Eloise’s School Computer username and password. Nancy will automatically remember her Aunt’s information in her journal under her observations. Click back a few times and take the ideas key on the black inside of the cabinet. Turn around and head into the living room. Turn right towards the T.V. and get a closer look at the rightmost bookshelf. Pick up the eleventh book and take the teacher’s lounge key. Exit the house and Nancy’s phone rings. It’s Detective Beech. He tells you he’s at the diner. Let’s go over there now.
Down to the Diner!: Click on the diner place and talk to the man in the blue shirt at the counter of the diner. When you finish turn left and talk to Detective Beech, or as he calls himself, ‘Uncle Steve.’ When you finish talking to him, click on one of the pink menus, either on the diner table to your right when you walk in, or to the left when you walk in behind the booth. Take note of Xe: R3. Go into the kitchen, located behind the counter of the diner. Turn right and see the work schedule. Someone wrote, going up and down, ‘Check yer eyesight in gym.’ Note Te: L3 in the last box. Notice that something has been removed in the bottom corner of the Schedule. Turn around and pick up the ladle in the black box. Click on the note next to the bin. It’s a note from Connie to Daryl, supposedly declining a night out. Take the bolt cutters underneath the cutting area and replace it with the ladle. Click on the paper on the fridge. The numbers are in code with letters. It says, ‘Daryl brings secrets to the diner To get cash for a life so finer.’ Now exit the diner.
School Sightings: Go to the school now. Go left and see a bulletin board to your right in the school hallway. Click on the white slip of paper. It is written backwards. It says ‘Up, down, left, right the first letters will help my plight.’ Notice He:U2. Go forward and click on the locker with a yellow banner on it. Must be Jake’s. Since we don’t know the combination, let’s keep going. Turn right and see another bulletin. Look closely on the slip of paper. The words are mixed up in different sentences, but it really says ‘Find the morning edition and discover the crime, the answer is in black and white to who will do the time.’ Again, notice Ir:D2. Go straight and see another bulletin board. Look close at the pink slip. Reading it diagonally up and down, it says ‘Sinners on a vid.’ Note Kr:L2. Keep going straight, until you get to the end of the hallway. Click on the bulletin next to the metal double doors, Click on the 3 index cards. Index card #1, reading it upside-down says ‘Nowhere to turn to, Nowhere to hide, let the books in the library, be your answer guide.’ Index card #2, reading it backwards and starting at the bottom, says ‘A symbol of kanji worn with great pride reflects big secret that someone must hide.’ Index card #3, reading it upside-down and backwards, reads ‘He did what it took, to make the grade, even if it meant cheating, to keep up his charade.’ Notice K:R1 on Index card #1.
Meet Hector: Turn right past the bathrooms and see a guy in a jersey, Hector Sanchez. He tells you he can’t talk now after a few sentences, but click on him again and you can finish everything else you want to say. Turn to the right of him in the corner. See a judo poster. Past the soda machines, turn a curved left and turn left into another hallway.
Library Time: Go forward into a main lobby room and see two bulletin boards on either side of the library doors. The board on the left of the doors has a white slip of paper reading ‘Grape Grape Orange Cool Will play the alarm in the school.’ Notice Zr:R4. The bulletin on the right has a slip with a list of numbers. Notice Y:D3 on the slip. Use your ideas key to open the doors. Turn right to the library with the encyclopedias. The red bookshelf has one about kanji. The green bookshelf has one about Marie Antoinette. The other red one has a book about Braille. These books will come in handy later. Turn right and see a drawer filled with maps. Open the fifth one and under that map is a slip of paper. Notice Na:L3.

Read the red letters: If anything happens to me sear
Read the blue letters: ch under my combo in catalog!
Hmm... maybe his locker combo? As soon as we figure that out, we can search it on the library computers!
Meet Mr. Tanaka: Exit the library. Continue right and go into the study room with all those chairs and tables! Meet Hal Tanaka. Hal will also tell you he needs to study and leaves the conversation short. But just click on him again and you can finish talking!
Talk to him and he says he doesn’t know Jake’s locker combination. He says something about using your phone. Click on the bulletin board to the left of Hal. On the bottom of one of the papers, backwards, it says ‘The hidden tape will seal my murderers fate.’ Note C:R1. Exit the room, entering the hallway with the bulletin board. Look close at the blue and white paper, and it reads ‘A crane contestant in a masked disguise, won the prize money despite all the lies.’
Connie Watson: Go back and turn left into the pink room, to meet Connie Watson. Connie will do the same thing to you, cut you off short. Talk to her again to learn some more information. If she cuts you off again, continue clicking on her until you’ve said everything you needed to say. Once you’re done, notice the room to the right of Connie. Even though you have a key, she still won’t let you in there. I guess we’ll have to wait until she’s out of here to snoop, but how do we get her out of her room? Turn out of her room and see another bulletin board.
Click on the Senior Essay Contest slip and notice the underlined words. Put them together and they say: ‘Put elements in order to open puzzle.’ Again see Zn:D1.
Jake’s combo: Look at your phone. Since we know Jake needed a phone to open his locker, and that letters and numbers on a phone match up, why don’t we try his name in numbers?
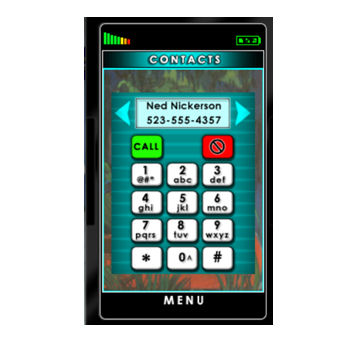
‘Jake’ would be ‘5253’, since a J is a 5, A is a 2, and so on. Find Jake’s locker and enter 5253. Click on the video tape cover. It’s empty. Look through ‘English Essays Through the Ages’ by Prudence Rutherford. Read about the Masked Judo person, in Paseo Del Mar, Florida. Click down and see a newspaper on the bottom of the locker. Read about the Break-In at Local Pharmacy. Now go talk to Hulk about the break-in. He tells you he doesn’t know anything about it.
Library Research: Head into the library. Turn right across from the encyclopedias and pick up the ‘Sports Today’ magazine. Read about Steroid Abuse. Go over to the library catalog computers and search ‘5253’. A search comes up as ‘Evidence’ by Jake Rogers, located ‘Under My Seat.’ Go upstairs and keep going left until you find a table and chairs. Look under the rightmost seat and find a tile with buttons on it. This will be useful later.
Teacher’s Lounge Snooping: Exit the library and go to gym area where the soda machines are. Use the one that works, and click on Grape, Grape, Orange, and then Cool. The machine breaks, and Hulk will say ‘Nice one!’ Better tell Connie! Talk to her and she will go off to fix it. Connie will leave, and now’s your chance to snoop in the lounge! Use your gold key to open the doors and log on the computer using username: Eloise Drew password: o wise elder. Click on the icon ‘Printer’ on the desktop. You will hear something printing. Go back, turn left, and take the paper from the machine. It’s a security detail report. Note the bottom of the page, about catching several students peeking through the teacher’s lounge. One of the students was Daryl Gray. Go back onto the computer, and click the passwords icon. These will come in handy later. Isn’t that weird how reading the codes down, it spells ‘Nancy Drew’? Everything else on the computer to look through is optional. Go to the file cabinets and open the Senior Final Papers. Open Hal’s and see that he simply copied from the book in Jake’s locker! Before leaving, note the bulletin board with CL:D2. Leave and and get a phone call from Mitch Dillon. He says stop your ‘nosey-nosing.’ Creepy how he knew, just like Samantha Quick in VEN... Anyways, call him back, and he says he doesn’t know what you’re talking about. What a liar! Go over to Connie’s desk and read what she’s writing. Interesting...Talk to Hal about the essay.
He admits he copied it! When you finish talking with him, go to the maintenance room. It looks like the lock is in Braille. Remember that book we saw in the library about Braille? That might help! Go to the library and look in the book. The decoded Braille is:
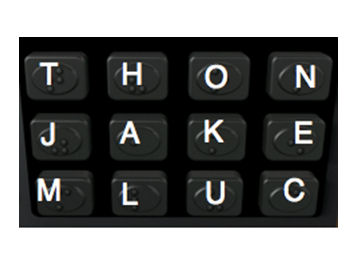
Isn’t that weird how the second line spells out ‘Jake’? Hmmm... must be a coincidence! We can open the lock later. For now, let’s go to Maxine’s Diner.
Video Tape: Go to the diner and talk to Daryl. He says ‘Uncle Steve’ isn’t here right now. When Daryl asks you about Jake’s locker, be sure to say ‘It was open and I just looked through it.’ Finish talking, and Daryl will give you a letter someone left for you. It says to meet them in the maintenance room. Click ‘Note’ on the Braille lock. It will open. Click on the red button for the service elevator. Turn left, open the toolbox, and pick up the gloves. You can also take the matches in the other corner of the room. I wonder why there’s a Maxine’s Diner cup in here? Use your bolt cutters to break the chain off the boiler. Click the gloves and have them on as you do this next part. Click the first meter, first meter, third meter, third meter, and first again. To the right of the boiler is a grate. Take the video tape and go through the grate. Now go to Aunt Eloise’s house, turn the power on, and insert the video in the TV. It’s showing all the bad things that Connie, Hal, and Hector have done. Go back to the school and talk to Connie and Hulk. Now go to the diner and talk to Detective Beech.
Opening the tile: Go to the library and look at Jake’s Chemistry book and the paper inside it. Remember those things, like C:R1? These will come in handy now. Each element has a number with it, list them from least to greatest (or first to last). Start with the element from Maxine’s Diner. Find it in the Periodic Table of the Elements above the table. The letter (U,R,D,or L) stands for up, right, down, or left, and the number (1,2,3,etc.) stands for how many times you go up, down. left, or right.
Here is the order you press the tile buttons in:
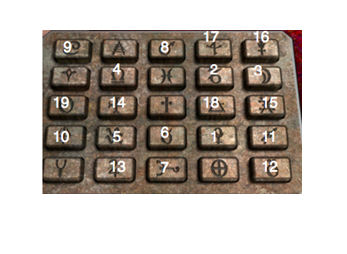
Pick up the cassette tape.
End Scene: Go back to Aunt Eloise’s house and watch the video of what really happened. Turn off the TV and the culprit is right in your face with a gun! They want to know where something is. Tell her/him it is in the tapestry. Tell them 3 incorrect answers and a trap falls on them! Watch the ending scene.
CONGRATULATIONS!
You have beat Nancy Drew #1: Secrets Can Kill REMASTERED!
Be sure to play the next Nancy Drew Game: Secret at the Water’s Edge
This document was provided to GameBoomers.com and may not be distributed without express written permission of the author and GameBoomers and the content may not be altered in any way.