By Her Interactive
Walkthrough by Norma Kuderna and Linda Shaw
August 2002
This walkthrough is written for junior and senior detective modes. If this is your first time playing a Nancy Drew game try the tutorial on the cd-rom. This game is non-linear but certain things have to be done before you can proceed. For example, you can do the activities in the temple, but you won't be able to get past the last quiz question. It is easier to finish all your tasks in the lab first. The only difference that I could see between the junior and senior detective mode is that the maze is harder when you play as a senior detective.
Nancy is working for the Beech Hill museum in Washington, DC, as a deputy curator. This is an internship position, which her dad’s friend, Franklin Rose, helped her get. Beech Hill museum is closed now and getting ready for an Ancient Mayan Culture exhibit.
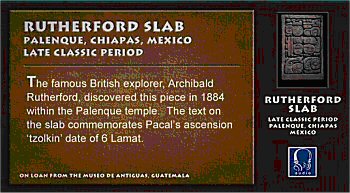
Nancy meets Joanna Riggs…. In the exhibit hall. She shows Nancy the jade carving of King Pacal. Later they talk in her office and she tells Nancy there is a list of tasks she would like done on Nancy’s desk in the lab. Before you leave Joanna’s office, look at the magazines on the round table in the corner. Look at “Art in the America’s”. Click on the paragraph about Rutherford on page 28. Nancy will say, “ Topeka Commission for the Arts…how cultured!” Now you can look through the rest of the article.
Before going to the lab take a look around the lobby of the museum. Leave the office and turn around to view the plaques on each side of Joanna’s office door. Especially look at the plaque on the right side that lists the major contributors and click on the bottom section where it lists Lady Prudence Rutherford and the Topeka Commission for the Arts. Nancy will say, “Topeka Commission for the Arts – that’s the organization Prudence Rutherford works for!”
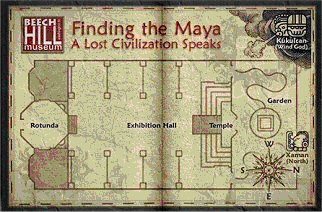
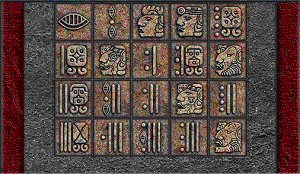
Go to the admission desk and look at the map. (Notice some of the glyphs and their translations. It will be useful later. )
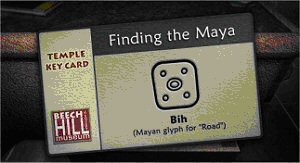
Go around the other side of the admission desk and look in the drawer. Take the Temple Key card
Notice there is a knob missing on the doors to the headphones.
Go out towards the double golden doors, but turn to your left and go into the alcove. Pick up the paper that is folded into an airplane. You will need this later to finish task #3.
The double doors lead to the Metro station. The red dots show where you can go at this time.
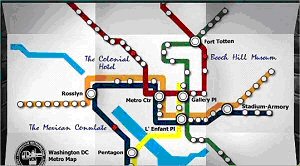
The Colonial Hotel is where Nancy is staying. Her laptop is there and contains her notes about what she has done and what she needs to do next. This is very helpful if you get stuck and don’t know what to do. Later as you pick up Sonny’s floppy disk and Henrik’s disk you can access the information from Nancy’s computer.
You can also call her friends, Bess and George, for help. Use the alarm clock if you have to change times.
Time to get to work! Go to the LAB…
To find the lab, go all the way through the main exhibit hall and veer right before you get to the pyramid. Go through the door that says “Employees Only” and then take the door to your right that says “LAB”.
LAB
Nancy’s desk is the one on the left facing the door. Find the list of tasks. Open the top drawer on the right and look at Sonny Joon’s notebook. Look at the candy wrapper. Pick up the loose knob. (looks like it might fit on the glass cabinet in the lobby). Look along the counter at the Spectro X analyzer. Click on the switch and Nancy will say, “ I better get permission first.” Look at Henrik’s desk and also the ham radio.
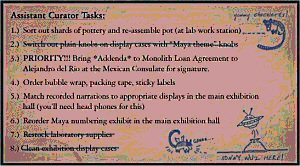
#4. Order Bubble wrap, packing tape, sticky labels. (easy to do first)
Look at the list of suppliers next to the phone and call Silvio’s Curatorial Bonanza
At 555-9963. Talk to Silvio and try ordering more packing supplies. Your account
number is BH119K.
Before leaving the lab to do task #3 which is a PRIORITY, talk with Henrik. Ask about his work, monolith translations, etc. Ask about the order for packing material and he will absolve you from that task. Ask for advice.
Leave the lab and go to the Mexican Consulate to finish task #3. Make sure you have found the Monolith Loan Agreement. It is that airplane folded paper in the alcove of the lobby. Talk with Alejandro del Rio. When you finish return to the museum and use the knob you found on the glass cabinet to get a pair of headphones. Go back to the lab and cross of task #3.
#1. Sort out shards of pottery and re-assemble pot (at lab work station)
You need to find 2 missing pieces first. One is in the box labeled Sonny’s “Stuff”
located on a shelf in Shipping and Receiving across the hall from the Lab. The
other piece can be found in a bowl on the top floor of the pyramid.
After finding both missing pieces go to the work station in the lab. Click on the pottery pieces and all 7 pieces will show up on the right side. Place your cursor over either side of the black turntable until it changes to a curved arrow. This will turn the vase and make it easier to place the pieces. When all the pieces stick in place you will know it is done and Nancy will say, “That’s done!” Now you can cross this task off your list.
#5. Match recorded narrations…
Henrik will give you some help on how to do this if you ask him. This is what he says:

There is a picture of how the exhibits are lettered on the Auto Narrator in Sonny’s
notebook.
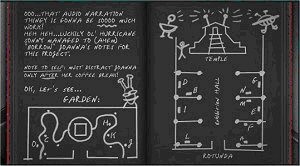
Using your head phones, go to each of the exhibits in the main hall and also in the garden. Listen to the exhibit and check to see if the audio matches with the exhibit. If it doesn’t you need to change it on the Convomatic Auto Narrator located in the Shipping Receiving room. When they are arranged correctly Nancy will say, “That’s done!” Cross that task off your list and you will have only one more to do.
Click here to return to the walkthrough
To solve the auto narrator puzzle, change the number for each of the lettered exhibits:
A 5
B 8
C 14
D 7
E 1
F 6
G 9
H 15
I 3
J 13
K 12
L 4
M 2
N 10
O 11
#6. Reorder Mayan number exhibit in main exhibition hall.
You will need to find two tiles first. One is located in the main exhibition hall in the glass case in the section “Who Were the Maya?” Click on the key hole to open the glass case. The other tile is located in the garden section on the Bicephalic Altar.
Once you have those tiles, go to the end of the Language section in the main exhibition hall. Click on the key hole to open the case. See picture below:

For clues on solving this puzzle:
Go to Nancy’s room and check out Sonny’s floppy disk. Insert it in the lower right hand slot of her laptop. The password is koko kringle. Under Stuff to Remember you will find Sonny’s I’d rather be counting sheep guide to the MAYA NUMBER SYSTEM. With this information and the two tiles you are ready to complete the task and mark it off your list.
This is how the completed puzzle will look:
Under Stuff to forget you will find the system login: and system password for the TEMPLE MAZE puzzle.
Stuff to do will have added information for the Convomatic Narrations.
Go to the GARDEN
While you are checking the narrations on the exhibits in the garden, look at the monolith. Examine it closely by clicking on it and Nancy will say, “This side looks damaged.” You will hear footsteps. Step back and you will meet Sinclair. Talk to him and he will tell you to meet him at his office. That site will be added to the metro map.
After finishing all your tasks, talk with Joanna in her office. Go to Sinclairs and ask him why he said Beech Hill is in jeopardy.
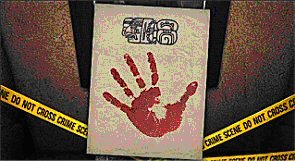
Before going back to Beech Hill, stop off at the Mexican Consulate and talk with Alejandro again. Go back to the lab and notice that Henrik is not there. As you leave the lab an alarm will go off and Joanna will tell you the police are on their way. You are at the crime scene and will see a paper with a scarlet hand print on it where the jade carving used to be. Talk with Joanna and then go back to the crime scene to take the note with the hand print.
Go back to the lab. Henrik is not there but he left a note for you on the desk.
Check your voice mail. Call Franklin Rose at 555-1441.
Talk with Joanna. She tells you to analyze the hand print.
Go back to lab
Analyze the scarlet hand print on the note.
Use the note with the scarlet hand print on the Spectro X Archaeo-Analyzer
1. Click on the switch to turn it on
2. Click on the door to the analyzer receptacle.
3. Place the hand print inside
4. Click on the screen, then click on START
5. Click on compare
6. Click on the left arrow to line up the graphs.
7. Click on MATCH
Nancy will say “That’s it!”
The compound used to make the hand print is HgS
EXIT
Walk over to the Periodic Table
Click on Hg then click on S
Nancy will say, “So the hand print was made from mercury and sulfur.”
Tell Joanna about your results.
Return to lab.
Look at the Vendors list next to the phone and call Keep it Real. (555-6766)
Talk with Mack.
Leave the lab and walk into the garden. Go in about 5 or 6 steps on either side of the temple and then turn around. Go toward the front of the temple and Henrik will fall down the stairs.
An ambulance will come to take Henrik to the hospital and you will be back in your hotel room talking with Bess.
By this time you should have analyzed the Red Handprint in the machine in the lab, and listened to your voicemail. You should also have called 555-6766 for the Mercury-Sulfur shipment.
HOTEL:
Leave the hotel after your conversation with Bess & George.
MUSEUM:
Speak to Joanna Riggs in her office:
a) take it easy….
b) How can I help around here?…..
TEMPLE PUZZLES:
You can do the Temple puzzles at any time. Remember to slide your temple card in before starting each puzzle. The last quiz question on level 2 will require some information from Henrik’s notes. The quiz question on level 3 will require an answer from Henrik. Help for the Temple activities are found near the end of the walkthrough.
MUSEUM LAB:
Voicemail from Nurse Bluefoot (555-4000). Call the nurse
a) “Nurse Bluefoot…
b) “Can you explain the amnesia?
c) “Has he lost his memory for good?
d) “I see! So we need to help….
e) “Where do I come in?
f) “Well, I’ll be happy to help in anyway I can.
g) “Great. Anything else?
h) “The last thing we want is a meltdown!
HOSPITAL:
Talk to Henrik.
a) “What access code would that be?”
b) “Actually, Nurse Bluefoot thinks with….”
c) “Visual aids often help….” Put the crime scene note with the Scarlet Hand on the cork board
d) “Come On Henrik”
e) “Great. These are Maya Glyphs.”
f) “I’m sure you have written….”
g) “The author!”
h) “Henrik, this note was found at the crime scene.”
i) “I’m investigating the theft of the Pachal…..
SINCLAIR’S OFFICE:
“Spoken to Joanna…”
“Have you spoken to the Police?”
“Did you hear…..”
“What’s
the name of the Museum in New Mexico?”
”Do you think Prudence Rutherford…..”
“There was an incident at the Museum…”
“I need a photo of the Pacal carving…”
Take the photo he offers and return to the HOTEL.
HOTEL:
Comment: If you can't reach Chaco Canyon CC or Prudence at this time, continue on and try again later.
Phone Chaco Canyon Cultural Center (505-555-1222)
a) “I heard the thief…”
b) “Do you know of any symbolic….”
c) “What types of artifacts did…..”
d) “Do you have a list of the stolen pieces….”
e) “I’m interested in the jade carving…”
f) “Could you send me a photo of the jade carving?”
MEXICAN CONSULATE:
Ask Alejandro all questions
HOSPITAL:
Add photo to bulletin board and speak with Henrik.
a) “Do you ….
b) “Think, Henrik. Where’s….
c) “Easy, Henrik!”
d) “Why would you break into the Museum…..”
e) “What kind of plot?…
f) “Do you know what it belongs to?
g) “One of the pieces was stolen…
h) “Do you know….
i) “Did you use Joanna’s name…..
j) Do you have anything against Joanna?
MUSEUM:
LAB- Voicemail. Call Franklin Rose (555-1441).
Talk to him about Joanna. If you get the Pacal carving back will he give Joanna another chance?
Comment: This conversation about Prudence may happen at a later time for some.
1) “I need to talk to Prudence….:
2) “Dad never told me….
3) “Ms. Rutherford had a necklace….:
4) “That would be great…”
Read the Note from Joanna on the desk beneath the phone.
Use the key Henrik gives you on his desk drawers (top and bottom). From the TOP drawer, take his zip disk.
From the bottom drawer, read the papers, take them and put them in your inventory. Also read the book.
JOANNA’S OFFICE: Get the key to the glass cabinets in the Exhibit Hall from her top desk drawer.
Examine the shipping order on her desk.
Open the file cabinet drawer and examine the Provenance Documents. Read all 5 documents.
HOTEL:
Phone Prudence Rutherford (1-785-555-7279)
a) “Im sorry about your loss….:
b) “Was the necklace a gift….?”
c) “More. In what way?”
d) “What does the jade piece look like?”
e) “About the theft, where were you…..?”
f) “Was anything else taken…?”
g) “About the theft….”:
h) “What about evidence?”
i) “A red handprint was …..”
j) “Ms Rutherford. It would be helpful….:
k) “Oh, that would be wonderful….”
l) Thanks a million.
Insert the Zip Disk from Henrik’s desk into the zip drive attached to the laptop. Review your notes up to this point.
Set the alarm for 10:00am
HOSPITAL:
Visit Henrik. Put his notes on the board.
MEXICAN CONSULATE:
Talk w/Alejandro
a) “Have you heard…..?”
b) “How did she jeopardize….?”
c) “I need to know the Nahuatl word for Snake….:
d) “I’d rather not say….”
e) “Something tells me……”
f) “First you tell me you are unconcerned….”
g) “Okay, Alejandro…”
MUSEUM:
Go get the Providence Document files from Joanna’s file cabinet and return to the Mexican Consulate’s office. Give them to Alejandro in exchange for the word: COATL
HOSPITAL:
“You recognize….”
[Password is STONE]
“What did the scribe say…?”
“What happened to the scribe’s writings?”
“does this mean that the monolith….?”
“Do you think the monolith can be opened?”
“Do you think there is anyone I can trust?”
“Henrik, I need to know…..”
“You rest up….”
Comment: You may do this calendar part later after you have all 6 sides of the key to the monolith.
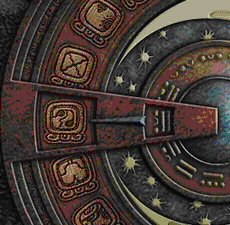
Go to the GOD area of the EXHIBIT HALL. Use the key from Joanna’s desk drawer on the glass cabinet containing the Mayan Calendar pieces. SAVE YOUR GAME. Quickly close the cabinet after getting the calendar wheels, and rush out to the Garden and the center Temple. Insert the calendar pieces on the side that faces the steps leading up into the Temple. Zoom in on the calendar pieces and rotate both the inner and outer rings until a stone pulls inward.
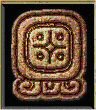
You want
to set the calendar to 6 Lamat. The information is found on the Rutherford slab
in the garden. The glyph for Lamat is:
LAB: Approach HAM Radio. As you try to use it the radio tube goes out. Replace the tube on the side of the radio with the tube from the Exhibit hall.
EXHIBIT HALL: Use the key from Joanna’s desk drawer on the glass cabinet where the HAM radio is located. Open the side of it and take the radio tube. Close the case.
Turn the machine on.
Enter: 2731 (and hit the CONNECT button).
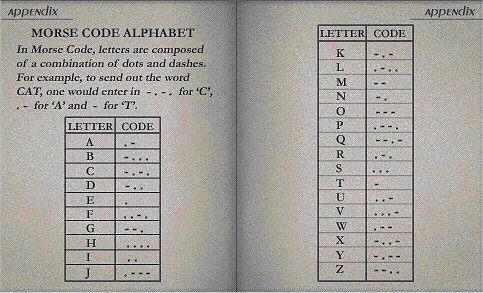
Using the Morse Code, enter the word: COATL
Follow each letter with the SEND button.
When you have entered the word C O A T L, enter the word L E C H E (Spanish for MILK, which is the smuggler’s code for the coast is clear, send the item).
Turn the machine off and return to the Hotel.
HOTEL:
Use the laptop and the zip disk. Enter Henrik’s password (STONE). Look at all his notes, translations, etc.
WEST: Henry Dabble (1-605-555-3195)
Call Henry Dabble, then call his daughter, Penelope (Poppy Dada).(1-605-555-3197)
Check the time on the clock.
Leave the Hotel and visit Sinclair’s Office. Take a cookie and switch it with the jade piece in the painting. (CORTEGA KEY)
MUSEUM:
Enter the Shipping/Receiving room and open the box in the receiving area. Match the eyes so all 3 figures have crossed eyes. [HINT: The Middle figures right eye moves alone. Adjust the eyes on the other 2 figures first]. Get the Jade Key piece. This is the SMUGGLER’S KEY PIECE.
HOTEL:
Check Henrik’s notes again. ATANZAHAB is the Mayan Matchmaker. Now you can finish the Temple quiz on level 2.
If it isn’t too late in the afternoon, phone the Chaco Canyon Cultural Center (1-505-555-1222) and speak with the Sheila Schultz, director. Ask her everything. Hang up and call her again. Comment: Might have to wait a day before you can call her back. She will see if she can find the carton the original piece was shipped in and send it express to the Museum. Set the alarm for 8:00am
MUSEUM:
Get package from Shipping/Receiving. RUTHERFORD’S KEY PIECE arrives.
For fun!!!! Call Bess even though you may not need her help. Talk with her often until you find out who her surprise guests are.
For help with Temple Activities:
Temple Activities
Level One
You can do these activities in any order. All answers are found in the museum.
Corn Roll:
Each player gets 2 rolls of the corn. On the 2nd roll you can choose to pass for either warrior. You are the orange warrior. When you land on the same square as the blue warrior, you have captured him. When you capture him 4 times you win!
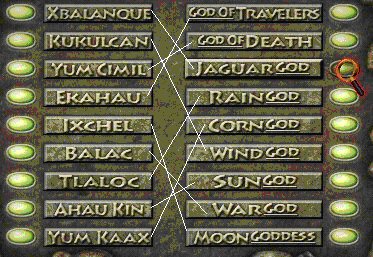
Matching Glyphs to their translation:
Quiz:
Type in your answer on your keyboard and then use your enter key.
1. Pacal ruled over which city in present day Mexico?
Palenque
2. What is the name of Pacal's mother?
Lady Zac Kuk
3. What is the name of the calendar used to compute the 260 day ceremonial year?
Tzolkin
4. What is the name of the 'supreme' god in Maya mythology?
Itzamna
5. What is the name of a modern Maya language?
Quiche
Click here to return to main walkthrough.
Temple Activities
Second level
BALL GAME:
Along the bottom is the power of the shot. Along the right side is the angle. Choose the power you need by clicking on the - or + arrow. Move the angle to low, mid, or high by clicking over the one you want. Click on the SHOOT button. If the ball goes through the hoop, the player moves back a step.
1) set to 4, height = High
2) set to 3, height = Medium
3) set to 5, height = Medium
4) set to 6, height = Low
Push the red button and watch the key features of Yum Cimil.
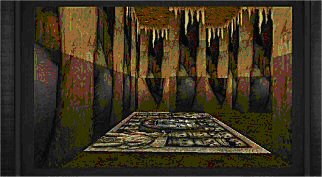
MAZE GAME:
The maze game requires login and password. This is found on Sonny's floppy disk.
Login: = sjoon
password: = spacebaby
type these on your keyboard and then click on your enter key.
Cheat: Click on the "M" key on your keyboard to bring up a map in the conversation area of the game.
Here is a picture of how the maze ends. When you get to something like this you are at the end!
Quiz 2nd level:
1. What is the name of one of Shield Jaguar's wives?
Lady Xoc
2. Which Maya 'monster' represents the continuous 'cycle of life of death'?
Bicephalic
3. What did the Maya call a decorative woven blouse?
huipil
4. What is a 'cahal'?
prominent nobleman
5. What is the name of a Maya matchmaker?
This answer is not found in the museum and you must find it from Henrik's notes. ATANZAHAB is the Mayan Matchmaker.
Temple Activities
Third level
:
Enter
the lower level. Move to the Mayan Calendar. Note the symbol for Kaban
Rotate the outer wheel to the Kaban symbol. Now rotate the inner wheel until you hear a ding, which will be the Mayan number for 12.
Remove your card, and go around the corner to the Tomb. Examine the Tomb.
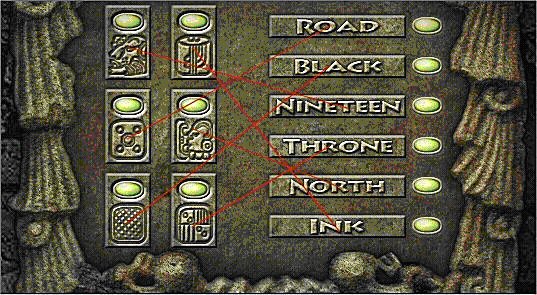
Go to the God Puzzle on the wall by the bridge. Insert your card. Solve the God Puzzle (see picture below).
Return to the Tomb and use your card. Get the TOMB PIECE (PACAL KEY).
Level 3 Quiz question: No one knows what Pacal was afraid of but Sonny was petrified of the Coatimundi! It's an ornery bandit with a narrow snout and a long ringed tail, much like a racoon or a polecat. The answer is coatimundi, but you must get this information from Henrik before it can be used in the quiz.
With all 3rd level activities complete, you can go to King Pacal's Tomb, enter your card and open tomb to get the jade carving Henrik hid there. Pick up your glowstick also.
Exit to the Garden from the Bottom door of the lower Temple area. Return to the Hotel. Phone Franklin Rose (555-1441). Get Joanna back. Set alarm to 8:00am.
MUSEUM:
Go to the Shipping/Receiving room and get the package from the Chaco Canyon Cultural Center. CHACO KEY (piece number 5). Enter the Lab and use the machine below the Periodic Chart. Click on the machine TWICE. Take the CHACO KEY piece and place it in your inventory. (If Joanna isn’t in her office yet, call Franklin Rose again (555-1441) and select other conversation choices. Enter Joanna’s office and speak with her TWO times.
1) “Take it easy…”
2) “I’ll call right away.“
2nd Conversation:
1) “Sure thing, Joanna!”
Exit her office and make your way to the Shipping/Receiving room. Move forward to the box on the top shelf. Use the code that Joanna gave you (0677) and remove the 6th piece.

LAB:
Put the pieces together by rotating (move your cursor to the lower right side of the black plate) and clipping in the pieces. The final key should look like the picture below.
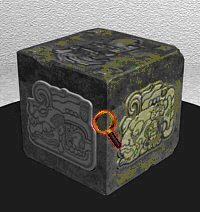
Exit into the Garden area and move to the Temple/Tomb in the center. Click on the “keyhole” side of the Temple and rotate the cube 4 times. Insert the key (Click). Move to the left hole. The cube should be displaying the mold piece facing you. Insert the key (Click). Rotate to the left again, and rotate the cube 1 time. Insert the key (Click). Finally, rotate to the left a final time, and rotate the cube 2 times. Insert the key (Click). The Tomb opens. SAVE YOUR GAME HERE.
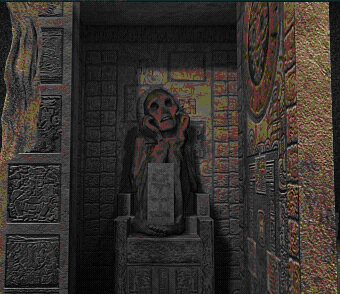
Enter the Tomb. When the Tomb door closes on you, use your Glow Stick. Turn LEFT 2 times, open the mouth. Get the metal piece from inside the mouth. Turn right one time. Insert the metal piece in the hole at the top. Turn right 2 times. Look down. Get the piece for the door and the Scroll. Turn left and use the piece for the door on the door eye.
END GAME SCENE.
Nancy solves another mystery!
This document may not be distributed without express written permission of the author and the content may not be altered in any way.
For
Questions or Comments on this Walkthrough,
Please write to:
NKuderna or
LShaw
Copyright © August 2002
updated 8/30/02