GameBoomers Walkthrough by Tally Ho
![]()
| I strongly urge you NOT to print this walkthrough. It makes no sense. Instead, save it to your hard disk, then you can load it (offline) while playing the game, and use <Alt-Tab> to switch between the game and the walkthrough. The reason is, it contains many internal links to pictures and answers, which are cascaded at the end of the main text. Printing will result in zillions of pages, some blank, wasting paper and time. |
The introductory sequence reveals your new position - Assistant to Joanna Riggs at the Beech Hill Museum. Your father's friend, Frederick Rose used his influence to help get the job. Joanna explains what the exhibit is all about, and introduces three names during the conversation: Alejandro del Rio, Mexican Consulate; Taylor Sinclair, Dealer of Antiquities; and Henrik van der Hune, Expert on Mayan writings. If you ask for "any last advice" as your final question, she says "Semper ubi sub ubi." Cute. The Latin translates into nonsense: "Always where under where." But if you read that sentence aloud, it sounds like "Always wear underwear." Good advice Joanna; thanks.
She says you have several tasks ahead, so head to the other end of the building, and find the Laboratory. (As you step out of the office, the main entrance to the Museum is just to your right. Exiting there will take you to the Washington Metro, and access to several other locations. Turning left, takes you into the museum's exhibition hall.) Straight ahead is the receptionist's area. Go there, and pick up a guide to the museum. See where it says "Ekahau, God of Travelers" on the front, and two more clues on the inside? Jot these down; you will need to recall them later. As you study other museum exhibits, there will be little tidbits of information you will either have to remember, or return to find it. Taking notes is the key to success in this game. Notice the display of headphones behind the desk. You can't open it yet. Go into the Exhibition Hall. Explore if you like, but you will be wanting to visit those displays with the headphones on. Continue to the far end of the room, until you come to the base of the pyramid. Look to the right, and you will see two more doors. One is an open archway to the garden area, and the other is a door leading to the employee's area. Go there.
Introduce yourself to Henrik van der Hune. He talks about his field of expertise, translating Mayan glyphs. After speaking with him, you should examine the broken pot and the ham radio seen near his desk, and the Spectro-Analyzer, that big blue machine on the other side of the lab. (Click on the power switch on each machine.) Talking with Henrik again will reveal information about all three items.
Take note: it is not possible to exhaust all conversations, as it is in most games. Sometimes, you will find the conversation ending abruptly, leaving some topics unavailable. Throughout this game, you will find multiple questions available when you proceed through a conversation, but some choices will result in your becoming stuck in the game, while other choices will allow you to finish. As a rule, be a cautious detective, and try to proceed in such a way as to not "blow your cover." |
Go now to your desk, the one to the left of the door, and examine the clipboard containing a list of chores for you to finish. The first one seems obvious - re-assemble that broken pot, as soon as you find the missing piece(s) that is. It appears Sonny already did the second one, as well as the last two. What's this priority job? Take a paper to the Consulate? Something else to look for, I guess. Order Bubble-Wrap. That's easy enough, the phone number for packing supplies is right there next to the phone. Call Silvio's at 555-9963. Oops, Silvio is not too thrilled to hear from Beech Hill. Seems they haven't been paying their bills. Oh well, at least you can cross that chore off the list.
Look in Sonny's desk drawer. Three things to get: a loose cabinet knob, his notebook containing much information that we don't quite understand yet, including a map of the display cases that looks like it will come in mighty handy; and a Koko Kringle Kandy bar. Make a mental note of the name of the candy, and what that cow logo looks like. You just might need to remember it later.
Let's exit the lab, and go straight across the hall into the shipping/receiving room. Take a couple of steps into the room, and turn around to face the doorway. You can see the phone, and a clipboard on the wall. Reading the clipboard reveals one item of interest. Number 1113 is an ornamental jade with an unidentified glyph. If you explore the items on the shelves, you will find several containers, all locked. The one labeled BH 1113 has a keypad lock on it. Perhaps we will find the code somewhere. On the other set of shelves is an open carton containing "Sonny's Stuff." Look in the box and take two items: a computer disk of Sonny's, and a piece of that broken pot.
Before exiting, go towards the door, and look to the right wall. Between the stepladder and the shelves is a panel of some sort on the wall. Examine it and you will discover that it is the control for the audio clips that accompany the exhibits. One of your chores tells you to match the narrations with their appropriate exhibits. Can't do much without more information, so let's head out and go to the entrance area of the building again. Go around behind the receptionist's desk, and put that knob on the cabinet. Now you can open it and take a headphone. While you are right there, open the drawer in the desk and take the key-card.
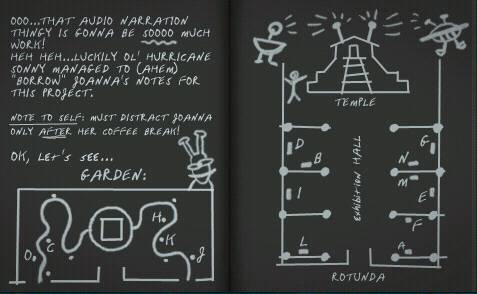 |
This is where Sonny's diagram will come in really handy. If you looked at the controller for the narrative blurbs, you observed that they are labeled A, B, C - up through O; fifteen in all. This little map allows you to identify which exhibit location is associated with which audio control. |
Let's go ahead and tackle that audio system. Write down the letters A-O on a column, then visit each exhibit and place a descriptive word by each letter. For example, A = Ham Radio, F = Mayan Influence etc.
When that list is complete, return to the control panel in the Shipping Room. Open any one of the controllers, let's use A as an example. On first inspection, you see the large letter A, a green arrow, and up-and-down arrows. The A never changes, it is tied to the location where you saw the Ham Radio exhibit. The green arrow plays the currently selected audio piece, and the up-and-down arrows change the selection. Suggested procedure: Stick with A, and using the up-and-down arrows, start with 1 and listen to each audio blurb from 1 to 15. Using the list you created, write the numbers representing the audio selections opposite the descriptive name you chose. If you were really observant, you realized that several of the audio selections played correctly. In fact, ten are okay, and only five need to be fixed. The wrong ones are A, C, D, G, and J. Want the complete layout? Too lazy to create your own, huh? Click Here. Might as well return to the lab, and cross off that item from the to-do list.
As you went through the garden area, if you happened to examine the Monolith close-up, you met Taylor Sinclair. If you didn't do that, go there now and examine the Monolith to make him appear. He's kind of a greaseball, but seems harmless enough. He tells you some interesting things, and wants you to come to his office later. Not to check on his collection of etchings, I hope. Let's worry about him later. |
Go to the center of the entrance lobby area and look around. See the three tall advertisements, one blue and two red? Look at the red one to the left of the entrance, between there and the Receptionist's. Look closer, and find a paper airplane on the floor. Pick it up, and it turns out to be the document that needs to go to Alejandro. Whoo! Half a million dollars, and that's only the "rental!" Head out the big brass door, and take the Metro to the Consulado de México.
Sometimes, when you attempt to visit another location, or place a phone call, you cannot because it is too late in the day. If this happens when you try to see Alejandro, or Sinclair, or later on - the hospital, go to your hotel room and reset the time. On your clock, choose Alarm, then change the time with the arrows, then select "Set." |
Examine the table across from the entrance, and read a pamphlet regarding provenance. Talk with Alejandro, and near the end of the conversation, give him the documents. He will not let you take them back, not to worry. Just return to the Museum, and go about more of those chores.
When you get back, go all the way through the Exhibit Hall, and up the steps into the Temple. Straight ahead, and slightly right, is a stone plinth with two bowls displayed on it. Look closely at the bowls, and find another piece of the broken pot. Go back to the lab. If you have two pieces in inventory, you will be able to assemble the pot. The turntable rotates, and you should be able to figure out what goes where. It's pretty easy, and when it's done, it's done. Let's check the list. Well! only one chore left. "Re-order the Number Exhibit." What's that all about? Go to the exhibits and find the Number display. It's at location D.
| Do you
see where the cursor is in the picture to the right?
Hovering over the lock on the cabinet? That's the way to
open the box in order to get to the number exhibit. The
lid swings up to the left, so when you go to close it,
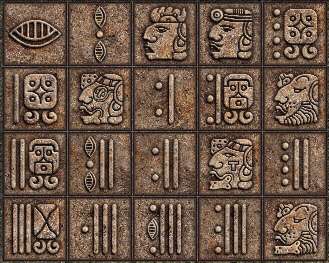
look up to the left to find it. Oh no! Some of the numbers are bars-and-dots, which we can figure out easily enough; but some are god-heads, which also stand for numbers. What's worse, two tiles are missing. Some research is necessary. |
 |
Head to your hotel room, it's time for some research. Go to your laptop computer, and before you turn it on (by clicking on the screen,) insert Sonny's disk in the drive. The drive in the computer is the floppy, that thing next to it is a Zip drive. You will find a Zip disk later. Clicking on the computer icon reveals your personal notes. These expand as you progress through the game. Clicking on the Floppy icon prompts you to enter a password. If you enter the wrong password, or none, it buzzes and shows you that cow logo you saw before. Remember the name of the candy?
Under "Stuff to do" is something we know already. "Stuff to to" is the important one - it tells all about the numbering system. Want to do it yourself? Make a list of twenty numbers, from Zero to Nineteen. Make a brief description, such as "Hat" "Doctor" and so on, next to the numbers they represent. The bars and dots are easy; the dots are one each, and the bars are five. So if you ever see three bars and two dots for example, that's seventeen. Take care, though, looking at the dots. They must be dots, not some other little symbol. If another symbol appears where a dot could be, just ignore it. So three bars, two dots and a little 'thing' between them is still seventeen. Stuff to forget? I think not. Look at the top of the page, and you will get Sonny's log-in name sjoon and his password, spacebaby. Before you leave the hotel room, reset the Alarm to morning. 9:00 a.m. is good.
You need to find the two missing pieces for the number exhibit. Go to the Maya Influence exhibit (position F) and open the display case. Look closer and find one of the tiles. Now go around the left side of the Pyramid, and enter the garden. Ahead to the right is the Bicephalic Altar. Find the other number-tile sitting there. Now you can head back to the number-case and put it all in sequence. Click here to see it solved.
Take the Metro to Sinclair's office. (If you did not encounter him in the garden, you must do so to make the location accessible. If you still need to do that, go to the monolith and look at it close-up.) Talk to Sinclair about everything. Go back to the Museum and talk with Joanna now. Be sure to ask her about Henrik and where he worked before. If you did not happen to look at the magazines on the little table, inspect them now to see an article about Prudence Rutherford and her necklace; the one Sinclair said was stolen. Looks something like the Pacal jade. (If you looked at the brass plaque listing the Museum's Donors, you note the connection with Ms Rutherford; if you haven't looked at the plaque, do it now. It's just outside the office.)
Go back to the lab, and cross off the chores you have finished. When you exit the lab, the security alarm sounds, and Joanna tells you the Museum's been robbed. Someone stole the Pacal jade and she's in deep doo-doo now. Inspect the crime scene and discover the Scarlet Hand. Talk to Joanna about everything, including evidence the police found. She tells you to have a look around. Go back to the Pacal exhibit and take the red hand. Talk to Joanna about the red hand you found, and Henrik's whereabouts. She asks you to analyze the Scarlet Hand.
Go into the lab, and straight ahead to the Spectro-Analyzer, that big blue machine. Turn on the power, and place the red hand in the compartment on the left. Press Start to do the analysis. The graph appears, and you need to find the matching compound. Press "Compare" then the left arrow until the graphs match. (About six hits on the right arrow or once to the left will do it.) Then press "Match." HgS - "That's it!" she says. Huh? That's what? It's a symbol for a chemical compound. If you have forgotten your high-school chemistry, not to worry. There is a Periodic Table of Elements on the wall, and this one has a feature that most tables do not - hotspots that automatically tell you what you want to know. The spot at the right end of the red area reveals that Hg stands for Mercury, and the spot in the upper-right yellow area tells you that S stands for Sulfur.
Everything you ever wanted to know about Mercury Sulfide can be seen at this website: http://mineral.galleries.com/minerals/sulfides/cinnabar/cinnabar.htm
Report your findings to Joanna. She tells you that Mercury and Sulfur make a mineral called Cinnabar. Also ask her about obtaining some Cinnabar, and the whereabouts of Henrik. ESSENTIAL: Use the phone in the lab to call "Keep It Real" 555-6766. Learn that someone named J.R. ordered cinnabar just last week. We really should talk to Henrik about all this. Let's go see if he is in the garden. Nope, not there. Oh No! As you return to the gallery, Henrik turns up all right, on his back at the foot of the stairs! He is hauled off to the hospital, and you end up in your room, talking with Bess and George. (Before you leave, set the time to 10 a.m.) Back at the Museum, talk with Joanna. She seems to be slipping a notch or two. Go to the lab and check your voice-mail. You should have two messages, one from Franklin Rose, and one from Nurse Bluefoot. Call them both. Let's visit the hospital and see what's going on.
Go see Henrik. He seems to have sort of a selective memory. Put the Scarlet Hand on his bulletin board. He can still read Mayan glyphs, but doesn't recall anything about the theft.
We haven't seen the greaseball for a while. Go to Taylor Sinclair's office and be sure to ask him for a photo of the Pacal carving. Take it, and scoot right over to the hospital. It jogs Henrik's memory, and you learn that he stole the Pacal carving in order to prevent someone more dangerous from finding it. He hid it so well even he can't remember where it is. He gives you a key.
The key he gave you fits his desk. Examine the top of the desk, and find a number for the Chaco Canyon Cultural Center: 505-555-1222. Read the book on operating the Dyna-Ham radio, and instructions for Morse Code. Open the top drawer and take the Zip disk. Open the bottom drawer and find three things: A sheaf of papers describing an expedition he shared with someone known as Big Bunny, a page of his personal translation notes, and a book with instructions for contacting the smugglers. On page four, it says the password is the Nahuatl word for "Snake." Who do we know who comes from central America?
Talk to Alejandro about everything. Ask him EVERYTHING from the top down. To get the word for 'snake' he wants some documents in trade. Be sure to ask him about cinnabar, and your suspicions of Joanna. Some quick stops from here - Stop by the hospital and put Henrik's notes on the board. Then go to the hotel, and call Franklin Rose. Ask him about Prudence Rutherford, and get her telephone number. It's 1-785-555-7279. Don't call her just yet, give Franklin time to talk to her. Do call the Chaco Canyon Cultural Center (1-505-555-1222.) Ask about the theft, Henrik, Sinclair, and a photo. Set the clock for morning. Now you can call Prudence Rutherford. Be sure you DO NOT insult her about the Corn Growers Ball, or you will be el-stucko. If you need to get un-stuck, call her back and apologize. You must get her to agree to send you the replica of her stolen necklace.
Now try Henrik at the hospital. Take careful note of his work, especially the new glyph meaning "stone." Talk with him about the Prison of Stone and the Whisperer's soul. When his memory stops working, go to the hotel, and put the Zip disk into the external drive, and open the files on the disk with the password (stone.)
There are several important clues on this disk. Read the translation; it's not essential. Open the Notes, and pay close attention to the following: atanzahab is a Matchmaker; a necessary clue for the Quiz. The Prison of Stone uses a six-sided jade lock. Whisperer - there must be a mechanism for escape. West: Henry Daddle, phone no. 1-605-555-3195. Copan Fool - use the Ham Radio to obtain this one. Under the Contacts folder, learn that the password for the smugglers is "snake" in Nahuatl. (You already know that from the book in his desk.)
When you exit the computer, grab the phone and call Henry Daddle. He tells you his daughter Penelope has the jade carving now. Call her at 1-605-555-3197 and talk with her about Taylor Sinclair, (It turns out his nickname is Big Bunny) and the painting with the rubber shark. While you are at the telephone, call Chaco Canyon again, and ask for a replica of the carving. You will need to call them again later. Things are starting to move now. Let's see if we can get that piece out of the painting. (Set the clock for morning before you leave.)
Go to Sinclair's office. Talk to him. Take a cookie, then examine the painting. Sinclair conveniently leaves the office. Looking closely at the painting, you find the jade piece! Substitute the cookie for the carving. Wow! That was easy.
Return to the Museum. Go into the office, and Joanna should be missing. Peek in her microscope if you like, then look at the items on her desk. See the packing list? It's a copy of the one on the wall in the shipping room. Again, notice Number 1113, the Diego de Landa carving from Cuba. This is one of the items listed in Henrik's notes. (See the blue photo frame? "Gocats" is the screen name of the gal who "runs" the forums at HER Interactive. Cute.) Open the desk drawer, and take the key.
Go to the filing cabinet, open the drawer and take out the Pacal Provenance file. Read the documents. Eight hundred grand for that little bauble. Wow! The papers look in order to me, but Alejandro wants to read them. Take the file to him. He tells you the Nahuatl word for "Snake" in return.
Go see Henrik at the hospital, and talk about the six keys.
Let's go see if we can raise anybody on that Ham radio in the lab. Turn on the power to the radio and - Oh No! We blew a tube. What now? Maybe that other radio in the exhibit case has a usable tube in it. Open the display case with Joanna's key, turn the radio so you can get to the side panel, and take the tube. It looks okay.
Back in the lab, install the replacement tube and turn on the power. That's better. (I'll bet a lot of GameBoomers remember radios with tubes that occasionally blow out. I certainly do.) Let's see, the instructions said to tune into 2050 to get the code for the real frequency. To do that, press the two, the zero, the five, the zero, and the "Connect" button. The voice comes on and says "ocho...tres...dos...siete...uno." That's 83271. The instructions said to take the last three numbers and attach a zero, so 2710. Then add up all five digits, that's 21, and add that to 2710. That comes to 2731. Try that frequency and see if anybody's home. (If you happened to play with the radio before, and tune into this frequency, you got a message saying this channel does not receive any transmissions.) Now you are told to transmit.
First, you must send the password, "coatl." This is an unusual Morse code device, in that you can back up if you need to. Let's hope you don't need to. "C" is dash-dot-dash-dot. So, press those symbols, then press "send." This transmits the letter "C". "O" is dash-dash-dash; "A" is dot-dash; "T" is dash; "L" is dot-dash-dot-dot. Press the send button after each group. Sending coatl gets the request to send you intended message. The word to send is "leche". L = dot-dash-dot-dot, E = dot; C = see above, H = four dots. You are told the package will be dispatched the fastest possible way. Now transmit the word "vacas" meaning payment is sent. V = dot, dot, dot, dash and S = three dots.
Go to the Hotel. Set the clock to daytime, and call Sheila at the Chaco Canyon. She will be sending you something useful.
By this time, we are expecting three packages. The smuggler's, and shipments from Chaco Canyon, and Prudence. Have a look in the Shipping room. Go to the shipping dock, and there should be something there. If you open it, and find a puzzle box with three faces, set the eyes so they are all crossed. (You can actually do it in four clicks. Number the eyes from left to right. Click in this order - 1, 2, 4, 6.) The box can now be opened, and the jade piece is yours. Go to the lab, and check your voice mail. Uh-oh, Joanna is in trouble with the Board of Directors. Call Franklin rose and talk to him. If you can get the Pacal carving back, maybe they'll un-suspend her.
Go to the hospital and tell Henrik you received the piece from his friends. He now tells you that the Pacal is hidden in the tomb at the bottom of the Temple, and that Sonny was afraid of a coatimundi. Back to the museum with you. Go to the shipping room and check. Prudence's package could be there. If it is, take the jade piece. Let's head into the temple and tackle those quizzes and games.
![]()
Go up the steps into the pyramid. You will find three tasks. Be sure always to swipe your card before each task. Let's do the easiest one first. Straight ahead is a matching game. There are six glyphs, and six words. If you have been a diligent explorer, you will have seen all but one of these, scattered throughout the various exhibits. However, it is possible to solve this game with no knowledge, using the following procedure. Click on a glyph, then on a word. If you are correct, it will stay lit. Remember the pairing. It takes no time at all, using this brute-force method, to learn which goes with which. Match them all, and 'Ding' the bell says you are done.
Looking around the room, you see two computers, and a door with a key-slot. Go to the computer that is near the locked door, put your card in the slot, and select either Activity Instructions to get some help, View your progress to see that you have satisfied the match-up game, or take the five-question quiz. The answers are contained in the audio and video blurbs that go with the exhibits, and it you have not been taking notes, or don't have a photographic memory, you may need to re-visit some of the exhibits. This is a walkthrough, so I will provide the answers. The following table tells you where do do your research, the lazy way is to click on the question for a spoiler.
Question (Click on question to reveal answer.) |
Location of Answer |
E |
|
M |
|
I |
|
M |
|
D |
The other computer contains the Bul game, where the object is to roll the 'dice' and move the appropriate steps. You go first, for two turns. You must roll once, but can pass the second turn if desired. The computer must also roll, and can pass if desired. The advantage you have, is YOU decide whether the computer rolls or passes at its second turn. This gives you a big edge, because when the computer's second turn is a threat to you, you can pass him, and roll yourself. This game is easy to beat, once you see how to restrict the computer's choices. Passing all three tasks on this level will activate your card to unlock the door. Descend to the Second level.
Level Two contains three games as well. A five-question quiz, a Ball Game, and a Maze. (I HATE MAZES, and have said so for years. This one is no more friendly than any other, except that there is a neat way to handle it. While you are negotiating the maze, press "M" and you will have a map that shows the layout of the maze, and your current position. All mazes should have this feature. THANK YOU H.E.R. Interactive!!) Just to show you what a sport I am, I am going to negotiate the maze first. See ya, smiling, I hope. Actually, the map is confusing, because it is mirror-imaged, or something. You come to a corner, and the map shows a right turn is required, but in the maze itself, you must turn left. Confusing, but still usable. Even I got through this maze without cussing. By the way, the login is sjoon, and the password is spacebaby, found on Sonny's disk.
Here are the five questions found in the quiz:
Question (Click on question to reveal answer.) |
Location of Answer |
Near O |
|
C |
|
Near H |
|
H |
|
Zip Disk |
You need to play the ball game. Throw the ball through the hoop by setting the power and angle selections. As a rule, the farther away you are from the target, the more power you need, (usually) and a lower angle. Figure it out yourself, or cheat by clicking here.
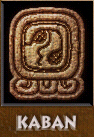 |
You will now have access to the third, and lowest level. At the foot of the stairs is a small room with a Mayan calendar puzzle. The plaque says the challenge is to set the wheels so it reads 12 Kaban. Do it by placing this icon in the outer window (takes 16 clicks if I recall) and the number 12 in the inner window (11 clicks.) While you are there, also take note of the image for Lamat, the month that Pacal ascended to the throne. You will need to know what it looks like later. |
Go toward the stairs, and around to the right, appreciating the exhibits on the way. In the next room, you find another match-up game. This one's longer, but it works the same way. Here's the cheat, if you need it. Then, across the bridge is another quiz. (Do not try to go through that big wooden door yet. What animal was Pacal afraid of? Remember what Henrik told you. This quiz contains only one question. Your card will now open Pacal's tomb. It is located in the same alcove as the Calendar puzzle. Open the lid, move the jade mask and take the Jade. When you leave, be sure to take the light-stick. Wow, high-tech stuff in a Mayan exhibit. Maybe Sonny was onto something after all! Now go back to the wooden door at the end of the creaky bridge, go through, and use your light-stick to find the exit.
The exit places you in the garden. Go to the shipping room and pick up the final package. It sure looks like a mold. Take it to the lab, and place it under that device next to the Periodic Chart. Click on the gadget to bring it down, click again to create the casting. Open the package and voilà.
Use the phone to call Franklin Rose, Tell him the Pacal is safe, and you want Joanna back. He agrees. Go see Joanna (you might have to reset the time) and she gives you the code to that locked container referred to in the document on her desk. Open the box with the code 0677, and now you have all six pieces. Time to assemble the key. Use the turntable next to the pot you assembled. The base appears there, and the first piece that must be installed is the top. Rotate the base until the top fits, then press the side-pieces into place. You can see what shape fits which side.
Now go to the Exhibit where the calendar stones are. (Location I.) Unlock the case, and take the stones. Close the case, and go directly to the Monolith. Install the stones on the monolith. The calendar must be set to the date the king ascended to the throne. Remember the information from the exhibit located at location J? It said the king took the throne on 6 Lamat. Need to see what Lamat looks like? Click here.
Rotate the outer ring until Lamat is at the 9 o'clock position, then rotate the number ring until six is there also. Click! A square block slides inward. Try the key there. Rotate it until another block slides in. Keep up the process until all four sides have been unlocked. The door opens, and you are face-to-face with the scribe's mummy, and her notes. Look at the book. Oh! It's blank. Now what? (You can save your game if you like, but if you don't succeed in the next task, you get a Second Chance.
Taylor Sinclair appears, and you learn he has been behind all the trouble, just so he can get the scribe's writings and sell them on the black market. He locks you in. There is not much air, you must act quickly and accurately. Use the light-stick. You are facing the exit. Turn around to face the mummy, click on her and take the object from her jaws. Turn right once, facing the wall left of the exit, and look up. Find the spot to insert the object. Then turn all the way around, facing the wall right of the exit, and look down. (down-arrow) and move the stone lid. You happen to find the real writings. Move them, and take the small object. Now turn left and look up, finding the spot. Insert the object in the eye, and the door opens.
![]()
Congratulations Detective Drew, on solving another difficult case. See you in the next one.
![]()
![]() GameBoomers
Walkthroughs and Solutions
GameBoomers
Walkthroughs and Solutions
| A | Ham Radio | 5 |
| B | Scribes | 8 |
| C | Bicephalic | 14 |
| D | Numbers | 7 |
| E | Pacal (1) | 1 |
| F | Maya Influence | 6 |
| G | Body Shaping | 9 |
| H | Kings | 15 |
| I | Pantheism | 3 |
| J | Pacal (2) | 13 |
| K | Twins | 12 |
| L | Bowls | 4 |
| M | Zac Kuk | 2 |
| N | Ball Game | 10 |
| O | Bloodletting | 11 |
The password is Koko Kringle.
Palenque
Zac Kuk
tzolkin
Itzamna
Quiche
| Position | Power | Angle |
| 1 | 4 | High |
| 2 | 3 | Mid |
| 3 | 5 | Mid |
| 4 | 6 | Low |
Lady Xoc
Bicephalic
huipil
Noble Man
atanzahab
| Xblanque | Jaguar |
| Kukulan | Wind |
| Yum Cimil | Death |
| Eckahau | Traveler |
| Ixchel | Moon |
| Balac | War |
| Tlaloc | Rain |
| Ahau Kin | Sun |
| Yum Kaax | Corn |