Nancy Drew: The Secret of Shadow Ranch
by Her Interactive
Walkthrough by MaGtRo
July, 2004 ver.1.02
Gameplay: The Main Menu has the new game, load-save game, continue,
second chance, game setup, credits, help and exit game. Game setup has voice,
music and special effects volume control, closed captioning, auto move and
brightness adjustments. Help has directions on how to use the cell phone,
journal, toolbox and other information. After clicking on New Game, select the
level of gameplay as senior or junior level. Click on Gameplay overview to learn
how to navigate throughout the game and the different settings in the game.
There are unlimited save game slot in this point and click game.
This
walkthrough describes both junior and senior detective. The sequence shown is
not necessarily the only way to get through with the game. The game is not
linear in most parts. The
junior detective gameplay has a task list while the senior detective does not
have.
Nancy
Drew was met at the airport by Dave Gregory, the foreman of Shadow Ranch. The
Rawleys were called away on an emergency and Nancy was given a phone number to call
as soon as she gets to the ranch. The Rawleys are Bess and George aunt and
uncle. Nancy's friends have not yet arrived.
Ranch Life, Outlaw and Phantom horse:
Click
on the cell phone at bottom of screen. Click on directory and select Rawleys.
Click the phone icon to place the call and talk to Aunt Bet. Ed Rawley was
bitten by a rattlesnake in their bedroom last night. Nancy is told to get a
horse from Tex, the wrangler so she can ride, Shorty will go ahead with the cookout tonight
and also to take an envelope from the roll top desk to Mary Yazzie. Get the key
and directions from Dave. Before they can say anything about phantom horse, they
got called for tests. Call Bess Marvin, stranded in Omaha and talk to them.
Den: Look
around. Turn right and check the bookcase at the corner. Open the Like the Wind
through My Heart book by Charleena Purcell. Turn left to the fireplace. Check the Ranch Horses
on the table by the fireplace to learn about different breeds of horses. The
clock on the mantle seems to be broken. Read the newspaper at the hearth of the
fireplace.
Pan
left from the fireplace. Look close at the corner chest with blankets and the
locked roll top desk. Check the bookcase left of the desk.
See
that the front door is closed - so the back door it is. Pan right to go to the next
room. Check Frances Humber's portrait right of fireplace. Click the radio to
listen to the weather news about possible thunderstorms to the north of Phoenix
and not to go out unprepared. The ranch is north of Phoenix as shown by the
ranch leaflet during the intro.
Kitchen: Look around. Open the recipe box on the preparing table and read
the different recipes. Check the counter, oven and then talk to Shorty, the cook.
Learn about Dirk Valentine's phantom horse and Frances, the one in the
portrait. Turn around; check the notes on the fridge about measurement, cute
magnets and
the Sheriff's phone number (it will be entered in the cell phone directory).
Exit the kitchen.
Backyard: Look around at the chopping block at right and the fire pit on
the left. Check the red pump house. Go to the chicken coop left of the vegetable
garden and talk to Dave about everything. Take the roll top desk key. Go back to the house and look at
the thermometer right of door.
Roll top desk:
Go back to the roll top desk in the den and use the key on the lock. Read Jane
Nash's irate letter and Mary Yazzie's bill of sale. Take the 3 levers from top left shelf
beside the stapler and the letter to Mary Yazzie.
Things to do before one can ride:
Stable: Go back out and go to the
stable. Enter the tack room door on the right and talk to Tex, head wrangler. He wants you to prove
that you can ride before he'll let you. You have to have a hat, gloves, canteen
full of water, saddle and bridle the horse. Then answer Tex questions before you
can ride. <whew all that> Then when done riding, dismount, hook the horses,
place the saddle and bridle where you got them and keep the gloves with the
saddle. Before you can ride, you have to do Shorty's chore. Bob will be
your horse.
Go back outside to the stalls and say hello to Bob, Clyde and Ace, the horses.
Check the barrel racing chart right of the gate to the corral. Now let's start
doing Tex' list of To-dos. Go to Shorty in the kitchen.
Shorty's Chores
Talk to Shorty. What a list -
pick ripe vegetables, build a cooking fire in the fire pit and place a bucket
with water beside it.
Pick ripe vegetables - Go outside,
turn around and take the basket
hanging right of the thermometer by the door. Check the thermometer. Go to the vegetable garden.
Learn what ripe
vegetables look like - Remember to pick the ripe ones only or you will be sent back
home. Check the cell phone web browser. Click on the button under web. Click the
arrow right of SEARCH and select 'harvesting vegetables'. Check the snap beans:
Romano, dry beans: Black Turtle, tomatoes: red Beefsteak, bi-colored Northern
Lights, golden white Old Ivory Egg and orange yellow Golden Queen. To exit, click on X at
top right of cell phone.
Right garden - Pick the 2 ripe Beefsteak tomatoes. They are automatically placed in the
basket at the tool box inventory. Check what they look like at the tool box.
Pick the 2 reddish Golden Queen tomatoes. There's no Black Turtle ripen
dry beans.
Left garden - Pick all 4 red Northern lights tomatoes
and ignore the beans and ivory egg tomatoes.
Bring the vegetables to
Shorty in the kitchen.
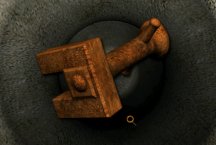
Eggs in basket -
Basket - Pick up the old basket.
Look at basket in inventory-tool box and see that it is broken. Click on the broken part
to see closer. Right click to rotate the pieces.
Click on a piece, right
click to rotate the pieces and place them on appropriate layer of the basket. It
is best to check the ends of the weaving and the design.
There is also a click
sound and the weavings cannot be removed when placed correctly.
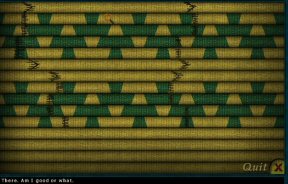
If done correctly, Nancy
will say 'There, am I good or what'.
Click on red thread 3
times to sew the weavings together. 'Voila'.
 |
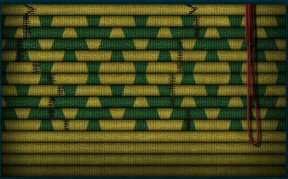 |
| Junior level |
Senior level |
Eggs - Go to chicken coop and talk to Dave. Enter the chicken coop. Read
the 'danger' sign above the white hen. Heed or else! Take all other eggs from
the 7 nests. Go to the kitchen and then comeback to the coop. Take the egg left by
the white hen. Check all 8 nests with or without hens to be sure you've got
6 eggs. Give the eggs to Shorty.
Ask for canteen of
water.
Build Campfire:
Wood - Go to the chopping block by the
kitchen door. Click on a log and it automatically goes on the block. Click on
wedge and it is inserted on the log. Note that it is lopsided.
From the 3 steps below
the block:
1. Adjust the angle to
hit by matching the wedge on the log and the one on the #1 selection.
2. Position the
footprint where the log is (left, middle or right) and how far you are from the
log (the closer the log the farther the footprint should be).
3. Hit it.
Correctly do this 3 times and Nancy will say
'There just call me Nancy Paul Bunyan Drew'. Take the chopped wood.
Kindling -Turn to the kitchen door and pick up the
twigs on the ground left of the porch. Go between the vegetable gardens and
pick up more twigs. Go to chicken coop door and pick the twigs on
the ground right of the door. Turn around from chicken coop door and pick twigs from the ground
by the cactus garden on a rusty cart. Take the twigs on the ground right
of the red shed.
Newspaper - Go back inside the house to the fireplace. Take newspaper from
the basket in front of the fireplace. Read the second newspaper about bank
robbers. They are now crumpled newspapers.
Build campfire - Go back to the fire pit.
Look close at the fire pit and read a
coded note. Place the crumpled newspaper at center,
then the collected twigs and then the chopped wood. Nancy will praise herself
when done.
Bucket with water - Take the bucket by the fire
pit and go to the red pump house. Place the bucket on sink and turn the right tap on.
Take bucket full of water and place it back beside the fire pit.
Prepare to ride:
Go back to the tack room. Look at the drawing
on the American Quarter Horse on the wall, horse feeding schedule on wall, check
girth poster and anatomy of horse hoof.
Talk to Tex. Take white hat from barrel.
Take gloves and saddle from Bob's post. Then go to Bob at the stalls outside.
Place the saddle on
Bob. Remember the poster - tighten that girth. Click on stirrup to check the
cinch. Click on cinch until it is tight. Put down the stirrups. Click on Bob
(neck) and lead him to the corral. Mount and Tex comes
to give you the ... test.
Test time - The
answers to these questions can be found on
the books inside the house.
Where's the horse's hocks? back legs.
Where's the horse's frog? bottom of hoof.
How tall is 15 hands? five feet.
What is a Paso Fino? gaited horse.
How do you know if a horse is colicking?
keeps lying down and then standing up.
What is the difference between a bay and a
chestnut? bay has black points.
What tribe bred the first Appaloosas? Nez
Perce.
What part of the horse is most likely to be
hurt when it founders? the feet.
What part of the saddle should be checked
before you go out on the trail? cinch.
What is a mule?
offspring of a female horse
and male donkey.
Let's ride. Go forward,
open gate and click on Mary's Gifts on the map.
Mary's Gifts:
Enter the Gift shop. Go forward and
check the trunk on right wall. Note the inscription - EH AH inside a heart.
Check the petroglyphs and old west pictures under the Closed sign by the window.
Look close at the FH (Frances Humber?) inscribed tuning forks set on next table. Read the brochure
on Arizona's Petrified Wood on the left table. Look close at the arrowheads on
the wall.
Run for Cover Game - Check the game - Run for Cover by the native rugs.
The object of the puzzle is to get the roadrunner to the hole on the opposite
side of where the roadrunner is situated. The coyote and roadrunner moves only
one square at a time. Find a safe path while blocking the coyote(s) so that they
will not be able to catch the roadrunner. Best to have the coyotes close
together when they chase the road runner. Use the arrows on the right to move
roadrunner.
Junior level solution:
Level 1: Down 2xs, right 2xs, up once, down 6 times,
right 5 times to hole.
Level 2 by Betty Schaeffer: Down 2x,
Right 2x, Down 3x, Right 1x, Down 2x, Right 4x to hole.
Level 3 by Betty Schaeffer: Up 2x,
Right 3x, Down 4x, Right 1x, Up 4x, Right 3x, Down 2x, Left 1x, Down 2x, Right
1x to hole.
Senior level solution
Level 1: Down 2xs, right 2xs, up once,
down 6 times, right 5 times to hole.
Level 2: Up 2xs, right 7xs to end, left 3xs, down 4xs, right 3xs to hole.
Level 3: Up 2xs, right 2xs, down 2xs, left 2xs, up 3xs, down 3xs, right 2xs,
up 3xs, right 5xs, up once to hole.
When the 3
levels are completed, take the token from the slot. It is 1 and half from
Dry Creek Merchants. Play often to get more tokens for later
puzzle. Have fun!
Read about Charleena Purcell's romance novelist announcement. Her
phone number will now be in the phone directory. Remember, we saw a signed
book of hers at the ranch house. She is researching this area.
Pan left and look at the picture of 'a
beautiful horse' on left counter where Mary is situated. Talk to Mary and find out that her offer to buy land from the Rawleys
was rejected. Ask her about Banner, the trunk and the token.
Trunk - The trunk can't be opened.
Get help to open
the trunk - Look at the trunk
again and Mary will let you have your pick of what's inside if you get it
opened. Let's try using the levers that's in the tool box. Click on the initials
and Nancy should say - If I could find out who made this
thing, it might help me get it open. Who would know about things
in these parts during that time. Remember Charleena's
announcement. Go outside the store and use the cell phone. Call Charleena
Purcell. Talk to Charleena about the trunk. Eldridge and Abigail Humber's
wedding day was 4-9-1811.
Open the trunk - Go back inside and look close at
the trunk.
Use the 3 levers on the lock of the trunk.
Based on the Humber's wedding date, enter 4-9-11.
The trunk lock has 12
stop points like a clock. Click the left lever to 4 o'clock position, the middle
to 9 o'clock position and the right lock to the 11 o'clock position.
The trunk opens. Take the watch. The other items are sheriff badge, scissors and pan.
Ranch:
Stable: Let's go back to the
ranch. Remember what Tex said you need to do after the ride - Take the saddle
and bridle off Bob. Place them in the tack room back where you got them - Bob's post.
The gloves are on the saddle.
Pick up the blue letter that fell off. It's a card from J.
Nash to Tex - remember the irate mail at the roll top desk. Read the birthday
card - Jane is Tex' sister. Pull back and the fallen items are automatically
placed back on the saddlebag. Talk to Tex about Jane. That talk didn't come out too
well.
Kitchen: Talk to Shorty about Mary.
Humber's History and Dirk's Treasure:
Den : Let's check the things
that are in here.
Chest - Look close at the triangular
blanket chest in the corner.
The birds have square pegs on them. Now that we are expert in unlocking trunks
let's try this one. Insert the 3 levers on the square peg of the 3 birds at the
corner point of the chest. Again the pegs have 12 stop points like the clock.
Now to find the code. Hmm. The red, blue and yellow birds surround
a clock.
Look close at the broken
clock on the mantle. The 12 is above a red mark, 2 above the blue and 7 above
the yellow marker.
Go back to the
chest. Insert the 3 levers on the square pegs. Turn the red to 12, the blue to 2
and the yellow to 7 o'clock positions.
Secret Compartment: Aha! The secret compartment opens. Read Meryl
Humber's journal. Find out about Frances Humber, Dirk Valentine and Harrison's
Yellow (Frances' favorite flower) as told by her
father Meryl, the sheriff.
Read Dirk's letter to Frances. Treasure - that's
something!
Clues in Dirk's
letter: Map of rock pictures; favorite flowers, flowers on your favorites
and message in his jail cell. 9 (I) 12 15 22 5 (LOVE) 25 15 21
(YOU). Take the petroglyph (rock drawing) map
inside the envelope.
Pocket Watch from house chest - Look at the pocket watch.
To open the watch, click
on the pick and it will be inserted on the side of the watch. It has MH for
Meryl Humber.
This is a random puzzle
and the numbers changes when the watch is closed.
Press on the numbers
that are active: 2 4 6 8 10 and 12.
Find out which number
gets depressed, ex. 10. Then find out the next number that will stay depressed
after pressing the initial number, ex. 10, 6. Then press 10, 6 and find the next
number depressed and go from there.
The watch opens
revealing a picture of Meryl and Frances. Take the watch pick.
Pocket watch from Mary's trunk
- We have another watch taken from Mary's trunk.
Click on inventory-toolbox and at
the eye icon. Look close at the pocket watch in the box.
Click on toolbox again
and take the watch pick just taken from the house pocket watch.
Click the pick on the
pocket watch in the box.
The watch opens showing
FH. Do the same procedure for opening this watch as that of the other watch.
This is a random puzzle
and the numbers changes when the watch is closed.
Press on the numbers
that are active: 1 3 5 7 9 11.
Find out which number
gets depressed, ex. 1. Then find out the next number that will stay depressed
after pressing the initial number, ex. 1, 11. Then press 1, 11 and find the next
number depressed and go from there.
See the same picture
from the other watch except Meryl's side is torn off.
Click on Frances'
picture to see 'Green Bottle under' written on the back.
Call Charleena and learn about Frances, Dirk and the treasure.
BBQ time: See Shorty yodel and gets
insulted. The phantom horse gallops by and the pump house blows up.
The next morning, a phone call from Bets occurs.
Call the sheriff.
Chore time again:
Go to the kitchen and
see that Shorty is gone. Look at the desk right of the stove. Look
at the mineral map of the area. The SW Geological Survey phone number is now in
the cell phone directory. Nancy gets caught by Shorty snooping on his stuff.
Talk to him again and he wants you to get eggs and vegetable again.
Go outside. Call
the SW Geo Survey and found out about Shorty and
the map. Take the vegetable basket from the wall. Pick the ripe veggies again.
Check the web using your cell phone for reminders on what ripe veggies look
like.
Pick veggie
time again - Hey, they're riper now. Remember the appearance of the seeded
snap beans: Romano, dry beans: Black Turtle, tomatoes: red Beefsteak, bi-colored
Northern Lights, golden white Old Ivory Egg and orange yellow Golden Queen.
Left vegetable garden -
Pick the 5 ripe Romano beans (not the dried ones) and the 2 ripe Ivory egg tomatoes. No Northern
Lights tomatoes.
Right vegetable garden -
Pick 2 red beefsteak tomatoes and the 3 dried Black Turtle beans. Show them to
Shorty.
Pick eggs again
- The basket is in the tool box. Go to the chicken coop. Pick the 6 eggs
from all nest except the one from the white hen. Give the eggs to Shorty.
Now, he wants you to
bake a birthday cake for Tex. It can be done anytime today. Get canteen of
water from Shorty.
Birthday cake -
Check the recipe box on the prep table. Look at the ingredients needed for
Shadow Ranch Cake. Check the fridge for measurement adjustments.
Batter: Turn to the work area
left of the oven. Magic! All the ingredients appear.
Place 2 sticks of butter
in the bowl. Magic spatula...
Then add 2 eggs to the
bowl.
Add 5 of 1/3 cup milk
Add 2 pints of flour.
Add 3 teaspoon of baking powder
Add 7 of 1/3 c sugar
Last, add 3 teaspoon of
vanilla.
Back up and select BAKE.
Place the batter on the large round pan. Bake for 45 minutes at medium
temperature. Press the red switch on the left.
Take the cake from the
oven. Nancy will say 'Perfect' if everything is correctly done.
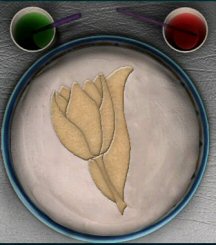
Icing: Have a 'sample' of the
cake. Place the icing on the left on the cake.
Then the marzipan flower
needs to be placed on the cake.
Look
close on the icing on the cake and see some indentation.
Place
the pieces following the lines. Right click to rotate the pieces.
Be
sure that they are close together.
When
correctly done - Nancy will say - 'it's a tulip'.
Now, color the flower
red and the stem and leaf green.
Favorite Flowers, flowers on your favorites:
Pump House: Look at the pump house. Call the sheriff and talk to him about
everything. He gives permission to enter the pump house.
Go in and look close at the corroded pipe left of the blue pump. Pick
up the blue arrowhead.
Turn left and see a grilled door at bottom shelf. Enter and go
forward until another grilled door. Talk to Dave sneaking around. Find out all
what he knows about Frances and the treasure. He's related to Ellie, cousin of
Frances. He has the other half of the picture with stairs to cellar written on the back. Dave is upset and leaves.
Turn left and take the
purse that is on the right middle shelf beside a rusted bugle. The purse
has some beading removed.
Check the door top of
the stairs. See that it leads to the den. Go back down to the cellar and go out through the grilled door
to the pump house. Nancy comments on this stairs.
Stairs: Once on the foot of the stairs with the grilled door, turn
around and click on the top landing. Lift the landing, look close and see a
puzzle.
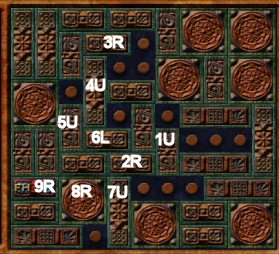
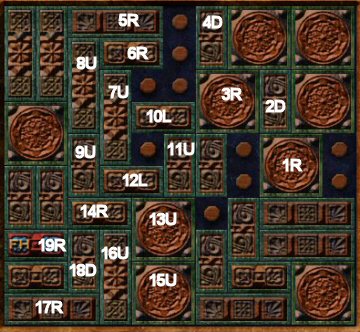
FH puzzle - After
some attempts to do the puzzle, Nancy will
comment 'that if I move the piece that has Frances' initial on it, I'll be all
set. So the object of the puzzle is to get a space beside the red FH tile, so
that it can move to the right.
|
 |
 |
|
Junior Puzzle |
Senior Puzzle |
After moving the red FH tile, a green bottle appears. Click on
the bottle and read the old letters.
On the first letter,
Dirk mentions favorite shawl (stitch) and favorite handbag (beads). The second
letter mentions about favorite crackers, cracker tins and an agate that shows
one of their meeting place. The third letter mentions about the flower on cake,
flower on favorite letter paper and Charlie's grave. Note: Now, we know
Frances' favorites - shawl, purse, crackers, cake and stationery.
Go out through pump
house and talk to Dave some more. He wants you to fix the
chicken coop while wearing gloves. Read Frances' letter. Note the lily on the stationery.
The jail house is in a ghost town in Dry Creek.
Den:
Go to the house and take a close look (zoom in twice) on Frances' shawl. While in close up of the stitch - Use the
cell phone and do a web search for common knitting stitches. The shawl is knitted
using Daisy stitch. Nancy should say -the daisy stitch.
Do a search for Harrison
Yellow. It's a yellow rose.
Call Bess Marvin and keep them up to date. Tell them about the
purse, Dave and the petroglyph map. George will check up on the purse.
Stable: Go to Tex at the tack room. Talk to Tex again and he talks about
her sister. Tex wants you to feed the chicken and the horses.
Feed the chicken and horses:
Bins: (L-R) 1-5 -
Oats, Mix Pellets, Corn, Pink Pete's Pink Cattle Supplement, Chicken chow.
Chicken - Look at the Feeding schedule board. The
chickens need 2 scoops of chicken chow.
Look at the bins below. Gee, which one is the chicken chow? Look
at all the bins. The only one that looked like what chickens would eat is the
one at far right - it isn't oats or corn. Take 2 scoops of the chicken chow.
Pull back and keep bucket. Go to the chicken coop and pour the chicken feed in
the Easy feed hopper.
Horses - We need to feed Bob, Clyde and Ace. So we need
to make rations A, C and D. By the look of the feed in the bins - the middle bin
in the corner
is the corn, the leftmost bin is oats and that leaves the one in between as the
pellets. The pink stuff is
Pete's Pink Cattle Supplement.
Ration A for Bob:
2 cans of oats from the
left bin to get the scale mark to 2.
2 scoops corn from the
middle bin to get the scale mark to 3.
1 cup mix pellets from
the bin between to get the scale mark to 4.5.
Pull back and keep
bucket. Empty the bucket on Bob's feeding bucket outside.
Ration C for Clyde:
Place the bucket back on
the scale.
3 cans of oats from the
left bin to get the scale mark to 3.
1 cup mix pellets from
the bin between to get the scale mark to 4.5.
Pull back and keep
bucket. Empty the bucket on Clyde's feeding bucket outside.
Ration D for Ace:
1 can of oats from the
left bin to get the scale mark to 1.
1 scoop corn from the
middle bin to get the scale mark to 1 1/2.
2 cups mix pellets from
the bin between to get the scale mark o 4.5.
Pull back and keep
bucket. Empty the bucket on Ace's feeding bucket outside.
Return bucket. Talk to Tex.
Now he wants you to do
barrel racing and roping. Take the saddle and gloves from Bob's post. Refresh
your memory of barrel racing by looking at the chart on the right of the corral
gate. Saddle Bob - remember to tighten that cinch. Go to the corral.
Barrel racing -
Click on barrel 1 and pass through the right side. Then pass the left side of
barrel 2 and then pass on the left side of barrel 3. Do this as fast as you can.
Click on the barrels when you approach - not on the sky and Bob will do a
tighter turn. This will lessen the time of the ride. Hey, I did 9.5 seconds! Yay!
Roping - Take the
rope on the sawhorse. Watch the lariat that is swinging overhead, when it forms
a circle throw-click. You just need to make 4 out of 5 perfect throw.
Congratulations.
Back up and Nancy will
now say she can get her own lariat. Take the lariat Tex hands out. Take the
saddle and go to the corral.
Use the cell phone to learn more about where we should go. Call
Charleena and find out about the token you got from the game at Mary's place.
Saddle Bob again and let's go for a ride. Click on the gate to go out to the
wilderness.
Look for Dirk's jail cell
Dry Creek: Pass Mary Yazzie on the way
to Dry Creek. Let's look around. Go forward.
General Store - Did you hear-see that stone dropping from
the General store? Turn left at the General store, go to the right side and then
look close at the contraption on the walkway. Pick up a red handled lever.
Pan right to the outhouse and pick an arrowhead from the ground. Be
careful picking arrowheads if there are scorpions or rattlesnake. Come back
later to pick them up when you meet these critters.
Jail - Go to the Jail-Sheriff's office across the way.
Take a look at the carved brand on the plank on the walkway in front of the
door. It looks like BD. Enter the jail. Find out that the cells are locked. Exit the jail and
explore the town further on.
Turn left to the bank on the left and beside the general store.
Turn around and go forward. Look at the carved
J brand on the
hitching post. Look at the barrel across the hanging platform - another brand,
this one with a heart. Pick up the arrowhead beside the barrel.
Cappy's - Check Cappy's left of the cemetery.
Dirk mentioned this place in his letter. See that it
has a digital padlock and has a sign by the sheriff. Find out that the cell
phone does not work here.
Cemetery - Check the hitching post just in front of the
cemetery for another brand.
Mary's Gifts: Ride out to Mary's Gifts
and use the cell phone. Call the sheriff. The combination for the lock at
Cappy's is 9 2 7 4.
Enter the store and look at the new petrified wood on the
table by the window. Talk to Mary about the petroglyphs at Cougar Bend, wood, treasure and seeing her
on Rawleys land. I think she's a lil upset!
On
the trail of Dirk's petroglyph map:
Trail Stop: Ride to Trail Stop. Pick up an
arrowhead on the right sides of path just in front of Bob. Go forward and
pick up another arrowhead on the left. Go forward and see Charlie's
grave. So this is one of the lover's meeting places. Turn around and go to the
striped rock left side of the path. Uh OH - there's a rattling sound - don't
click on it or you die. Go back to the path and go forward and pick another
arrowhead on the left side of the path. Forward again and get another
arrowhead.
Cougar Bend: That rock formation looks
familiar. Take a look at the petroglyph map in the tool box. Go forward and pick
up an arrowhead close to the flat rocks. There's another arrowhead
on the ground in front of the big rock that can be climbed on to the left side
of the rock formation.
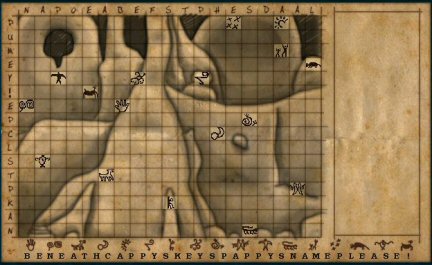
Petroglyph map - The object of the puzzle is to find petroglyphs in the rock formation and enter their location on the petroglyph map
in your tool box.
Once a petroglyph is seen,
look close and click on it.
The map will automatically show up with the drawings on the
right side.
Click on the drawing on the right and place the drawing on one
of the light colored square that is as close to the place you found it on the
rock formation.
The light colored squares are the clues where to find the
petroglyphs.
At center area of the rock formation, look up and use the lariat
on the protruding log to get up on the top of the ledge. Remember to wait for a
complete circle on the lariat. There's an arrowhead on the floor on the
ledge. Have fun.
Once all the glyphs have
been placed in the map, the decoded glyphs make out -
Beneath Cappy's keys pappy's name please!
More
of Dirk's clues
Mary's Gifts: Use the cell phone and call
Charleena, the one that might know pappy's name. Ask about Dry Creek. Cashmeer Valentine is Dirk's father.
Dry Creek - Cappy's: Enter 9 2 7 4 on the combination lock. Enter
the tavern. Check the books on the table. It is an electrician manual. Turn left and see a cracker tin like what Dirk stated on his love
letter but the name of the tin is unreadable. We need to know the name of the
crackers - it's one of Frances' favorites. Look
at the geometric shape on the table right beside the cracker tin. Interesting!
Look
at the picture right of the piano. Pan right and see that someone has been
hanging out in here. Sleeping bags, water and other items are seen.
Check the old arcade game by the exit.
Piano puzzle - Look close at the base of the piano.
Remember
Beneath Cappy's keys pappy's name please! (piano) clue.
Flip the decorated panel above. The object of the
puzzle is to enter the name of Dirk's father - Cashmeer.
The puzzle resets when you pull back. Note which other letters
are depressed by pressing each of the letters. Example: Pressing the first
letter on the right depresses letters (L-R) #1 and #4. Learn what other letters
do. Then from these clues, one can deduce which letter is the least affected by
pressing other letters.
From Left to right, numbered 1-8: Press 7 to E, 6 to E, 8
to R, 3 to S, 2 to A (done), 5 to M, 1 to C and 4 to H.
Take the letter from the secret compartment.
"Take your forks
and a crank to the Beady Eyes Ranch. And make sure you see what's below. When
you stick the forks in and give it a spin, off towards my treasure you'll go."
Hmm...
Frances' forks, crank and Beady Eyes ranch
Mary's Gifts: Use the cell phone and call
Charleena. Ask about the name of the crackers.
Use the cell phone to do a search on the web about Cattle brands
and Beady Eyes Ranch. The web search stated that some brands
represent the name of the ranch, while others are initials or fanciful designs
associated with specific ranchers. Beady Eyes ranch might be B and E or
something. Now where did we see that brand? Dry Creek is loaded with branded
wood.
Enter Mary's shop and look at Frances' tuning forks on the table.
Ask Mary to see if she'll lend us France's tuning forks. She wants 10 arrowheads
and she'll give you the tuning forks. She hands a box to collect the arrowhead.
If you have not collected them yet: There are 2 arrowheads at Dry Creek, 4
arrowheads at Trail Stop, 3 at Cougar Bend and one at the pump house at the
ranch. Mary needs only 9 arrowheads and she gives one arrowhead to Nancy.
Take the tuning forks from the table by the window.
Dry Creek: Look and then click at the brand
on the walkway plank in front of the jail. Isn't that BD for Beady. Take the box and then close the lid.
The shape of the box looks familiar. Ha, remember where we saw a shape like
that. Go to Cappy's.
Tuning fork - box puzzle - Go to the cracker tin can on
the left counter. Look close again on the outline on the counter. Place the box
taken from under the BD plank on the outline.
Place the red handled crank found by the general store on the
side of the box.
Take the tuning fork from the tool box and then click on the
holes top of the box.
See the tuning forks lines up in front. The object of the puzzle
is to find out which tuning fork goes in the 4 slots.
Note that each tuning fork has a letter of the note on its base.
Arrange the tuning fork to form the name - FRANCES. Once the correct tuning fork
is in the right place - it could not be moved anymore.
Turn the crank. The lamp
on right wall breaks from the sound produced. Take
the note in the lamp. "Now go and peek Beneath Zebra rock. But you'll need a
magnet what's there to unlock."
Remember where we saw a striped rock. We need to go to Trail
Stop but first, we need a magnet. Now where did we see one? Aha - Shorty's
fridge is loaded with magnets.
More
Ranch Chores
Ranch: On the way back to the ranch,
see Mary and Tex. What is that all about? Remember to take the saddle and return it on Bob's post at the
tack room or Tex will bite your head off.
Its night time and we still haven't fixed the chicken coop.
Chicken Coop puzzle -
Remember what Dave said - use gloves. Take the gloves from the saddle in the
tack room. Go to the chicken coop.
Click the gloves on the wires and pliers.
Arrange the wires on the hole of the coop.
Once the correct wires are in place, it will not be movable
anymore.
Nancy will
tell you if it 'looks right'. Junior level has less and larger pieces than
senior level.
See that the gloves glow in the dark. The gloves touched the
powder that was over the electrician book at Dry Creek. Then the phantom horse
gallops by and the electrical wires sparks.
The next morning, Nancy talks to Bess and George.
Go to the kitchen and take the apple magnet. Go and talk to Shorty.
Go out the
door and see a horseshoe on the ground. Pick up the horseshoe.
It's time to do the veggie and egg chores
again. Take the vegetable basket outside and go to the vegetable garden.
Vegetable garden
- Hey, they're riper now. Remember the appearance of the seeded snap beans:
Romano, dry beans: Black Turtle, tomatoes: red Beefsteak, bi-colored Northern
Lights, golden white Old Ivory Egg and orange yellow Golden Queen.
Left vegetable garden -
Pick 4 bicolor Northern Lights tomatoes.
Right vegetable garden -
Pick 2 red beefsteak tomatoes, 2 orange yellow Golden Queen tomatoes and the 2
dried Black Turtle beans. Show them to Shorty.
Pick eggs again
- The basket is in the tool box. Go to the chicken coop. Pick the 5 eggs
from all nest except the one from the white hen. Go to the kitchen and then
go back to check the white hen's nest. Take the egg from the white hen's
nest. Give the eggs to Shorty.
Get another canteen of
water from Shorty. Talk to Dave by the chicken coop. Go to the tack room and talk
to Tex. Nancy shows Tex the horseshoe with a rock wedged in it. Hmmm... Ask
about Mary.
Ask Tex if you can go riding now. He says the bridle should
be put back together first. Yahoo!
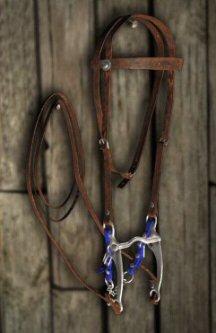
Bridle puzzle -
|
Take the bridle parts
from the can at top shelf. Place the parts together. Once the correct part is in
place, Nancy will make a comment about it.
Look at the bridle left
of the door as an example. Right-click pieces to rotate.
Turn and place the belt like part
from bottom right
inside the headstall.
Place the 2 short pieces
buckle side up first to the side of the head strap.
Turn and lace the metal next.
Turn and attach the long coiled
part on the ends of the metal.
Turn and place the blue
part on the metal end.
Perfect.
Take the bridle.
|
 |
Talk to Tex and then
saddle Bob up. Time to ride out.
Time
to check the jail message
Mary's place:
Talk to er... trick Mary. Tex and Mary are in love. How sweet - Tex! Learn about
why Mary wants the Rawleys property.
Dry Creek:
Cappy's - Go to
Cappy's, look at table that had the books and see that the mystery person has taken all his things away. Check the
box left at the corner. There's a key on top of the box. Pick up the key.
Ouch!
Jail -
I'm in
the jail cell. That's what we wanted but not this way.
Dirk's message - Look close at the lines
right of the sink.
Count the lines and it
will correspond to a letter in the alphabet.
Use your computer's
keyboard, type in the letters and then press return key. Ex: A - 1 line, B - 2
lines, Z -26 lines - under bank lamp.
Turn left and see the key hanging on the wall outside.
Jailbreak - Look
close at the key and see an overturned chair.
Use the lariat on the
chair to turn it up under the key. Time the click on the chair when the lariat
makes a perfect circle.
Pick up bricks from
the floor by next cell and look close at key. Click brick on the key. You will see angle arrows and strength bar for
the brick throw. Use the second arrow from the left as the angle of the throw.
Move the strength slider to the middle. Click on throw. The key is one on the
chair.
Use the lariat again to
pull the chair to the cell.
Click the key on the
middle of right cell door frame and out you go.
Pick up the paper off
the floor. It is Dirk's code for his secret messages. Read the blue inked
note. The culprits use the same code.
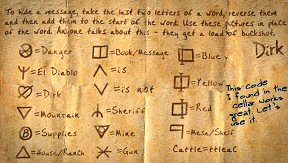
Decode the message found
in the fire pit. Will need more supplies. If ranch is not
soon check message mesa again. Dirk might have hidden it
right under sheriff nose. So the saboteur is from the ranch.
Bank - Go to the bank
(building across the hangman's platform) and look under the lamp on the right side of the building.
Check the loose brick on
the side. Read the note - Did you know you can play some
games more than one way? You can and I'll tell you how. Use the ring that/s the
twin of Ellie's, your cousin in Cappy's fun machine now. We need
to get that ring.
Ranch - Take the
saddle off Bob and place it in tack room. Talk to Dave by the chicken coop about
Mary and borrowing his aunt's ring. Step one way away from Dave and call the
sheriff. Saddle Bob and go to Dry Creek.
Dry Creek - Cappy's Arcade Game:
Check the old arcade game by the exit.
Mean Gang -
Insert the token won
from Mary's Gifts. If you run out of tokens, go to Mary's Gifts and play the
'Run for Cover Game' again.
Pull the lever and try
to get 4 mean guys to make the meanest, roughest and toughest gang in the West.
Click on the buttons
under the ones you want to keep. There is only one chance given to remove
the good guys.
Pull the lever again and
see if you get 4 mean ones. If you win, you get 2 more tokens.
Nice Gang - It is time
to check Dirk's note under the bank lamp. Save Game.
Use Dave's aunt's ring on the red
button above the slot.
The sign changes to 'make the nicest, sweetest and most
pleasant friends.
Insert token on the slot. Pull lever.
Click on the buttons
under the ones you want to keep.
Pull the lever again and see if you get 4 nice
ones. Take the key.
Check
Dirk's Zebra rock message from the tuning fork puzzle.
Trail Stop:
Time to check the 'zebra rock' mentioned by Dirk. Remember the striped rock
close to Charlie's grave with the rattle snake - that's the one. Go forward from
Bob 3 times and pan left. Go to the striped rock free from rattle snake. Push off
the rock and open the door to reveal another puzzle.
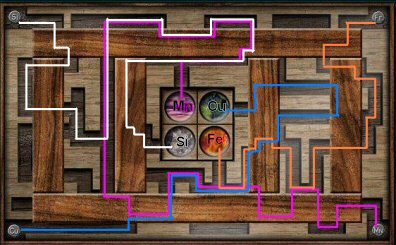
Zebra rock puzzle
- The object of the puzzle is to place the element symbol on all 4 corners to
the appropriate colored circles at the center.
Use the apple magnet to
move the symbols. Click- on symbol and move it on the gray area to get to the
appropriate circle at the center. Some areas are covered by the brown strips of
wood and the metal's path cannot be seen. The hidden paths can zigzag, so try moving it around to
see where the metal piece is free to move. Note the message at bottom left and
the sound of progress.
The pink circle is Mn
-manganese. The blue circle is Cu - copper. The silver circle is Si - silicon.
The orange-red is Fe - Iron.
A music box with another
puzzle is revealed. We need more information on this one. Take the music box
with flowers.
Favorite Flowers, flowers on your favorites again:
Mary's Gifts:
Time to check e-mail messages.
Crackers: The e-mail about the Cracker name from Charleena
Purcell states to check out Kelleher on the web. Check web, search and
Kelleher. Aha! The name is Sunflower Crackers!
Beaded bag:
Check the e-mail about beads. The bead pattern mail states that it is called
Spiral Flower. Note the pattern.
Enter the store and talk
to Mary about beads. Mary will get the
beads if Nancy finishes the display.
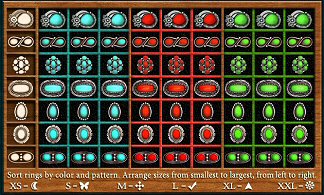
Ring Display -
From left to right: Sort rings by color and pattern. Arrange sizes from
smallest to largest.
1. Arrange the similar
designs in its row based on the white design on the left column.
2. Sort the colors based
on the color of the frames around the rings
3. Sort each color by
the size: smallest on the left and largest on the right. The size can be seen
when the rings are picked up and the icon under the cursor shows the size. The
chart for the icons is seen at the bottom of the frame. ex. half moon is XS.
Nancy will say if it
looks right.
Talk to Mary and she'll
give the beads.
Bead Bag - Click on the purse in
tool box to see a big view and then click on the square that needs beads. A new frame is seen. The
pattern as researched by George is:
Yellow - 1; Black, Black
with red corners - 4 times; Red, white, red, red with pink corners - 4 times.
Sew in spiral.
Click the beads on the
needle in the order shown above. When correctly done, the beads will be sewn and
Nancy will say- Perfect! That flower looks kinda like a poppy.
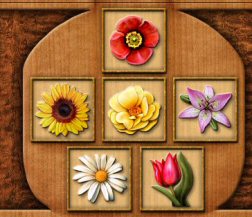
Music Box Puzzle:
We know from her
father's letter Frances' favorite flowers is Harrison yellow rose.
The flowers on Frances'
favorite things are: lily from the letter to her cousin, sunflower from the
cracker tin can, tulip from the birthday cake, daisy from the knitting stitch of
the shawl and poppy from the beaded purse.
Look close at the flower
music box taken from under the zebra rock.
Dirk's clue was favorite
flower with flowers on your favorites. So arrange the other
flowers found on Frances' favorites around Frances' favorite flower.
At the center, select
the Harrison yellow rose. Select Poppy on top,
sunflower on the middle left and lily on middle right. Select daisy on bottom
left and tulip on bottom right.
The box opens to show a
note and a slot. Read the note. Insert the key taken from Cappy's arcade game on
the slot. Another puzzle and code is seen.
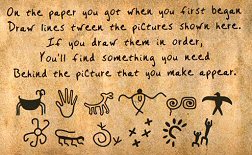
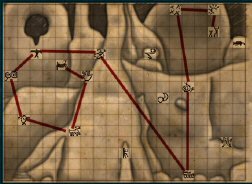
Map Puzzle:
Based on Dirk's note -
draw a line connecting the petroglyphs he shows on his note.
Click on the first
glyph, then the second, then the third, etc... A white line will form to
connect them.
A V. Hmmm.
Closing in on the treasure.
Cougar Bend:
Ride Bob and let's check the source. Look at the connected lines in the map.
Note the top middle petroglyph that is not connected by any lines. Looks
familiar! It's the drawn V. Go forward and lasso that log above on the shelf.
Climb the rope and look for the V petroglyph. Pan left to the flat rock
and click on it to reveal a rock and a note. Read the note.
On Charlie's
grave, hold this up, look around and you'll see the trail to a gift to you from
me. Take the scuffed rock. Let's ride.
Mary's Gift:
Talk to Mary about the scuffed rock. After Mary worked on the rock, a picture agate
is revealed. Exit and get a phone
call from Bess and George.
Trail Stop:
Go forward 3 times, turn right and click on Charlie's Grave. The picture agate comes up.
Move the cursor to find a match of the picture. Turn around and see the matching
tree just behind zebra rock. Click to go there.
? area:
Nancy rode Bob towards 'that' direction. Turn right and go forward until up the
cliff. Use the lariat on the protruding log 'up there'.
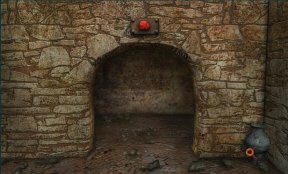
Ancient Cliff Dwellings:
Enter the dwellings. See an etched coded message.
Based on the decoder
note found on the jail floor, the message is decoded as:
brown . lime .
yellow . red . blue . orange . lime . yellow . brown . blue .
lime . orange . blue . brown . lime . orange . red . blue . yellow . lime . blue
. lime . brown . yellow -V
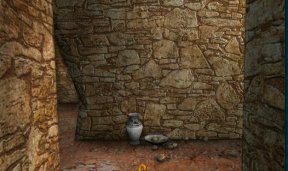
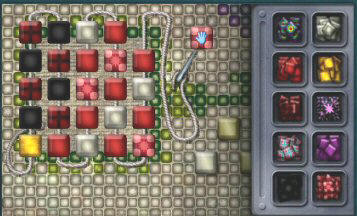
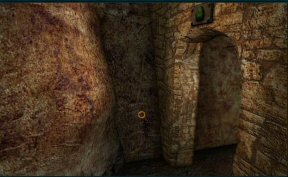
Maze: Here is the start of the
maze. SAVE GAME or do second chance when you need to start over. Just follow the
code colors on top of the door and check every pot.
Note: I was informed that the keys are randomly placed in different pots in
different locations. So just use the maze directions and look for ALL the pots
in side chambers and in the main path.
Turn right to enter
room. Turn right to brown.
Turn left, check pot by
lime opening and enter lime.
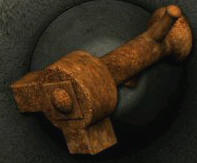
Right, forward and check
pot. Take L shapedkey.
Turn left, forward and
before you enter yellow at right - go forward to orange and check pot. Take =
shaped
key.
Turn around, forward out
of orange and left to yellow.
Turn right, climb ladder
by red.
Right, right, forward, check
pot, take wedge shaped key and right to blue.
Go down ladder at blue
and forward to orange.
Right and forward to
lime.
Right to climb ladder by
yellow.
Left and enter brown at
right.
Right to blue.
Right, then left to
lime.
Left to orange.
Right to blue.
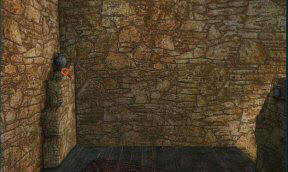
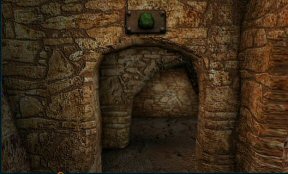
Left to brown. Enter
brown, turn
right to face lime, turn around and look at pot. Take I shapedkey.
 |
 |
| Enter brown opening |
See lime opening |
 |
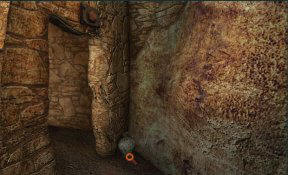 |
| Face lime opening |
Turn around and see pot |
 |
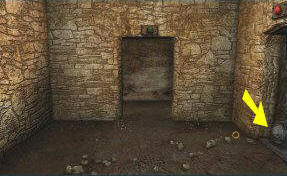
Turn around. Enter lime.
Forward to orange. Check
pot.
Right, forward and right again to
red.
Left, forward and left to
blue.
Forward to yellow.
Left to lime.
Forward to blue. Check
the pot under red and take U shaped key. Click on mat and see a hole on the
floor.
Turn left and enter lime.
Left and climb ladder of brown.
Forward to yellow.
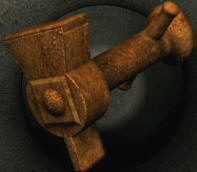
Maze keys:
Click on metal plate. Place the keys on the
keyhole with the same shape as its end. Click on bolt at right.
Dirk's loot: See a big heart on the
wall. Turn right and see the loot. Open the chest and see solid gold hearts.
Exit the room.
Meet the saboteur.
After the saboteur stops talking turn left, run down the ladder, turn around and turn right-enter lime
opening.
Turn left, take the red stone on
top left opening. Turn right and
take lime stone on top of the opening. Place the red stone on the hole where the
lime stone was previously. Turn right and now place the lime stone on the
hole that had previously held the red stone. This should confuse you-know-who. Second chance works well here! Watch,
listen.
Sassy Detective,
Hawkeye! Yahoo!
This
document may not be distributed without express written permission of the author
and the content may not be altered in any way.
For
Questions or Comments on this Walkthrough,
Please write to:
MaGtRo
Copyright © 7/2004
MaGtRo
 GameBoomers
Walkthroughs and Solutions
GameBoomers
Walkthroughs and Solutions