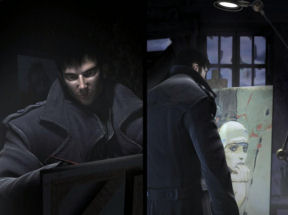
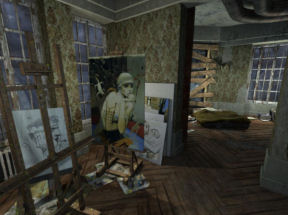
| NIKOPOL STRATEGY GUIDE By Becky Waxman Preparations This Nikopol: Secrets of the Immortals walkthrough was updated on 12-12-09 to reflect the changes in the version released by Big Fish Games. Nikopol: Secrets of the Immortals is a point-and-click adventure game that uses first person perspective and 360 degree panning. As you move the cursor, it changes as it glides over hotspots that show when you can move, take things, use things, and examine things. The main menu is a futuristic landscape from atop Nikopol’s apartment building in Paris. You can pan around 360 degrees to see all the menu features. Here you first select a profile (multiple profiles allow more than one person to play the game at the same time) save, load, quit, start a new game, continue gameplay, watch the credits, and tweak the options (mouse sensitivity, volume, subtitles -- click on the empty bar to enable the subtitles -- screen resolution and graphic quality). There are nine save slots plus an autosave. Under certain circumstances, saving over a previous save changes the saved game’s position on the list – you should keep track of the saves by date and the accompanying screenshot, not by the position on the saved game list. You can reach the main menu during gameplay by pressing the “Esc” key twice. The main menu can be confusing to navigate, as can some close-up screens later in the game. "Active/hotspot" buttons in close-up screens tend to be on the lower right of the screen, and can be very small. Look for small words or symbols -- the small white word "save" under the rectangle in the Save Menu, for instance, or a small "X" or "+" symbol when trying to get out of computer screens or other close-up screens later in the game. Sometimes clicking once on an object brings a comment, and you will need to click again to get the response described in this walkthrough. Nikopol is alt-tab friendly so that you can access your desktop at any time while playing the game. Right-click to bring up the inventory. To then select an inventory item, left-click on one of the displayed items to place it in the “active” position at the bottom of the screen. Once an item is in the “active” position, you use it by left-clicking on the point in the environment where you want to place or use the item. The inventory screen also contains two small, bluish buttons. These are located between the center circle and the outer circle that displays the various items. When you click on the lower right bluish button, the cursor will turn into a magnifying glass. Clicking the magnifying glass on any documents in the outer inventory circle enables you to read them. Right-clicking allows you to exit the inventory. In the Got Game version of this game, you can access the Nikopol User Manual in .pdf format (once the game is installed) by going to Start/Programs/Nikopol. Note: I played the PC version of Nikopol, published by Got Game in North America – the version published in Europe by Lighthouse Interactive may contain slight differences. For the version of Nikopol released by Big Fish Games, note the differences in gameplay signified by the blue font. Before we get started, note that the Big Fish version has fixed a translation error, in which the word "crane" should have been "skull."In a couple of instances, hotspots that were accessible too early in the Got Game version have been deactivated until later in the Big Fish version -- if this guide says to click on something and it doesn't work yet, try moving ahead to the next instruction in the guide. Setting the Scene The game opens with a cut scene introducing the player to Alcide Nikopol, the artist, and the remarkable events that are unfolding around him. During the sequence, a strange being looks at the unconscious body of a man and remarks: “This mortal seems pure – surely lost in this city.” Toward the end of the sequence, you’ll see Nikopol as he paints, plus a brief view of his signature at the bottom of a canvas. You then find yourself in a crumbling apartment that appears to be in an advanced state of disarray – giving new meaning to the “eccentric artist starving in a garret” experience. Although there are female figures in Nikopol’s paintings, it’s doubtful that a female has had a hand in either embellishing or straightening up his apartment.
The year is 2023, the location – Paris. Depressing manifestations of ruin and despair have overtaken what was once The City of Light. The dictator-prophet Choublanc now holds sway, heading up the state-controlled church and the military. One section of Paris -- the city center -- exists for the favored few who run the government. Everyone else lives amidst poverty and squalor. Current Events Four events now color the future of Nikopol and his fellow Parisians. First, an enormous jelly-fish-like creature has appeared atop the Montparnasse Tower (the tallest building in Paris, also sometimes called the bunker) and the creature is rapidly growing in size. Second, a mysterious capsule has crashed in a part of the city, and whatever was inside has escaped before the military could reach it. Third, a floating pyramid has appeared from nowhere, apparently inhabited by beings resembling gods from ancient Egypt. And last, there’s an upcoming election in which the dictator-prophet Choublanc is the only candidate, with punishment guaranteed for anyone who doesn’t turn up to vote for him. Artist in Residence After the opening cut scene, you can explore Nikopol’s apartment, pick up items and hear him comment on his surroundings. Left-click whenever you see the cursor change. Nikopol mentions that he once painted a portrait of Choublanc. A painting to the right of Nikopol’s empty easel reveals a woman with blue fingernails and an odd mesh-like sleeve over her right arm. On the bottom right of the painting is Nikopol’s signature from the opening cut scene. Items that should be picked up in the first two rooms (the bedroom and studio) include:
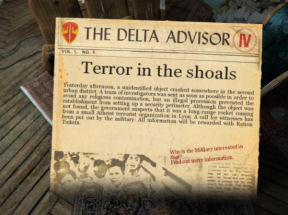
Leave the bedroom by clicking to open the double doors. Nikopol’s living room is in even worse shape than his bedroom and studio! Look up at the ceiling and down at the floor to see exposed pipes and wiring, water leaking on the floor, and metal braces that have been clumsily wedged to keep the ceiling from tumbling down. Click on the movie projector in the center of the room, then click on the top round reel canister to open it. Move toward the fireplace at the end of the living room, and click to note the blocked double doors to the right of the fireplace. On the right of the fireplace mantle, next to some piping, is a video reel that you can pick up. Note: if you’ve already found the hotspot that lowers the movie screen over the top portion of the fireplace, you won’t be able to pick up this video reel until you’ve clicked on the center bottom of the movie screen to send the screen back up to the ceiling. Read All About It Turn back around to the coffee table with papers on it. Click on all of the papers and read them.
Walk through the gap in the living room wall to the entryway. Look at the ceiling, where Nikopol is worried that there may be a collapse. Pick up the paper under the door. It’s a letter from someone named Gorgon. Nikopol has recently joined an anti-government religious sect, and Gorgon, the organization’s Chaplain, invites him to appear at the cemetery for the final test and rite of initiation. Gorgon asks Nikopol to bring a picture of Nikopol’s father to the test. This last requirement is puzzling, but Nikopol decides to obey the request. The only problem – he doesn’t have a picture of his father to bring. Walk into what’s left of the bathroom – not much privacy here. Click on the phone to hear a message about the upcoming election. Setting Up the Movie Projector Return to the movie projector in the living room.
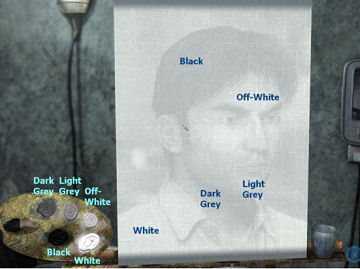
If you haven’t already, click to open up the circular video reel canister. Right-click to bring up the inventory. In inventory, place the cursor over the video reel until you see the words “video reel” appear, and left-click on it. You will automatically return to Nikopol’s living room, and the video reel will be in the “active” position at the bottom left of the screen. Move the cursor until it’s over the open video real canister on the movie projector and left-click on the open canister to place the video reel in it. Then click on it to close the canister. The movie projector is now ready to be used. Before you can use the projector, you need something on which to project the image. Go to the fireplace and look up at the conjunction of the ceiling and fireplace. Click to bring down the movie screen. Click on the switch on the movie projector to see a film of Nikopol’s father (who was also named Alcide Nikopol) at his court martial for insubordination. Alcide Nikopol Senior was condemned to forced hibernation in a space capsule, a sentence that was supervised by an android called XB2. Nikopol’s father could easily be his twin; the two are eerily alike. It seems, from the similarities in their physical appearance, that Nikopol could simply do a self-portrait to give to Gorgon. However, this task won’t be that easy. Setting Up the Easel Go back into the studio. In the corner near the bust are some canvases. Pick up a white canvas. Turn around and pick up the empty easel next to the picture of the woman with blue fingernails. Return to the living room. Nikopol automatically places the easel on the side of the room. Right-click to bring up the inventory. Left-click to select the white canvas – you will then see the living room and the empty easel, with the white canvas in the lower left of the screen in the “active” position. Left-click on the easel to place the white canvas on it. Right-click to return to the inventory and left-click on the painting tubes + brush, which will appear in the lower left of the screen in the “active” position. Left-click on the canvas, and Nikopol mentions that he needs to find a “trick” to paint more quickly. Right-click to return the painting tubes + brush to the inventory. Then turn and click on the knob on the movie projector that’s about midway up the base of the projector. This turns the projector toward the white canvas. Nikopol can now use the projected image to paint a picture of his father. Portrait of the Revolutionary as a Young Man Right-click to go back into the inventory and left-click on the painting tubes + brush to put them into the “active” position. Left-click on the white canvas to bring up a close-up of the white canvas and to begin painting. There are five available colors – black, dark grey, light grey, off-white and white. The colors cannot be mixed. The task is to paint the colors in the correct place on the canvas. Now is a good time to experiment with the painting, and black is the easiest color with which to experiment. Click on the black paint and then on the hair of the figure on the canvas. Note that this paints the hair, the eyebrows and the eyes. Click on the white paint and click on the hair to erase the black paint. Click on the black paint and click on the middle of the figure’s forehead. Note that this paints the middle of the forehead, the top portions of the shirt, part of the cheeks and nose and eyes. Click on the white paint and click on the forehead to erase the black paint. Click on the black paint and click on the middle of the figure’s chin. Note that this paints the chin, and portions of the ear, the lower parts of the cheeks and the forehead directly under the hair. Click on the white paint and click on the middle of the chin to erase the black paint. Click on the black paint and click on the figure’s neck under the chin and somewhat to the left. Note that this paints the shadowed portion of the face – the left portion of the neck, around the exterior of the eyebrows and eyes, the left nostril, portions of the ear, and a very fine line beneath the hair. Click on the white paint and click on the neck to erase the black paint. Click on the black paint and click on the left portion of the shirt. Note that this paints the shirt, one cheek and the bridge of the nose. Click on the white paint and click on the left portion of the shirt to erase the black paint. Finishing the Portrait of Nikopol’s Father
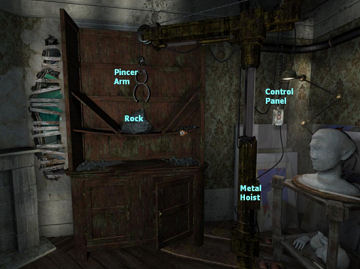
You have just painted the shirt white, which is the color that it ought to be. Now you are ready to add the right color to the other portions of the painting. Click on the black paint and click on the hair. Click on the dark grey paint and click on the neck. Click on the light grey paint and click on the chin. Click on the off-white paint and click on the forehead. Since you painted the shirt white already, there should be a slight pause, and then the close-up view of the canvas and paints will disappear and the finished portrait of Nikopol’s father will go into the inventory. Now would probably be a good time to save your game. Getting out of the Apartment for a Bit of Air You now should have in inventory: Gorgon’s letter, incense, portrait of Nikopol, the chisel, the hammer, and the chains. Go to the entryway, facing the door out of the apartment. Before clicking on the door, look back toward the bathroom and note a tall, grey metal pipe that is leaning in the left corner next to what would have been the door to the bathroom area. A timed challenge follows. Click on the door to exit. As soon as Nikopol goes out into the hall, he sees a giant insect-like creature coming up the stairs toward him. He automatically goes back into the apartment (a sensible course of action, considering). Slowing Down the Creature/Monster As soon as you have control of the cursor, turn around and pick up the grey metal pipe in the corner. You can use it without having to put it into your inventory. The cursor becomes the pipe after you pick it up – turn back around and click it on the door and the door is temporarily blocked. As quickly as you can, go through the bathroom and turn to head toward the bedroom. (If you aren’t quick enough, the giant insect-like creature bursts through the front door and you die as everything fades-to-red. It’s fun the first couple of times this happens. You can start the sequence again by clicking on the pyramid that appears on the screen after the fades-to-red graphic dissolves.) As you click to go into the bedroom, you’ll probably see the insect-like creature burst through the front door, though there is no fade-to-red this time. If you have clicked to enter the bedroom quickly enough, you’ll enter and automatically close the bedroom double doors behind you. As soon as you have control of the cursor, right-click to bring up the inventory and left-click on the chain to put it into the “active” position on the lower left of the screen. Then click on the door. This chains the door shut and gives you an unlimited amount of time with which to work. End of the timed challenge. Fragrant Incense Go into the studio and note that the creature can’t see you, but only smell you. How can you eliminate its sense of smell? Return to the bedroom and pick up the small, red lighter that sits atop a piece of paper next to the bed. Right-click to bring up the inventory and left-click on the incense, which will appear in the “active” position on the lower left part of the screen. Move the cursor to look for a hotspot over the long, narrow brown incense holder just above the piece of paper where you picked up the lighter. Click on this hotspot to put the incense into the holder. Right-click to bring up the inventory and left-click on the lighter to put it into the “active” position on the lower left part of the screen. Then click on the incense and Nikopol will light it. This will make it impossible for the insect-like creature to smell where you are. Trapping the Creature/Monster Return to the studio. The old wooden cabinet with the rock on it is blocking a way out into the living room. If you move it, you could provide another exit into the living room and possibly trap the insect-like creature in the bedroom. There’s a large, metal hoist on the side of the room to the right of the bust. Click on the hoist with a pincer arm to move it next to the old wooden cabinet.
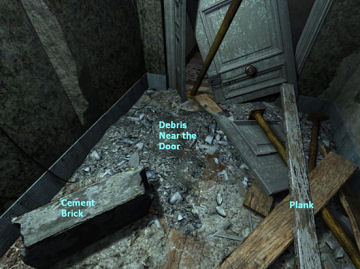
Click on the hanging control panel on the right to lower the pincer arm to pick up the rock on the old wooden cabinet. Click on the control panel again to lift the rock. Click on the metal hoist to move it away from the old wooden cabinet. Now would probably be a good time to save your game. Walk back into the bedroom. A timed challenge follows. Click to remove the chain from the bedroom door. It will take a few seconds for the creature to break down the door. As soon as you have control of the cursor again, turn and click to return to the studio. Click on the old wooden cabinet to move it to block the door leading into the bedroom. Turn and click on the metal hoist with the rock to place it in front of the newly-relocated wooden cabinet. Then click on the hanging control panel on the right of the metal hoist to put the rock on the old wooden cabinet to secure it. You can now enter the living room through the door that used to be blocked by the old wooden cabinet. If you can still see the creature through the opening in the wall, wait until it goes back into the bedroom. Once out of the studio, don’t immediately run toward the front door to exit the apartment. Instead, you want to trap the creature in the bedroom. Click to move into the living room and turn left and click to go toward the bedroom. Click on the double doors to the bedroom to shut them. Then right-click to bring up the inventory and left-click on the chain in inventory to put it into the “active” position. Left-click on the door to chain it shut. The creature can no longer escape. Note: if you aren’t quick enough, you’ll be given the chance to try again when the screen with the pyramid appears. End of the timed challenge. Unblocking the Front Door When you try to leave the apartment through the front door, you realize that the exit is blocked by debris. It’s a good thing you trapped the creature in the bedroom, because if you hadn’t, it would have caught up with you as you tried to remove the debris! Move the cursor around the entryway area – the debris has created new items to pick up and to move. Click on the door to discover that Nikopol needs a tool to un-jam the door. If the metal support is moved, the ceiling will collapse.
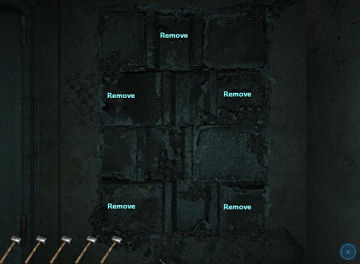
Click to remove the debris near the door. Click to prick up a grey cement brick to the left of the door -- this does not go into inventory, but the cursor becomes the cement brick. Place the cement brick where the debris was just removed. Click to pick up a plank to the right of the door and place it on top of the cement brick. The metal support falls, but the makeshift cement-brick-plank device holds up the ceiling. In inventory, click on the hammer to place it in the “active” position on the lower left of the screen. Click on the door to clear a path out of the apartment. The stairway out of the building is now blocked. (The insect-like creature certainly leaves a mess in its wake.) Turn to the left (the hammer is still in the “active” position) and click to see a close-up of the bricked-up window. You must use the hammer to break the bricks in order to escape. Note: if you exit the close-up view of the window, you will probably need to click on the hammer in inventory again in order to use it on the bricked-up window. You are allotted five strokes (represented by hammers) in order to clear all the bricks. There are more than five bricks, but you can clear the window with only five strokes. Bricks that are adjacent to two bricks that have been removed will also automatically be removed. There are a couple of ways to do this – one way is illustrated below.
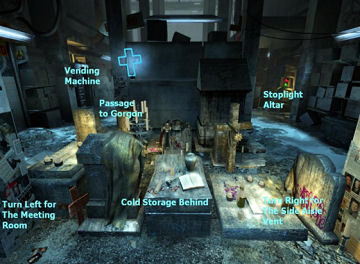
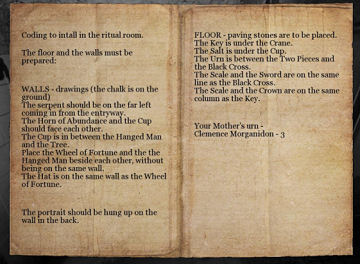
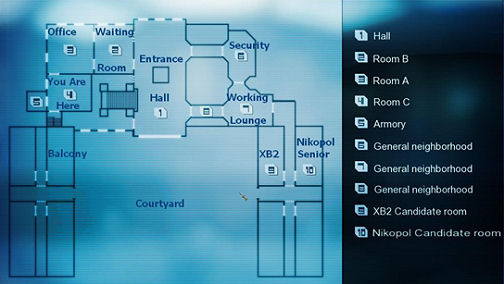
Click to continue on to Nikopol’s upcoming appointment with Gorgon at the cemetery. The Cemetery After another cut scene sequence, Nikopol at last arrives at the cemetery and speaks to Gorgon. Gorgon is a creepy individual with strange eyes and open sores on his face. He seems oddly restless. His English is crude and he misspeaks frequently, yet combines this with an archaic, formal mode of address. He calls Nikopol “…my son,” as a priest might, but almost as an after-thought. Gorgon has assigned Nikopol a coding task involving a small room that functions as a meeting room for the anti-government religious cult. He hands Nikopol a Ritual Manual that gives hints about the coding. Do I Have to Read the Manual? To see a close-up of the Ritual Manual and read the hints, right-click to bring up the inventory. Note two small, bluish buttons between the center circle and the outer circles containing the various items. Click on the lower right bluish button -- the cursor will turn into a magnifying glass. Click the magnifying glass on the Ritual Manual in the outer circle of items. (Note: clicking the magnifying glass on the center circle when an item appears there will not allow you to read it – you must click on the item where it resides in the outer circle.) You now have a close-up of the Ritual Manual and you can read the instructions/hints for Nikopol’s coding task. Note that the coding requires Nikopol to draw complex images on the walls of the meeting room with chalk (it’s a good thing he’s an artist). It’s strange that Nikopol’s father’s portrait is part of the ritual. And even stranger that Nikopol’s mother’s ashes are here in an urn – Your Mother’s urn – Clemence Morganidon – 3. Perhaps Gorgon knows more about Nikopol’s family than he has (so far) revealed. Click anywhere on the screen to back out of the close-up view. Then right-click to put away the inventory. Player 23 Click on the shelf to the right of Gorgon and read about the results of the hockey game mentioned earlier. Player 23 on the Lyon team almost singlehandedly defeated the Paris Kamikazes, then publically denounced Choublanc. Who is this ruthless and courageous Player 23? Also noted is the execution of a general who conspired against Choublanc. This is apparently a frequent occurrence, as Nikopol’s response to the news is: “Another coup”? Explore the cemetery, which was once a butcher’s shop. It’s a bizarre place, full of shelves with old boxes, paper on the floor, and (now illegal) religious icons and statuettes, illuminated by candlelight. It’s a miracle the whole place doesn’t instantly burn to the ground. There are a few headstones that make it seem cemetery-like, but with concrete everywhere, there’s no ground in which to bury a body. Cemetery Orientation It’s possible to become a bit lost here. To establish an orientation, return to the place where you are viewing the scene below:
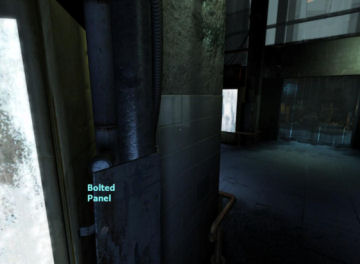
Note the location of the stoplight altar, the vending machine and the passage back to where Gorgon is waiting. Turn left to see the Meeting Room where you’ll eventually perform the coding task. Turn right to see the side aisle with boxes. After turning around 180 degrees, you can see the cold storage entrance with its vertical slat curtain. Click on the entrance to the cold storage area. It seems that the person behind the security camera won’t allow you to go in there. Turn back around and proceed in the direction of the stoplight altar. Face the altar and click on what seems to be a cross, but is actually a four-way lug wrench. The “cross key” goes into your inventory. Turn right and walk towards the cold storage area, then make a left at the side aisle. When you are at the end of the side aisle, facing the candles, pan right and look at the empty bottom shelf. Click on the shelf twice and Nikopol notes that the shelf is new and it isn’t bolted well. Right-click to bring up the inventory and click on the cross key to put it in the “active” position. Then click on the shelf to remove the bolts. Click again to remove the shelf. And click again to open the vent. Cold, Cold Storage Click to crawl through the vent. Here’s a weird, nightmarish place. You can see the frosty air rising in front of you. Click on a nearby cold storage unit to hear Nikopol’s reaction. Move forward and to the left to a center, semi-circular area. Turn slightly to the right and click on the frozen compartment/unit on the far right, and Nikopol mentions that sometimes salt is used as a preservative. Wasn’t salt one of the items noted in the Ritual Manual? To the right of the unit that you just clicked on is a bolted panel.
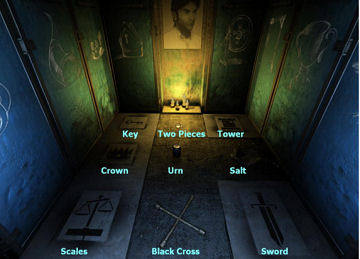
Right-click to bring up the inventory and click on the cross key to put it in the “active” position. Then click on the bolted panel to unbolt it. Click on the storage unit to try to open it, but Nikopol notes that it is frozen shut. Click on the panel again to remove the panel cover and click to turn the red wheel. The storage unit heats up. As the temperature inside rises, the form becomes more visible. What will you encounter when you open the door? Click to open the door. Like a pillar of salt, the form is strangely beautiful. Click twice to hear Nikopol’s comments. You need a tool. Right-click to bring up the inventory and click on the chisel to put it in the “active” position. Then click on the figure. A piece of salt goes into your inventory. Turn around and click to leave the semi-circular center area. Turn left and explore the far end of the cold storage room. Note on the wall a dimly-lit “Boucherie” sign above the two end-units. Perhaps there’s another door here behind the units? Return to the center of the cold storage area and leave it via the central vertical slat curtained door. The Grisly Automat Now it’s time to check out the vending machine. Click on the machine to find out that it doesn’t contain beverages. Click on the right of the machine to learn that you need coins. Click on the collection box to the left of the vending machine. Gorgon warns you against tampering with the “donations.” He is watching you in the security mirror. If you pan around the ground under the collection box, you will now find a hotspot. Click and the cursor becomes a rock. Click the rock on the security mirror that Gorgon is using. Now you can click on the collection box to liberate three coins. Right-click to bring up the inventory. Click on the three coins to put them in the “active” position. Then click on the coin slot in the vending machine. A light illuminates the fourth shelf. According to the Ritual Manual, you need the third shelf to locate Nikopol’s mother’s urn. Click on the green “up” arrow on the top right of the vending machine. Note the name at the top of the vending machine, identifying the person whose ashes are in that particular urn. Click one of the green “right/left” arrows on the vending machine until Nikopol’s mother’s name, Clemence Morganidon, appears at the top of the vending machine. Press the green bar beneath the arrows on the vending machine, and a robotic arm picks up the urn and places it in the slot at the bottom. Click to pick up the urn. Click on the coin return to get back two coins. Meet Me in the Coded Alcove You’re now ready for the meeting room and the coding task. Turn left and move toward the cold storage area. Turn right before you enter the cold storage door and proceed to the meeting room. It’s dimly lit and has screen-like panels on the walls. Now would probably be a good time to save your game. Right-click to bring up the inventory and click on the lighter to put it in the “active” position. Then click on the candles at the far end of the room. Nikopol now has a light source he can hold up while he looks for a light switch. On the right is a light switch with a keyhole underneath it. Click on the switch to turn on the light (you don’t need the key yet). Pan around and note the various panels where Nikopol has to draw symbols. On the floor on the right is a piece of white chalk – click on it to place it in inventory. Also on the right, on the floor, are three paving stones or floor tiles – a key tile, a crown tile and a scale tile. The cursor turns into each tile when you click on them – right-click to put each tile down. In front of these tiles are the broken remnants of other tiles. These are remnants of a black cross tile, a salt tile and a tile with two coins. Nikopol needs something to replace the broken paving stones/floor files. And in inventory, conveniently, Nikopol is carrying a cross key, salt, and two coins. Pan to the left to see two more paving stones/floor tiles on the floor – a sword tile and a tower tile. You need to reach the hints/instructions in the Ritual Manual once again, now that you have assembled all the elements for the task. Or you can glance at the illustration below.
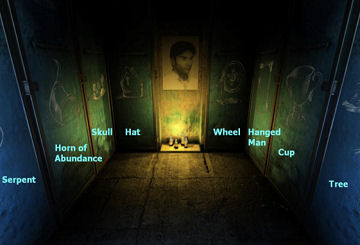
Chalk Drawings First, hang Nikopol’s father’s portrait at the center of the room. If you’ve been reading the Ritual Manual in close-up mode, click anywhere to exit the close-up and then click on the portrait in inventory to put it in the “active” position. (If you haven’t been reading the Ritual Manual, right-click to bring up the inventory and then click on the portrait to put it in the “active” position.) Click on the blank rectangle on the end wall above the candles to place Nikopol’s father’s portrait there. Next are the drawings on the walls. Right-click to bring up the inventory and click on the chalk to put it in the “active” position. You know that the serpent goes on the left on the panel nearest the door, so click on the left panel closest to your current position. A group of icons appears in front of you. Now click on the serpent icon, and Nikopol will draw a serpent on the left panel closest to the door. (Throughout, the chalk remains in the “active” position at the bottom left of the screen.) Note: if at any point you draw the wrong chalk drawing on a panel, simply click on the panel and on the correct icon, and Nikopol will draw the correct drawing right over the mistaken one. The cup is between the hanged man and the tree, and it faces the horn of abundance. The most likely position from which the cup can be between two symbols (neither of which is the already-drawn serpent) is the center panel on the right. Click on the right center panel, the icons will appear, click on the cup and Nikopol will draw a cup on the center right panel. The hanged man is beside the cup and also beside the wheel, though it is not on the same wall as wheel. That means that the hanged man must be on the far right side panel, and the wheel must be on the panel that faces you and is between the portrait and the right wall. Click on the panel to the right of the portrait and then on the wheel icon and Nikopol draws the wheel icon to the right of the portrait. Then click on the far right panel and on the hanged man, and Nikopol draws the hanged man on the far right panel. Since the cup is between the hanged man and the tree, the near right panel (closest to the door) must be the tree. Click on the right panel closest to your current position and then on the tree icon and Nikopol will draw the tree on the near right panel. The hat is on the same wall as the wheel, so it goes to the left of the portrait. Click on the panel to the left of the portrait and on the hat (Bishop’s miter) icon and Nikopol draws the hat on the panel to the left of the portrait. The horn of abundance faces the cup, so it has to go on the left center panel. Click on the left center panel and on the horn of abundance icon and Nikopol draws a horn of abundance icon on the left center panel. There is only one panel left, and only two icons that haven’t been used yet. Click on the far left panel and on the skull icon and Nikopol draws the skull on the far left panel. The walls are now complete and should look like this:
Nikopol comments that the wall drawings are in the right place. Selecting the Best Floor Tile Now for the floor. Important Note: There is an error in the Ritual Manual that makes this challenge much harder. Where the Ritual Manual mentions “Crane” it means “Skull.” In the Big Fish Game version, the error in the Ritual Manual has been corrected so that the Manual says "Skull." There are nine spaces/squares to be filled with tiles and other objects. Picture the horizontal adjoining spaces as a “column” of three squares and the vertical adjoining spaces as a “line” of three square tiles as per the Ritual Manual. The key tile should go under the skull drawing, so place it in the far left corner of the floor. (Left-click to pick the key tile up where it’s leaning against the wall, and then left-click to place it in the far left corner.) Note: If at any time you place a tile or inventory item/object in the wrong space, you can simply click to pick it up and (in the case of the tile) put it in another space or (in the case of an inventory item/object) the item will go back into your inventory when you click on it and you can work with it again from the inventory. The salt goes under the cup. Right-click to bring up the inventory and click on the salt to put it in the “active” position. Then click on the right center space on the floor under the cup drawing. The scale and the crown are on the same column as the key. This means that they go into the remaining two spaces along the left side, but their exact placement in the left “column” isn’t yet clear. The urn is between the two pieces and the black cross. This means that it can’t occupy a space on the left column or a space on the right column because of the key tile and salt already identified for those spaces. The urn must go on the dead center space, since that is the only space remaining where the two pieces and the black cross can go on either side of it. Right-click to bring up the inventory and click on the urn to put it in the “active” position. Then click on the center space to place the urn there. Now for the scale tile. It belongs in the left column, and is on the same “line” as the black cross. The scale tile can’t go in the left middle space, because that would put it in the same line as the urn and salt. Click to pick up the scale tile and place it in the near left space (the left space that is closest to your current position.) The crown tile now goes in the left center space to complete the left column, and the “black cross” or cross key goes in the near center space (the center space that is closest to your current position). Right-click to bring up the inventory, click on the cross key to put it in the “active” position, and click on the near center space to place the cross key there. The two pieces (coins) belong in the only remaining space that is next to the urn – the far center space. Right-click to bring up the inventory and click on the two coins to put them into the “active” position. Then click on the far center space to place the two coins there. The sword is on the same line as the black cross. Click to pick up the sword tile and place it on the near right space (the right space that is closest to your current position.) This means that the tower tile goes in the last remaining open space – the right far space. Click on the tower tile and then on the right far space to place the tower tile there.
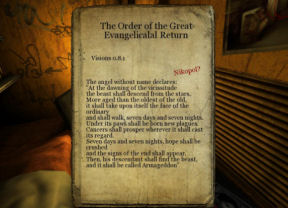
What next? Suddenly the room seems even smaller! Click on the lock in the door and Nikopol notes that the key is still in the lock. This Manual is User-Friendly Click on the bottom of the door, where you see a bar of light on the floor. There’s a plate attached to the door. Turn around and pick up the cross key from the floor. The cross key goes into your inventory. Right-click to bring up the inventory and click on the cross key to put it in the “active” position. Click on the bottom of the door and Nikopol removes the plate, making a larger space under the door. Right-click to put the cross key back into inventory and right-click again to bring up the inventory and click to put the Ritual Manual in the “active” position. Click under the door to place the Ritual Manual there. Right-click to bring up the inventory and click on the chisel to put it in the “active” position. Click on the lock on the door to push the key out of the lock, where it falls onto the Ritual Manual. Right-click to put the chisel back in inventory and click on the Ritual Manual under the door to slide it forward. A set of keys goes into your inventory. Right-click to bring up the inventory and click on the keys to put them into the “active” position. Click on the lock to open the door. Secrets and a Prophecy It’s odd that Gorgon appears to have disappeared and locked everything up. The keys should still be in the “active” position, so click on the lock on the door to Gorgon’s office – maybe there’s something of interest to discover in the back room. Well, it’s obvious that Gorgon is more organized than Nikopol. Apparently, like Nikopol, he is a hockey fan. Right-click to put the keys back into inventory. There’s a paper sticking out of the books on the shelf above the bed – it’s a decoding diagram. Click on it and it goes into inventory. Click on the books near the candles at the far end of Gorgon’s desk. Read “The Order of the Great Evangelicalal Return.”
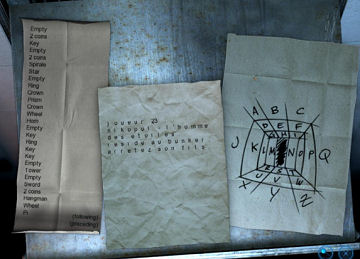
Nikopol’s name has been added to the page describing a time of great change. Who is the beast that is “…more aged than the oldest of the old”? Perhaps one of the gods from the floating pyramid? And how would this beast manage to “…take upon itself the face of the ordinary”? And if the beast is one of the gods, who would his descendant be? After reading this prophecy, it certainly sounds as though Paris, having already experienced years of poverty and despair, is now doomed to even worse times. Though perhaps Armageddon would be an improvement over the status quo? And how does Nikopol fit into this prophecy? Click anywhere to put the prophecy away. Click to pick up the narrow piece of paper on Gorgon’s desk – this coded letter goes into inventory. Click on the photo that is also on the desk. It’s Nikopol’s father, photographed at his court martial before being placed into forced hibernation in the space capsule. Gorgon has added a red pentagram to the picture. Click on the photograph on the wall and the photo goes into inventory. Now right-click to bring up the inventory. You can examine the photo and decoding diagram more closely by clicking on the small circular button in the inventory screen – this button changes the cursor into a magnifying glass, and you can then click the magnifying glass on the photo and the decoding diagram to see them in close-up view. Note: you will not be able to examine the coded letter this way. The photo looks like the inside far wall of the cold storage area, back when this was a butcher’s shop and not a cemetery/cult headquarters. The coded diagram looks like the Meeting Room in which Nikopol was recently imprisoned after he redecorated it. Under the bed is a briefcase. Click to pick it up and put it on the bed, and then click to select a letter to read from the briefcase. That’s an eye-opener. Gorgon has offered his services? Given Gorgon’s knowledge of Nikopol’s father, what has he told “Sergeant Luc Goliard”? (Interesting that the executive in charge of the Worship Authorities is a policeman.) Decoding in Dead Earnest Figuring out how to read that coded letter seems like a very good idea. Click anywhere to return the letter to the briefcase, and return to the Meeting Room. To work with the decoding diagram, you need to be able to see the squares on the ceiling of the Meeting Room, which are barely visible in this light. Click on the small circle beneath the light switch, and you’ll learn that the switch works with a key. Right-click to bring up the inventory and click on the keys to put them in the “active” position. Then click on the circle below the switch. With the ceiling light on, you can see all the squares with their symbols. Right-click to bring up the inventory and click on the decoding diagram to put it in the “active” position. Turn to the left to the small slanting shelf structure and click on it – this places the decoding diagram, the coded letter and a third document with the number 23 on the surface of the slanting shelf, and shows them in close-up view. If you click on the blanks on the document with the number 23, a keyboard appears. At the same time, some of the blanks on the document are highlighted in red, as are certain words in the list on the left. These remain highlighted until you click on a letter on the keyboard, which places that letter in the blanks that were highlighted. Apparently, the blanks in the document are associated with the words on the list, and also are associated with a letter of the alphabet, probably from the decoding diagram. Read the list of words – some of these are very familiar, and are the same as the chalk drawings on the walls and the tiles on the floor. Looking at the decoding diagram, you can tell, for instance, that “horn” is associated with the letter “K.” Clicking on the word “horn” highlights it and also highlights blanks on the letter. Click “K” on the keyboard to place the letter in the blanks where it belongs. (If you are playing the Got Game version, you will soon realize that the letter is in French, not English.) In the Big Fish version of the game, the letter has been translated into English, making this puzzle easier for those who are not French speakers! Look further down this page to go directly to the instructions and the Word list in blue font for the Big Fish solution. Got Game Solution: Note – you can see more words on the back of the word list by clicking on the word “following” at the bottom of the list. Click the “X” at the bottom of the screen to exit the close-up, and take a better look at the room and the symbols on the ceiling, walls and floor. Words from the list that might be associated with the ceiling symbols:
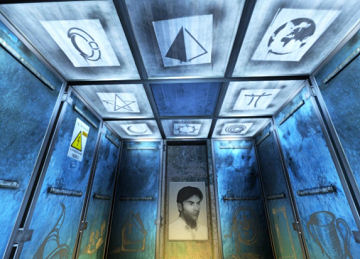
The ceiling tiles seem to be arranged this way:
Click on the slanting shelf to see the close-up of the papers again. Associating drawings, tiles and objects with the corresponding letters from the decoding diagram, (and noting, for the Got Game version, that Crane = Skull, Miter = Hat and Hangman = Hanged Man) you come up with the following (a few letters of the alphabet are missing because not all of them are used in this document):
Click on “following” at the bottom of the list of words (if you haven’t already) to turn it over and then click on the word “Ring” and then on “A” on the keyboard. All of the “A” blanks will be filled in. Click on the word “Prism” and on the “B” on the keyboard. Then click on the word “Star” and on the “D” on the keyboard and click on the word “Empty” and on the “E” on the keyboard. Note: If at any time you click on a word and associate it with the wrong letter by clicking the wrong letter on the keyboard, you simply click on the letter in the document that you know is wrong and it will be highlighted in red – then click on the correct letter on the keyboard and it will replace the mistaken letter. Proceed through the alphabet in this same way: Click on the word “Pi” and then on the letter “F.” Click on the word “Sun” and then on the letter “H,” (at this point you will need to click on “preceding” at the bottom of the page to find “Sun” on the other side of the page) and so on until all the blanks have been filled up. You then see the document written in French. Big Fish Solution: Note – you can see more words on the back of the word list by clicking on the word “following” at the bottom of the list. Click the “X” at the bottom of the screen to exit the close-up, and take a better look at the room and the symbols on the ceiling, walls and floor. Words from the list that might be associated with the ceiling symbols:
The ceiling tiles seem to be arranged this way:
Click on the slanting shelf to see the close-up of the papers again. Associating drawings, tiles and objects with the corresponding letters from the decoding diagram, (and noting that Miter = Hat and Hangman = Hanged Man) you come up with the following (a few letters of the alphabet are missing):
As you solve this puzzle, you will need to turn the paper over to see what's on the other side by clicking on “following” or "preceding" at the bottom of the list. Click on the word “Ring” and then on “A” on the keyboard. All of the “A” blanks will be filled in. Click on the word “Prism” and on the “B” on the keyboard. Then click on the word “Star” and on the “D” on the keyboard and click on the word “Empty” and on the “E” on the keyboard. Note: If at any time you click on a word and associate it with the wrong letter by clicking the wrong letter on the keyboard, you simply click on the letter in the document that you know is wrong and it will be highlighted in red – then click on the correct letter on the keyboard and it will replace the mistaken letter. Proceed through the alphabet in this same way: Click on the word “Pi” and then on the letter “F.” Click on the word “Sun” and then on the letter “H,” (at this point you will need to click on “preceding” at the bottom of the page to find “Sun” on the other side of the page) and so on until nearly all the blanks have been filled up. You can read enough of the message now to add in the remaining missing letters. After the word "as" on the letter, click on the blank and on the letter "Q" on the keyboard. There is now one blank left on the letter. Click on it and click on the letter "C" on the keyboard.
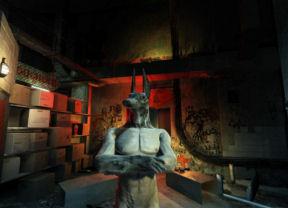
In the Big Fish Games version the message in English reads: Player 23 – Nikopol – the man from the stars resides in the bunker. Stop his son as quickly as possible. In the Got Game version, the message is in French. For the English translation, see below: Player 23 – Nikopol – the man from the stars resides in the bunker. Stop his son as quickly as possible. Someone seems to think that the hockey player from Lyon – number 23 – is Nikopol Senior. Gorgon appears to have received instruction to detain or somehow stop Nikopol the son. That explains the importance of the portrait (confirming both identities) and why Nikopol was locked in the Meeting Room. Now would probably be a good time to save your game. Click the "X" at the bottom right of the screen to exit. Should You Trust the Jackal-Headed One? When Nikopol leaves the meeting room, he is approached by an Egyptian god – Anubis.
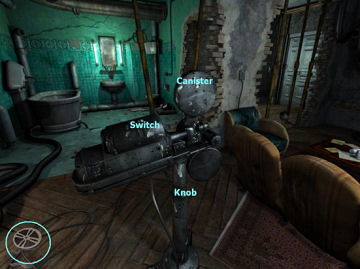
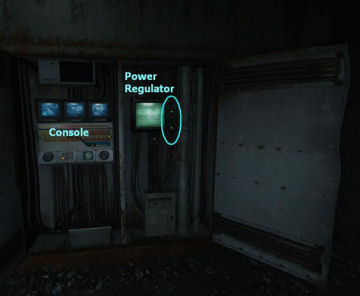
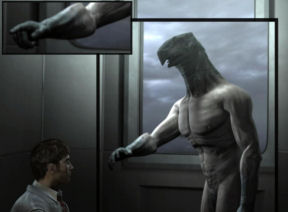
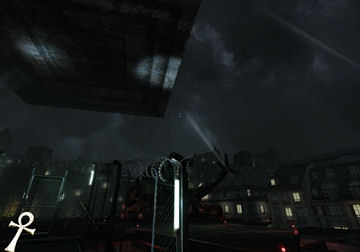
Anubis: “Alcide Nikopol! Listen to what I, Anubis, god among the gods, have to say… The shuttle that was transporting your father returned to earth a few days ago. Sadly, Horus, my horrid and deceitful congener, subjected him to his will. Together, they are going to disrupt the forces that hold Paris together, and cause chaos in the city. You must stop them.” Nikopol: “My father? But, but… why me?” Anubis: “You are the only one who can stop your father. Take this ankh, it will protect you against Horus’ powers. When you have found him, point the ankh at the pyramid. Then, I will come and subjugate my brother.” In the exchange above, Anubis is more cryptic than helpful. But he does confirm that Nikopol Senior has recently returned to Paris, and he asserts that Nikopol Senior has somehow teamed up with the Egyptian god Horus (who discovered the space capsule crash site first). Anubis doesn’t say why Nikopol is the only one who can stop his father and doesn’t comment on the fact that perhaps Paris could use a little disruption at this stage. Anubis gives Nikopol an Egyptian ankh, and tells him to find his father in the National Bunker (this structure is also called the Montparnasse Tower and the Montparnasse Bunker – it currently dominates the Paris skyline). Once Nikopol Senior is found, Nikopol is supposed to summon the gods using Anubis’ankh. Nikopol -- understandably stunned by this encounter -- agrees. As soon as Anubis takes his leave, you hear Gorgon’s voice as he attempts to give Nikopol up to the authorities. A timed challenge follows. Nikopol needs to leave quickly to elude the authorities at the gate. He needs another exit. Remember the cold storage wall with the “Boucherie” sign on it? Turn around and click to go through the cold storage door (the one with the vertical slat curtains). Turn to the right and click to go to the far right wall with the Boucherie sign. There is now a hotspot on the frozen units under the sign. Click to move the units and then click again to go through the door. End of the timed challenge. Another cutscene shows Nikopol walking toward the National Bunker/Montparnasse Tower. Nikopol muses that Gorgon was eager to betray him because Gorgon thought that Nikopol was about to fulfill the end-time prophecy, apparently as the descendant of the beast who would bring about Armageddon. Getting Past the Doorman There’s a guard at the gate who won’t let Nikopol through. Behind the guard are lasers that can incinerate anyone who is unauthorized to enter. Somehow, this guard (and the lasers) must be circumvented or incapacitated. In front of the railing, slightly to the left, lying on top of a broken grate is an iron bar. Click to pick it up – it goes into your inventory. Turn further to the left and take the steps down to the Metro. Click on the gate that bars your way – it’s too heavy to lift. To the left of the gate is a metal column with a rectangular plate at the bottom. Right-click to bring up the inventory and click on the iron bar to put it into the “active” position. Click on the plate (it may take as many as four attempts) to remove it. Click on what’s behind the panel – it’s a chain. Right-click to bring up the inventory and click on the chisel to put it into the “active” position. Click on the chain and the gate rises up. The Underground Go down the Metro stairs. Look around at the tunnel and metro cars. Interesting graffiti. Click on the wrecked metro car and Nikopol confirms that the metro car is blocking his way. Turn back around and walk in the opposite direction, where you’ll find two metal doors over a metal cabinet. Click to open the doors. There’s a console on the left – click to take a close look at it, though you can’t use it yet until you power it. Click on the “X” at the bottom of the screen to exit the close-up. Note also a power regulator (flickering screen) on the right. Click for a close-up of the power regulator.
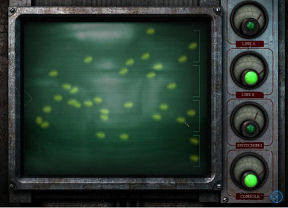
Before clicking on anything else, note that there are four dials on the right of the power regulator, each with a green button. The dials are labeled “Line A,” “Line B,” “Switching” and “Console.” When the green light comes on for each dial, it signifies that a portion of the console unit to the left is powered. You can only work with the console if the green console light is on. Clicking on the “X” at the bottom of the screen pulls you out of the close-up, and keeps the lights and power steady for the dials that were lit up at the moment you exited. Wait until you see the console button and the Line B buttons light up at the same time as in the illustration above. Quickly click on the “X” at the bottom of the screen. When you look at the flickering screen from this “pulled back” position, you should still see the console and Line B buttons lit up beside the flickering screen, as circled below.
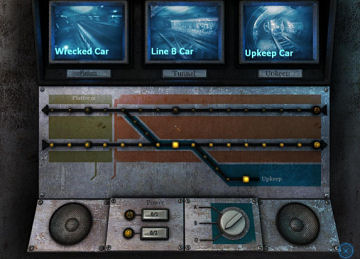
Click to see a close-up of the console again. Now that it’s partially powered up, you’ll be able to see screen images from the Metro security cameras, and the lights delineating Line B will also be lit up.
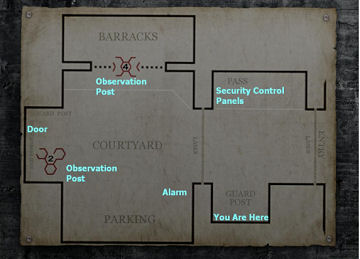
The left image is of the platform on Line A with the wrecked car where you are currently standing. The middle image is of the tunnel in Line B and shows a car on Line B that can be moved using the console. The right image is of the end of the Upkeep line and shows the front of a car that can also be moved using the console. There are buttons on the left of the console under the “Power” label that can remotely move trains on Line A and Line B. For these to work, the console must have power to those particular lines from the power regulator you examined a moment ago. There’s also a dial on the console to the right of the buttons; this switches the tracks. (The “0” setting is for the Upkeep Line.) To use the dial to switch tracks, the “switching” button on the power regulator must be on. Line B should currently be powered, since you clicked to get to the “pullback view” when both the console and Line B buttons were lit on the power regulator. You’ll know that Line B is powered if you can see lights on the console as illustrated above. If Line B isn’t currently receiving power, you need to go back to the power regulator and get power to both the Line B green button and the console green button. Note: The flickering screen/power regulator has a feature that might make it easier for you to control the power. If you click four times on the flickering screen, you can then (sort of) control the power on the flickering screen by adjusting the position of four magnet-like icons. Using these magnets, you may be able to send power to the areas you want with a little more accuracy. However, I never did find a way to do this that made the “console and Line B” or the “console and Line A” combinations constantly steady. And I never found a way to light up all four buttons at once. It’s easier, in my opinion, not to click on the magnets in the first place and just to wait for the setting you need to be randomly generated, clicking quickly on the “X” at the bottom of the screen when the right green buttons light up. However, if you’re finding that you just aren’t fast enough, then it may make sense to experiment with the magnets by clicking on the flickering screen. Playing with Trains – Step One The first task is to move the metro car in the Line B tunnel out of the way so that the Upkeep train can get through. (The Line B car is signified by the lit up square on Line B on the console). If you’ve followed the instructions above, you’ve already enabled power to the console and to Line B. Go to the console and click on the “B” button – look immediately up at the screen and see that the train on the “Tunnel” security camera screen is now moving away. Note: since a track switch isn’t involved, you can move the Line B train while the dial on the right of the console is at “0” or “B” or “A.” Further note – if you have been playing around with the console, chances are good that you’ve ALREADY moved the train on Line B, and if you look at the security camera screen for “Tunnel,” you’re likely to see just an empty track with no train. If so, you should then proceed to the next step. Playing with Trains – Step Two Now you need to switch the tracks so that the ”Upkeep” train can go onto Track A. Move out of the console close-up and click to get back to the power regulator close-up. Wait until you see both the console and the switching buttons light up and quickly click on the “X” at the bottom of the screen. In “pullback view” you should see the two lower buttons on the power regulator lit up. Click on the console and put the dial at “0” if it isn’t already there. Then click the dial to move it to “B” and then to “A.” You’ll hear a beeping sound to signify that you’ve switched the tracks – you should also see lights on the console lit up on the Upkeep line, zigzagging up to the “A” line. Playing with Trains – Step Three Move out of the console close-up and click to get back to the power regulator close-up. This time you’re waiting until both the console and the “Line A” buttons light up, then quickly hitting the “X” button at the bottom of the screen. In “pullback view” you should see the top button and the lower button on the power regulator lit up. Return to the console, and you should see lights on the Line A portion of the console. Click on the “A” button and watch the security screens as the Upkeep train leaves that track, goes through the Tunnel and ends up on Track A right where it’s supposed to be. Night Crossing Ignoring the announcement that illegally crossing the border will lead to three years of imprisonment and hard labor, click to go through the passage next to the train and cross the border. Walk to the rear of the train and note a ladder on the right leading up. Nikopol can’t reach it. Look down at the ground under the ladder and click – the cursor turns into a rock. Click on the ladder and click to climb up. A Bad Night to be a Guard Silently explore the guard post. Click on the map, the “Wanted” poster and the Choublanc poster. Click on the two devices with buttons and click to pick up the old knife from the table. Click to remove the cord from the outlet under the big red button. Right-click to Then click bring up the inventory and click on the old knife to put it into the “active” position. on the cord you just removed from the outlet to cut it. Right-click to put the old knife back into inventory. There are now two places to click up the cord -- the plug end (near the wall) and the exposed wires (closer to you). Click again on the cord close to the wall to plug the cord back into the outlet and Nikopol notes that it is now dangerous. (Note: if you click to pick up the exposed wires end BEFORE plugging the cord back into the outlet, you'll need to right-click to put the exposed wires down before plugging in the cord.) Now that the cord is plugged into the outlet, click on the end closest to you -- the one with the exposed wires -- and the cursor becomes the exposed wires. Click on the border guard. Click again on the guard to get him out of sight – his magnetic pass card goes automatically into the inventory.
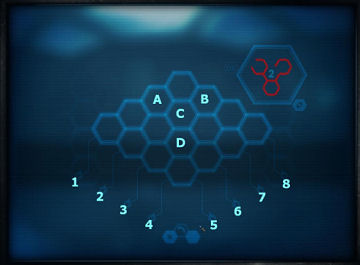
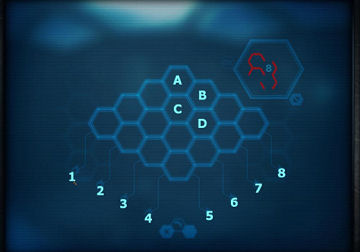
Cross the road and take a look at the Security Control Panels. Click on the red box above the laser control panel to open the door. Click on the wires twice to switch them. Then go back to the guard post and click on the green button on the intercom once or twice until Nikopol calls the guard. Once the guard is down, click on him to get a key – the armory key goes into the inventory. Turn around and face the locked cabinet in the guard post. Right-click to bring up the inventory and click on the armory key to place it into the “active” position. Click on the locked cabinet and click to remove the rifle with a scope. Without moving from the guard post, look up and see the guard in the observation post above the moving flood light. Right-click to bring up the inventory and click on the gun to look through the scope. Follow the floodlight up until you see the guard on the observation post. Move the scope until the guard is in the center of the crosshairs and click to fire. This is a bit awkward, as the scope is always moving slightly. Fortunately, you can keep firing over and over and the guard doesn’t move and no one seems to hear you – aim for the guard’s chest. Cross the road to the area near the security control panels and look back and up to see another guard at another observation post, also with a moving flood light. Right-click to bring up the inventory and click on the gun to look through the scope. Again, you have unlimited chances to dispatch the guard. When you are successful, the gun is out of bullets. Four guards down. Note: if you forget that the lasers are enabled and try to walk into the courtyard, you will die and will be returned to the point where only one guard is down. Lasers Off You now need to turn the lasers off. Click on the red box and on the wires – for some reason, switching the wires doesn’t turn the lasers off. Click on the laser control panel below the red box. The lasers are represented by the red and green lights at the top of the screen. You want to deactivate them so that the lights are all turned off. Look at the three slider knobs on the right. Leave the left one where it is, and push the middle knob and the right knob down to the very bottom. The lasers are deactivated. Magnetic Pass Card – Code 2 Now look at the screen on the right with an image of Choublanc. Right-click to bring up the inventory and click to put the magnetic pass card into the “active” position. Click on the slot to the right of the screen, and a diagram with hexagons appears. The guard’s magnetic pass card is coded for entry 1 (note the red configuration for code 1 at the top right of the screen). Click on the diagram to get an idea of how it works. Note what happens when you click on the “flags” on the bottom of the diagram and when you click in the center of the hexagons. According to the map in the guard post, the Montparnasse Tower’s entry requires code 2. (Note: if you haven’t paid attention to the map, you will inevitably find in a short while that the only door you can go through requires a magnetic pass card with code 2.) Click on the arrows below the red code 1 configuration to find the configuration for code 2. There are also configurations for code 3 and code 4 – these are significantly easier to do than code 2, and provide good practice before you attempt code 2. Click on the curved arrow at the center bottom of the screen to clear away any changes you’ve made to the diagram – this resets everything.
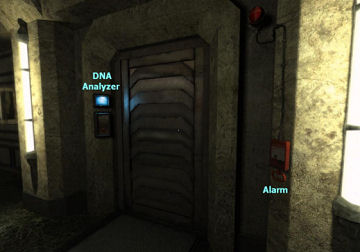
To code the magnetic pass card to code 2: First click in the center of the hexagons A, B, C and D. Then click flag 7, and flag 2. Next click inside hexagon B. Click on flag 2. Click inside hexagon B and then click inside hexagon C. The OK button near the top of the screen will flash, and the magnetic pass card, now changed to code 2, will go into your inventory automatically. Breaking into Montparnasse Tower (National Bunker). Walk across the street to where the vans are parked. Now would probably be a good time to save your game. You can only move in one direction from here because there are still guards near the barracks. You’re going to have to distract the guards. Note the alarm box on the wall. Don’t press the large red button – this will bring the guard, and Nikopol will die. Click twice to open the door of the alarm box. A timed challenge follows. Click on the “on” button and then (as soon as the light comes on) immediately click on the two grey wires to the right. As soon as you have control of the cursor, turn to the right and hide behind the van. Then, as soon as you see the guard arriving at the alarm box, turn slightly to the left and click to run into the courtyard. You will arrive at a door where you need to use the magnetic pass card, which is now changed to code 2. Right-click to bring up the inventory and click on the magnetic pass card to put it in the “active” position. Click on the slot and then click on the door to your left that has the code 2 diagram on it. (If you are caught during this process, you can click on the pyramid to try again, but you will probably have to recode the magnetic pass card to code 2.) Note: if you don’t manage to get through the door into the tower, but aren’t caught by the guard yet and can get back to the alarm box after he’s left it, you can click on the blue striped wire in the alarm box to bring the guard back to the alarm box so you can slip into the courtyard again and get to the tower door. End of the timed challenge. Another cut scene plays, this time showing an attempt to destroy the jelly fish creature plastered over the top of the Montparnasse Tower. The jellyfish is a pink color that makes it look like a giant piece of chewed-up bubble gum. Containment Take some time to look around, especially up. You can see the jellyfish at the top of the tower, and a huge graphic of Choublanc’s face in familiar “Your Beloved Dictator is Everywhere” style. Talk to the guard and learn that Nikopol Senior is on the 50th floor. The only things going into the Montparnasse Tower at the moment are the containers with new material to use on the jellyfish. The jellyfish is continuing to expand further and further down the face of the tower. (If they can’t figure out how to stop it, soon they’ll have to rename Montparnasse Tower “MontBubble-Gum Tower,” which probably doesn’t mesh with Choublanc’s sense of dignity. For what it’s worth, the name “Choublanc” translates to “White Cabbage.”) Becoming New Material Walk back to your original position before talking to the guard and then sneak into the side area with the fence and the containers full of new material. Everything is highly flammable – let’s hope nobody tosses a match in here. There’s one container where the cursor changes to show that you can interact with it. It looks as though there’s no way around stowing away into one of those containers – but first the container needs to be unlocked. A timed challenge follows. Go back to your original position and the guard walks out toward you and then turns around to look up at the jellyfish. Quickly return to the side area with the fence and click again to go forward through the gate to the area next to the tower entrance, where you can see a key hanging from a hook in a small grey security box. The guard will only have his back to you for a short while, so click to pick up the key (which goes into your inventory) and then click to go back into the fenced side area. (Note: sometimes, even if you don’t see the guard walk away from his post, by the time you get to the key the guard has left, allowing you to swipe it.) End of the timed challenge.
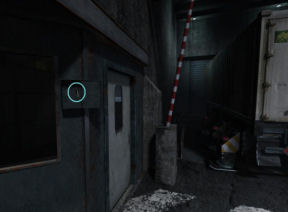
Return to the locked container. Right-click to bring up the inventory and click on the chest key to put it in the “active” position. Click on the container to open it and then click to climb into it. The guards have an intriguing conversation while transporting Nikopol’s container. An android, XB2, is running against Choublanc in the upcoming election! XB2 was the android in Nikopol Senior’s space capsule – the one monitoring his forced hibernation. Is XB2 following Nikopol Senior’s orders? When the capsule crashed, did it damage XB2 so that he’s “not functioning within normal parameters”? Nikopol also learns that all the soldiers and guards have been ordered to assemble at the Elysee, due to the recent coup. Click on the interior of the container – it’s too dark. Right-click to bring up the inventory and click on the lighter. Click anywhere to light the lighter. It throws a small circle of light, which you can move with the cursor. Move it around until you see the lock mechanism near the top of the container. Right-click to bring up the inventory and click to put the cross key in the “active” position.
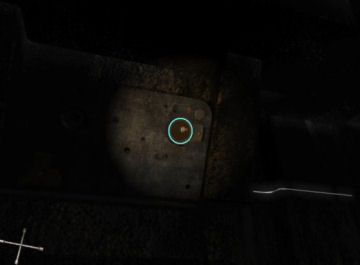
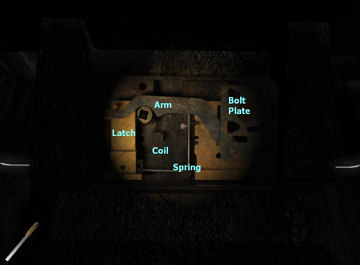
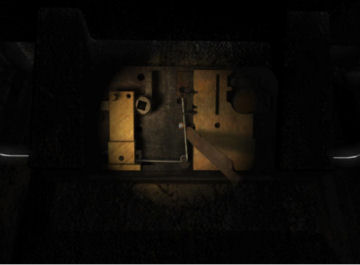
Click on the bolt portion on the top right of the lock. This reveals the lock mechanism in the illustration below. Right-click to put away the cross key and bring up the inventory and click on the chisel to put it in the “active” position.
Click on the bolt plate to use the chisel – the bolt plate comes off. Then click on the arm to move it. Right-click to bring up the inventory and click on the old knife to put it in the “active” position. Click on the coil to remove it.
Next click on the vertical portion of the spring – Nikopol inserts the old knife between the spring and the bolt plate. Click on right lower part of the bolt (a bit above and to the right of where the old knife is positioned). The bolt slips upward. Click on the old knife handle to remove it from the spring. Right-click to place the old knife once more in the “active” position, and click on the bottom part of the spring. Now click on the latch and the latch slips upward. Now would be a good time to save your game. Click on the lid of the container and Nikopol climbs out of the container. Toxicity is Good You are on a terrace on the 50th floor. Examine your surroundings – Nikopol Senior is on the other side of the building. There’s a guard that you can see through the door – when you do choose to move into the hallway, do so when the guard isn’t visible. There are chemicals on a shelf, but you can’t use them yet, and a grilled vent next to the shelves. (Note: it’s strange, but you also can’t save your game here.) A partially timed challenge follows. Wait until the guard has just left the hallway and click on the red button to go inside the hallway. Look around quickly. There’s a door with no handle on the right. If you click on the red button to try to open the door to the left, Nikopol notes that he can hear a guard in there. By now the guard on patrol is probably returning – turn back around and click on the red button to open the door that leads back out to the balcony and then click to go back outside (sometimes the movement hotspot that takes you outside takes awhile to pop up – keep moving the cursor slightly until it does). There must be a way to clear the security room so you can enter it. The chemicals on the shelf of the terrace are now available for use. You can click on the chemicals and they are poured into the green bowl – if the combination isn’t toxic enough, the bowl automatically empties. Click twice on the grill of the vent to open it. Click on the control panel on the left to turn the fan so that it blows into the security room. Click on the unidentified white bottle on the right of the top shelf – the cursor becomes the bottle and you can click it into the green bowl in front of you. Then click on the blue bottle of bleach on the right of the bottom shelf and empty it into the bowl. Toxic vapors form. Click on the green bowl – the cursor becomes the bowl. Click to put the bowl on the ledge directly under the fan. If you don’t do this quite fast enough, Nikopol may empty and bowl and you may need to make the fume mixture again and put it under the fan a second time before it works. When done correctly, you’ll see a guard staggering out of the security room. He collapses on the floor. Note: If you aren’t fast enough here, the other guard sees the body on the floor and shoots Nikopol. If this happens, you can click on the pyramid when it appears on the screen to start the sequence again. This puts you back to the moment when the guard first collapses. The Security Room Click to go through the open door and then turn left and click to enter the security room. Turn around and click on the body of the guard – he is pulled into the security room and the door closes automatically. A hypodermic pistol, which Nikopol automatically takes from the guard’s body, goes into the inventory. End of the timed challenge. Look around your surroundings. There are familiar images of Choublanc, evidence of hockey’s large fan base, and a small photo of the Montparnasse Tower seen from a distance (pre-jellyfish). On the desk you’ll note some spilled coffee and the year-2023-equivalent of bags of Cheetos and freeze-dried bananas. Three security monitors dominate the desk. The left monitor shows the guard in the hallway outside the security room. If you can see the guard on the monitor, then the guard is in a position to see Nikopol instantly if he leaves the security room. Eavesdropping on the Gods Click on the central monitor and Nikopol overhears a conversation between Nikopol Senior and Horus.
Nikopol Senior: “You’re just playing with me. You’re worse than Choublanc and all the others. You’re egocentric, totalitarian and inhuman.” Horus: “Of course. I’m a celestial being, bound by rules that you cannot comprehend. Nikopol, we’re going to take control of this city. You will govern the humans and I will take care of that pyramid problem.” Nikopol Senior: “Pardon me asking, but that pyramid over there -- what exactly is it?” Horus: “There is no proper definition for it in your terrestrial vocabulary. In order to conquer Paris, we need to first gain control of the fuel. With this energy, Anubis and his lazy followers will be crawling at my feet. Their transportation vessels are very archaic. Without combustible fuel, they are prisoners here....” Nikopol Senior is clearly regretting his partnership with this particular Egyptian god. Apparently, Horus thinks his role as a “celestial being” gives him unlimited license – the usual rules (especially the “kinder, gentler” ones) should not apply to him. The gods need combustible fuel for their floating pyramid. Horus hopes to use Nikopol Senior to replace Choublanc and take over the government of Paris. Once this is accomplished, Horus plans to acquire the necessary fuel for the pyramid and use that fuel in a scheme to gain influence over Anubis. Click on the monitor on the right for some emails with interesting background information. Top Secret The giant insect-like creature that invaded Nikopol’s apartment turns out to be a tick that feeds off the jellyfish on the tower, which is from Centaurus Alpha. The authorities have been able to communicate with the ticks, but not with the jellyfish. Typical. The crashed space capsule containing Nikopol Senior and XB2 was meant to be a prison, but it malfunctioned and returned to Paris. Nikopol Senior somehow managed to escape the capsule while leaving behind a substantial portion of his left leg, which was frozen and then fractured at the time of impact. This makes Senior’s triumph as a hockey player even more remarkable. Horus must have had something to do with restoring the leg. It was the authorities who sent the tick after Nikopol in his apartment – they have identified his smell and compared it to his father’s smell. Somehow they know that the younger Nikopol’s legs are both organic (perhaps the tick could sense this). The last email has helpful information for anyone snooping around the tower – the guards in the hallway and security room we know about, but there are also three more around Nikopol Senior’s cell. There’s no need to be careful in the elevators, on the stairs and on the 51st floor. (Click on the “+” symbol at the bottom of the screen to exit the email program.) On to the Storeroom Playground Examine your surroundings. Turn to the right and push the red button on the device under the two ropes on the wall. It sounds like another door has opened. A brief timed challenge follows. At some point, Nikopol will say: “I think the path is clear.” When he says this, exit the security room. Click to go straight into the room across the hall with the door that is now opened (that’s what the red button affected). The door will close automatically. End of the timed challenge. Look around the storage room. If you want to take a break from the game, it is finally possible to save your game here. Click on the freight elevator – the elevator door is locked. Pushing the red button near it does nothing. Okay, try the stairs. The Jellyfish, Up Close and Personal Nikopol begins to get a first-hand acquaintance with the jellyfish and the creatures that are chewing it. There’s some cardboard near the feeding tick, but Nikopol hesitates to get that close to the creature. Click to go further in the room and then click twice to squeeze by the jellyfish and go through the door. These ticks really are ugly! Click on the red rolling cabinet and the cursor becomes the cabinet. This gives Nikopol an idea. Right-click to put the cabinet down. Squeeze back through the door and turn back to look at the tick feeding on the jellyfish. Right-click to bring up the inventory and click on the hypodermic pistol to put it into the “active” position. Then click on the jellyfish a few feet away from where the tick is feeding. Sedation ensues. Go back and pick up the big pieces of cardboard/cardboard box. Move back toward the door and stop in front of the “foot” of the jellyfish that is almost blocking the door. Right-click to bring up the inventory and click on the cardboard box to put it in the “active” position. Then click on the jellyfish. Right-click to bring up the inventory and click on the lighter to put it in the “active” position. Then click on the cardboard box sitting on the jellyfish. The flame won’t catch. Nikopol needs some “kindling.” What’s left in inventory that might suffice? Burn, Baby, Burn Aha! The Ritual Manual! After rubbing your hands gleefully, click on the Ritual Manual in inventory to put it in the “active” position. Click on top of the cardboard box to place the Ritual Manual there. Right-click to bring up the inventory and click on the lighter to put it in the “active” position. Then click on the cardboard box again. The flame causes the jellyfish to retract. Go back into the room with the remaining tick, who is now happily eating its last meal. Click on the rolling cabinet. The cursor turns into the cabinet – use it to bash the tick and ruin his dinner. Click to move past the squashed tick On the ground on the right is an old hammer – click to pick it up and it goes into the inventory. Nikopol needs to get through the partially bricked-up door in front of him. Right-click to bring up the inventory and click on the old hammer (it actually looks more like a pickaxe) to put it in the “active” position. Click on the bricked-up door. You are allowed eight strokes with the hammer in order to break the door down. A brick will automatically be removed if the bricks on two sides of it are removed. Here’s one solution:
Now would probably be a good time to save your game. Click to go through the door. A timed challenge follows. You are near Nikopol Senior’s cell, and an alarm sounds. Click to move forward into the cell. The door closes automatically behind you, but the cell is now empty! The guards begin pounding on the door. Barricading the Cell Door Click to move closer to the door and click to take a look at the small control panel on the left – it’s in bad shape and the wiring is exposed. Turn back around and pick up the glass on the sink. Right-click to bring up the inventory and click on the glass to put it in the “active” position. Click on the faucet of the sink to fill the glass with water. Once the glass is full, click on the control panel next to the door to short it out. This buys you more time. End of the timed challenge. Breaking Out of the Cell Turn back toward the bed. Pick up the stool next to the bed – the cursor becomes the stool. Click the stool on the window and Nikopol hurls the stool at the window, which breaks. Click to pick up the black feather on the bed and click to remove the sheets from the bed. Move to the other part of the room near the window. Look down on the ground below the window -- click on the shards of glass. Right-click to bring up the inventory and click on the sheets to put them in the “active” position. Click on the shards of glass and Nikopol will make a lucky knife, which goes into the inventory. Click on the broken window. Nikopol thinks he could get down to the takeoff pad where his father is about to leave for the Elysee – if he had a rope. Look down at the baseboard near the lower right portion of the window. Click to discover that Nikopol has an idea. Move back near the door so that the sink is on your left and look down at the baseboard to the right of the sink. Click and Nikopol sees a wire at the top of the baseboard. Right-click to bring up the inventory and click on the lucky knife to put it in the “active” position. Click on the baseboard just to the right of the sink and (after moving back across the room) click on the baseboard just to the right of the window to cut a long strip of wire. The wire goes into the inventory. Look at the wall between the window and the sink, about a foot down from the ceiling. Two hooks are there. Right-click to bring up the inventory and click on the wire to put it in the “active” position. Click on the hooks and the wall and the wire is automatically tied to the hooks and thrown out the window. Click on the window and Nikopol begins repelling down the Montparnasse Tower wall. Casing the Joint Just missed him! Nikopol Senior’s transport takes off, and Nikopol has to stow away in another vehicle in order to follow him. You find yourself in a room that looks like it might be part of an art gallery. Turn around to observe your surroundings. There’s a security panel near your position, associated with the armory – the locked door contains a code 8 diagram. Click to go to the other side of the room. All of the artworks are in glass cases, making it difficult to examine them. This doesn’t look like a public room – why encase the art this way? The owner apparently cares more for their value than for their beauty. If you click the magnetic pass card on the security panel, Nikopol tells you that he needs to configure it in order to get in through the door. There ought to be another security control panel somewhere nearby that will allow him to do this. Click on the screen to view a map of this portion of the Elysee. Click on the “+” symbol at the bottom of the screen to exit the map.
Click on the red button near the door to enter the next room. Note the countdown warning sound before the door opens. Listen to the surprise announcement! Choublanc seems to have surrendered to Horus’ plans. Is Horus forcing Nikopol Senior to go along with this also? Look around the room – there are three doors. Move to the other side of the room and click on the window. (Choublanc has built oil refineries throughout Paris, even in the Elysee gardens? Perhaps that is why the Egyptian gods, desperate for combustible fuel, have zeroed in on Paris.) Look at the desk and the odd flickering figure. This seems to be an office, but whoever works here apparently doesn’t produce much. Perhaps it is Choublanc’s office? Turn right and go through the door – this is a waiting room. There’s another flickering figure and a beautiful gold plate on the table, as well as a large hole in the wall – evidence of the recently attempted coup? Or did Horus walk right through the wall here? Go through the hole in the wall. You’re in a back staircase area. Click to walk to the left and then left again. Pause to look up to your left – that is a large statue! To your right is an open door -- two guards are chatting in the doorway. Click to go forward and listen to their conversation. Now would probably a good time to save your game. Turn around and go back the way you came until you’re in the waiting room area again. A timed challenge follows. Click on the red button to go through the door near the hole in the wall. You’re back in the Entrance Hall. You hear the warning countdown sound – someone is about to come through the door across the Entrance Hall from you. Look quickly to the left. Click to pick up the iron bar and then click to go inside the closet. End of the timed challenge. I, Android -- XB2 Goes Rogue While hiding in the closet, listen to the phone conversation. XB2 and Nikopol Senior (both of whom are running for President) are locked in well-protected rooms and can talk to no one except by phone/intercom. Getting to Nikopol’s father won’t be easy. With Choublanc gone, who gave these orders? Click to exit the closet. If you turn to the far right, you can just see a guard at the desk. Click to walk across the entrance hall. Look to the right and see two more guards. Click on the red button to go through the door. Go through the hallway with large pipes and click to enter the security room. When you do, you overhear the voice of XB2, who sounds as though he’s been implanted with a will-to-power chip. Click to pick up the mobile phone – it goes into the inventory. Click on the middle screen – it isn’t working. Giving Orders to the Guards Click on the screen to the right. Some interesting details – rooms with two doors can be entered surreptitiously by entering at the exact moment that a guard is exiting – signified by the warning countdown sound. The south entrance hall door was installed incorrectly – wires from the sound system are exposed. And the mobile phone may be impossible to use when inside the building. Click to exit the email screen. Now click on the screen to the left. You can affect the guard’s patrol patterns. A configuration that will work – one guard for Surveillance Hall North, one for Surveillance Hall South and one patrolling A – B – C. Click to exit the screen. Turn right and click to enter the working lounge. The stove and refrigerator look as though they’re from a different century. Turn right again and go into the hallway. Two items here are of interest – a security control panel where you can change the code on the magnetic pass card, and the door with the exposed wires mentioned in the email. Magnetic Pass Card and Code 8 for the Armory Right-click to bring up the inventory and click on the magnetic pass card to put it in the “active” position. Click on the slot in the security control panel and you’re back to the hexagon-and-flag setup. Click on the arrow at the top right to get to the diagram for code 8. (If you want to practice a bit before trying the extremely tricky code 8, there are also configurations for code 5, code 6 and code 7.) To reset, click on the curved arrow at the center bottom of the screen. To leave the close-up view, click on the “X” at the center bottom of the screen.
To code the magnetic pass card to code 8: Important note: do NOT click on the center of the lettered hexagons as you start! Clicking on the A, B, C, and D hexagons BEFORE following the instructions below will result in the wrong outcome. First click inside hexagon D, then click on flag 7. Then click on flag 3 and click inside hexagon C. Next click on flag 7 and click inside hexagon C. Click inside hexagon D and click inside hexagon B. Then click on flag 2 and click on flag 8. Last click inside hexagon B and click inside hexagon A. The OK button near the top of the screen will flash, and the magnetic pass card, now changed to code 8, will go into your inventory automatically. Right-click to bring up the inventory and click on the lucky knife to put it in the “active” position. Then look down at the floor and click to cut the wire. This will deactivate the warning countdown sound from this door so that Nikopol can go through it silently. Click on the red button to go through the door. Returning to the Armory Click to continue through the Entrance Hall and back towards the waiting room – but pause before going through the hole in the wall – there’s a guard patrolling. A timed challenge follows. Wait until the guard has gone through the door to the office, and immediately click to enter the waiting room. Walk toward the door the guard just went through. Put the cursor over the red button on the door. Wait until you hear the warning countdown sound from the other door – the guard is about to come through that door. Click on the button and Nikopol will automatically walk through the door at the same time the guard walks through the other door – so the guard doesn’t see him. Now walk across the room to the door that is next to the exterior wall. Click on the red button to enter the room where you originally started your Elysee experience. The guard is still coming – click to cross the room and get on the other side of the cabinet. Then click to push the cabinet in front of the door. End of the timed challenge. Click to cross the room to the armory door. Right-click to bring up the inventory and click on the magnetic pass card. Click on the slot to use the magnetic pass card and open the door. Choosing a Weapon with Tact Look around the room. Click on the handle of the grate in front of you and it rises up to reveal three nasty looking weapons. Click on the paper on the side of the weapons case to read about what each firearm can do. Nikopol will only carry one at a time. The gun on the right is FA-99. If you try it, you will find that it won’t pierce the glass on the windows at the Elysee. The gun in the middle is CK-21. If you try it, you’ll find that its bullets will penetrate the glass, but it’s loud enough to alert the guards. The gun on the left is BAR-89. “Tactful elimination” sounds nice, though always having to clean the gun afterwards is an annoyance. But it looks like you’ll only get one shot with it anyway. Click to pick up the gun on the left and leave the armory. Head up the stairs until your way is blocked by a mattress. There’s a ladder to your left – it might be interesting to see what’s up there. Turn to your left and climb up the ladder. Walk down the catwalk and turn to your left again – you’re looking down on the entrance hall. Hello Choublanc! Climb back down to the mattress in front of the door. XB2 and Day of the Jackal – Sort Of Right-click to bring up the inventory and click on the lucky knife to put it in the “active” position. Then click on the cord around the mattress. It falls to the floor. The door is stuck. Right-click to bring up the inventory and click on the iron bar to put it in the “active” position. Click on the door and Nikopol uses the iron bar to open it. Now would probably be a good time to save your game. Click to walk through the door. You’re on a balcony overlooking the courtyard just outside the entrance hall. Click on the building across the way. It’s where XB2 is quartered. You must bring him to the window. Nikopol is outside, so it’s now possible to use the mobile phone. Right-click to bring up the inventory and click on the mobile phone. It pops up on the right corner of the screen and has arrows that allow you to scroll through the various people to call. You click on the phone symbol to automatically dial. Click through the arrows until you get the “Sick Bay” designation, then click on the phone symbol. Interesting news about Choublanc. Click through the arrows until you get the “Invited Apartment 2” line. Click on the phone icon to try to talk to Nikopol Senior. That’s frustrating! A timed challenge follows. Click on the arrows until you get the “Invited Apartment 1” designation. The phone rings several times and then XB2 answers. Quickly click on the “X” at the bottom of the screen to put away the phone (you can do this as soon as the phone starts to ring – you don’t have to wait to hear XB2’s voice). Right-click to bring up the inventory and click on the gun. You will then be looking through the scope of the gun. If you are quick enough, XB2 will still be on the phone and you can shoot him. If you aren’t quick enough, you can still locate the correct window (it’s the one with the phone on the wall) and call again to bring XB2 over to it. Dial again to bring him to the phone. If you shoot and miss, you die and start over again at the pyramid screen. (Note: if you have trouble getting the phone to work a second or third time, leave the balcony and walk to the stairs. Then return and try the phone again.) End of the timed challenge. After eliminating XB2, Nikopol wants to go in search of his father. The Father and Child Reunion Nikopol needs to get down into the courtyard. Click on the courtyard, but he refuses to jump – the balcony is too high. Go back down the stairs and click on the mattress, which is lying on the floor next to the ladder. Click on the mattress and then click on the doorway – Nikopol throws the mattress out onto the balcony. Click on the mattress again and then on the courtyard and Nikopol heaves the mattress over the balcony onto the courtyard surface below. Click on the courtyard and Nikopol jumps down onto the mattress. Pause for a moment and look around. There are still two guards standing over by the open door to the entrance hall. They will certainly see you if you walk through the courtyard. Right-click to bring up the inventory screen and click on the mobile phone. Cycle through the numbers until you reach the number for the “Doors to Lounge.” Click on the phone icon and Nikopol calls the guards waiting at the entrance hall door – they leave to answer the phone at the reception desk. After several rings, Nikopol mentions that the guards have left and he can get by now. Walk across the courtyard and into the other wing of the Elysee. (You can take your time doing this – those guards are easily distracted for a very long time. This gives you a chance to stop and look around the courtyard.) Go through the garage area and you arrive in a hallway. XB2’s room is on the left and Nikopol Senior’s room is on the right. Walk down the hall and click on the red button on the door at the end on the left. If Nikopol presses the button, the alarm will sound. Horus’ Feather Comes Home to Roost Go back and click on the intercom box outside Nikopol Senior’s door. There’s a DNA-verification system. Is Nikopol carrying anything that might have a sample of his father’s DNA? How about the feather from the bed in his father’s cell? A timed challenge follows. Right-click to bring up the inventory and click on the black feather to put it in the “active” position. Click on the blue rectangle above the intercom. Nikopol enters the room, eager to speak to his father at last. Horus! How to get away? How can anyone outrun a god? (Note: with every failure, you can try again from the pyramid screen.) Click on the alarm to the right of the door of Nikopol Senior’s room.
Turn and click to run down the hallway. Then click on the red button of the door at the end of the hallway and click to go through it. The door closes behind you and you find yourself in the guards’ working lounge. The timed challenge ends. Once you’re in the lounge, you can hear gunfire and shouting and the alarm sounding, but you can walk around calmly and decide what to do. Calling the Gods Nikopol wants to get in the clear and climb up as high as possible in order to use the ankh to summon Anubis. Remember the ladder to the roof? Take either of the exits from the working lounge or the security room to walk to the entrance hall – there are no guards there, but Nikopol won’t leave through the open front door because he can see guards in the courtyard (they’ve probably just discovered that both of their presidential candidates are dead and they will be shooting on sight). Walk through the waiting room and office to the room by the armory, then up the stairs and up the ladder to the roof. Click to go out on the roof, and look up to see the pyramid directly above. Right-click to bring up the inventory and click on Anubis’ ankh to put it in the “active” position. Click on the pyramid.
It’s the end game. Mortals versus Immortals? This document was provided to GameBoomers.com and may not be distributed without express written permission of the author and GameBoomers and the content may not be altered in any way. |