| |||||||||||||||||||||||
SCRIBE'S NOTEBOOK | |||||||||||||||||||||||
| Use the scalpel (in your inventory) to make a slit near the bottom of the leather cover of the scribe's notebook. Remove the scribe monk's key and the sheet hidden in the cover. | |||||||||||||||||||||||
| Get dressed, then go talk to Nostradamus. He tells you that the sheet found in the leather cover is a recipe for feigning death and that the scribe probably faked his death. Note his comments about the pentagram and 'the key is in the last one'. | |||||||||||||||||||||||
STRAIGHTEN THE SWORD | |||||||||||||||||||||||
| Go to the forge and place the sword in the furnace. Pull the lever on the right of the furnace to stoke the fire. Use the large tongs to move the sword onto the anvil on the right. Take the sledgehammer and straighten the sword. Drop the sword in the bucket of water, then remove it. | |||||||||||||||||||||||
SCRIBE'S ROOM | |||||||||||||||||||||||
| Open the chest with the key you removed from the cover of the scribe's notebook. Take the monk's cowl and Philibert's note from the chest. Examine the chest with the magnifying glass, then remove the sawdust noting that it's from the bookshelf in the scriptorium. Move Philibert's note into the diary section of your log book. | |||||||||||||||||||||||
CONSTANCE'S ROOM | |||||||||||||||||||||||
| You find another body! Examine Constance's head with the magnifying glass to learn she was also poisoned. You can't remove the note she's holding, but you can read it with the magnifying glass. It purports to be a suicide letter that frames you, Nostradamus and Chavigny for the murders. | |||||||||||||||||||||||
| After the guards leave the room you need another disguise to move about the chateau freely, so put on the monk's cowl you found inside the chest. | |||||||||||||||||||||||
CHAPEL | |||||||||||||||||||||||
| Go down to the chapel and remove the sheet on the table to confirm that the scribe is not dead. | |||||||||||||||||||||||
CHAVIGNY | |||||||||||||||||||||||
| You find Chavigny locked up behind bars in the guards' room. Talk to him to learn that the Cardinal of Lorraine, the Duke de Guise is behind the plot against Prince Henry of Navarre and that there's a pentagram engraving in his room. He gives you the key to his room. | |||||||||||||||||||||||
| Use the key to enter his room and examine the green book on the writing desk. Take the pentagram engraving and read the open page (without the magnifying glass) to learn that it's the last prophecy. The last prophecy is what Nostradamus referred to as 'the last one', so use the scissors to cut the page out and put both documents in the diary section of the log book. | |||||||||||||||||||||||
CATHERINE DE MEDICIS | |||||||||||||||||||||||
| To get Catherine to go along with your plan you must select the most appropriate responses during the conversation with her. Each correct response is indicated on the progress meter to the left. You need not get all five responses correct, but unless the progress meter goes past the halfway mark, she will have you arrested. There are two possible ways to get five correct responses: | |||||||||||||||||||||||
| |||||||||||||||||||||||
| |||||||||||||||||||||||
CHAPEL | |||||||||||||||||||||||
| Go to the altar in the chapel to trigger the scribe's entrance. On regaining consciousness you must complete the remainder of the game as a timed sequence. The progress meter to the left indicates time remaining. Save your game position regularly to avoid having to start over from the beginning. | |||||||||||||||||||||||
| |||||||||||||||||||||||
| The scribe talks about an entry into the sanctuary from the chapel and the pentagram on the altar. | |||||||||||||||||||||||
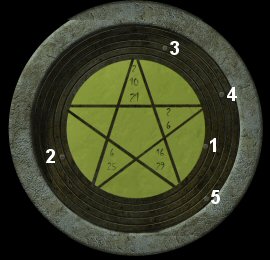
GLASS PENTAGRAM | |||||||||||||||||||||||
| Adjust the glass pentagram by setting the knobs to the positions shown on the graphic below. Note that the knobs are numbered from 1 to 5, with 1 being the innermost knob and 5 the outer one. | |||||||||||||||||||||||
| |||||||||||||||||||||||
| When adjusted correctly, the numbers within the four points are transcribed onto the 'last prophecy' page in the diary section of your log book. | |||||||||||||||||||||||
| Remove the glass pentagram as well as the stand you find behind it. | |||||||||||||||||||||||
DECIPHER LAST PROPHECY | |||||||||||||||||||||||
Open the 'last prophecy' page in the diary. The 4 rows of numbers transcribed from the pentagram refer to the letters in the corresponding rows of text. Note that hyphens are also counted as letters. Use the quill on each letter corresponding to the numbers as illustrated in the graphic below. If done correctly, nine letters are entered next to the numbers. | |||||||||||||||||||||||
| |||||||||||||||||||||||
| These nine letters are an anagram that must be unscrambled. Select (click) a letter to enter it in the blank spaces at the bottom of the page. | |||||||||||||||||||||||
| |||||||||||||||||||||||
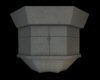
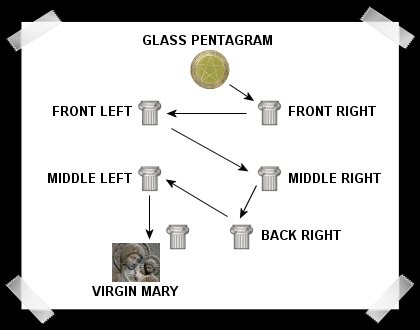
PILLAR SYMBOLS | |||||||||||||||||||||||
| Speak to the scribe twice and select the 3rd dialog topic (Did you notice any strange inscriptions in a script quite different from ours) to learn about the symbols on the pillars (capitals) in the chapel. | |||||||||||||||||||||||
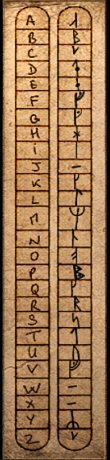
| The tops of six pillars have mechanisms that can be rotated to display various symbols. Adjust the mechanisms to correspond with the deciphered anagram in a clockwise sequence, beginning with the front right pillar. You can view the alphabet and corresponding symbols by clicking the question mark in the top right corner. There are a number of possible options, one of which is as follows: | |||||||||||||||||||||||
| |||||||||||||||||||||||
| When adjusted correctly, the pillars recede revealing a system of mirrors. | |||||||||||||||||||||||
| Examine the statue of Virgin Mary (back left of the chapel) to interpret the lines of the prophecy that refer to 'chaste eyes show where the treasure lies'. | |||||||||||||||||||||||
LIGHTS AND MIRRORS | |||||||||||||||||||||||
| Did you notice that the stand (found behind the glass pentagram) is a telescopic object? Examine it in your inventory and extend it. Insert the extended stand into the small hole on the altar, then place the glass pentagram at the top of the stand to activate the light beam. | |||||||||||||||||||||||
Initially the light beam is directed at the front right pillar. The mirrors control the reflection of the light beam and are used to ultimately direct the beam at the 'eyes' of Virgin Mary. Clicking a mirror either moves it (up or down) or changes the angle of deflection. | |||||||||||||||||||||||
| |||||||||||||||||||||||
To adjust the mirrors as illustrated in the above graphic click them as follows: | |||||||||||||||||||||||
| |||||||||||||||||||||||
| When the mirrors are correctly adjusted the beam is deflected at a spot on the floor. Prise the floor tiles apart with either the sword or the long metal bar to reveal a chamber below. | |||||||||||||||||||||||
UNDERGROUND CHAMBER | |||||||||||||||||||||||
| Pick up the stone head lying on the ground and replace it on the headless statue. From the position of the statue's arms you know exactly where to put the straightened sword. Note that if you forgot to straighten the sword at the forge, you'll find another one lying on the floor in the chamber. | |||||||||||||||||||||||
| Go through the hole in the wall, then sit back and enjoy the ending... | |||||||||||||||||||||||
TOTAL POINTS | |||||||||||||||||||||||
| |||||||||||||||||||||||
The highest possible score is 370 points. Should anybody want a complete list of the points, please feel free to email me using the link in the Navigation Menu below. | |||||||||||||||||||||||
| |||||||||||||||||||||||