| ||||||||||||||
| Wake up, get dressed and go talk to Nostradamus. On hearing what you discovered, he says there are four volumes of the Astronomia Magna at the chateau. | ||||||||||||||
| Head off to the chateau and report your progress to Catherine de Medicis. | ||||||||||||||
| On the way to Chavigny's room you find the missing fragment of the map lying on the floor. Move it to the map section of your log book and examine it to learn about a hidden room in the scriptorium. | ||||||||||||||
| Talk to Chavigny in his room and then go to the guardroom where you learn that the dagger used to kill the guard has been put back in the rack above the bed. | ||||||||||||||
RARE BOOK ROOM | ||||||||||||||
| Go to the middle aisle of bookshelves in the scriptorium and you yet again have a vision of Philibert. Examine all the bookshelves carefully to find a hotspot on the books in the second bookcase (from the right) on the 4th shelf from the top. Move the books aside to reveal a keyhole. | ||||||||||||||
| Examine Philibert's key in your inventory and separate the 'teeth' with the scalpel, then use it in the keyhole to gain access to the rare book room. | ||||||||||||||
| Use the lighter to light the candles on the wheel suspended from the ceiling. | ||||||||||||||
| You won't find anything in the volume of the Astronomia Magna on the nearest podium, but perhaps there's another one here. The green book on the bottom shelf (2nd from right) opposite the podium at the far end is the second volume of the Astronomia Magna. Remove the green book, put it on the podium and open it to find another of Philibert's notes inside. | ||||||||||||||
CONSTANCE | ||||||||||||||
| It's time to take the aphrodisiac potion to Constance. You can do this either as Madeleine or César. Also, you can accept or agree to drink some yourself if you take it to her as César. | ||||||||||||||
| To get her to answer both your questions, you must win the dice game twice. Unfortunately there's no fixed solution as the totals are randomly generated and the die values making up a specific total are not always the same. | ||||||||||||||
| Ask the first question (I need to know more about Philibert. Did you know him?) to get the medallion Philibert asked her to keep. Ask the second question (When did you learn what happened?) to learn that the scribe also knew about the quatrain. | ||||||||||||||
| If you lose a particular game there are a number of inventory items that you can give her. The rose, preparation against the plague (or vinegar of the four thieves) and the lantern can all be given to her without affecting anything in the game. | ||||||||||||||
| ||||||||||||||
RARE BOOK ROOM FLOOR | ||||||||||||||
| Return to the rare book room. In his last note Philibert wrote about the Sidhe and finding an ancient gallery under the chateau that leads to a wall covered with symbols. Perhaps there's an entrance to the underground gallery somewhere in the rare book room. | ||||||||||||||
Examine his medallion in your inventory, noting the letters SIDH inscribed on it. Turn it over to see a series of symbols on the other side. | ||||||||||||||
| ||||||||||||||
| The four stone tiles on the floor at each corner of the room also have symbols on them. Study them carefully to see that four of the symbols are identical to those on the medallion. | ||||||||||||||
| Click the four stone tile symbols in the same order as they appear on the medallion. | ||||||||||||||
| ||||||||||||||
| Study the floor carefully, noting that with the four corners depressed tiles can be moved around. | ||||||||||||||
| ||||||||||||||
VIEWED FROM THE ENTRANCE | ||||||||||||||
To access the large hole under the floor manipulate the stone tiles as follows: | ||||||||||||||
| ||||||||||||||
| Attach the rope (found hanging on the wall at the forge) to the light fitting above the hole. Note that if you previously used this rope to raise the fallen bookshelf, then examine the long frayed rope (taken from the well) in your inventory and cut off a scrap of rope with the scissors or scalpel. Now attach the remaining rope to the light fitting. | ||||||||||||||
| Climb down the hole to enter the underground gallery Philibert wrote about. | ||||||||||||||
UNDERGROUND GALLERY | ||||||||||||||
| You finally get to the gallery that you've seen dozens of times during the game. | ||||||||||||||
| Pick up Book 4 of the Astronomia from the ground, open it and read the last of Philibert's notes. | ||||||||||||||
| Go to the far end of the gallery where you find the wall covered with symbols, a sword and a shield. Note that it's important to pick up the sword and shield before doing anything with the wall. Also, put the shield (in your inventory) where you can get to it quickly. There are two stones missing from the wall and you just happen to have them. Insert Nostradamus' small engraved stone into the hole on the left and Philibert's small engraved stone into the holes on the right. | ||||||||||||||
| There's another tremor immediately after the cut scene in which you copy the carved symbols into your diary, causing the gallery roof to start collapsing. You must act quickly to avoid getting crushed by the rocks, so take the shield from your inventory and (while holding it) move forward twice. | ||||||||||||||
| To exit the gallery climb up the rope which is directly above you. | ||||||||||||||
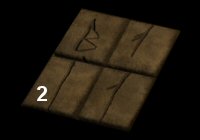
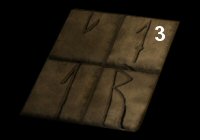
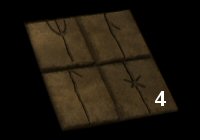
TRANSLATE THE SYMBOLS | ||||||||||||||
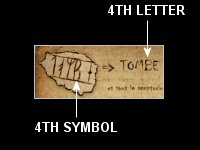
| The carved symbols copied from the wall appear on Philibert's second note in your diary. Using the compass, draw another ring around the one on the left page to complete the diagram. The scrap of paper in the top left corner has 5 symbols on it that can be translated by using the quill on it. | ||||||||||||||
| Study the 5 symbols and their translation, noting that the 4th symbol represents the letter 'B'. | ||||||||||||||
| ||||||||||||||
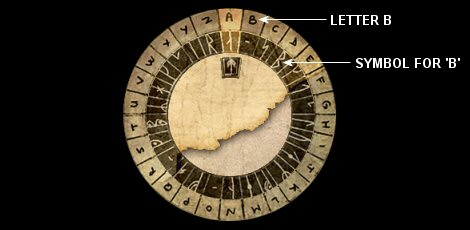
| Initially the two dials are aligned with the letter 'A' and its symbol. Click the up arrow under the letter and symbol to enter the symbol into the chart on the right page. 'B' is the next letter on the outer dial and its symbol (identified from the scrap of paper in the top left corner) is 3 turns away. To align the letter 'B' and its symbol rotate the outer dial once to the left and the inner dial three times to the left. Repeat this same sequence (outer ring once to the left, inner ring three times to the left and use the quill on the up arrow) for all 26 letters to complete the translation. | ||||||||||||||
| ||||||||||||||
SCRIBE'S BODY | ||||||||||||||
The scribe's room is through the first door along the upstairs corridor. You find his body lying on the floor. Use the magnifying glass to examine the following parts of his body: | ||||||||||||||
| ||||||||||||||
| Open the diary and click on all three areas of the scribe's body depicted in the drawing to complete the analysis of what you found. | ||||||||||||||
REPORT TO NOSTRADAMUS | ||||||||||||||
| Talk to Nostradamus about the dream and the scribe's body. During the conversation he gives you an opportunity to name the killer. His response is identical irrespective of who you suspect, and you also won't gain or lose any points. | ||||||||||||||
OBSERVATORY MOBILE | ||||||||||||||
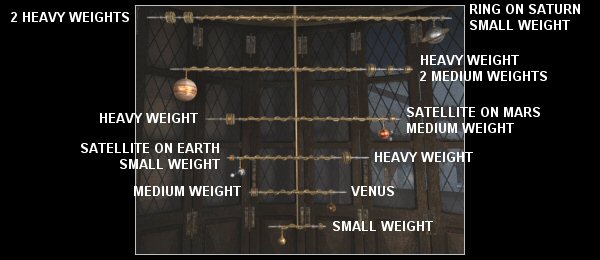
To fix the mess in the observatory you must align the 6 horizontal bars on the mobile. Use the ring, satellites, Venus and weights on the sides of the bars as indicated in the graphic below. | ||||||||||||||
| ||||||||||||||
EUCALYPTUS TEA | ||||||||||||||
Nostradamus suggests that you drink eucalyptus tea to avoid dreaming. Go to his workbench in the office and prepare the eucalyptus tea as follows: | ||||||||||||||
| ||||||||||||||
| Drink the eucalyptus tea and head off to your room for a good night's sleep... | ||||||||||||||
| ||||||||||||||