Nikopol
by Benoit Sokal and White Birds Production
Walkthrough by MaGtRo September 2008
Gameplay: This is a first
person point and click game. After installation of the game which doesn't need
the DVD in the drive, choose a profile. The profile selection can be scrolled
using the arrow at bottom right and then click 'select'.
The main menu is seen as floating icons over the city.
Pan right or left to see: New game, load, options, profiles, credits, quit and
save icons.
The options menu has graphic and sound options:
mouse, volume, subtitles, resolution and advanced selections.
The game play default cursor is a dot at the center of
the screen. The dot cursor changes when it lands on an item that can interacted
on or during movement. Check the manual for the different action cursor.
The inventory is accessed by right click of mouse. A
central circle is surrounded by small circles that contain the items picked up.
Hovering over an item in a small circle shows the item on the central circle and
is selected by a left click. The central circle has the main menu access and a
read icon on its perimeter. Right click closes the inventory.
Save a game by clicking on the 'save' under the empty
frame at right. It is saved when the scene, time and date is entered. There are
9 saved game slots and one automatic saved game file.
A manual is in the installed game folder in your
computer.
You can die in this game but gets a lot of chances to
do the puzzle again.
Paris March 2023: Alcide
Nikopol paints in his apartment. A pyramid hovers over the city. A flying man
comes out of the pyramid. An announcement
by the militia states that an unidentified object has fallen from the sky. Two
modules on a parachute fall down from the sky. See a crashed module on a rooftop. Inside
is an unconscious man. Horus, an Egyptian god with a falcon head looks down on
the man.
This mortal seems pure. Surely lost in this city.
Chapter 1
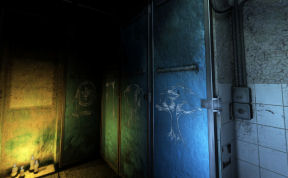
Nikopol's apartment: Gorgon,
the brotherhood chief left a message for Nikopol. He seems to be in a panic the
last time.
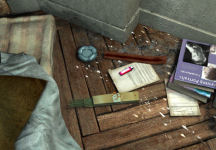
Bedroom:
Look around the room.
Look at the window and take the chain.
Look down right of the mattress. Take incense and the lighter.
Living room:
Open the door at right and go forward to the bathroom.
Turn right and go
forward to the front door. Take and read Gorgon's letter slipped under
the door.
It informs Nikopol
that his final test for joining the order of Great Evangelical Return is now.
They want him to bring a portrait of his father.
Picture of
Nikopol's father: There might be a picture in one of
the vacation reels.
Turn right and go to
the living room. Take a video reel from the corner shelf.
News:
Turn around and read the newspaper on the coffee table. Learn that a reward
is out for news about the unidentified object that crashed. Also that there
is an Atheist terrorist group in Lyon.
Read about the
mysterious pyramid and Choublanc, the dictator-prophet's negotiation with
the identity of the pyramid inhabitants.
Learn that selling religious objects are illegal.
Hockey game Paris Holy Cross vs Lyon's Kamikaze
will be hosted by Choublanc.
Projector:
Go to the movie projector behind the chairs.
Open the top right
circular canister. Place the video reel and then close the canister.
Go to the plugged
fireplace. Look up and pull down the movie screen.
Go back to the
projector and pull the lever on the top of the tube part.
See Nikopol's father during his court martial. He
was sentenced to hibernation and guarded by an android, XB2.
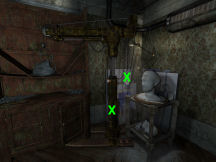
Studio:
Go to the studio left of the bedroom. Look around the studio. See the
pyramid outside the window.
Take the empty
painting easel in front of the window.
Take the painting
kit on the table at left.
Pan left and take a
white canvas from the stack at the corner.
Take hammer
and automatically the chisel right of the unfinished bust.
Paint the
portrait: Go back to the projector. Automatically,
place the easel down.
Place the white
canvas on the easel. Click the painting kit on the blank canvas.
Nikopol wants to
find a way to paint quicker. Right click to return the painting kit to
inventory.
Turn to the
projector and click the base of the projector so that it shows the face on
the canvas.
Click the painting
kit on the blank canvas.
Look close at the
projected face and paint over it. It is done when Nikopol states that it
finished.
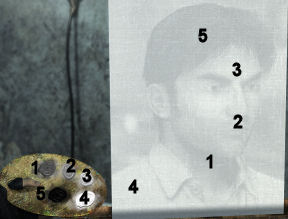
Click on a paint and
then click on a part of the face on the canvas.
Click on the glass of water at right of painting
to reset the puzzle.
Paint black (5) on
the hair and automatically do the eyebrows.
Paint white (4) on
the shirt and automatically do the cheeks.
Paint dark gray (1)
on the jaw line and throat.
Paint medium gray (2) on top of mouth and automatically do the inner jaw line.
Paint light gray (3)
on the forehead and automatically do the rest of the face.
It is time to bring
it to Gorgon.
Front Door:
Look up and see that the ceiling is getting weaker and are held by posts.
Exit the apartment
and see a monster that wants to arrest Nikopol.
Escape the Monster Militia: Automatically, Nikopol goes
back inside the apartment.
Block the front
door: Turn around to the right and take the heavy
metal beam at the corner.
Place the metal beam
on the door and it bars the door for a few seconds.
Bedroom door:
Go to and enter the bedroom. Automatically close the bedroom door.
Use the chain on the
door lock to buy some time.
Studio:
Go next door and face the shelving right of the fireplace.
See the monster
through the broken wall. Nikopol states that the monster can not see
but can smell him.
Turn to the right
and click the base of the hoist. It will move to the shelving.
Press the button on
the control hanging at right to lower and clamp the stone from the shelving.
Press the button
again to raise the stone off the shelving.
Click the base of
the shelving again to move it away from the shelving.
Block the monster
from smelling Nikopol: Enter the bedroom.
Look down right of the mattress. Place the incense on
the incense holder above the box of incense.
Use the lighter to
light the incense. That should block the monster's sense of smell.
Take the chain
off the bedroom door and immediately go back to the studio.
Studio:
Now that the stone is gone from the shelving, move it to block the entryway
to the bedroom at left.
Move the hoist with
the stone and it will be beside the moved shelving.
Lower the hoist to
place the stone back on the shelving.
Lock the monster:
Exit through the unblocked door.
Now that the incense
is covering your smell, go to the bedroom door and close it.
Use the chain on the
door to lock the monster inside.
Exit the
building:
Unblock the front
door: Go to front door and see that exit is blocked by
a metal beam and the destroyed door.
Click on the metal
beam and door. The place will collapse if that metal beam is removed.
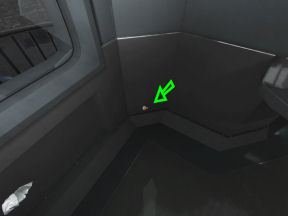
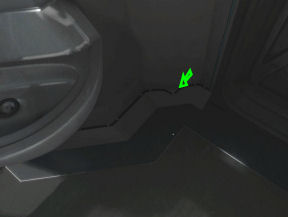
Look down on the
floor and see a pile of dirt left and above the stone block.
Click on the pile of
dirt to make a clear space.
Take the block of
stone below it and drop it on that clear space.
Take the wood beam
lying on the right. Place it on top of the block of stone to support the
ceiling.
Use the hammer on
the door to remove it from the exit.
Find a way out:
See that the stairs on the right is blocked.
Turn around and see
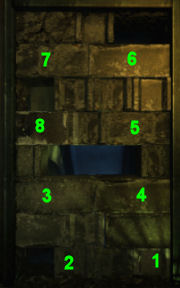
a window that is bricked up. Look close at the bricked up window.
Use the hammer or
click on 5 bricks to make a space to exit. Exit through he opening
Watch Nikopol climb
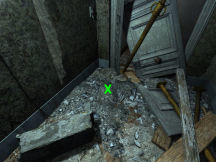
down the wall of the building. He rides a taxi and goes to the cemetery.
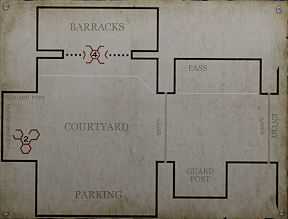
Chapter 2
Cemetery:
Meet Gorgon.
Gorgon: He wants Nikopol to
code a secret message to the other faithful in a way that the militia will
not catch on.
Gorgon gives a
manual to explain the coding. Read the manual in inventory. The meeting
place is at a back room at right.
Read the hockey news
on the counter right of Gorgon. Wow - hockey in the future is vicious.
Hockey player 23 asked for asylum. There
was an attempted coup by General Vertegoutte?
Look around at the cemetery and see that this is a place full of the dead in boxes.
Meeting place:
Pan left from Gorgon and go forward twice. Turn right and enter the open
door.
Enter the dark room.
Click and Alcide wants light. Use the lighter.
Pan a bit to the right wall. See 2 switches. The
bottom one needs a key and the top one is with a flip switch.
Click the flip switch.
Review the manual:
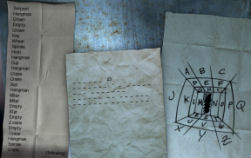
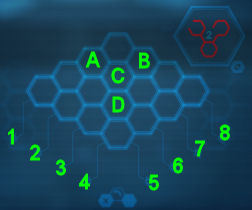
The walls need something drawn on them. The floor needs tiles.
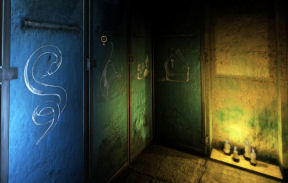
Wall drawing: Read the
wall drawing arrangement in the manual. There are 4 panels on each side of
the central panel where the portrait should go.
Pick up the chalk
on the floor at right.
Click the chalk on a
wall panel to draw. A selection of icons will be seen.
Click the icon that
you want to draw and it will show up on that panel.
The serpent
should be on the far left coming in from the entryway.
The Horn of
Abundance and the Cup should face each other.
The Cup is in
between the Hanged Man and the Tree.
Place the Wheel
of fortune and the Hanged Man beside each other, without being on the same
wall.
The Hat is on the
same wall as the Wheel of Fortune.
Based on the clues,
draw the different symbols at the correct place.
Draw from left to
right: Serpent, Horn of Abundance, Crane or skull, Hat
or Miter, empty space for the portrait, Wheel of Fortune, Hanged Man, Cup
and Tree.
If done correctly,
Alcide will say: All the drawings are in the right place.
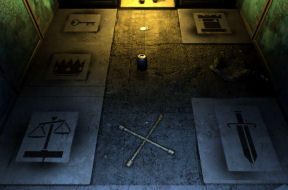
Tiles on the
floor: Tiles should be arranged on the floor. Review the tiles
description in the manual
Find the tiles:
Look down on the floor and see tiles by the walls.
At left side the
tiles are: sword and tower.
At right side the
tiles are: key, crown and scale.
There are missing
tiles. Click on the broken tiles in front of the other intact tiles by right
wall. See
that black cross, salt and two coins are missing. The urn is also missing.
Two coins:
Exit the room and then pan left to the path left of the graves.
Go forward and see a
vending machine. Click and see that these are urns with the ashes of the
dead.
To the left of the
vending machine on the wall is a collection box.
Click on it twice
and see that Gorgon is watching on the mirror on the wall.
Draw Gorgon's attention
elsewhere: Pick up a rock from
the ground below the collection box.
Use the rock on the
mirror on the wall. The mirror is now focused elsewhere.
Open the collection
box and get 3 coins.
Mother's urn, Clemence Morganidon: Your Mother's urn
- Clemence Morganidon - 3
Use coin on the slot below the red circle of the
vending machine.
See that it lights
up and that the name of the content of the urn is written on the top of the
machine.
Clemence Morganidon is at 3. Use the up arrow to light up the third from top row.
Use the left arrow once and see that the name
above is Clemence Morganidon.
Press the bottom
green rectangle below the down arrow.
Take the urn
(pop can) and also the 2 coins.
Black cross:
Turn around and go forward to the makeshift altar.
Take the tire
iron-cross key that the faithful uses as a cross.
Cold rooms:
Turn right, forward and look up at a moving camera that checks the area.
Try to go in through
the rubber curtain and hear a warning voice.
Look at the sign on
the right behind the grill - Boucherie arrow pointing to the right.
Go left of the
rubber curtain to the side aisle.
Pan right and down.
See a recently placed metal shelf. Use the cross key-tire iron on the metal
shelf.
Click to remove the
plate. Go through the grill behind the plate.
Enter the cold
rooms. The place is a cadaver repository before they are buried.
Look around. Go
right to center of the building. See that the door is guarded only by a
speaker.
Pan left and go forward to the other end. See
the Boucherie sign above the frozen bodies.
Salt:
Go back to the center area by the rubber curtain.
Turn around from the
curtain and enter the inner alcove.
Turn right and click
on frosted door at right end.
Alcide says that the
corpse is preserved in salt.
Look at the metal
plate right of the end door. Use the tire iron-cross key on the plate.
Take the plate off.
Turn the red valve once and see that the ice on the door melted.
Open the door and
use the chisel to get a piece of salt.
Exit the cadaver
building.
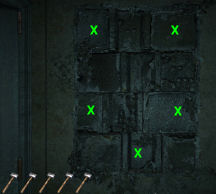
Arrange the tiles:
Go back to the meeting room. Now that the missing items are collected, it is
time to arrange the tiles.
The key is under
the Crane.
The Salt is under
the Cup.
The Urn is
between the Two Pieces and the Black Cross.
The Scale and
Sword are on the same line as the Black Cross.
The Scale and the
Crown are on the same column as the Key.
Your Mother's urn
- Clemence Morganidon - 3
Arrange the tiles
as clued by the manual.
Place tile or items
from left to right and top to bottom:
Key, 2 coins and
tower
Crown, Urn and salt
Scale, black cross and sword
Perfect,
everything is in place.
Place the portrait
of Alcide's father at the center panel above the candles.
Find out what
Gorgon is up to:
Someone possibly
Gorgon locks Alcide inside the room.
Open the door:
Look down at base of door. Click and see that there is a plate screwed here.
Take the cross
key-black cross from the floor and use it on the plate at bottom of door.
See that there is a
space now.
Use the manual on
the space under the door.
Use the chisel on
the door keyhole.
Pull the manual back
and get a ring of cemetery keys.
Use cemetery keys on
door lock.
Gorgon's office:
Exit and go left pass the vending machine.
See-click that the
large rollup doors are locked.
Use the cemetery
keys on the lock of Gorgon's office.
Enter and look
around.
Take the decoding
diagram paper from the book shelf. Look at it in inventory.
Click and read
Visions 0.8.1 of the Order of the Great Evangelical Return. Learn of a beast
that will cause Armageddon. Note the red lettered "Nikopol". So they think
Nikopol is the beast.
Take the coded
letter on the counter. Look at the picture of Alcide's father with a red
star.
Look up and take the
photo on the wall above the roll up window. Look at the photo in
inventory. See a door with a Boucherie (meat market) sign above it and the
meat counters.
Pull out the suitcase from under the bed. Read the
letter from the Worship Authorities. Gorgon is collaborating with the
government.
Decode the
coded letter: Exit the office and go back to the
meeting room.
Use the cemetery
keys on the bottom panel switch right of the door with the tree drawing.
The ceiling lights
turn on. Look around and see that the whole room has symbols.
Study the decoding diagram and see that each of
the panel that has the symbol has a letter associated with it.
Turn left and see a
metal cover that is open. Place the decoding diagram on the open metal cover.
See 3 papers:
the coded letter, the paper to decode it and the decoding diagram.
Since the symbols on
the coded letter at left have an associated letter as seen on the right paper
- enter the letters on the lines of the paper at the center.
On the paper at center when a line is
hovered on by the cursor, see that the line turns red. The symbol for that
line is red lettered on the coded letter at left.
Click on the line
and see the alphabet frame. Click-select the alphabet associated with that symbol
and all the letters of that symbol will be filled. If an error is done,
click on the delete and the erroneous letter will be removed from the middle
paper.
The coded letter has more words at the back of the
paper. Click on the word 'following' to turn the paper on the other side.
At bottom right,
click the magnifying lens to review the symbols in the room. The X is to
exit out of the puzzle.
|
A -
Ring
B -
Prism
C -
Earth
D -
Star
E -
Empty |
|
F -
pi
G -
Moon
H -
Sun
I -
Spiral
J -
Serpent |
|
K -
Horn
L -
Crane (skull)
M -
Miter - Hat
N -
Wheel
O -
Hanged Man
P -
Cup |
|
Q -
Tree
R -
Key
S - 2
Coins
T -
Tower
U -
Crown |
|
V -
Urn
W -
Salt
X -
Scale
Y -
black cross
Z -
Sword |
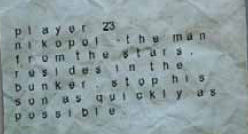
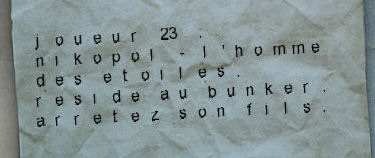
Alcide reads the
decoded message that states: player number 23... Nikopol... His son. Alcide is to be
arrested.
Gods at war: Exit the room.
Meet Anubis, the God among the Gods and the jackal
headed God.
He informs Alcide that his father's shuttle
returned to earth several days ago.
Horus took and subjugated his father and with him has plans
to cause chaos on Paris.
Anubis wants Alcide to stop Horus and his father.
He gives an Ankh that will protect Alcide
from Horus.
Once Alcide finds Horus, point the ankh to the
pyramid and Anubis will come to subjugate Horus.
Elder Nikopol is in the National Bunker.
Gorgon: Hear Gorgon warn the
militia about Alcide. 2 militia men have come to arrest him.
Escape the cemetery:
Remember the Boucherie (meat market) picture seen in Gorgon's office.
Enter through the rubber curtain and be inside the
cadaver repository.
Go right to the frozen cadavers under the
Boucherie sign.
Click the frozen cabinets and see a door.
Go through and escape. Watch Alcide escape and
arrive at the checkpoint.
Border patrol: Alcide is
stopped from going through the checkpoint and entry to the 1st Urban
district. Only residents of the 1st Urban district are allowed to pass.
There is a curfew because of the attempted coup. The
National Bunker is at the far end of that district.
Chapter 3
Pass through the
Border Patrol.
Security border
patrol checkpoint: Look around.
Look at the laser
light on the left wall.
Look down on the
road and take the iron bar.
Look at poster on
the left wall and see that there is another candidate for the oncoming
election. The XB2 android that was to guard the elder Nikopol in his
hibernation is running against Choublanc.
Metro Tunnels:
Go in the Metro
tunnels: Go down the steps on the left of the
checkpoint that ends in a grilled door.
Click on grilled
door and see that it is too heavt to lift. It cannot be opened even with the iron bar.
Look down at left
and see a worn down plate.
Use the iron bar on
the plate 4 times until it pops off. The iron bar breaks.
Look-click inside
and see a chain that holds the grill door.
Use the chisel on
the chain and the grill raises.
Enter the metro
tunnel. The metro was closed because toxic mud of the Seine river flooded
the tunnels.
Blocked rail
tracks: See a train blocking the rail tracks.
Click on the right
side of the tunnel and Alcide says that the old metro prevents the passage.
Turn around and go
forward.
Turn left to cabinet with metal door covering the metro control panels.
Clear the
passage: Open the cabinet.
Console:
Check the console on the left and see that there is no power.
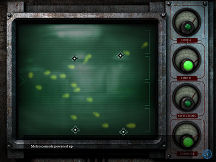
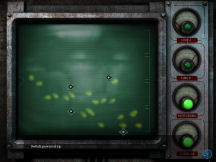
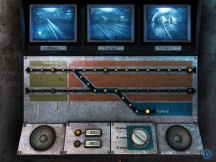
Monitors:
See that there are 3 monitors on the top for: platform with the blockage
(Metro A), the tunnel (Metro B) and the upkeep (start of the switch).
Rail lines:
The middle portion shows the set up of the rail lines.
The top is line A,
the bottom is line B and the zigzag lights is the upkeep or switch line.
Power buttons and
directions: At the bottom panel see the buttons that starts
the power to Lines A and B.
The knob at right
points to the place where the switching line goes through.
Power supply:
Check the right side monitor and see that it is the power supply control.
Gauges:
See 4 gauges on the right: Metro line A, Metro line B,
Switching, and Console. These gauges show how much power is directed to
those areas.
Power:
The power is depicted by moving flakes. To get power to an area, concentrate
the floating power to go to the open bracket beside the gauges and make the
gauges stay at 100 % or to point to the right.
Power
concentrators: Click on the monitor and see a glyph
that can attract or herd the floating power. Click 4 times to get 4 of the
power concentrating glyphs.
Use the glyphs to
power the area you want.
This can be done
on fewer steps if you can light up 3 gauges at a time.
Unblock the B
line to clear the switching lines.
Power the console
and Metro line B: Concentrate the power to the console
at bottom of the monitor and line B second from top.
Place glyphs at
bottom and at top to flank-concentrate the flow of power to flow to the
bottom console and second from top B. Wait to see which ones light up.
Click on the X to
pull out of close up as soon as the lights are on the correct
gauges.
You can see if both
lights are on from a far view.
Note:
If you can get line B, switch and console lit up at the same time, you can
do the procedure 'Activate the upkeep switch line' now.
Console:
Look at the console at left.
Remove the car from
line B that is blocking the upkeep line.
Now that metro line
B has power, press the bottom B (0/1) button.
See the car move
away from line B on the monitor.
Activate the
upkeep switch line:
Power the console
and upkeep line:
Concentrate the
power to the console at bottom of the monitor and switching line second from
bottom.
Place the glyphs by
click hold dropping it and flanking-concentrating the floating power to the
2 bottom gauges. Wait to see which ones light up.
As soon as
the lights are on the bottom 2 gauges, pull out by clicking on the X at
bottom right.
You can see if both
lights are on from a far view.
Console:
Look at the console at left.
Turn the knob at
bottom area from 0 to B to A. See the lights go on the switching line.
Unblock the A
line and clear the path for Nikopol.
Power the console
and Metro line A: Concentrate the power to the console
at bottom of the monitor and line A at top.
Place
glyphs at bottom and at top to flank-concentrate the flow of power
to flow to the bottom console and top A. Wait to see which ones
light up.
Click on the X to
pull out of close up as soon as the lights are on on the correct
gauges.
You can see if both
lights are on from a far view.
Console:
Look at the console at left.
Remove the car from line A (the one behind you).
Now that metro line
A has power, press the top A (0/1) button.
See the car move
away from upkeep on the monitor.
See it come on the
rail tracks behind you and pushes the other car out of the way.
Go to the surface:
Go to the now opened rail tracks at right.
Look up and see a
ladder. The ladder is held by a wedge.
Look down on the
ground. Pick up a rock and use it on the ladder.
Climb up on the now
lowered ladder.
Guard Post:
Be on the guard post right of the checkpoint.
See the guard on
watch.
Check the map on the
wall and learn that there are 2 lasers flanking this area.
Across is the pass
machine. The barracks and the MontParnesse door have key card code seen in
red.
Look around and see
the wanted poster for Nikopol's father.
There's a locked
cabinet right of the vending machine.
Check Choublanc's
poster above the desk. Take the old knife from the desk.
See the big red
button of the alarm and the intercom with green button.
Take care of the
guard:
See wire coiled
right of the desk. It is still plugged to the socket.
Unplug the wire from
the wall socket.
Use the dull knife
on the coiled wire to get exposed wire.
Plug the wire again
into the wall socket.
Use the exposed wire
on the guard standing on the road.
Pull the
electrocuted guard to the guard post away from the road.
Automatically get
his magnetic pass card.
Take care of the
other guard at the courtyard:
Use the
call-intercom box by pressing the green button. Alcide calls the guard. He
wants the laser off.
The laser lights seen at the wall is red.
Cross the road to
the machine at other side of the road.
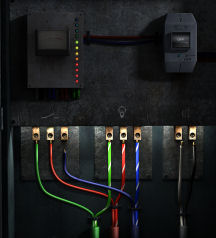
Laser power: Open the top left
box and see the green and red wires. Unplug them. Plug them back but they
get plugged the other way.
Pull back and look
close at the panel at the bottom of the box. Press the on-off button and the
lasers do not want to be turned off. The bar lever doesn't want to move.
Go back to the other side. The laser lights seen at the wall is
now green.
Use the call box again to call the guard.
The guard got
zapped. Click on the zapped guard and get an armory key.
Locked cabinet:
Use the key on the locked cabinet right of the vending machine.
Take the rifle
with scope.
Take care of the
guard at the watchtowers:
Barracks
watchtower: Look up at the guard
at the watchtower over the barracks.
Use the rifle with
the scope and fire at the guard.
Left watchtower:
Cross the road. From facing the pass card machine, pan left and up.
See the guard at the
watchtower. Use the rifle with the scope and fire at the guard.
When both watchtower
guards are taken care of, there will no more bullets and the rifle is gone
from inventory.
Turn off the
lasers.
Laser panel: Look close
at the laser control at the bottom of the wire box.
Click-hold-move the middle and right bars-levers
down so the red light goes to the left and the green lights are gone.
The laser to the
courtyard and to the road back to the second urban district are off.

Pass card: Based on the map,
the MontParnesse door has code 2 pass card.
The one taken from the guard pass card is for code
1. We need to change the card to code 2.
Pass code 2
entry: Insert the magnetic
pass on the slot right of the monitor.
See the red lines 1 seen on the pass card at top
right.
The object of the
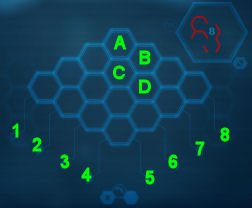
puzzle is to copy that code on the hexagons at center.
The arrows outside
the hexagons remove the lines on the side of the hexagon they are pointed
at.
Clicking inside a
hexagon with red lines already entered removes the previously entered red
lines and adds red lines on the gray lines around that hexagon.
The return arrow at
bottom center resets the puzzle. The X pulls out of the puzzle.
The top right
graphics is the line to be copied at the center. The bottom right button
cycles the patterns of the red lines. The OK button flashes when the
code-red lines entered are accepted.
Based on the
magnetic pass and the map, we need pattern 2 on this machine.
Enter code 2:
Change the pattern at top right to pattern 2.
Click the center of
hexagons A, B, C, D to get red hexagons.
Click #7 arrow, #2 arrow, inside B, #2, inside B
and inside C.
See the flashing OK.
Automatically be pulled back with the coded magnetic pass.
Courtyard:
Go to the courtyard by going forward when at the pass card machine.
Parking lot:
See parked vans.
Turn to the left
wall and see an alarm panel.
Deactivate the
alarm: Don't press the right red button on top of the panel
or you set off the alarm.
Open the panel and
see the alarm systems for all the border patrol.
Click the on button
and see the lights on the box at top left cycle down
The
right wires are for the loudspeaker of the alarm. Immediately remove the wires on the
right side to silence the loudspeaker.
Remove
either the solid green or the solid blue wires on the far left.
Then
turn right, forward and hide behind the vans.
See the guard run to the alarm.
Immediately go to the guard house at top left. The
guard will come back in a while.
Use the coded 2 pass card on the slot below the
red light.
Pan left and exit through the door to the MontParnesse
Tower.
MontParnesse Tower: Be at the
yard in front of the MontParnesse Tower.
See space cars arrive. See the jellyfish on top of
the Tower.
The space cars shoot the jellyfish.
Chapter 4
MontParnesse Tower:
Get inside the tower: Talk to
the guard.
Learn that elder Nikopol is at 50th floor. Only
the cases with items used to test on the jellyfish are allowed up there.
After talking completely with the guard, go back to the center of the yard. Look up at the
jellyfish covering the top of the tower.
The guard joins Alcide and looks up.
Pan left and enter the gate. Turn around
and see a locked chest on the ground.
Exit through the gate at left. Turn to the left
and see a key hanging inside a box on the wall.
While the guard is still intent on the jellyfish,
take the chest key. Immediately go back through the gate at left.
Use the key on the locked chest. Enter the empty
chest.
Hear men pick up and take the chest to the top
floor where you want to be.
Learn about the deployment of the guards to Elysée
where Choublanc is staying.
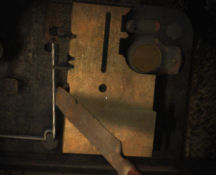
Open the lock of the box from inside:
It's dark in here. Use the lighter and then look on one side of the cover of
the chest.
|
 |
|
 |
|
 |
|
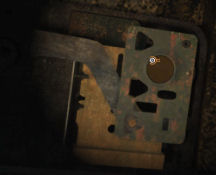
See the lock of the chest. The chest is locked
from outside.
Use the cross key on the square hole to take the
cover off the lock.
|
|
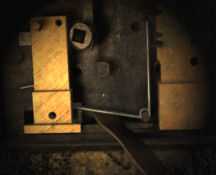
Look at the part on the right with the round hole.
Use the chisel on the plate with round hole. The
chisel breaks. |
|
Click on the thin plate on the top that holds the 2 gold plates
together. |
|
|
|
|
|
|
|
 |
|
 |
|
 |
|
The spring is blocking the right plate. Use the
knife on the right side of the vertical part of the spring to move the
spring to the left. |
|
Push the plate on the right up by clicking on the
bottom part of the plate.
Take the knife back into inventory by clicking on
the handle.
|
|
The spring is blocking the release of the left
plate also. Use the knife at bottom of the horizontal part of the spring to
push the spring up. Push the left plate up.
Exit the box by clicking on the cover. |
50th floor: See that you
are outside the 50th floor. Look around.
No save is possible on this part until inside the
store room.
See a guard patrolling at the end of the hallway
behind the door.
Study-click the map on the wall left of the door.
Father is on this floor at other side of the barracks.
Enter through the door by pressing the red button.
Check the double doors that do not have a handle
at right.
Turn around and see a Security office ahead. The
guard is coming back.
Turn left, press the red button and immediately
exit back to the outside before the patrolling guard catches you.
Get in the security room:
Vent: Look at the vent
left of the shelves. Open the vent.
Flip the switch seen at left to point to the right
so that air goes in the office rather than exhausting it out of the Security
room.
Fumes: See a pan in front
of the vent.
Check the bottles on the right. Mix chemicals on
the pan to see what is formed.
Use the top right small white bottle with red cap
on the pan.
Add the bottom right blue bottle of bleach. See
toxic vapor come out of the mixture.
Take the pan with the mixture and place it in
front of the fan of the vent.
Hear and see the guard come out of the Security
room and falls down unconscious.
Security room: Enter
through the door and then go left and enter the Security room.
Pull the unconscious guard into the Security room.
Automatically, get a hypodermic gun.
Right
monitor: Click on the monitor to check the
incoming mails.
From top
to bottom:
1. Learn
about the spatial jellyfish. It came from Centaurus Alpha. It
has
now grown down to the 51st floor. It is covered with ticks that are
now being
trained for urban combat.
2. Learn
about the crash of Alcide Nikopol placed in cryogenic sleep
because of insubordination. His left leg supposedly has broken
off and left at the shuttle. The report included the raid on
Alcide's apartment.
3. A
woman's picture.
4. Learn
about Gorgon and the escape of Alcide, the son of the hockey
player Alcide Nikopol.
5. Learn
that the elevators, stairs and the 51st floor are not guarded.
Click on
button at bottom right to exit the frame.
Middle
monitor: Click on the monitor and see Horus
talking to the elder Nikopol. Hmm... Nikopol still has both legs
or was it fixed by the gods?
Nikopol
asks about the pyramid. The plan of Horus starts with the control
of the fuel. Horus states that the pyramid needs combustible fuel.
Horus
realizes that someone is eavesdropping on them and blocks the
video and later audio of the room.
Red
button for door: See a box at right end of
the table. There is a red button.
Press the
red button and hear a door open.
When the
way is clear outside, exit the room by pressing the button right
of the door.
See that
the door across the hall is now open.
Storage
room: Enter the now open door. See that this
is a storage room.
Go through
the open entryway on the right and see a part of the spatial
jellyfish on the stairwell.
51st floor:
Climb the stairs at right to 51st floor where the jellyfish has
already invaded.
See a tick
feeding on the jellyfish. There are some cardboard beside it.
Take care
of the first flea: Go back to the right side
of the feeding tick.
Let's add
something to his feed. Use the hypodermic gun on the jellyfish that
he is feeding on.
See him fall
asleep. Take the cardboards beside it.
This can be done on the left side of the
tick.
Move the jellyfish:
Go forward
and see some part of the spatial jellyfish.
Before entering the other corridor, place
the cardboard box atop part of the jellyfish.
Add the
manual to the cardboard boxes. Use the lighter on the manual to get
a fire.
The fire
heat made the jellyfish move away from this room and to the room
where the agitated flea is located.

Take care
of the second flea: Go through
right side of the jellyfish to be in the next hallway.
See another flea at left. This one is
feeding now (if you saw him earlier, he is agitated).
Take-pickup the red tool chest.
Now that the flea is standing in one spot
filling his stomach, click the tool chest on him. He is now sleeping
also.
Exit this
area: Go forward to where the tick is located.
Pick up the
hammer from the floor beside the flea.
Use the pick
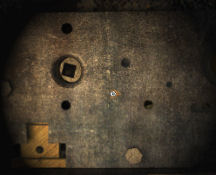
axe to get a close-up of the bricks.
Click on
specific bricks. The cracks weaken the bricks further. The passage
is clear now.
Find the
elder Nikopol: The guards are coming.
Go forward
the hallway and see that the cell of the elder Nikopol is empty.
Outside the
window, see that father is outside and being taken by the Third
company to the Elysée.
Stop
the guards from entering:
From the
window, go to the right side of the sink. Take the glass from the sink.
Turn the tap on by clicking the glass
from inventory on it. Get a filled glass.
Pan right
and use the filled glass on the security lock left of the door.
Sparks are seen from the control panel and makes the lock
inoperative.
Exit
the room: Pick up the stool beside the bed
and click-throw it on the window.
The window
breaks.
Go to the
window and look down at the glass shards.
Turn
around to the bed. Take the feather from the bed. Horus?
Take the
bed cover and use it to pick up a glass shard.
Look down
on the baseboard of the room and see cable.
Use the
wrapped glass shard-lucky knife on the cable right and left of the sink to get a
piece of cable.
Look up to
the wall at right of window and use the cable on the coat hook.
Exit
through the window.
The elder
Nikopol enters the space car and departs.
Alcide stows
at the back of the other car and arrives at Elysée.
The guards
are deployed at the Elysée because of the election.
He enters
through a grate and is now inside the palace.
Chapter 5
Find my father:
Elysée: Look
around to see where you are.
Room 4:
Monitor: Check
the monitor and get a map of the Elysée.
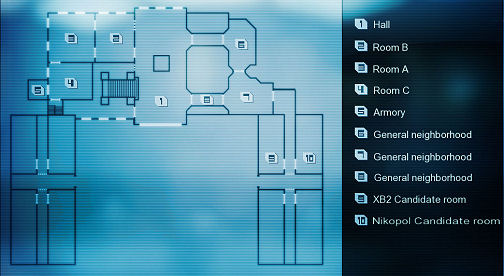
You are in #4. XB2 is in #9 and Father is
in #10.
Armory: Look at
the door left of the monitor.
It is the armory and it has the #8 code
for the pass card.
It is #5 in the map.
Outside: Climb
the stairs on the left and see a mattress covered door.
Climb the ladder on the wall and be
outside. Look around and see that there are guards.
Climb back down to go back to room 4.
Room 3: Press the
door lock left of the door and the cabinet. The door signal sounds.
Enter and be at room 3.
Hear Choublanc's announcement that he is
stepping down as dictator and going to the Defense monastery.
He is replaced by Alcide Nikopol (father)
in this election. This must be the work of Horus.
Room 2: Pan
right. Go through the right door and be in room 2. That signal of
door opening sounded again.
Pan right. The left door is closed and
try to get through the right door. If there is a guard, go through the crack on the right wall.
(If you go through the crack)
Stairs: Be under
the stairs.
Go forward, left and see the hallway
ahead.
Go forward. There are guards outside the
window of the hallway on the right.
Hallway: There
are 2 doors at the opposite wall of the hallway.
If you open the right door, the guards
will hear it.
North hallway: Go
left (north) to the other end of the hallway using the left path.
Take the
iron bar leaning on the metal cabinet.
Hear a guard coming, immediately go back
to the left wall and enter the open maintenance metal cabinet.
Hear the guard talk about the candidates.
Only the sergeant can talk to the candidates and only by telephone.
Exit when the guard has stopped talking.
Exit and enter the door at opposite wall.
Room 6: See that
you are in a hallway. Open the other door. That door signal
is loud.
This is 'general neighborhood' or security
room for the guards.
Look close
at the monitors.
Hear the other candidate XB2 talk about wanting Nikopol dead.
XB2 was his guard when Nikopol was in cryogenic
state.
Alcide wants to stop XB2 before he kills his father.
Middle Monitor: Click
on monitor and see that it's not working anymore.
Take the mobile phone from left side of
the monitors.
Left Monitor:
Click on the monitor and see the guards' deployment.
The guards can be moved to a patrol that
will enable Alcide to get to the armory and father.
We can do this later until we see where
the guards are located.
Right Monitor:
Read the memo about Security here at Elysée, specifically the escape
hatches.
The telephone does not work inside the
building.
Room 7: Go right
from the monitors. See that this is the break room of the guards.
See the door at left that leads to the
candidates rooms. It must be locked from the other side.
Room 8: Go right
from room 7.
Code the pass card:
See a familiar pass card coding station.
The pass card needs to be coded to pattern
8.
Insert the pass card on the slot.
Enter code 8:
Change the pattern at top right to pattern 8.
Click D 7 3 C 7 C D B 2 8 B A.
See the flashing OK.
Automatically be pulled back with the coded magnetic pass.
Get back to the armory:
Now that the pass card is coded, go back to the armory.
Silence the door of room 8:
There is a guard outside this door.
If the door is not noisy and the signal
above the door is silenced, Alcide might be able to sneak by.
Look down below the door plate left of the
door.
Use the lucky knife on the cable of the
door signal to cut it.
Way to armory:
Exit through the door. Go forward to the other side.
Enter the hallway close to the windows.
Turn right under the stairs. Go forward
through the crack on the wall.
See a guard patrolling room 2.
Turn right and read the memo tacked on the
door. That gives me an idea.
Program the patrol deployment:
Go back to room 6 where the monitors are located.
Click on the left monitor. Use the arrows
to change the deployment.
Alcide states to use the security defaults
or any programmed deployment. These are seen when the 3 areas at
bottom left are all in black letters.
It is needed that Rooms A B and C need
guards to be moving-patrolling; not at a standstill-surveillance.
The hall needs surveillance so that we can sneak and not get caught
if the guards patrols.
This is just one example of default
deployment.
Top: Surveillance Hall -
north
Middle: Patrol A - B - C
Bottom: Surveillance
Hall - south
Exit through room 8 and go back to hallway
E under the stairs.
Go back to the crack on the wall and see
the patrolling guard.
Room 2: Wait
until he enters through the door on the left.
When the door closes, then go forward and
go to that far right door where the guard went through.
Stand in front of right door. Look at the
door signal above the left door or wait to hear the door signal of
his moving to another room before entering room 3 using the right door.
Room 3:
Immediately go to the right door on the left wall and go through to
room 4.
Room 4: To work
undisturbed, immediately go to the left side of the cabinet and push
it to block the left door.
Armory: Use the
coded 8 pass card on the slot right of the armory door. Look around.
Rifles: There are
rifles on the wall. Push up the grate door of the display using the
handle at the base of the screened door.
Study the paper on the left of the rifles.
It describes the rifle so that you can select which one you want.
Select the one for tactical elimination;
it has range and silencer - BAR-89 rifle (gun) on the left.
Exit the room.
Find XB2 and stop him:
Outside: Turn
right and climb the stairs.
Mattress: Use the
lucky knife to cut the cord of the mattress.
The door is stuck. Use the iron bar to pry
the door open.
Exit to the outside on a walkway.
XB2: Look left to
the yard.
Use the scope of the rifle to look through
the windows at opposite building.
See the middle window with a telephone on
the wall.
Use the mobile phone and press the phone
icon on 'invited apartment 1'.
Once the phone starts ringing, close the
phone frame.
Use the rifle scope and focus on the
window with the phone.
Wait until you see XB2 answer the phone,
target and fire.
If you missed, an alarm sounds and you're
dead.
If you hit him, see him fall down.
Go down: Click
on the ground below.
Go back to the hallway and pick up the
mattress.
Throw the mattress outside.
Throw the mattress over the railing to the
ground below.
Jump down.
Guards: See 2
guards on the left up the stairs and by the door.
Use the phone and cycle to call 'doors to
the lounge'.
Close the phone, wait a bit and see the 2
guards go inside.
Go to
father:
Apartment hallway:
Go forward to the building across the yard.
Enter the garage at right. Climb the
stairs left of the car.
See the 2 apartments at right and left of
the hallway.
Click on the left and right doors.
DNA verification system:
Click on the door lock of the right door and it asks for DNA
verification.
Check the robot's left apartment. It asks
also DNA verification from the android.
Turn back to elder Nikopol's apartment.
Use Horus' black feather on the lit frame above the door lock. The door opens.
See the elder Nikopol dead. Talk to Horus. He says that
his brothers did this to stop Horus.
Horus wants Alcide to replace his father
and become the president of Paris.
Horus chases Alcide after he refuses.
Escape Horus:
By the door of Nikopol's apartment, turn right and immediately press the red alarm panel right of the
apartment.
The guards are alerted.
Go forward to the end of the hallway.
Press the door lock's red button.
Enter room 7, go to hallway 8 and out to
room 1.
Go forward to the small hallway and then right under the
stairs. Go through the crack on the wall.
Be at room 2, take the right door to go to
room 3, then another right door to room 4 and up the stairs left of
the armory.
Climb the metal ladder to the rooftop.
Go forward to be by the glass ceiling.
Look up at the pyramid and use the ankh.
Watch the justice of the Immortals.
I will arrange that.
This document may
not be distributed without express written permission of the author
and the content may not be altered in any way.
For
Questions or Comments on this Walkthrough,
Please write to:
MaGtRo
Copyright © 9/2008
MaGtRo
 GameBoomers
Walkthroughs and Solutions
GameBoomers
Walkthroughs and Solutions