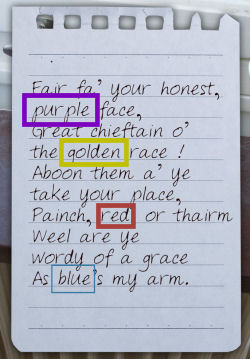
Profound Red: Carol Reed Mystery 12
By MDNA Games
Walkthrough by MaGtRo January 2017
Gameplay: This is a first person point and
click game.
Warning: The game has sex gadgets and
adult illustrations.
Before the game starts, see the game settings: display
and sound selection frame. The display frame has device, colors and run in
window choices. The sound frame has a choice of sound device.
The main menu has resume, new game, load, save,
options and quit selections.
The options menu has speech, music, effects
adjustments and subtitles choice.
The tutorial on how to play the game can be
selected at start of the game.
Objectives and hints are found in Carol's journal found at left of inventory
bar.
There is a good hint system in the game. The hints
can guide the gamer without the need of a walkthrough.
The main menu is accessed by right mouse click or
the ESC key.
The space bar shows all the active spots in the
screen.
In Win7, the saved game folder is located at
C:\Users\computer name\Saved Games\Profound Red folder.
Carol hopes that she gets time to enjoy
summer. She takes
guitar lessons.
Investigate Stina's message.
Carol's home:
Look around the apartment.
At the office, click on the guitar to play a few
chords and maybe enjoy a drink of white wine. Look around in her office. Exit the office.
Living room:
Play the guitars in the room.
Turn to the window. Check pot of rosemary.
Pick up Carol's cell phone on the amplifier under the window.
A message from Stina about visiting her at her
new job at Amalia's House is seen. New location is added to map.
Look at Carol's cell phone in inventory - it
has a GB button! Yay!
Turn left, right of chest hutch by office door
to see an
active power outlet.
Check the bedroom and kitchen. See window cleaning
items in kitchen closet by dining table.
At the WC, see a hairbrush on the hamper. Someone
is losing hair.
Exit the apartment to see the map.
Hotel - Amalia's House:
Jump to Amalia's
House. Go forward and enter the reception door at left.
Ring the bell on
desk. Talk to Stina. The hotel got a text message from a Louise. It sounds
like a suicide note and was traced to a Louise Elliot.
Walther Elliot's
address is stated by Stina. New location is added to map.
Exit the hotel area and jump to Walther Elliot.
Walther Elliot's apartment:
Talk to Walther (Mikael). Louise Elliot is his
sister. She jumped from Azure Cliff and broke her neck in the fall.
Sven Olsen is a close friend of Louise. He lives
Apus St. New location is added to map.
Walther will visit his mother for a few days and
will be gone.
The Azure Cliffs:
Jump to Azure Cliffs. Go forward twice and look
right.
Take the magnetic card from the raised
ground.
Turn around and look up. See the top of the cliff
from where Louise supposedly jumped from.
Go back and exit.
Sven Olsen:
Jump to Sven Olsen. Talk to Sven. Louise also sent
a suicide note to Sven.
Sven gives a key to Louise's apartment. New
location is added to map.
A photo of Louise is given.
Investigate Louise Elliot.
Louise's apartment:
Look around Louise's apartment. WC is on the left
and kitchen is at right of hallway.
Envelope: Go forward to living room. Turn right and pick up
the envelope on top of green box at bottom of the table by window.
Open the
envelope and see a picture of Amalia's House. Turn it to read Louise's
surprise for Sven.
Louise booked the Viktoria's Suite for the weekend
under Sven's name. She prepared a surprise for Sven.
Backpack by drums has running shoes.
Box: Turn around to door. Look
close at the wooden box on table right of the speaker. It is missing an
ornament.
Bedroom: Enter the door at
left in the living room.
See a locked orange cash box on table.
Turn left and see a tablet that needs a password.
Amalia's House:
Go back to Amalia's House and talk to Stina about
Viktoria Suite.
Veronica Stein booked the suite day before
yesterday. She spent time in the suite and got the key to the tool shed.
Show Louise's picture to Stina. Veronica is
Louise.
Viktoria Suite: Exit and climb
the steps on the left. Turn right and enter Viktoria Suite.
Fireplace: Open the metal
door of the fireplace by mirror. Pick up the match box and open it. Get
the shed key from matchbox.
Left side table: Open the
drawer to see body stocking packet. Take the ancient mobile phone.
It needs a battery.
The right side table has a nail file.
Bag: Turn right to the exit
door. Look close at shopping bag. Take the pair of scissors.
Receiving room: Go to
the other room. Check the sofa. The WC is at left.
Turn around. See a Gamesong right of window.
It needs a code to turn it on.
Look in trash can on floor. See a postcard that
points to the sofa pillow.
Graffiti Plant: Move the
sofa pillow and read the Artwork at Graffiti Plant leaflet.
Turn and
read Louise's message. New location is added to map. Louise suggests to look for golden signs at
the plant.
Stove: Check the
stove and see that the fire door is screwed locked.
Tool shed: Exit the suite. Go forward to
the red tool shed.
Use the key taken from matchbox on padlock at left
door. Take the screwdriver left of the blue Tommasi bag.
Viktoria Suite: Go back to the
suite and the locked fire-oven door.
Use the screwdriver on the 2 screw-locked
doors of the oven.
The small door is empty. Open the large oven
door.
Take a wooden box with graphics on the cover similar to
graffiti on leaflet.
Exit the suite. You can look around Amalia's
Hotel different areas. Exit the area.
Follow Louise's clues.
Graffiti Plant:
Look around. Turn left and go to left end. Turn
left and look close at painted boulders.
Go back to left end of building. Turn around,
enter building and look around.
Golden signs:
Louise wrote to look for golden signs here.
Go forward once and take the ladder
from far wall. Turn around go back to original path.
Go forward once more and turn left. Look at
the golden G symbol on the post at center of building.
Continue forward once and turn left. See a
golden r symbol at far wall.
Continue forward again and turn left. Go
through a low windowless opening at far wall to be outside
Turn around
to see a golden 7 on the graffiti left of opening.
Go back inside. Continue to end to see an open
pipe and hole on the wall.
Open wooden box:
In inventory, look close-right click the
wooden box taken from the Viktoria Suite oven.
Press the 3 symbols that match the 3
golden signs seen on the graffiti.
Press (left to right) positions 2, 3 and 6. Press
the button on top. See 5238.

Amalia's House:
Go back to Amalia's House and Viktoria Suite.
Go to the Gamesung gamepad by window at the
other room.
Match game: Enter the
numbers taken from the open wooden box: 5238 to turn on the gamepad.
Do a match game. Click a ? and see a symbol.
Look for the matching symbol and click both of them.
Do this until all squares are matched. Press
the arrow button below.
See a picture of the square hole at the
Graffiti building.

Graffiti Plant:
Go back to Graffiti plant and to the square hole
on the wall at end of path.
Take the mobile phone battery.
Ancient mobile phone:
In inventory, combine (click, hold and drop)
the mobile phone battery and the ancient mobile phone taken from drawer
at Viktoria Suite.
Look close at the mobile phone in inventory.
Press each number and see 4 numbers appear.
Button 1 has #4. Button 4 has #2. Button 6 has #1. Button 0 has #3.
Press in order shown by clue: buttons 6401.
See an electrical box with a smiley.
Smiley box: Go to entryway to
this graffiti building.
Turn right before exiting and look close at
electrical boxes on brick wall.
Use the screwdriver taken from Amalia's House tool
shed on smiley box.
Take the punch card for 7 free
massages for Sven. Sven gave a massage table to the Scandium Insurance Group.
Sven Olsen:
Talk to Sven about Scandium.
Learn that Scandium Insurance Group is where
Walther is boss and Louise works part time. Their father Einar gave them the
money 10 years ago to start the company. New location is added to map.
Learn about the massage table and the alias used
by Louise at the club - Veronica Stein.
Scandium Insurance Group:
Try the door and see that it is locked. In closeup, use Louise's magnetic card found at
Azure Cliffs on the locked door of the building.
Stairs: Look around at right and
see that there's button with key icon to raise the blocking bar to stairs at far wall. It
is too far.
Louise magnetic card doesn't work on the card
reader.
Office: Turn around. Enter the
open door to the office. Look around.
See Walther Elliot locked door left of conference
room door.
Check Lotta Persson's work cubicle in front of
Walther's door. The cubicles are identified by a tag on the desks.
Check the other cubicles. The Aquarium door behind Irene's cubicle
is locked.
Louise's cubicle: Turn
around and check Louise's cubicle.
Read the note about her missing printer. Take the
key from Louise's desk.
Check the cabinet by wall. Use the key from
Louise's desk on the lock at top right of cabinet.
Read the pink card - code 1759. Exit the
building.
Louise's apartment:
Go to the living room and then enter her bedroom
at left.
Turn left and look close at computer tablet.
Press the on button at left.
Use the code from pink card seen at office on
tablet - 1759.
See photos taken from a swinger club gathering.
Uncover Louise's secrets.
Sven Olsen:
Ask Sven about the photos. Learn that Sven manages
the swinger's club and that's where he met Veronica Stein-Louise.
Sven loans the key to Club Adam and Eva. New
location is added to map.
Club Adam and Eva:
Use the key loaned by Sven to open the club's
door.
Locker room: Turn right and
see lockers for guests.
Lounge: Turn left from mirror
and candelabra to enter the lounge.
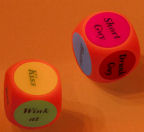
Go behind the bar and look around.
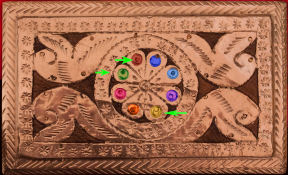
Study the picture of labeled dice pointing to an
ornate box with colored circles beside the cash register.
Turn around and see the cabinet with locker
keys. Exit the bar.
Back room: Turn left to the
long sofa with crimson pillows.
Turn right and enter through doorway left of the
restrooms.
Turn right and enter through the doorway left of the stairs.
Dice room: Turn left and see a
room with sofa and pillows.
On the table, see the dice pictured on the paper by the cash
register.
Turn right and enter the covered pool with a
yellow plastic duck.
Turn right from pool and enter the shower room.
Take the shower scraper.
Go back to dice room and turn left towards
entryway. Check the wall clock that stopped left of the entryway.
Hallway before mirror room:
Look close at tall table at hallway.
Take a packet of moisturizer beside the
matchbox.
Mirror room: Go through
the entryway at top left.
Enter the room with 2 long mirrors on wall.
Turn right and examine the box on the sofa. It is
the one depicted on the paper with the dice drawing.
Massage room: Enter the
massage room across from the mirror room.
Look under the pillow. Take the MP3 player
with camera. The battery discharged.
Dark rooms: Back up from massage
room and turn left. Enter and Carol says - it's too dark here.
Exit the club: Turn
around. Exit through the hallway right of the massage room; pass the round
chairs and forward to the lounge with the chandelier.
Go to the chandelier, locker room area and turn
right to exit.
Scandium Insurance Group:
Employee's lounge: Enter the
building.
Use the shower scraper from the club on key button
of stair wall. Go upstairs.
Massage room: Go pass the tables
and turn right.
Enter the door at end of short hallway. See the
massage table donated by Sven.
Open the cabinet. Read the letter on top of books
at middle shelf.
Learn that Louise has a summer cabin. Exit the
building.
Louise's summer cabin:
Sven Olsen: Go to Sven
and ask about the cabin. New location is
added to map.
Sven earns his living by working on exhibitions.
Louise's summer cabin: Turn
left and see a long red barn that is locked.
Go forward and see the cabin-house. See a padlocked shed
with horns
beside the cabin.
Red shed: Go to right
side of house and around to the back.
Enter the red shed by clicking on hook at top left
of door.
Take the key inside the empty plastic plant
pot.
House: Go back around to
the front door of the house.
Use the key from pot on the locked door.
Look around.
Kitchen-dining room:
Open the blue cabinet ahead.
Open the box on top and see pictures of Louise
in the club.
Turn left and examine the sealed paint tin on shelf above
the dining room table.
Turn left and check the drawers under the
window. See pictures.
Turn left and check the corner shelf above the
sink. Take the keys.
Living room: Go through to
the room right of sink.
Turn left and see a door with no handle behind
a red chair.
Exit the living room.
Small Office: Turn
right and go to small office.
Poster: Look at
desk and see a poster for Europe during the War Exhibition.
Sven is the exhibition curator and is located at
the Norrköping Museum.
Read the back side to see the list of
clues made by Louise to lead to a ring.
The checquered box will be opened with
colours from Finger Tingles thing.
Enter the
bathroom under the stairs. Look around.
Upstairs hallway:
Climb the stairs.
Left bedroom: Turn left
from hallway. Check the unfinished room behind the door ahead.
At the bedroom, see the checquered box mentioned on the poster
on the small magazine table at right.
Master bedroom: Enter the
other bedroom. Look around.
Stairs: Go back to
stairs. See a cup on the shelf above the stairwell.
Carol needs something to grab it with.
Long red barn: Exit the
house. Go down the path. Use the key from shelf above sink on the doorlock.
Turn left and see a chisel on shelf. Carol can't
reach it. The ladder won't work.
Climb the steps. Turn right and take the coal
tweezers right of the privy holes.
House: Go back to the house
and up the stairs.
Turn around at top of stairs. Use the coal
tweezers on the cup on the stairwell shelf.
Get a shiny key.
Padlocked shed: Exit the
house. Go to shed with horns.
Use the key from cup on padlock. Take pitchfork.
Long barn: Go back to long
barn at end of path.
Use the pitchfork on the chisel at shelf left of
window. It falls down on the pile of wood.
Hunt for the
chisel by clicking on some wood. It is hidden at bottom right.
Take chisel. Go back to house.
Kitchen-dining room: Look
close at sealed tin can on shelf above the dining table.
Use the chisel from long barn on sealed tin. Take
the door handle.
Living room: In the living
room, turn around and
left. Use the door handle on door with no handle. Open door.
Envelope: Read the letter
from Carl R. He has Louise office printer and threatens her with
exposure about her blackmail activities.
Notebook: Read
Louise's thoughts on the notebook. Learn about Carl's motorbike basement. Louise
has the entry code.
Carl's motorbike basement:
Go forward to red door. Go through door. Look
around.
Go forward to next room. Turn right and enter the
next room.
Furniture room: Take the
flashlight from the sofa.
Turn right and take the trampoline left of
entryway.
Hallway: Forward to
hallway and turn left.
Look close at table at left. Read the letter on
top of the inverted pushcart. Carl wrote a complaint letter.
Check the locked metal door at end of hallway. It
needs a code. Exit the basement.
Club Adam and Eva:
Now that we have a flashlight, check the dark room
area of the club.
Go forward to lounge. Enter the backroom right of
the sofa.
Enter left of stairs. Turn right and go top left
to the rooms with sofa.
Dark area: Turn right and
forward to dark hallway.
First room (couples only):
Use flashlight and look around.
Turn left and see a trash can. Enter the black
colored theme room.
Turn right and move the round pillow. Take the
charging cable from the sex tool.
Exit the room. You can look around at
different rooms here.
Exit the club.
Carol's home:
Combine the charging cable and the discharged MP3
player taken from the club's massage room earlier.
Use the MP3 player with charging cable on the
power plug at top left corner of living room.
Take the charged MP3 player. Read the memo. Learn
where Louise keeps her club locker key.
Sven Olsen:
Talk to Sven. Louise's locker is #34.
Follow Louise's clues - continued.
Club Adam and Eva:
Go behind the bar and take key #34 from the key
cabinet.
Go to the locker room, look close and use the key
on locker 34.
Open the small case. Take the ornament.
Louise' apartment:
Go to living room. Look close at the wooden box
right of the bedroom door.
Use the ornament from locker room on box. Take the
key.
Go to the orange locked cash box in the bedroom.
Use the key just taken on cash box.
Open and look close at coin with 3842
written on it.
Carl's motorbike basement:
Enter the basement. Turn right to hallway and
forward to metal door with keypad.
Enter 3842 on keypad and enter. Look around at
nice motorcycles.
Box: Turn around to the door.
See a box on top of locker.
At far view, use ladder taken from Graffiti Plant
on locker.
Check the box and get Carl Roper's address on box.
New location is added to map.
Pick up the ladder again.
Check the motorcycles at other end of room.
Take the yellow rubber gloves from table.
Carl Roper:
Ring the doorbell by pressing the black button
below the door handle.
Talk to Bigge. He's cleaning the apartment. Bigge wants you to bring window cleaning equipment
before he'll let you in.
Carol's home:
Go to the kitchen. Open the cabinet right of hutch
by dining table. Take the Ajax glass cleaner bottle.
Club Adam and Eva:
Now that we have the rubber gloves; check the
trash cans in the area.
Dark area: Enter the dark area
at back of the club.
Turn right at hallway. Go forward to black
curtain.
Turn left twice. Go forward to room hidden by
white-black with blue at top wall left of the depicted woman.
Use the yellow rubber gloves on the trash can.
See a picture of the dice room with words: wink
at and then kiss the drunk guy.
Dice room: Exit the dark area.
Go pass the massage room to the hallway.
Turn around and enter the room with dice on table.
Examine the dice on table. Note that kiss is yellow;
wink at is green and
drunk guy is brown.
Mirror room: Go back to the
room across the massage room.
Turn right and look close at the box.
Using the clues seen at dice room; press the brown
and green buttons at top left and yellow at bottom right.
Take the Finger Tingles that has blue, yellow and
red dots. We saw this clue and the checquered box before.
Louise's summer cabin:
Go to the left bedroom at top of stairs in the
house.
Look close at chequered box. Using the clue taken
from club; press blue, yellow and red hexagon.
See a postcard of Barthew's Stoll. New location is
added to map.
Turn the card over and see the clue "look under
the red moss".
Barthew's Stoll:
Look around and then enter the tunnel until the
end.
Turn right and forward twice. Turn left and check
the red moss on ground.
Pick up a rock with a clock depiction. Turn rock over and see "where have you seen this?"
Club Adam and Eva:
Go to Dice room. Turn around and look close at
wall clock that has stopped working.
Turn it over and read Louise's notes about drawer
at 1950's room at Norrköping Museum. New location is added to map.
Norrköping Museum:
1950 room:
Enter and look around.
Go to living
room. Turn right to book shelf. Open top drawer.
Pick up the
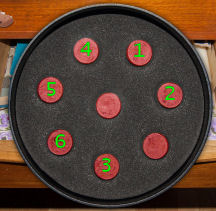
black disk. See that it has small circle underneath.
The aim is
to turn all the circles to red.
Press
circles 1-6.
See the next
clue - 1980 VHS.
1980 room:
Exit the 1950 room. Turn right twice and go forward to 1970 room.
Turn left
outside 1970 room and see the 1980 room left of the helicopter.
Enter and turn
around. Take the VHS tape on the book shelf.
Turn to TV and
VHS recorder. Use VHS tape on recorder.
See next clue on
TV: 1950 red book.
1950 room:
Turn right from 1980 room. Go forward twice to silver
flying boat-seaplane and turn left.
Go to 1950 room again. Go to book shelf
and check the red book at left side of shelving.
Check the back
of the book and see the next clue - 1970 jug with snake.
1970 room:
Go to living room and check the jug with snake on shelf.
See the next
clue - 1960 ashtray.
1960 room:
Examine the red ashtray on coffee table.
See the next
clue - 1970 vinyl record.
1970 room:
Go to living room and check the vinyl record on right shelf top of
pre-amplifier.
Look close at
the back of the record to see - next clue. Louise hid something at father's
metal factory. New location is added to map.
Exit the museum
right of the flying boat-seaplane.
The Elliot Metal
factory:
Go forward
to the opposite corner of the building. Turn around and go down the stairs
to basement. Look around.
Basement:
Turn right and take window scraper from window shelf.
Go forward twice
and turn left. Take antique mobile phone from ground. Turn to the back and see
that it needs battery.
Outside:
Go outside and turn right. See a plastic jug on ground below. It is
unreachable right now.
Turn left and
look inside the well. See a spray can and pipette. It is also unreachable.
Other building:
Go inside the other building. Turn left and forward to dark area.
Use the
flashlight on screen. See a drain on the floor at left room.

Look close
at urinal in right room wall. Take the battery. Note the colored lines
above the urinal.
In inventory
combine the ancient mobile phone and battery.
Look close
at mobile with battery. Press the 3 buttons until the colored lines
above the urinal is reproduced - red at left, green at center and blue at
right..
Press OK
button. See a
picture of 1970 white bowl.
Norrköping Museum:
1970 room:
Go back to museum. Enter the 1970 room.
Check the white
bowl at right middle shelf in the living room.
See the next
clue - 1950 vinyl.
1950 room:
Examine the vinyl record on the turntable.
See the next
clue - picture of Design Museum. New location is added to map.
Design Museum:
Look around at
the different costumes.
Go to the
farthest room at right. Look close at 4 costumes at right corner.
Read the next
clue tucked at waistline of the dress form at right.
See the next
clue - the second suit with the H insignia.
Go back to the
uniform with insignia and white shoes display 2 clicks back.
Check the pocket
of the second suit. The next clue states that there is a stone outside the
low window at the graffiti plant.
Graffiti Plant:
Enter and go
forward 4xs. Turn left and go outside through low window.
Go forward and
look under the stone block.
Turn the rock
over. Read Louise note.
Club Adam and Eva:
Go to the dark
rooms. Enter the first room ahead.
Look close and
open tube of cream. Use the scissors on the tube to get a wedding ring.
Investigate
Carl Roper.
Carl Roper:
Now that you
have the window cleaner and scraper, go back to Carl Roper's apartment.
Ring the doorbell
and talk to Bigge.
Look around the
apartment. Turn left and read the letter on desk.
Learn that Carl
has #7 store room at Ciccone St 6.
See a closet
with key at end of hallway. The key lock needs lubrication.
Kitchen:
Enter the room at right. Check the motorcycle pictures on counter.
Living room:
Read the letter in folder on coffee table.
Bedroom:
Go to room across living room.
Read the poem
on the window shelf.
Take the
magnetic card from computer table.
Open the drawers
on cabinet at right. The middle drawer has a box with 4 numbers.
Carl's storage
room:
Use the magnetic
card from computer table on the card reader left of door.
Go to storage 7.
See a
colored keypad.
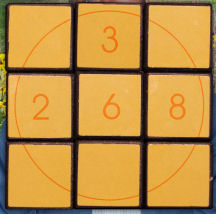
Using the
poem clue; press - purple, gold, bottom red and blue buttons.
See
skateboards. Take the
Rubik's cube from box at left.
Get a text
from Jonas. He is at DeVille Park. New location is added to map.
Locate Jonas'
father's items.
Jonas:
Talk to Jonas.
Learn that he's studying ancient languages.
Jonas asks for
help in finding his father's lost things at the Herb Garden. New location is
added to map.
Jonas gives the
list of the missing things. Jonas will work on the Rubik's cube.
Herb Garden:
Go across the
bridge and enter the Herb Garden at left.
Tape measure:
Go forward and left twice to be behind the building.
Look close at
pile of rocks. Take the tape measure.
Flower Seed:
Go back to the main path. Turn left and forward once.
Turn right and
look close at plant on left of side path. Take the Macarena seed packet
hidden under the leaves.
Turn left to
face the main path. Go forward to the tree. Turn right and look close at
another plant.
Postcard:
Take the postcard of the Cactus Garden. Jonas' Father was there when
he was feeling sick. New location added to map.
Medicine
blister pack: Go behind the tree with bench and
forward to water's edge.
Take the
blister pack from ground.
Hearing aid:
Look at bench surrounding the tree. Take the hearing aid.
Cactus Display:
Liniment:
Turn left twice. Check the trash bin. Take the tube of Zon liniment
from ground at right side of bin.
Flower seed:
Go forward at path once. Turn right. Take the Indian
cress flower seed packet from flowers by statue.
Bottle of
pills: Turn to main path. Go forward 4 times. Turn
right and
take the bottle of pills from grass.
Cactus
Garden: Turn right to the path and go to the cactus display
on other side of path.
See a blue card
on ground. The garden is under construction and the fence is high.
Use the
trampoline taken from Carl's motorbike basement on fence.
Jump on
trampoline. Take the blue membership card.
Go to the exit
behind the statue.
Get a message
from Jonas asking for Belladonna. He sent a Belladonna picture.
Herb Garden:
Go inside the
herb garden. Go forward 3 times.
Go left and pick
a Belladonna leaf.
Jonas:
Talk to Jonas.
He gives the solved Rubik's cube.
Investigate
Carl's connection with Elliots.
Carl Roper:
In bedroom, go to drawer
right of computer table.
Open the middle
drawer. Using the cube solution: press 2 at middle left, 6 at middle, 3 at
top middle and 8 at right middle.
Click on open
padlock. Read the rejection letter. Learn about
the problem Carl had at Elliot Laboratory.
Library:
Carol wants a
background check on Carl also. New location on map is added.
Carl Roper:
Go to computer at right. Click on keyboard and the search icon.
Read about Carl
Roper losing his appeal of unfair dismissal.
Learn that Carl
was chief chemist at Elliot's lab and was accused of erratic behaviour. The
other colleagues who lived at Mercury Street also showed similar behaviour
after Carl was dismissed.
Mercury
Street: Do a search on Mercury Street.
Read about the
derelict houses on Mercury Street. Carl's house was #3. New location on map is
added.
Mercury Street:
Carl's house:
Go forward twice. Enter the house at right. Carol counted
the houses.
Enter and look
around.
Bedrooms:
Go forward and left to 2 doors. The right door is locked.
Living room:
Take the metal object bar on the floor at right.
Kitchen:
Go left at hallway and to the kitchen.
See a coffee tin
on the counter. The lid is stuck.
Turn left and
see a coffee filter cone on the shelf.
Turn towards the
hallway and take the key on key hooks.
Other bedroom
door: Go back to the locked bedroom door. Use the
metal object on door.
Open the black
metal box on the floor. Take synthetic oil.
Basement:
Go forward towards kitchen and right to basement stairs.
Go down. Look
around. Turn right and forward to basement room. Turn left and
see 2 rooms.
Go to left room.
Turn around to entryway. Take the scalpel under the light switch.
Enter the
adjacent room. Turn around to entryway and check the dresser. Take the
sandpaper on top of dresser.
Go back
upstairs.
Kitchen:
Look close at coffee tin can.
Use the
sandpaper taken from basement on rusty tin can. Take the club
card.
Second floor:
Climb the stairs.
Right upstairs
bedroom: Take the pliers from floor.
Left upstairs
bedroom: See a coat hanging by window. Check the pocket to
see Carl's calling card while he was Chief Chemist at Elliot Laboratory.
Carl Roper's
apartment:
Go to the closet
at end of hallway that has a key on keyhole.
Use the
synthetic oil from Mercury Street on key.
Check and open
the Canon printer.
Read the paper.
Learn how to deactivate the central locks at the Scandium office. The phone
number of Securitas and the code 2178 are stated.
Scandium
Insurance Group:
Enter the
office.
Use the cell
phone and call Securitas to deactivate the locks. Give the code.
Go to the
Aquarium at back of the cubicles and enter the conference room.
Check the bag on
the chair. Read Louise's notes. Is he innocent?
Carl Roper:
Ring the
doorbell. Talk to Carl. Learn about his being fired by Louise's father and
the reason.
Carl admitted
taking the printer. He shows the blackmail letter he took from Louise's
trash. The blackmail letter was for Mr. Carlsson.
Learn how to
enter Walther's office. Carl used a bent credit card.
Investigate
Walter Elliot.
Scandium
Insurance Group:
Walther's
office: Enter the office and go to Walther's
office door.
Look close
at lock. In inventory, use the pliers from Mercury St house on club card
from coffee tin.
Use the bent club card on lock of Walther's office door.
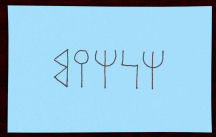
Tablet:
Look around the office. Turn on the tablet on desk and see symbols used as
password lock.
Pull back
and Carol wants to ask Jonas about the ancient language.
Take a
picture using camera on cellphone that automatically appears on screen to get
photo of
strange letters.
Letter:
Read the letter sent to Walther by Immodia Berling concerning Louise's
vicious activities.
Use the
phone to call Immodia Berling. Immodia will meet Carol at home.
Carol's home:
Talk to Immodia.
LOL. Learn about her intentions concerning Louise and the club.
Learn also that Walther's mother moved next
door to Walther. New location added to map.
Learn also about
Walther taking over the metal factory.
Louise's mother:
Press the call
box left of door and get buzzed in. Talk to Louise's mother.
Walther might be
in his cottage. Louise's mother got a suicide text from Louise.
Walther's
cottage:
Sven Olsen:
Talk to Sven. Learn that Walther bought Christina Nilsson's birth house. Info
about the house is found at Rostock Mountains. New location is added to map.
Also there has
been a burglary at the club.
Rostock
Mountain: Go forward through the woods. Turn
left at end and climb the cliff.
Go forward,
right and read the info panel. Learn that Walter bought and moved the house
to a new location. New location added to map.
Club Adam & Eva:
Sven said there has been a burglary at the club. Look around the club.
Go to the dark
area. Turn left to the curtained black-red room. Take the key at left
side.
Walter's
cottage: Enter through gate. Use the key taken from club
on cottage lock.
Living room:
Read the letter on table by sofa. Learn that Jed who financed Scandium is
being blackmailed by Louise.
Bedroom:
Enter the door at right. Check the cabinet.
See a box
labeled with Walther's address at Mercury Street. The number is covered by a
Fragile tag. Try to take it off.
Use the
moisturizer on the label first; then use the scalpel from Carl's old house.
The address is Mercury St 10.
Kitchen:
Check the other rooms. Go to kitchen top left from living room after exiting
the bedroom.
Take the file
from the trash can under the sink.
Read the letter
on kitchen table. Walther starts to write a letter asking Louise to stop digging into
Mercury Street affairs.
Walther's Mercury St
house:
Enter second
from last house on Mercury Street.
Left bedroom:
Go forward and then left. Enter the left bedroom. Open the closet at left.
Check the black box and take the spool of steel wire.
Right bedroom:
Turn back from hallway and enter the adjacent right bedroom. Check the left closet. Read a
letter from Myana (former girlfriend) with the ancient letter (reversed B).
Read the note on
the floor from Greta; thanking him for coffee.
Check the other
rooms. Go upstairs to look around.
Go down the
basement using the stairs off the kitchen.
Take the
planting fork from right room in basement.
Take the
boathook left of power box by stairs.
Jonas:
Ask Jonas about
ancient language and the letters of Walther's tablet.
Jonas wrote down
Myana using South Arabian letters in a note.
Scandium
Insurance Group:
Walther's
office: Enter the office and look close tablet.
Enter the
password using Jonas' note of Myana's name on tablet.
See a to do
list. He wants to be sure no bottle, containers, pipettes or syringes are
left.

The Elliot Metal
Factory:
Go down to the
basement via the stairs at far top left corner of main floor. Look around
and take all containers.
Go forward once
and left. Pick up the plastic bottle.
Go forward outside to
round room. See a jug on ground. Use boat hook from
Walther's Mercury St house on jug-plastic container.
Turn around and
look down in well. In inventory combine the ring with steel wire.
Use ring with
steel wire to get pipette.
Drain:
Go to next building. Go left to dark area. Look close at drain on floor
of left room.
Use garden-plant
fork on grill of drain. The holes are too small. Use the file on plant fork.
Then use the
filed planting fork on grill. Take the syringe with needle.
Carl Roper:
Carl will
analyze the items from metal factory.
Learn that
Walther gives coffee to the neighbors at Mercury Street.
Carl's house at
Mercury St.
Go to kitchen
and turn around. Take the coffee filter cone on shelf right of
entryway.
Get a text from
Carl. The plastic container has traces of Fentanyl.
Carl Roper:
Give the filter
cone to Carl for analysis.
Carl asks for
liquid from where you got the syringe. He gives the pipette. The
syringe was found
at the drain at metal factory.
The Elliot Metal
Factory:
Go down to
basement. Get a text from Carl. The filter cone has traces of a drug that
distorts perceptions of sight and sound - severe hallucinations.
Go to the other
building and left to dark area. Open the drain at left room.
Use pipette on
liquid at bottom. Get a new text from Carl. It says it was a blind chase.
Walther:
Meet Walther on
the way out.
Use window
cleaner on Walther. After Walther bends down completely, go pass him to stairs. Exit the metal factory.
Car:
At the parking lot, check the red car.
Open the armrest. Get the codes for mother (1679), garage (1395) and Jed (4988).
Check the glove
compartment. Read the letter from mother. She knows about Walther's
poisoning the tenants at Mercury Street and activities at metal factory. She
wants Walther to convince Louise to stop investigating Mercury St incident
and Carl Roper.
Louise's mother:
Try the door
handle - Louise's mother is not home now.
Use code 1679 on
door keypad. Look around the apartment.
Bedroom at right
of hallway: Enter bedroom at right of hallway. Take the
key in medicine box on bookcase.
Kitchen:
Take 3 of clubs card from behind the tray with flower design on
counter.
Open the tea tin
on shelf right of patio door. Take the 8591 paper.
Turn around and
check the Jasmine Tea tin. See that the tin has the 4 suits at corner of
label on cover of tin.
Bathroom:
Enter the bathroom across the kitchen.
Turn right and
open the lightbulb box. Take the ace of hearts card.
Living room:
Check the black pushcart drawers. Take the 2 of clubs card from left
drawer.
Locked chest:
Turn around from sofa.
Use the key from
medicine box on the chest lock.
Take the sim
card from eyeglass case.
Upstairs:
Go to hallway and climb stairs at right.
Open the red
ottoman. Take the 4 of diamonds card.
Kitchen:
Go back to kitchen and look close at Jasmine tea tin on hood above stove.
Press in order:
heart, club, spade and diamond.
Take the
cellphone. Enter the number taken from the other tea tin - 8591.
It wants the sim
card. Insert the sim card from eyeglass case.
Press the SMS
icon. Select "sent". Read the confession letter sent to Walther.
Exit the apartment. Learn what happened next.
This document may not be
distributed without express written permission of the author and the content may
not be altered in any way.
For Questions or Comments on
this Walkthrough,
Please write to:
MaGtRo
Copyright © 1/2017
MaGtRo
 GameBoomers
Walkthroughs and Solutions
GameBoomers
Walkthroughs and Solutions