|
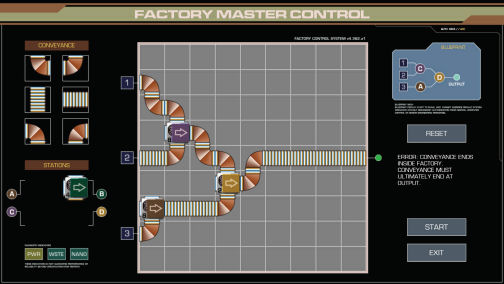
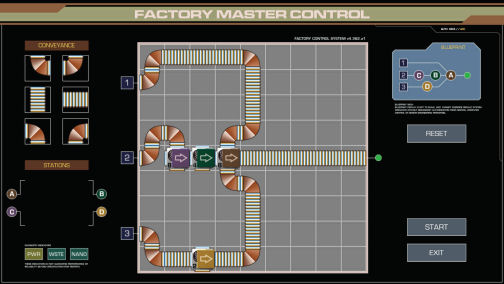
PROMINENCE Official Guided Walkthrough by the Prominence Development Team If you have any questions or feedback about this walkthrough, please contact: info@prominencegame.com Act One Medical: Take a moment and look around. It’s kind of dark in here. The main overhead lights seem to be out (or at least, turned off) and smaller, yellowish lights provide just enough visibility to getaround – and perhaps make things feel a little creepy… Judging by the icon on the control panel, the windowed door to the left appears to be locked(although you can try it anyway just to be sure). Walk along the Outer Medical hallway to the first corner. There’s a computer screen to the right,and attempting to interact with it confirms that it is unpowered. There’s also an unusual-looking machine here with a small control keypad. It doesn’t appear to have power either.While you’re here, you can turn around to get a good view of Inner Medical through the curved window. You can also turn and look up at the black hemisphere on the wall, which appears to be some kind of Camera. When you’re ready, continue along the hallway toward the heavy-looking door and the overturned cart. Along the way, you can try the second windowed door if you like. You’ll also experience a flash, a bit of vertigo and subtle muffled voices. Or déjà vu?. Or is it memories? Or something else? Once at the end of the hallway, try interacting with the solid-looking door (or its control panel). Since this door is stuck and the doors to Inner Medical are locked, you’ll have to find a way out. Look down at the floor near the overturned cart and pick up the keycard (left click). Was it on the cart when everything fell, or did someone drop it? Was there a struggle or did someone just leave in an awful hurry? What happened here? Move to either of the doors that lead to Inner Medical. Now (right click) for the inventory screen. Or use the scrollwheel to change the cursor to the items in your inventory. Then (left click) to go back to the game. Use the keycard (left click) on the door lock. The card will pulsate when you are in the correct spot. Then click on the door and enter Inner Medical. An objective will appear on your screen at this point if you have Auto Objectives selected in the Options screen. It’s on by default, but if you prefer a harder, old-school adventure experience, this setting can be turned off. There’s a pair of big computers in the corner next to the Medscanner bed. As you walk over to them, you’ll see a stylus sitting on one of them. Pick it up. Look down between the Medscanner bed and the servers and you’ll find a service panel that can be opened up. Inside, there’s a switch and some kind of battery with a harness attached. Turn on the switch and the Medscanner will power up. The door will close automatically when you back out of the zoom, or you can close it manually by clicking on the open service panel door. If you look back at the servers, they now have some animated displays. You tried the only door out of Medical and it’s not working. Maybe you can get out through the air vent? Climb up onthe countertop and try to remove the air vent. No luck! Still, it might be easier to find a way to get through this vent than to find a way through the heavy main door. Is that a faint sound of a fan coming from the vent? Go to the foot of the bed and you’ll see that the Medscanner monitors are now on because of the switch that was activated. Zoom into the display and click the “Calibrate” button, and you’ll find that something must be very wrong with this Medscanner. The blast leaves a scorch mark on the floor. That could almost certainly burn through the vent, couldn’t it? Exit the Medscanner zoom. If you turn around and look through the large window, you’ll see that the terminal is now online. Leave Inner Medical and go into the corner with the Medical Archives system and the Holoprojector. Click on the Medical Archives screen and you’ll be able to see and hear recent Medical reports. Hm! Zoom in on the Holoprojector. Click on the cover to open it and inside you’ll see a curved reflector held in place by a pair of clasps. Using the right-click to access the inventory would be okay here, but it’ll be faster to use the mousewheel. Scroll it up or down until the stylus is selected, then use it to pry one of the clasps on the left side, and then repeat for the second clasp. Now you can take the reflector. Back out of the zoom (you can close the cover separately if you wish), and then go back into Inner Medical. Walk back around the bed and put the reflector on the scorch mark. Head back to the Medscanner control panel and activate it to blast a hole in the vent. BLAM! Climb onto the counter and remove the vent. The noise from the duct gets louder. (You can actually climb down and hear it in other nearby areas, too, if you’d like.) When you’re ready, head into the Air Duct. Air duct: Crawl forward until you reach the bend in the duct. A narrow vertical shaft extends upward, but it’s too small to climb up. Pick up the prybar. Turn to face the spinning fan and use the prybar on the power cable on the left side of the fan. (As the fan sparks and spins down, you might notice that you still have control and can do what you like. We try hard in Prominence not to take control away from the player unless their character is actually impaired in some way.) Pick up the wire. Click on the fan blade to zoom in on it. If you click-and-drag the fan blades, you can rotate them until there’s a gap at the bottom. Crawl through the gap and continue until you reach the end of the duct. Click to push down the grate. As it swings down, you might notice a clang and what sounds like a piece of something breaking and rattling onto the floor. Move through the opening to drop into the Storage Room. L2 storage room: Look at the grating of the vent you just came through and you’ll notice a piece missing. The shard is on the floor nearby. Pick it up. There are several boxes and containers in here, but nothing else of note right now. Click on the door to leave. L2 hallway: Now you’re in a hallway, and like the other areas it seems to be lit by small alternate fixtures rather than direct overhead lighting. Straight ahead, the hallway leads to a door at the far end. Look left and you’ll see two doors and a massive fire door that spans the entire hallway. Look to your immediate right there is a door as well. Head to the left hallway. As you move along the hallway, you may notice something on the right. Turn and you’ll see some status monitors with animated readouts and displays. Click on them. Sure enough, it seems that there is a serious lack of power in this place right now. On the wall opposite the monitors there’s a door with a red (locked) status light. You may also notice the metal duct running across the hallway. That’s the duct you just crawled through, so you can probably guess where the door with the green status light leads. Move to that door (and toward the huge door). If you give the door with the green status a try,you’ll hear and see that it’s jammed. Now you’ve got a prybar, though, so go ahead and pry open the door. You’ll be back in Medical, but now that the door isn’t stuck anymore you can come and go as you please. Head back into the hallway and click on the big door, then walk back to the bend in the hallway. The door on the right leads back to the Storage Room. Go through the door that’s straight ahead. Data archives (dark): There must be a power failure. The room is completely dark and you can’t go any further without some kind of light. Turn around and head back out to the hallway. L2 hallway: Turn right and follow the hallway to the door at the end. It won’t open at first, but you can use the prybar to open it up and move into the Elevator Shaft. Elevator shaft: Look upward and you’ll see that the elevator car is on the next floor up, so the only direction to go is downward. Look downward and the shaft descends into blackness. It looks like there might be something of interest along the side wall a short way down. Move toward the ladder and climb down one level. Look to the right and move off the ladder. Look to the left and there will be a control panel on the wall with 3 sliders. The top slider controls the lights above, the middle slider controls the lights by the control panel, and the bottom slider controls the lights below. For now, turn off the top slider by moving it all the way to the left. Set the bottom and middle sliders each to the halfway point (there’s not enough power right now for full activation of any slider). You can back out of the zoom at any time to see the effects of the current panel settings. Head back to the ladder and climb down one more level to the bottom of the elevator shaft. Move toward the doors. Use the prybar again to open them and move into the Service Corridor. Service corridor: Explore the length of the corridor here and pick up the key at the far end. It’s sitting on one of the cylinders. Since the other doors here are currently locked, head to the green-lit door near the elevator to enter Power Control. Power control: Move down the steps and look to the right and you’ll see a workbench and some kind of cabinet. Head over to it and pick up the B7R5 card from the workbench, then look in the box on the floor next to the workbench and take the stun baton. Like the drawers in Medical, the cabinets here have biometric locks and you cannot open them. You’ll have to make due with whatever you can find laying around. Walk around the room to the control panel next to the central power station. Open the panel at the bottom right of the station. If you turn the switch on and off, nothing happens. Looks like the battery must be dead. Click on the big dead battery to remove it. Another flash and more voices. This time one voice definitely escapes the cacophony toward the end. Clearly something has happened -- or is happening -- to you. Wasn’t there a battery in the Medscanner at the beginning? It wasn’t the same size as the black one, but maybe there’s a way to rig it up. Leave Power Control, turn right at the corridor and go back up the elevator shaft to the second level. With the slider settings that were used previously on the way down, you should have no trouble getting back up and through the 2nd floor doors of the elevator shaft without having to make any additional adjustments. Head back up to the hallway outside of Medical. Along the way, you can skip any of the movement transitions if you like by holding down <CTRL> when you click to move. (There’s also a setting in the Options screen to disable transitions altogether for adventure gamers who find the movement animations uncomfortable.) Medical: Go back to the Medscanner service panel where you saw the battery. Use the key on the lock, and then take the battery. Head back down to Power Control. Power control: If you haven’t already saved the game, this is probably a good time to hit <ESC> to access the main menu and click “Save Game”. Click on an empty save slot and you’ll be prompted to add a comment for the save file. Save files also include a screenshot of the current in-game view along with a time/date stamp. Go to the control console at the central power station. Open the panel where you pulled out the old battery. Place the battery from Medical on the left side of the compartment. Use the wire to finish rigging up the connections. (If you turned the switch off, you can now turn it back on and the console will turn on.) Once you zoom out of that view, the monitors on the station should be powered and working. Zoom in on the top row of monitors and click the button for “Conduit Access”. You can now remove the burned out power coil from the conduit. In order to close the circuit and restore power, use the prybar on the conduit. BLAM! After the cinematic plays, you’ll see that the power is back on and the room is now being fully lit by the dynamos beneath the floor. There’s a computerized voice coming over the PA system saying something about a technician needing to report to Central Computer Control. She certainly sounds a bit messed up. You can inspect the prybar and the console if you’d like. Look toward the stairs that lead back to the Service Corridor. To the left of the staircase is a Local Communication Terminal (LCT). You may have noticed it before. It’s working now that the power is back on. You can walk over andinteract with the LCT to cycle through a mix of voicemail and email messages – including one from someone named Zemith who mentions working up in Central Computer Control. Maybe he’s one of the technicians the PA system is talking about? Another one, from Vryse, mentions the prybar, and that it fell down a narrow vertical duct under ANNIE. And hey, wasn’t there another LCT up in Medical? Maybe you can get some more information from that. And now you’ve got a computer talking, so there’s got to be a way to find her somewhere... Head back into the Service Corridor. Service corridor: Now that you’ve restored power, the environment will look and act quite differently. You’ll also hear the computerized voice intermittently deliver status reports over the PA system. She’s got a lot to say, and not much of it sounds like good news. If you move along this corridor and look around a bit, you may also notice the machinery here will occasionally vent off coolant and cast sparks from the tops of the towers. Players will have a chance to learn about these machines and many other devices during the course of the game. The doors here still aren’t opening. If you look closely at the controls (or try using the keycard), you’ll find that none of them have keycard readers. Since the power is back on, perhaps the elevator will work and you won’t have to climb up and down the ladder any more. Then you could get to other floors as well. Why not give it a try? Elevator: It works! If the climb down the elevator shaft and the parked elevator car are any indication, then you’ve probably already been on level 2, but let’s see if that’s really the case. Plus, it’ll be a good chance to see if stuff in there has power now like the areas on Level 1. Click on the “2” on the control panel to take the elevator to level 2, and you’ll go on a short ride.(You might even notice that your cursor sinks briefly as the elevator starts, then rises back up a bit as it comes to a halt). Click on the door to exit. L2 hallway: Definitely brighter in here now that the main lighting fixtures are powered. Head toward Medical. As you head toward Medical, you may notice that the monitors on the wall have changed. Feel free to inspect them before entering Medical. Medical: As with the hallway, it seems like power is on now. Check out the LCT messages. Head to the computer terminal in the corner. Read/listen through the Medical Archives. Should we jot down any of those names and numbers? This is an adventure game, after all. ;) If you replace the reflector, you can also use the holoprojector here. Head out of Medical and go back down the hallway and go into the dark room again. Maybe it will be lit now. Data archives (dark): Hmm. Still dark. It didn’t have any lighting earlier, either. Maybe something else happened here and power isn’t getting through? For now, turn around and head back into the hallway and return to the Elevator. Elevator: Take the elevator up to Level 3. L3 hallway: This area seems to have a different structural form than levels 1 and 2. Turn right and go through the door. L3 storage: Another flash will occur with more voices as you enter here, and the voice at the end sounds considerably less comforting this time. Click on the handle of the bin on the lower shelf to slide it out, then take the B7R5 card. The holoprojector bulbs aren’t needed right now. Click on the bin handle again to push it back and then exit the zoom, (or just exit the zoom and it will be pushed back automatically). Head back into the hallway. L3 hallway: Continue up the hallway. Head past the intersection to the right turn and keep following the hallway. Try the door up on the right side and then take a close look at the door control. Looks like a keycard is needed. Try using the keycard from Medical. Try the fire door. Looks like there’s no way through here yet. Head back to the intersection. Walk down the side corridor with the two doors on opposite walls. Head through the door on the left. Colony communications: Explore. Check out the LCT messages. Pick up the URC from the console. If you activate the large holotable, you’ll see a view of the colony. But is this the proposed colony? Or is it the actual structures? Could you be in one of the buildings, or are you elsewhere? Hm! Go back into the hallway and then through the door on the opposite wall. Security: Each display here is wired up to a different system. One is for keycard encoding and management. That could be handy! Another one accesses the big video wall and camera systems, although most of them seem to be offline. The last is some kind of environmental hazard detection system (and seems to be reporting some troubling news). You can check out each of them and then when you’re ready, use the Keycard Management System. As the instructions on the screen say, simply use the existing keycard on the track to the right of the screen. Sure enough, the keycard found in Medical is encoded for Dr. Reitessa. According to the LCT messages down in Power Control, Zemith and Vryse have both recently done work in Central Computer Control. There was no Medical report for Vryse, but there was one for Zemith. Click the “no” symbol in lower right button on the keypad interface (or use the BACKSPACE key on your keyboard to clear the current record numbers; or click on the back arrow several times), then click (or type in) 58426 and Zemith’s record should appear. As with Dr. Reitessa, you can read about him if you like. When you’re ready to encode his ID onto the keycard, click the “encode” button on the interface, then use the keycard on the track. To confirm that the card is encoded correctly, you can examine it in the inventory screen or swipe the card again and the reader will display the currently encoded identity. Exit the keycard screen and then zoom in on the chassis on the left side of the control station. Click to open the top panel and then take the G4L1 card out of the socket, then back out of the zoom. The video wall and two of the three security control systems will shut down. You can also check out the LCT in here, and some of the other objects if you’d like. When you’re ready, head back into the hallway. L3 hallway: Go back to the only door on this level that has a keycard reader. Use the newly-recoded keycard on the door control to unlock it, then click to go inside. Central computer control: Access the LCT, then enter the big room. ANNIE speaks up as you enter. Click on the monitor on the central pillar. It looks like she’s offline. Click the button to enter maintenance mode. Exit the screen and look around. The machines that rose up from the floor have status lights that match the monitor screen (3 are red, 1 is green). Go to each of the red machines and open the drawer. Inside are a series of boards, one of which is burned out. Click on the burned out board to remove it, and then use the corresponding replacement board from your inventory to replace it. Once the new board is in place, click the button in front of it to change the color of the symbol in the hologram so that it’s different from all the others. [The goal colors are also in order of decreasing wavelength, which is also the order of the rainbow: Red, Orange, Yellow, Green, Blue, Violet.] When successfully configured, you’ll be able to see the status lights of each machine switch from red to green when you’ve backed out of the zoom. (You can also view the status of all four machines at once by zooming into the monitor on the central pillar.) Once all four machines are green, use the monitor on the central pillar to Initiate Startup. Act Two Welcome to Act 2! You’ve now met ANNIE and even though she’s still pretty messed up, at least she’s starting to pull herself together. If you look at the big monitor near the exit, you’ll see that it’s now active. If you click on the screen, you’ll see an animated display of how much of ANNIE’s neural network is online and functional. Currently, it’s 21% operational, which is probably why she often stutters, distorts, and generally sounds quite robotic, although this is already a considerable improvement over the general status messages barking over the PA before she was restarted. She asked for help with an area down on Level 2, so head out and take the elevator down to Level 2 and go into the one room that’s accessible but still dark. Once you enter, ANNIE will make some interesting observations and... Data archives (dark): Okay, so you’re a robot! Well, that’s one mystery solved, isn’t it? Not only that, but you’ve got a shiny new interface. First, follow the objective and right-click to access your new inventory/UI system. There’s a tab for all your inventory items (including an area where you can drag items to wear them), a tab for voicemails, another for emails, and even one for ANNIE messages. Observant players may also notice that there’s another tab that’s not yet online yet. Hmm! You might also notice that every email and voicemail you’ve seen or heard has automatically been logged and stored for easy access. Click on any icon to toggle playback of a voicemail or message, or to read an email. Once you feel comfortable with the updated UI, right-click to go back to the view of the room and ANNIE will impart you with another gift... The room may not have power, but now you don’t need it because of your enhanced vision (e-viz). You can toggle e-viz on anytime with the <F2> key. Try it out and explore the room! When you get to the far end of the room, ANNIE will provide an update of what she thinks is wrong. Apparently there’s a power substation below that can be activated and the power can then be re-routed to arrive here, and your objectives screen should update accordingly. If you haven’t already found it before leaving Data Archives, go to the middle of the room and click on the rolltop of the machines next to the walkway. One of them will open to reveal an inner control area with a portable diagnostic computer. Click on the connector at the end of the cable to unplug the machine and take it with you. This is a BELOS (Basic Engineering Language Operating System) computer. Notice the shape of the socket; there may be other places where this socket appears where it could be connected and used. When you’re ready, head back into the hallway. For an extra bit of fun, you can leave e-viz on if you like and see what happens when you move into a well-lit room. Once you’ve toggled e-viz off and things are back to normal, make your way to the elevator and head down to Level 1. On the way, ANNIE will connect with you via a radio uplink. Now she won’t be blaring over the entire PA system just to contact you. Since the link is bi-directional, she’ll also be able to react to what you see and do and can offer helpful feedback. L1 hallway: When you exit the elevator, move up the hallway to the doors that ANNIE has now managed to unlock for you. You can proceed as you like, but for the purposes of this walkthrough, go to the door that’s halfway down the corridor on the right, and then click on it to enter a new area. Skyway: You may recognize this area -- albeit from a different viewpoint -- from the video wall in Security. If you walk forward, you see that half the Skyway is lit and the other half is not. If you walk to the dark end, the door won’t open because there’s no power. Look closely at the station in the middle of the Skyway and you’ll see a BELOS port. Use BELOS on the port to hook it up, then click on the screen. BELOS is controlled via the keyboard, a bit like old-school text adventures. Simply type in commands and then hit <ENTER>. The display shows some information about this particular station and available commands, so type HELP and hit <ENTER>. Since we want to turn the power on, and the system indicated a power anomaly at P504, type in ACTIVATE P504 and then hit <ENTER>. The crackling of electricity sounds interesting, if a little disconcerting. Type QUIT and hit <ENTER> to leave the BELOS screen. Looking around, it’s nice to see that the hallway is now fully lit and the door at what used to be the dark end now has a green light. Unfortunately, if you look down, you’ll see that there’s electricity arcing through the puddle of coolant or other fluid that’s on the floor here, so there’s no way to reach the door like this. Click on BELOS again. And type OPEN D21 <ENTER> to remotely open the far door, then type DEACTIVATE P504 <ENTER> to turn off the power. Once again, QUIT <ENTER> will get you out of the BELOS screen. No more electricity arcing and although half the Skyway is still dark, the door is open. Head through the door. Manufacturing (dark): It’s dark here, but that’s not a problem. Hit <F2> to activate e-viz and have a look around. Objectives will update to find a way to get power to this room. (Remember you can toggle the display of the current objective with either the <TAB> or <F3> keys.) Move toward the elevator and take the board that is leaning against the column. It’s one of the wall panels and is fully insulated. Head back to Skyway. Skyway: Go to the middle of Skyway again and use the board on the puddle. Click on the BELOS screen and enter ACTIVATE P504 <ENTER> to restore power. With the insulated board covering the puddle, you can traverse the hallway freely. Click on the BELOS connector to disconnect it from the socket here and take it with you. It might come in handy again later! Go through the door to Manufacturing where you picked up the board. Manufacturing (lit): Now that power is on in here, the Objectives will update to remind you that you need to get the power subsystem in here working. There are two workstation screens that are active in here right now. If you move to the middle of the room and face the lit screens, Factory Power is on the left and Factory Waste is on the right. Accessing the Factory Power screen shows that there is an issue with the waste lines, so click on the Factory Waste screen. The diagram shows two red indicators: line 3 and pipe B. Looks like those will have to be fixed before the power can be started up. There’s also the word ALERT in the bottom left of the screen. What’s that about? Click on it and you’ll find an interesting message between co-workers. If you’d like, you can try the elevator. In fact, judging from the removed wall panel and the exposed wiring and materials there, it looks like someone else may have been trying to get it to work... Since there’s no other way out of here right now, head back through Skyway and into the Service Corridor. Service corridor: After you come through the door from Skyway, turn right and move to the end of the corridor. Look to the left and you’ll see that the last door here has a green status light and is accessible. Head inside. Waste processing: Move down the steps and check out the LCT, then move forward to the workstations. Examine the screen of the workstation on the left and you’ll see an indication of the pipe B issue: The valve is closed and needs to be open, but it needs to be done manually. Head out through the side door onto the catwalk. Turn right and move onto the lift, then press the button to ride down to the lower level platform. At the bottom, move forward to the pipes on the wall and look closely to see pipes A, B, and C. Right-click and go into inventory. Click on the shard, then click on the broken stun baton to unscrew and remove the plates. Then use the shard or the stylus on the stun baton to remove the burned out power core. Now use the stun baton with the square hole on the bolt for pipe B. Once it’s in place, clickand-drag to rotate the stun baton until the valve indicator is horizontal (i.e. open). Back out of the zoom by moving the mouse toward the bottom of the screen. Return to the lift and press the button to go back up. If you’d like, you can explore the catwalk and travel around part of the Waste Processing area. When you’re ready to continue, re-enter the control room. Click on the workstation monitor again. If A, B, and C are all green now, click the “Process Waste” button. Head back to the Service Corridor. Service corridor: Turn around and look to the left of the stairs that lead to Waste Processing. Pull the lever and the signal light will change from yellow to green. Move to the middle of the corridor, then go through Skyway and back into Manufacturing. Manufacturing: Go into the Factory Waste screen and all the indicators should be green. Click the “Activate” button to clear all the lines and send the contents to Waste Processing. Now go into the Factory Power screen. The power issue appears to require a manual startup due to some damage, so click the button and you’ll be taken to a screen with a list of subsystems and a series of power feeds. Each subsystem requires a particular load at startup and then a sustained load. The graphs for each subsystem illustrate how the power cycle works for each particular system. Material Distros, for example, requires a massive amount of initial power, which tapers down to a relatively low sustained load. Assembly Systems, by comparison, requires the same load at startup and when sustained. To assign the different subsystems to the available power feeds, click and drag on the solid-colored square swatches to one of the power conduits. Overloading a line will reset the puzzle. There are several solutions to this puzzle. Here’s one way to do it: Conveyor System (yellow) to A. Once it settles, move to C. Molecular Lattice (light green) to A. Once it settles, move to C in the available gap. Material Distros (orange) to A. Once it settles, move to B. Cleanup Controllers (purple) to A. Once it settles, move to B in the available gap. Nanolathe Controller (turquoise) to A. Assembly Systems (blue) to the available gap in A. Once you’ve succeeded in assigning all subsystems to the available power feeds, a confirmation message and a “Startup” button will appear. Click it and then exit the screen. ANNIE will congratulate you, but it sounds like she’ll need some help getting into Data Archives. If you haven’t already checked out the LCT in here, you may want to have a look and listen on your way out. Then, head back through Skyway and into the Service Corridor, then take the elevator up to Level 2 and go into Data Archives. Data archives (lit): Thanks to your efforts, Data Archives is now lit and operational! Head to the far end where the control console and the big monitor are located. If you examine the console controls, you’ll see that there’s a malfunction, so you’ll need to find another way to access the archives. Just below the console display, you may notice a HAC interface socket. If that sounds familiar, it’s probably because you may have noticed the HAC chip in your inventory. If you look at your inventory screen and hover over the HAC chip, the description text includes “POWER SYSTEMS” as a known keyword. Since the archives need to be aligned, move back to the middle of the room and open the roll top where the BELOS system was originally found. Reconnect it to the socket. Now that the room is powered, click on the screen and you’ll be able to access and align the archives. As with the Skyway, you can type HELP <ENTER> for a list of commands. To obtain the alignment address, type LOOKUP POWER SYSTEMS<ENTER>. Next, use the supplied address to align the archives by entering LOAD 2-702-30<ENTER>. Once you receive confirmation that the archives are aligned, move back to the console with the HAC socket. The HAC chip is not like other inventory items. Most of the time, you can activate it simply by hovering over a particular object or connector. Hover over the connector to use the HAC chip on the socket and take a ride into the holographic digital world of the archives! Holographic data archives: To find the schematic, head up to the top of the tower. You’ll see an article with “SCHEMATIC” and the description “Engineering schematic detected, Parser unavailable.” Click on it. You can’t process all the schematic data, but ANNIE can see through you and she’ll be able to receive all the data. Once ANNIE reads the schematic, she’ll also be able to alter the programming in your HAC chip, which will unlock the ability to download camera buffers. You might recall one of Zemith’s voicemails describing the camera system and the buffers. With this new skill, you can now begin to piece together the events that occurred after the main systems went offline. Before you leave the tower, you can scan through some of the other articles if you’d like to learn about some of the power system technologies used on the mission. There are 3 that can be found in this particular tower. When you’re ready to leave, look downward while on the bottom level of the tower and click on the platform to return to your body in the Data Archives room. You’ll see a new tab in the UI for “Cameras” which will store all the camera buffers that you download, like the tabs for “Voicemails” and “Emails”. Now, if you’d like, you can go back into any room that has a camera and download it and listen to what happened there. If you go to Medical, for example, listening to the camera buffer will give you a glimpse into what the data in the holoprojector is all about. You may even hear and recognize the holoprojector operational sounds in the playback of the camera buffer. Other cameras can be downloaded as well. Not all of them have contents in the buffer, but most of them do. Using the time stamps on the emails, voicemails, and cameras, you can even begin to assemble a timeline of the recorded events. Also, as you explore the game and learn more about the mission and the Letarri, you can return to Data Archives and try looking up different words with the “LOOKUP” command through BELOS. This will unlock additional towers that you can explore, which will have more details about the mission and their world. When you’re ready to continue, disconnect BELOS from the terminal so that it goes back into your inventory, and then head up to Security. Security: Right-click to go into the inventory screen, the look at the camera next to the door to activate your HAC chip and download the camera buffer. Go to the console with the monitor that’s still active and you’ll see that it shows a fire alert. Listen to the camera buffer from this room and you’ll hear two crewmembers reacting to what sounds like some serious trouble. You’ll also hear one of them mention the override code: 6649. Enter it on the console and then click “CONTINUE” to deactivate the fire alert. Leave Security and go left, and then turn left again at the T-junction. Go around the corner and you’ll see that the large fire door now has a green light overhead instead of the red (locked) light. Head over and click on the door to go to the next area... Note: At this point, you’re about halfway through the game. Now that you’ve seen and learned much about the game and the core gameplay, you’re welcome to continue the adventure on your own, or you can turn the page and proceed with the walkthrough. Act Three Congratulations! You’ve made it to Act 3. Hydroponics: Upon entering the new area, which looks to be a hydroponics farm, two things have become clear: you’re in space (and presumably on the colony ship), and (more distressingly) that this ship is heading toward the star at the center of the New Letarr system. Take a look around and you’ll notice the large domed hydroponic farm dominating the center of the area. Outside the window to your right is the emptiness of space. On the catwalk leading around the room are a variety of machines. Also nearby you will see an LCT terminal. Click on it and read through the logs. Then look above the LCT and you’ll see a camera above. Hover over it to download the two camera logs. Go into your interface to listen to them. Interesting! Head along the catwalk to your right. Once you reach the end of the catwalk in this direction, you’ll notice a ladder. Click on it to move down to the lower level. Once you step off the ladder, head to the left, towards a squat piece of machinery. Looking down at it, you’ll see a rectangular service access panel. Use the key from your inventory to open it, and then click on a yellow power core inside the panel to remove it. If the term “power core” sounds familiar to you, it might be because you removed a burnt-out power core from the stun baton that you found in Power Control. You will find that, by inserting this working power core into the disassembled stun baton, and then replacing the charge plates that you can make a working stun baton. Awesome! But what is it good for? Well, more on that later... Continue to walk down the lower level catwalk past the large window to your right, until youreach the end of the walkway. Here, you will find another piece of machinery, this time with an open panel and a BELOS plug wired into it. This must be where Teleda was hacking into the controls to alter the gravity in the Cafeteria.... but where is the Cafeteria? Head back to the ladder and back up to the upper level. Work your way around the catwalk to the door on the far side. Click on this door to enter the Cafeteria. Cafeteria: Clearly, with all the debris in this room, a massive explosion happened here. The elevator is here, but with all the debris inside it, you aren’t able to use it. The explosion also cracked the front window. There must be a way to clear the elevator of debris, or get into the elevator shaft from a lower level. This elevator shaft here is connected to the Manufacturing area (the room with the open wall panel next to the elevator). Head back through Hydroponics, follow the corridor to the elevator, and take the elevator down to the first floor. Exit and head to the door on the right, follow the Skyway into Manufacturing. Manufacturing: Once you’ve made it here, head to the elevator. Above the elevator is a camera. Use your ability to access cameras by hovering the cursor over it and downloading the camera buffer. Listen to the recording to discover an interesting fact about the elevators... electrical discharges will automatically open the doors in an emergency. Use the stun baton on the elevator door to open it. You will now be inside the elevator shaft. Looking up, you’ll see the ladder has broken above you, so make your way down the ladder instead. Once at the bottom, head to the elevator shaft door. As before, use the stun baton on the door to open it. Cargo: You are now inside Cargo. Head forward to the box sitting on the catwalk. Face it and click on the top to open it, then click on the contents inside to retrieve one of them... and a cutscene will play. It appears as though YOU are complicit in the sabotage! ANNIE however seems to think you had been reprogrammed to do what you did, and is still willing to work with you to save the mission. You have retrieved a wrapped seismic charge from the box, so now you can head back to the door you came through and head back up the elevator shaft to Manufacturing. Once in Manufacturing, head back through the Skyway, to the Service Corridor and into the working elevator. Take this elevator up to the third floor, and then head down the hallway, through Hydroponics and back in the Cafeteria. Cafeteria: Once back in the Cafeteria, you will notice that the window is cracked. It is possible that an explosion at that point would blow out the window and decompress the room, potentially clearing the debris. You now have the seismic charge, but if you read the description for it in your player UI, you know that it requires an electrical charge to detonate. The stun baton discharges an electrical charge, so use the shard to cut open the wrapped seismic charge. Then take the seismic charge and attach it onto the end of the stun baton. Now you have what is essentially a bomb. Unfortunately, the bomb will only work if you squeeze the trigger, which would result in your demise. Clearly, That's not going to work. But the stun baton does have a socket at the end for a remote connector to be attached, and you have a URC in your inventory that you picked up in Colony Communications. Examine the URC in your inventory and you’ll notice the numbers “2250” on the side. Attach the URC to the end of the stun baton, and now you have an explosive device that can be remotely triggered. Much better! Zoom into the view of the window where the crack is, and place the on the shelf by the crack. (For extra laughs, try clicking the stun baton trigger a few times after you’ve placed it on the shelf.) When you’re ready, head out of the Cafeteria, and back towards Colony Communications. Colony communications: Go to the far side of the room by the three consoles. The middle console is a signal generator. Set the frequency to 2250 (the number from the side of the URC), then hit TRANSMIT. ANNIE stops you from detonating the bomb because she’s calculated that the decompressionalone won’t be enough to eject the debris from the Cafeteria. She suggests trying to reduce the weight of the debris. Hm! Wasn’t Teleda working in Hydroponics to turn off the gravity in the Cafeteria in the hopes of using zero-g to clear the elevator debris? Head to Hydroponics. Hydroponics: Head to the ladder to go to the lower floor. Once there, walk along the walkway past the large windows until you’re in front of the machinery that has the BELOS connector wired into it. Plug in the BELOS terminal and type “HELP” to get a list of available commands. “FLOATCAFE” seems to be the one to use, so type it in and hit <ENTER>. Once you do this, you’ll hear the door to the Cafeteria automatically locking as the gravity turns off. Then type “EXIT” and hit <ENTER> to exit the BELOS screen. With this complete, head back to Colony Communications. Colony communications: Return to the signal generator console and input 2250 once again and hit TRANSMIT to see the results of your efforts. Wow! The explosion has cleared the debris, and after a few moments, ANNIE activates the shutters to seal the breach and re-pressurizes the Cafeteria. Well, now it’s time to go forward to the Cafeteria and find out where the elevator can take us! But first, ANNIE informs us that because of the explosion, the ship has changed its orientation, and the antenna is now picking up a faint signal. She suggests using the antenna array controls in Communications. Since we’re already here, let’s do that! The leftmost terminal in the bank of three consoles is the antenna array controls. Use the controls on the bottom of the screen to adjust the pitch and heading of the antenna dish. As you get closer to the correct position, the static will clear and the transmission will become clearer. Once you get to the correct positions for both pitch and heading, ANNIE will begin downloading the message to decrypt it, and the screen will reveal details about the message. (The correct positions are approximately 60 for both pitch and heading). So THAT’s where the crew went! They left in shuttles to New Letarr’s surface, but they’re in serious trouble. Looks like it’s up to you and ANNIE to get them the supplies they need... one way or another. With the transmission complete, you can now head to Hydroponics. Hydroponics: Head down to the lower level and head to where you plugged in the BELOS system. Using the terminal, type in the command to restore the gravity to the Cafeteria: “RESTORECAFE” <ENTER>. You should hear the door unlock. Type “EXIT” and hit <ENTER> to leave the terminal screen. Grab the BELOS terminal before you head back up the ladder and head into the Cafeteria. Cafeteria: Well, THIS looks a lot better. The emergency shutter has closed over the hole in the window. The debris is cleared and the elevator looks available for use. Head into the elevator. On the panel showing the floors available, notice that you have 4 floors denoted by the numbers one through four, and then the lowest level is named “CL”. The door at the bottom of this elevator shaft led to Cargo, so the “CL” is most likely “Cargo Level”. Since you climbed down the elevator shaft one level from the elevator opening in Manufacturing, that’s level “1”. The elevator shows we’re on level “3” right now, so that leaves levels 2 and 4 to explore. Click “2” to head down to level 2 first and then click on the door to exit into the Hangar. Hangar: Inside the Hangar, turn to your right and look up to get the log from the camera on the wall by the elevator door. Then, make your way down the corridor to the right of the stairway heading to the upper level. Continue forward once more to the open space where the shuttles are. Well, where they are supposed to be. ANNIE tells you that the shuttles have been launched and that you should head up to the elevator to the fourth floor to find the Bridge. Before that, though, explore the Hangar. You’ll find a fire door on the top level that’s locked, as well as crane controls. Heading back down the staircase, head to the door you walked past to get to the shuttle area. This leads to.... Hangar control: The Hangar Control room! Inside this room are all the controls for launching and tracking active shuttles. Immediately after entering, checking out the LCT on the wall to your left. And then head to the sparking camera on the wall opposite the door. From the logs, you’ll learn that Alavaji apparently stayed behind to try to fix the ship. Head to the back of the room and look down and to your left to find the pair of magnetic boots. Pick them up, and then head out of the room. You can explore the rest of the Hangar if you wish. (We might come back later, depending on how you choose to proceed in the final stages of the game.) When you’re ready, head back into the elevator. Click ‘4’ to head to the fourth floor. Bridge Foyer: Stepping out of the elevator, first look up and to the left to get the log from the camera. Sounds like someone else besides Alavaji didn’t want to leave as well! Turn around and try the door. ANNIE informs you that the door to the Bridge is locked down with voice recognition, and you’ll need a voiceprint to get inside. Head back into the elevator and head down to level 3. Walk through the Cafeteria and into Hydroponics. Once in Hydroponics, turn to the right and head down the walkway. At the L corner, look down to see the open air vent cover. Climb into the duct and through the vent to get into the Habitat Silo. Habitat silo: The habitat silo has no gravity, so you’re floating out in the middle of the top of the silo. Go into your inventory and drag the magnetic boots onto the WEAR icon, and you’ll be able to stand on the wall by the airvent exit. Since there’s no gravity here, you can use the boots to walk down the side of the silo wall until you reach the umbilical connector (the contraption with the yellow lights). Hover over it like you would with one of the cameras and your HAC chip will pick up another buffered log from the moment when the explosions happened. When you’re ready, head back up to the airvent exit, crawl back through the airvent and into Hydroponics again. From there, head to the fire door to your right, pass through it into the corridor beyond, and make your way to Colony Communications. Colony communications: Once inside Comms, head to the three consoles on the far side of the room. ANNIE has loaded up the rightmost one with the senior crew members who have access to the Bridge and their target voiceprints. There are also, for each one, a series of voice slices that could be used to generate the voiceprint we need. Alavaji and ren Talove don’t have enough to work with, but there should be a full set for ren Keterek. (If ANNIE warns you that you don’t have what you need, you are missing some. Head back to the cameras you may have missed. You will need the cameras from Hydroponics, Hangar, Hangar Control Room, and the umbilical in Habitat Silo to make the voiceprint.) Assemble the voiceprint by dragging each slice so that it matches up to the target waveform and hit CONFIRM. If you’ve done it right, ANNIE will inform you that you now have the appropriate voiceprint to get into the Bridge. So let’s head back up there! Bridge foyer: In the Bridge Foyer, click the lock on the door to automatically play the voiceprint and unlock the door. Then click on the door to go into the Bridge. Bridge: Wow, bright! Once ANNIE adjusts a few things, you can see but its still quite bright. The sun is getting awfully big in the windows. Before you go anywhere, look up and to the left of the door you just entered through to pick up a log from the camera there. Then turn back to the main console by the window. If you click on the center console, you’ll see a screen similar to the LCT screens, and you can find Alavaji’s transmission logs there. Just beneath the screen is an orange security card: Alavaji’s master keycard. Click it to pick it up. This is a high level security card; it should open anything that has a card lock on it. Continue to explore this room and when you are ready, leave through the door. ANNIE will make a recommendation about getting the factory online. It’s time to head down to Power Control. Once you get there, make your way to the back of the room. The door there leads into Propulsion Control. Use your high-level engineer’s master keycard to unlock the door. Propulsion control: Inside Propulsion Control, you’ll see an LCT directly ahead. Walk to it and you may notice a locker to the right with a hazard suit inside. Check out the logs in the LCT, and you’ll find that the lock on the hazmat suit locker has been programmed with Raphe Secarra’s birthday. You could go back up to Security to get his birthday from the Security console, but you disabled that equipment when you pulled the G4L1 card out of it to help repair ANNIE. Hm! Also in the room is a Propulsion Control panel, but without more power from the Core, it won’t work. Head back to the corner of the room with the two doors at right angles to each other, and go through the left one into the Core Control Room. Core control room: What a mess! This room, like the Cafeteria, has seen better days. Look up and to your right to get the log from the camera there. Listen and you’ll hear yet again that crucial moment went everything went awry, this time from Alavaji and Harije’s post here in Core Control. Next, head to the door on the far side. Click on the door and you’ll find that in order for the door to unlock, you’ll need a hazmat suit on. Turn around and look down to find a usable G4L1 card amidst the rubble. Aha! We can use this to find Raphe’s birthday. Head back out the door you came in and head back to Security on the third floor. Security: Once inside Security, head to the console. Click on the box to the left of the terminal. Open the cover and insert the G4L1 card you found in Core Control into the slot. The system will power up again. Go into your UI and bring up Reitessa’s medical report for R. Secarra to get his ID number, and then enter it into the Security workstation. His security record will appear including his birth date. That five digit code will be used to open the door to the hazmat locker in Propulsion Control. So let’s get down there! Propulsion Control: Back in Propulsion Control, head to the locker and click on the keypad to the right of the locker door. Input the five digit code and the door should unlock. Exit the zoom and click on the door to open the locker. Click on the hazard suit to pick it up. Go into your inventory and wear the suit by dropping it onto the WEAR icon where the magnetic boots are. Once you change into the suit, you’ll notice that your view is restricted slightly by the helmet. Now, head back through the wreckage of Core Control to the door that leads to the Core and click on it. This time, the door should open and you’ll enter the Core. Core: Inside the Core, things are bad. Even with the haz suit, there’s so much radiation that your optical sensors are malfunctioning and you’re effectively blind. Eviz doesn’t help much in this situation, but fortunately, you’ve restored and repaired ANNIE well enough that she can direct you verbally. Listen for her instructions about what which way to turn and when to proceed forward. Once you get to a certain point, you will be near a console and can click on it, which will (re-) activate the core containment field. Much better! Now you can actually see the full layout of the Core. Explore around a bit. Once you are through, it’s time to head back to Power Control. Note: If you want to play through both endings of the game, this is a good spot to save the game. Power control: Back in Power Control, head to your left after going down the steps and you’ll be at the Power Allocation console. Swipe your engineer’s master keycard to access the allocation system. Now that the Core is providing more power, we can allocate power to various parts of the ship. There are two profiles loaded that have enough energy from the Core to work: ANNIE’s profile provides the necessary power for building a shuttle to escape. Alavaji’s profile is from his attempt at fixing the ship. Once the choice is made, it cannot be changed. Choose one of the profiles and then move the highlighted sliders all the way up to the “FULL” setting. When everything is set, click EXECUTE. If you pick ANNIE’s shuttle profile, continue the walkthrough using Act IV A (page 28). If you pick Alavaji’s fix the ship profile, continue with Act IV B (page 32). Act Four Choice A: Build a shuttle Now that you’ve activated ANNIE’s profile in the Power Allocation screen, the factory now has full power and you can work on building yourself a shuttle to escape the doomed Laeril. ANNIE will inform you that in order to use the factory, you’ll need to load the console in Manufacturing with blueprints from Data Archives. To do this, she provides a new keyword: “SPACECRAFT”. So let’s head back up to Data Archives. Data archives: Like before, use the BelOS terminal on the connector in the console near the center of the room. Type in “LOOKUP SPACECRAFT” and hit <ENTER> to get the address for the data tower. Then use the “LOAD” command with the address to realign the archives so that you can access it. Once the archives are aligned, leave the BelOS terminal and enter the archives at the end of the room by looking at the HAC interface. This will bring you into the Data Archive Tower. Data archive tower: Inside the tower, you’ll need to find three blueprints. Two of them are on the first level of the tower; the other one is one the top level. Enter each article so that ANNIE can see them through your optics. She will store a copy and send it to the manufacturing terminal. Once you get all three, she will then direct you to go to Manufacturing to build yourself a shuttle. Leave the tower through the bottom of the lowest level and then make your way through the ship to Manufacturing. Manufacturing: Head to the far side of the room, by the elevator. Facing the elevator, look to the left and you’ll be able to access the Fabrication terminal. Click on it to enter the interface. ANNIE has already loaded the blueprints. The setup for the first one is shown in the upper right corner, and indicates how the factory should be configured in order to build the first part of the shuttle. The fabrication process begins when you hit the SIMULATE button. One raw resource will appear at each of the node to the right of the labels A, B, and C. They will travel along the conveyor pieces that you place on the grid. A piece will travel for 2 seconds along a straight conveyence and only 1 second along a curve. One or more pieces can also be processed in the stations (A, B, C, and D). Resources must arrive at stations at the same time. They process for a certain number of seconds (indicated on the combiner) and then exit the right side of the station as a new material to continue along the conveyence. The final result must arrive at the green exit marker on the grid. The solutions to each blueprint template are as follows (other solutions do exist):
Once you are done, ANNIE lets you know that the shuttle is being moved up to the Hangar. Make your way up there using the elevator. Hangar: Once you are in the Hangar, turn to the right and head forward on the ground floor. You’ll see the shuttle waiting for you. ANNIE mentioned that in order for the shuttle to aid the colonists, it needs to have the supplies on the hangar bay floor loaded onto it. Before you board the shuttle, turn around and head back toward the elevator and then turn right and walk up the stairs. Follow the walkway along the wall, past the large fire door to your left and then turn right. Move forward, make another right, and you’ll be in front of the cargo crane controls. Click on it to load the cargo onto the shuttle. Return to the front of the shuttle and climb aboard. Okay, all ready to go. Click on the console to launch the shuttle and... there’s something wrong! Teleda had mentioned something in her logs about the shuttles not having working navigation modules, and it looks like the issue wasn’t resolved in these blueprints. You’ll need to find another nav module. ANNIE mentions that there is one in Research. She also suggests getting into Research by going outside the ship through Waste Processing. Make your way to Waste Processing. Waste processing: Walk down the staircase and toward the bank of consoles. The rightmost one controls the disposal of waste tanks. If you activate it, you’ll notice that the full waste tank in the chute launches off and then another one takes its place. In order to use that chute, you’ll have to come up with a way to stop a new tank from entering the chute. To do this, you’ll need to take a closer look at the mechanism there. Head out of the control room and make a left, and then follow the walkway around the room until you get to the chute. You’ll see the tanks lined up, and a conveyor track that guides each tank into the chute. Look closely and you’ll notice that the track itself is covered by a safety shield. A card reader is there to retract the shield for maintenance or in case of a jam. Use Alavaji’s master keycard on the card reader. Next, use the shard on the conveyor track to jam it. Once the shard is in place, head back to the control room and use the console there once more. This time, the barrel in the chute will launch, but nothing will replace it, leaving the chute open for you to enter. Head back to the chute, and go down into the tube. You’ll need to drag the hazard suit onto the WEAR icon once more -- not because you need to breathe, but because the radiation this close to the sun is likely to fry some delicate circuitry. Once you’ve suited up, move through the first door into the airlock, then look to the left and pull the manual control lever. The airlock will be activated, and you’ll slowly make your way over to.... Research: Inside Research, you’ll need to activate your eviz by hitting <F2>. Looking around, it’s pretty clear that an explosion blasted a hole in the side of the hull here. Head forward and down the stairs to the flickering LCT, look up to see the camera and download the log here. Then head back up the stairs and make a left. Move forward and look to your right. The first probe launch tube was once where the hole in the hull now resides, but the second probe launch tube is intact. Click on it to open it and access the probe. Click on the outer shell of the probe to slide open the top, and then click on the navigation module to retrieve it. Once you have it, head back to Waste Processing, remove the hazard suit, and then continue onwards to the Hangar and into the shuttle. Shuttle: Once in the shuttle, use the nav module on the middle console, and ANNIE will let you know that you can launch when ready. Click the flight console, and you’ll launch the shuttle, escape the Laeril, and bring much-needed supplies to the colony. Congratulations! You made it to the end of Prominence! Act Four Choice B: Fix the ship Although ANNIE has warned you about the potential dangers of this path, she is still willing to help you. Now that you’ve activated Alavaji’s profile in the Power Allocation screen, you can activate the engines in Propulsion Control. Go back up the steps and through the door into Propulsion Control. Propulsion control: Turn to your left and move to the console there. Click on the screen and you’ll now be able to energize the engines. Move the sliders up to full for each engine. It’s going to take a lot of power to escape the pull of the sun! Once this is done, ANNIE will advise that you get Hydroponics online before heading to New Letarr to rescue the colonists. While the factory can churn out materials quickly ready with all its supplies and machinery, Hydroponics isn’t operational yet and food takes time to grow. We can help the colonists out by getting Hydroponics up and running. To do this, we’ll need to find CO2 cartridges from atmoscrubbers around the ship, and two ofthem should be enough to provide the gas needed to get the plants growing. Exit Power Control and take the elevator up to the third floor. Once you leave the elevator, head to Security. Security: Behind the chair at the console is an atmoscrubber with a red light. Click on the panel on the central part of the unit and it will open. Click on the CO2 cartridge to add it to your inventory. L3 hallway: Leave Security and head down the corridor towards Hydroponics. At the end of the corridor, by the fire door, turn to your left to find another atmoscrubber with a red light. Again, click on it to open the panel, and then click on the CO2 cartridge to retrieve it. Then go through the fire door into Hydroponics. Hydroponics: Once inside Hydroponics, move forward once and turn to your left. You will see a terminal and two large vats with receptacles mounted on them. Insert first CO2 cartridge into one of the receptacles, then turn and use the second CO2 cartridge on the other receptacle. Once both are in position, click on the terminal screen. Rotate the two dials so that they point upward toward the leaf symbols to unlock and activate the cartridges. Once you have finished this, Hydroponics is now online. Great! ANNIE now tells you to head to the Bridge, so that she can help you plot a course to New Letarr. Bridge: Back on the Bridge, though, clicking on the main console by the window reveals a problem. The navigational module is burned out, apparently, and needs replacement. Teleda had mentioned something in her logs about the shuttles not having working navigation modules as well. You’ll need to find a replacement. ANNIE mentions that there is one in Research. She also suggests getting into Research by going outside the ship through Waste Processing. Make your way to Waste Processing. The easiest way to get there is to take the elevator in the Bridge Foyer down to level 1, then walk through Manufacturing and Skyway, then turn right once you arrive in the Service Corridor. The door at the end leads to Waste Processing. Waste processing: Walk down the staircase and toward the bank of consoles. The rightmost one controls the disposal of waste tanks. If you activate it, you’ll notice that the full waste tank in the chute launches off and then another one takes its place. In order to use that chute, you’ll have to come up with a way to stop a new tank from entering the chute. To do this, you’ll need to take a closer look at the mechanism there. Head out of the control room and make a left, and then follow the walkway around the room until you get to the chute. You’ll see the tanks lined up, and a conveyor track that guides each tank into the chute. Look closely and you’ll notice that the track itself is covered by a safety shield. A card reader is there to retract the shield for maintenance or in case of a jam. Use Alavaji’s master keycard on the card reader. Next, use the shard on the conveyor track to jam it. Once the shard is in place, head back to the control room and use the console there once more. This time, the barrel in the chute will launch, but nothing will replace it, leaving the chute open for you to enter. Head back to the chute, and go down into the tube. You’ll need to drag the hazard suit onto the WEAR icon once more -- not because you need to breathe, but because the radiation this close to the sun is likely to fry some delicate circuitry. Once you’ve suited up, move through the first door into the airlock, then look to the left and pull the manual control lever. The airlock will be activated, and you’ll slowly make your way over to.... Research: Inside Research, you’ll need to activate your eviz by hitting <F2>. Looking around, it’s pretty clear that an explosion blasted a hole in the side of the hull here. Head forward and down the stairs to the flickering LCT, look up to see the camera and download the log here. Then head back up the stairs and make a left. Move forward and look to your right. The first probe launch tube was once where the hole in the hull now resides, but the second probe launch tube is intact. Click on it to open it and access the probe. Click on the outer shell of the probe to slide open the top, and then click on the navigation module to retrieve it. Once you have it, head back to Waste Processing, remove the hazard suit, and then continue onwards to the Bridge. Bridge: Head to the small console on the right side and plug the nav module into the top. Once it is in place, click on the main console at the front of the Bridge to begin the trip to New Letarr. All looks good, except... it seems like there is a problem with the HAC chip in the navigation console. Turn back to the nav console and click on the lower panel to reveal components and a burnt out HAC chip. ANNIE scans the ship for another one, but the only other one on the ship is yours. Enter your inventory by right clicking. (Scrolling with the mouse wheel will not bring up the HAC chip, since it’s not meant to be removed.) Click on the HAC chip to select it, right-click to get back to the main view (ignore the warning messages), and then click to place it into the slot. Immediately, the bridge computer begins rewriting the memory for use. You have bravely sacrificed yourself to save the Letarri and their mission. Congratulations! You made it to the end of Prominence!
|